The Real Estate Module Help Page
Setup
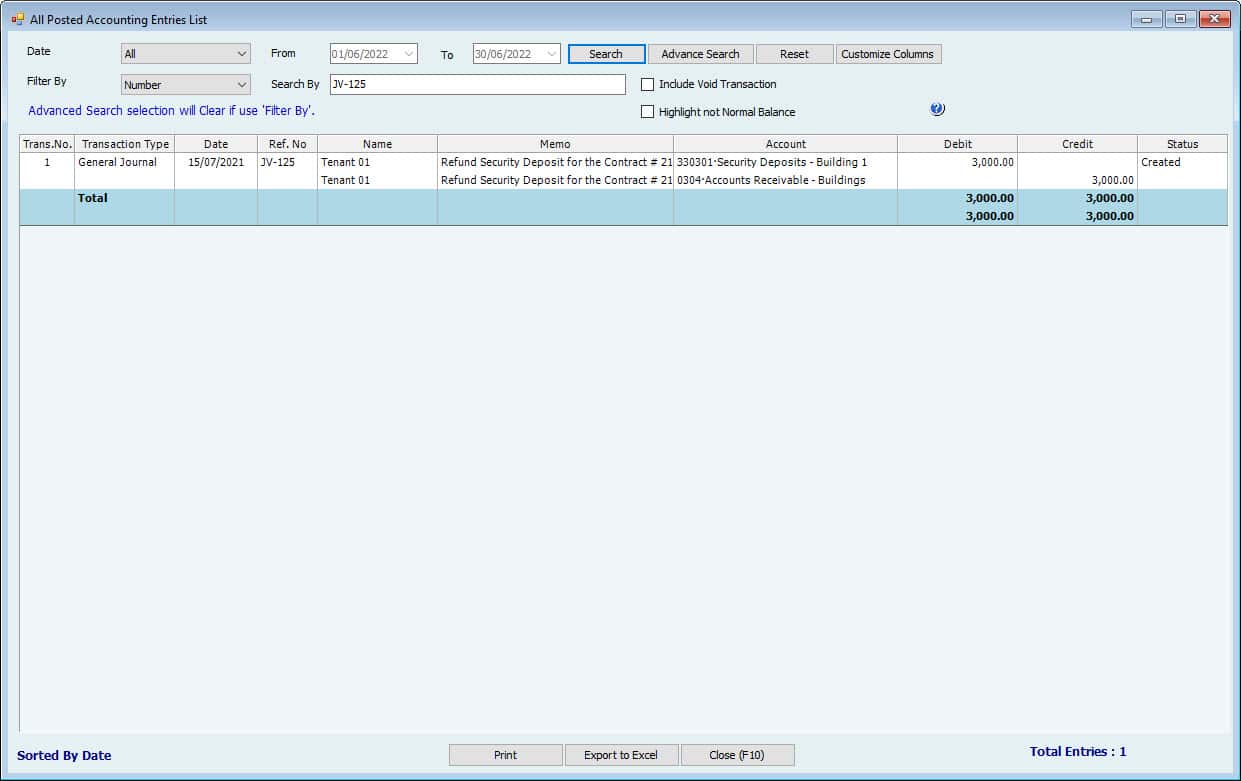
Feature setup is essential for setting the company’s regulations, arrangements, and control policy.
Before recording any operations, the user must set up the company file.
If these settings are not made, the customer may find that the results do not comply with its policies and need to re-enter its operations.
Therefore, settings are vital when using the software. It’s very important to understand this. The setup unit is the most important step and must be done before using the software.
01. Tenancy Contract Calculations
1-1. In the Below cases, the VAT is fully charged to the Tenant.
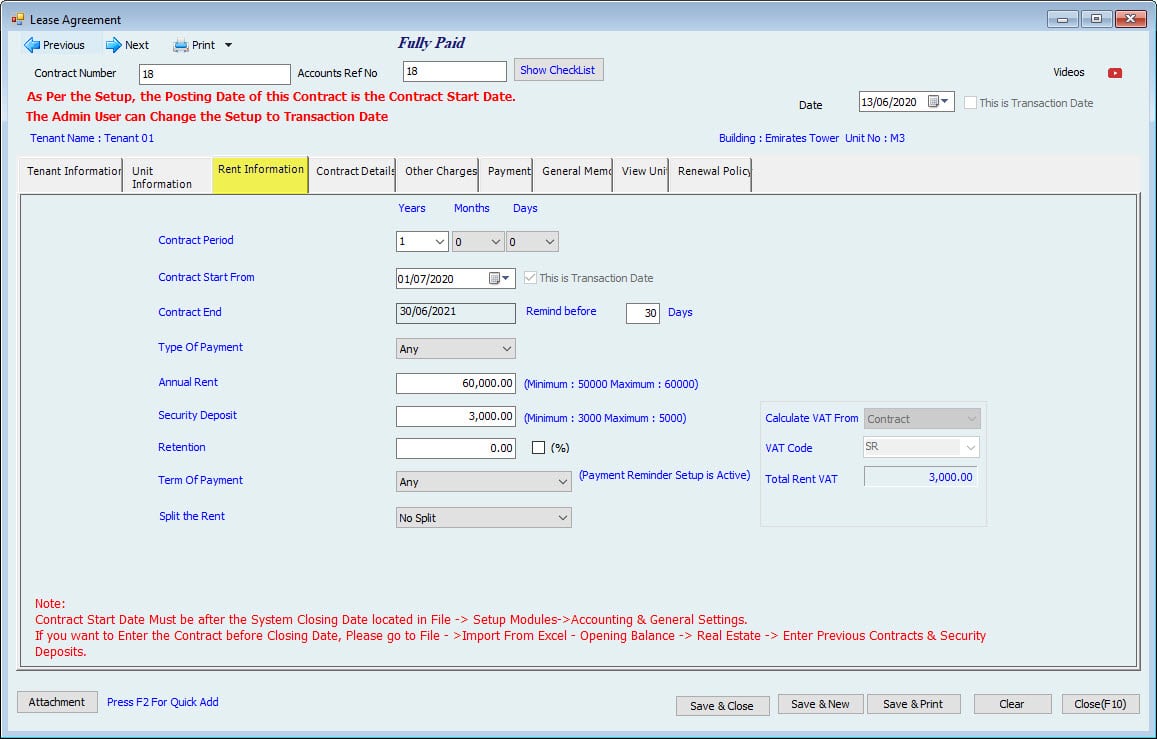
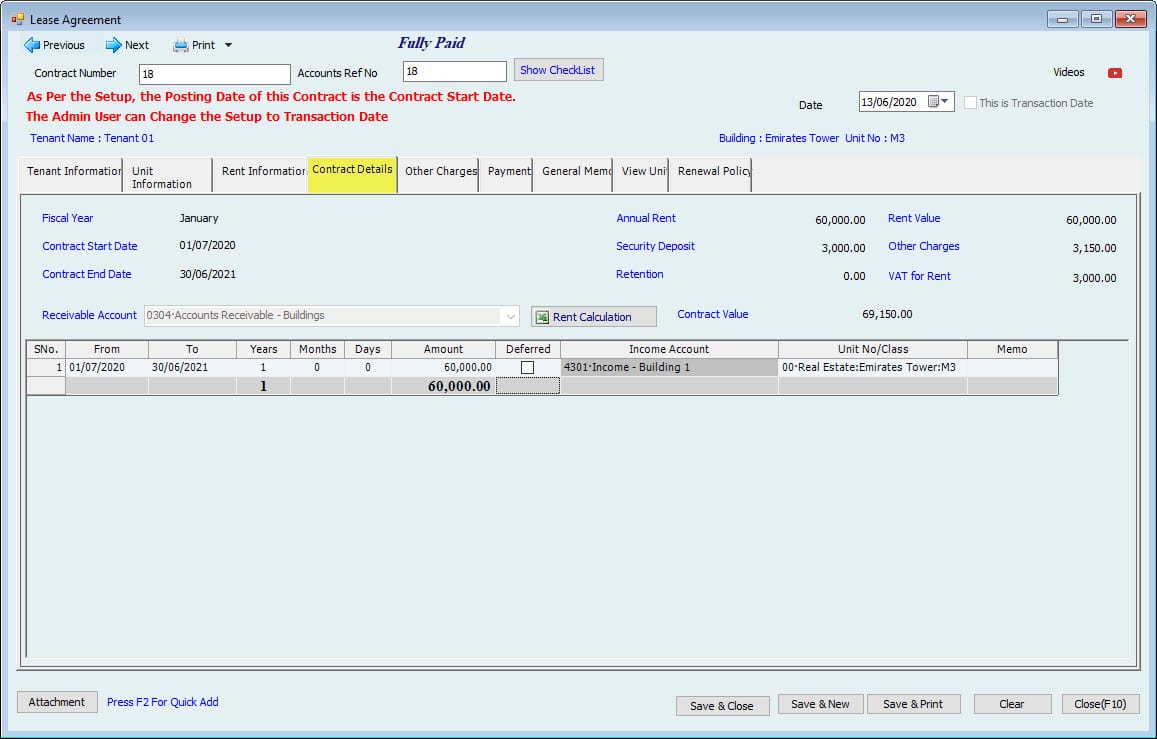
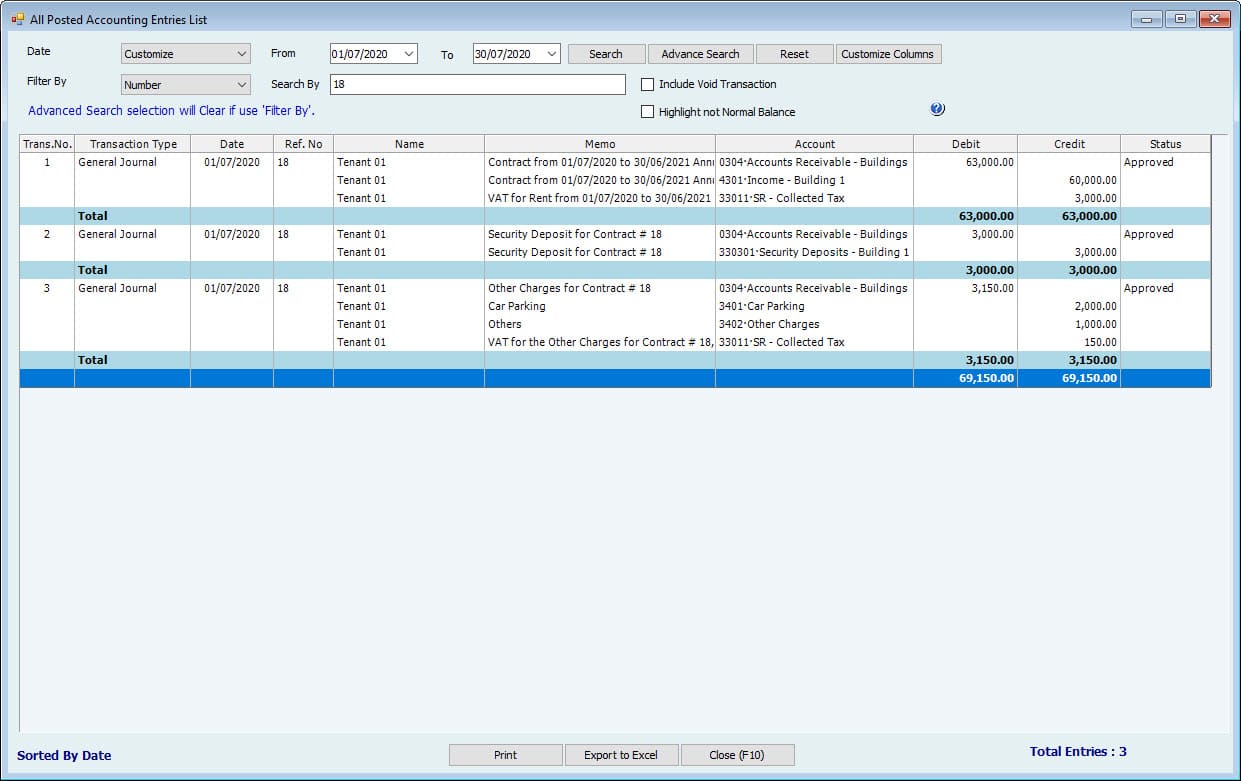
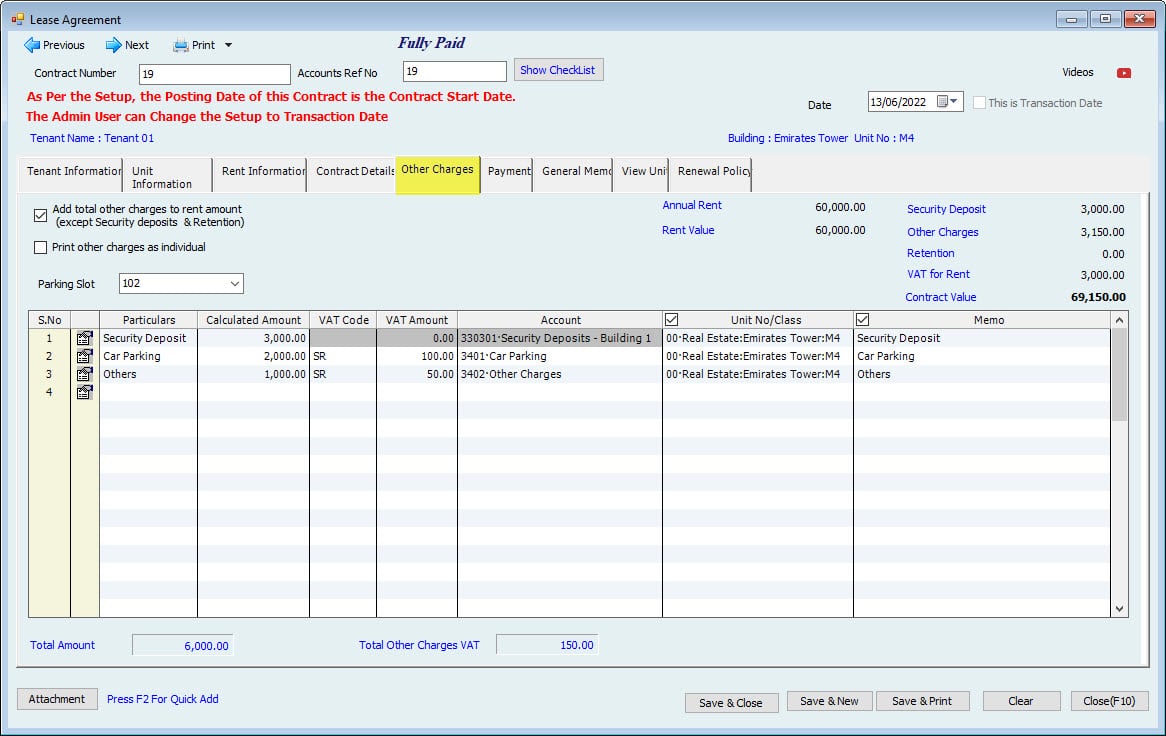
Case 1: Contract Amount FULL period Income.
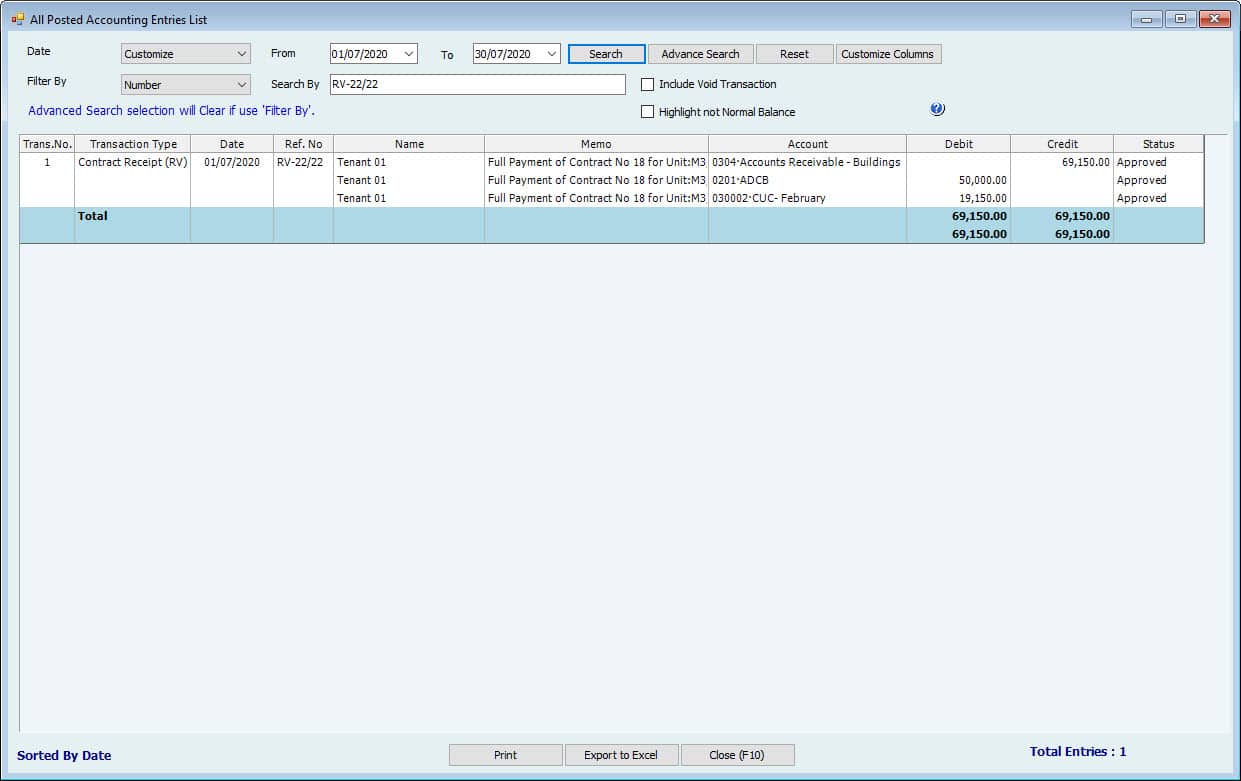
| Contact Info | Lease Contract Accounting Entries. Form Type: JV | ||||||
| Contact Information | Contract Values | Period | Dr. | Amount | Cr. | Amount | |
| Annual Rent Amount | 60,000.00 | 60,000.00 | From 01.07.2020 To 30.06.2021 | Dr. Tenants - AR | 63,000.00 | Cr. Income | 60,000.00 |
| VAT 5% | 3,000.00 | 3,000.00 | Cr. VAT | 3,000.00 | |||
| Total | 63,000.00 | 63,000.00 | |||||
| Additionals: | |||||||
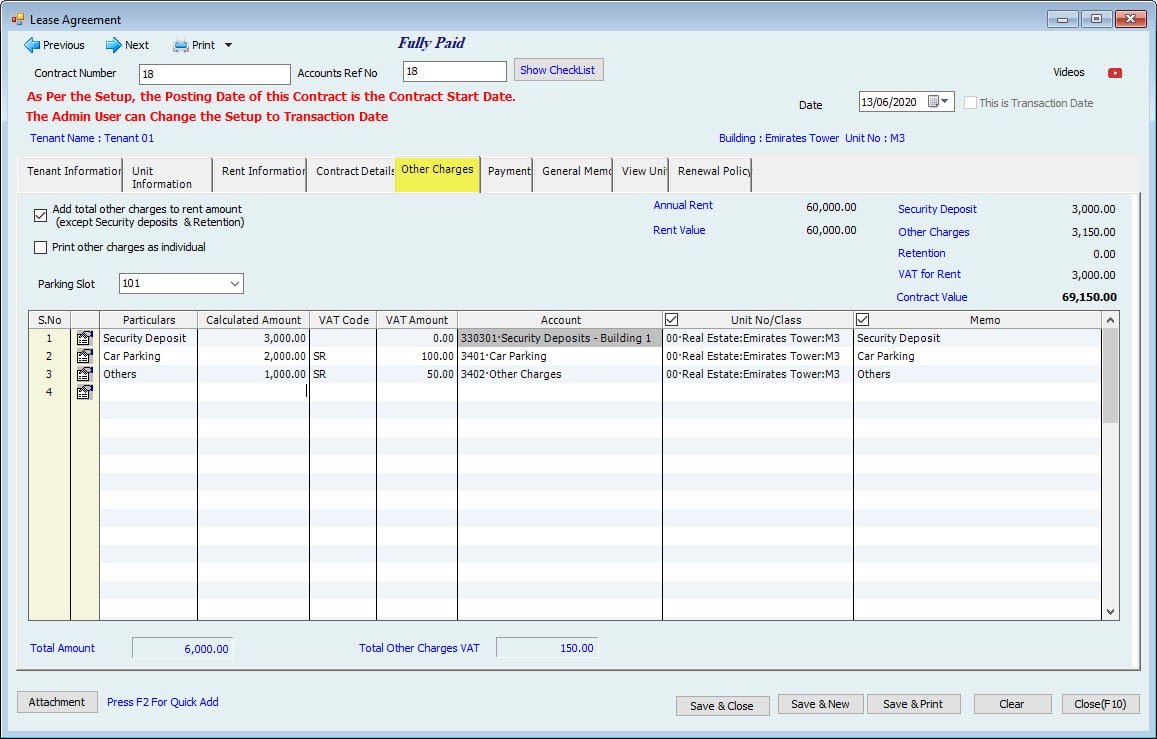
| Security Deposit | 3,000.00 | 3,000.00 | Dr. Tenants - AR | 3,000.00 | Cr. Security Deposit - Liabilities | 3,000.00 | |
| Parking | 2,000.00 | 2,000.00 | Dr. Tenants - AR | 2,000.00 | Cr. Income Parking | 2,000.00 | |
| Other Charges | 1,000.00 | 1,000.00 | Dr. Tenants - AR | 1,000.00 | Cr. Other Income | 1,000.00 | |
| 6,000.00 | 6,000.00 | ||||||
| VAT 5% | 150.00 | 150.00 | Dr. Tenants - AR | 150.00 | Cr. VAT | 150.00 | |
| No VAT on Security Deposit | |||||||
| Total | 6,150.00 | 6,150.00 | |||||
| Total Contract with VAT | 69,150.00 | 69,150.00 | |||||
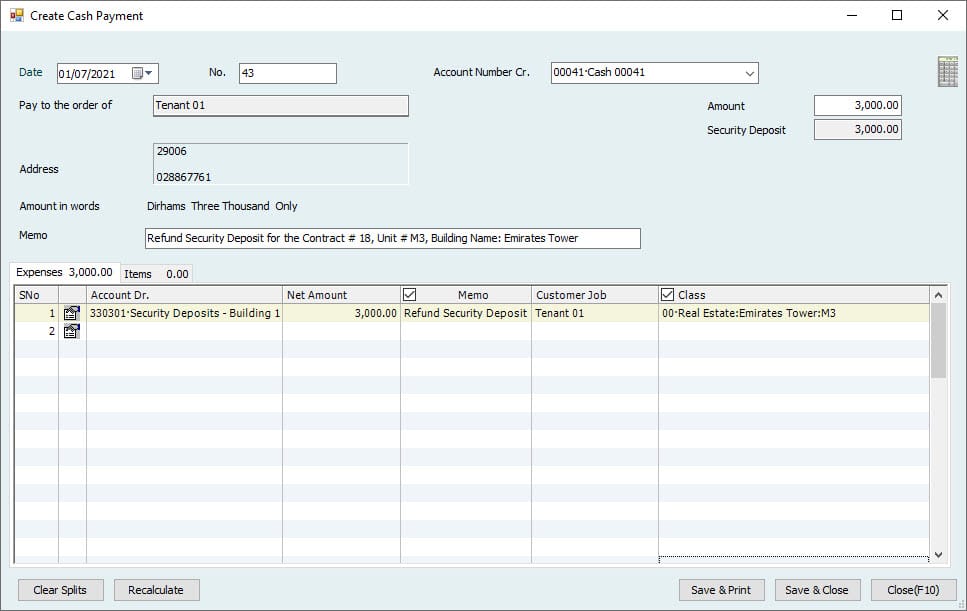
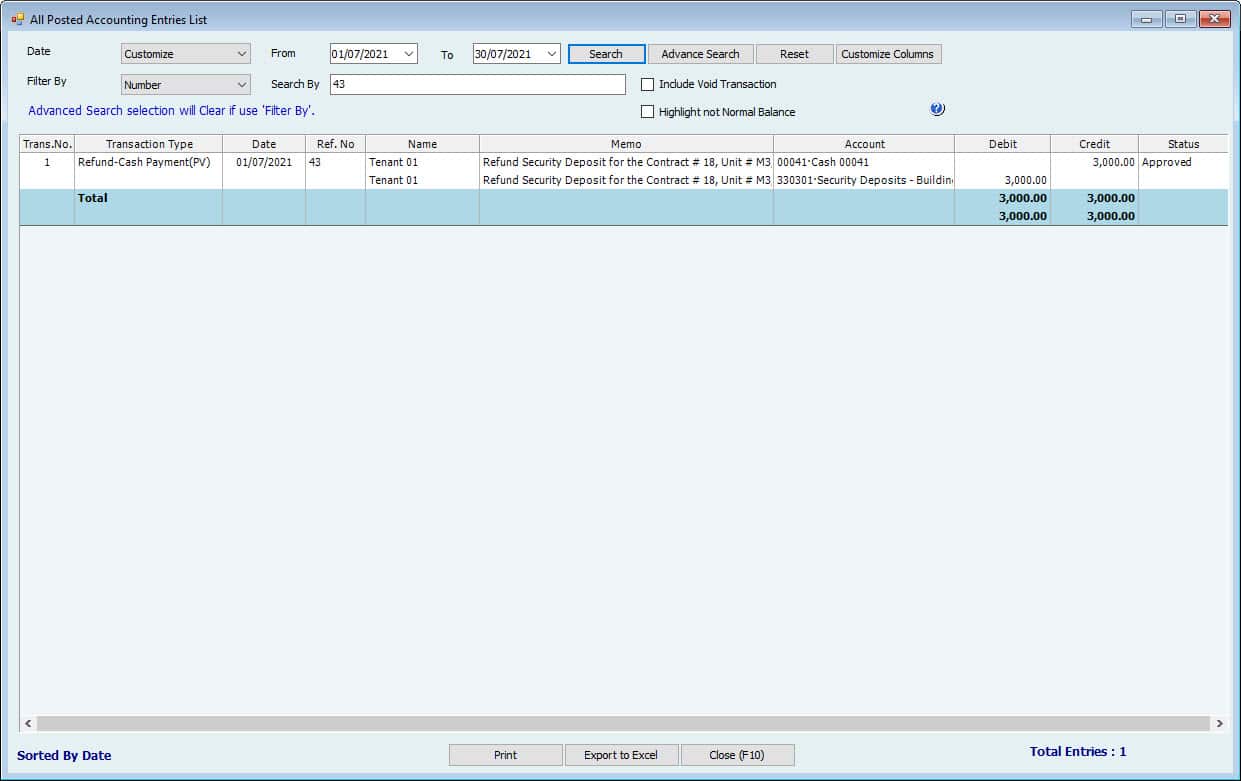
| Refund Security Deposit Accounting Entries. Form Type Payment Voucher. | |||
| The Contract must be released. | |||
| Dr. | Amount | Cr. | Amount |
| Cr. Security Deposit - Liabilities | 3,000.00 | Cr. Cash \ Bank | 3,000.00 |
| By Payment Voucher | |||
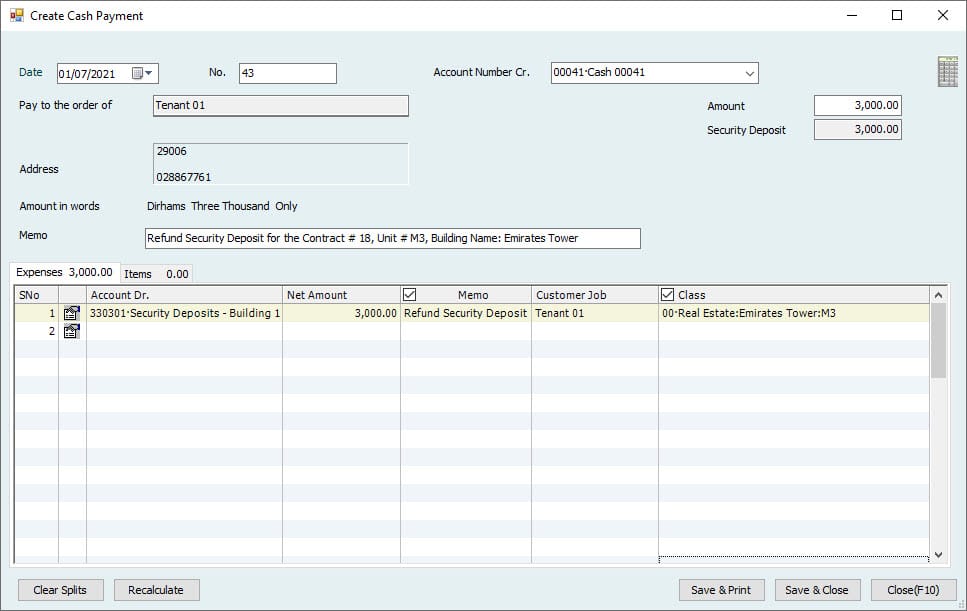
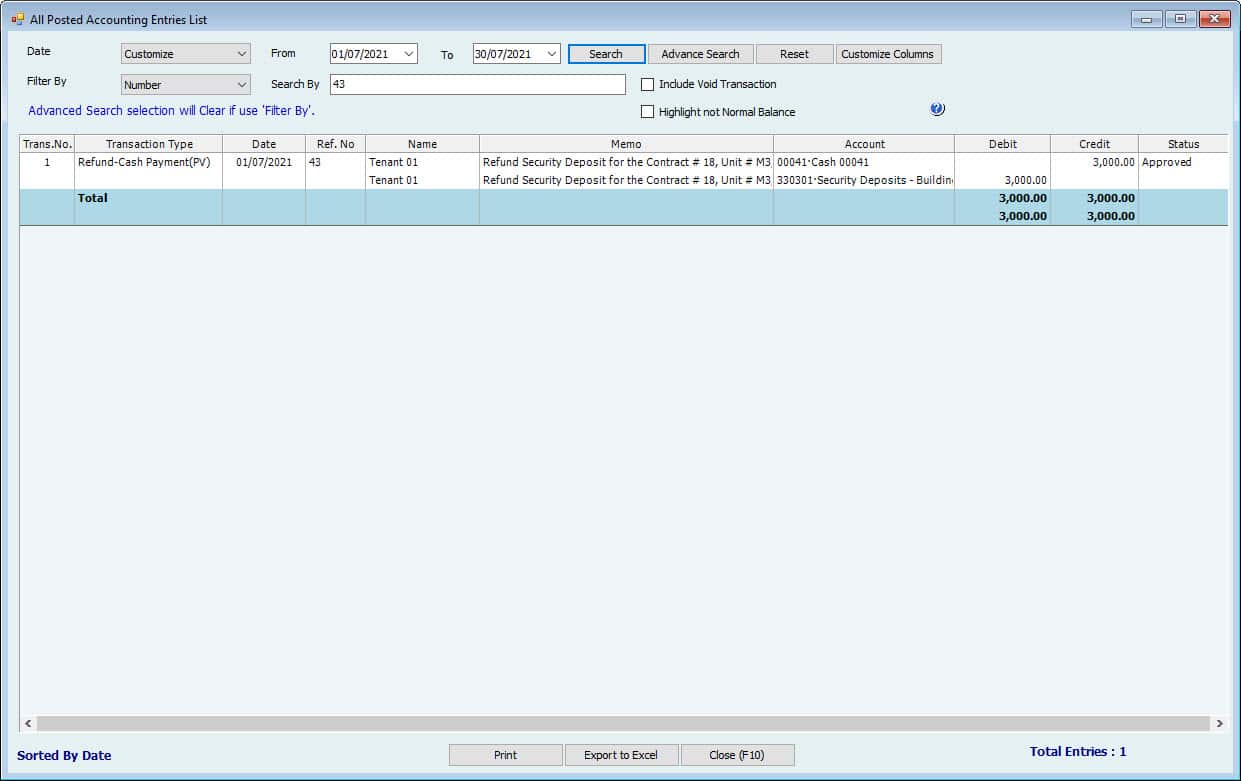
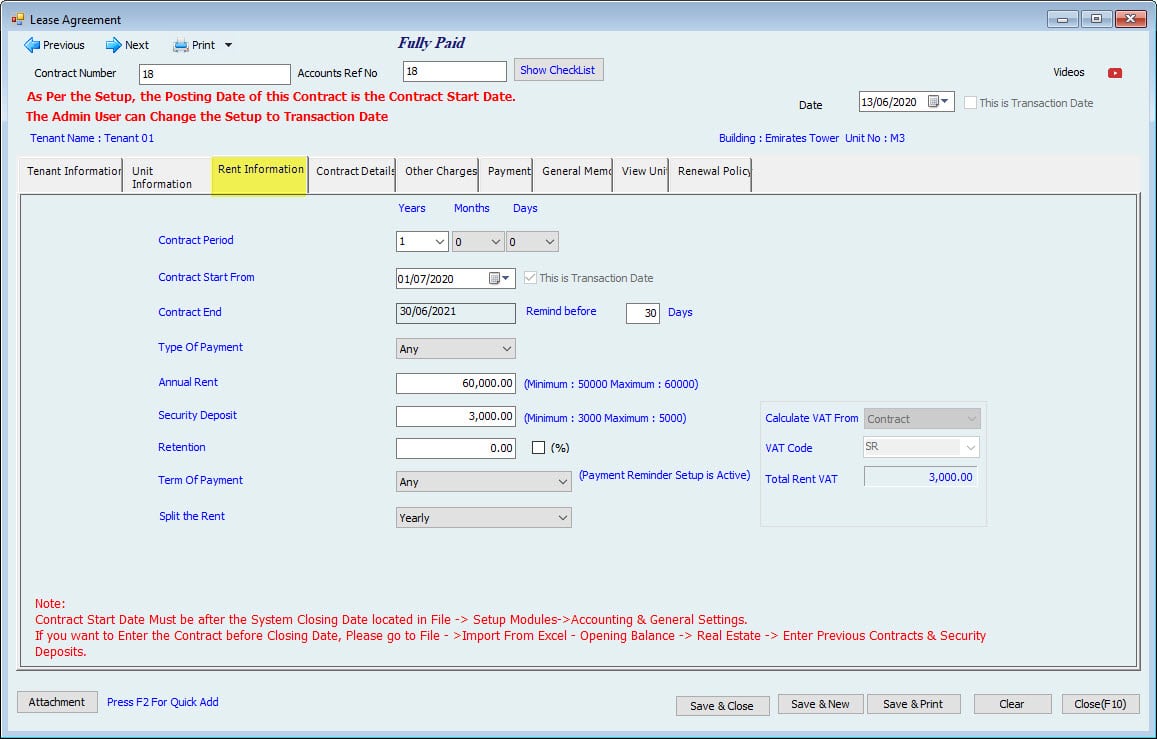
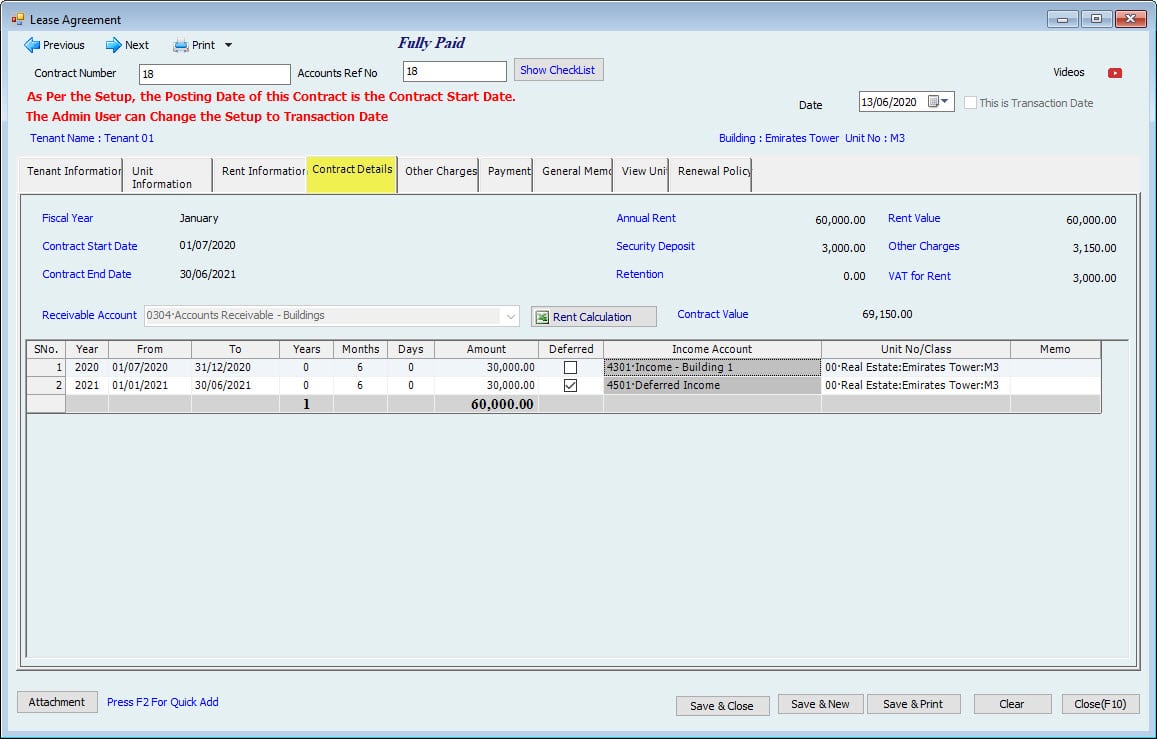
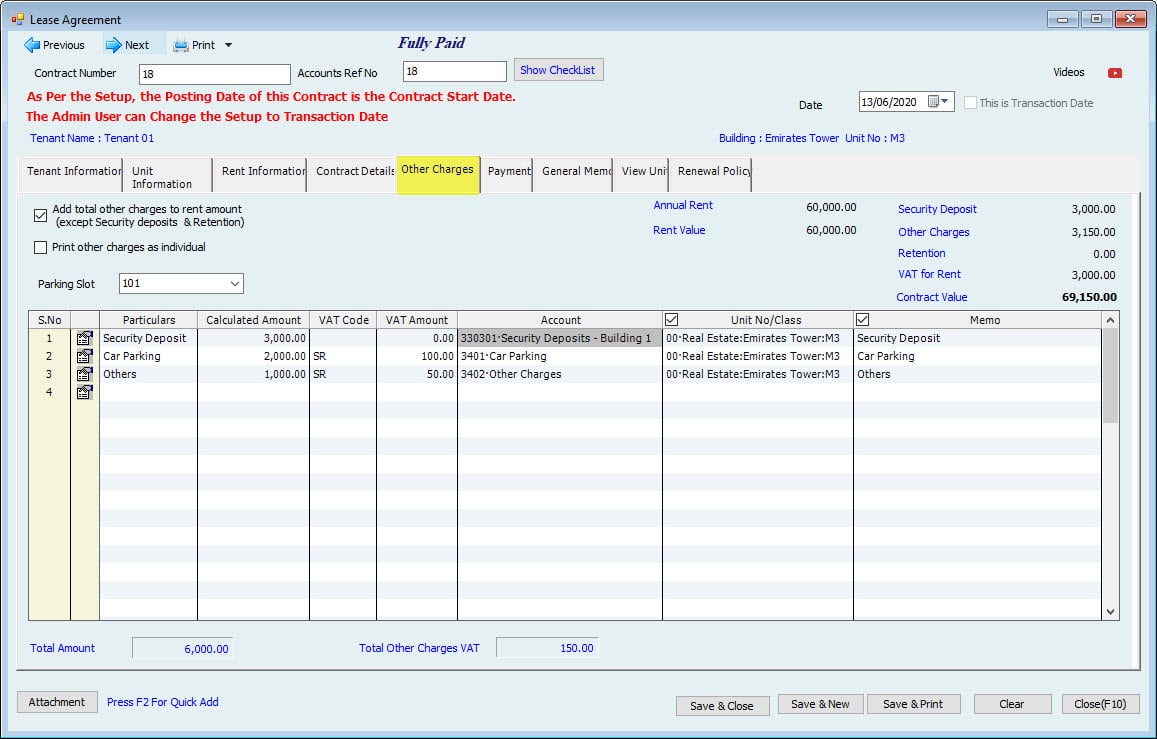
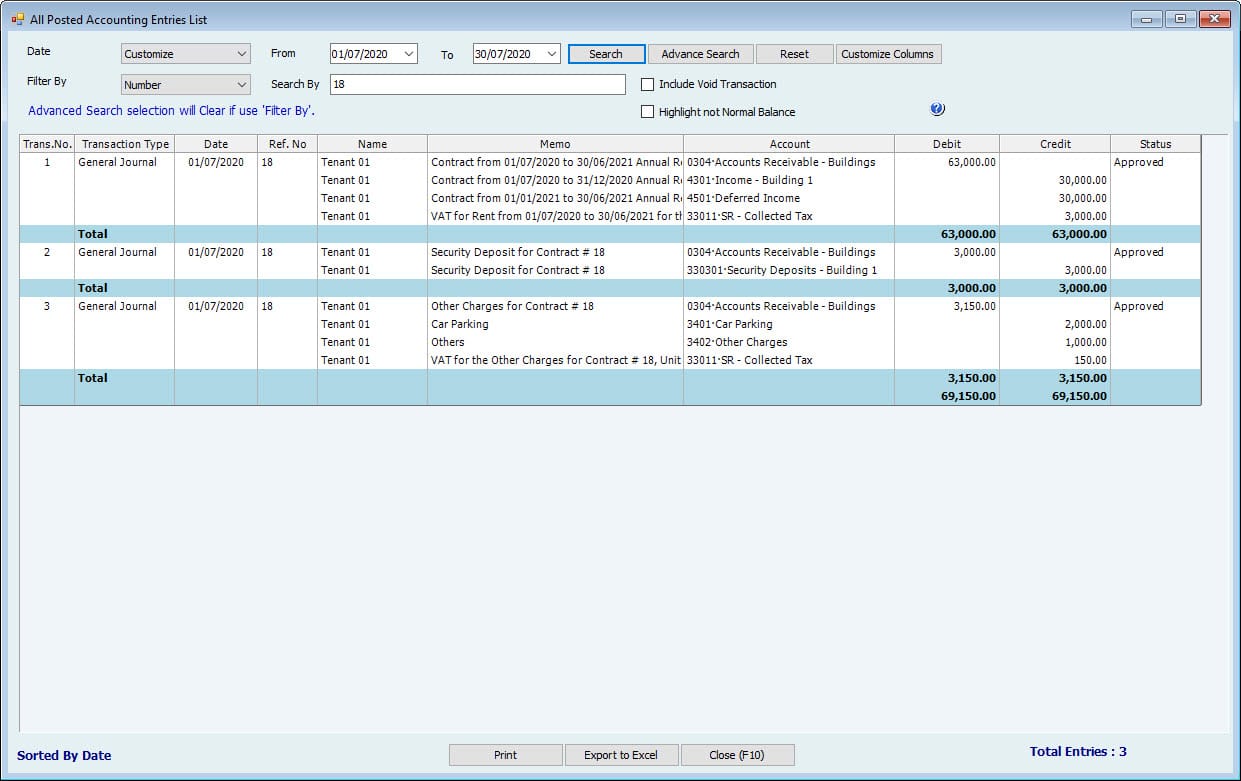
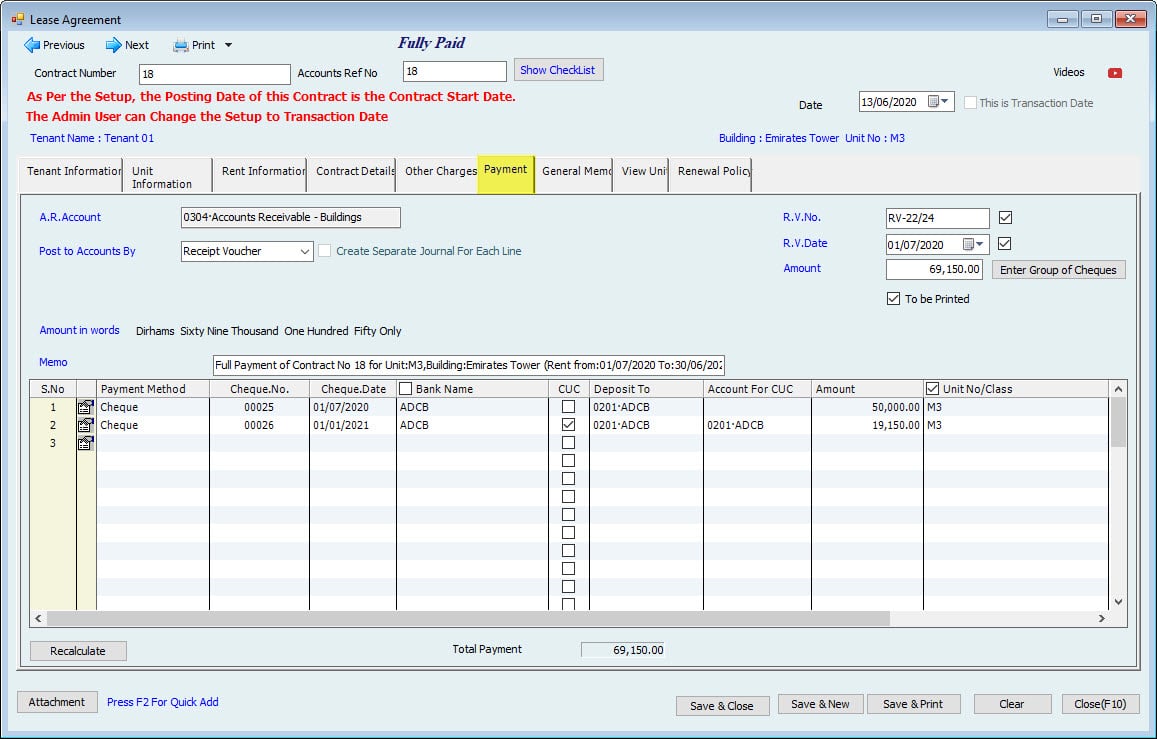
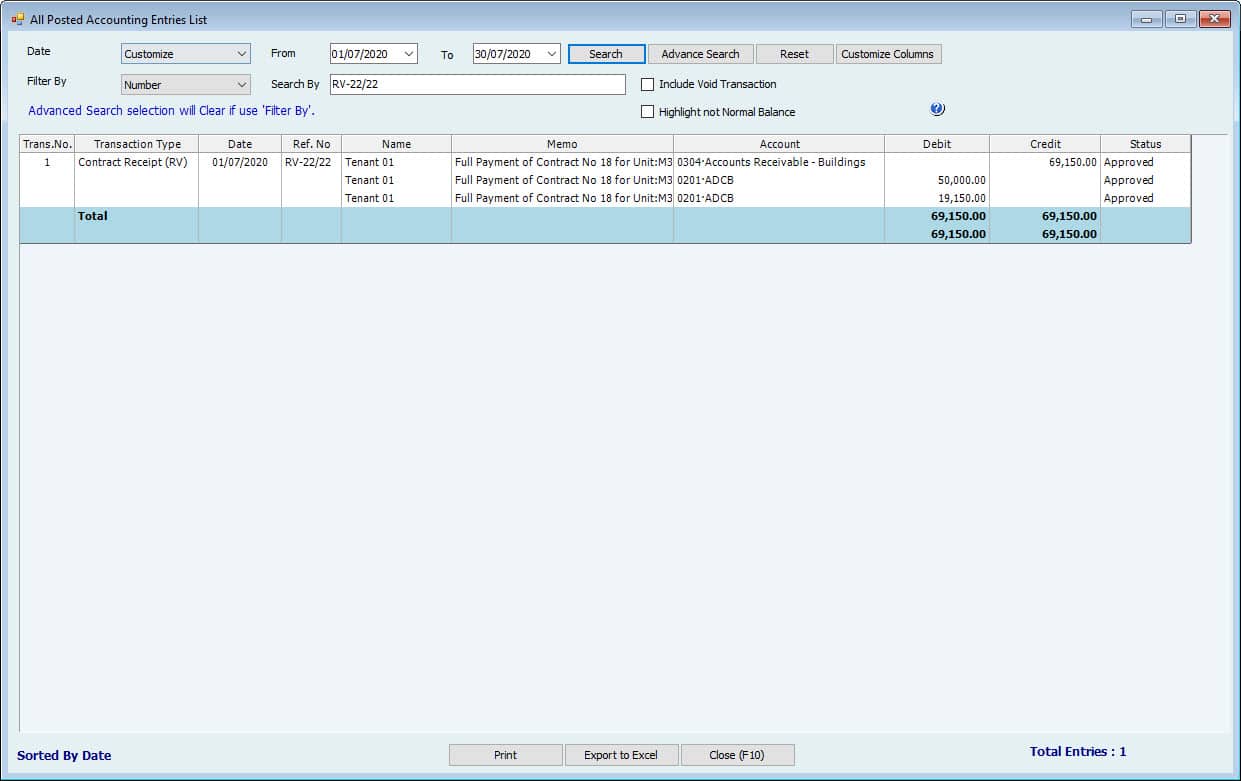
Case 2: Contract Amount SPLIT Yearly period Income.
| Contact Info | Lease Contract Accounting Entries. Form Type: JV | ||||||
| Contact Information | Contract Values | Period | Dr. | Amount | Cr. | Amount | |
| Annual Rent Amount | 60,000.00 | 60,000.00 | The year 2020 - 6 Month | Dr. Tenants - AR | 63,000.00 | Cr. Income | 30,000.00 |
| The year 2021 - 6 Months. | Cr. Deferred Income | 30,000.00 | |||||
| VAT 5% | 3,000.00 | 3,000.00 | Cr. VAT | 3,000.00 | |||
| Total | 63,000.00 | 63,000.00 | |||||
| Additionals: | |||||||
| Security Deposit | 3,000.00 | 3,000.00 | Dr. Tenants - AR | 3,000.00 | Cr. Security Deposit - Liabilities | 3,000.00 | |
| Parking | 2,000.00 | 2,000.00 | Dr. Tenants - AR | 2,000.00 | Cr. Income Parking | 2,000.00 | |
| Other Charges | 1,000.00 | 1,000.00 | Dr. Tenants - AR | 1,000.00 | Cr. Other Income | 1,000.00 | |
| 6,000.00 | 6,000.00 | ||||||
| VAT 5% | 150.00 | 150.00 | Dr. Tenants - AR | 150.00 | Cr. VAT | 150.00 | |
| No VAT on Security Deposit | |||||||
| Total | 6,150.00 | 6,150.00 | |||||
| Total Contract with VAT | 69,150.00 | 69,150.00 | |||||
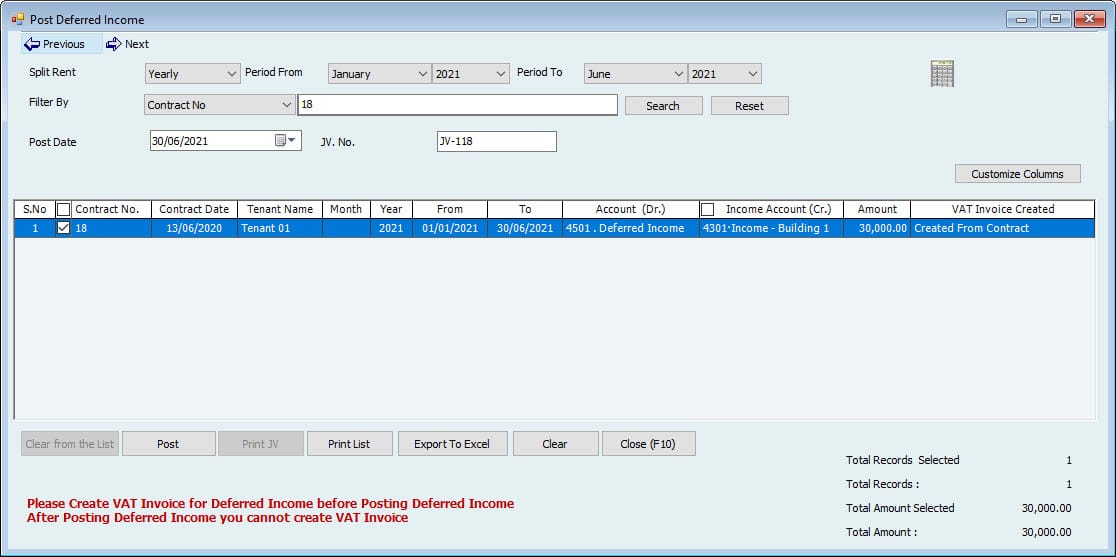
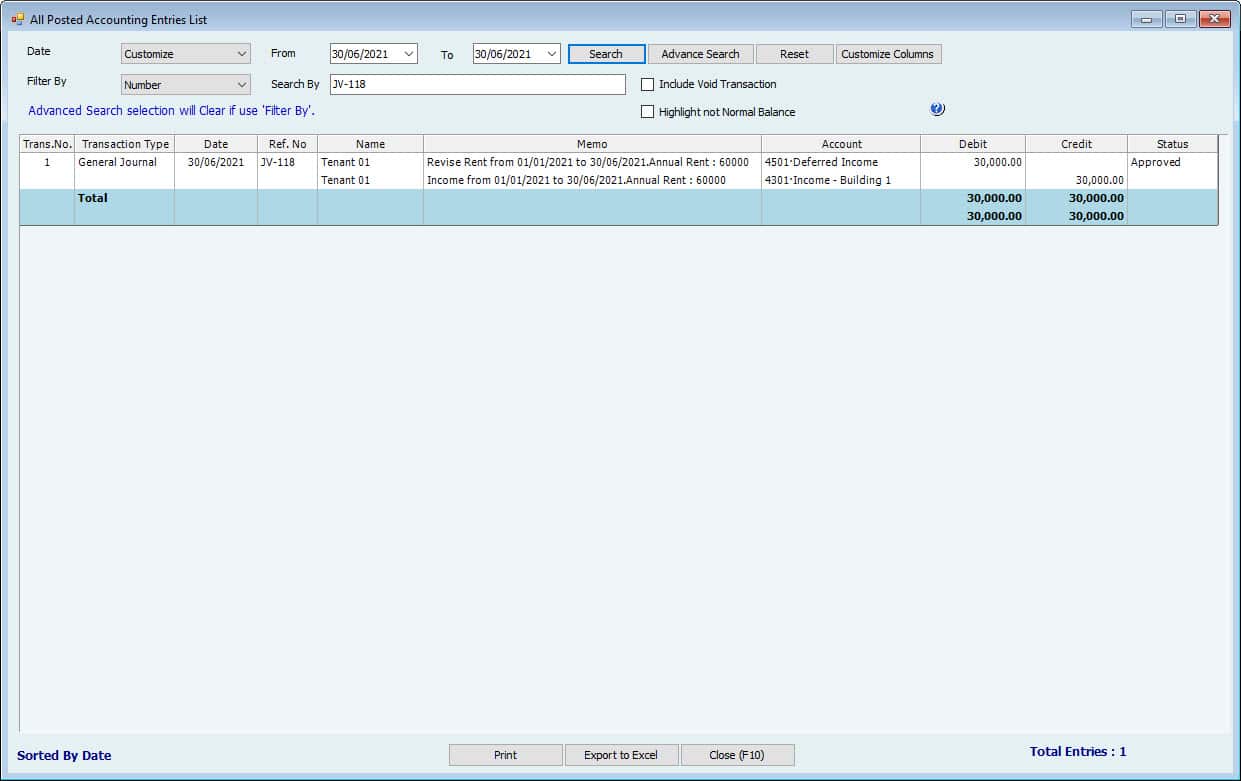
| Post Deferred Income Accounting Entries. Form Type: JV | |||
| Dr. | Amount | Cr. | Amount |
| Dr. Deferred Income | 30,000.00 | Cr. Income | 30,000.00 |
| Refund Security Deposit Accounting Entries. Form Type Payment Voucher. | |||
| The Contract must be released. | |||
| Dr. | Amount | Cr. | Amount |
| Cr. Security Deposit - Liabilities | 3,000.00 | Cr. Cash \ Bank | 3,000.00 |
| By Payment Voucher | |||
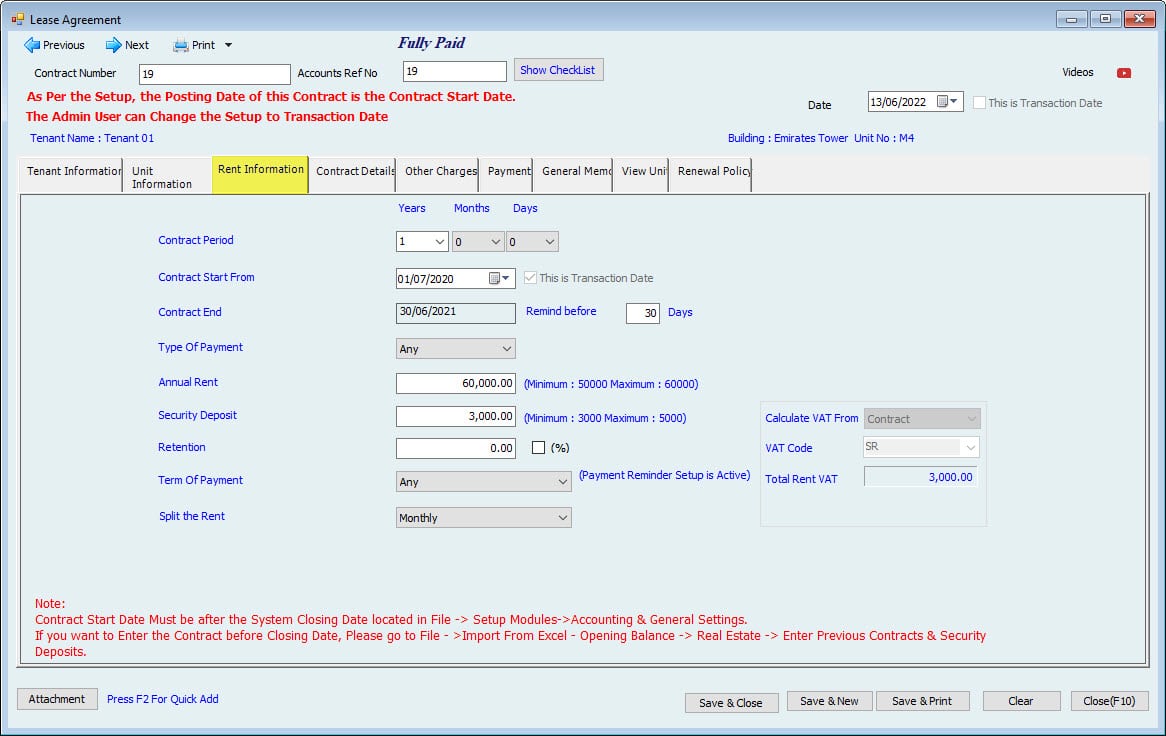
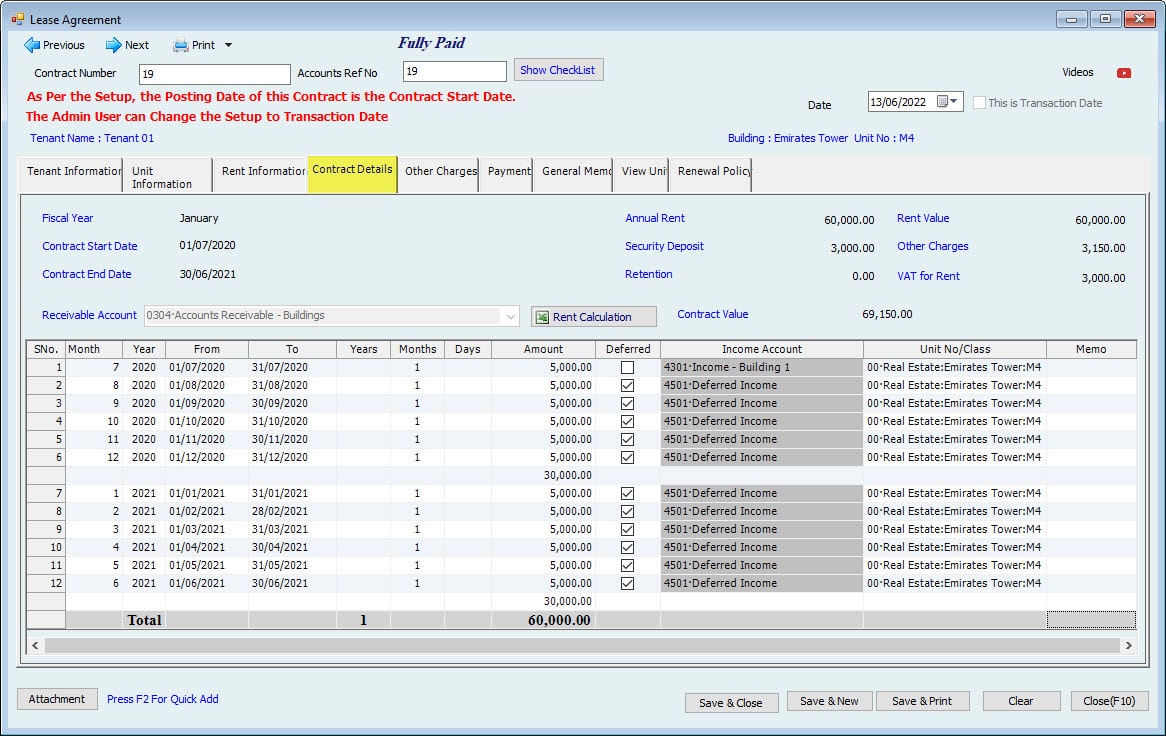
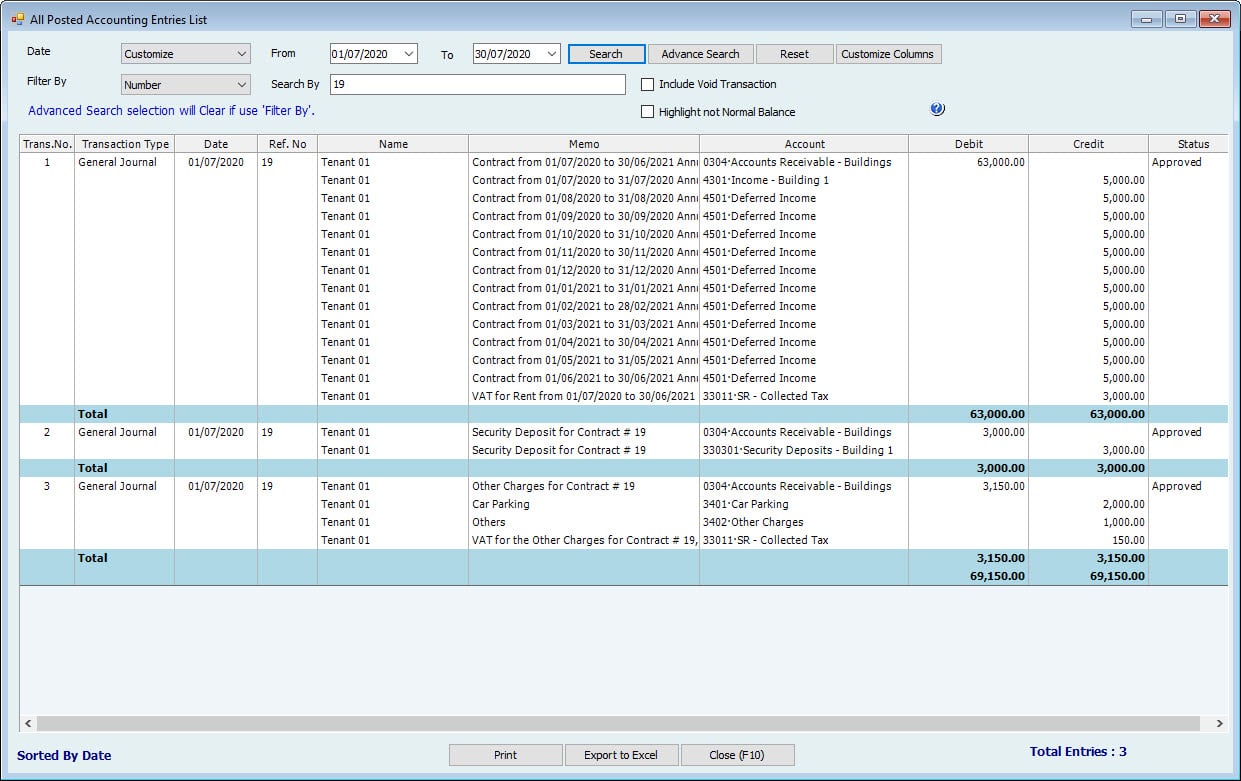
Case 3: Contract Amount SPLIT Monthly period Income.
| Contact Info | Lease Contract Accounting Entries. Form Type: JV | ||||||
| Contact Information | Contract Values | Period | Dr. | Amount | Cr. | Amount | |
| Annual Rent Amount | 60,000.00 | 60,000.00 | July Year 2020 | Dr. Tenants - AR | 63,000.00 | Cr. Income | 5,000.00 |
| August Year 2020 | Cr. Deferred Income | 5,000.00 | |||||
| September Year 2020 | Cr. Deferred Income | 5,000.00 | |||||
| October Year 2020 | Cr. Deferred Income | 5,000.00 | |||||
| November Year 2020 | Cr. Deferred Income | 5,000.00 | |||||
| December Year 2020 | Cr. Deferred Income | 5,000.00 | |||||
| January Year 2021 | Cr. Deferred Income | 5,000.00 | |||||
| February Year 2021 | Cr. Deferred Income | 5,000.00 | |||||
| March Year 2021 | Cr. Deferred Income | 5,000.00 | |||||
| April Year 2021 | Cr. Deferred Income | 5,000.00 | |||||
| May Year 2021 | Cr. Deferred Income | 5,000.00 | |||||
| June Year 2021 | Cr. Deferred Income | 5,000.00 | |||||
| VAT 5% | 3,000.00 | 3,000.00 | Cr. VAT | 3,000.00 | |||
| Total | 63,000.00 | 63,000.00 | |||||
| Additionals: | |||||||
| Security Deposit | 3,000.00 | 3,000.00 | Dr. Tenants - AR | 3,000.00 | Cr. Security Deposit - Liabilities | 3,000.00 | |
| Parking | 2,000.00 | 2,000.00 | Dr. Tenants - AR | 2,000.00 | Cr. Income Parking | 2,000.00 | |
| Other Charges | 1,000.00 | 1,000.00 | Dr. Tenants - AR | 1,000.00 | Cr. Other Income | 1,000.00 | |
| 6,000.00 | 6,000.00 | ||||||
| VAT 5% | 150.00 | 150.00 | Dr. Tenants - AR | 150.00 | Cr. VAT | 150.00 | |
| No VAT on Security Deposit | |||||||
| Total | 6,150.00 | 6,150.00 | |||||
| Total Contract with VAT | 69,150.00 | 69,150.00 | |||||
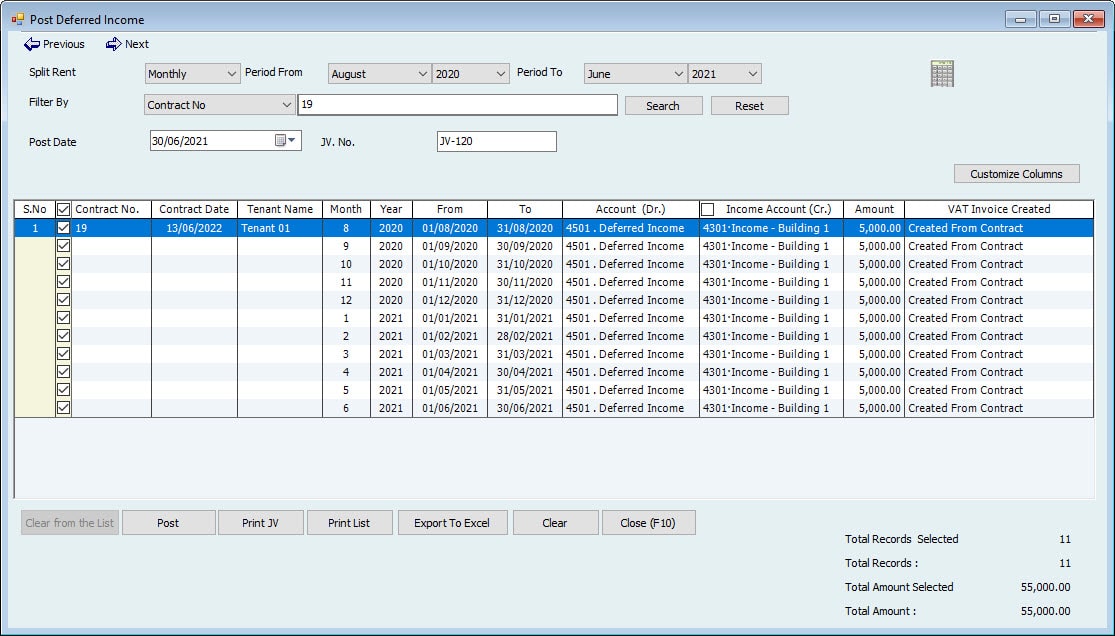
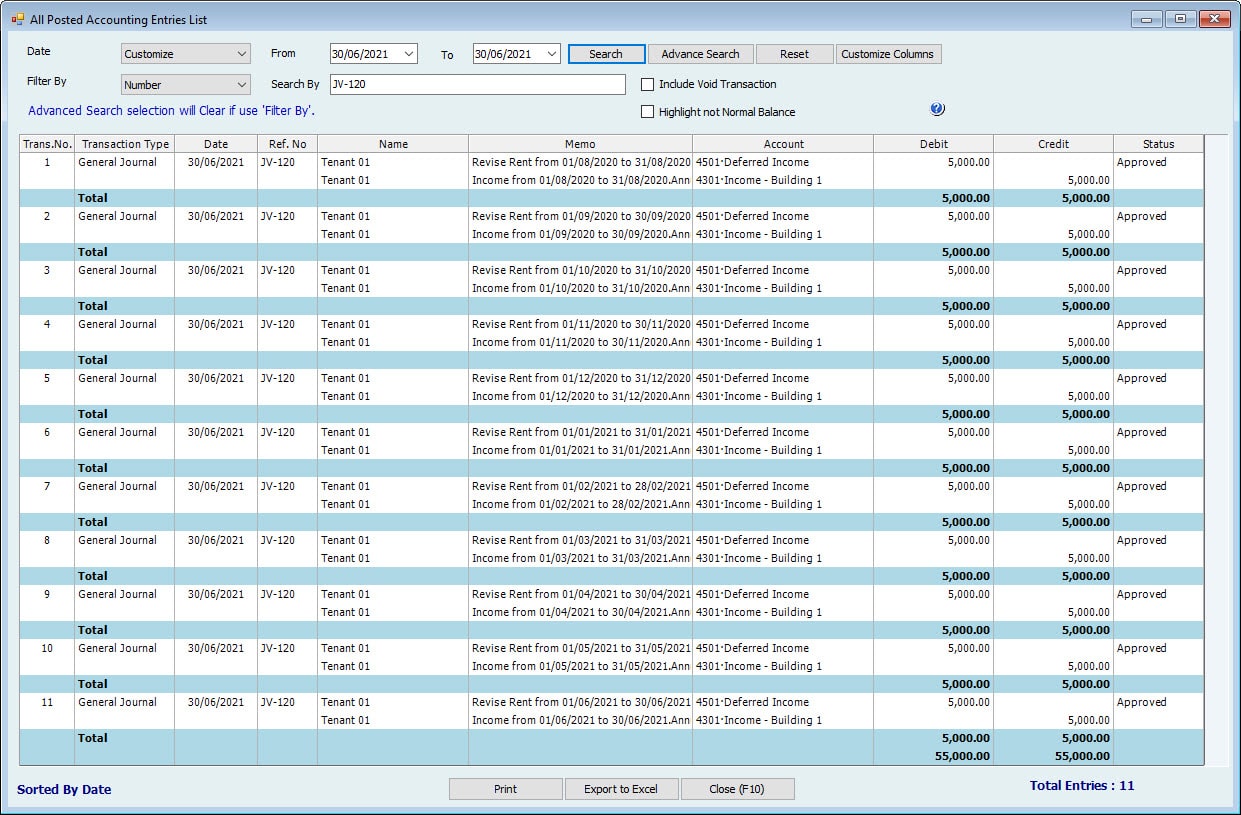
| Post-Deferred Income Accounting Entries. Form Type: JV | |||
| Dr. | Amount | Cr. | Amount |
| Dr. Deferred Income | 5,000.00 | Cr. Income | 5,000.00 |
| Dr. Deferred Income | 5,000.00 | Cr. Income | 5,000.00 |
| Dr. Deferred Income | 5,000.00 | Cr. Income | 5,000.00 |
| Dr. Deferred Income | 5,000.00 | Cr. Income | 5,000.00 |
| Dr. Deferred Income | 5,000.00 | Cr. Income | 5,000.00 |
| Dr. Deferred Income | 5,000.00 | Cr. Income | 5,000.00 |
| Dr. Deferred Income | 5,000.00 | Cr. Income | 5,000.00 |
| Dr. Deferred Income | 5,000.00 | Cr. Income | 5,000.00 |
| Dr. Deferred Income | 5,000.00 | Cr. Income | 5,000.00 |
| Dr. Deferred Income | 5,000.00 | Cr. Income | 5,000.00 |
| Dr. Deferred Income | 5,000.00 | Cr. Income | 5,000.00 |
| Refund Security Deposit Accounting Entries. Form Type Payment Voucher. | |||
| The Contract must be released. | |||
| Dr. | Amount | Cr. | Amount |
| Cr. Security Deposit - Liabilities | 3,000.00 | Cr. Cash \ Bank | 3,000.00 |
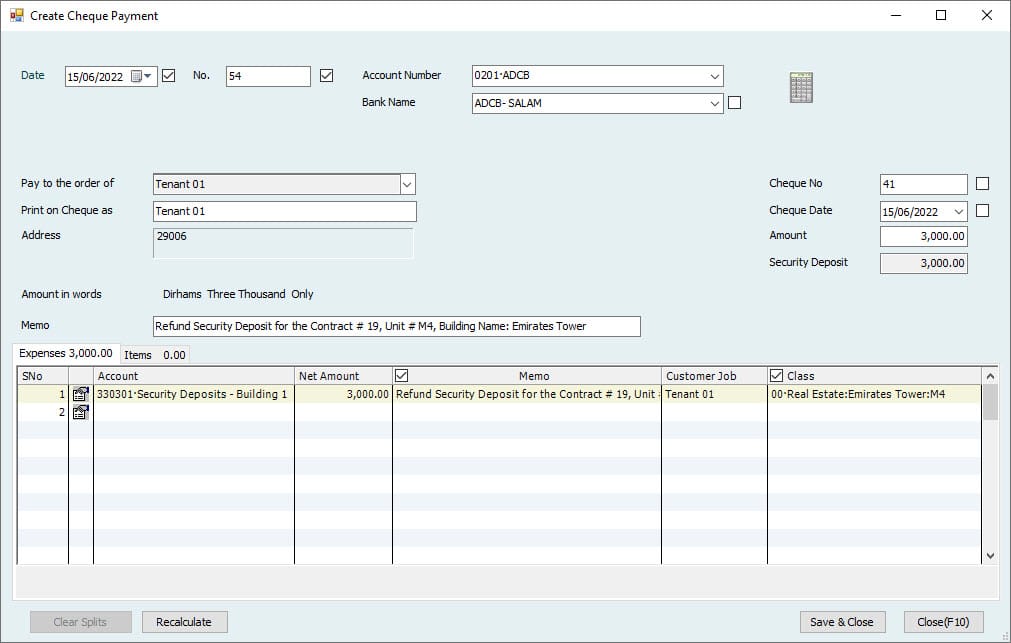
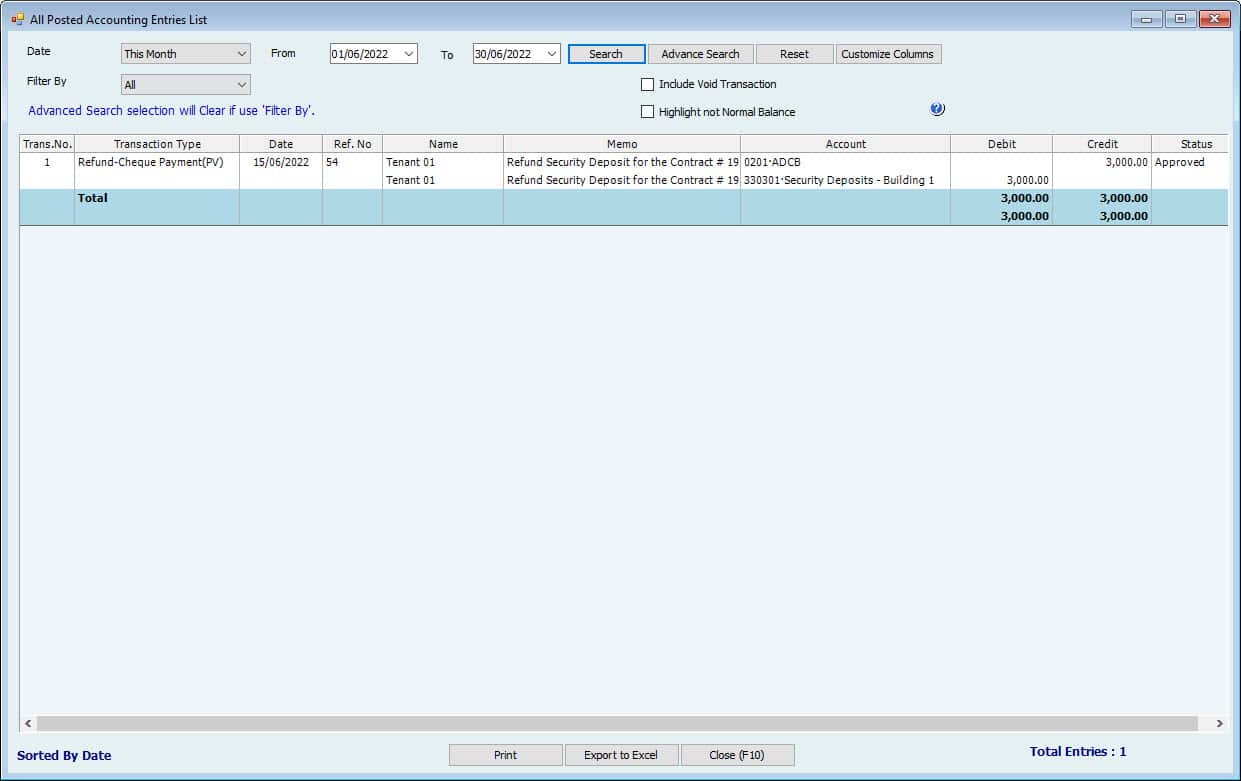
Case 4: Split Monthly with Pre-Terminate.
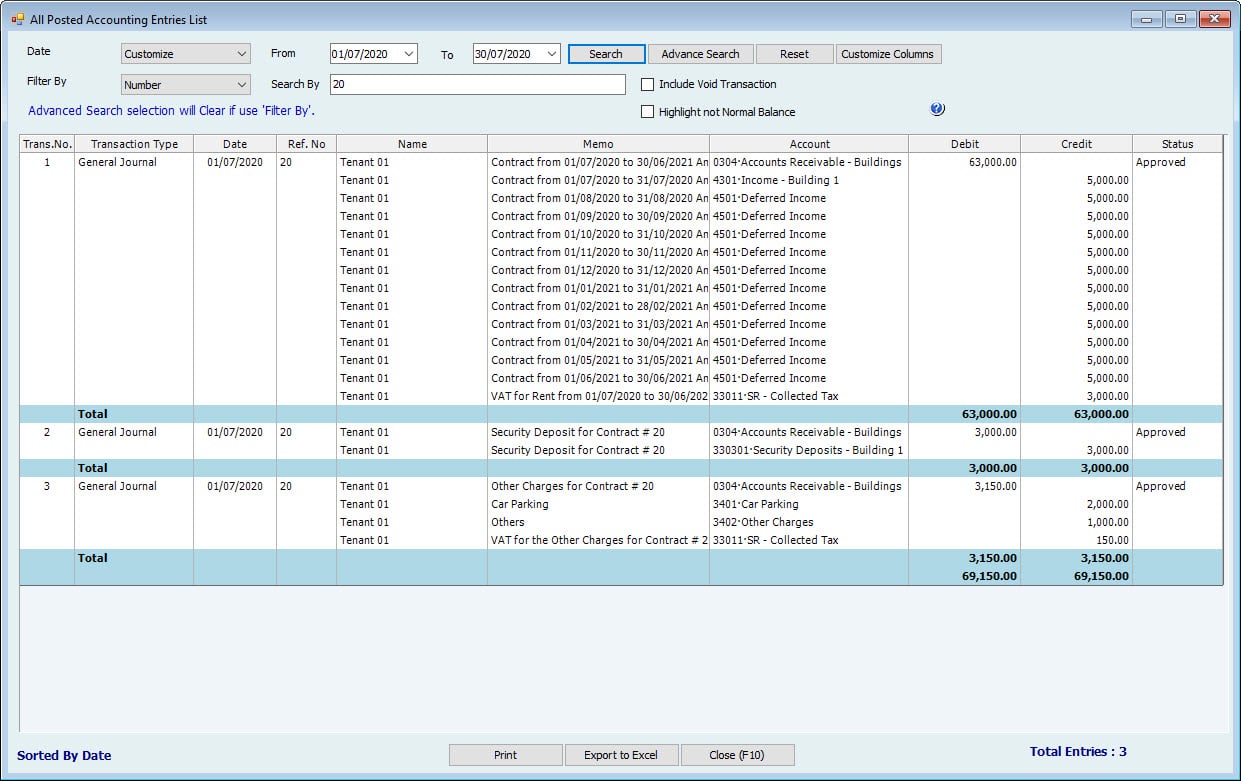
| Contact Info | Lease Contract Accounting Entries. Form Type: JV | ||||||
| Contact Information | Contract Values | Period | Dr. | Amount | Cr. | Amount | |
| Annual Rent Amount | 60,000.00 | 60,000.00 | July Year 2020 | Dr. Tenants - AR | 63,000.00 | Cr. Income | 5,000.00 |
| August Year 2020 | Cr. Deferred Income | 5,000.00 | |||||
| September Year 2020 | Cr. Deferred Income | 5,000.00 | |||||
| October Year 2020 | Cr. Deferred Income | 5,000.00 | |||||
| November Year 2020 | Cr. Deferred Income | 5,000.00 | |||||
| December Year 2020 | Cr. Deferred Income | 5,000.00 | |||||
| January Year 2021 | Cr. Deferred Income | 5,000.00 | |||||
| February Year 2021 | Cr. Deferred Income | 5,000.00 | |||||
| March Year 2021 | Cr. Deferred Income | 5,000.00 | |||||
| April Year 2021 | Cr. Deferred Income | 5,000.00 | |||||
| May Year 2021 | Cr. Deferred Income | 5,000.00 | |||||
| June Year 2021 | Cr. Deferred Income | 5,000.00 | |||||
| VAT 5% | 3,000.00 | 3,000.00 | Cr. VAT | 3,000.00 | |||
| Total | 63,000.00 | 63,000.00 | |||||
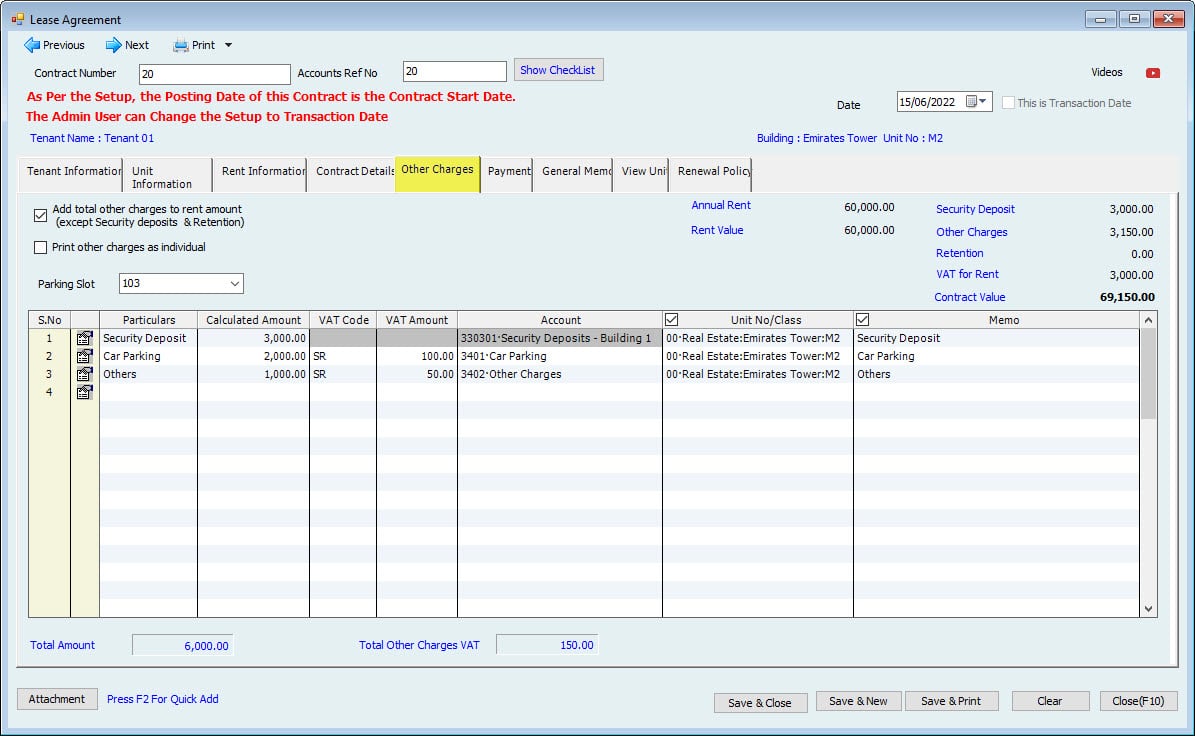
| Additionals: | |||||||
| Security Deposit | 3,000.00 | 3,000.00 | Dr. Tenants - AR | 3,000.00 | Cr. Security Deposit - Liabilities | 3,000.00 | |
| Parking | 2,000.00 | 2,000.00 | Dr. Tenants - AR | 2,000.00 | Cr. Income Parking | 2,000.00 | |
| Other Charges | 1,000.00 | 1,000.00 | Dr. Tenants - AR | 1,000.00 | Cr. Other Income | 1,000.00 | |
| 6,000.00 | 6,000.00 | ||||||
| VAT 5% | 150.00 | 150.00 | Dr. Tenants - AR | 150.00 | Cr. VAT | 150.00 | |
| No VAT on Security Deposit | |||||||
| Total | 6,150.00 | 6,150.00 | |||||
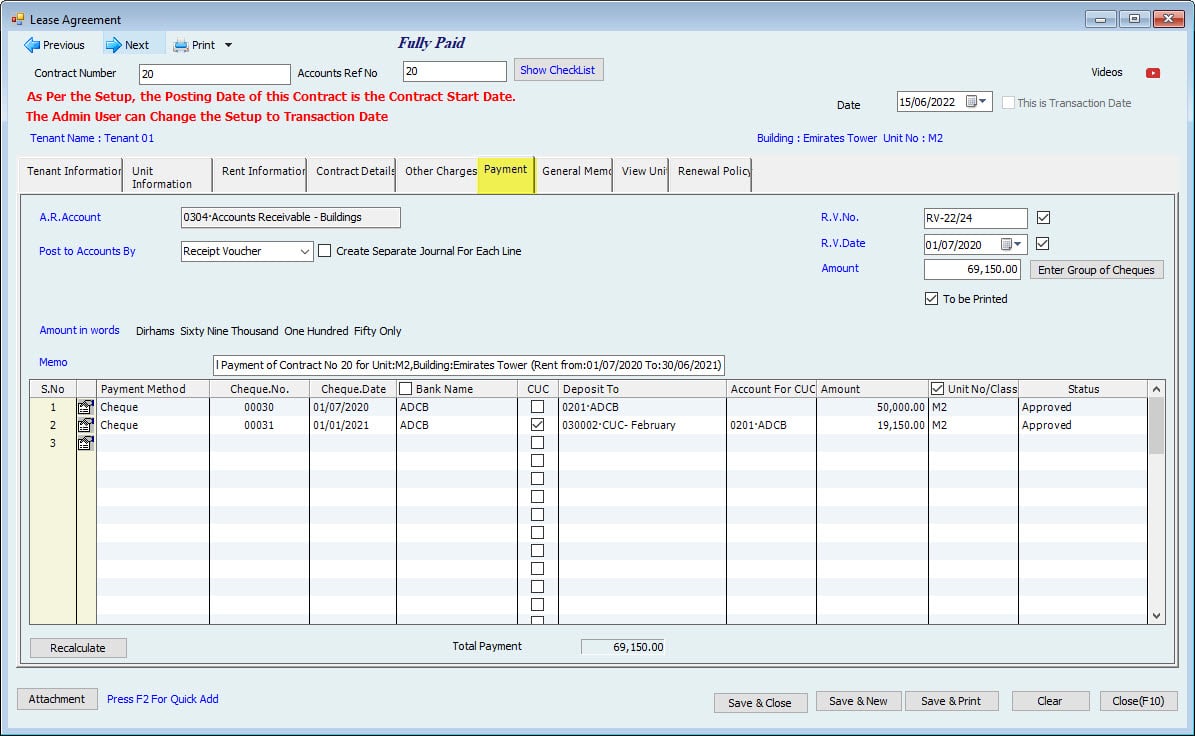
| Total Contract with VAT | 69,150.00 | 69,150.00 | |||||
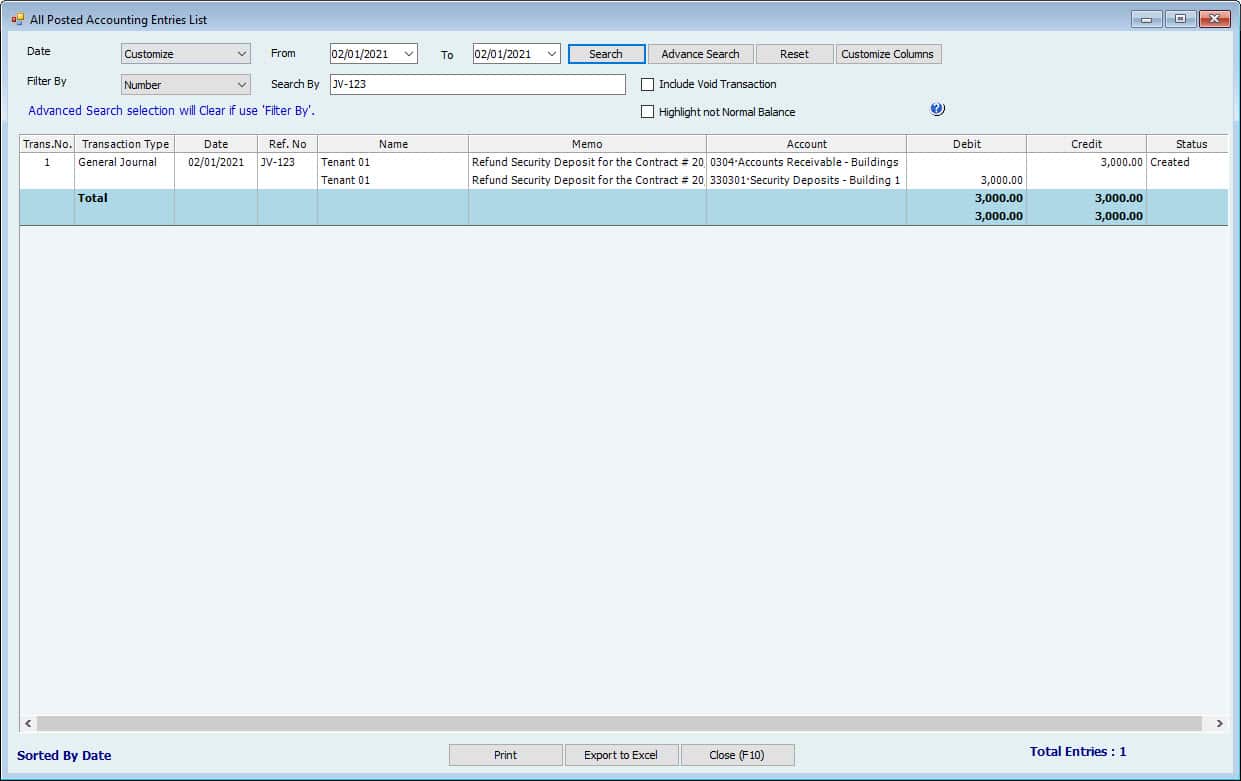
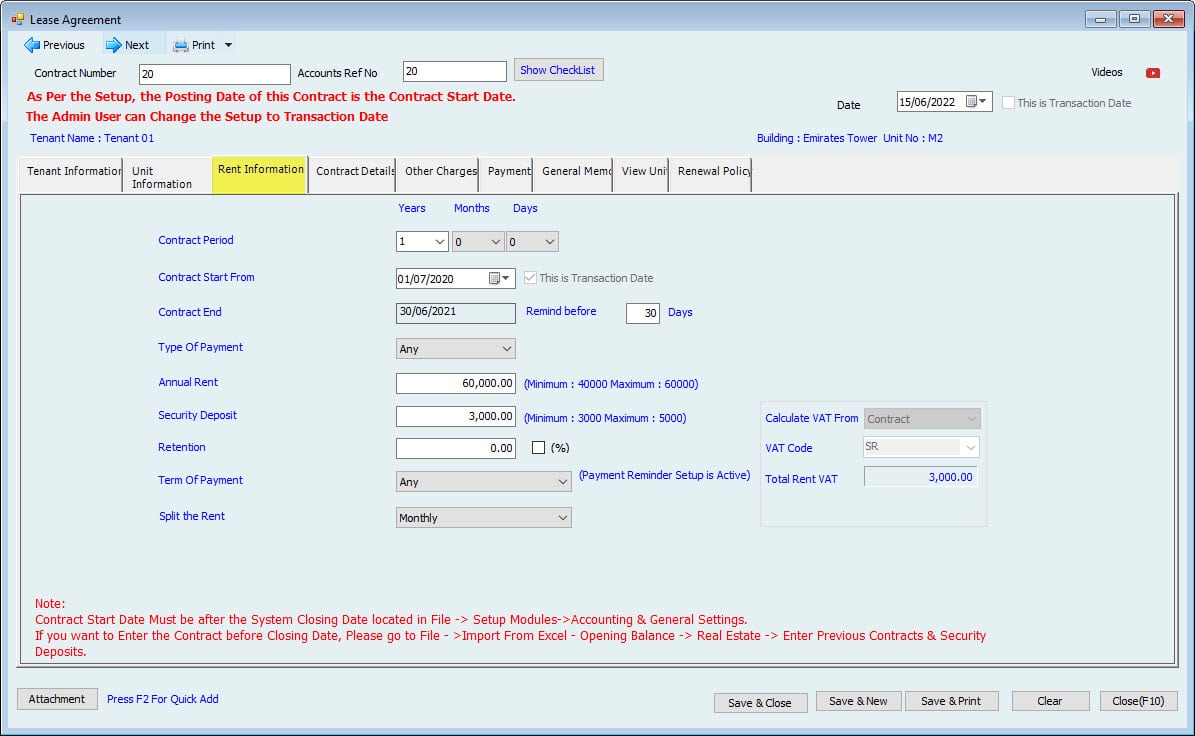
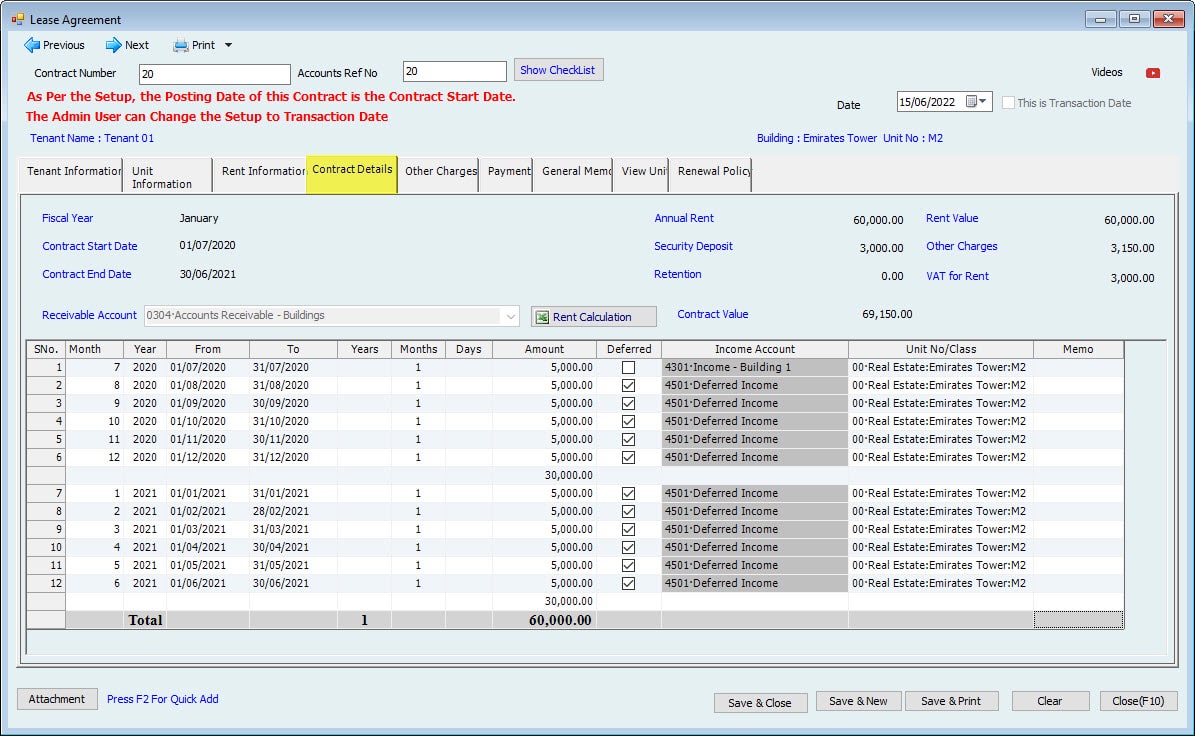
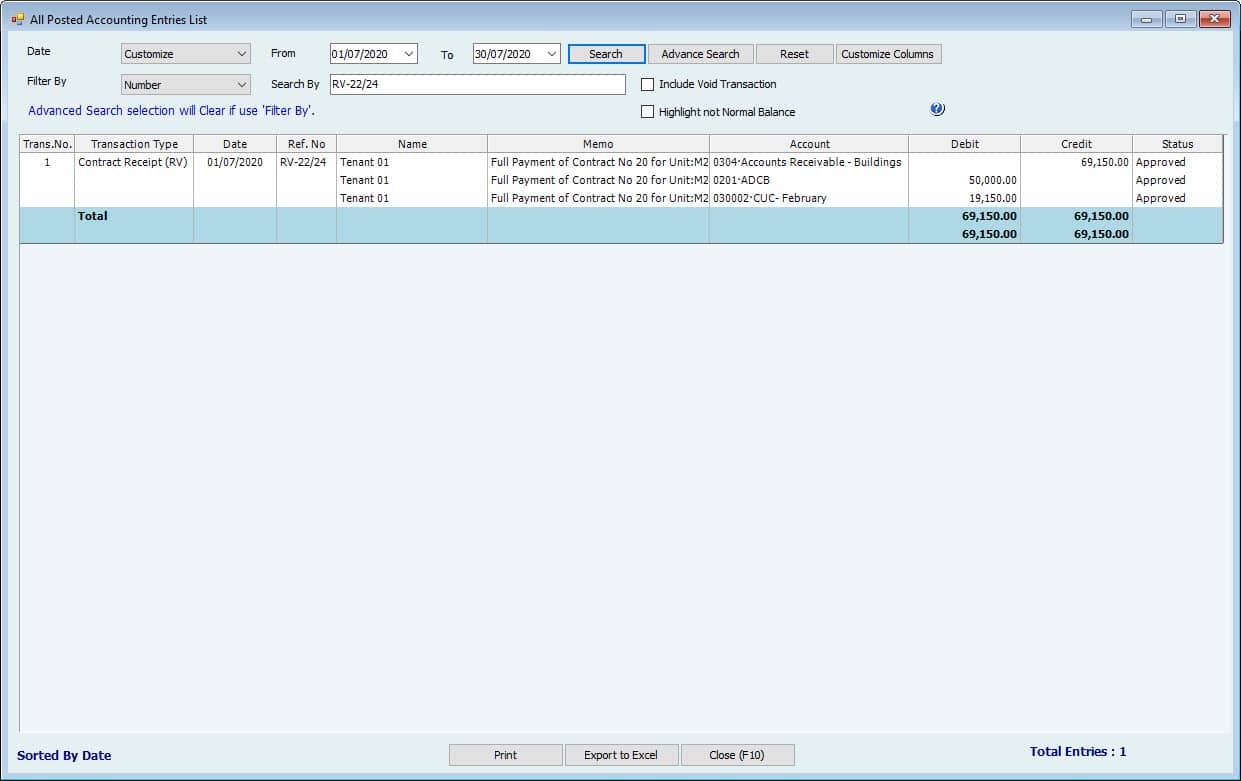
| Post Deferred Income Accounting Entries. Form Type: JV | |||
| Dr. | Amount | Cr. | Amount |
| Dr. Deferred Income | 5,000.00 | Cr. Income | 5,000.00 |
| Dr. Deferred Income | 5,000.00 | Cr. Income | 5,000.00 |
| Dr. Deferred Income | 5,000.00 | Cr. Income | 5,000.00 |
| Dr. Deferred Income | 5,000.00 | Cr. Income | 5,000.00 |
| Dr. Deferred Income | 5,000.00 | Cr. Income | 5,000.00 |
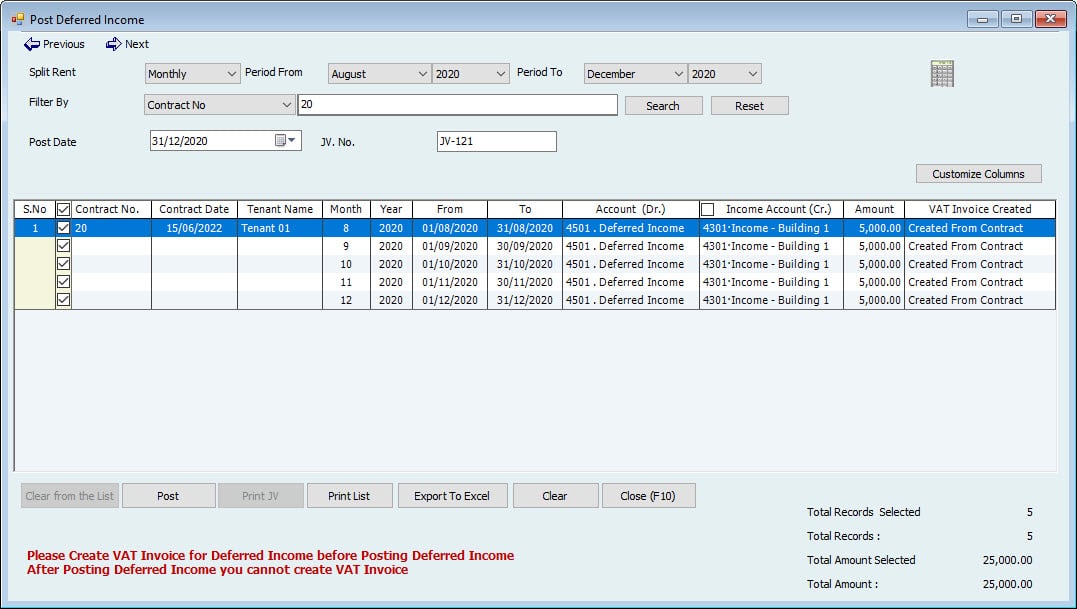
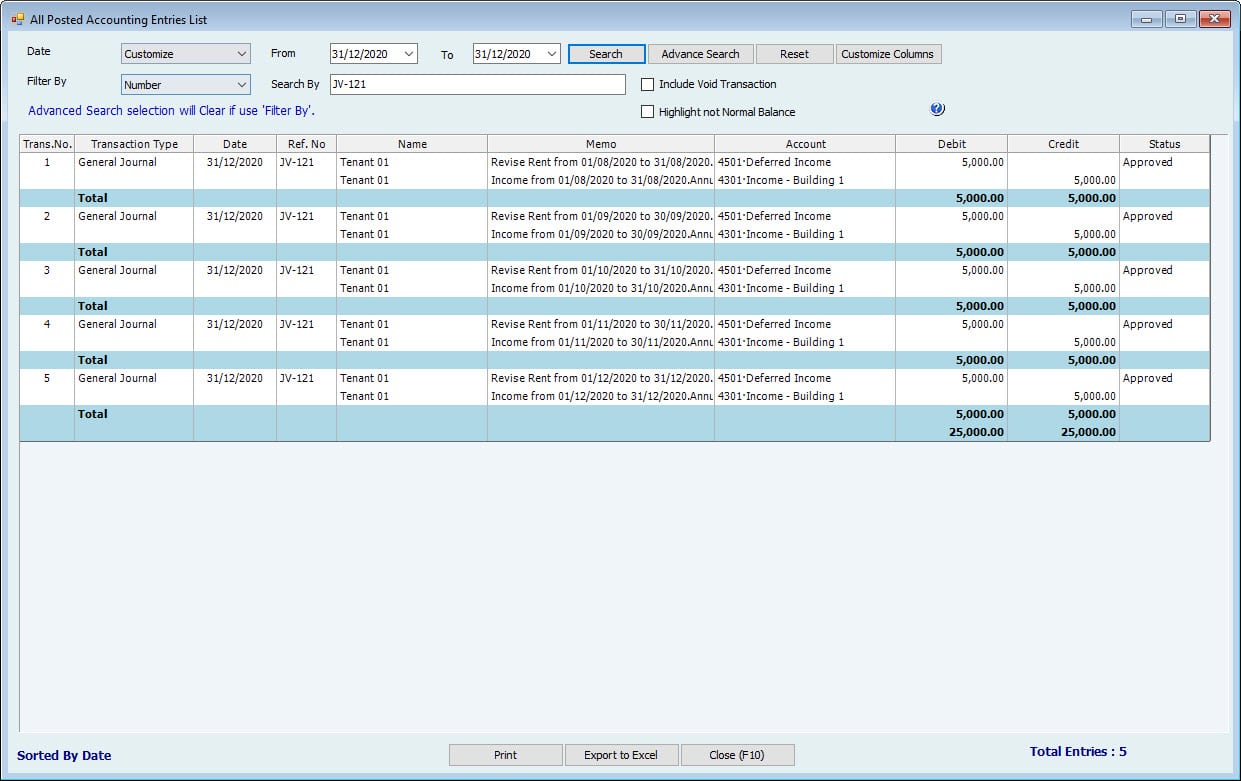
| Pre-Terminate Accounting Entries. Form Type JV | |||
| The pre-Terminate Date is: 01.01.2021 | |||
| Dr. | Amount | Cr. | Amount |
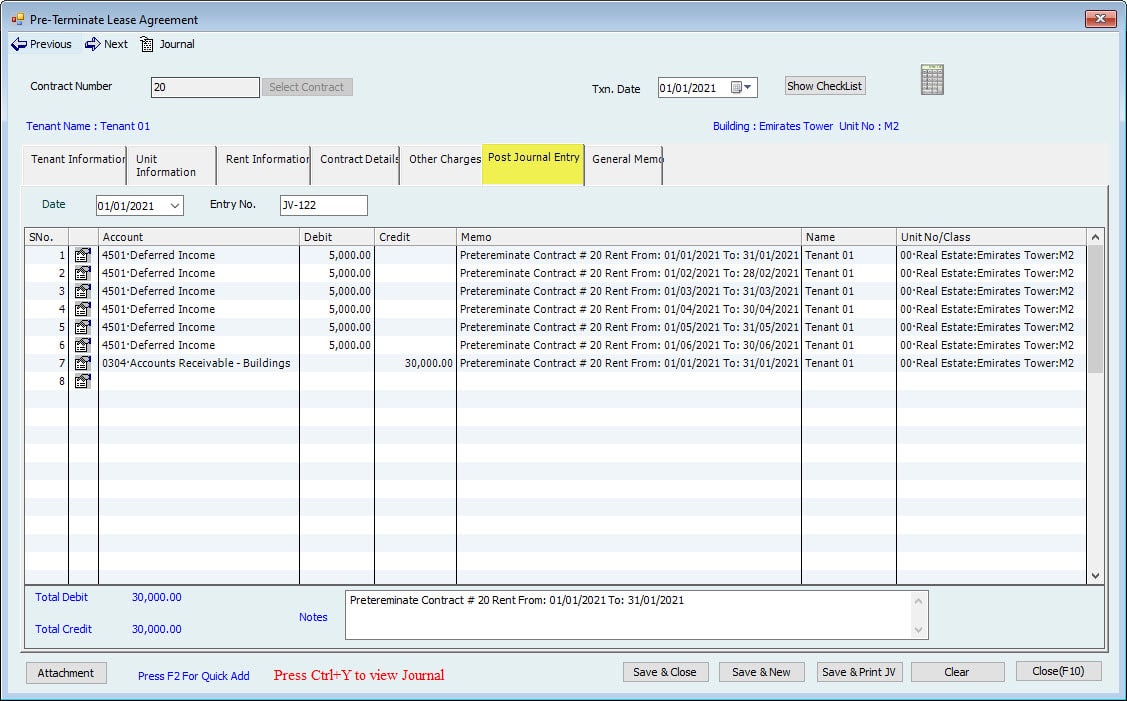
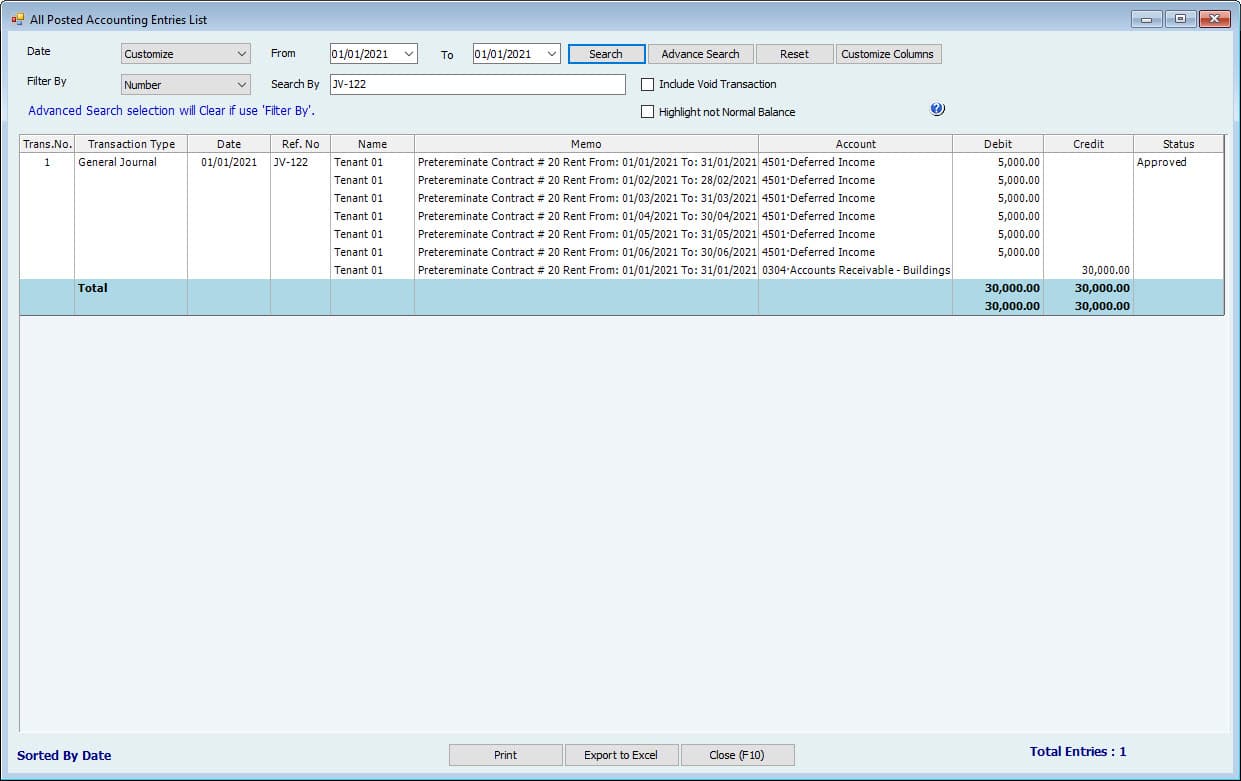
| Dr. Deferred Income | 30,000.00 | Cr. Tenant - AR | 30,000.00 |
| If Deferred income is posted from any period from January to June 2021, the System will make automatically revise the entry as below | |||
| Dr. Income | 5,000.00 | Cr. Deferred Income | 5,000.00 |
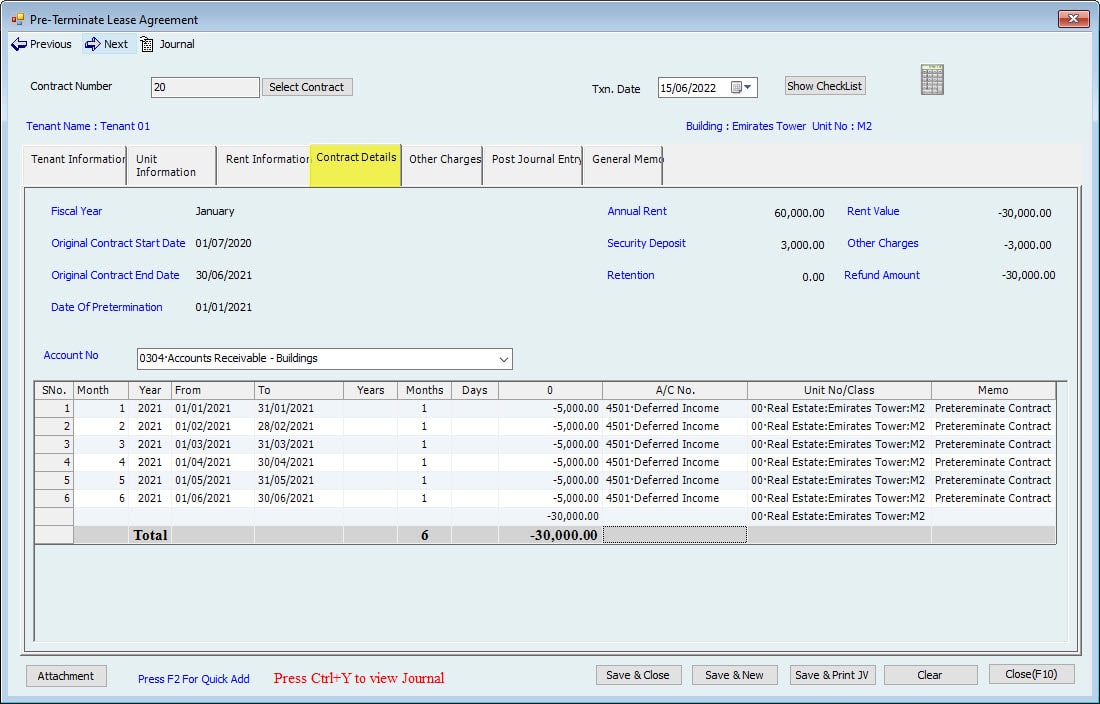
| While creating this step, System will open a new window to create Journal Voucher. Users can add any additional charges or additions to Tenant. It will reflect his Account directly. | |||
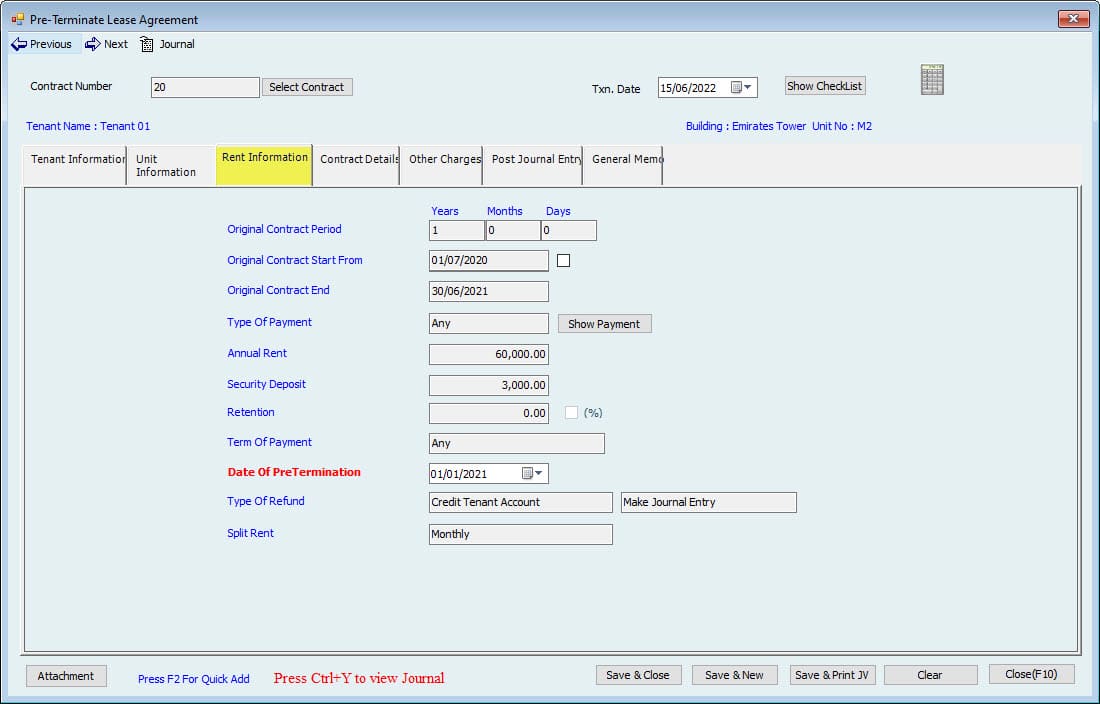
| Refund Security Deposit Accounting Entries—form Type Payment Voucher. | |||
| The Contract will be released by Pre-Terminat Action | |||
| Dr. | Amount | Cr. | Amount |
| Cr. Security Deposit - Liabilities | 3,000.00 | Cr. Cash \ Bank | 3,000.00 |
1-2. In the Below cases, the VAT is based on Deferred Income NOT fully charged to the Tenant.
Case 5: In the Below cases, the VAT is based on Deferred Income NOT fully charged to the Tenant.
| Contact Info | Lease Contract Accounting Entries. Form Type: JV | ||||||
| Contact Information | Contract Values | Period | Dr. | Amount | Cr. | Amount | |
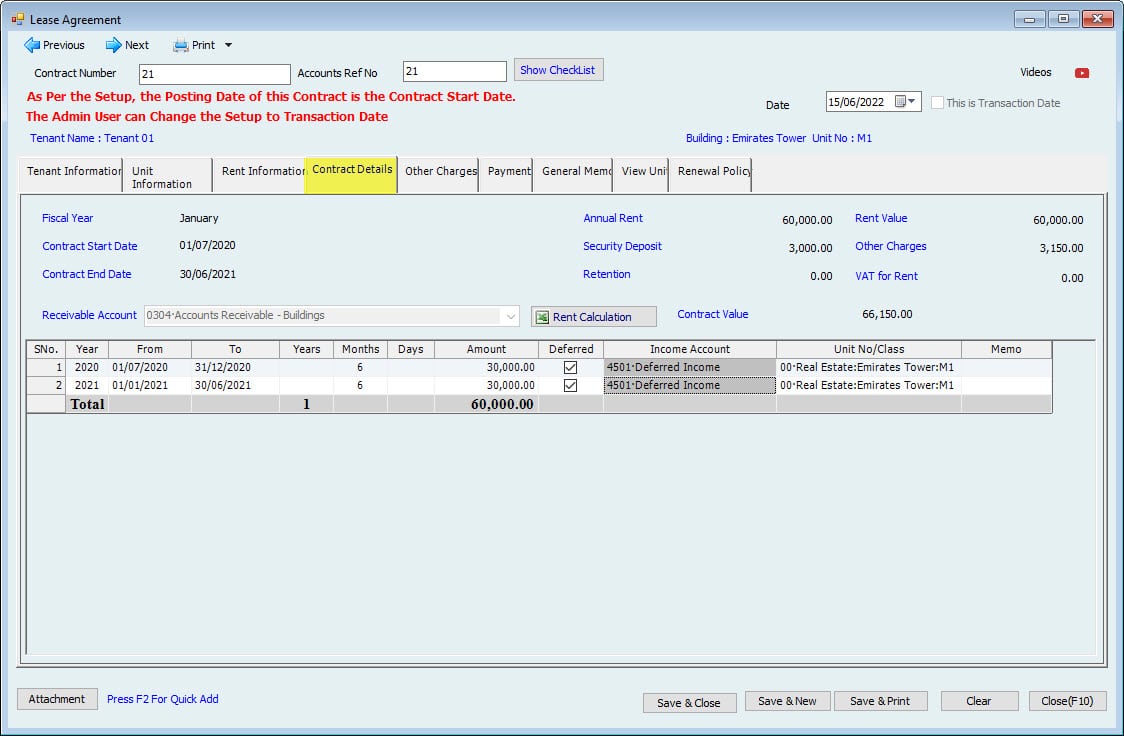
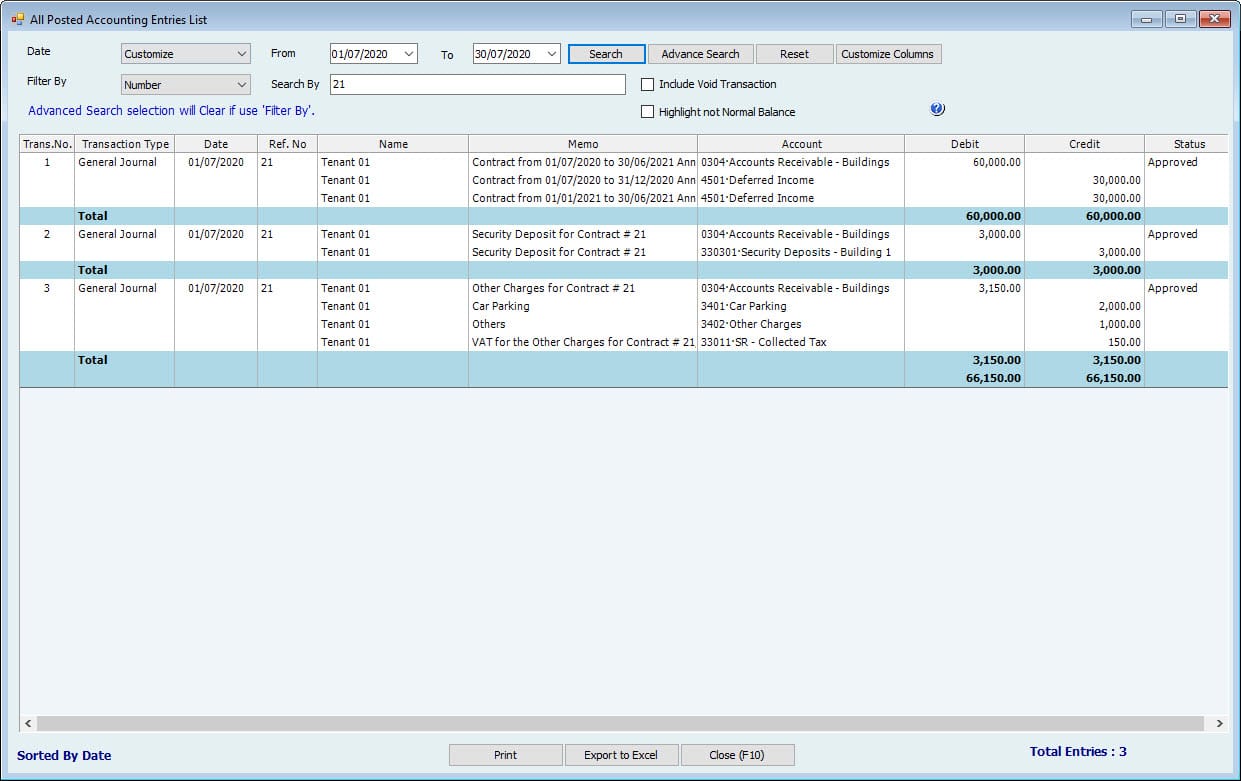
| Annual Rent Amount | 60,000.00 | 60,000.00 | The year 2020 - 6 Month | Dr. Tenants - AR | 60,000.00 | Cr. Deferred Income | 30,000.00 |
| The year 2021 - 6 Months. | Cr. Deferred Income | 30,000.00 | |||||
| VAT 5% | 0.00 | 0.00 | VAT On Deferred | ||||
| Total | 60,000.00 | 60,000.00 | |||||
| Additionals: | |||||||
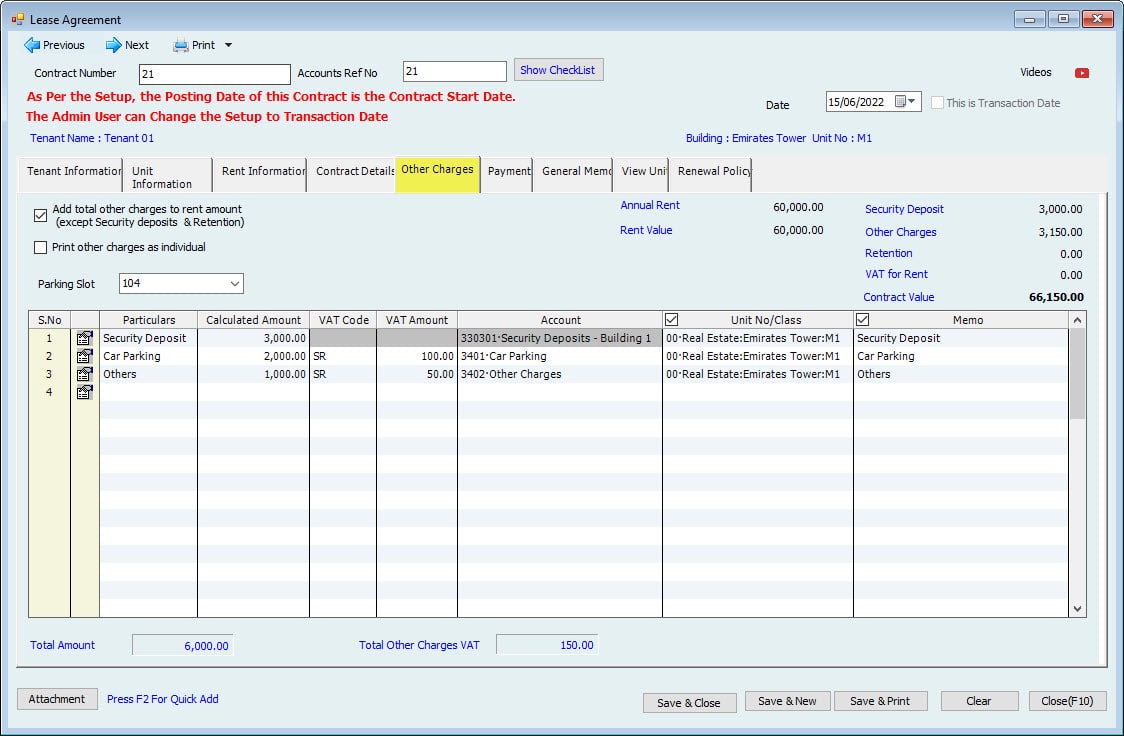
| Security Deposit | 3,000.00 | 3,000.00 | Dr. Tenants - AR | 3,000.00 | Cr. Security Deposit - Liabilities | 3,000.00 | |
| Parking | 2,000.00 | 2,000.00 | Dr. Tenants - AR | 2,000.00 | Cr. Income Parking | 2,000.00 | |
| Other Charges | 1,000.00 | 1,000.00 | Dr. Tenants - AR | 1,000.00 | Cr. Other Income | 1,000.00 | |
| 6,000.00 | 6,000.00 | ||||||
| VAT 5% | 150.00 | 150.00 | Dr. Tenants - AR | 150.00 | Cr. VAT | 150.00 | |
| No VAT on Security Deposit | |||||||
| Total | 6,150.00 | 6,150.00 | |||||
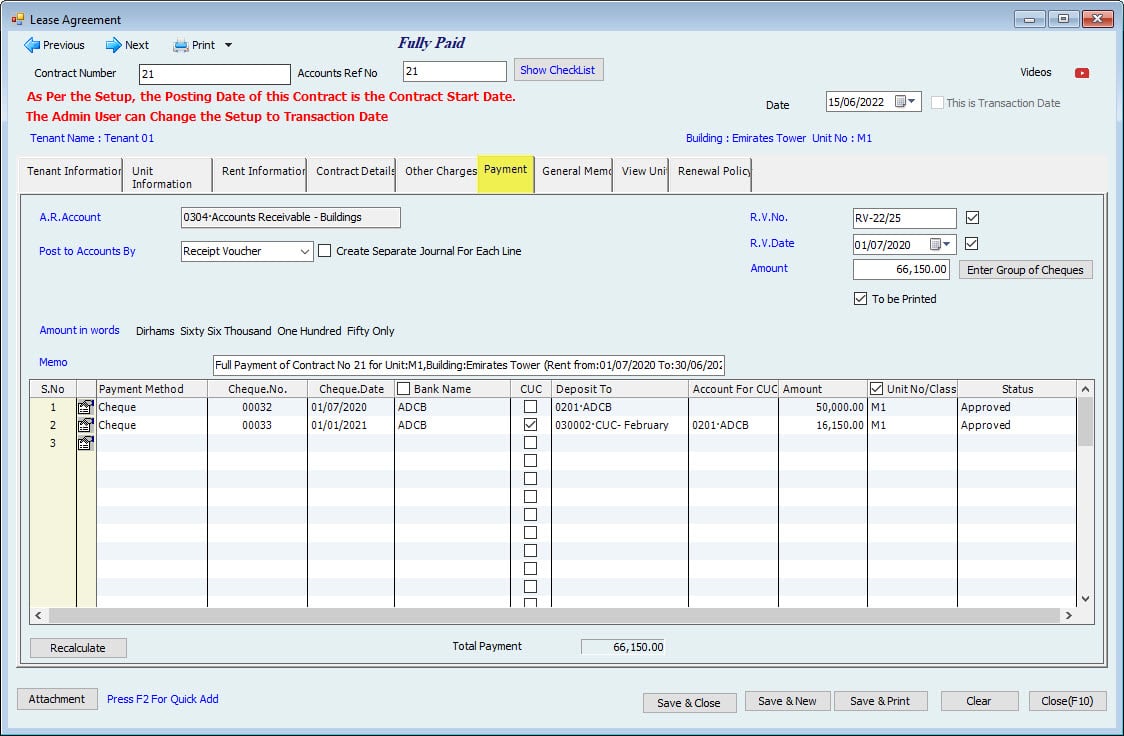
| Total Contract with VAT | 66,150.00 | 66,150.00 | |||||
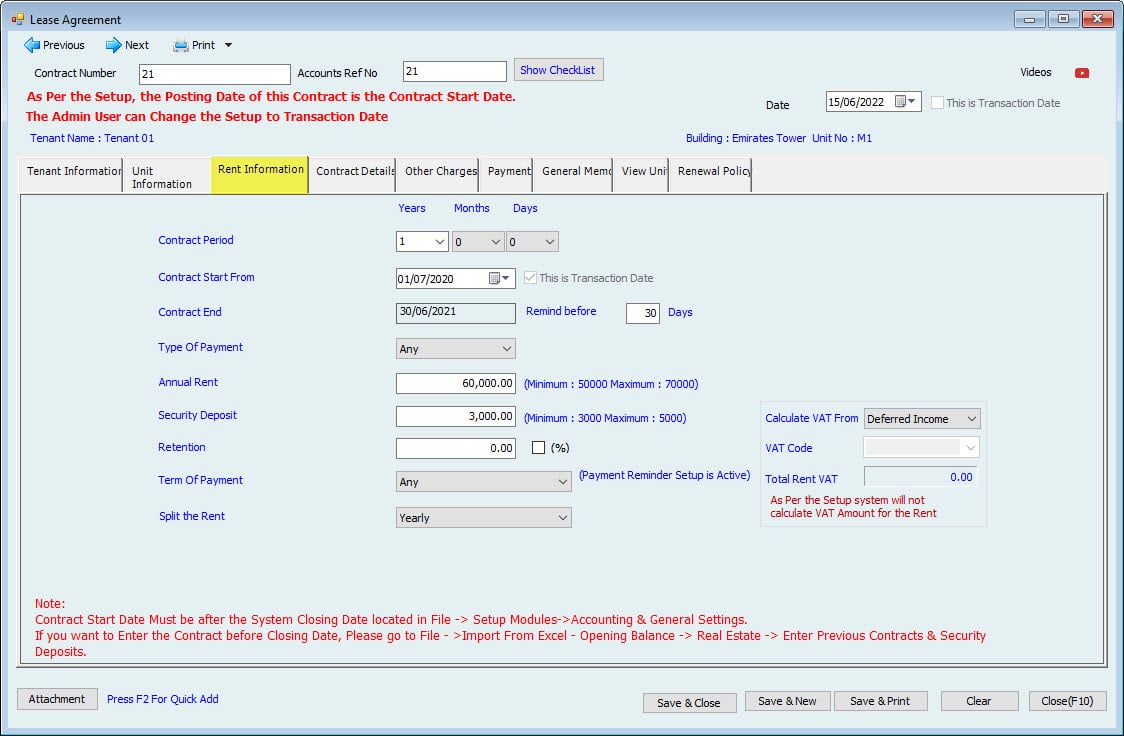
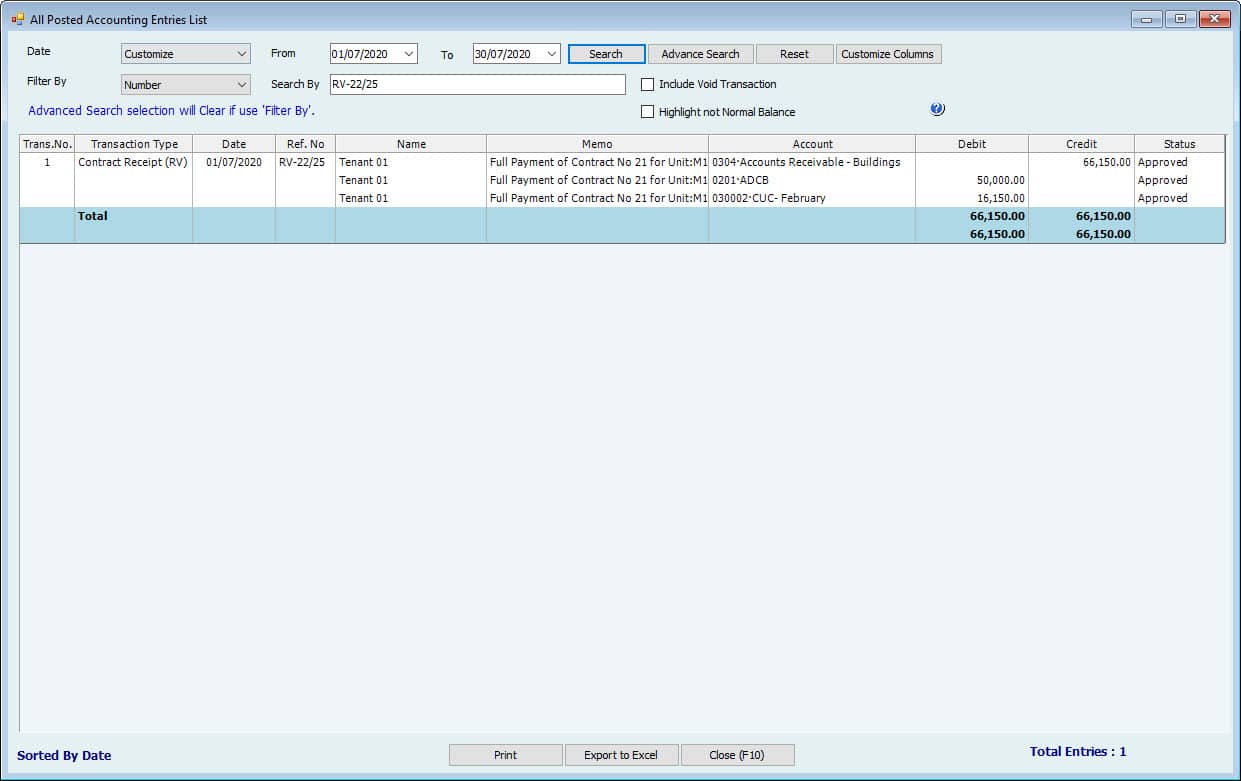
| Create VAT Invoice for Deferred Income | |||
| Dr. | Amount | Cr. | Amount |
| Dr. Tenants - AR | 3,000.00 | Cr. VAT | 3,000.00 |
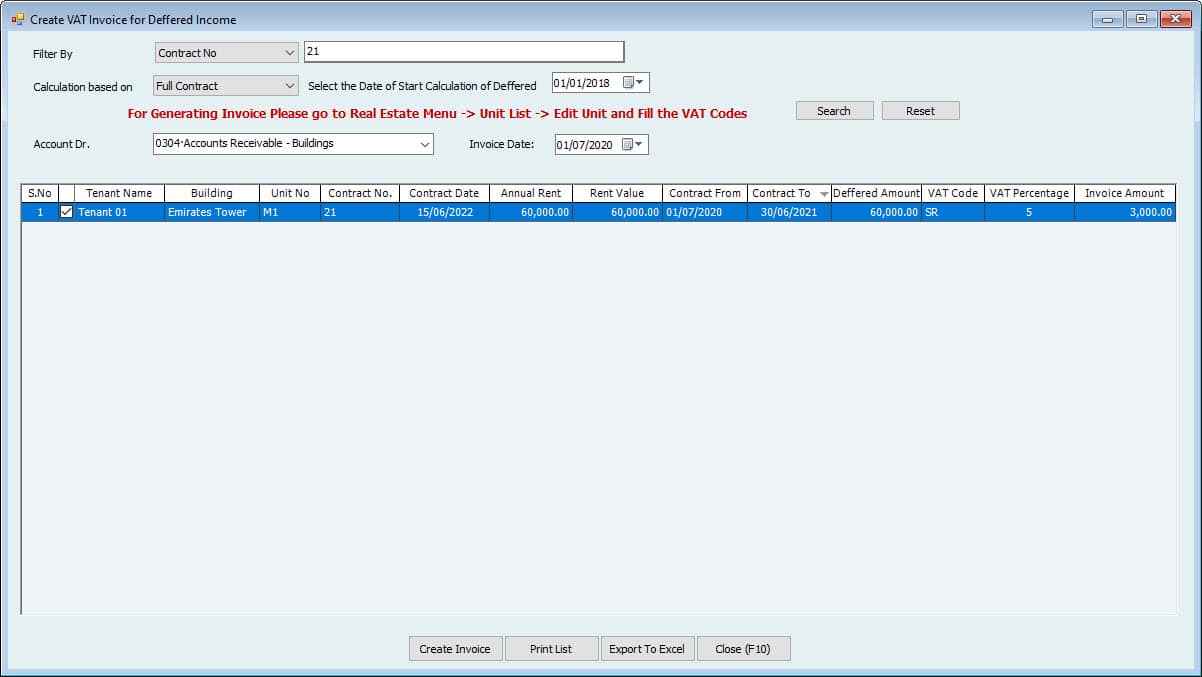
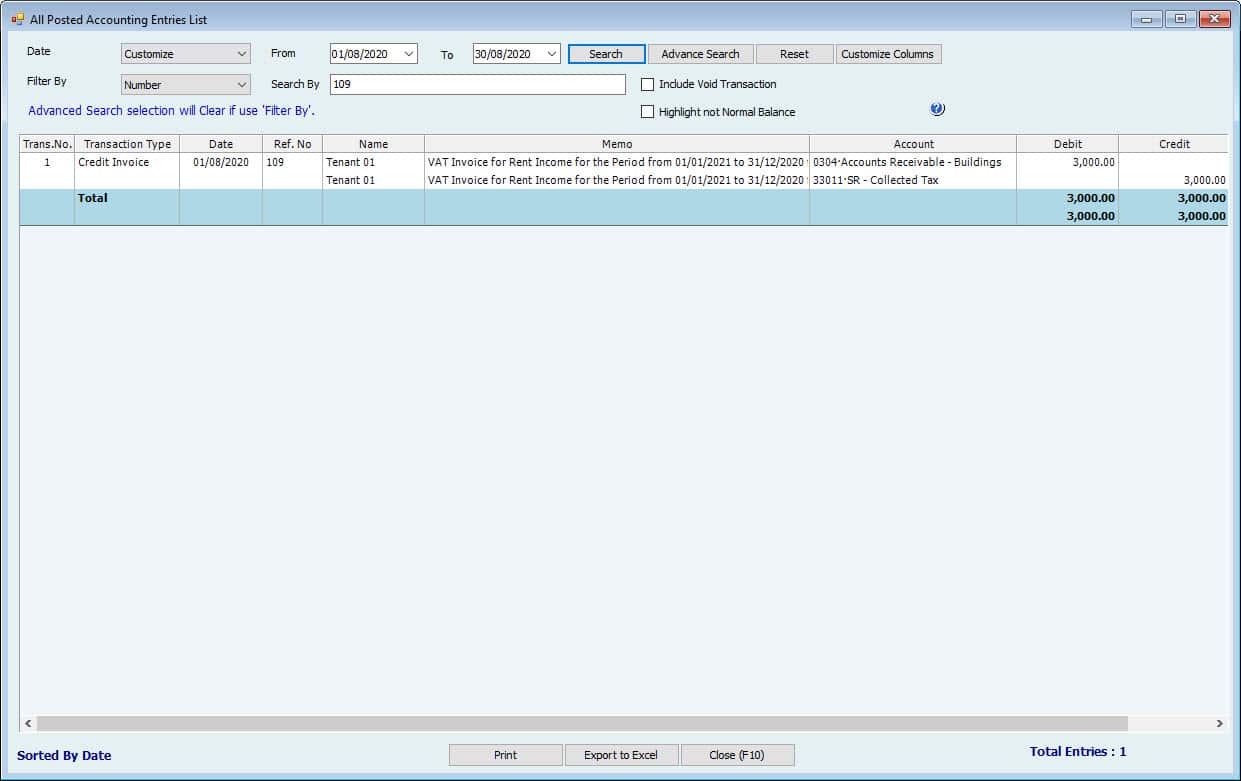
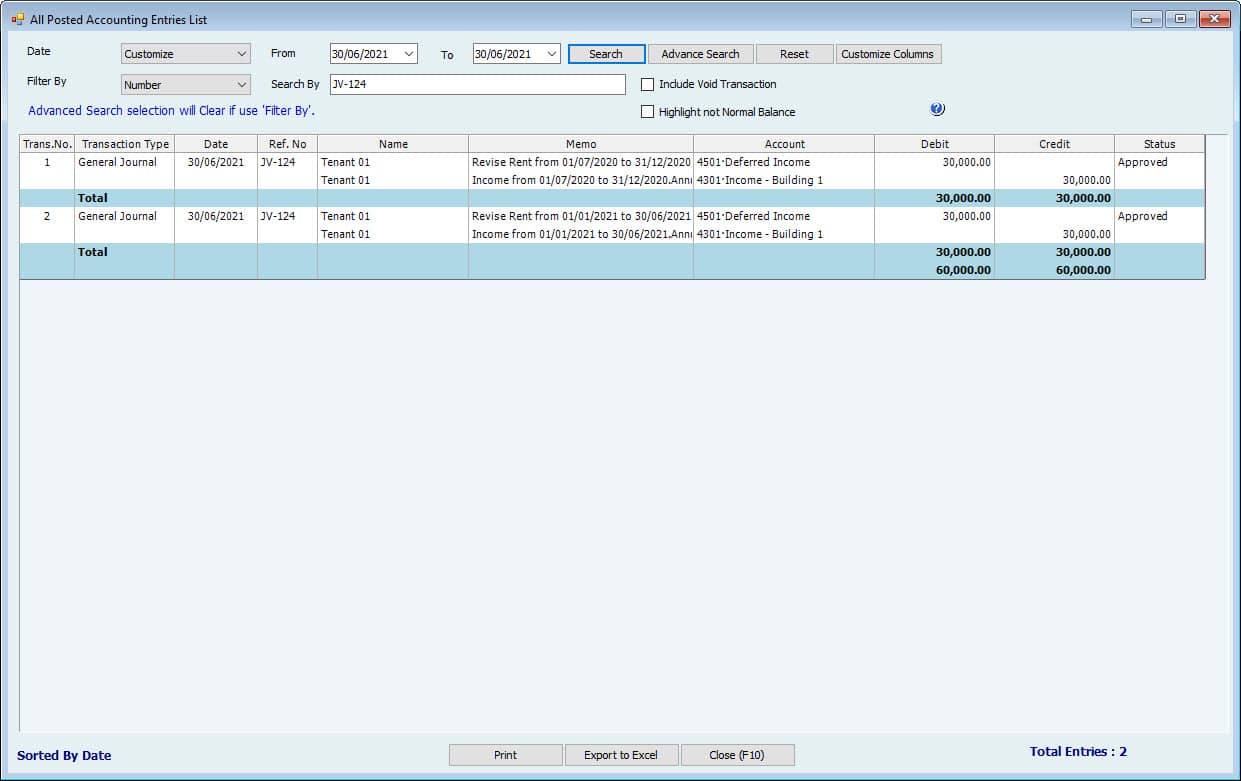
| Post Deferred Income Accounting Entries. Form Type: JV | |||
| Dr. | Amount | Cr. | Amount |
| Dr. Deferred Income | 30,000.00 | Cr. Income | 30,000.00 |
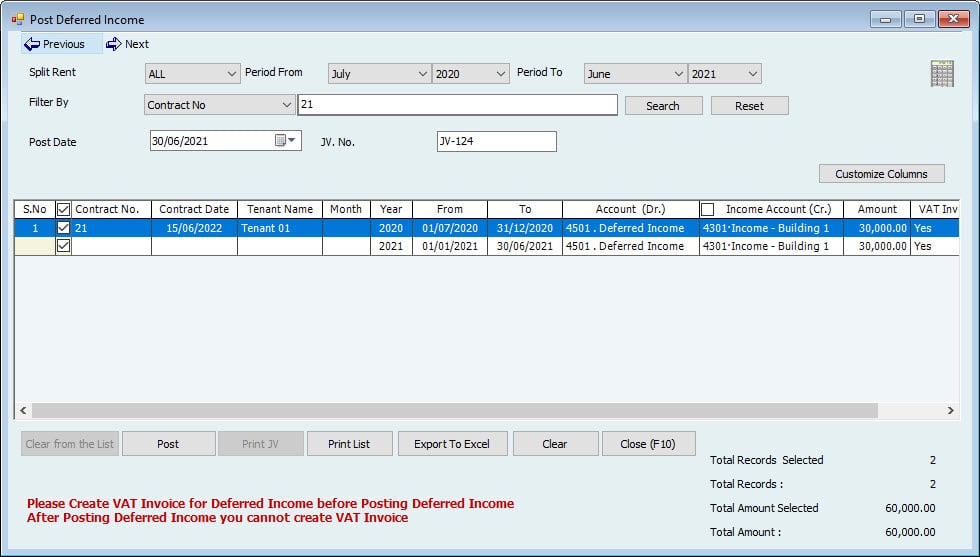
| Refund Security Deposit Accounting Entries. Form Type Payment Voucher. | |||
| The Contract must be released | |||
| Dr. | Amount | Cr. | Amount |
| Cr. Security Deposit - Liabilities | 3,000.00 | Cr. Cash \ Bank | 3,000.00 |
| By Payment Voucher | |||
Rent Calculation Scenarios
| Annual Rent | 155,000.00 | ||||||||
| Rent From | 15/07/2020 | ||||||||
| Rent To | 14/07/2021 | ||||||||
| Period | 1 Year | ||||||||
| Month Calculation Basis: | Annual Rent / 12 * No of Months | ||||||||
| Days Calculation | Annual Rent / 365 * No of Days | A | B | C | |||||
| Srl.No | Year | From Date | To Date | Month | Days | System Calculation | Manual Calculation | Decimal Points | |
| 1 | 2020 | 15/07/2020 | 31/07/2020 | 17 | 7,219.00 | 7219.18 | 0.18 | ||
| 2 | 2020 | 01/08/2020 | 31/08/2020 | 1 | 12,916.00 | 12916.67 | 0.67 | ||
| 3 | 2020 | 01/09/2020 | 30/09/2020 | 1 | 12,916.00 | 12916.67 | 0.67 | ||
| 4 | 2020 | 01/10/2020 | 31/10/2020 | 1 | 12,916.00 | 12916.67 | 0.67 | ||
| 5 | 2020 | 01/11/2020 | 30/11/2020 | 1 | 12,916.00 | 12916.67 | 0.67 | ||
| 6 | 2020 | 01/12/2020 | 31/12/2020 | 1 | 12,920.00 | 12916.67 | 0.67 | ||
| Total | 71,803.00 | 71802.51 | 3.51 | ||||||
| 7 | 2021 | 01/01/2021 | 31/01/2021 | 1 | 12,916.00 | 12916.67 | 0.67 | ||
| 8 | 2021 | 01/02/2021 | 28/02/2021 | 1 | 12,916.00 | 12916.67 | 0.67 | ||
| 9 | 2021 | 01/03/2021 | 31/03/2021 | 1 | 12,916.00 | 12916.67 | 0.67 | ||
| 10 | 2021 | 01/04/2021 | 30/04/2021 | 1 | 12,916.00 | 12916.67 | 0.67 | ||
| 11 | 2021 | 01/05/2021 | 31/05/2021 | 1 | 12,916.00 | 12916.67 | 0.67 | ||
| 12 | 2021 | 01/06/2021 | 30/06/2021 | 1 | 12,916.00 | 12916.67 | 0.67 | ||
| 13 | 2021 | 01/07/2021 | 14/07/2021 | 14 | 5,701.00 | 5945.21 | 0.21 | ||
| 83,197.00 | 83445.21 | 4.21 | |||||||
| Total | 155,000.00 | 155247.72 | 7.72 | ||||||
| We are Discarding the Decimal Points while Calculating the whole month. | |||||||||
| The sum of decimal points will be added by the end of each year. | |||||||||
| For Example, in the above Example: | |||||||||
| December is the end of 2020, and July is the end of Contract 2021. | |||||||||
| Explain the Amount of 12,920 seen in the December 2020 Calculation. | |||||||||
| Manual Calculation - ( B ) | Points - ( C ) | System Calculation ( A ) | |||||||
| December | 12,916.00 | 4.00 | 12,920.00 | We ignore the points for Amount: 12916, and We round the Decimal point total from 3.51 to 4. | |||||
| Explain Amount 5,701 seen in December 2020 Calculation. | |||||||||
| Manual Calculation - ( B ) | Points - ( C ) | System Calculation ( A ) | |||||||
| July | 5,945.00 | 4.00 | 5,949.00 | We ignore the points for Amount: 12916, and We round the Decimal point total from 3.51 to 4. | |||||
| 248.00 | Less | ||||||||
| 5,701.00 | This amount is for the Last Month of the Contract end month. | ||||||||
| Amount 248 Calculation | |||||||||
| Ref. | |||||||||
| Total Rent for the Year 2020 | 71,802.51 | ( B ) | |||||||
| Total Rent for the Year 2021 | 83,445.21 | ( B ) | |||||||
| Total | 155,247.72 | ||||||||
| Unit Annual Contract | 155,000 | ||||||||
| 247.72 | |||||||||
| Round Amount | 248 | Extra Amount will be deducted from the last month of the Contract end month. | |||||||
Real Estate setup
Setup
Settings are the most potent and essential Module. It allows you to set rules and requirements according to your Company policy. Our software is customizable for any business as per their requirement. We have flexible settings for each Module separately.
The software has a pre-defined Setup for each Module as a regular practice of companies, allowing the User to use the program quickly. This Module has a checklist that gauges the control of users over function. If set p posting control window, the System will not allow the User to save the task unless they follow the procedure set by the admin.
The followings are examples of Real Estate Module Settings:-
- When creating or renewing the Contract System, check the pre-setup rules like the validity of documents: passport expiry, residence visa or national ID …etc.
- While renewing, the Contract System will check if any pending amounts on the Tenant have not yet been paid or the last Contract has not been paid entirely.
- In Setup, the System will not refund the security deposit to the Tenant if the Contract is not fully paid or the maintenance Amount is not paid.
- Setup to post the Income monthly, yearly, or once.
- Set pre-defined Income, deferred income, Cheques Under Collections, Cash, and security deposits.
- Set to calculate the other charges like parking for the Contract period or annually.
- Set how many days are allowed before renewing, canceling, or pre-terminating the Contract.
- And more.
To access real estate settings, Go to:
File-->Setup Modules-->Real Estate Settings

General Settings:
- General Tab:
Round off the annual Rent Amount when creating the Unit if Setup Rent by size:
When you create a new Unit for the building, you have to pay the annual Rent. This Rent can be defined per Unit or by size. If you select the size, e.g., Square meter, and give some Value per square meter, this Rent might go into fractions when calculating the total size. This option allows you to round off Rent Value.
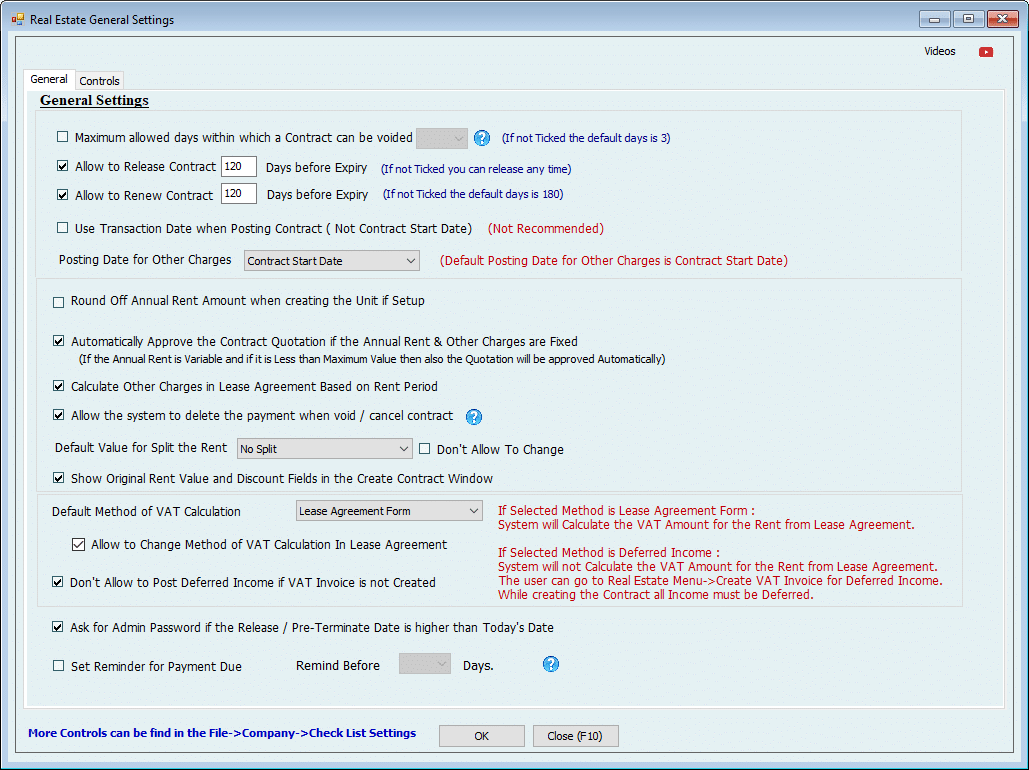
- Maximum allowed days within which can void a Contract: This is the maximum number of days to void a Contract after the creation Date (default is three days).
- Allow to Release Contracts, specify the maximum Number of days before the expiry date that you can release a Contract within these days.
- Allow to Renew Contract; specify the maximum Number of days before the expiry date that you can Renew the Contract within these days.
- Use Transaction Date when Posting Contract (Not Contract Start Date): If the User ticks this option, the System will use the Date placed on the top of the Contract form as the transaction Date, not the Contract start Date.
- Automatically approve the Contract Quotation if the annual Rent & other charges are fixed.
If we don't tick mark this option, all real estate Contract quotations must be manually approved.
If we tick this option, the quotations will be approved automatically for the following 2 cases.- If the Rent and other charges are fixed*, the Quotation for the Contract will be approved automatically.
- If the Rent is variable, but the amount is within the minimum and maximum limits, the Contract Quotation will be automatically approved.
- *In the real estate Unit, where we mention the Rent Amount and other charges, there is another option to keep these fixed or allow changes when making a Contract.
Calculate other charges in the lease Agreement Based on Rent Period. - Allow the System to delete the payment when void / cancel the Contract; by default System will delete the payment when void / cancel the Contract; the User can already void/cancel the Contract if the Contract is already posted as CUC or already posted Differed Income.
- The default value for splitting the Rent can be yearly, monthly, or no split.
- Show Original Rent Value and Discount Fields in the Create Contract window. ; Tick this option to view Original Rent Value and discount fields in the Create Contract window.
- Default Method of VAT Calculation: Select the preferred VAT Calculation method from the dropdown
- Allow to change the method of VAt calculation in the lease agreement: Tick this option to allow the User to change the VAT calculation while creating the Contract.
- Don't allow posting deferred Income if the User has not created the VAT invoice.
- Ask for Admin Password if the Release / Pre-Terminate Date exceeds Today.
- Control Tab:
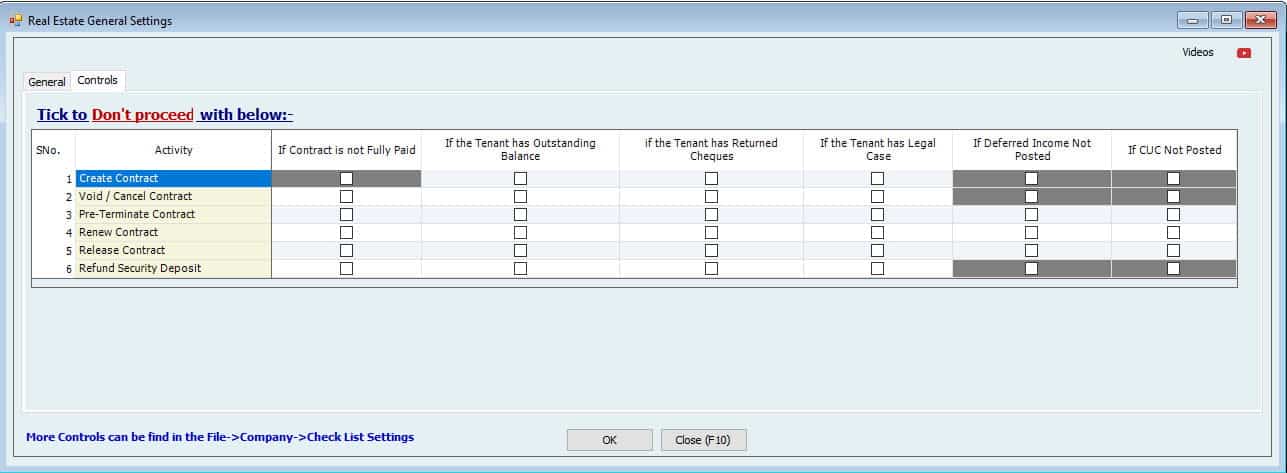
Tick to "Don't Proceed" with the below activities;
- If the Contract is not fully paid;
- If the Tenant has an Outstanding Balance.
- If the Tenant has Returned Cheques
- If the Tenant has a Legal Case
- If Deferred income is not posted
- If CUC not posted
Users can set up rules here to prevent such activities as creating Contracts, voiding / Canceling Contracts, pre-terminating contracts, renewing contracts, Releasing contracts, and Refund Security according to the settings.
Other Charges Settings:
These other charges are from the Contract window. We can add new charges there, but here in the settings, we can define either fixed or minimum/maximum limits for these charges. We can also mention the default Account for these charges, which is changeable from the Contract.

Property:-
Users can record all the properties they own. This feature will allow the users to capture general details (Cost of property, Number of Units it holds, etc.).
Units:-
Users can record all information about units contained in that property. This feature will allow the users to capture general details about the Unit (No. of rooms in the team, the purpose of use, Cost of the Unit, etc.) It will also allow capturing its pictures. An example of a Unit may include- Flat in a building.
Tenants Information:-
The System users can record all information about their tenants. It includes personal details, accounting activities (Ex. Repayments), Contract status, Contract expiry Date, and much more.
Creation of Contract Quotation:-
Users can create quotations for their The quote will capture information such as the Customer's details, the Unit that the Customer is being allocated for the Customer, Rent evaluation information for that Customer, etc.
Contracts:
Automatic Contract creation-
Once the Quotation is approved, it will convert into a lease. The User needs a final Contract, a document that acts as a rental agreement between the landlord and the Tenant. The System allows creation automatically.
When the User makes a new Contract, the System will automatically read all the information entered at the time of the Quotation creation.
Cancel Contract-
The System gives the privilege to cancel the Contract for that particular Tenant. The cancellation of the Contract can be within a limited period.
Renew Contract-
The contracts can be renewed after the expiry date or even before. There is no need to wait for the expiry Date. When the User renews the Contract for that particular Tenant, the basic information will read from their previous Contract and the
the System will also give the privilege to increase or decrease the Rent.
Pre-terminate Contract-
The System users can Pre Terminate the Contract for that Tenant; This means that the Tenant that gets Pre-terminated their Contract will get a refund on the remaining Contract period. The s stem will automatically calculate the Amount and debit it to the Tenant.
Release Contract-
The User can terminate the Contract whenever the Tenant wishes to leave. This feature will not provide a refund of their Rent, although it will just refund their security deposit.
Collect payments-
Users can record the financial Data from the business. Users can record the payments made by the tenants. These count receivables are then updated to Accounting to record the Company's financial transactions. The System can process the following payment modes:
- Cash
- Cheque- The System can accommodate all types of cheques.
It Includes Post-dated cheques (PDC) or Current dated.
- When a User creates a Contract, all the payment transactions are made automatically by the System. For instance, if the Cheque by the Tenant is of the Current Date, then the System will automatically transfer it to the bank, or if the Cheque is Post-dated, the System will perform revised entries on that due Date. The System can also receive and manage a group of cheques.
- Both
Notice-
The System users can also create a notice to convey a message to their tenants. Maintenance- Users can also make maintenance requests for the tenants.
Menu Items of Different Features from the Real Estate Module
Property List
Here, users can see the List of properties and create new or edit any existing ones.
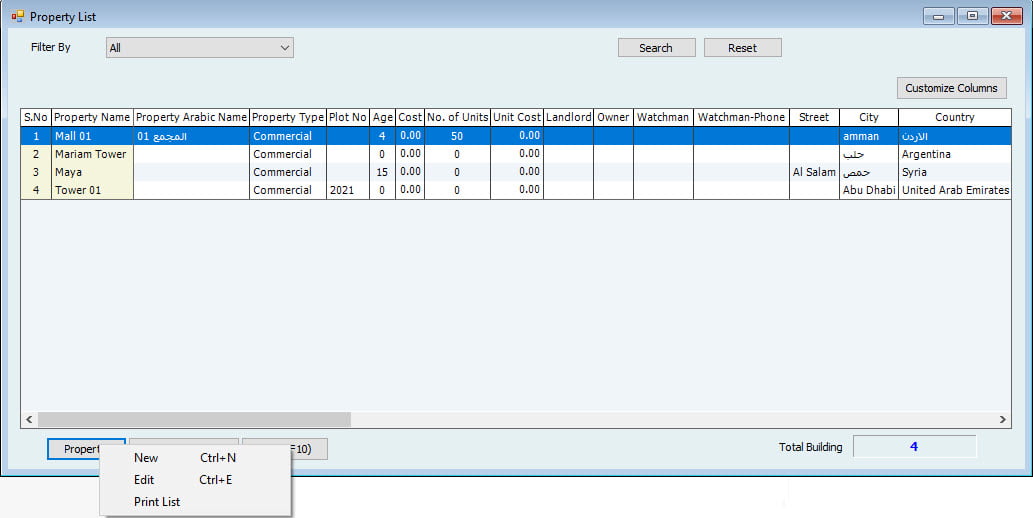
Users can filter the property by different options.
Create New Property: To add new, click on the property at the bottom and click “New.”
The first tab is for information about the property.
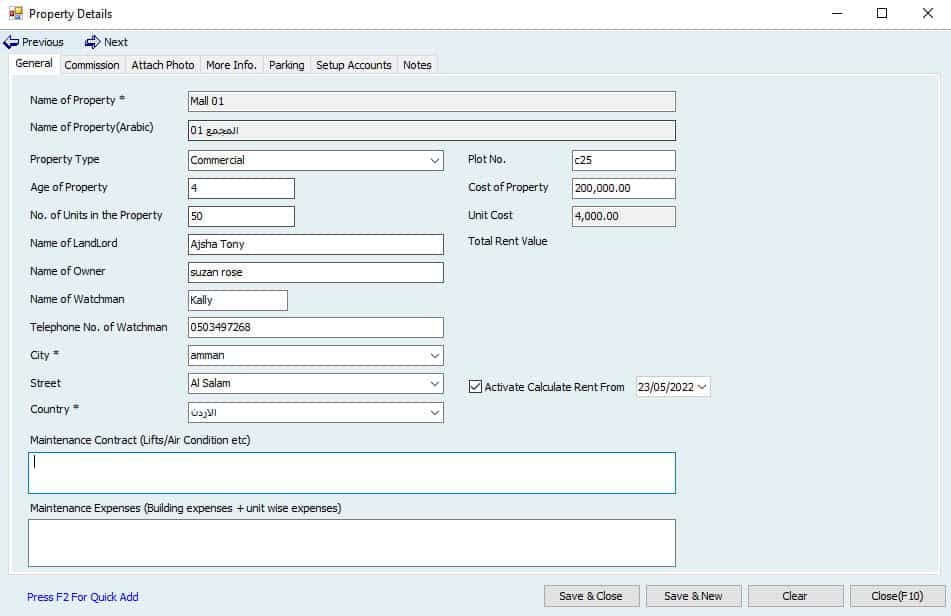
Write the name of the property.
Select the Property Type Commercial, Residential, or all for both*. (Optional)
*Press F2 to add a new type
Plot No (Optional)
Age of Property (Optional)
Cost of property (Optional)
In no. of units, the User has to write how many units are in the property*. I.e., flats, portions or villas, etc.
* It is essential to write the correct Number of units; in the next step, the User will create units based on these numbers.
Unit Cost will automatically be calculated as an average total cost by several units.
Name of the landlord (Optional)
Name of Owner (Optional)
Name of Watchman (Optional)
Telephone No. of Watchman (Optional)
Name of the city where the property is located.
Name of the street (Optional)
Name of Country
Maintenance Contract:
Users can write property details like Company name for lifts, Air conditioners, and Quantity.
Maintenance Expenses:
Users can store expenses as text to be shown in the List.
This second tab is commission settings for this property/building.
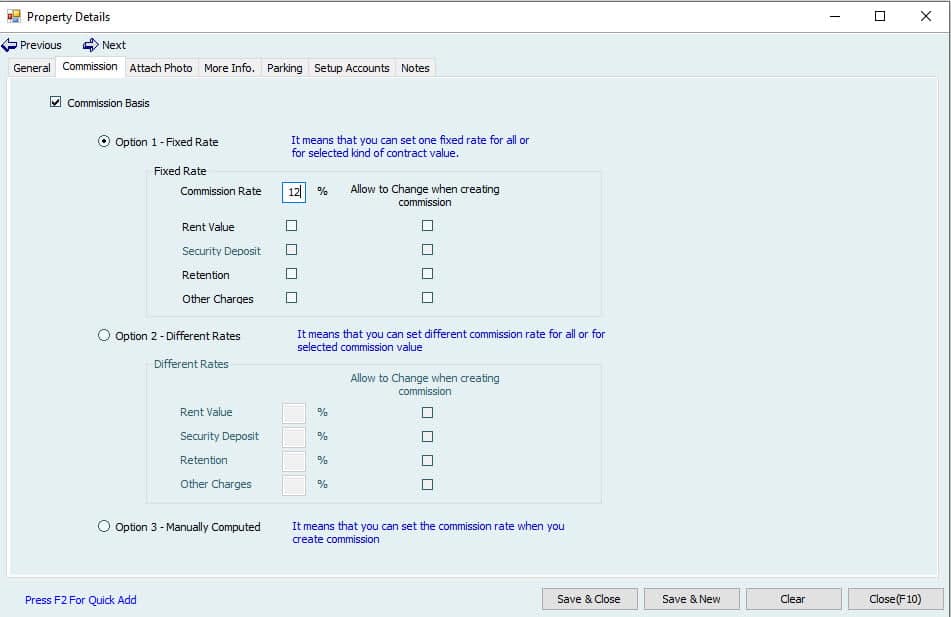
Option 1 – Fixed-Rate:
Users can set a fixed rate of commission for all the components of contracts created in this building.
Write
How much percent should the commission be, what component basis for commission (e.g., % of Rent Value or security deposit or both), and if you want to allow changing this at the time of creating the commission?
Option 2 – Different Rates:
Here different rates can be used for other components.
(E.g., different rates for Rent Value and different for security deposit)
Option 3 – Manually Computed:
The commission will not be calculated automatically. Instead, the User will calculate manually and enter it when creating the commission.
Important:
The User can only set the basis for commission calculation from this property window. The commission will only be created from another window and for fully paid contracts.
Users can attach and delete photos of the property.
The third tab has attached a photo of the property.

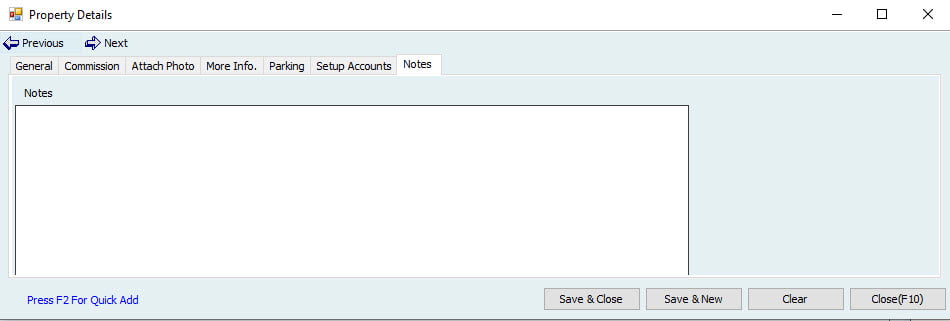
The fourth tab is for any additional notes for the property.
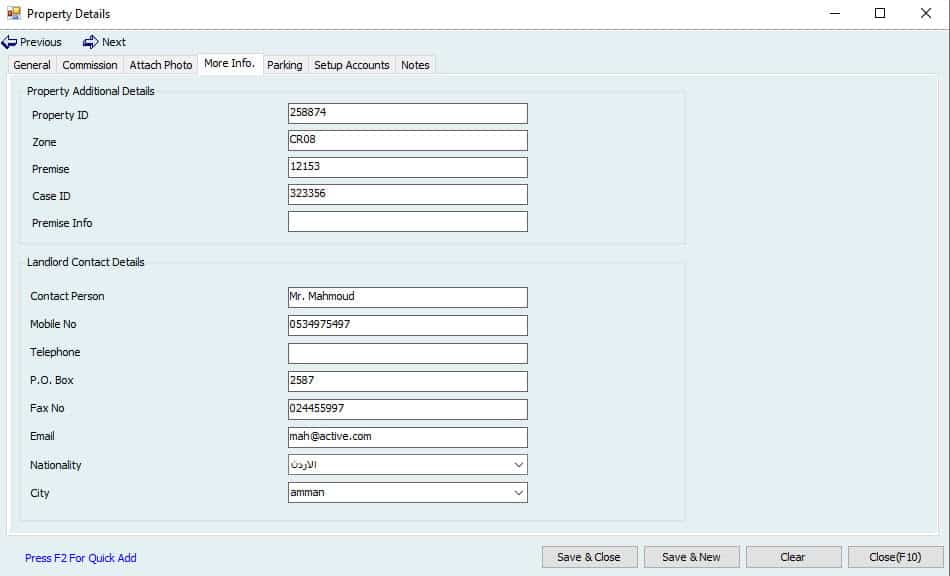
The fifth tab is more information about the property.
The last tab is a predefined Setup Setup Account for the property.

Unit List
In the Unit List, the User can create new units for properties and edit any existing ones.
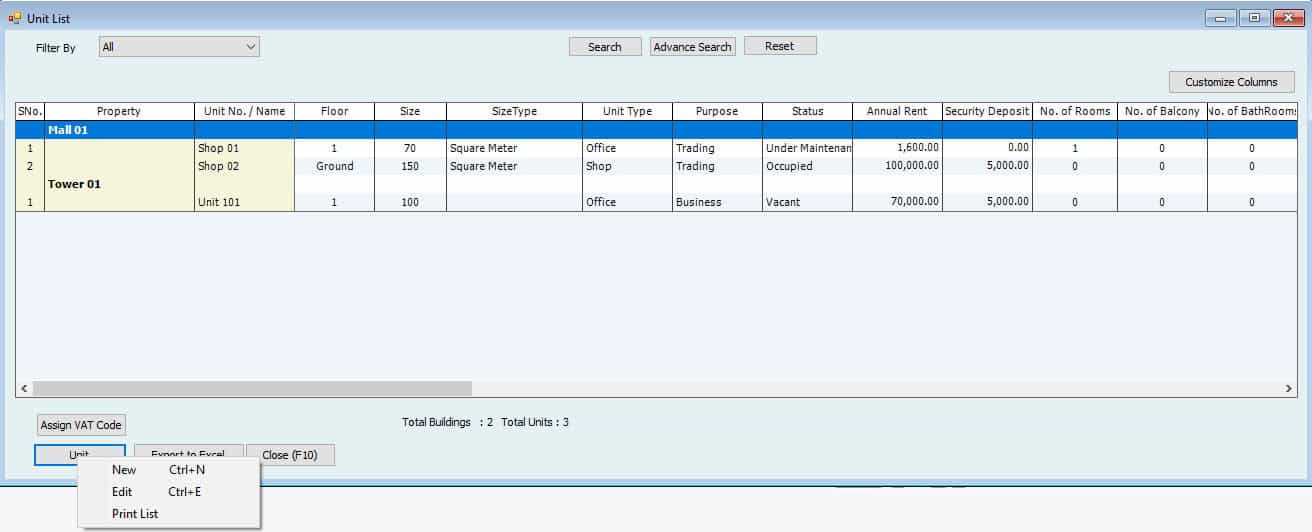
Create New Unit:
To add a new Unit, click on the Unit and select “New.”
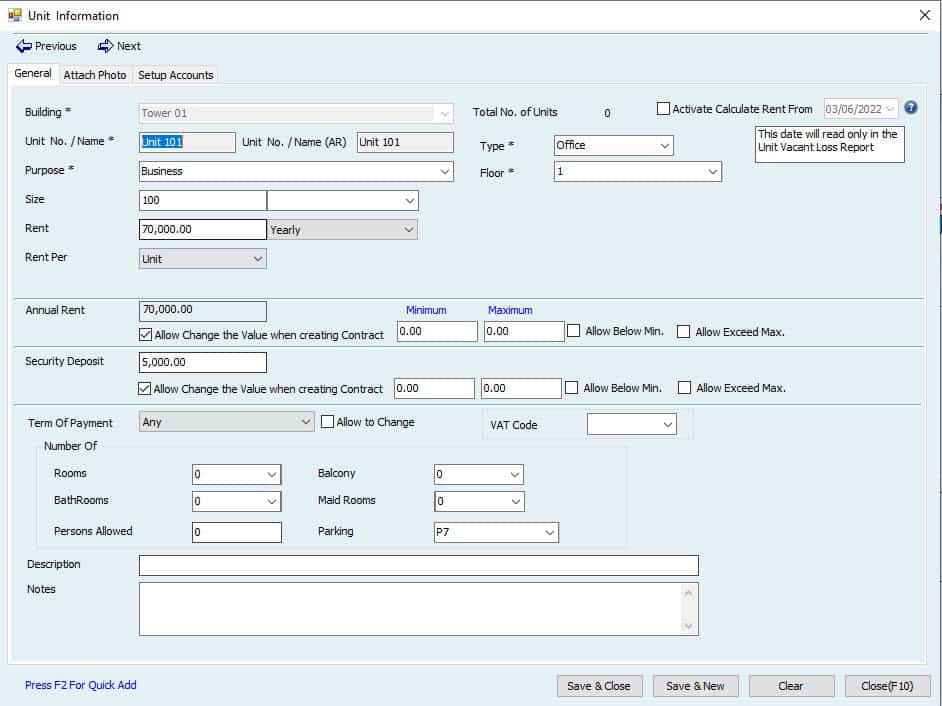
Select from existing Buildings in the dropdown to create a new Unit.
Unit No. It can be a flat Number, a villa Number like above, Unit 101. a is a flat Number or a villa Number.
Select the Type of Unit if it’s a shop or office etc.
Floor for Unit Purpose of the Unit is personal or business.
For the size of the Unit, the User has to write the figure and select the parameter. (E.g., 1000 square feet) Rent Value for the Unit. Define it as daily, monthly, or yearly.
You can select how you want to calculate the total Rent. Either Rent per Unit or by size*.
(e.g., 50000 per Unit or 50 per square foot)
* To use the size option, you must enter the Unit size.
Annual Rent will come automatically from Rent Value by size or Unit. Here users can select if Rent should be allowed to change when creating a Contract.
Users can limit the annual Rent between the minimum and maximum values or be allowed more or less than this limit. This will be applicable when making a Contract Quotation or Contract.
Security Deposit, if any, for the Contract. It will add to the Value receivable when creating a Contract. When creating the Contract, and will be shown.
It can be limited between the minimum and maximum values or can be allowed more or less than this limit.
Term of Payment whether the payment will be monthly, quarterly, semi-annually, or the User can add more.
Users can add Additional information by writing the Number of rooms, persons allowed, etc.
Users can add Descriptions for this Unit.
Notes
Users can store any other information about the Unit
In the second Menu, Users can attach photos of the units.
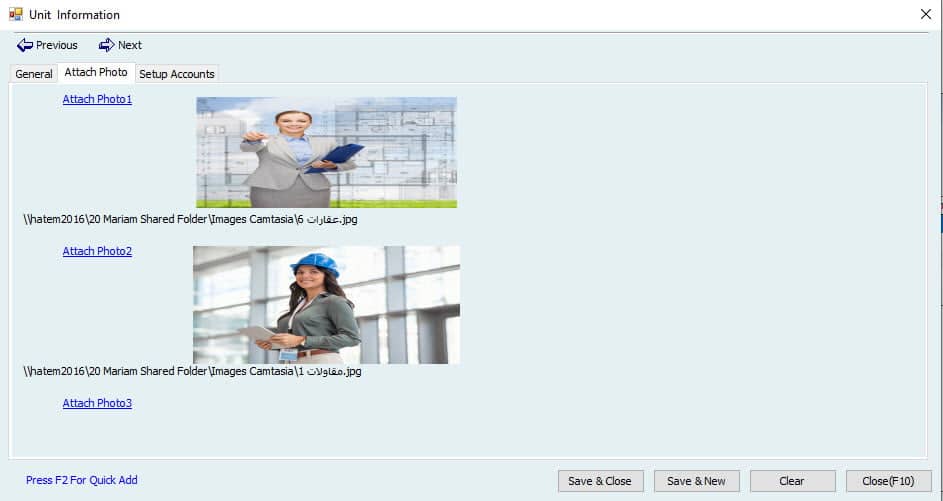
The last Menu will read the predefined Setup from the building.

Tenant List
This Tenant List is the same Customer List from the name center. Users can create new, edit, delete, or filter by different options.
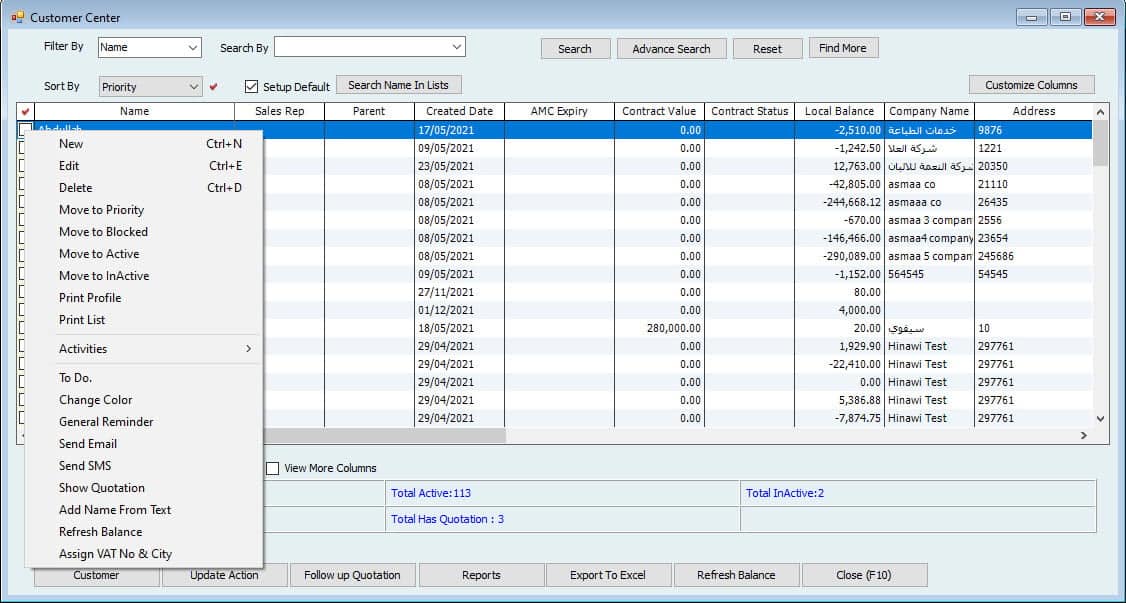
To create a new Customer, Click on the Customer on the bottom left and click on new or press CTRL+N.

The Customer file has one tab for Tenant information where the User can fill in trade Customer licenses and other information specifically for tenants.
Draft /Contract Quotation
Now we will begin with the Contract procedure.
Users can create the Quotation for the Contract first and can convert this Quotation to a Contract as it is after approval. To generate a quote, go to
Create Draft /Contract Quotation
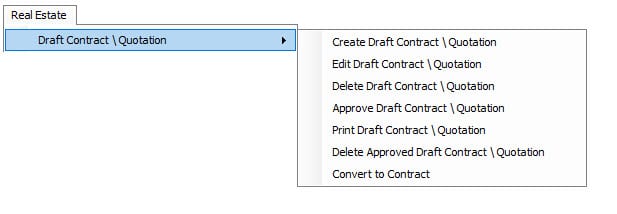
Go to; Real Estate --> Draft Contract \ Quotation --> Create Draft \ Contract Quotation.
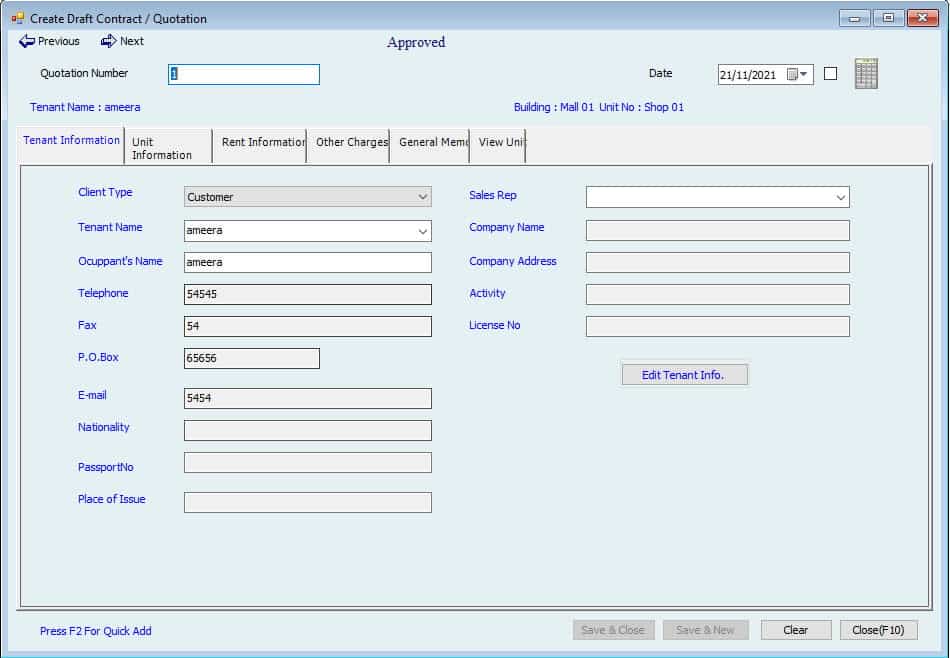
The first tab is for Tenant Information. The System will read the information from the Tenant's profile.
- Write Quotation Number
- Date of Quotation
- Select the Client Type, either prospective client or Customer.
- Select the Tenant Name. All the information in the below columns and on the right will be filled automatically except for Sales Rep.
- Users can then change the Occupant's Name if it differs from the Tenant's.
- Select the Sales Rep (Sales representative)* from the dropdown.
* Go to Lists --> Sales Rep List to add a new sales rep.
Click on the Sales Rep button and add new. Select the Sales Rep's name from the List and define the commission. To use commission, the User needs to activate commission from File -->Setup Modules-->Accounting and General Settings-->Sales Control Tab-->Use Sales Rep Commission. 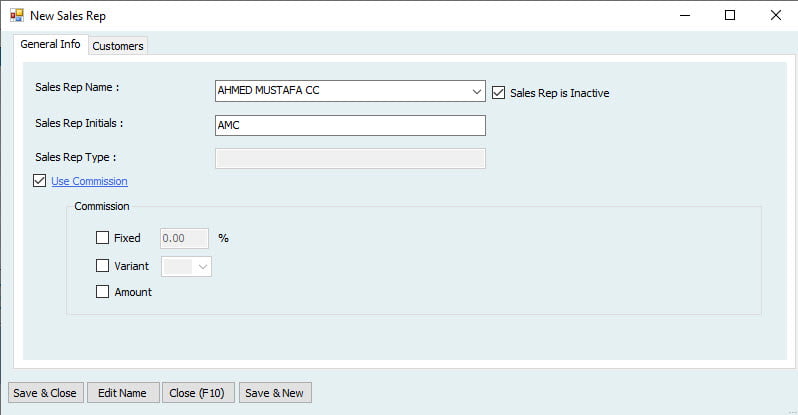
Second Tab for Unit information, which Unit User wants to create a Quotation.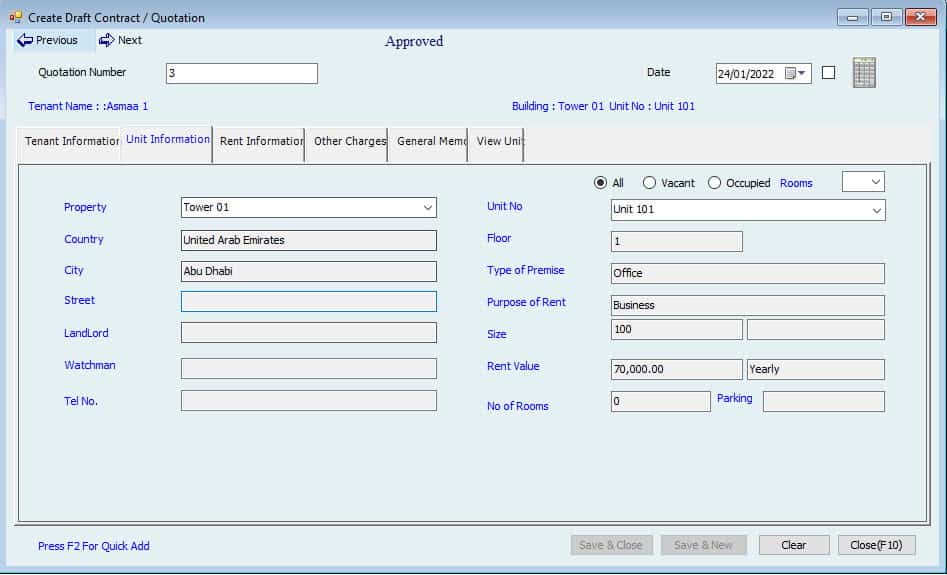
- Select the Property name. The information will be filled out automatically from the property profile.
- Now select Unit No. Users can see the units from the chosen property only.
Now we will enter the Rent Information in this tab.
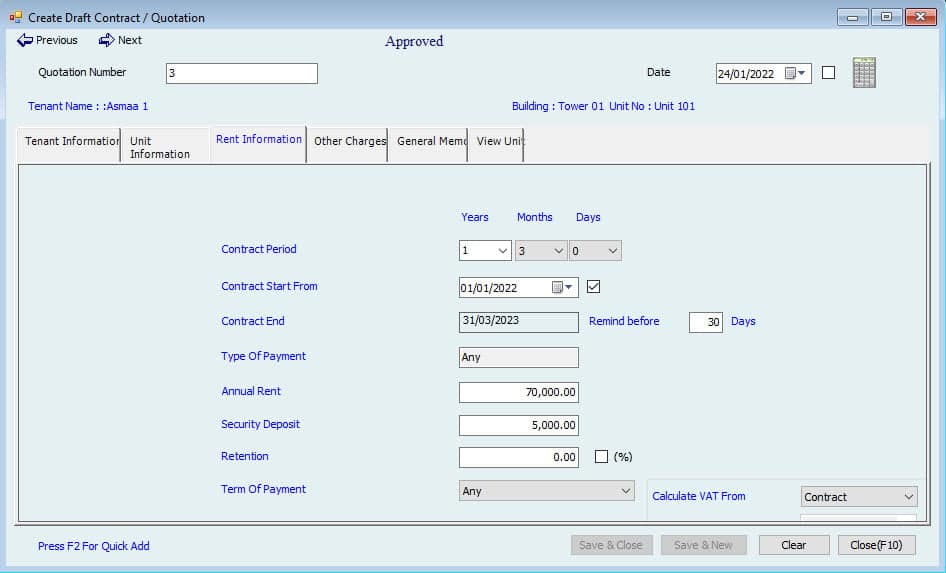
- Set the Contract Period for how long the Contract will be in exact years, months, and days.
- The Contract Start Date* needs to be entered in the next column. This can differ from the Quotation Date on the top right.* User can post the Contract entry to Accounting by Quotation Date or Contract Start Date. Can post This entry will only be posted at the time of making a Contract. Select the box beside the Date to post on any of these dates.
- The System will calculate the Contract End Date based on the start Date and period of the Contract.
- Remind before ___ days option instructs the System to give a reminder before the Contract expires. The reminder will pop up the exact no. of days before the expiry, which the User enters here.
- Type of Payment: The User can select the payment type from the dropdown. It can be in Cash, Cheque, or a combination of both.
- Annual Rent is the Rent per year* for this Contract. Users set preferences to limit the Rent Value in the Unit List, which is applicable here. (E.g., Rent can be a maximum of 150000of and a minimum of 145000one for this Unit)
* If the period is more than one year, the total Rent for the Contract period will be shown down as Rent Value. - Users can add the security deposit to the Contract Value. Users can Refund the security deposit at the end of the Contract.
- Retention can be used instead of the security deposit if the Tenant retains some money against the Contract. This will reduce the Contract Value by retention Amount.
- Terms of Payment are also pre-filled from the Unit profile, but users can change them here if you tick the "Allow to change" mark.
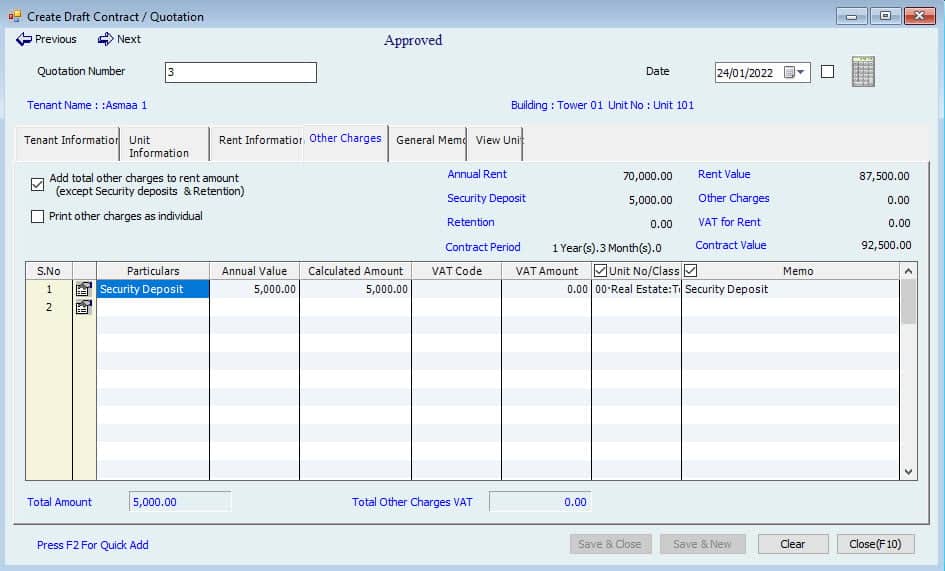
The next tab is for other charges if the User wants to add more. Also, users can change classes or memos for security deposit and retention.
Users can select the two options on the left side accordingly if the User wants to Add total other charges (Not Security deposit and retention) to the Rent Amount in total or Print other charges separately.
On the right side, the User can see the Rent Value, security deposit or retention, other charges, and the total Rent Value after considering all these quotations.
Edit Draft /Contract Quotation
Users can edit the Contract quotations at any time before approval.
Go to
Real Estate --> Draft Contract \ Quotation --> Edit Draft Contract \ Quotation
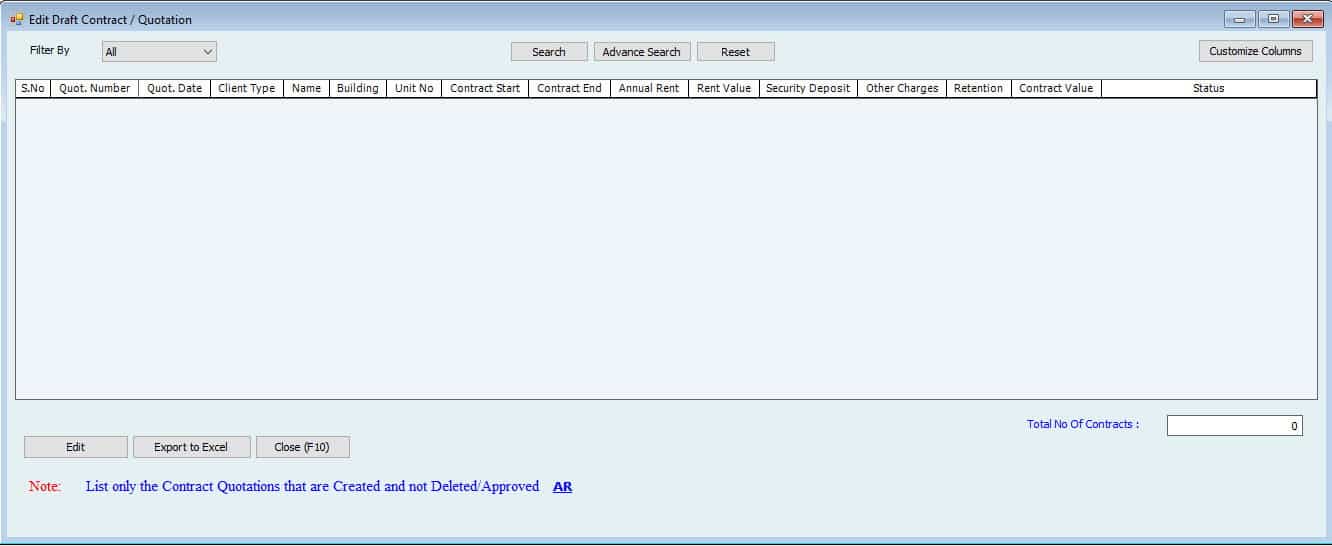
The User will see the List of quotations. Select the Quotation and click on the edit button to edit.
Delete Draft /Contract Quotation
Users can delete the quotations from the System before approval. Go to
Real Estate --> Draft Contract \ Quotation --> Delete Draft Contract \ Quotation
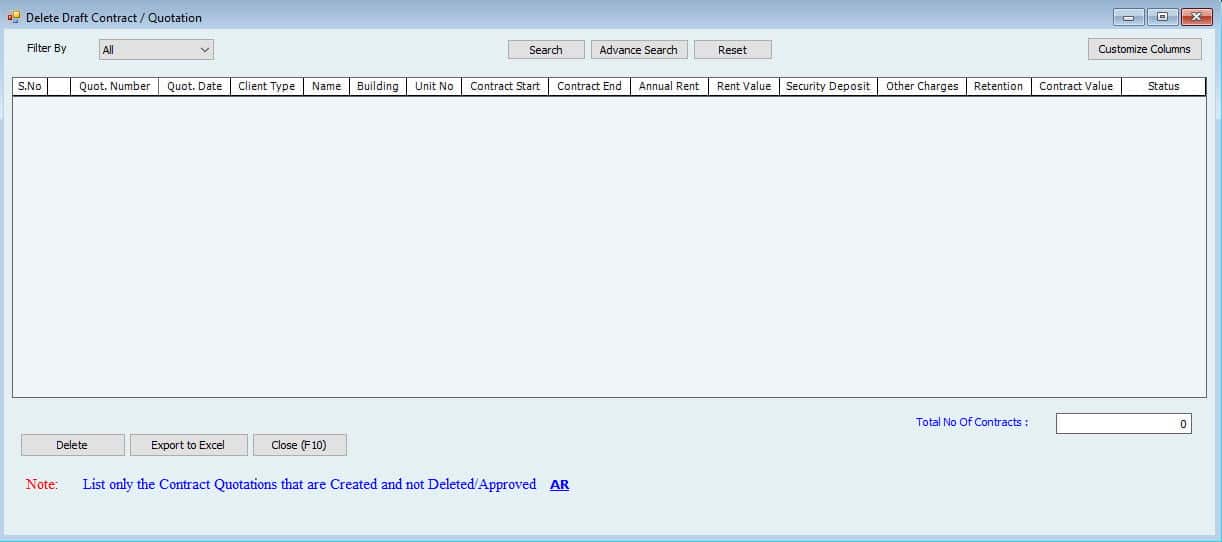
Tick-mark the Quotation from the List and then click the delete button to remove this from the System.
Approve Draft /Contract Quotation
After making sure the Quotation is acceptable or getting approval from management, the User can finally come and approve the quote from
Real Estate --> Draft Contract \ Quotation -->Approve Draft Contract \ Quotation
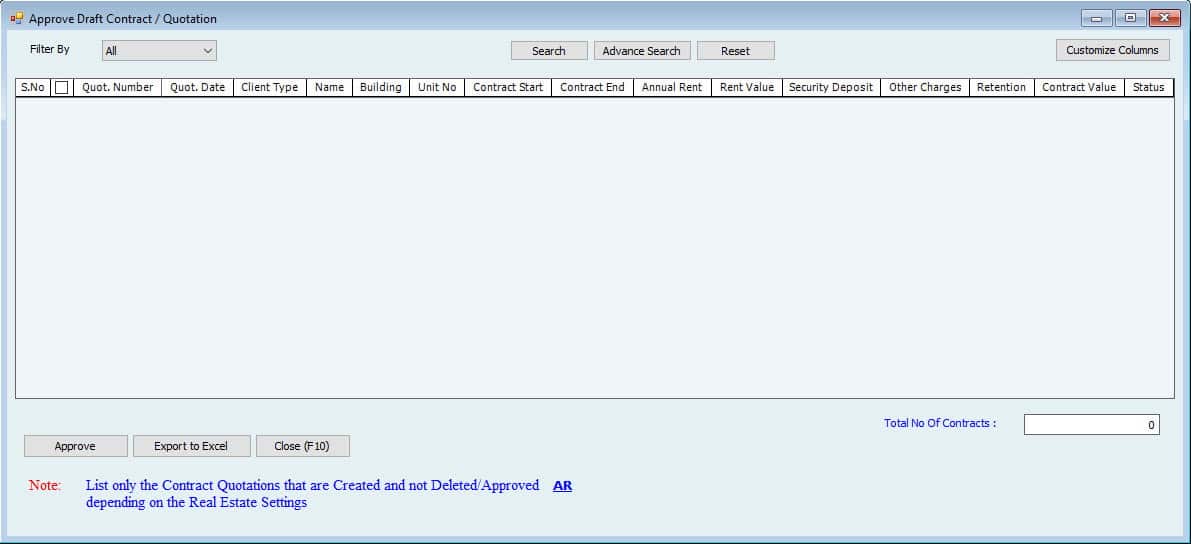
The List will show all the created quotations; select the one User wants to approve and click the approve button. Users can choose multiple Quotations at a time.
Important:
The System will not allow the User to edit the Quotation after approval.
Print Draft /Contract Quotation
Users can print the quotations only after approval. To print, go to
Real Estate --> Draft Contract \ Quotation -->Print Draft Contract \ Quotation
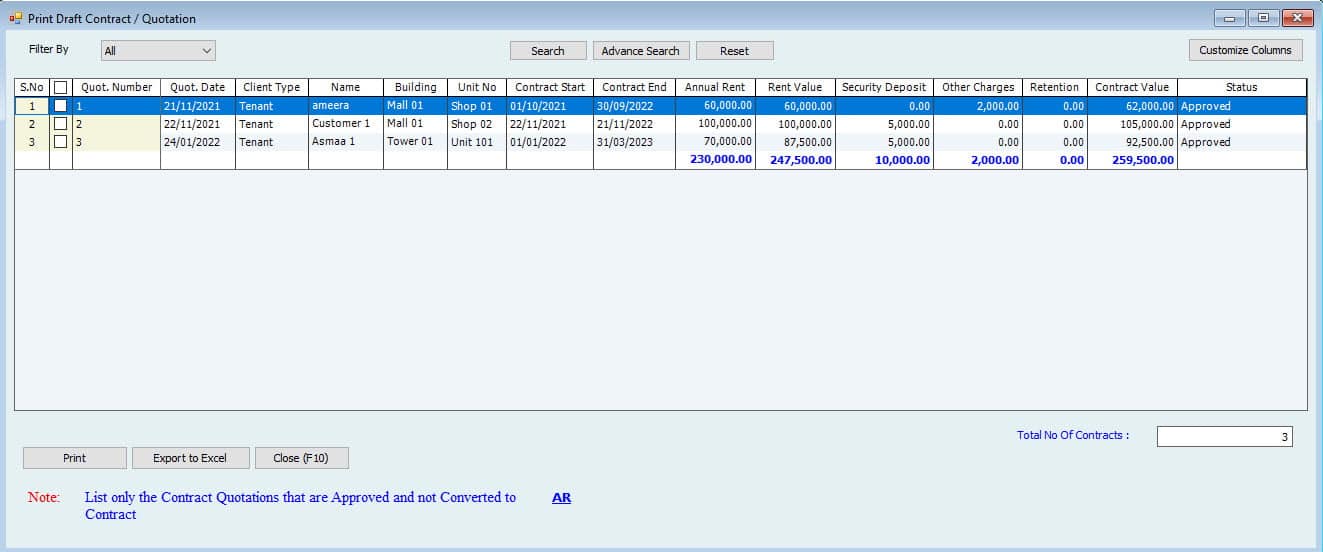
From the List of approved quotations, tick marks the one to print and click on the print button.
The User can customize this printing Template as per their requirements. To customize the Template*, go to File à Templates à Real Estate à Contract Quotation.
* For instructions on Templates customization, refer to the templates section.
This process was for Contract Quotation, which has no accounting effect. Now we will see the actual Contract, like how users can make a real estate Contract for tenants.
Important:
The User must select the Customer name type to create a Contract. If the name is prospective, the User must convert it to a Customer before proceeding with the Contract.
To convert Prospective to Customers,
Go to either
Lists -->Prospective Client List
or
Lists -->Name Center-->Prospectives Tab
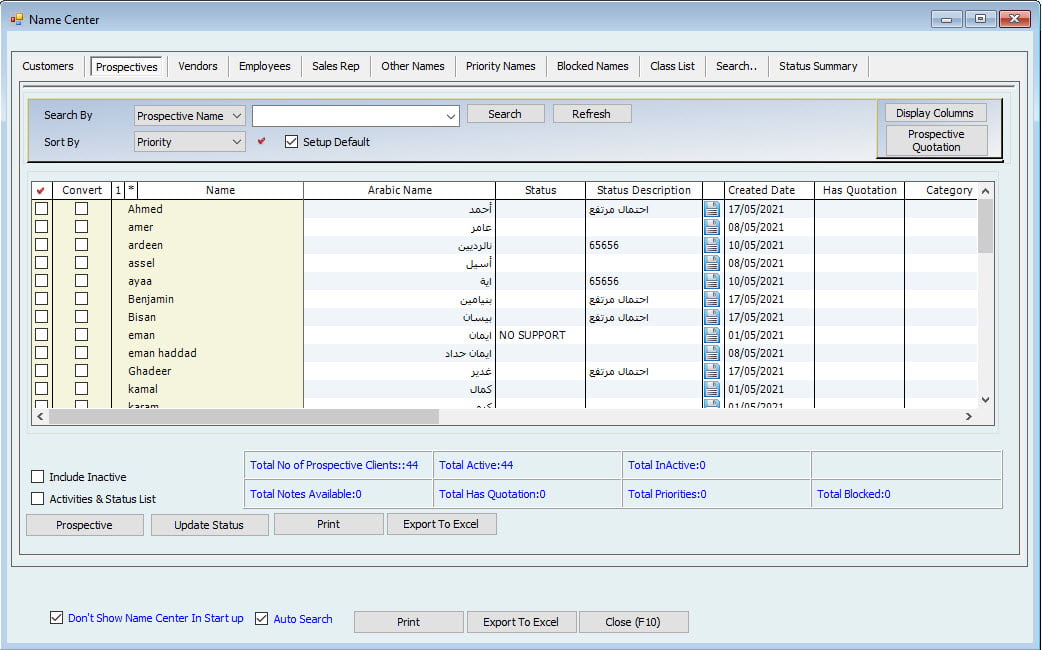
Filter the relevant Customer; tick mark convert column to select this name, then click on prospective down and select the option Convert to Customer; the System will convert the name to Customer.
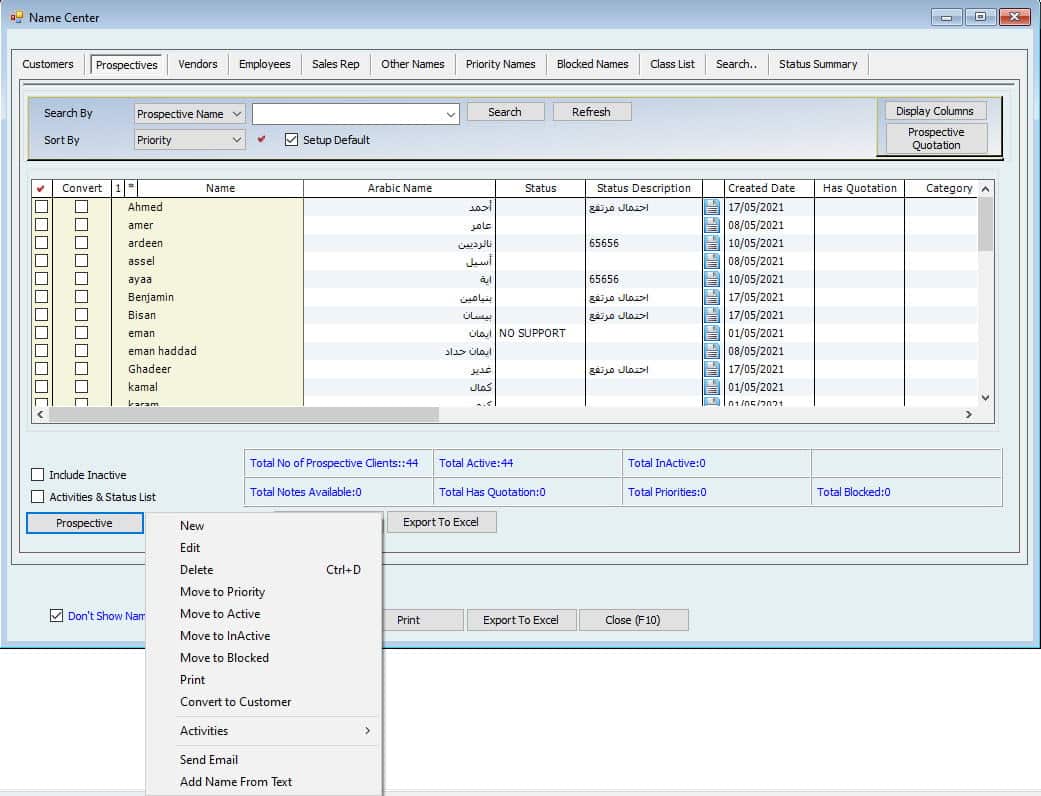
There are two ways to make a Contract.
- Convert an existing approved Quotation to a Contract.
- Make a new Contract from the beginning.
We will start with the first one, converting from Quotation to Contract. Go to
Convert to Contract
Go to Real Estate --> Draft Contract \ Quotation--> Convert to Contract.
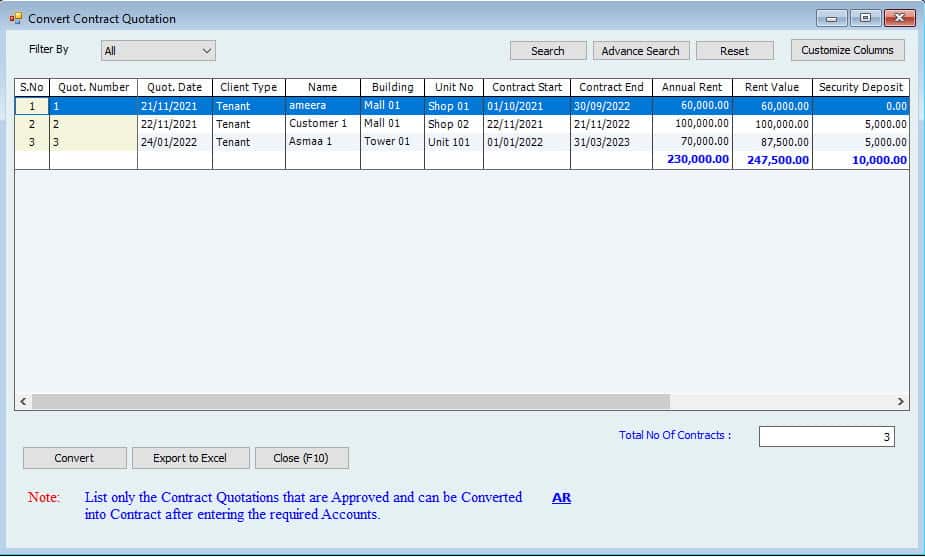
Select the Contract and click the convert button to open the convert window.
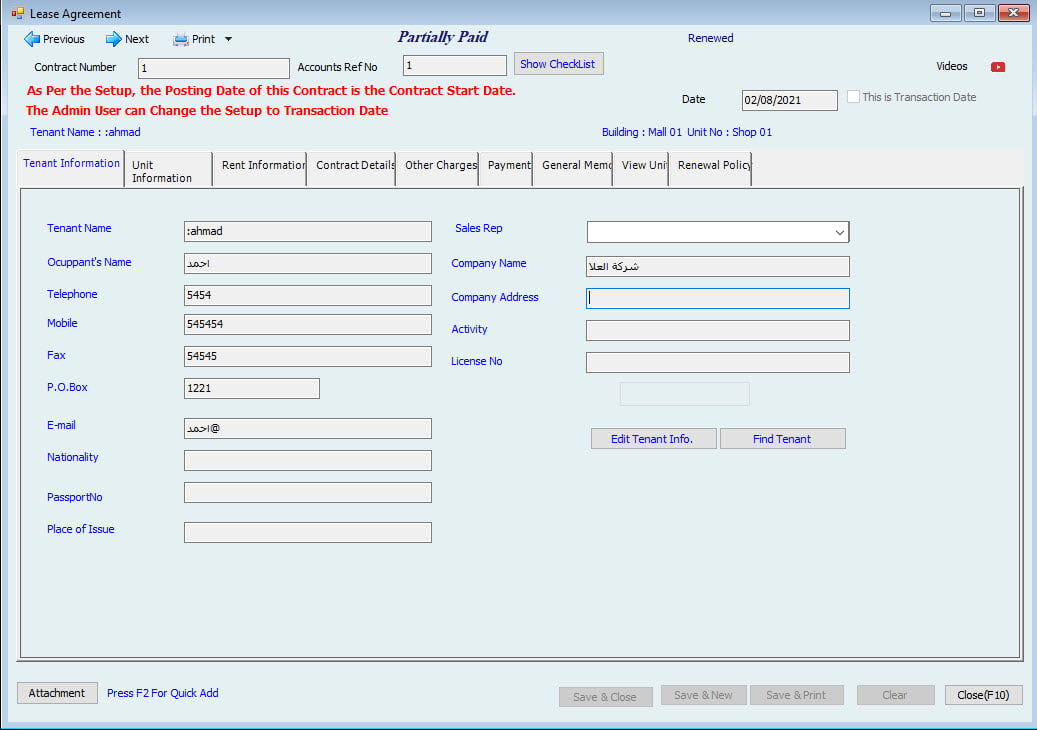
The convert window is a new Contract window, but it is pre-filled with all the information we mentioned in the Quotation.
The first page is for Tenant information. Users will see the same information from the Quotation. One extra Field is on the top middle.
QB Ref No is the Number of Journal vouchers posted to QuickBooks.
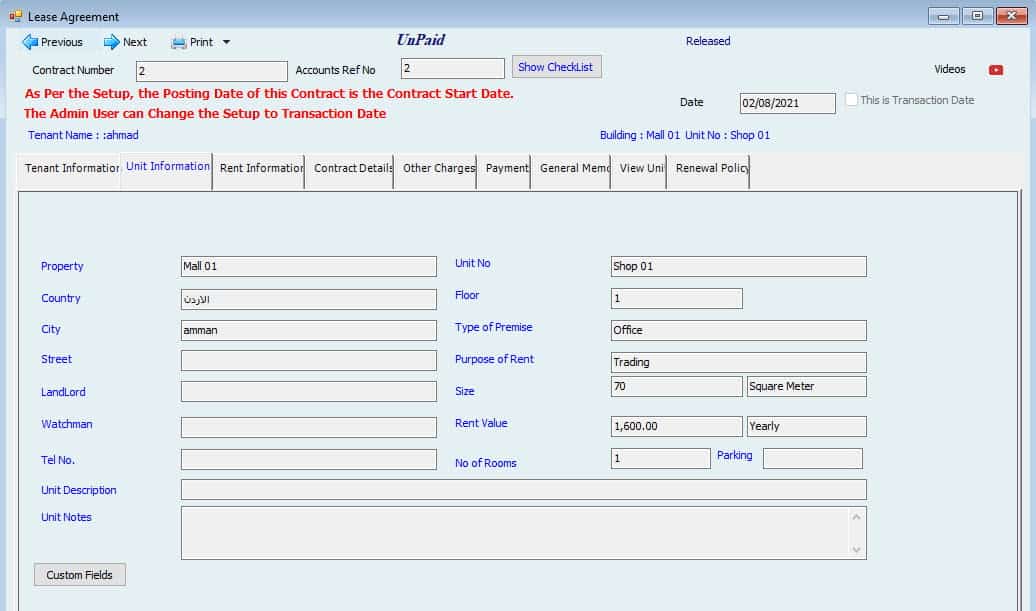
The next page displays the Unit information, including the property. This tab is also copying the same Data from the Quotation.
Here comes the next tab for Rent Information, showing the
Contract period
Contract start and end Date
Type of Payment
Annual Rent Amount
A security deposit or Retention
And Terms of payment.
Split the Rent option allows the User to split the Rent yearly, monthly, or without split. If users select monthly (the most common case), the System will automatically calculate the actual monthly Rent for the whole Contract period to post as income.
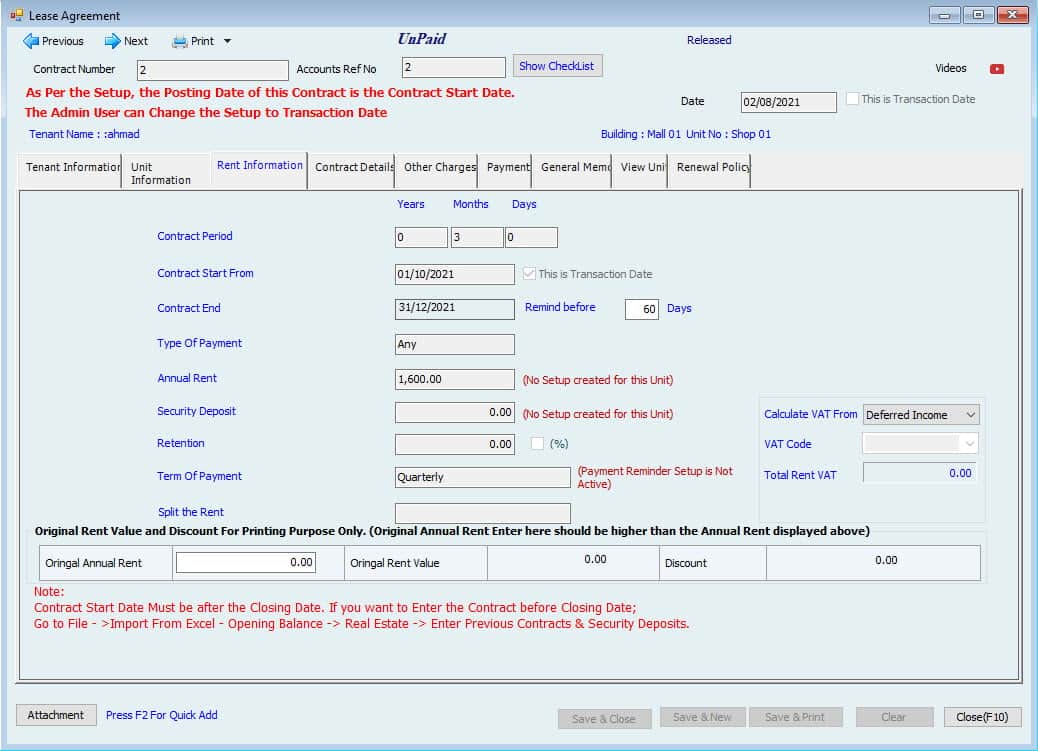
* User can post the Contract entry to Quickbooks by the software entry date or Contract Start Date. To post by any of these dates, mark the box beside the Date.
In this Contract details, tab User can see the details of Rent and accounts to link with the Contract.
The first Account to select is Accounts Receivable, where the User wants to track this Contract Amount as receivable.
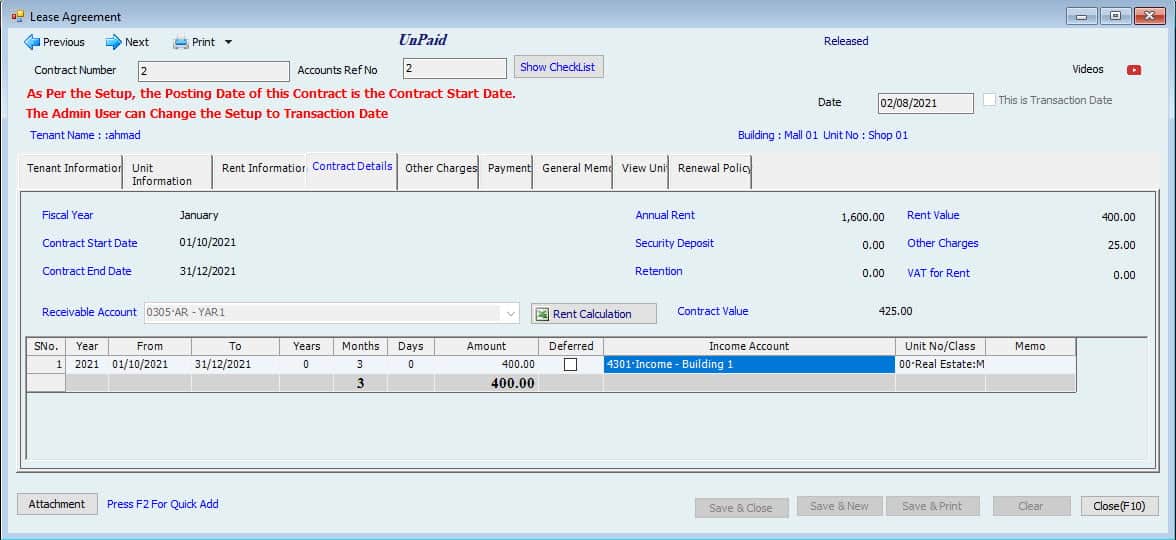
If the payment is complete in advance, then there is no need to select this Account here. Users can enter the payment information in the payment tab.
The second Account to select is the income Account. In the table, the extreme right column is for the income Account. There can be more than 10 or 20 lines for income, so Hinawi Software allows easy access here. The User needs to select the first line, which will copy down automatically until the end of the year. Again, the User can select for next year and copy it down.
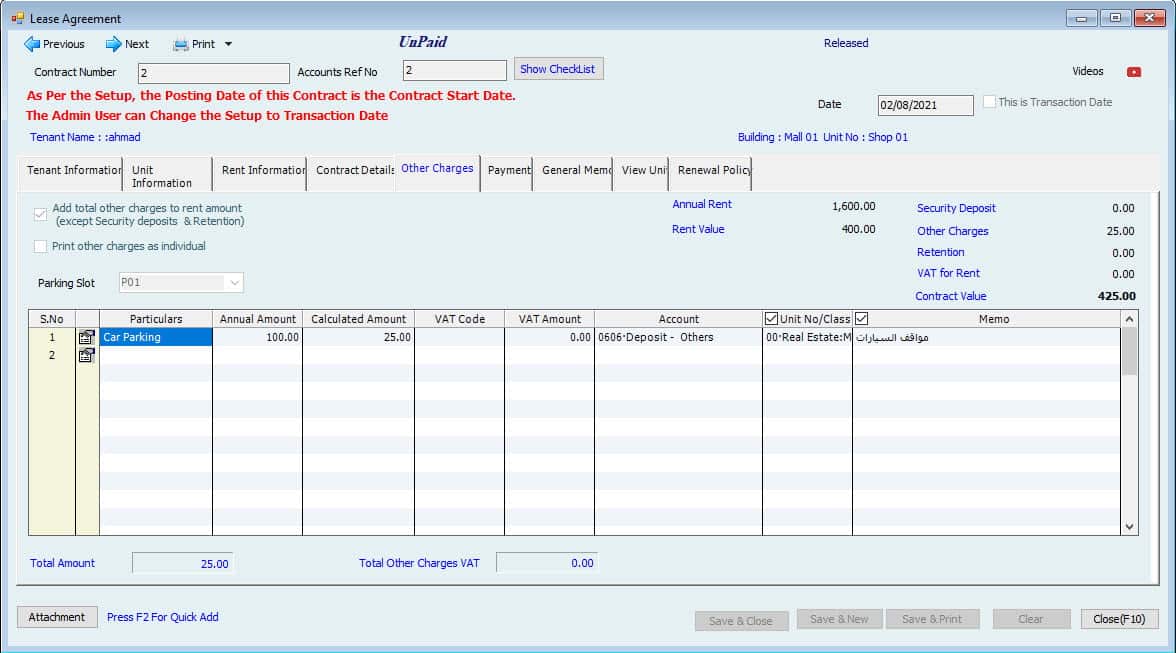
The next tab is Other Charges, where the User can see the security deposit, retention Amount, or any other charges already entered or can enter now.
Select the Account for a Security deposit or any other charges in this window.
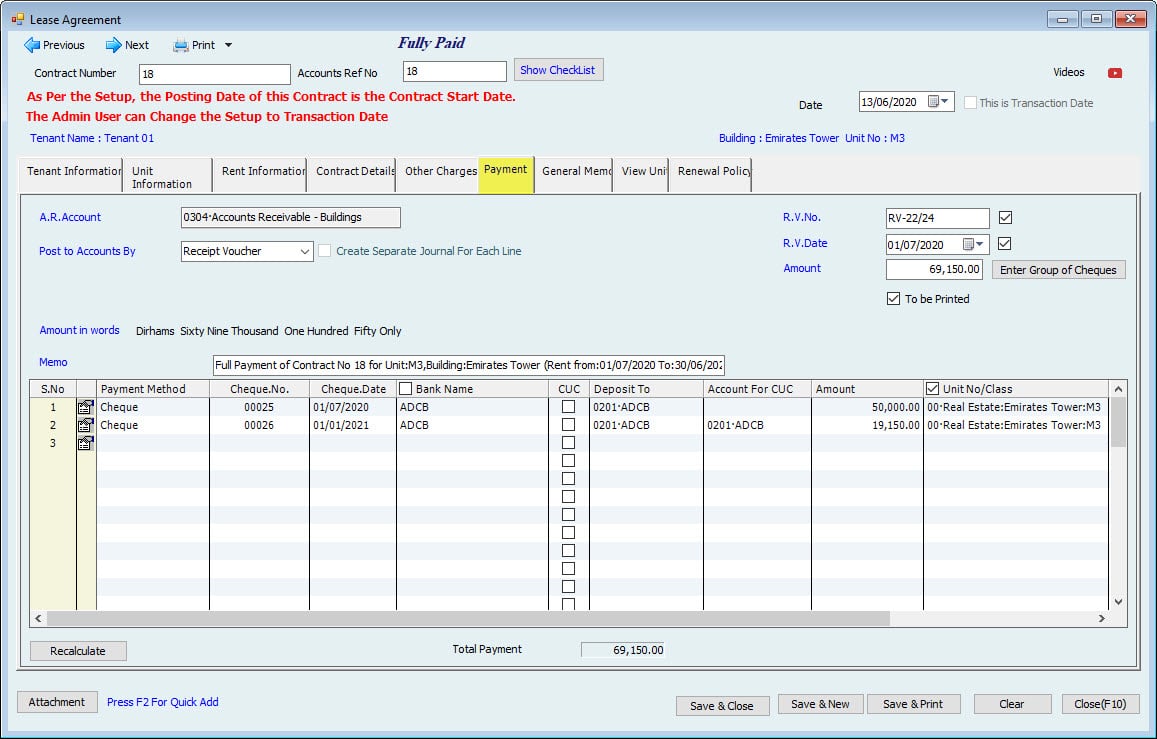
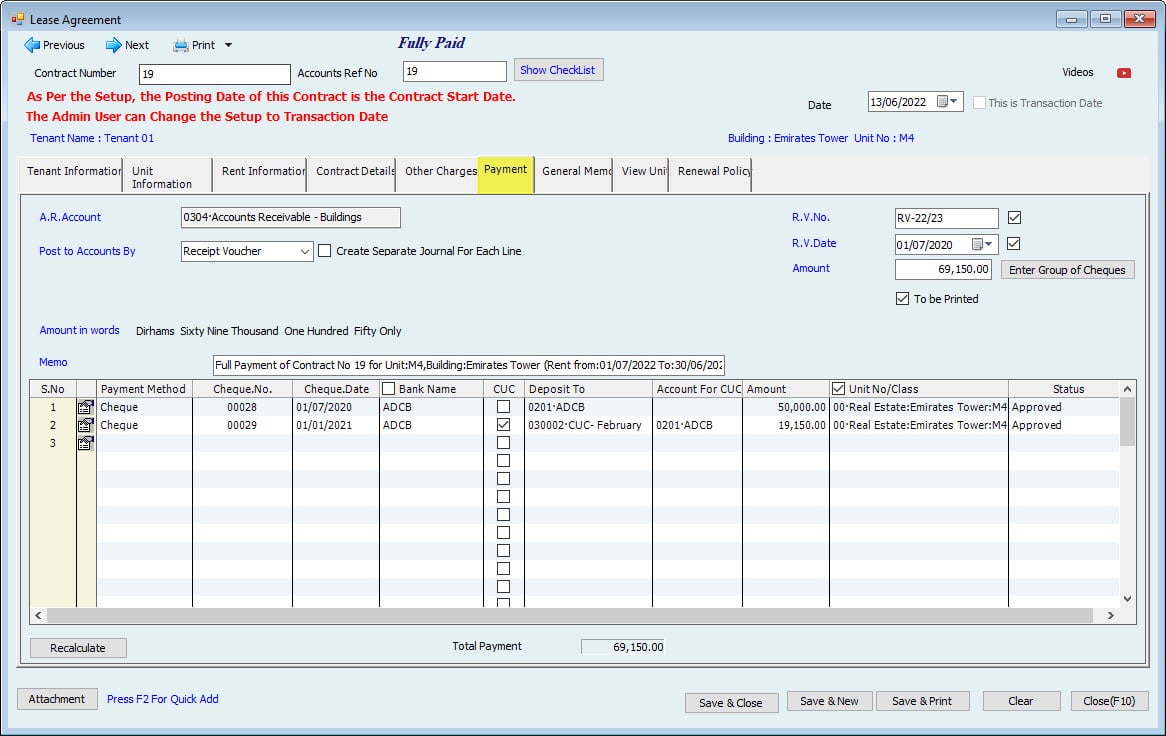
The next screen shows the Payment details for the Contract.
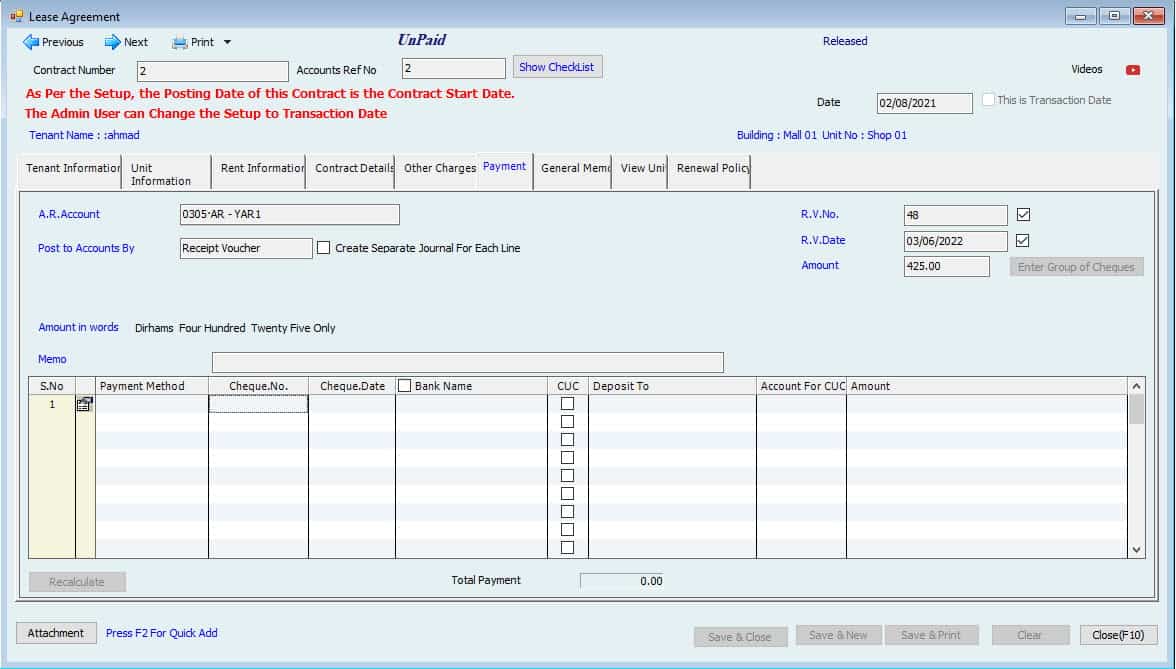
The payments can be entered from this Contract window or from :
Accounting -> Cash/Cheque Receipt Voucher ->Create Cash/Cheque Receipt Voucher
The accounts Receivable Account is showing grey, which cannot be changed. This Account is copied from the Contract details where we defined this Account.
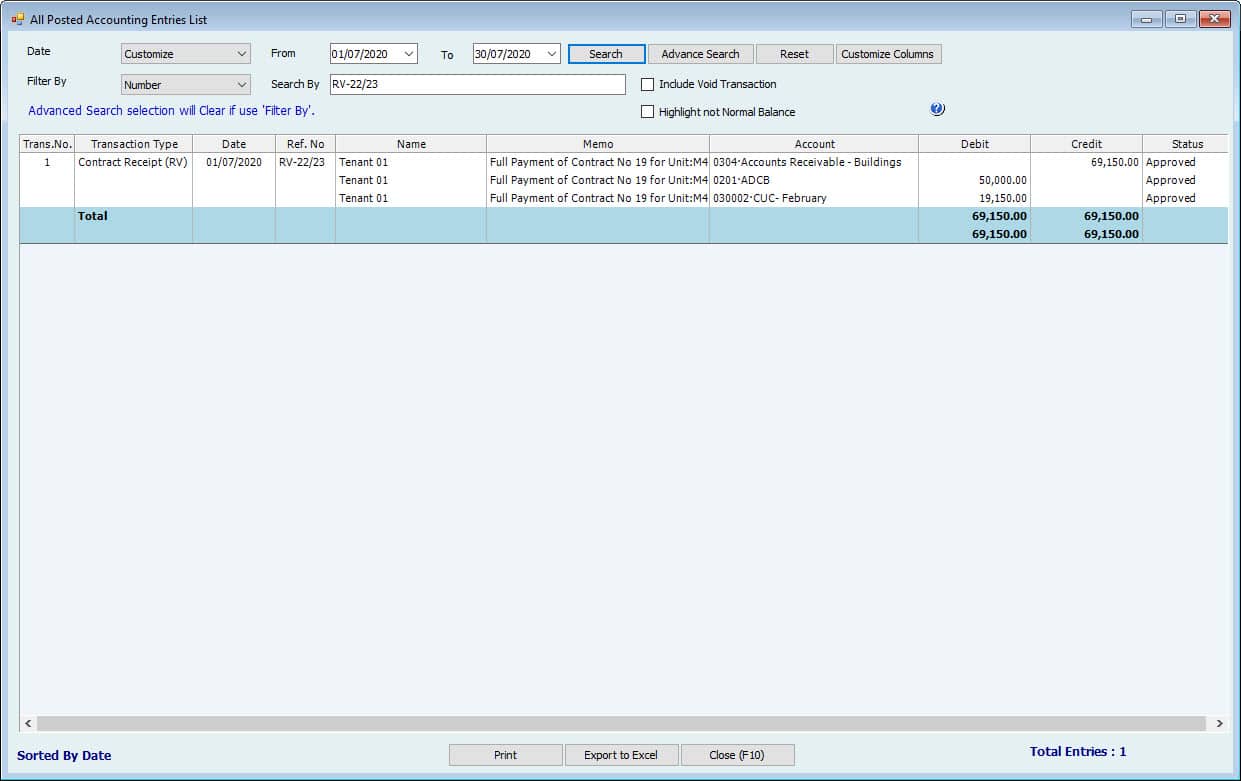
Post to QB by dropdown is a method for posting to QuickBooks. If the User selects the posting by Receipt Voucher, it will go to short books by receipt voucher. But for this method, the Account must be as Accounts Receivable with the Customer name. In all other cases, it can be posted as a Journal Voucher.
If posting by JV, select if you want to post the transactions by one JV or separate JVs for each line*.
* By each line, it means the lines in the table. In case payment is received by more than one Cheque, Cash, or both. Users can post all these transactions to Quickbooks in one turn.
On the right side, write the
R.V.No.
R.V.Date
As these numbers will update the payment to Quickbooks.
Write the Memo of the Receipt Voucher. This Memo will come after an automagical memo * from Hinawi Software.
* There are two checkboxes against the RV no and RV Date. If the User tick marks these boxes, the transaction will be posted to Quickbooks by these numbers, and Cheque no and cheque Date will automatically go into the Memo to Quickbooks.
If the User unchecks these two boxes, the transaction will be posted by Cheque no and Date. RV no and Date will go in the Memo automatically.
Select the Payment method if received by Cash or Cheque.
If Cash enters the debit Account where the User wants to deposit the received money, enter the Amount.
If Cheque is, enter the Cheque no, Cheque Date, Bank Name of the received Cheque, Deposit to Account, and Amount.
Class (will show If selected to post by JV)
Memo (will show If selected to post by JV)
When a User enters the Amount in the last Amount column of the table, maybe this will not match with the Amount above, so the User has to click on recalculate button on the bottom of the Left to make these 2 amounts the same.
This receipt will affect the Contract status because we have received some Amounts. The reports will show this Amount as paid, and the Contract status will be partially paid.
The general memo tab can write additional details not available in previous tabs.
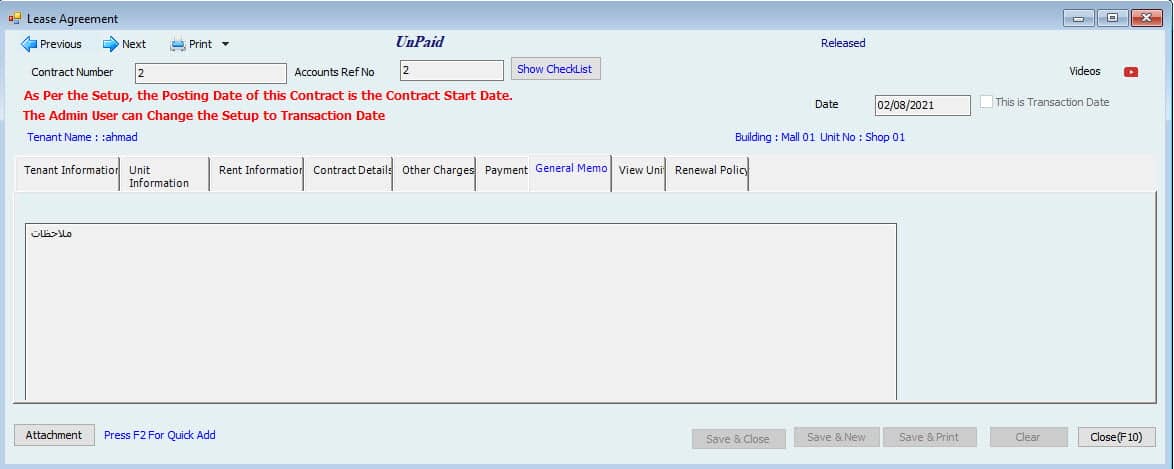
Update Memo on the Left bottom is to save Memo when the User cannot save the Contract from the save buttons down.
The tab for View Unit will show the picture of the Unit. These pictures can be attached or changed from the Unit profile.
The last Documents tab is to make sure of the availability of documents for the Contract. Tick mark the checkboxes against documents that are available. Mandatory documents are a must-have to check.
These documents can be defined from:
File -> Setup Posting Control-> Select Real Estate-> Document Checklist for Contracts.
For details, kindly refer to the Real Estate Settings section.
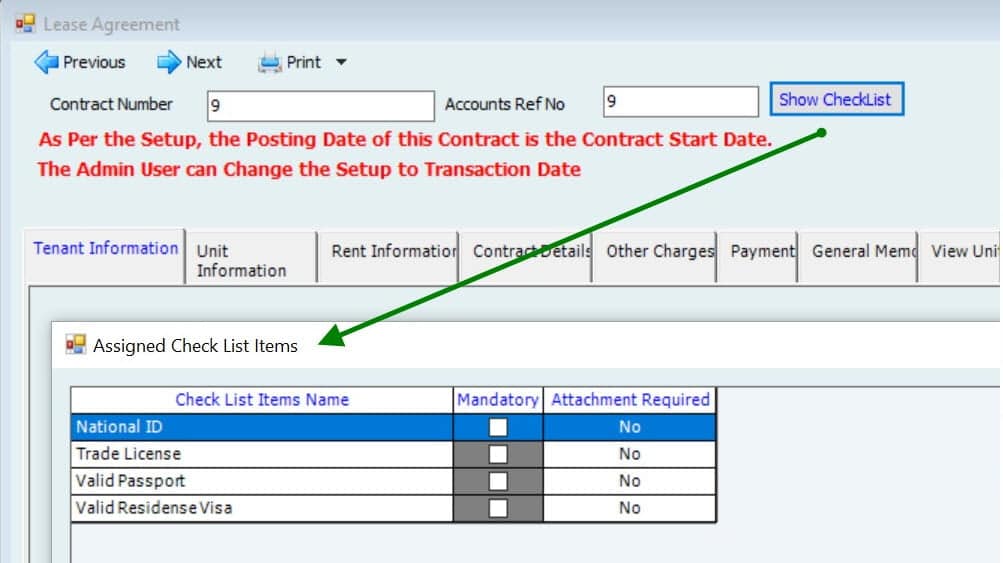
After updating the information, the User can save the Contract
Create Contract
The second way to make a new Contract is from Create Contract window.
Go to Real Estate -> Tenancy Contract -> Create Tenancy Contract.
This new Contract window is the same as converting Quotation to Contract. The only difference is that information will not be pre-filled from the Quotation, so the User has to enter all the information in one window, which the User entered through 2 windows (Contract Quotation and Convert to Contract).
Edit Contract
The next option in the Contract Menu is Edit Contract. The Contract can be edited at any time before completion or termination.
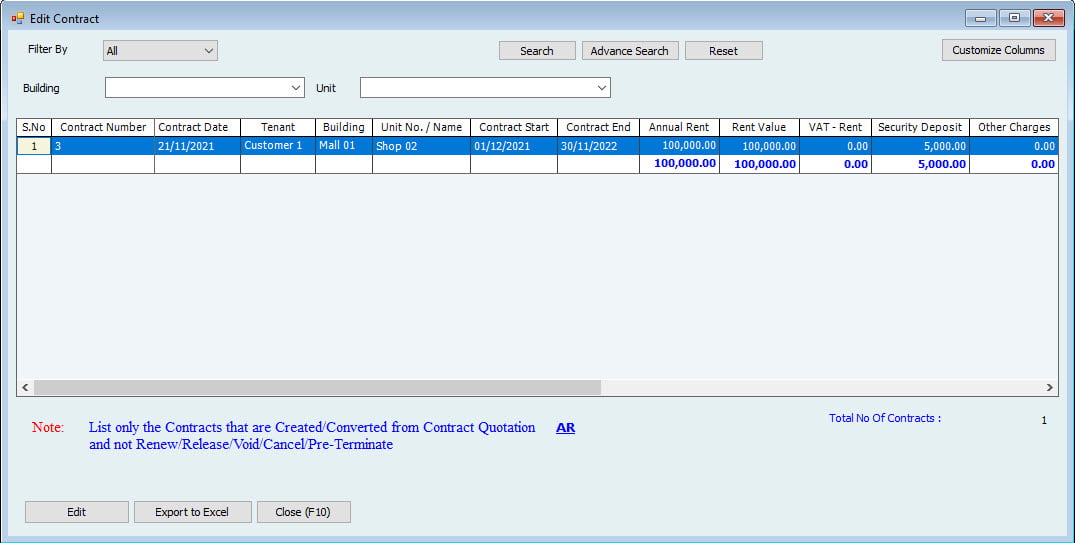
Go to Real Estate -> Tenancy Contract -> Edit Tenancy Contract
Select the Contract to edit and click the Edit button on the bottom left. The System will open the same Contract window so the User can edit and save.
Print Contract
After ensuring the Contract is acceptable, the User can come to the print window to print the Contract.
Go To Real Estate -> Tenancy Contract -> Print Tenancy Contract
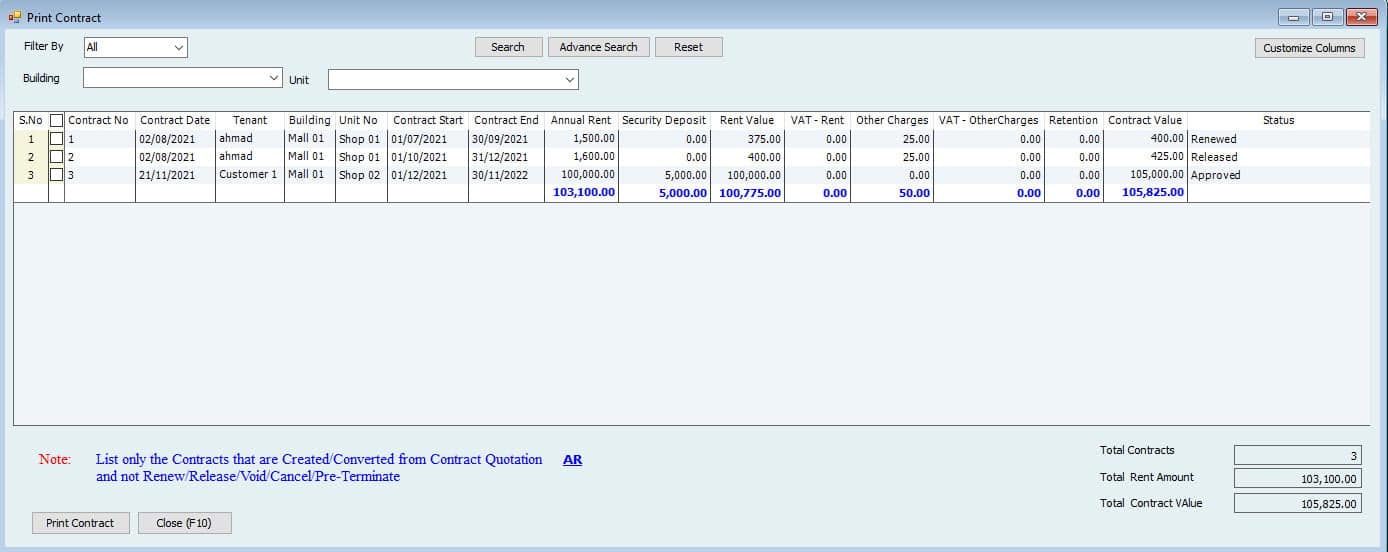
Select the one User needs to print from the List of contracts and click the Print Contract button. The System has a pre-defined Template* for Contract printing.
* This Template can be customized from:
File -> Setup Templates -> Real Estate -> Tenancy Contract.
For instructions on Templates customization, refer to the templates section.
Void / Cancel the Contract
The Contract can be voided or canceled if the Contract Date (Not the Contract start Date) is today or later. The contracts with the Date earlier than today cannot be canceled.
To cancel a Contract, the User needs to go to the:
Real Estate -> Tenancy Contract -> Void \ Cancel Tenancy Contract
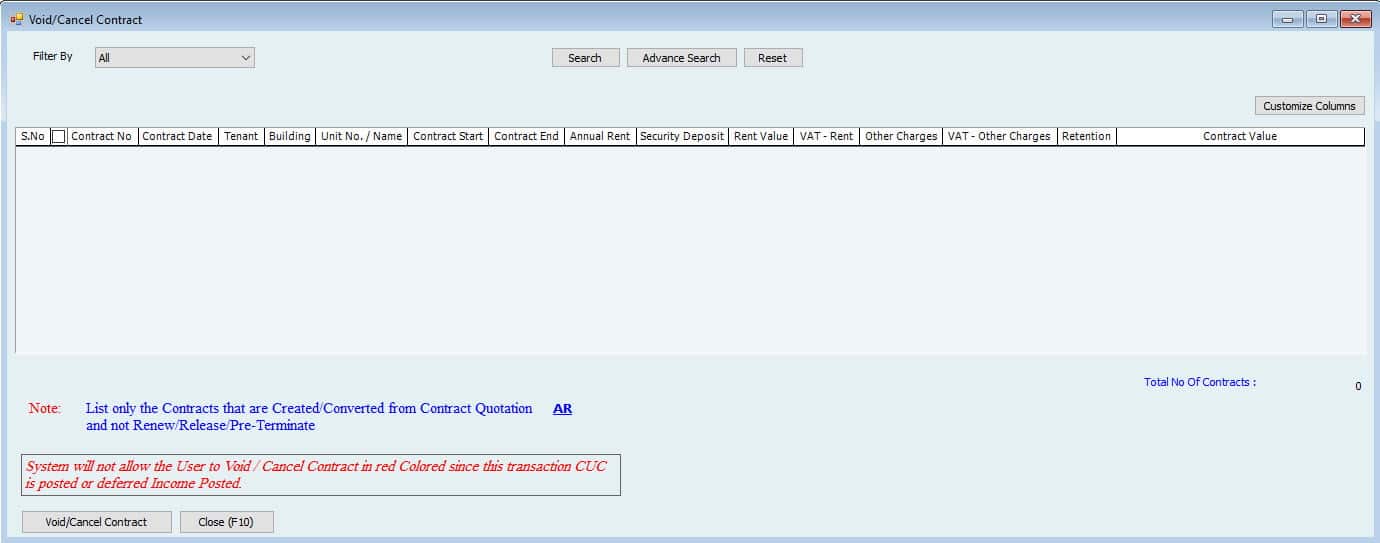
From the List, select the Contract and click on the Void/Cancel Contract button to void the Contract.
Pre-Terminate Contract
Real estate contracts can be terminated anytime between the Contract's start and end dates. This termination is before the Contract end Date, so the remaining income for the Contract period will be reversed and Accounts Receivable. This period will start from the Date of Pre-termination. To Pre-terminated the Contract, go to:
Real Estate -> Pre-Terminate Contract.
From this pre-terminate window, click the Select Contract button to show the List of available contracts.
A-List will open with contracts to select. Tick mark the Contract User wants to terminate and click on Pre-Terminate Contract.
The following window will automatically open the Contract window with extra fields.
In the Rent Information tab, choose the Date of Pre-Termination. This Date should be the exact date as the next calculations will be based on this Date. Whatever Date the User selects, the System will calculate the income to reverse from this Date to the end of the Contract.
Users can see in the next Contract Details tab the income is showing harmful amounts for the rest of the Contract period in the same months and days. These lines will depend on split Rent selection. If the Rent split is monthly, lines will come by months and by year if annually.
This information cannot be changed. Select the Accounts Receivable Account to reverse, which will probably be the same Account when making the Contract.
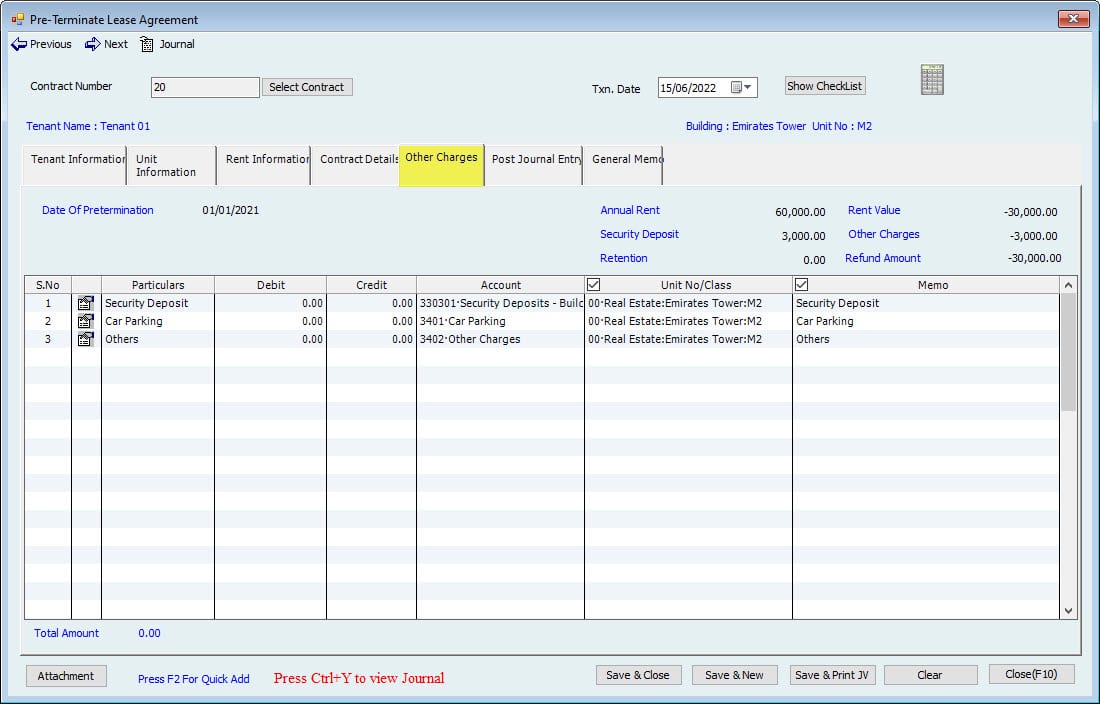
The other charges tab will show 0 by default. Now the User has a choice,
- Either the User wants to reverse this Amount with accounts receivable first and then refund or
- Directly refund the Amount, or there is no refund.
The net effect will be the same.
To use the first method, manually write the Amount in Other Charges (e.g., 1000 on the debit side), which will be shown automatically in the next tab. Then, the User can go to the Refund Deposits window to make the refund by payment or Journal Entry.
To use the second method, there is no need to write anything here and keep this Amount column. After saving pre-termination, go directly to the Refund Deposits window and make a refund or pass the adjustment Journal entry if there is no refund.
Now, users can see the Journal Entry for Pre-Termination. Click on the Post Journal Entry tab and see the entry. More lines can be added, but current ones cannot be modified.
After saving this form, the Contract status will be changed to Terminated.
Renew Contract:
The contracts can be renewed after the expiry date or even before the expiry—no need to wait for the expiry Date. The System allows you to renew the Contract Six months before the Contract expires, providing more flexibility for the User.,
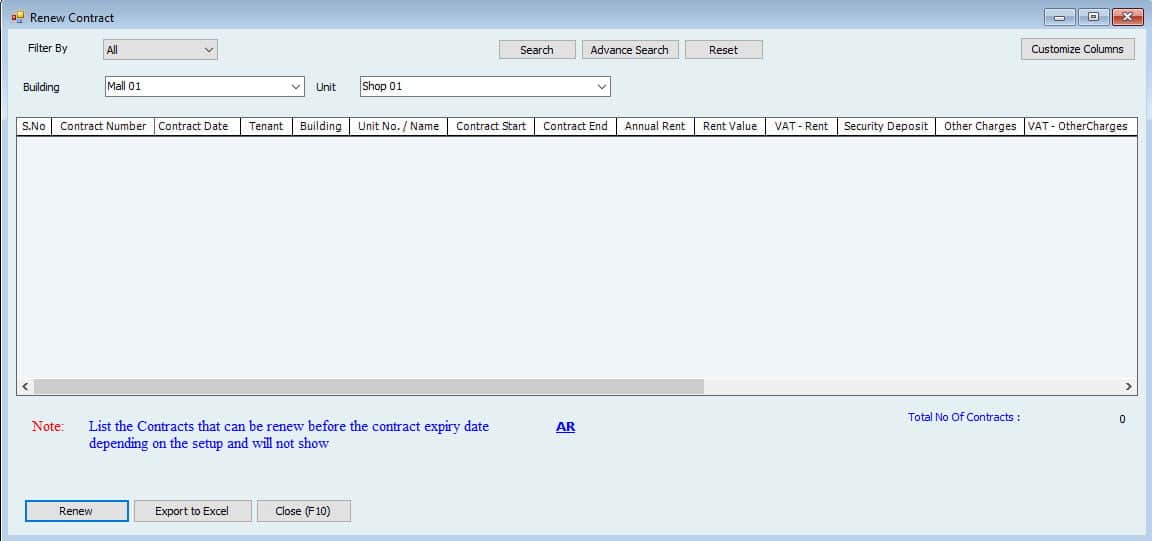
Users will only see the contracts in this List that are either expired or expire in six months. Select the one User wants to renew and click on Renew button.
One small window will require changes in the Rent, if any.
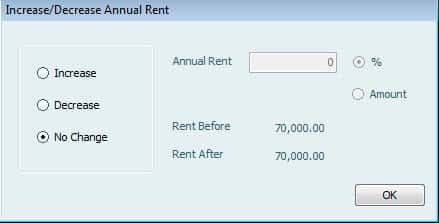
Users can write here if the Rent is the same, increasing, or decreasing.
If increasing or decreasing, the change is in % or exact Amount. After pressing OK, the System will open the Contract window with all the information pre-filled except accounts for income and other charges (if any).
Release Contract
A release Contract can be closed any time before the expiry Date. This option will complete the Contract, and the User can adjust anyway. After making the release Contract, the Unit will be available to create a new Contract. To release the Contract, go to the:
Real Estate -> Release Contract
Click on the Select Contract button to open the List of available contracts.
The User needs to select the Date before the contracts expire. The contracts expiring on this Date or before will appear here. Select the desired one and click on the Release Contract button.
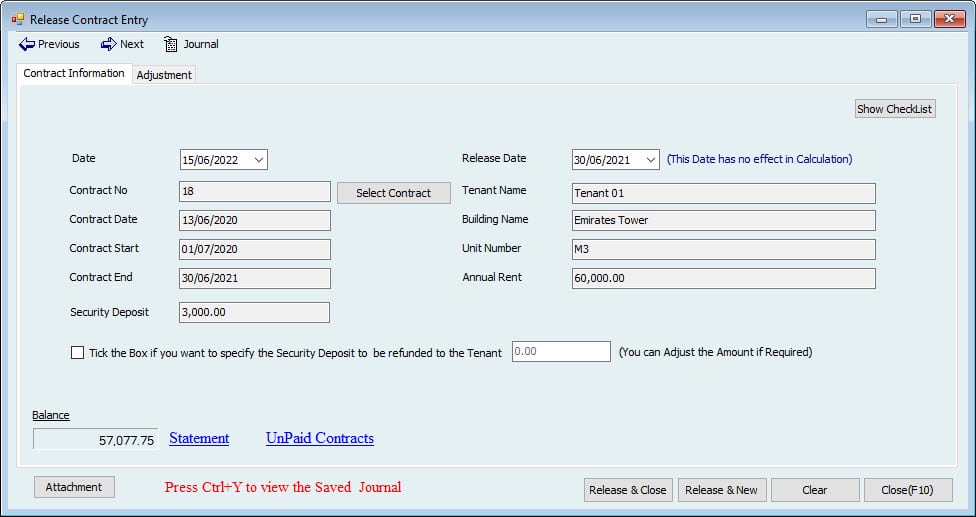
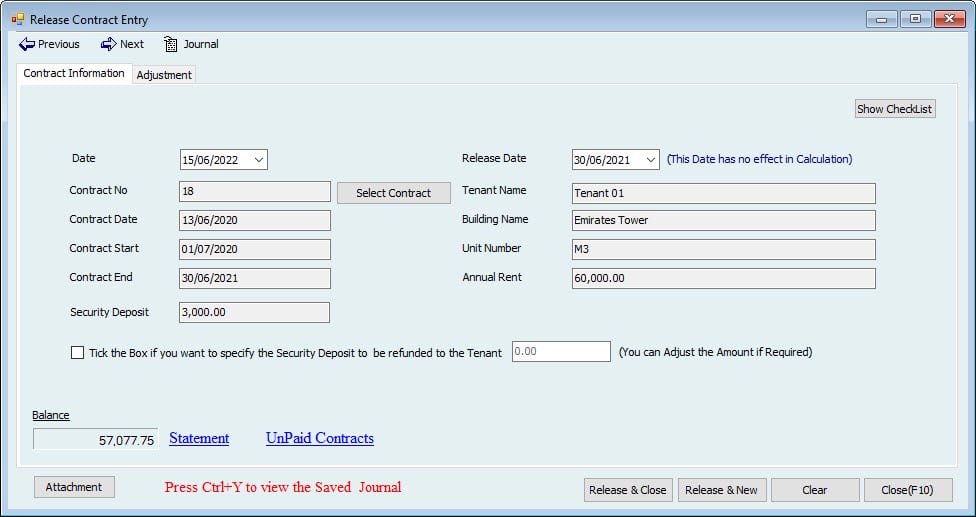
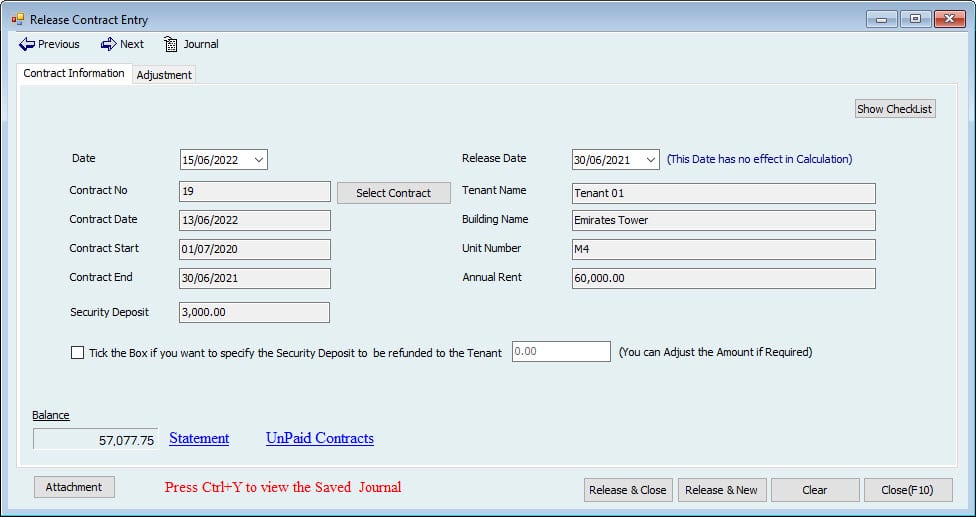
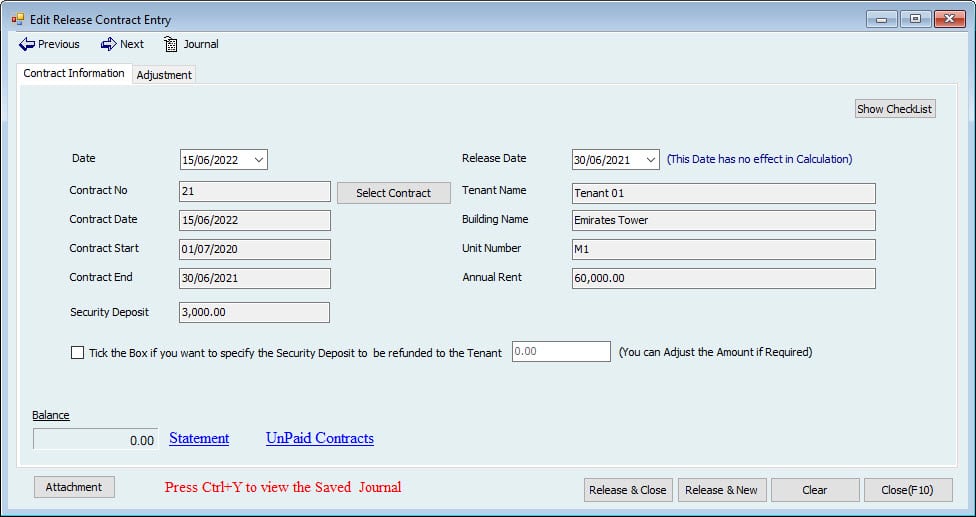
The release Contract Entry window will open now.
The Date on the left side is the entry Date. This means the transaction will be saved by this Date. On the right side, select the Release Date, and the rest of the Data is already in the fields.
Then click on the next tab, which is an adjustment.
In the adjustment tab, the User can make an adjustment entry. Here System gives complete control to the User. More lines can be added by clicking this icon and inserting a line.
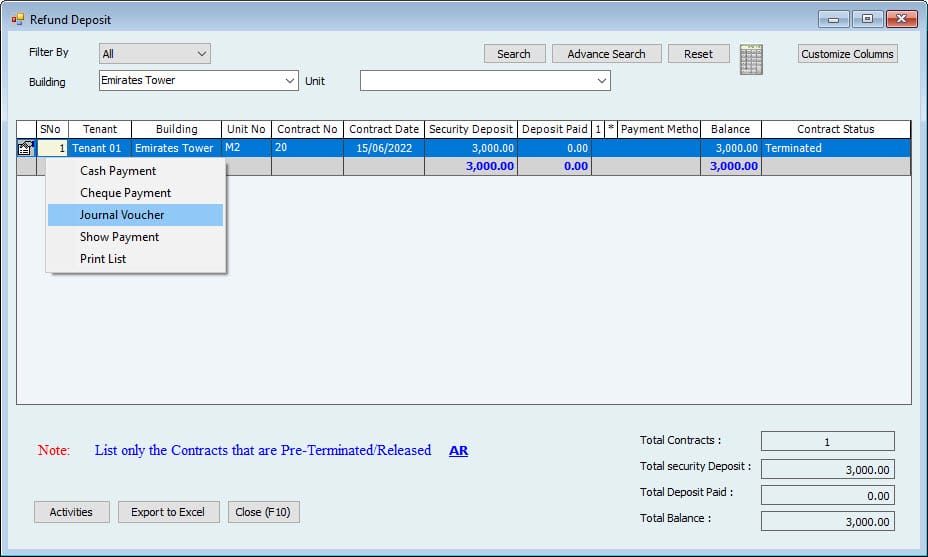
Refund Deposit
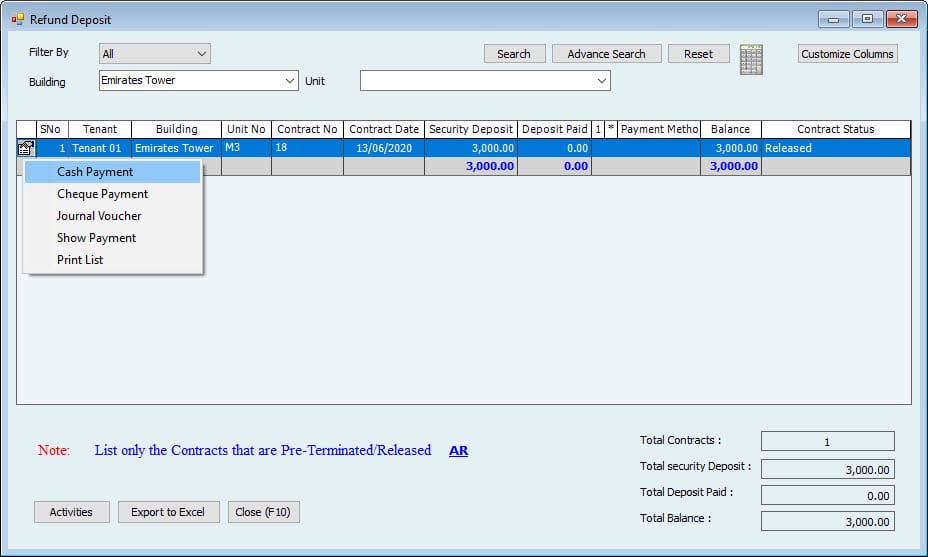
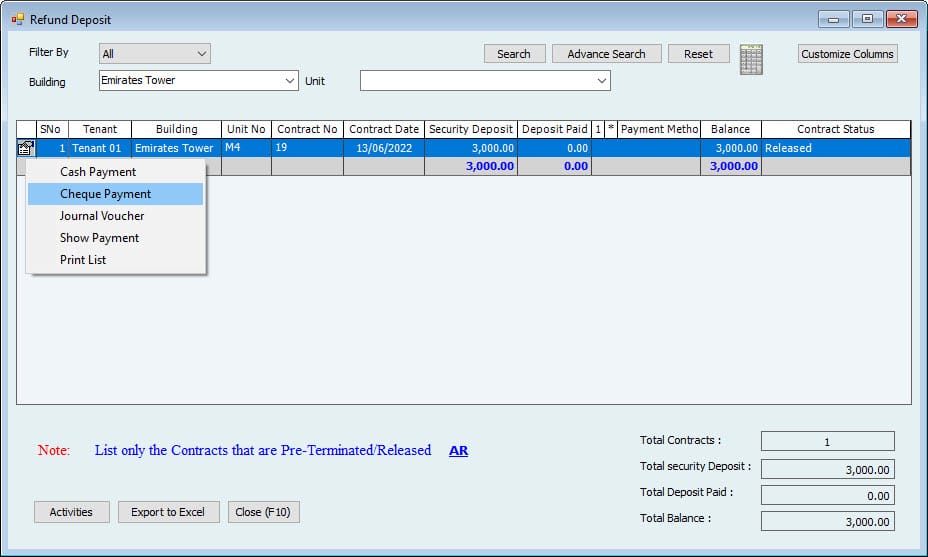
After the Contract is released or terminated, the security deposit will be refunded to the Tenant. To Refund the deposit, go to the:
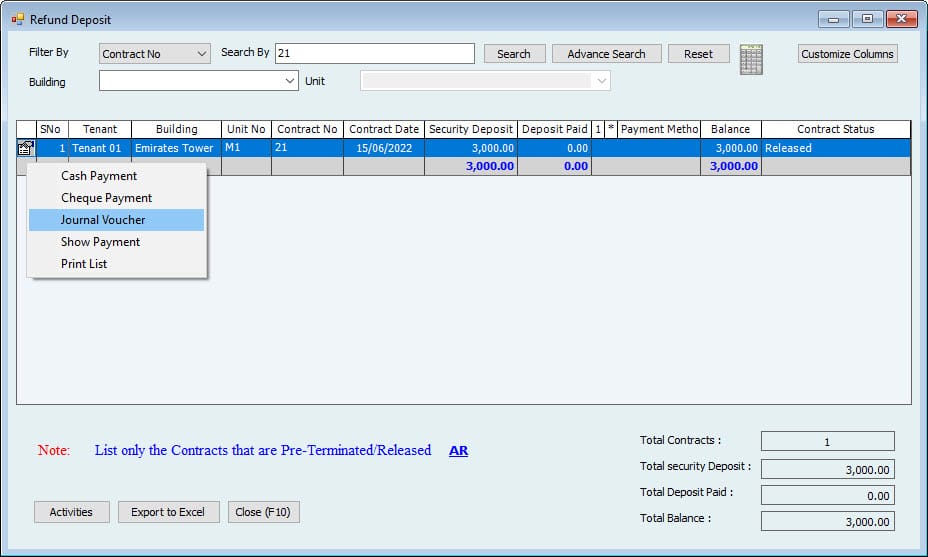
Real Estate -> Refund Deposits.
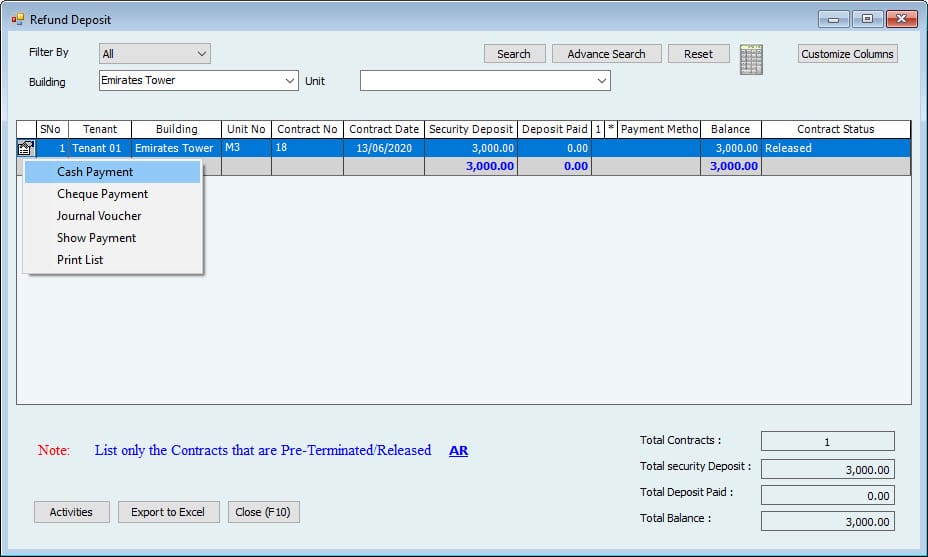
Users will see the List of released and terminated contracts. Select the User who wants to refund the deposit and click on activities on the bottom left. This pop-up will appear.
User can:
Create Cash Payment for this refund where the Amount and Tenant name will be pre-filled. Fill in the rest of the information and save the payment voucher.
Create Cheque Payment for this refund where the Amount and Tenant name will be pre-filled. Fill in the rest of the information and save the payment voucher.
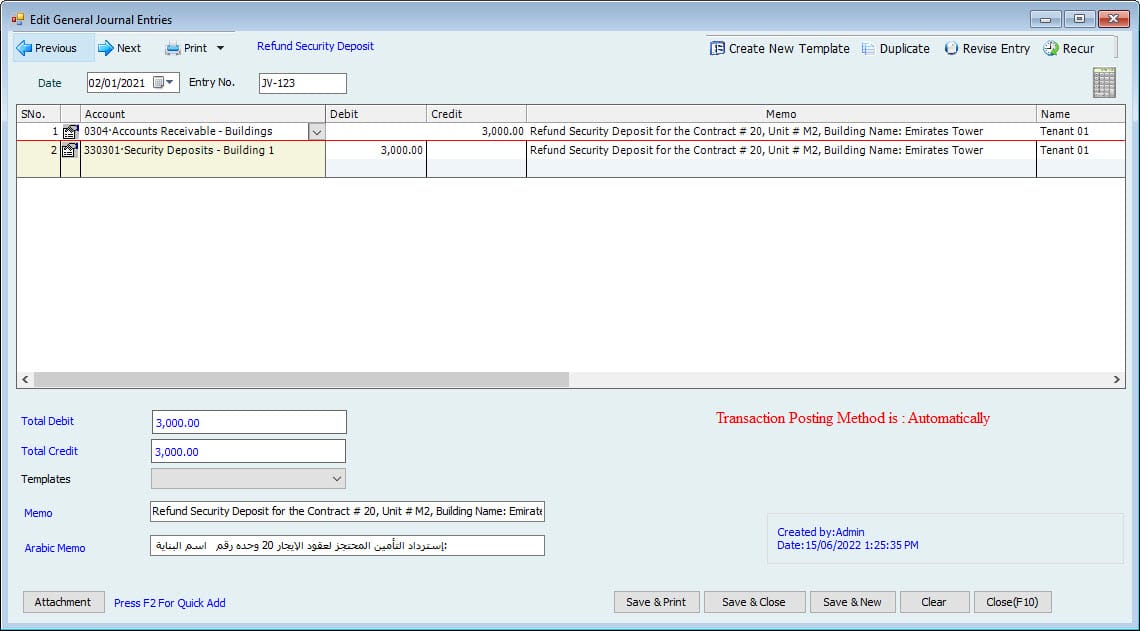
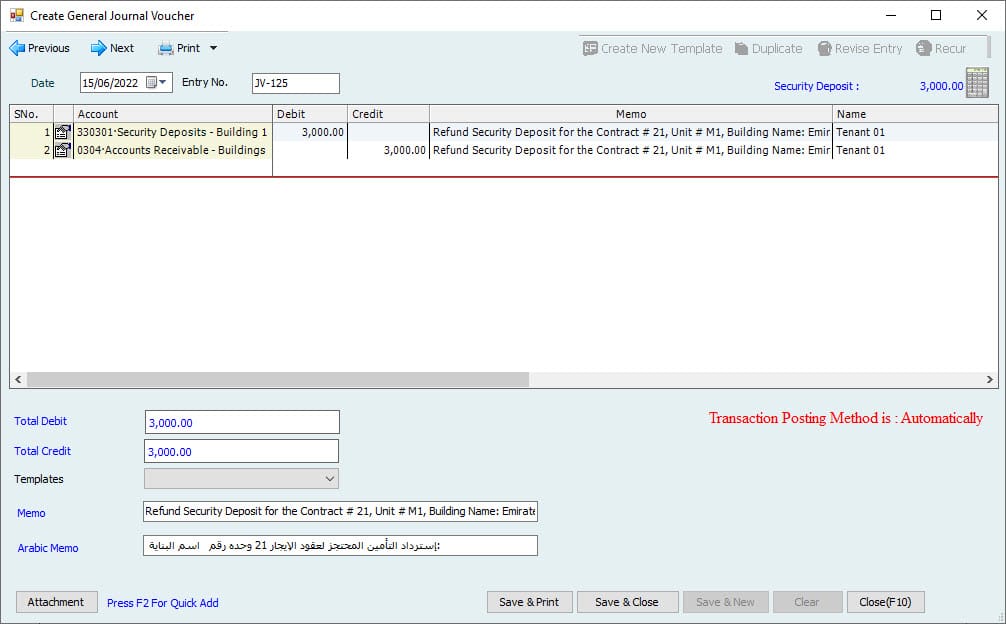
Create Journal Voucher for this refund. Fill in the information and save Journal Voucher.
Show Payment already entered for this refund.
Or Print a List of these refunds.
EVICTION CASE
Settings:
Create Setup for Professional Fees to Legal Consultants and Posting Accounts for Civil Cases.
The System will display all the Expired Contracts that are not renewed.
The User can move the Contract to the Eviction Case List from this window. From the Eviction Case List, the User must fill in their Civil Case Number and Save.
When saving, the System will create a JV for Professional fees for the Legal Consultant.
Dr. Accounts Receivable
Cr. Civil Case Charges
After that, Close the Legal Case.
Then Pay the Lawyer using a Payment Voucher (Cash / Cheque / Bank Transfer).
Dr. Civil Case Charges
Cr. Cash / Bank
Contract Commission
We already covered activating the Contract Commission and its basis in the previous menus. Kindly refer to the Building section.
Now it's time to create the commission for the Contract itself.
Important:
Commission can only be created for fully paid contracts.
To create a commission, go to:
Real Estate -> Create Commission for Property Management
Select from the Period when the Contract was started, and the System will List all the contracts with the commission within this Period.
Select one Building or all to show all contracts since buildings activate the commission, so the User must select the buildings here.
Click on the View button.
The table shows information about the Contract and commission basis. Users can change the % basis from here if allowed from the commission window.
Enter the JV no, Date, Debit Account, and Credit Account for the commission, as this will be entered by JV only.
JV will be entered for the whole amount if more than one Contract is selected.
The first tab is for the existing Contracts commission. The second tab is for Pre-terminated contracts, where all the columns will be the same. Still, the commission Amount will be negative, assuming the commission refund in case of termination.
After entering the information, press the save button to save the transaction.
Post Deferred Income
Go to:
Real Estate -> post deferred Income
It will show you the Contract deferred income not yet posted to QuickBooks.
Maintenance
The Hinawi Software maintenance Menu allows users to enter any maintenance or complaint details for real estate properties.
Request for Maintenance
Go to:
Real Estate -> Maintenance -> Request for Maintenance
When a User receives the maintenance request, it can be entered in this window.
Select the Building for which the request is received.
Select the Unit for this Building.
Select the Maintenance type* from the dropdown.
* Press F2 to add new.
Write the Request Date for Maintenance.
Any other details for the Maintenance?
After entering the details, press the save button.
Create Complaint / Maintenance
Now users can create a complaint or Maintenance from:
Real Estate -> Maintenance -> Complaints / Maintenance -> Create Complaints / Maintenance
Select the Building from the dropdown to create Complaints / Maintenance.
Select the Unit for this Building.
Select the name of the Employee who received the complaint/maintenance.
Select the option if it's a request for complaint or Maintenance.
Write the summary for the request.
The first tab for Unit Details will show the Unit information, including Rent Value and Tenant information (If occupied).
The User can select the type from the second tab for complaint/maintenance details.
If the User selects complaint from the option above, only complaint types will show; if Maintenance is selected, the maintenance type will show in the dropdown.
More than one line can be added here.
Edit Complaint / Maintenance
To edit complaint/maintenance, go to:
Real Estate -> Maintenance -> Complaints / Maintenance -> Edit Complaints / Maintenance.
Select from the created Complaints / Maintenance List and click the Action button to create a new, edit, or print List of Complaints / Maintenance. Created Complaints / Maintenance List
Print Complaint / Maintenance
To print a Complaint / Maintenance, go to:
Real Estate -> Maintenance -> Complaints / Maintenance -> Print Complaints / Maintenance.
Select from the List Complaints / Maintenance to print and click the print button.
Action on Complaint / Maintenance
After ensuring the Complaints / Maintenance is satisfactory, the User can act. Go to:
Real Estate -> Maintenance -> Action on Complaints / Maintenance
Select Complaints / Maintenance, click on the Action button on the bottom left, and click on Other Action.
A new window will appear in the middle.
Select the Date of the action.
Choose the action if the User wants to assign to Job, close by selecting done without creating a Job Card, Reject, put On Hold, or any other.
Write any additional Notes.
Select from the dropdown the name of the Employee.
The job card will follow this action because we selected Assign to Job.
Job Card
The job card contains information on services and items needed for the Complaints / Maintenance. Go to:
Real Estate -> Maintenance -> Job Card -> Create Job Card or Create Job Card from Complaints / Maintenance.
The difference between these two is:
If the User selects the create option, the System will open the job card window as fresh, and the User needs to choose the Building, Unit, services, and items.
Suppose the User selects the second option to create from Complaints / Maintenance. In that case, the window will be prefilled with all this information and Complaints / Maintenance information that the User already assigned to the Job.
The first tab for this window will show the Unit details.
The second tab shows Complaints / Maintenance details.
The service tab is to select the services from the Item List service type.
The description can be changed here.
Write the rate and Quantity to calculate the Amount.
Select the labor from the Employee List who will be doing this service.
The last tab is to select the Inventory items used in Maintenance.
After selecting the required services and Inventory, save the form.
Edit Job Card
To edit the job card, go to the following:
Real Estate -> Maintenance -> Job Card -> Edit Job Card.
Select the job card to edit from the List of created cards, click on Job Cards on the bottom left, and click edit.
Print Job Card
To print the job card, go to:
Real Estate -> Maintenance -> Job Card -> Print Job Card.
Select the job card to print from the List of available cards; tick marks the Job Cards to print and click on the print button on the bottom left.
Action on Job Card
No action can be taken for the job card. Go to :
Real Estate -> Maintenance -> Action on Job Card
Users can see the List of job cards with their service and Item details, including the Amount. Select one for which the User wants to take action, click the Job card button on the bottom left, and select Other Action.
A window will appear in the middle.
Choose the Date of action.
Choose the action to be taken if
Finished
Waiting for Item
Waiting for labor
Other (Enter manually)
Enter any additional notes
Select the Employee Employee's name from the dropdown who noted this action.
The status User selects other than Finish will show in the status column in the Action on Job Card window.
Once Finish is selected, this job card will disappear from this window.
Create a Cash Invoice from the Job Card.
After the Job card is finished, the User can make a Cash invoice to the Customer. Go to:
Real Estate -> Maintenance -> Create Cash Invoice from Job Card
This invoice can be created without charge. Select the Free of Charge box in the invoice window.
Create a Credit Invoice from the Job Card.
Users can also make a credit invoice for the finished Job card. Go to:
Real Estate -> Maintenance -> Create Credit Invoice from Job
An A-list of finished cards will show in the List. Select the one User wants to create an invoice for and click the Credit Invoice button on the bottom left.
An invoice window will open for this job card.
Unit and Building information is prefilled.
Invoice No is coming from the Invoice series.
Choose the Invoice Date.
On the top right, the System will show the type of request if Complaints / Maintenance and Unit status (e.g., occupied)
elect the Account for credit invoice.
Select the Customer's name.
If the User doesn't want to charge the Customer for this Complaint / Maintenance, mark the Free of Charge box.
After filling in all the information, save the invoice.
Notice
If the User wants to give any notice to tenants, it can be entered through
Real Estate à Notice
Select the Building
Select the Unit
Select from the dropdown the Notice Category
Enter the Notice Date
Subject of Notice
Any further details
Important:
This notice has no effect anywhere. This will only be saved as a record and shown in the reports.
General Memo
If the User wants to enter any general memo for the Unit, it can be entered through Real Estate -> General Memo.
Select the Building
Select the Unit
Select from the dropdown the Memo Category
Enter the Memo Date
Subject of Memo
Any further details
Important:
This memo has no effect anywhere. This will only be saved as a record and shown in the reports.
Far far away, behind the word mountains, far from the countries Vokalia and Consonantal, there live the blind texts. Separated, they live in Bookmarks grove, right on the coast.
Far far away, behind the word mountains, far from the countries Vokalia and Consonantia, there live the blind texts. Separated, they live in Bookmarksgrove right on the coast
Real Estate Activities | Accounting Journal Entries | Memo | ||
Create Quotation / Draft Contract | No Accounting affect | - Change the status of the Quotation to accept/reject - Can Convert a Quotation to a Contract. - View the status of the Quotation. - Can select both Customer and prospective same tenancy | ||
Tenancy Contract | ||||
Tenancy Contract
| Dr. Tenant AR | Total Amount to be charged to the Tenant / the Amount to be given by Tenant. | ||
Dr. Tenant. Retention | The Amount reserved by the Tenant to guarantee the service during the Contract will be returned at the end of the Contract. | |||
Cr. Income | It is the current month's or year's income as per Company policy. | |||
Cr. Differed Income | Its income is the income after the current month or year (i.e.) the income from the next month or year onwards to the end of the Contract. | |||
Cr. Security deposit | It is the Amount taken from the Tenant by the real estate company when creating a Contract and returned to the Tenant while leaving the Unit without causing any damage. | |||
Cr. Parking income | It is the Amount taken from the Tenant for providing a parking facility, and the calculation will be based on the Setup. | |||
Cr. Another income | Its income is the Amount taken from the Tenant to provide another facility. | |||
Payment Received From Tenant | ||||
Type of Payment | ||||
Cashner | Dr. Cash / Bank Cr. Tenant AR | Cash is a mode of Payment. The Account type is Cash / Bank | ||
Cheque – Currently dated | Dr. Bank Cr. Tenant AR | Cheque is a mode of Payment where the Date of the Cheque is the current Date. The Account type is Bank. | ||
A Cheque is a mode of Payment where the Date of the Cheque is a future Date. Here the User can view the Report on the List of cheques under the collection. These cheques are dated for the future. The Account type is Cheques Under Collections. | ||||
When collecting the CUC on the due Date | Date. Bank Cr. Cheque under collection (CUC) | The cheques under collection will be debited to the Income Account from the CUC Account on the due Date. | ||
Real Estate Accounting Entries – our Company Buildings
maintenance | ||
The maintenance request can be of two types: 1. Free of Cost 2. To be paid by Tenant maintenance | ||
Maintenance Free of Cost | Dr. Cost of Items- Inventory Cr. Inventory | This is the Cost of parts or the Amount spent on maintaining the Unit of a building without charging the Tenant of the Unit. |
Dr. Expense Cr. Cash / Bank / Vendor | Purchase materials directly to vendors for maintaining the Unit of a building without charging the Tenant. | |
Maintenance To be paid by the Tenant | Dr. Cost of Items- Inventory Dr. Tenant AR Cr. Income Cr. Inventory | This is the Cost of parts or the Amount spent on maintaining a building Unit by charging the Unit's Tenant. |
Dr. Tenant Cr. Cash / Bank / Vendor | Purchase materials direct to vendors for maintaining the Unit of a building by charging the Tenant of the Unit. | |
Void Contract | |
Option – 1: Void Contract Details and Void Related Payments Received Use this option in case cheques are not deposited to the Bank | |
Voiding Contract and other income | The original Entries will be ZERO. No, Revise entries. |
Voiding Payment for all types of the | The original Entries will be ZERO. No, Revise entries. If Payments send to QuickBooks by Receipt Voucher, the Receipt Voucher will be deleted. |
Option – 2: Void Contract Details only. Use this option in case cheques are deposited to the Bank | |
Voiding Contract and other income | The original Entries will be ZERO, and there will be no Revise entries. |
Payment for all types of System | The System will keep all payments as it is and will not make zero Amount or revised entries. |
Pre-Terminate Contract | ||
Pre-Terminate Contract
| Dr. Differed Income | The Company's expected income for the Unit Contract will be discarded after the current month or year. |
Dr. Security Deposit | It is the amount returned to the Tenant while leaving the Unit without causing any damage to the Unit. | |
D r. Parking income | The Amount returned to the Tenant for the required parking facility (Note: It will depend on Company Policy). | |
Dr. Another Income | The Amount returned to the Tenant for the other facility they require. (Note: It will depend on Company Policy). | |
Cr. penalty | The Amount to be deducted from the total amount that will be returned to the Tenant for damaging the Unit or other reasons. | |
Cr. Retention | The Amount reserved by the Tenant to guarantee the service during the Contract will be returned at the end of the Contract. | |
Cr. Tenant AR | The total amount to be returned to the Tenant depends on calculating the remaining days. | |
Release Contract | ||
Contract | No Accounting Entries, and there will be no Transactions. | |
Security Deposit | Dr. Security Deposit Cr. Tenant AR | This amount has been added to the refund security deposit List. (See below). |
Refund Deposits | ||
By Journal voucher | Dr. Voucher. Tenant AR Cr. Other Income/Penalties | The deposits will go to Income\Penalty Account if the Unit has been damaged or for other reasons like pending bill payments. |
Cash/Cheque Payment voucher | Dr. Voucher. Tenant AR Cr. Bank/ Cash | The deposits are refunded to the Tenant in case of Voiding, releasing, or terminating the Contract. |
No Action | No entries will be made | No made not Refunded / Deposit on hold |
Deferred Income | ||
On Posting differed income for a Contract | Dr. Contract. Deferred Income Cr. Income | It automatically created an entry to revise the Deferred income. The Amount will be credited to the Income account. The Account type of Deferred Income is Other Current Liabilities. |
Real Estate Accounting – Other Owner building
Quotation | ||
Real Estate Activities | Accounting Journal Entries | Memo |
Create Quotation / Draft Contract | No Accounting affect | - Change the status of the Quotation to accept/reject - Can Convert a Quotation to a Contract. - View the status of the Quotation. - Can select both contractor Customer and prospective same tenancy |
Tenancy Contract | ||
Tenancy Contract | Dr. Tenant AR Cr. Other Owner | Total Amount to be charged to the Tenant / the Amount to be given by tenants. |
The tenants' total Rent and all other charges are credited to the owner's Account. The Account type is: Other Current Liabilities | ||
Payment Received From Tenant | ||
Type of Payment. | ||
Cash | D. Other Owner Cr Tenant AR | Cash is a mode of payment. The Account type is Cash / Bank |
Cheque – Currently dated | Dr. Other Owner Cr. Tenant AR | Cheque is a mode of payment where the Date of the Cheque is the current Date. The Account type is Bank |
Cheque – Post dated | Dr. Cheque under collection (CUC) Cr. Tenant AR | Cheque is a payment mode where the Cheque Date is a future Date. The User can view the Report on the List of cheques under the collection. These cheques are dated for the future. The Account type is dates Under Collections. |
When collecting the CUC on the due Date | Dr. Other Owner Cr. Cheque under collection (CUC) | On the Date, the cheques under collection will be debited to the Income Account from the CUC Account. |
Commission for Manage Building | ||
This session can be calculated based on various criteria like ( Fixed %, Fixed Amount, or Manual input): 1. Rent Value 2. Security deposit 3. Parking 4. Other charges commission | ||
Commission charges commission – Manage building for Other Owner | Dr. Other Owner Cr. Income Commission | Commission calculation is based on the Setup. |
Receive Commission Amount | Dr. Cash / Bank Cr. Other Owner | Commission Payment from Other Owner |
Commission- Sales Rep. | Dr. Sales rep expenses Or Dr. Owner Cr. Cash/ Bank | This is the commission given to the sales representative. The Amount can be Expenses on o Company or cache n be deducted from the owner. It depends on a great Menten between the Real Estate Management Company and Owner. |
Maintenance for Buildings owner types Other Owner. | ||
The maintenance request can be of two types: 1. Free of Cost 2. To be paid by Tenant. | ||
A. If the Company has the ll cover all maintenance expenses based on the agreement with the other owner. | ||
Free of Cost | Dr. Cost of Items- Inventory Cr. Inventory | This is the Cost of parts or the Amount spent on maintaining you you not of a building without charging the Tenant of the Unit. |
Dr. Expense Cr. Cash / Bank / Vendor | Purchase materials directly to vendors for maintaining the Unit of a building without charging the Unit's Tenant. | |
To be paid by the Tenant | Dr. Cost of Items- Inventory Dr. Tenant AR Cr. Maintenance Income Cr. Inventory | This is the Cost of parts or the Amount spent on maintaining a building Unit by charging the Unit's Tenant. |
Dr. Tenant Cr. Income (with profit) Cr. Cash / Bank / Vendor | Purchase materials directly to vendors for maintaining the Unit of a building without charging the Tenant. | |
B. If the other one, r, of the building will cover all expenses for maintenance. | ||
Free of Cost | Dr. Other Owner Cr. Cash / Bank / Vendor | The Other Owner will cover all maintenance expenses |
To be paid by the Tenant | Dr. Other Owner Cr. Cash / Bank / Vendor | The Other Owner will cover all maintenance expenses |
Void Contract | ||||||
Option – 1 Void Contract Details and Void Related Payments Received | ||||||
Voiding Contract and other I Income | The original Entire type of ZERO. No, Revise entries. | |||||
Voiding payment for all types | The types of original Entries will be ZERO. No, Revise entries. If Payments send to QuickBooks by Receipt Vouchers, the Receipt Vouchers will be deleted. | |||||
Option – 2: Void Contract Details only. | ||||||
Voiding, Contract, and other Income | The original Entries will be types. The System here will be No Revise entries. | |||||
Payment for all types of System | The System will keep advisements as it is and will not make zero Amount and no, vise entries. ratio | |||||
Release Contract | ||||||
C not reaction | Nonreaction Accounting Entries, and there will be no Transaction. | |||||
Security Deposit | Dr. Other the Werther r. Tenant AR | This Amount has been added to the refund security deposit List. (Sean, other owners | ||||
Pre-Terminate Contract | ||||||
Pre-Terminate Contract
| Dr. another owner Care is rare. Tenants the | The total Amount of Rent and all other charges will be returned to The Total depending on the calculation of the days. | ||||
The Total Amount is to be returned to the Tenant depending on the calculation of the remaining days. | ||||||
Refund Deposits | ||
Cash/Cheque Payment Voucher | Dr. Other Owner Cr. Bank/ Cash | The deposits are refunded to the Tenant in case of Voiding, another sign, or termination of the Contract if the owner of another building asks your Company to keep deposits with you. |
Deferred Income | ||
Change Unit status
The following Menu in the real estate Module is Change Unit status. In this window, the User can see the current status of all units.
It can be changed to under maintenance or Occupied (by creating the Contract).
To change the status, click on Change Status at the bottom and select the appropriate option.
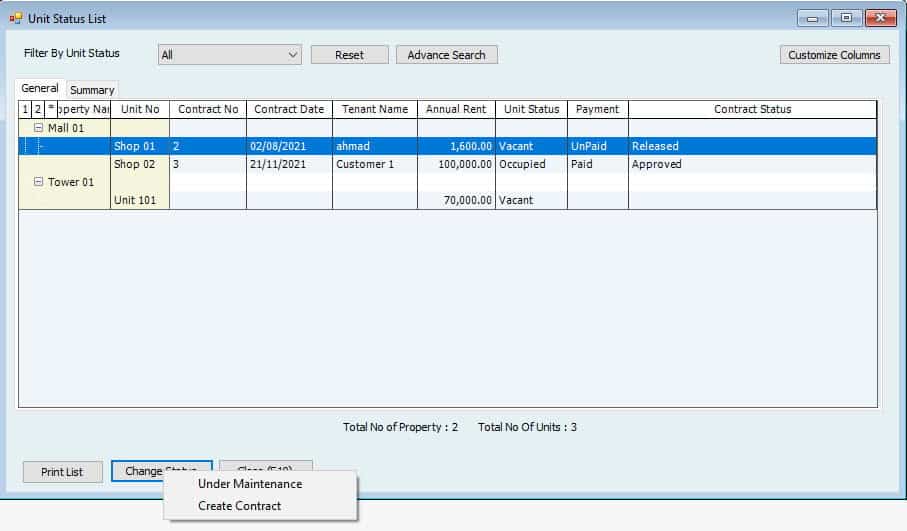
Convert fixed Assets to property
This window can be used to convert existing fixed assets into the System.
Select a fixed Asset from the List and click on convert.
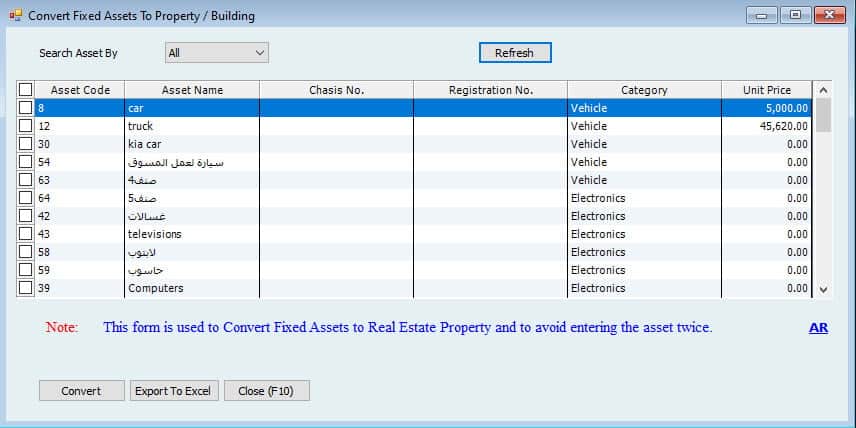
Map fixed Asset names with the property.
Users can map the property names with fixed assets if the same names are available in both lists. This option is helpful if the User has one fixed Asset and the same name in the Property List. By mapping these names, the User can take the Report by class and see all the transactions for this specific name. The User can
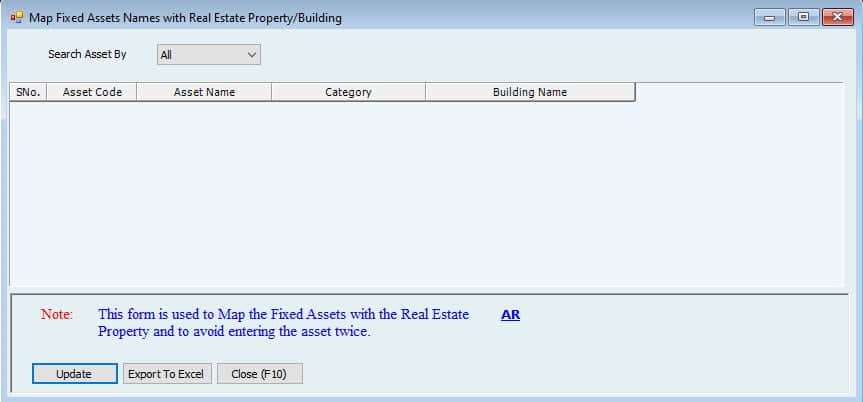
Convert Property to Fixed Asset
The User can convert the existing property/buildings from this window to fixed assets. Only buildings created from the real estate Module can be converted to fixed assets (not the converted assets).
Renew Passport
If the User has entered the passport details of tenants with expiry dates (from the Tenant profile à Tenant tab), this window can be used to see the expiring/expired passports and can be renewed from the same window. Go to:
Real Estate -> Renew Passport
Select the Expired on Data and press Search; the System will show you all passports* expiring on or before this Date.
* Only passports with expiry dates will be shown in this window.
Click on Renew button on the bottom left to change the Date from here, or it can be changed from Tenant Profile.
When a User clicks on Renew button, a window will appear in the middle.
Users can enter the new Expiry Date and press OK.
Enter Opening Balance
This window is for opening contracts. When the software is implemented for the first time, maybe the User already has some ongoing contracts which need to be entered into the System. These contracts can be entered through this window. Open this window from
File -> Import from Excel –> Opening Balance -> Real Estate -> Enter Opening –Previous Contract
In this window, the User has to fill in the information required.
Contract No.
Contract Date.
Tenant Name selects from the dropdown. Press F2 to add new.
Building name selects from the dropdown. Press F2 to add new.
Unit No. Select from the dropdown. Press F2 to add new.
Years, Months, and days select from the dropdown the original Contract period.
Rent From is the Contract start Date.
Rent to is the Contract end Date.
Annual Rent is the Rent per year.
Rent Value is the total Value (Annual Rent * Years, months, and days)
Total Other Charges* in one Amount.
Security Deposit* in one Amount.
Retention* in one Amount.
* Select the box with the column name to copy down values in all rows.
Contract Value is automatically calculated after the above three charges.
Paid Amount of the Contract.
The unpaid Amount of the Contract is still due.
Notes:
It can be entered for any additional information.
Write the information of all existing contracts and save the window. Remember, this Contract has no deferred income, so the User must record this entry himself. Also, this Contract will not show in the edit window. But this can be edited from the opening balance window.
Real Estate Manual
Real Estate Module in Hinawi Software is one platform to track all your Properties, Tenants, Contracts, and Collections. Users can access the whole Data in seconds. Also, the Contracts can be printed with customizable templates and sent forward directly. It includes the following.
- Setup
- Activities
- Templates
Setup
For the Real Estate module, some settings are available which can be accessed from
File -> Setup Modules -> Real Estate Settings.

General Settings:
- General Tab:
Round off the annual rent amount when creating the unit if setup rent by size:
When you create a new unit for the building, you have to pay the annual rent for the unit. This rent can be defined per unit or by size if you select the size, e.,g. A square meter gives some value per square meter; this rent might go into fractions when calculating the total size. This option allows you to round off this value if rent is selected by size.

Automatically approve the contract quotation if the annual rent & other charges are fixed:
If we don’t tick mark this option, all quotation for real estate contract needs to be approved manually, but If we tick this option, the quotation will be approved automatically for the following 2 cases.
- If the rent and other charges are fixed*, the quotation for the contract will be approved automatically.
- If the rent is variable, but the amount is within the minimum and maximum limits, the quotation for the contract will be approved automatically.
*In the real estate unit, where we mention the rent amount and other charges, there is another option if we want to keep these fixed or allow changing when making the contract.
Calculate other charges in the lease Agreement Based on Rent Period.
Allow the system to delete the payment when void / cancel the contract; by default system will delete the payment when void / cancel the contract; the user can already void / cancel the contract if the contract is already posted as CUC or already posted Differed Income.
The default value for splitting the Rent can be yearly, monthly, or no split.
Maximum allowed days within which a contract can be voided; this is the maximum Number of days for which an agreement can be voided after the creation date (default is three days).
Allow to Release Contracts, specify the maximum Number of days before the expiry date that you can release a contract within these days.
Allow to Renew Contract, specify the maximum Number of days before the expiry date that you can Renew the contract within these days.
- Control Tab:

Tick to don’t proceed with the activities if the contract is not fully paid or the tenant has an Outstanding Balance.
Other Charges Settings:
These other charges are being read from the contract window. We can add new charges there, but here in the settings, we can define either fixed or minimum/maximum limits for these charges. We can also mention the default account for these charges, which is changeable from the contract.

Property List
Here users can see the list of properties, create a new property or edit any existing one.

Users can filter the property by different options.
Create New Property: To add new, click on the property at the bottom and then click on “New.”
The first tab is for the information about property the

Write the name of the property.
Select the Property Type Commercial, Residential, or all for both*. (Optional)
*Press F2 to add a new type
Plot No (Optional)
Age of property (Optional)
Cost of property (Optional)
In no. of units, the user has to write how many units are in the property*. I.e., flats, portions or villas, etc.
* It is important to write the correct no of units in the next step; the user will create units based on these numbers.
Unit cost will automatically be calculated as an average total cost by the Number of units.
Name of the landlord (Optional)
Name of Owner (Optional)
Name of Watchman (Optional)
Telephone No. of Watchman (Optional)
Name of the city where the property is located.
Name of the street (Optional)
Name of Country
Maintenance Contract: The user can write the property details like the company name for lifts, Air conditioners, and quantity.
Maintenance Expenses: The user can simply store expenses as text to be shown in the list.
This second tab is commission settings for this property/building.

Option 1 – Fixed-Rate:
Users can set a fixed rate of commission for all the components of contracts created in this building.
Write
How much percent should be the commission, what component basis for commission (e.g., % of rent value or security deposit or both), and if you want to allow changing this at the time of creating commission?
Option 2 – Different Rates:
Here different rates can be used for different components.
(E.g., different rate for rent value and different for security deposit)
Option 3 – Manually Computed:
The commission will not be calculated automatically. Rather, the user will calculate manually and enter it when creating the commission.
Important:
From this property window, the user can only set the basis for commission calculation. The commission will a.
Users can attach and delete the photos for the property.
The third tab is attached to the photo. Of people.try

The fourth tab is for any additional notes on the property.

The fifth tab is more information about the property.

The last tab is predefined set upset up accounts for the property.

Unit List
In the unit list, the user can create new units for properties and edit any existing ones.
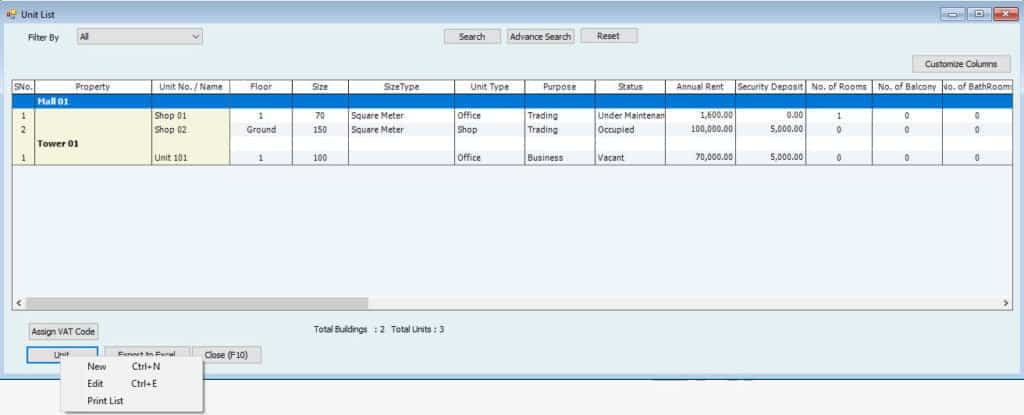
Create New Unit:
To add a new unit, click on the unit and select “New.”

Select from existing Buildings in the dropdown to create a new unit.
Unit No. can be a numbered or a Number above Unit 101.
Select the Type of unit if it’s a shop or office etc.
Floor for unit
The purpose of the unit is personal or business.
For the size of the unit, the user has to write the figure and select the parameter. (E.g., 1000 square
feet) Rent value for the unit. It can be defined as daily, monthly, or yearly.
You can select how you want to calculate the total rent. Either Rent per unit or by size*.
(e.g., 50000 per unit or 50 per square feet)
* To use the size option, you must enter the unit size.
Annual Rent will come automatically from rent value by size or unit. Here, users can select if rent should be allowed to change when creating the contract.
It can be limited between minimum and maximum values or can be allowed more or less than this limit. This will be applicable at the time of making a contract quotation or contract.
Security Deposit, it if any for the contract. It will be added to the value receivable when creating the contract and shown in the contract itself.
It can be limited between the minimum and maximum values or can be allowed more or less than this limit.
Term of Payment whether the payment will be monthly, quarterly, semi-annually, or the user can add more.
Additional information can be added by writing the Number of rooms, persons allowed, etc.
Description can be added for this unit.
Notes:
Any other information relating to the unit can be stored here.
In the second menu, photos can be attached for units.

In the last menu, it will read the predefined setup from the building

Tenant list
This tenant list is the same Customer list from the name center. Users can create new, edit, delete or filter by different options.
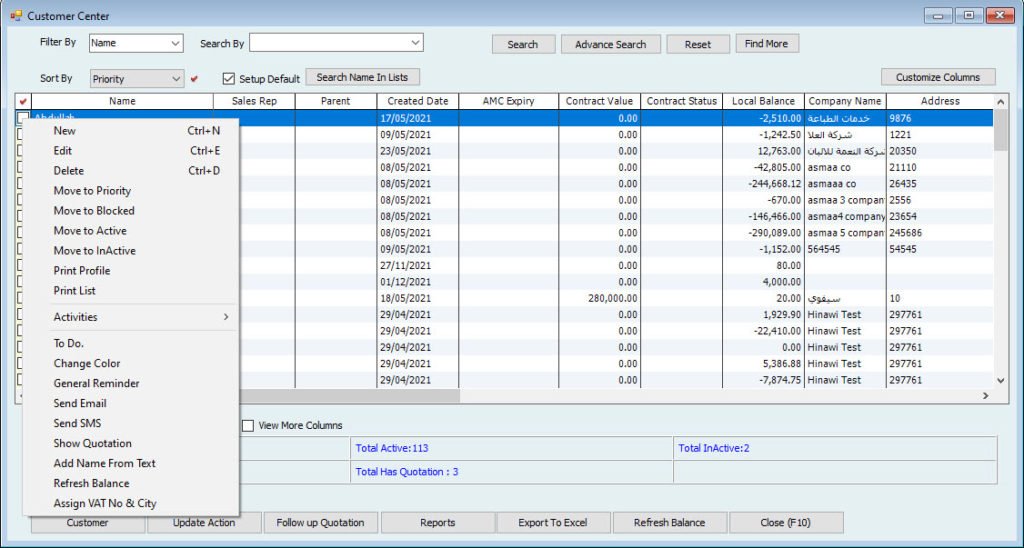
To create a new Customer, Click on Customer on the bottom left and click on new or press CTRL+N.
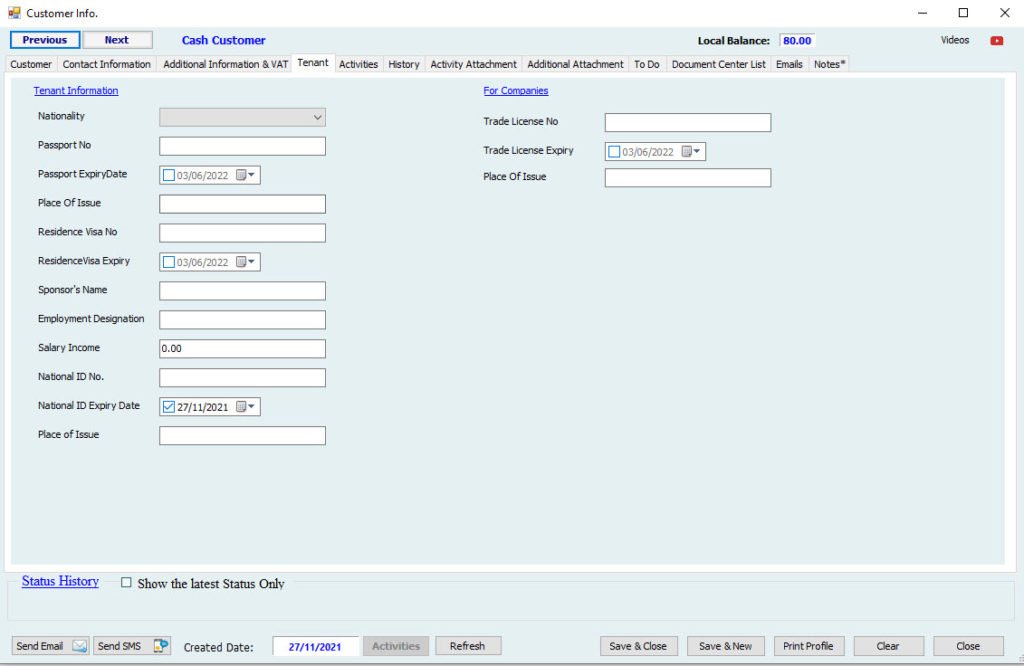
In the Customer profile, there is one tab for tenant information where the user can fill in trade license and other information specifically for tenants.
Change unit status
The next menu in the real estate module is Change unit status. In this window, user can see the current status of all units.
It can be changed to under maintenance or Occupied (by creating the contract).
To change the status, click on Change Status at the bottom and select the appropriate option.

Convert fixed Asset to property
This window can be used to convert existing fixed asseinto in the system.
Select a fixed asset from the list and click on convert.

Map fixed asset names with property
Users can map the property names with fixed assets if the same names are available in both lists. This option is useful if the user has one fixed asset and the same name in the property list. By mapping, these names user will be able to take the report by class and see all the transactions for this specific name.

Convert Property to Fixed Asset
From this window, user can convert the existing property/buildings to fixed assets. Only buildings created from the real estate module can be converted to fixed assets (not the converted assets).
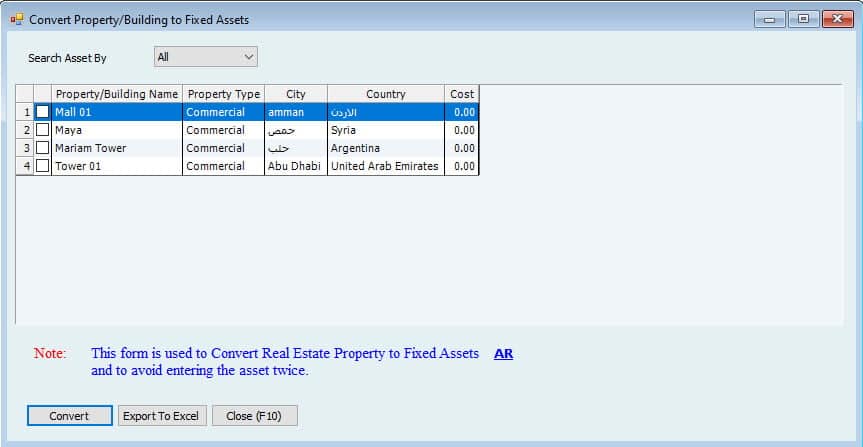
Draft /Contract Quotation
Now we will begin with the contract procedure.
Users can create the quotation for the contract first, and this quotation can be converted to a contract as it is after approval. To create a quotation, go to
Create Draft /Contract Quotation
Real Estate -> Draft Contract \ Quotation -> Create Draft Contract Quotation.

The first tab is for Tenant Information. Most of the fields here are pre-filled reading from tenant profiles.
Write Quotation Number
Date of Quotation
Select the Client Type, either prospective client or Customer.
Select the Tenant Name. All the information in the below columns and on the right side will be filled automatically except for Sales Rep.
Users can change the Occupant’s Name in case it’s different from the Tenant.
Select the Sales Rep (Sales representative)* from the dropdown.
* To add a new sales rep, go to the Lists Sales Rep list. Click on the Sales Rep button and add new. Select the Sales Reps name from the list and define the commission* basis.
* To use commission, the user needs to activate commission from
File -> Setup Modules -> Accounting and General Settings -> Other Settings -> Use Sales Rep Commission.

Second Tab for Unit information, which unit user wants to create a quotation for.

Select the Property name. The information down will be filled automatically from the property profile.
Now select the Unit No. Users can see the units from the selected property only. Same way, unit information will be filled automatically.
Now we will enter the Rent Information in this tab.

Set the Contract Period for how long the contract will be in exact years, months and days.
The Contract Start Date* needs to be entered in the next column. This can be different from the Quotation date on the top right.
* User has a choice of posting the contract entry to Quickbooks either by quotation date or contract start date. This entry will only be posted at the time of making a contract. To post any of these dates, simply tick mark the box beside the date.
The system will calculate the Contract End Date based on the start date and period of contract.
Remind before ___ days option instructs system to give reminder before the contract expires. Reminder will pop-up exact no. of days before expiry which user enters here.
Select Type of Payment like how you will receive payment. It can be in cash, cheque or combination of both.
Annual Rent is the rent per year* for this contract. User set preferences to limit the rent value in unit list and those are applicable here. (E.g. Rent can be maximum 150000 and minimum 145000 for this unit)
* If the period is more than 1 year, total rent for the full contract period will be showing down as Rent Value.
Security Deposit can be added to the contract value. This security deposit can be refunded at the end of contract.
Retention can be used instead of security deposit in case tenant is retaining some money against the contract. This will reduce the contract value by retention amount.
Terms of Payment also pre-filled from unit profile but user can change here in case you tick mark “Allow to change” there.

The next tab is for other charges if user wants to add more. Also user can change class or memo for security deposit and retention.
The 2 options on the left side can be selected accordingly if user wants to Add total other charges (Not Security deposit and retention) to rent amount in total or Print other charges separately.
On the right side user can see the rent value, security deposit or retention, other charges and then the total rent value after taking all these into consideration.
Edit Draft /Contract Quotation
Contract quotation can be edited any time before approval. User can go to
Real Estate -> Draft Contract \ Quotation -> Edit Contract Quotation.

User will see the list of quotations. Select the quotation and click on edit button to edit.
Delete Draft /Contract Quotation
User can delete the quotations from the system prior to approval. Go to
Real Estate -> Draft Contract \ Quotation -> Delete Contract Quotation.

Tick mark the quotation from the list and then click on delete button to remove this from the system.
Approve Draft /Contract Quotation
After making sure if the quotation is fine or getting approval from management, finally user can come and approve the quotation from
Real Estate -> Draft Contract \ Quotation -> Approve Contract Quotation.

The list of created quotations will be showing in this window, select the one user wants to approve and click on approve. More than one quotations can also be approved at one time.
Important:
Quotations cannot be edited after approval
Print Draft /Contract Quotation
User can print the quotations only after approval. To print go to:
Real Estate -> Draft Contract \ Quotation -> Print Contract Quotation.

From the list of approved quotations, tick mark the one to print and click on print button.
This printing template can be customized by the user as per their requirements. To customize the template*, go to
File -> Setup Templates -> Real Estate -> Contract Quotation
* For instructions on Templates customization, refer to templates section.
This process was for contract quotation which has no accounting effect. Now we will see the actual contract like how user can make a real estate contract for tenant.
Important:
In order to make contract, the name must be as a customer. In case if it is a prospective, user needs to convert it to customer before going ahead with contract.
To convert Prospective to Customer, go to either Lists -> Prospective Client List or from main screen top left Name Center -> Prospective Tab.

Filter the relevant customer, tick mark convert column to select this name, then click on prospective down and select the option Convert to Customer. The name will be converted to customer.

There are two ways to make a contract.
- Convert an existing approved quotation to a contract.
- Make a new contract from the beginning.
We will start with the first one which is converting from quotation to contract. Go to
Convert to Contract
Real Estate -> Draft Contract \ Quotation -> Convert to Contract.

Select the contract and click on convert button to open the convert window.
The convert window is actually a new contract window but it is pre-filled with all the information we mentioned in the quotation.
The first page is for tenant information. User will see the same information from quotation. One extra field is on the top middle.
QB Ref No is the number of Journal Voucher which will be posted to Quickbooks.

Next Page displays the unit information including the property. This tab is also copying the same data from quotation.

Here comes the next tab for Rent Information, showing the
Contract period
Contract start and end date
Type of Payment
Annual rent Amount
Security deposit or Retention
And Terms of payment.
Split the rent option allows the user to split the rent yearly, monthly or without split. If user select monthly (which is the most common case), system will automatically calculate the even monthly rent for the whole contract period to post as income.

* User has choice of posting the contract entry to Quickbooks either by entry date in the software or contract start date. To post by any of these dates, simply tick mark the box beside the date.
In this Contract details tab user can see the details of rent and accounts to link with the contract.
First account to select is the Accounts Receivable where user wants to track this contract amount as receivable.

If the payment is full in advance, then no need to select this account here. User simply can enter the payment information in payment tab.
The second account to select is the income account. In the table, the extreme right column is for income account. There can be more than 10, 20 lines for income, so Hinawi Software allows ease of access here. User just needs to select the first line and it will copy down automatically up to the end of year. Again user can select for next year and it will copy down.
The next tab is Other Charges where user can see the security deposit, retention amount or any other charges already entered or can enter now.
Select the account for Security deposit or any other charges in this window.

The next screen is showing the Payment details for contract.

The payments can be entered from this contract window or from
Accounting -> Cash/Cheque Receipt Voucher -> Create Cash/Cheque Receipt Voucher
Accounts Receivable account is showing is grey which cannot be changed. This account is copied from contract details where we defined this account.
Post to QB by drop down is a method for posting to QuickBooks. If user selects the posting by Receipt Voucher, it will go to quick books by receipt voucher. But for this method the account must be as Accounts Receivable with customer name. In all other cases it can be posted as a Journal Voucher.
If posting by JV, select if you wants to post the transactions by one JV or separate JVs for each line*.
* By each line, it means the lines in table. In case payment is received by more than one cheque or by cash and cheque both. User can post all these transaction to Quickbooks in one turn.
On the right side, write the
R.V.No.
R.V.Date
As the payment will be updated by these numbers to Quickbooks.
Write the Memo of the Receipt Voucher. This memo will come after automatic memo * from Hinawi Software
* There are 2 check boxes against the RV no and RV date. If user tick mark these boxes, transaction will be posted to Quickbooks by these numbers and cheque no and cheque date will automatically go in memo to Quickbooks.
If user uncheck these 2 boxes, transaction will be posted by Cheque no and date. RV no and date will go in memo automatically.
Select the Payment method if received by Cash or Cheque.
If cash, simply enter the debit account where user wants to deposit the received money and enter the amount.
If cheque, enter Cheque no, Cheque date, Bank Name of received cheque, Deposit to account, Amount
Class (will show If selected to post by JV)
Memo (will show If selected to post by JV)
When user enters the amount in last amount column of table, maybe this will not be matching with the amount above, so user has to click on recalculate button on bottom left to make these 2 amounts same.
This receipt will be effecting the contract status because we have received some amount. This amount will show in the reports as paid and the contract status will be partially paid.
General memo tab can be used to write additional details which are not available in previous tabs.

Update Memo on Left bottom is to save memo when user cannot save the contract anymore from save buttons down.
The tab for View Unit will show the picture of unit. These pictures can be attached or changed from unit profile.
The last Documents tab is to make sure the availability of documents for the contract. Tick mark the check boxes against documents which are available. Mandatory documents are must to check. These documents can be defined from
File -> Setup Modules -> Real Estate Settings -> Document Checklist for Contracts.
For details, kindly refer to Real Estate Settings section.

After updating the information, user can save the contract
Create Contract
The second way to make a new contract is from Create Contract window. Go to
Real Estate -> Tenancy Contract -> Create Tenancy Contract
This new contract window is same as of convert quotation to contract. Only the difference is that information will not be pre-filled from quotation, so user has to enter all the information in one window which user entered before through 2 windows (Contract quotation and Convert to contract).
Edit Contract
The next option in contract menu is Edit Contract. Contract can be edit any time prior to completion or termination.

Go to
Real Estate -> Tenancy Contract -> Edit Tenancy Contract
Select the contract to edit and click on Edit button on bottom left. System will open the same contract window, so user can edit and save.
Print Contract
After making sure the contract is fine, user can come to print window to print the contract.
Real Estate -> Tenancy Contract -> Print Tenancy Contract

From the list of contracts, select the one user needs to print and click on Print Contract button. System has pre-defined template* for contract printing.
* This template can be customized from
File -> Setup Templates -> Real Estate -> Tenancy Contract.
For instructions on Templates customization, refer to templates section.
Void / Cancel the Contract
The contract can be voided or cancelled if the Contract Date (Not contract start date) is today’s date or later. The contracts with date earlier than today cannot be cancelled.
To cancel a contract, user needs to go to
Real Estate -> Tenancy Contract -> Void / Cancel the Contract

From the list, select the contract and click on Void/Cancel Contract button to void the
Contract.
Pre-Terminate Contract
The real estate contracts can be terminated anytime between contract start date and end date. This termination is before the contract end date, so the remaining income for the contract period will be reversed and Accounts Receivable also. This period will start from Date of Pre-termination. To Pre-terminate the contract go to
Real Estate -> Pre-Terminate Contract.
From this pre-terminate window, click on Select Contract button to show the list of available contracts.
A list will open with contracts to select. Tick mark the contract user wants to terminate and click on Pre-Terminate Contract.
The next window will be opened automatically which is the contract window with some extra fields.
In the Rent Information tab, choose the date of Pre-Termination. This date should be the exact date as the next calculations will be based on this date. Whatever date user selects, system will calculate the income to reverse from this date up to the end of contract.
User can see in the next Contract Details tab, the income is showing negative amounts for the rest of contract period in exact month and days. These lines will depend on split rent selection. If rent split is monthly, lines will come by moths and by year if annually.
This information cannot be changed. Select the Accounts Receivable account to reverse which will be most probably the same account at the time of making the contract.
The other charges tab will be showing 0 by default. Now user has a choice,
- Either user wants to reverse this amount with accounts receivable first and then refund or
- Directly refund the amount or there is no refund.
The net effect will be same.
To use the first method, manually write the amount here in Other Charges (e.g. 1000 on debit side) and it will be shown automatically in the next tab. Then later on, user can go to Refund Deposits window to make refund by payment or Journal Entry.
To use second method, no need to write anything here and keep this amount column as it is. After saving pre-termination, directly go to Refund Deposits window and make refund or pass the adjustment Journal entry in case no refund.
Now, user can see the Journal Entry for Pre-Termination. Click on Post Journal Entry tab and see the entry. More lines can be added but current ones cannot be modified.
After saving this form, the contract status will be changed to Terminated.
Renew Contract
The contracts can be renewed after expiry date or even before expiry. No need to wait for the expiry date. System allows you to renew the contract Six months before the contract will be expiring providing more flexibility for the user.

User will only see the contracts in this list which are either expired or will expire in six months’ time. Select the one user wants to renew and click on Renew button.
One small window will requiring changes in the rent if any.

User can write here if the rent is same, increasing or decreasing.
If increasing or decreasing, either the change is in % or exact amount. After pressing OK, system will open the contract window with all the information pre-filled except accounts for income and other charges (if any).
Release Contract
Release contract means the contract can be closed any time before the expiry date. This option will close the contract and user can make the adjustment in any way. The unit after making the release contract will be available to make a new contract. For releasing the contract, go to
Real Estate -> Release Contract.
Click on Select Contract button to open the list of available contracts.
User needs to select the date before which the contracts will be expired. The contracts expiring on this date or before will appear here. Select the desired one and click on Release Contract button.
Release Contract Entry window will open now.
The date on left side is entry date. Means the transaction will be save by this date. On the right side select the release date and the rest of data is already in the fields.
Then click on next tab which is adjustment.
In adjustment tab, user can make adjustment entry. Here system gives full control to the user. More lines can be added by clicking this icon and then insert line.
Enter Opening Balance
This window is for opening contracts. When the software is implemented for first time, maybe user already has some ongoing contracts which needs to be entered into the system. These contracts can be entered through this window. Open this window from
File à Import from Excel – Opening Balance à Real Estate à Enter Opening –Previous Contract
In this window, user has to fill the information required.
Contract No.
Contract Date.
Tenant Name select from dropdown. Press F2 to add new.
Building name select from dropdown. Press F2 to add new.
Unit No. select from dropdown. Press F2 to add new.
Years, Month and days select from drop down the original period of the contract.
Rent From is the contract start date.
Rent to is the contract end date.
Annual Rent is the rent per year.
Rent Value is the total value (Annual rent * Years, months and days)
Total Other Charges* in one amount.
Security Deposit* in one amount.
Retention* in one amount.
* Select the box with column name to copy down values in all rows.
Contract Value automatically calculating after above three charges.
Paid amount of the contract.
Unpaid amount of the contract which is still due.
Notes:
can be entered for any additional information.
Write the information of all existing contracts and save the window. Remember there is no deferred income for this contract so user will have to record this entry by himself. Also this contract will not show in edit window. But this can be edit from opening balance window.
Contract Commission
We already covered in the previous menus about how to activate the contract Commission and their basis. Kindly refer to buildings section.
Now it’s the time to create the commission for the contract itself.
Important:
Commission can only be created for fully paid contracts.
To create commission, go to:
Real Estate -> Contract Commission for Property Management
Select from the Period when the contract was starts and system will list all the contract with commission within this date period.
Select one Building or all to show all contracts. Since the commission is activated by buildings so user has to select the buildings here.
Click on View button.
The table is showing the information about contract and commission basis. User can change the % basis from here if allowed form commission window.
Enter the JV no, Date, Debit account and Credit account for the commission as this will be entered by JV only.
If more than one contracts selected, JV will be entered for the whole amount.
The first tab is for existing Contracts commission. The second tab is for Pre-terminated contracts where all the columns will be same but the commission amount will be negative assuming the refund of commission in case of termination.
After entering the information, press the save button to save transaction.
Refund Deposit
After the contract is released or terminated, the security deposit will be refunded to the tenant. To Refund the deposit, go to
Real Estate -> Refund Deposits
User will see the list of released and terminated contracts. Select the one user wants to refund deposit and click on activities on bottom left. This pop up will appear.
User can
Create Cash Payment for this refund where the amount and tenant name will be pre-filled. Fill the rest of information and save payment voucher.
Create Cheque Payment for this refund where the amount and tenant name will be pre-filled. Fill the rest of information and save payment voucher.
Create Journal Voucher for this refund. Fill the information and save Journal Voucher.
Show Payment already entered for this refund.
Or Print List of these refunds.
Posted Deferred Income
Go to :
Real Estate -> post deferred Income
It will show you the deferred income months that not already posted to QuickBooks.
Maintenance
Hinawi Software maintenance menu allows user to enter any maintenance or complaint details for real estate properties.
Request for Maintenanc
Go to :
Real Estate -> Maintenance -> Request for Maintenance
When user receives the request for maintenance, it can be entered in this window.
Select the Building for which the request is received.
Select the Unit for this building.
Select the Maintenance type* from the drop down.
* Press F2 to add new.
Write the Request Date for maintenance.
Any other Details for the maintenance.
After entering the details, press the save button.
Create Complaint / Maintenance
Now user can create a complaint or maintenance from
Real Estate -> Maintenance -> Complaints / Maintenance -> Create Complaints / Maintenance
Select the building from dropdown to create Complaints / Maintenance.
Select the unit for this building.
Select the name of employee who received the complaint / maintenance.
Select the option if it’s a request for complaint or maintenance.
Write the summary for request.
The first tab for Unit Details will show the unit information including rent value and tenant information (If occupied).
The user can select the type from second tab for complaint / maintenance details.
If user selected complaint from option above, only complaint types will show and if maintenance is selected, maintenance type will show in dropdown.
More than one lines can be added here.
Edit Complaint / Maintenance
To edit complaint / maintenance, go to
Real Estate -> Maintenance -> Complaints / Maintenance -> Edit Complaints / Maintenance.
Select from the list of created Complaints / Maintenance and click on Action button to create new, edit or print the list of Complaints / Maintenance.
Print Complaint / Maintenance
To print a Complaints / Maintenance, go to
Real Estate -> Maintenance -> Complaints / Maintenance -> Print Complaints / Maintenance.
Select from the list Complaints / Maintenance to print and click on print button.
Action on Complaint / Maintenance
After making sure the Complaints / Maintenance is fine, user can go ahead to take an action. Go to
Real Estate à Maintenance à Action on Complaints / Maintenance
Select the Complaints / Maintenance, click on Action button on the bottom left and click on Other Action.
A new window will appear in the middle.
Select the date of action.
Choose the action if user wants to assign to Job, close by selecting done without creating Job Card, Reject, put On Hold or any other.
Write any additional Notes.
Select from dropdown the name of employee.
This action will be followed by job card now because we selected Assign to Job.
Job Card
Job card contains information of services and items needed for the Complaints / Maintenance. Go to
Create Job Card
Real Estate à Maintenance à Job Card à Create Job Card or Create Job Card from Complaints / Maintenance
The difference between these two is
If user select the simple create option, system will open the job card window as fresh and user needs to select the building, unit, services and items.
If user select the second option to create from Complaints / Maintenance, the window will be pre-filled with all these information along with Complaints / Maintenance information which user already assigned to Job.
The first tab for this window will show the unit details.
Second tab is showing Complaints / Maintenance details.
Service tab is to select the services from Item list service type.
Description can be changed here.
Write the rate and quantity to calculate amount.
Select the labour from employee list who will be doing this service.
Last tab is to select the Inventory items which will be used in maintenance.
After selecting the required services and inventory, save the form.
Edit Job Card
To edit the job card, go to
Real Estate à Maintenance à Job Card à Edit Job Card.
Select the job card to edit from the list of created cards, click on Job Cards on bottom left and click on edit.
Print Job Card
To print the job card, go to
Real Estate à Maintenance à Job Card à Print Job Card.
Select the job card to print from the list of available cards, tick mark the Job Cards to print and click on print button on bottom left.
Action on Job Card
Now action can be taken for job card. Go to
Real Estate à Maintenance à Action on Job Card
In this list, user can see the list of job cards with their service and item details including the amount. Select one for which user wants to take action, click on Job card button on left bottom and select Other Action.
A window will appear in the middle.
Choose the Date of action.
Choose the action to be taken if
Finished
Waiting for item
Waiting for labour
Other (Enter manually)
Enter any additional notes
Select the employee name from drop down who noted this action.
Whatever status user select other than Finish, it will show in the status column in Action on Job Card window.
Once Finish is selected, this job card will disappear from this window.
Create Cash Invoice form Job Card
After Job card is finished, user can make cash invoice to customer. Go to
Real Estate à Maintenance à Create Cash Invoice from job Card
This invoice can be created without charge. Simply select the Free of Charge box in invoice window.
Create Credit Invoice form Job Card
User can also make a credit invoice for finished Job card. Go to
Real Estate à Maintenance à Create Credit Invoice from job
A list of finished cards will show in the list. Select the one user wants to create invoice for and click on Credit Invoice button on bottom left.
Invoice window will open for this job card.
Unit and Building information is prefilled.
Invoice No is coming from Invoice series.
Choose the Invoice Date.
On the right top, system will show the type of request if Complaints / Maintenance and unit status (e.g. occupied)
Select the Account for credit invoice.
Select the Customer's name.
If user don’t want to charge the customer for this Complaints / Maintenance, simply tick mark the Free of Charge box.
After filling all the information, save the invoice.
Notice
If user wants to give any notice to tenants, it can be entered through
Real Estate à Notice
Select the Building
Select the Unit
Select from dropdown the Notice Category
Enter the Notice date
Subject of Notice
Any further details
Important:
This notice has no effects anywhere. This will be saved as a record only and will show in the reports.
General Memo
If user wants to enter any general memo for unit, it can be entered through
Real Estate à General Memo
Select the Building
Select the Unit
Select from dropdown the Memo Category
Enter the Memo date
Subject of Memo
Any further details
Important:
This memo has no effects anywhere. This will be saved as a record only and will show in the reports.
Renew Passport
If the user has entered the passport details of tenants with expiry dates (from tenant profile à Tenant tab), this window can be used to see the expiring / expired passports and can be renewed from the same window. Go to
Real Estate à Renew Passport
Select the Expired on date and press Search, system will show you all passports* expiring on or before this date.
* Only passports with expiry dates will be shown in this window.
Click on Renew button on bottom left to change the date from here or it can be changed from Tenant Profile.
When user clicks on Renew button, a window will appear in the middle.
User can simply enter the new Expiry date and press OK.
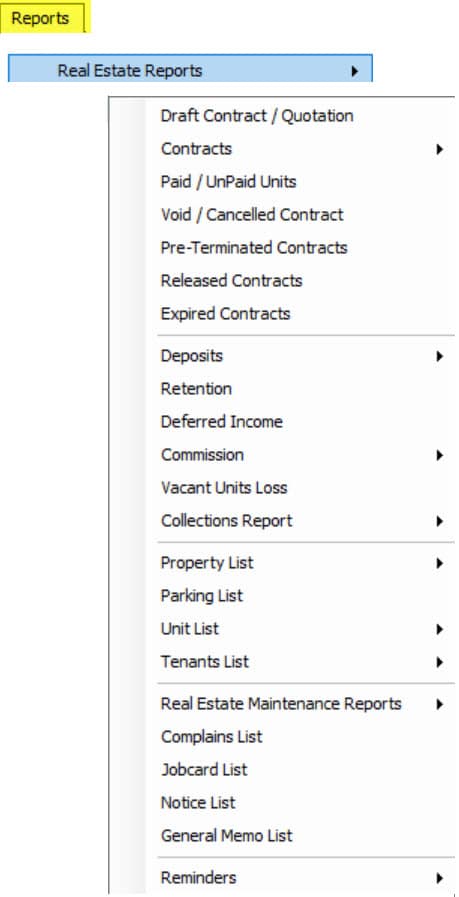
Reports:-
The Real Estate Module in Hinawi Software provides various reports users can generate. The feature reads all the Data from the System and allows the creation of a customized Report. After the Report is generated, the User can export it to excel for further use.
Real Estate Reports are beneficial and required for everyone using the Real Estate Module in Hinawi Software. Remember that all these lists and reports listed below can be exported to Excel, printed directly through the Software, or customized according to the information required to be viewed. Also, these reports can be filtered according to the required period requested.
- Detailed Report for Properties List, Unit List, and tenants List.
- Detailed Report for all contracts and status with filter option.
- Detail Report for units status: Paid, unpaid, occupied, vacant, under maintenance, and more
- Income and differed income
- Collections of current and post-dated cheques received.
- Maintenance reports with filter
- Loss of vacant units.
- Security deposits
- SMS Services
And more
➢ Draft Contract Quotation
➢ Contracts
By Property
By Unit
By Tenant
By Period
By Opening
By Company
All Contracts
Detailed Contract List
Printed Contract Invoice List
Printed Other Charges VAT Inventory List
➢ Void / Cancelled Contract
➢ Pre-Terminated Contracts
➢ Released Contracts
➢ Expired Contracts
➢ Deposits
Deposit Received List
Deposit Refunded List
➢ Deferred Income
➢ Commission
Created Commission (Detailed and Summary)
Not Created Commission
➢ Other Charges
➢ Vacant Units Loss
➢ Collections Reports
By Property (Detailed, Monthly, Summary)
By Unit (Detailed, Monthly, Summary)
➢ Property List
Type List
Age
No of Units
Name of Landlord
By Photo
Parking List
All Property
➢ Unit List
Occupied List
Vacant List
Paid/Unpaid
By Number Of
▪ Bed Room
▪ Balconies
▪ Bath Rooms
▪ Person Allowed
Rent Value
Purpose
Type
Size
By Photo
By Status
Unit History
Expenses by Unit
By Expired Contract
Tenancy by Unit
All Units
➢ Tenants List
Nationality
Building
All Tenant List
➢ Real Estate Maintenance Reports
Real Estate Complaint List
Real Estate Job Card List
Comprehensive Complaint List
Comprehensive Job Card List
➢ Complains List
➢ Job Card List
➢ Notice List
➢ General Memo List
➢ Reminders
Contract Expiry
Tenants Passport Expiry
Tenants Visa Expiry
Company Trade License Expiry
Note:
All reports can be exported to excel.
Design and templates are available for all Modules.
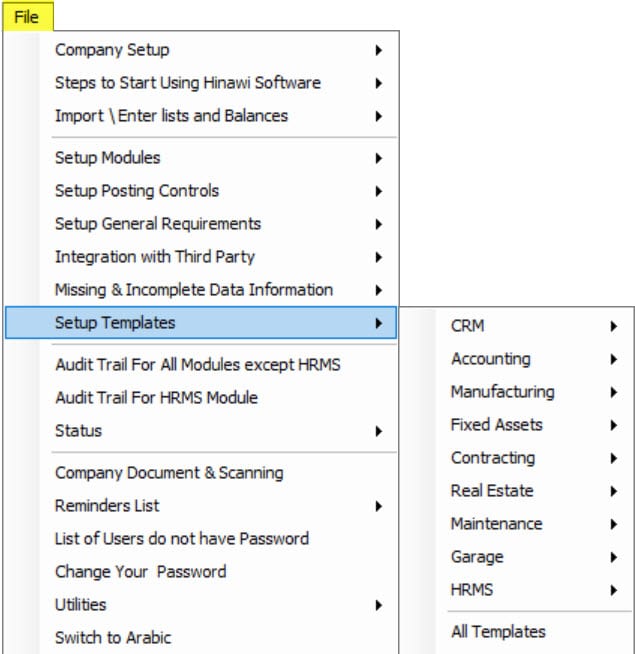
Because the Real Estate department needs to print all entries in the System, like Contracts, Receipt vouchers, Invoices, Notices…etc., we created an option to let the User build his forms for printing without additional charges. Aside f this, we prepared pre-defined templates for all activities to save the User's time.
The actual Estate Module is linked with other modules:-
In HRMS Module:
When a Company has its building for its staff, the System can link the Unit with Employee reading from the Real Estate Module. This link is in the Employee profile. The System will calculate the monthly Rent and add it to the Employee's actual costing Report.
In Accounting Module:-
When creating a job order for building maintenance, the System will read the Inventory and services from the accounting Module. All ac activities in real estate are affected by accounting.
In the Fixed Assets Module:-
The Property List can be converted to Fixed Assets. So will not enter the property name twice.
Integrated with QuickBooks Accounting
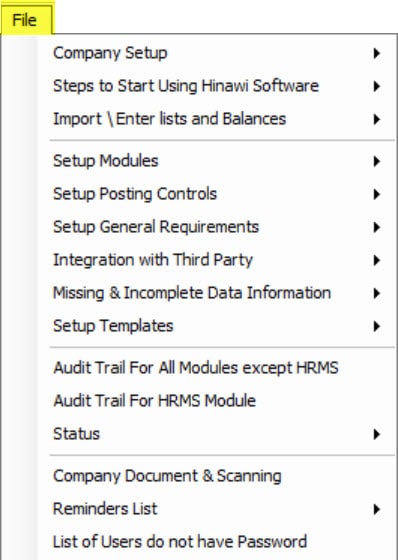
- The admin User can do internal control by the followings:-
- Set the Posting controls window located under File Menu >> Company
- The level of access is located under File Menu >> Company. Admin User can allow the User to create transactions but not edit. Or to approve but not pay. Or to read reports only….etc.
- By default, the User can’t change the transactions when approved.
- User activity Report is located under the report under-report Menu, and HRMS Report Menu reads every change on each transaction and lists with Date and time.
- And many more
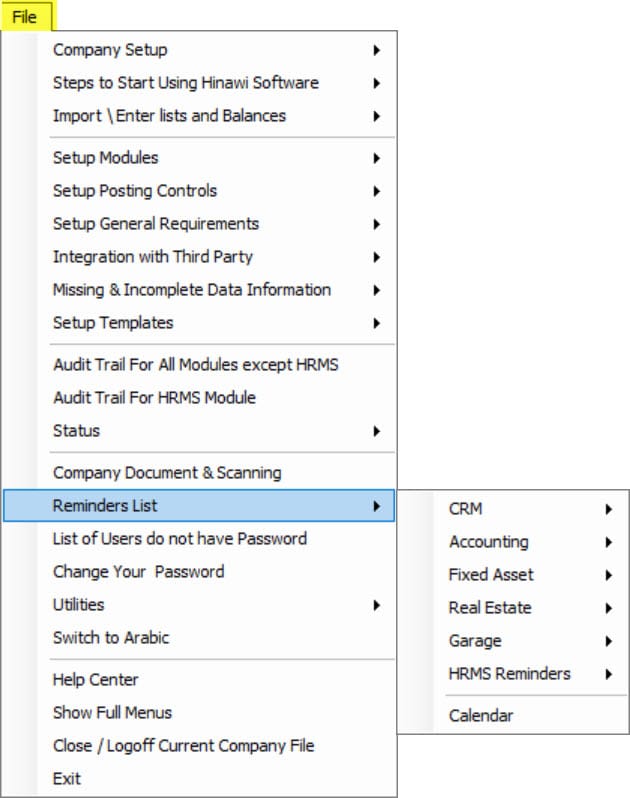
- Reminder for all Contract expiry.
- Cheques Under Collections (CUC).
- Tenants' passports and
- visa expiry Date.
- Company trade license expiry Date.
