
Important Note: Please fill all columns with RED color in the Excel sheet.
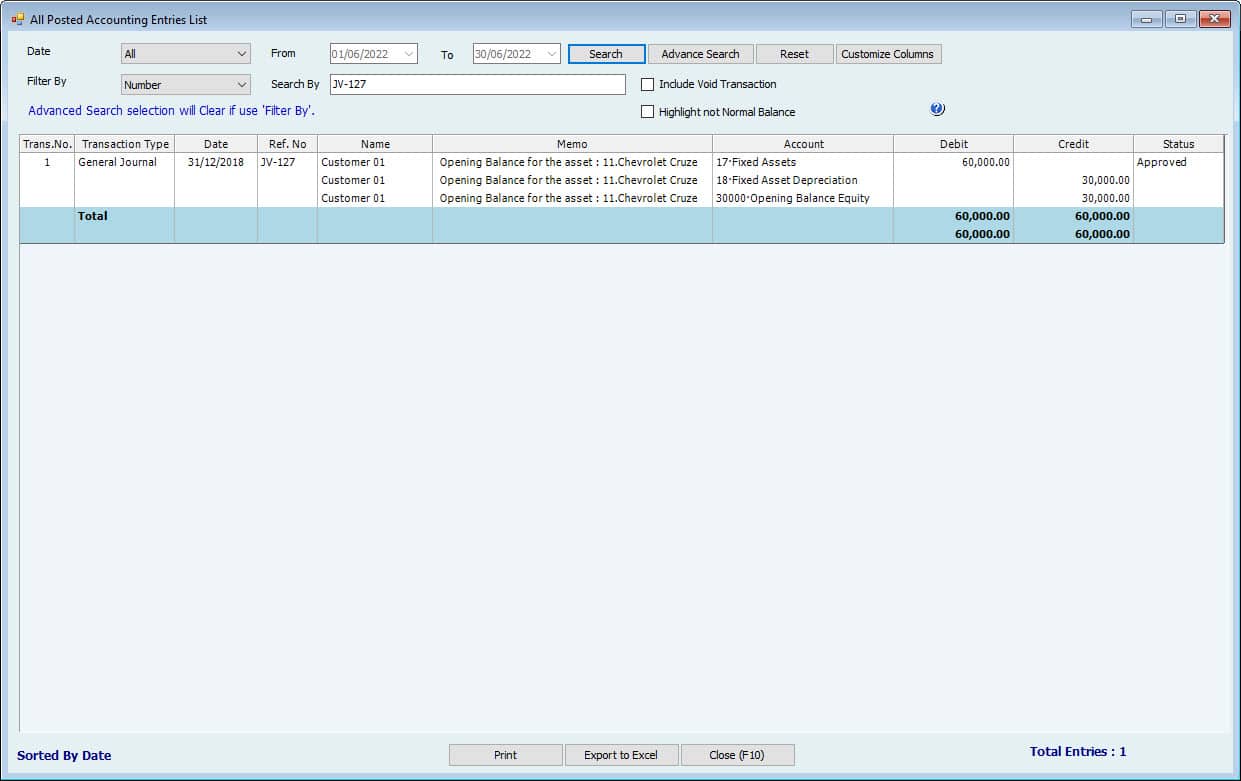
Dr. Fixed Assets
Cr. 30000 Opening Balance Account
Case 1: Importing of Used Fixed Assets and Dispose of them After Expiry Date.


Case 2: Importing of Used Fixed Assets and Dispose of them before Expiry Date.


Case 3: Importing Used Fixed Assets and Dispose of them after Expiry Date with selling amount.


Case 4: Purchase new Fixed Assets.
When a User creates a new Asset, the Cost cannot be entered through the Asset profile window; hence, the depreciation schedule is not there. This Cost must be entered through the purchase new Asset Menu by creating a bill and then paying or making a direct payment.
Users can enter new assets into Hinawi Software by
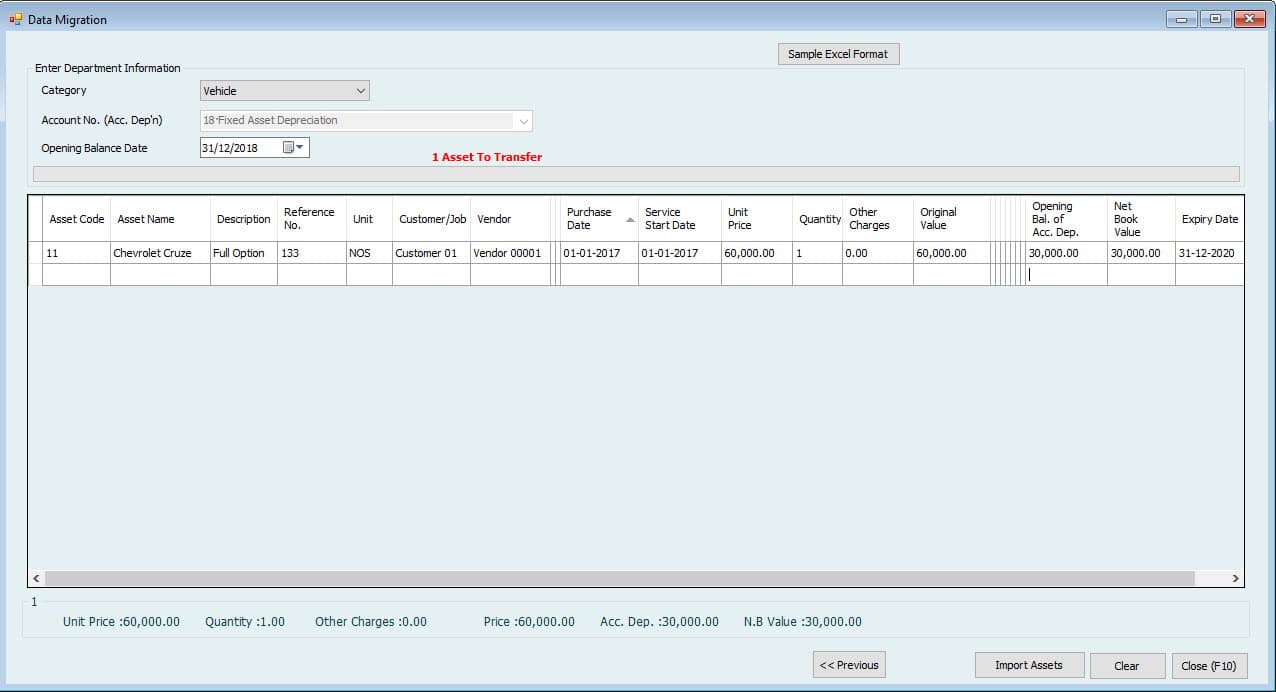
1. Import Fixed Assets From Excel
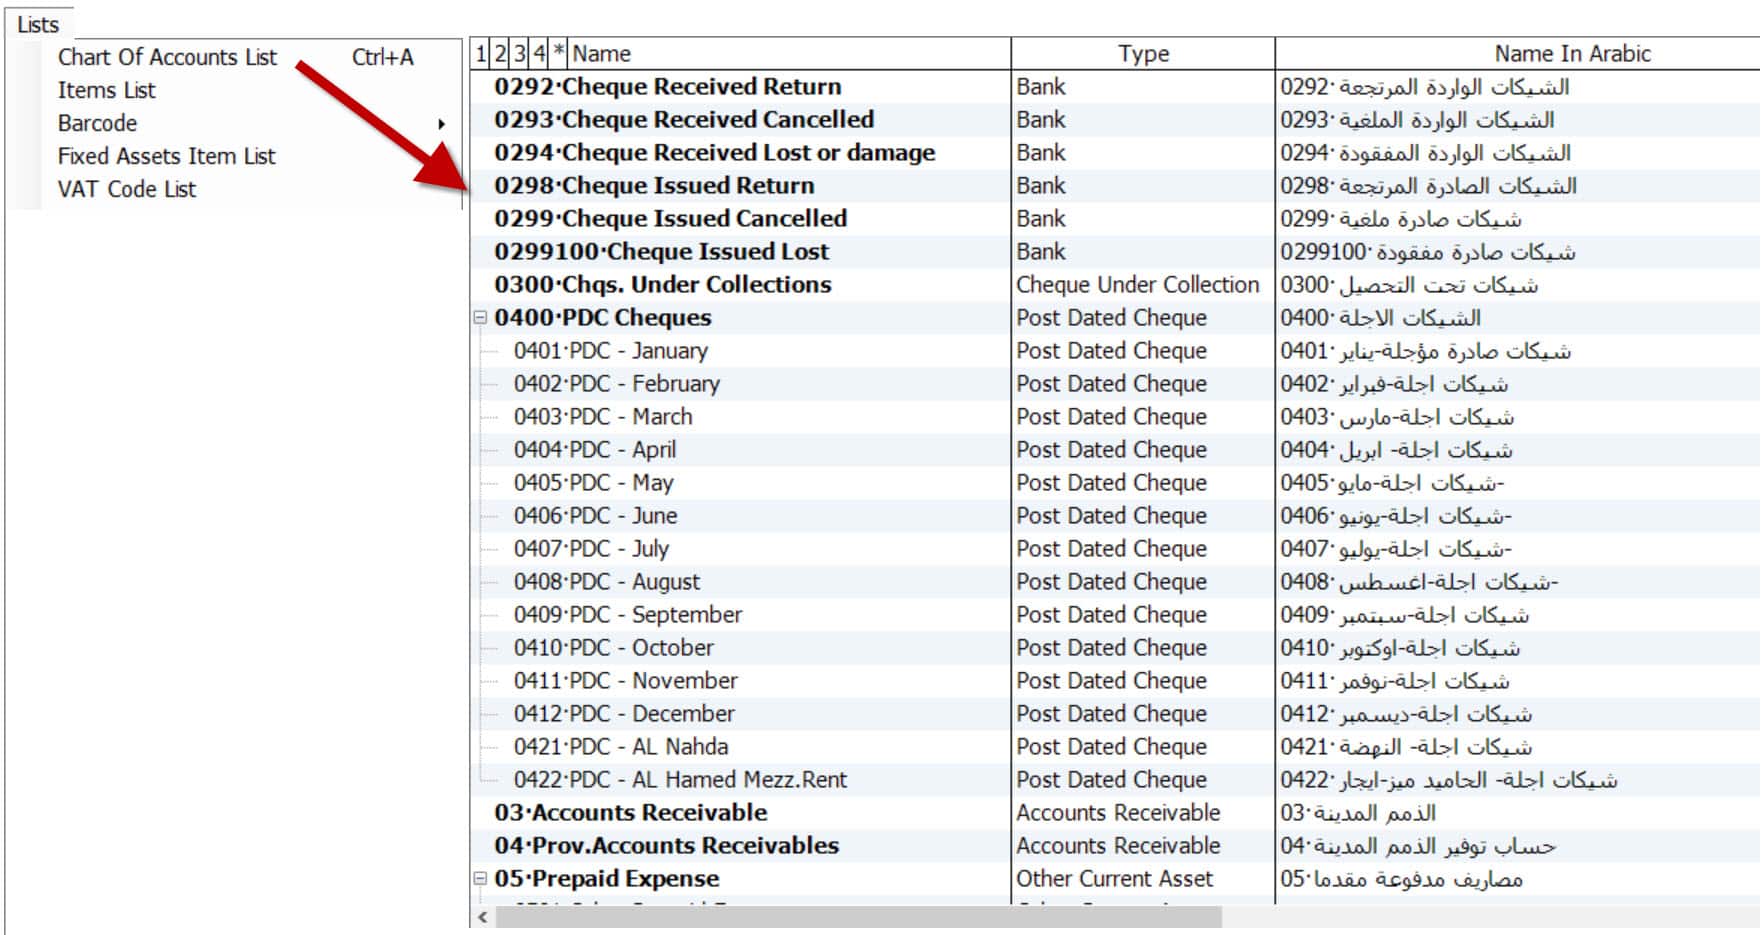
Go to File-->Import \ Enter Lists and Balances-->Fixed Assets-->Import Fixed Assets.
Now in this window, you have selected how you want to import.
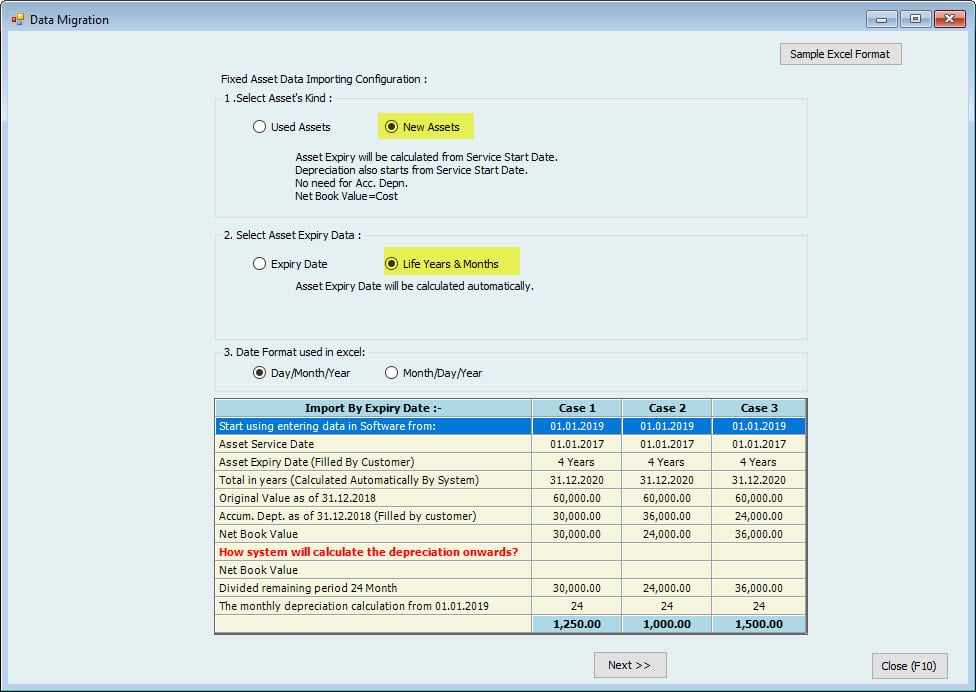
Select the category for which you want to import assets first.
Note:
Categories will import fixed assets. You cannot import assets together in one turn if you have more than categories.
After selecting the category, Account no. We are welcoming automatically from category settings.
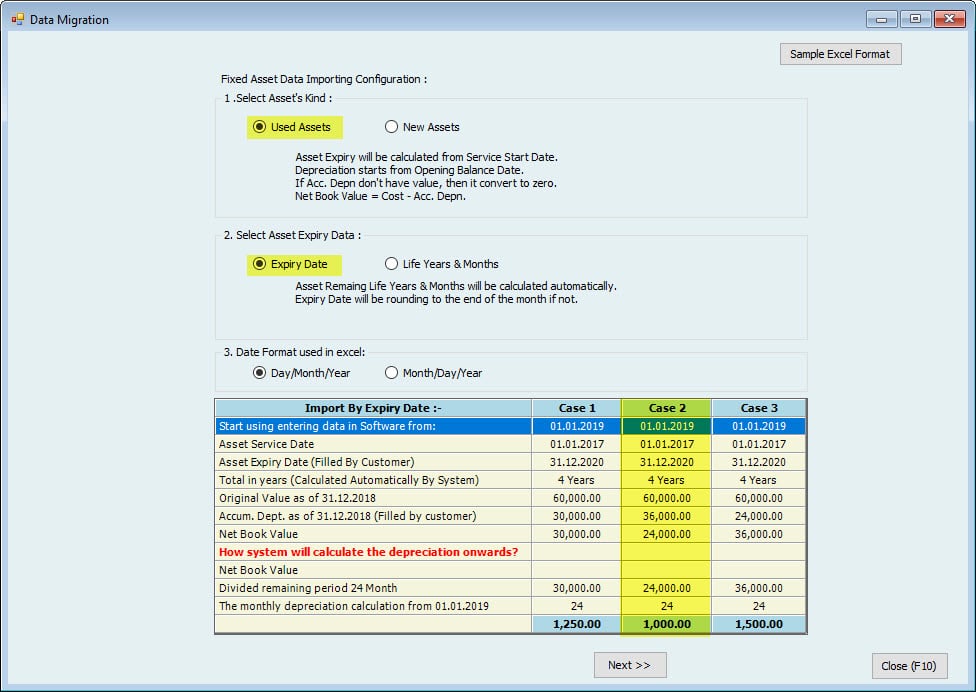
Enter the opening balance Date if you selected used assets in the previous window.
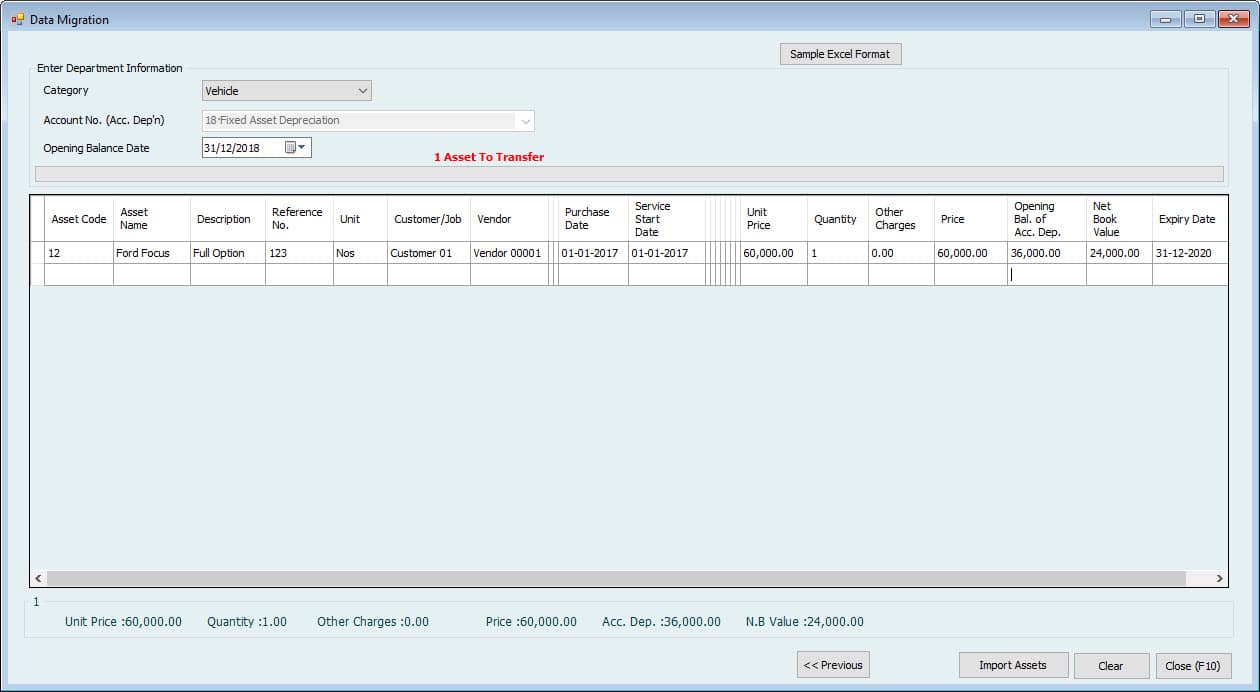
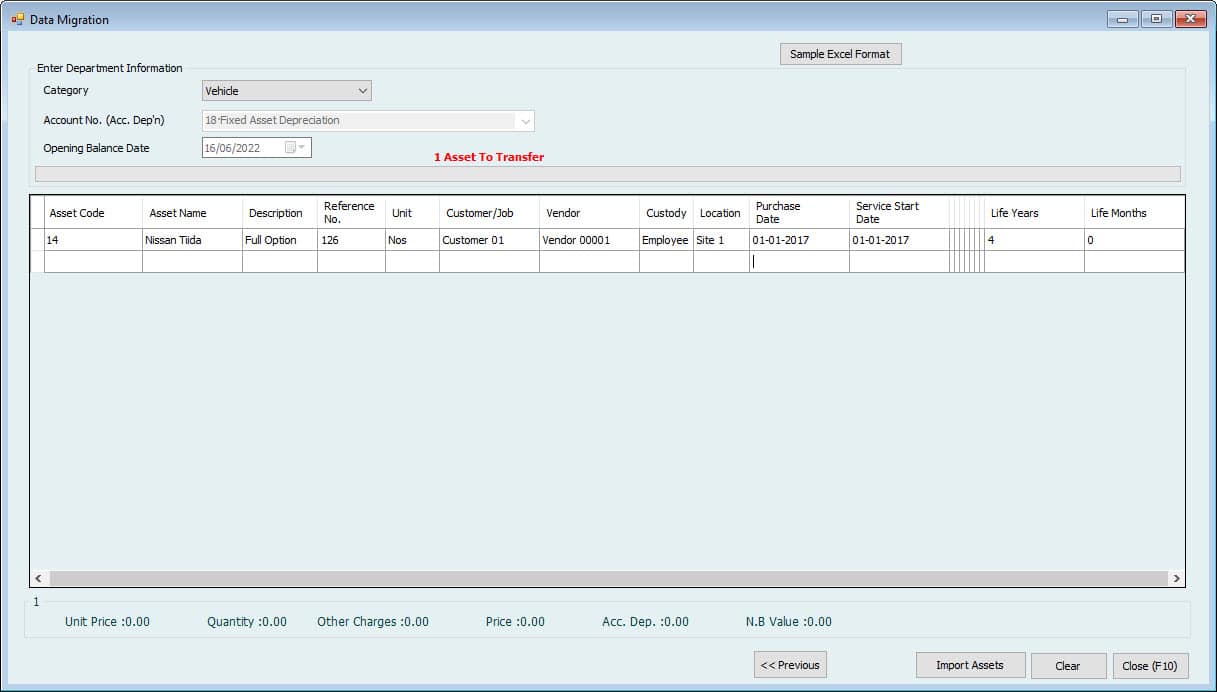
Now you can see the same column name in excel. You have to copy the Data from excel and paste it here. You can copy the whole column for one category from excel, e.g., Asset code, and right-click on the first box here to paste.
Suppose you want to enter the same value for all the assets in one column. Enter the Data in the first column, right-click CK, and select copy down. It will copy all the columns down.
This way, you can fill all the columns and click on import assets to import fixed assets into the software
2. Create a New \ Used Asset
Go to Fixed Assets-->Create New \ Used Asset
Users can use this form to enter the Fixed Asset information directly into the System. 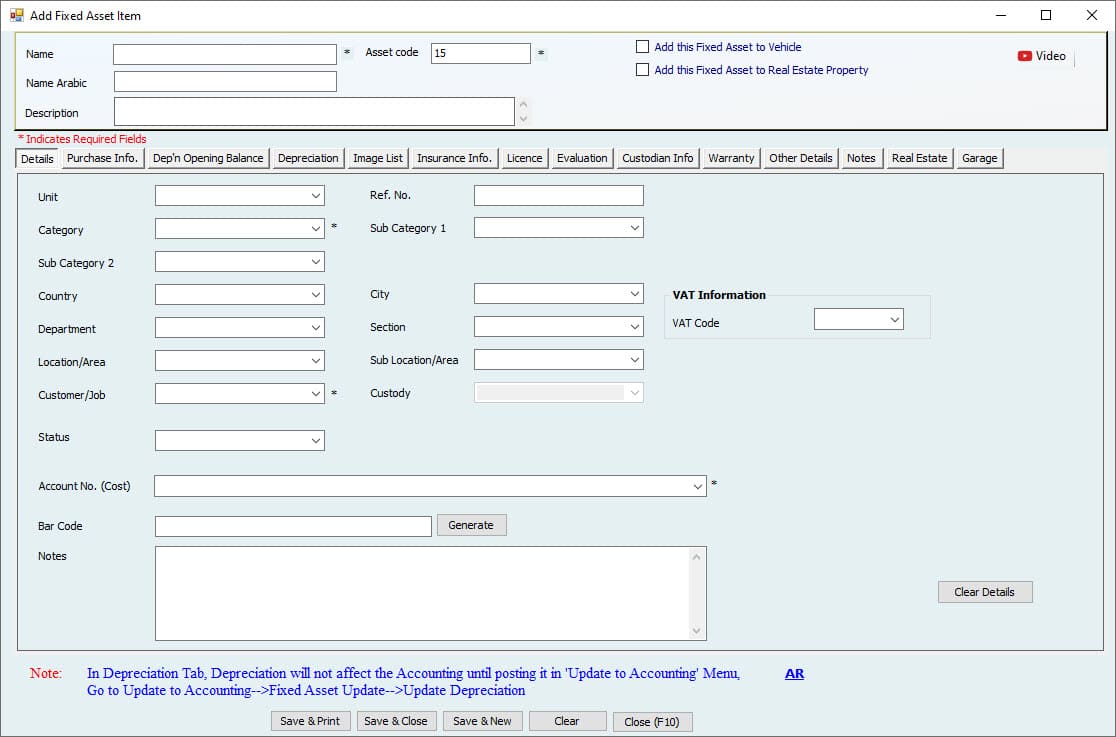
Make sure to Fill the all the mandatory information in the details tab.
And then move on to Purchase Info Tab. The User must select "NEW" to save an Asset not yet purchased.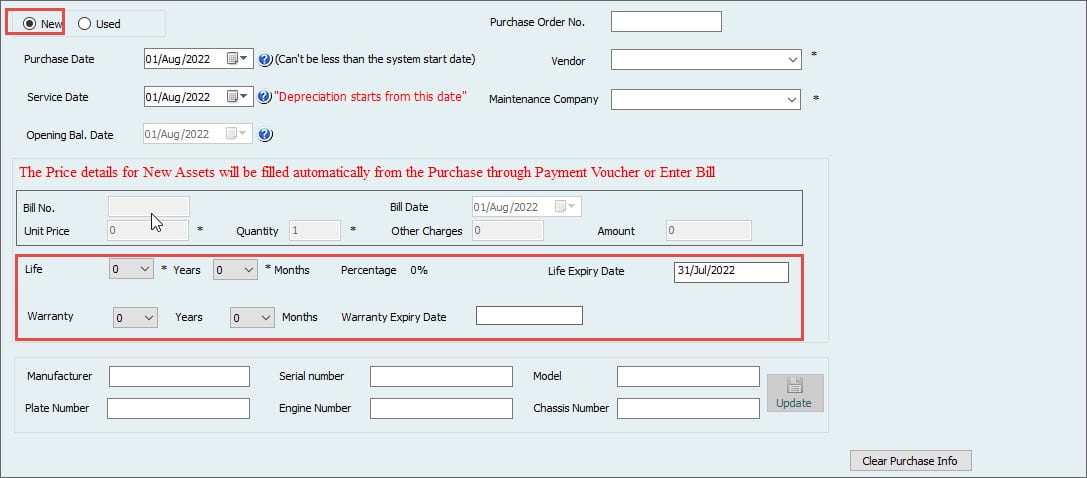
Option "NEW"
If the fixed Asset is new, some fields will be blocked. Users cannot enter those fields as they are for used assets. The Cost of new fixed assets will not be entered through this window. It will be entered through a bill or payment window. This will be covered later in the Purchase Asset Menu.
Other details are extra fields for vehicles to enter their registration information. This can be updated anytime.
After saving the "NEW" Assets by any of the above methods (import from excel or create a new \ used Asset window), the User can purchase the New Asset.
Purchase Asset
As discussed earlier, when a User creates a new Asset, the Cost cannot be entered through the Asset profile window; hence, the depreciation schedule is not there. This Cost must be entered through the purchase new Asset Menu by creating a bill and then paying or making a direct payment.
To do this, Go to Fixed Assets-->Purchase Asset
To generate a bill for a new Asset,
Go to Fixed Assets-->Purchase New Asset-->Create Bill for New Asset
Create Bill for New Asset
Go to Fixed Assets-->Purchase Assets-->Create Bill for Purchase Asset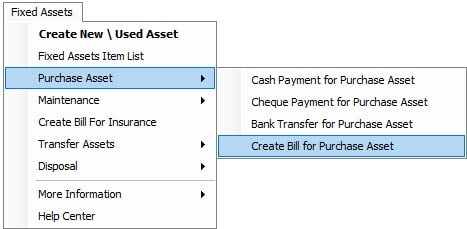

Then on the right side of the Fixed Asset tab, the User can see a button for Load New Assets. Click on this button to load new assets for this particular vendor. Remember, only the assets created as new and for this vendor will be shown here. Clicking on this button requires permission if the User wants to load a new Asset.
Click Yes, and the Asset (s) will be loaded into the column. Users can enter the Asset price, Quantity, other charges, or total Amount for the Fixed Asset. Whatever information entered here will be updated to the fixed Asset profile, and Depreciation will be scheduled automatically.
If the User enters the bill, this bill can be paid usually now through an accounting Module using any of these three windows.
The other method is direct payment. Rather than entering the bill, the User can make direct payment for this fixed Asset. There will be no accounts payable in direct payment as we are recording the Cost and payment for the fixed Asset simultaneously. But the User has to select the Load New Asset button to load the Asset in these forms.
All three forms have the same procedure, but only the payment method differs.
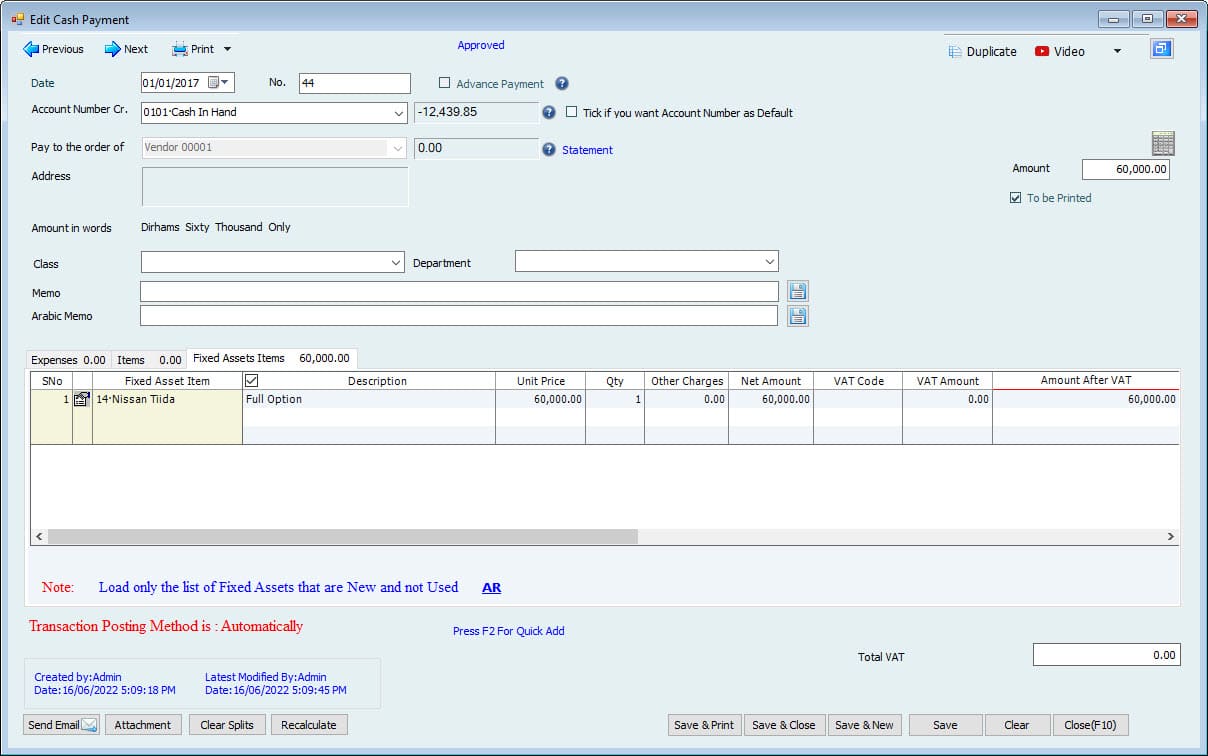
Important: The forms in the purchase new Asset window (Enter Bill, Cash payment, Cheque payment, or Bank transfer) are also available in the accounting Menu; the reason to use them from here is the option "Load New Asset," which is not available in accounting Menu.
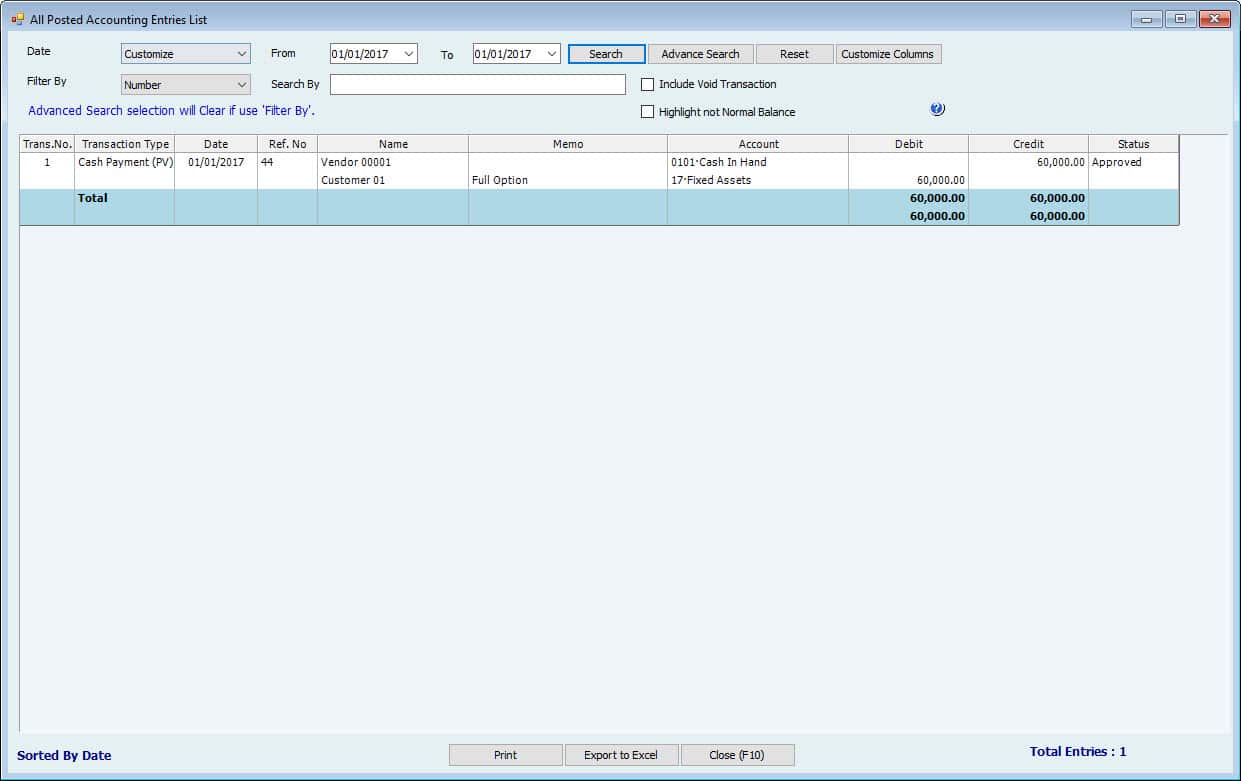
After purchasing, the Asset using payment, Go to Reports-->All Posted Accounting Entries List.
Users can see the Payment entry here.
Then Go to Fixed Assets-->Fixed Asset List, then search for the Asset created and Purchased.
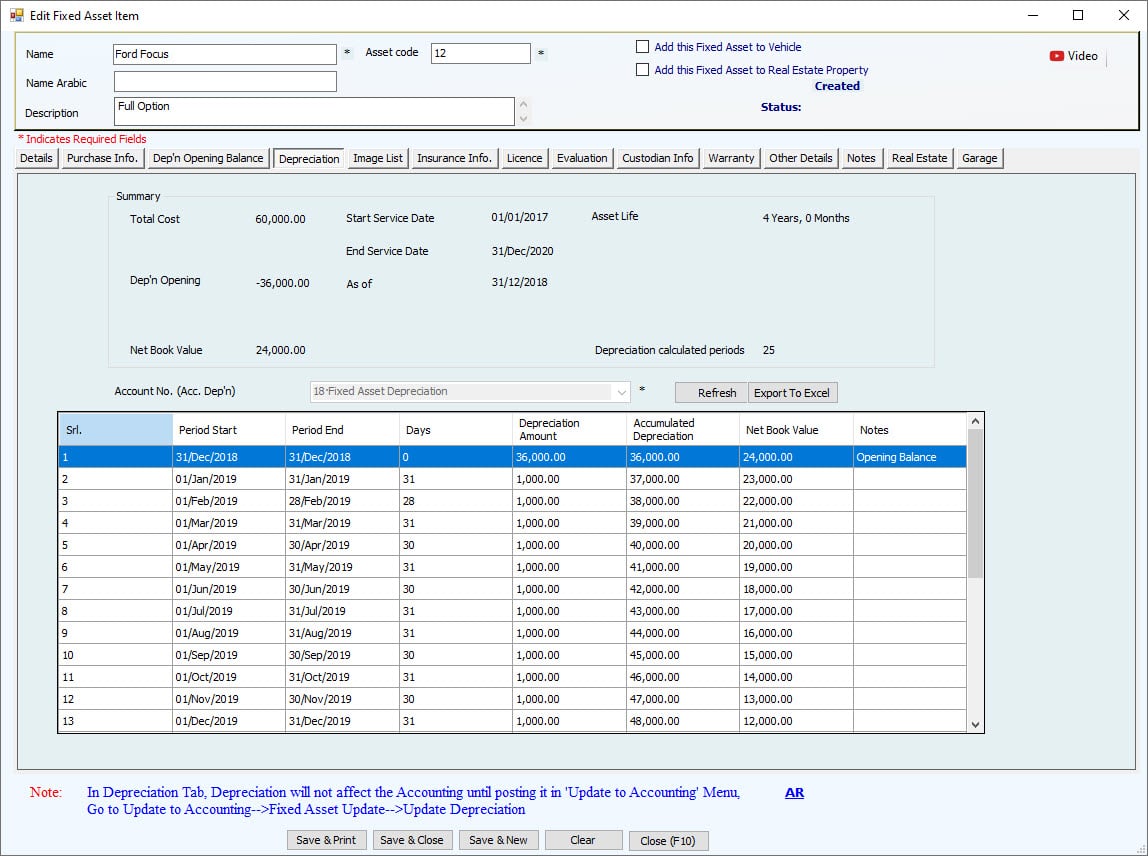
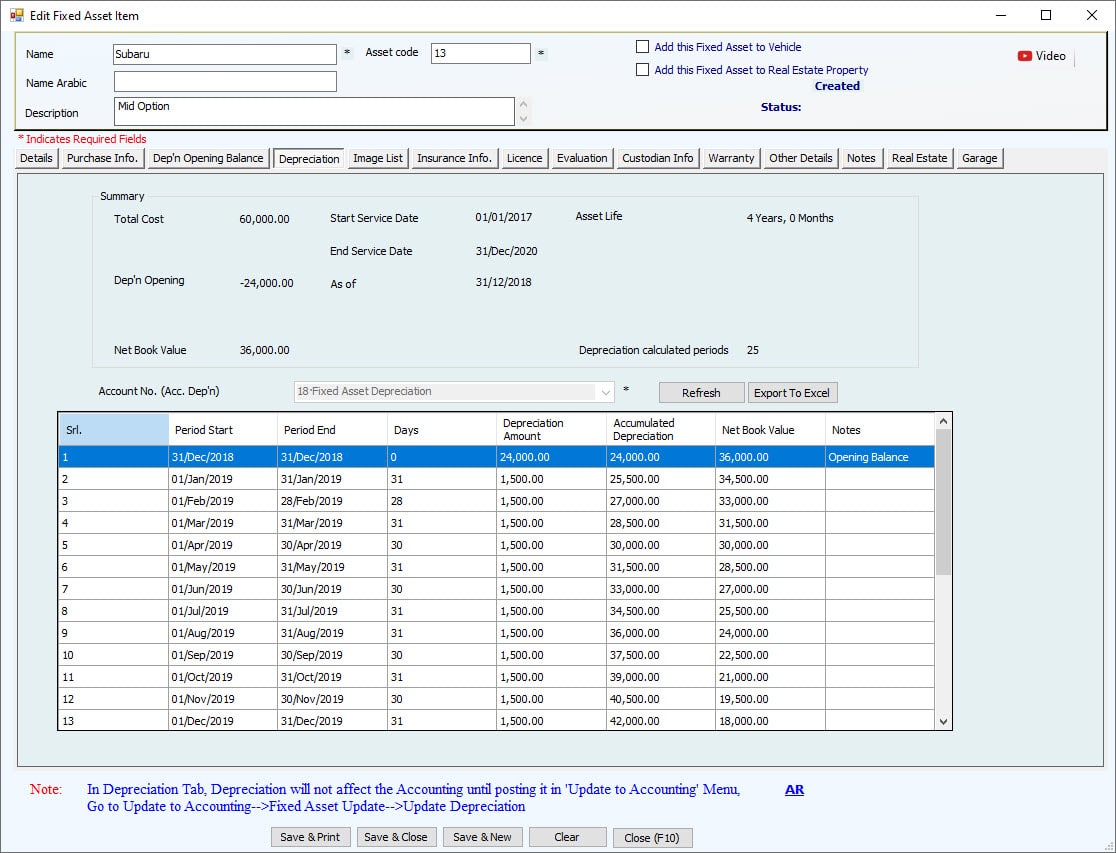
Go to Depreciation. Their User can now find the depreciation details
After entering the Cost of new assets, the Depreciation will show automatically in this window and reports.

The table shows monthly Depreciation for fixed assets equally for the remaining Life and netbook Value.
This schedule can be exported to excel by clicking the Export to Excel button.
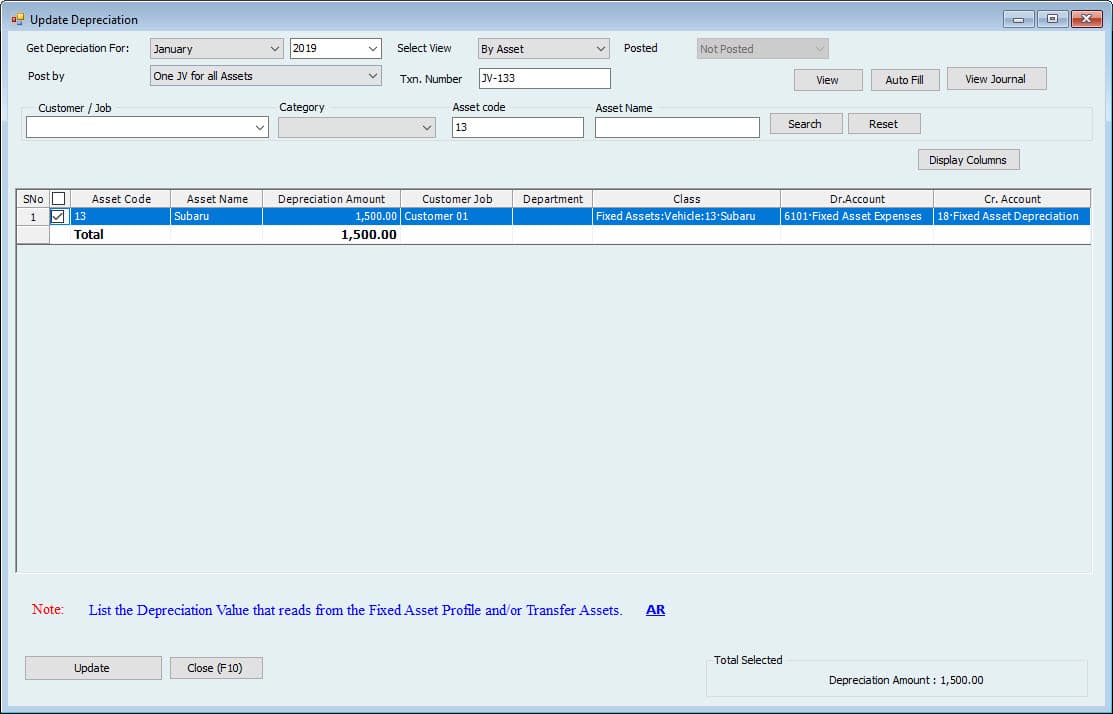
Update Depreciation
After entering the Cost of a new Asset, the Depreciation is ready to be posted anytime for new and used assets. Depreciation is calculated automatically, but the User must click the Update button to update the monthly Depreciation.
To Do this, Go to Update to Accounting-->Fixed Assets Update-->Update Depreciation.
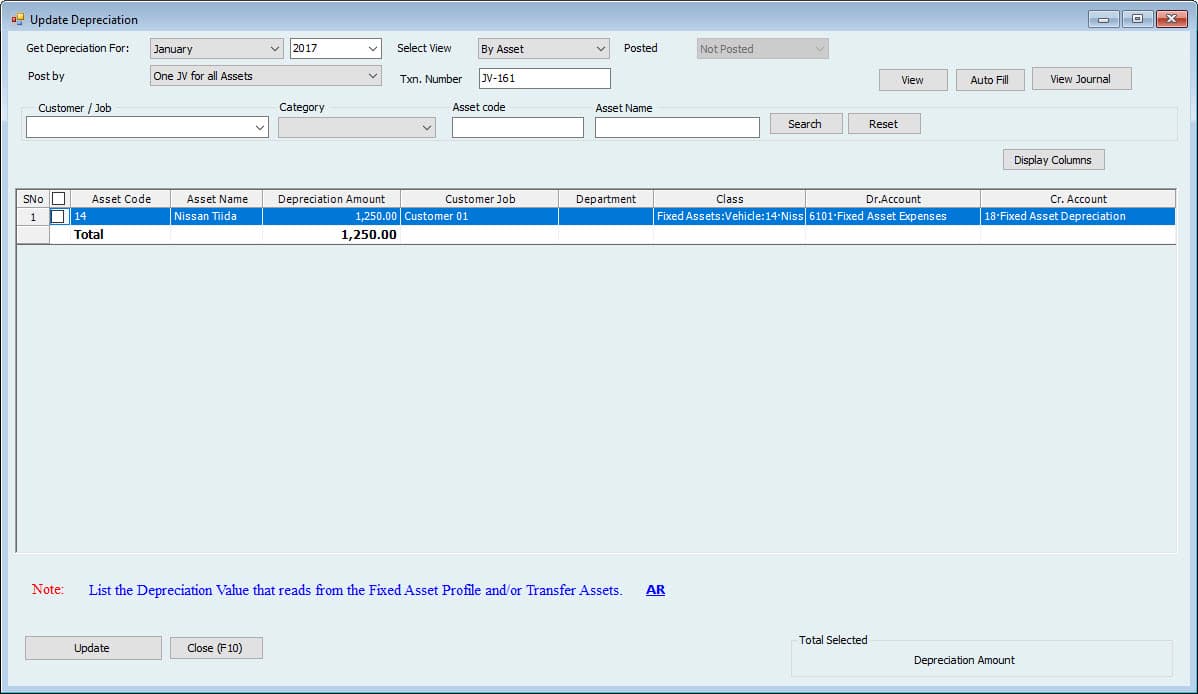
In this window, select the month for which the Depreciation needs to be posted.
Select View how the User wants to post Depreciation either by each Asset or by categories as one category total category Amount.
They posted a dropdown to select if the User wants to see the posted Depreciation or not posted.
Select the Number of JVs either User wants to post Accounting all assets in one JV or a separate JV for each Asset.
Enter the transaction Number. (By default, it's coming from the Journal voucher series)
Select the Customer name if Depreciation is for the Asset used for a specific Customer.
Tick mark the Asset (s) to post Depreciation and click the update Accounting button. Entry will be updated to Accounting.
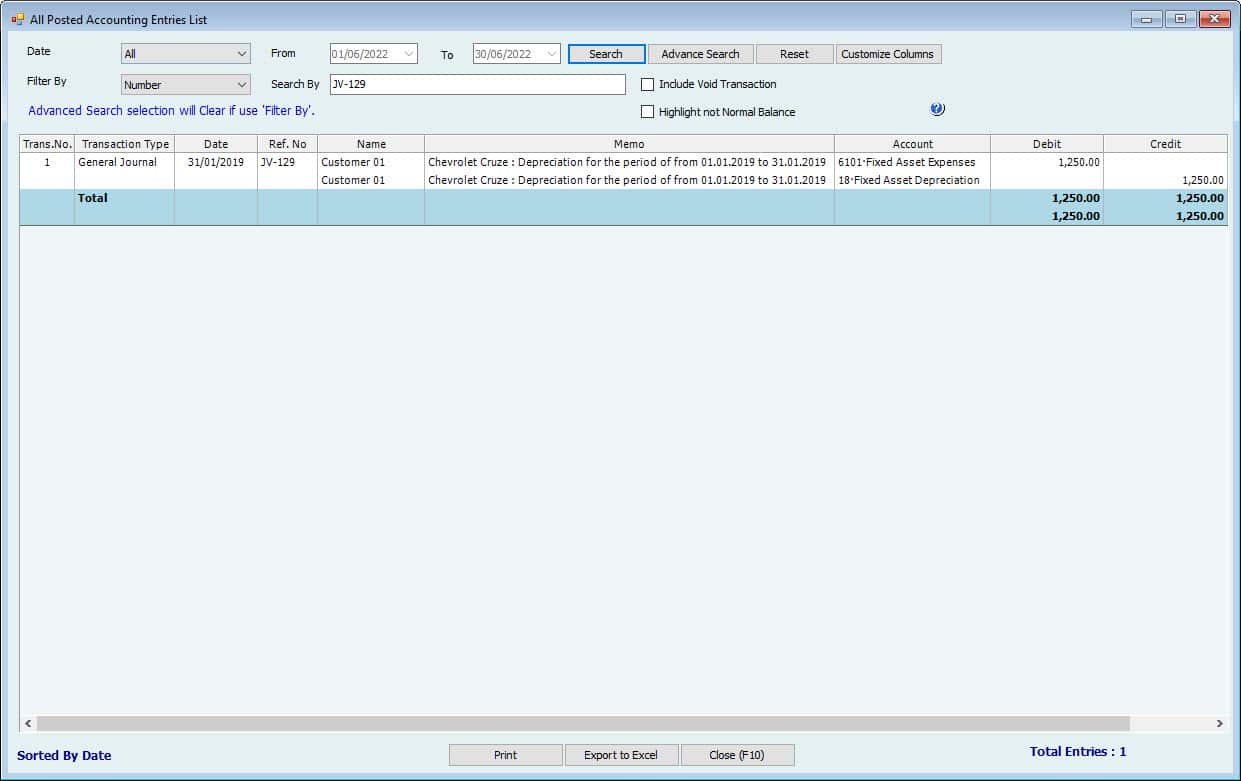
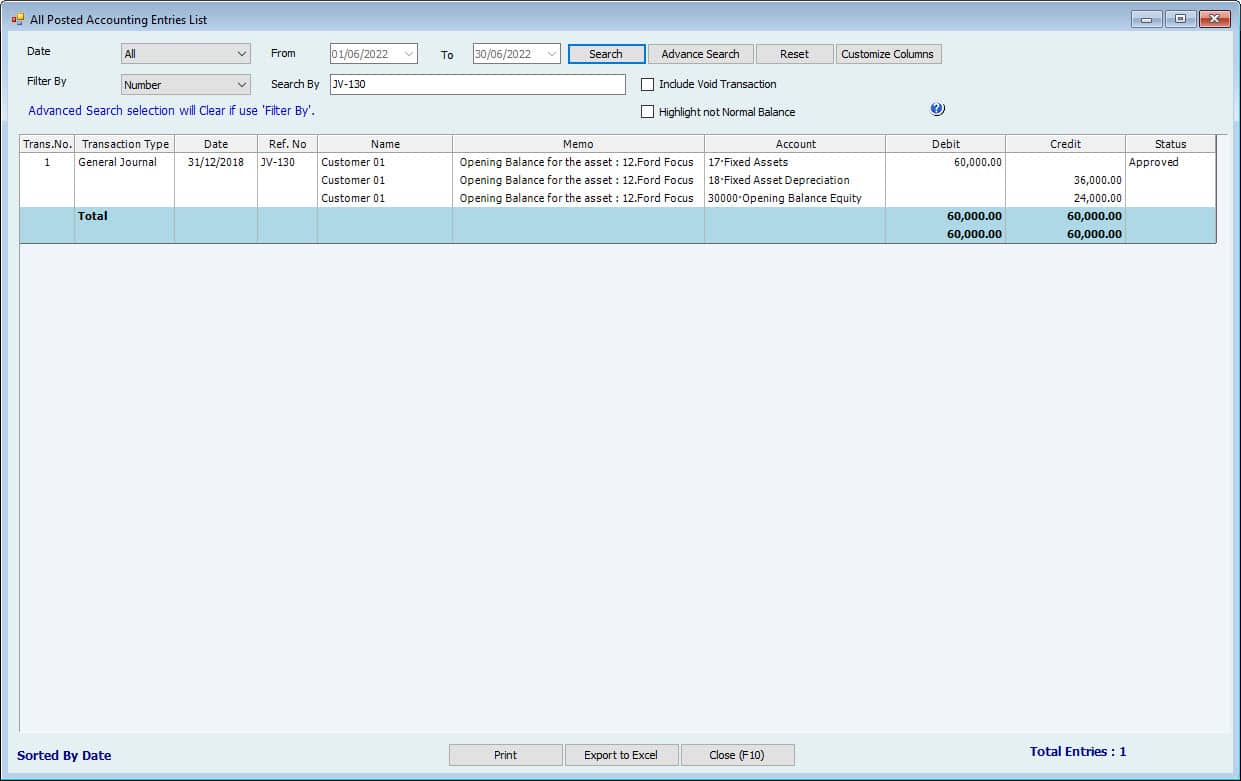
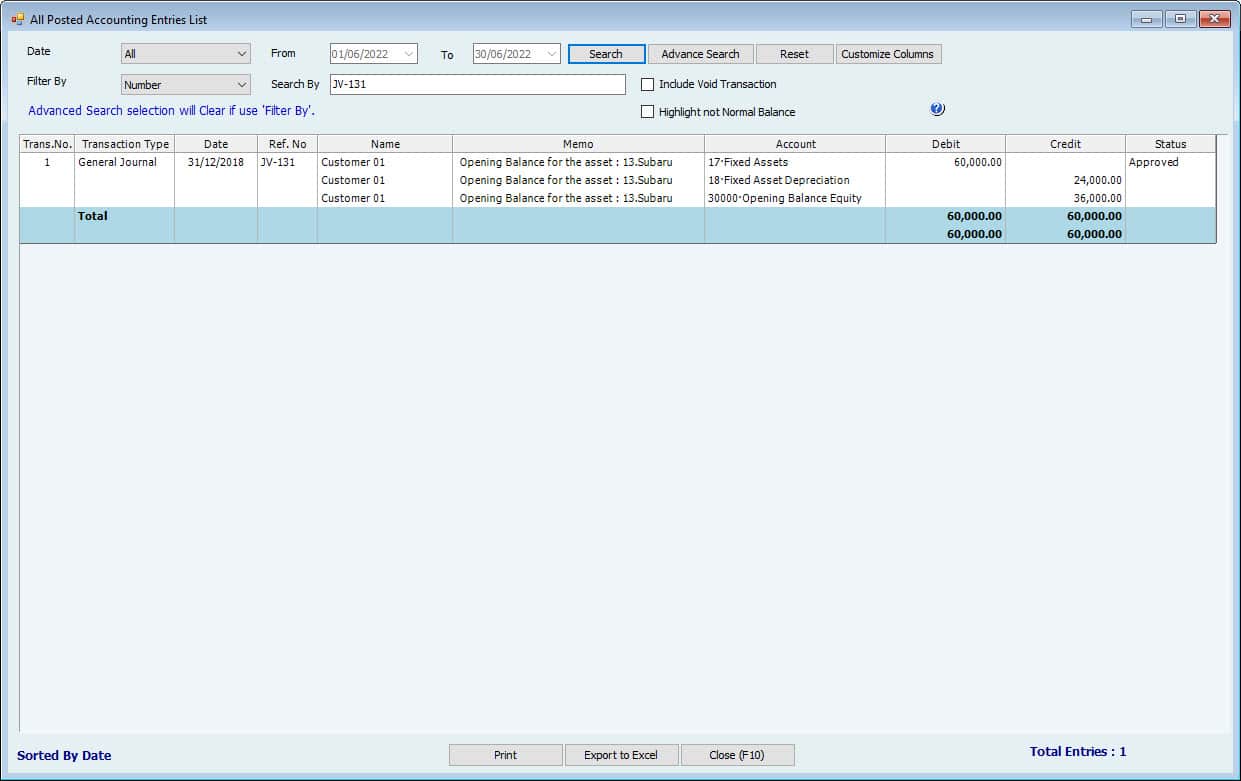
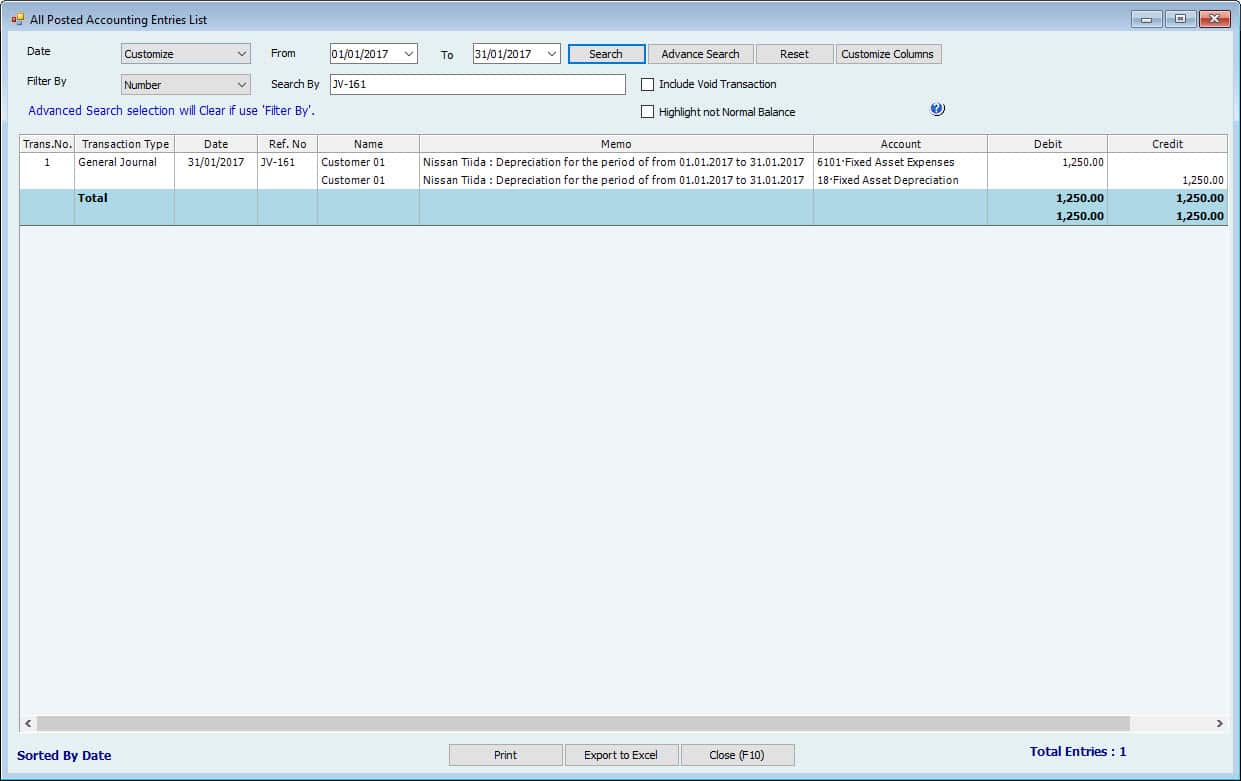
After that, Go to Reports-->All Posted Accounting Entries List
Users can see the Journal entry for the Posted Depreciation
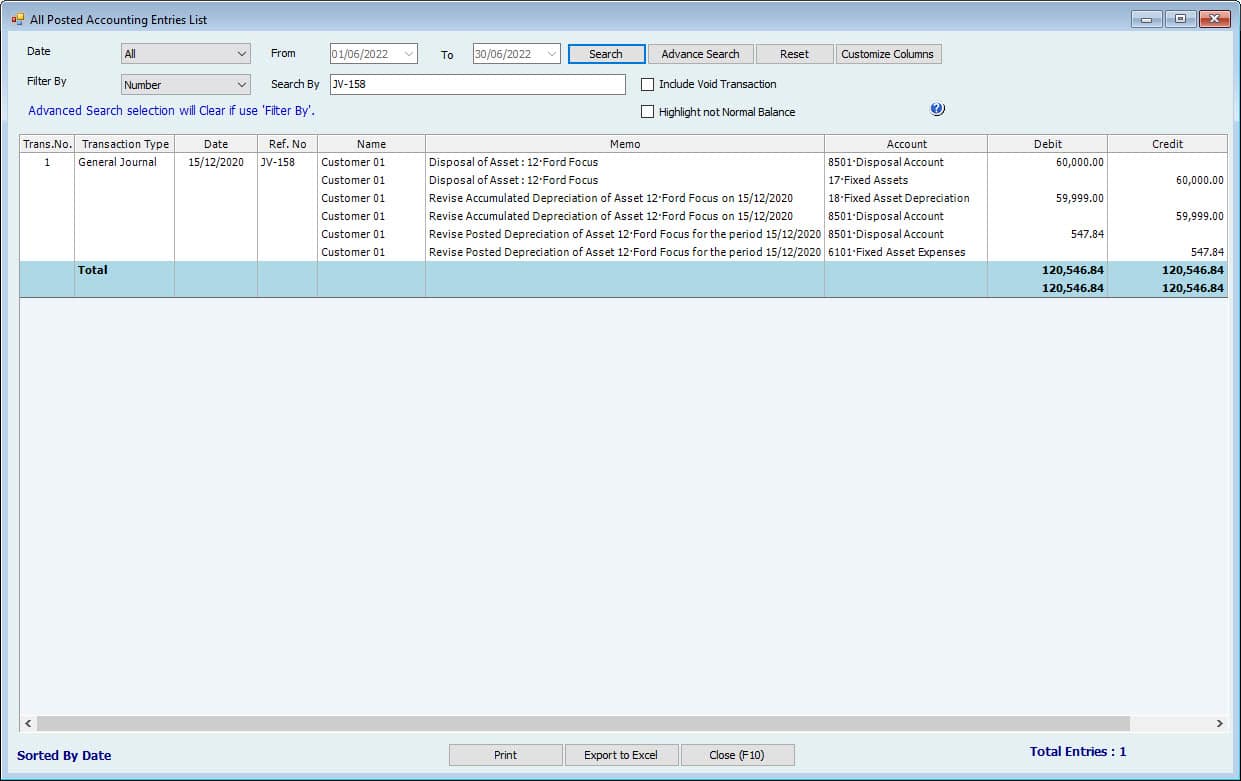
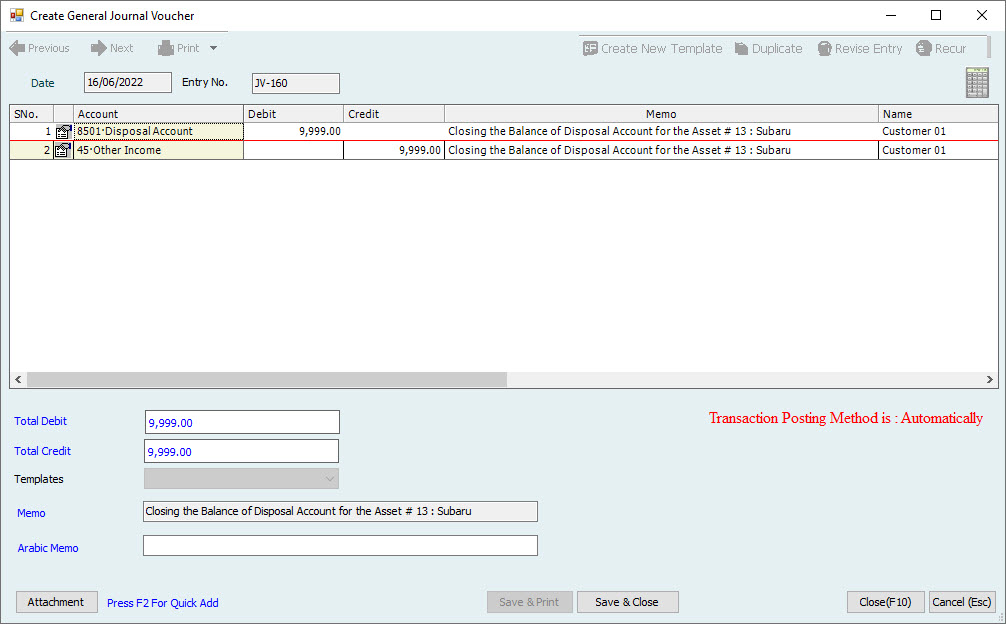
Dispose of Asset
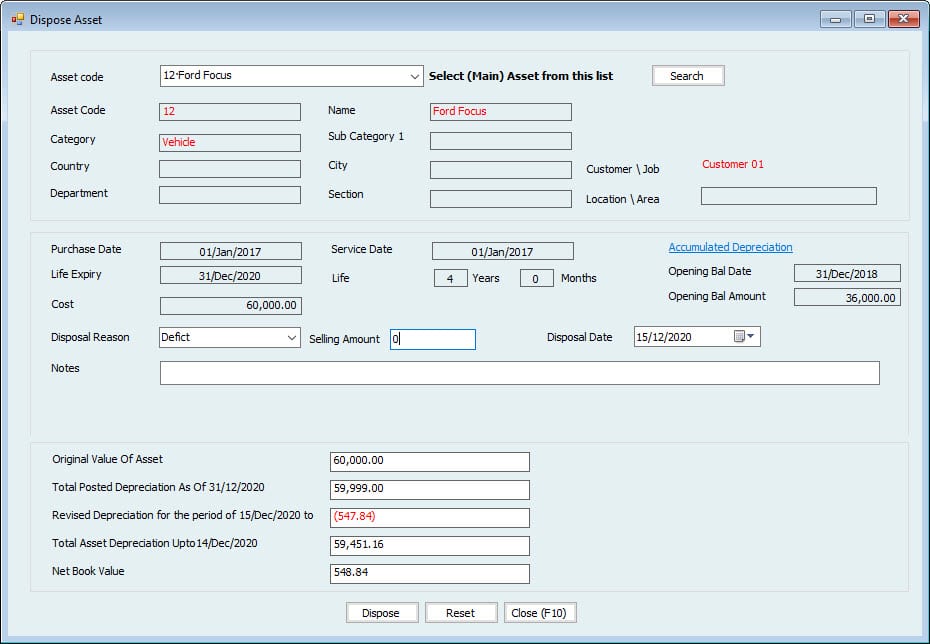
Now to Dispose of the Assets,
Go to Fixed Asset-->Disposal-->Dispose of Asset

After entering this information, save the Disposal. This Disposal will not take effect before approval.
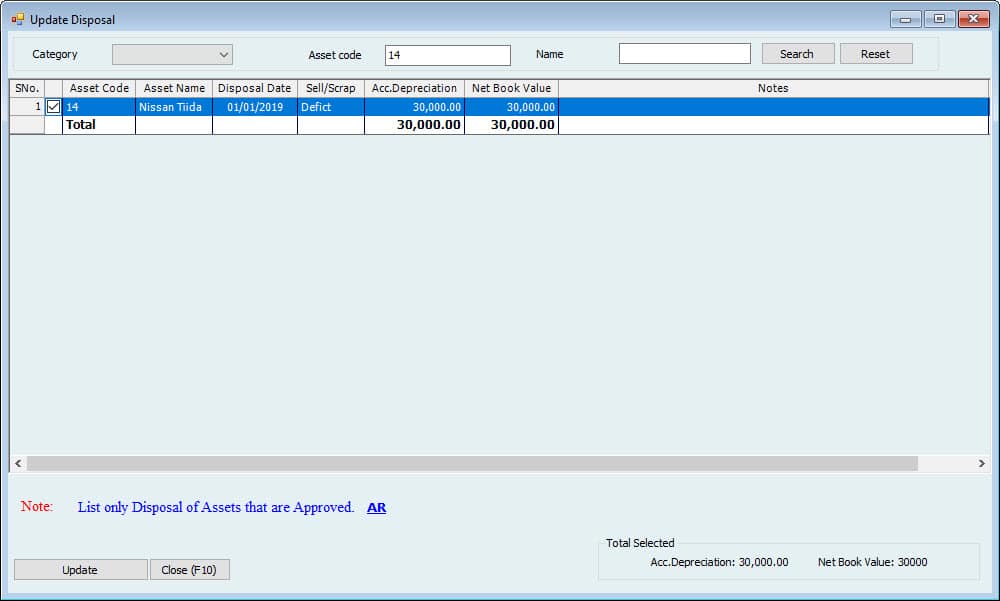
Update Disposal
Since the fixed Asset has been disposed of, the User can update this disposal entry to Accounting.
Go to: Update to Accounting-->Fixed Assets Update --> Update Disposal
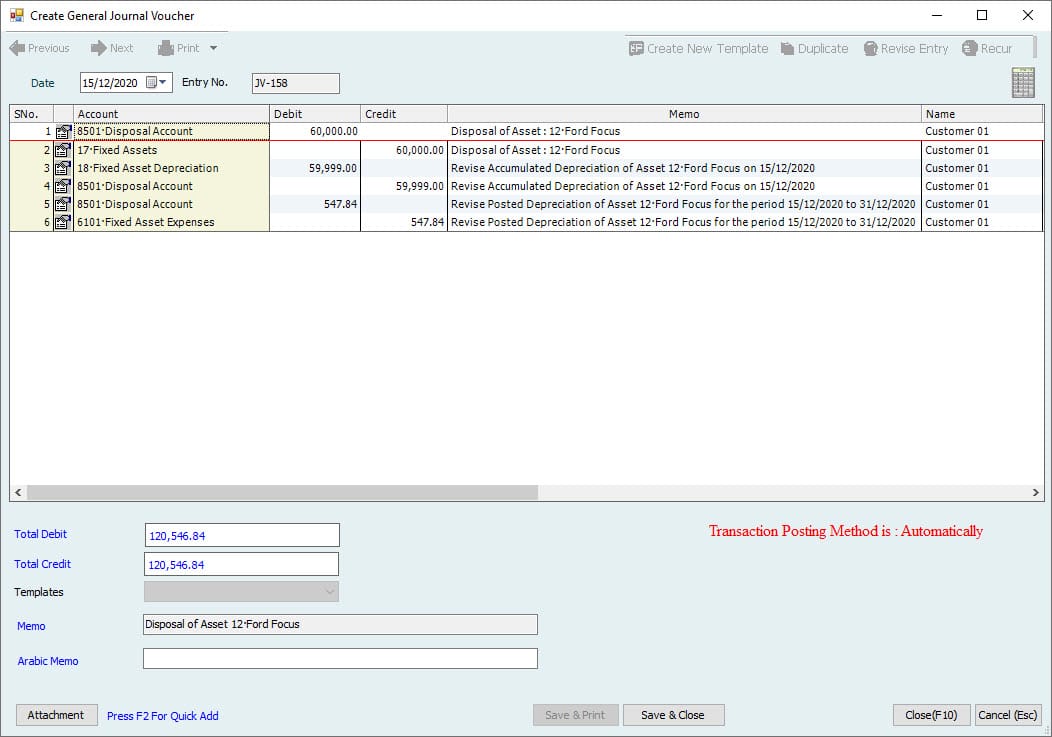
A window will appear with all approved disposals. Tick mark one to update and click on the Update Accounting button.
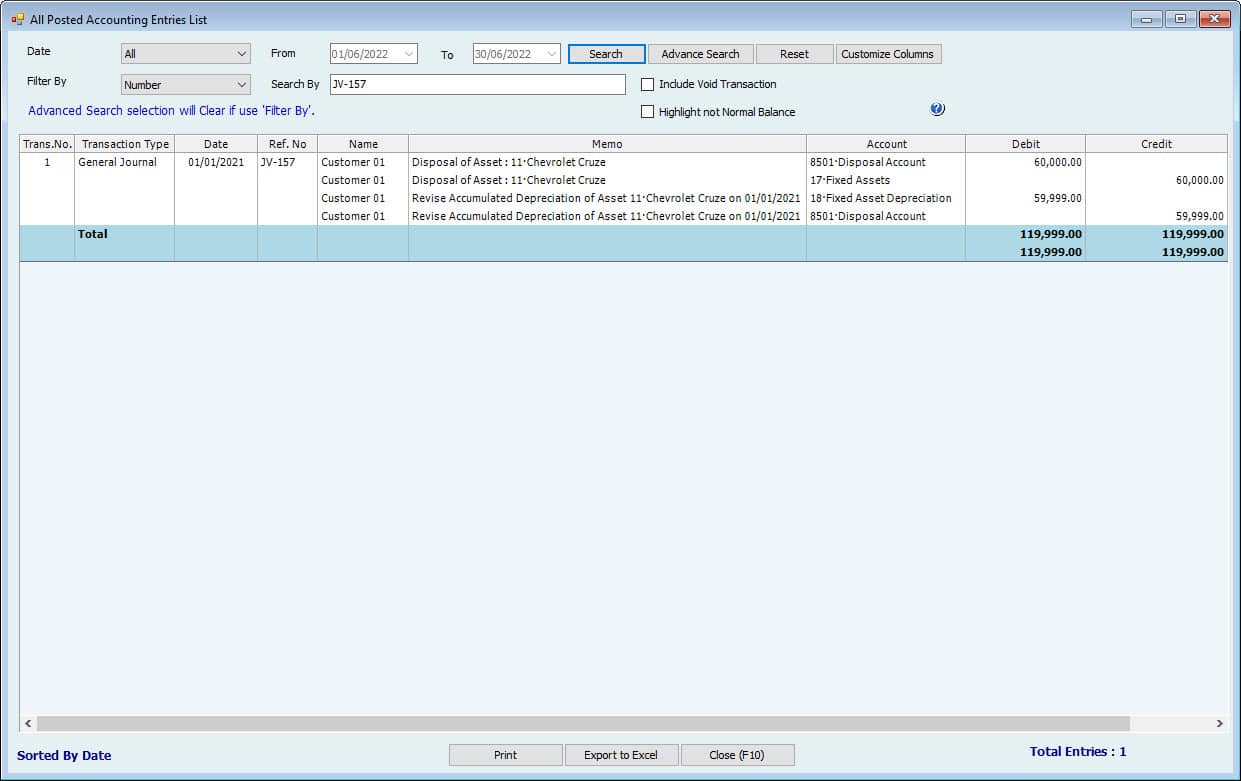
The System will open a new window with a JV showing the reversal of Cost and accumulated accounts and closing to Disposal accounts. These accounts are filled from category settings. Users cannot change anything in this entry and click the save button to post this entry to Accounting.
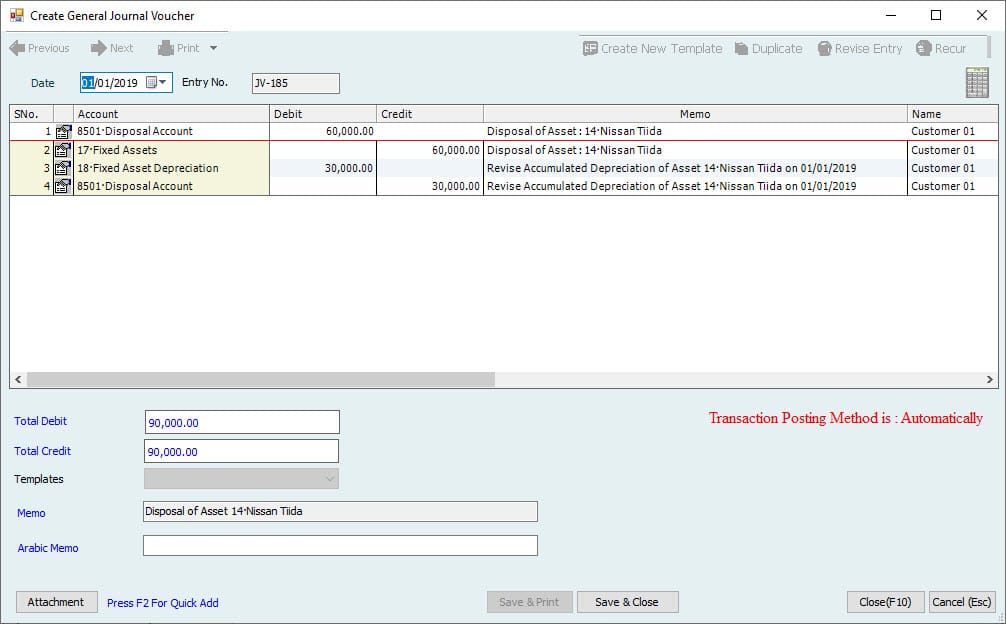
Important:
Remember, this will reverse the Cost and accumulated Depreciation, and the User must enter the Disposal receipt manually.
All the entries User can find it in the All Posted Accounting Entries List
Go to Reports-->All Posted Accounting Entries List

| Update \ Post Opening Balance. Required | Go to: Update to Accounting Menu --> Update Opening Balance | This step is a must before starting the entries. |
| Update Opening Cheques Under Collection - CUC | Dr. CUC Cr. 30000 Opening Balance Account | |
| Update Opening Post Dated Cheques Issued - PDC | Dr. 30000 Opening Balance Account Cr. PDC | |
| Update used Opening Fixed Assets | Dr. Fixed Assets Cr. 30000 Opening Balance Account | |
| Update Opening Security Deposit for Real Estate | Dr. 30000 Opening Balance Account Cr. Security Deposit | |
| Update Opening Differed Income for Real Estate | Dr. 30000 Opening Balance Account Cr. Deferred Income |
