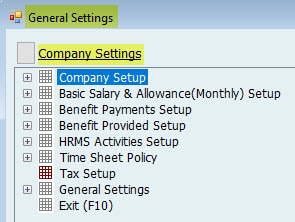
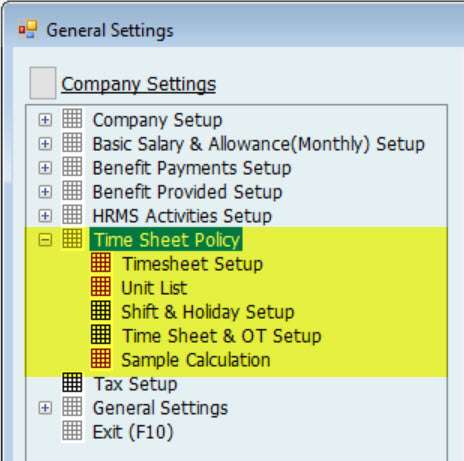
01. Company Settings
Here, the User can create a new Company. The System allows users to create any Number of companies in the same database or create separate databases for each Company. This feature helps hold Companies. There will be a separate Setup, reports, and level of acclevelsor for each Company.
Note:
When the icon is Gray, the Setup is not done.

1-1. New Company / Company wizard:
To create a new Company, go to:
File → Setup Modules → HRMS Settings → General Settings → Company Setup →New Company
All Information with (*) is a must to fill.
Company Information Tab
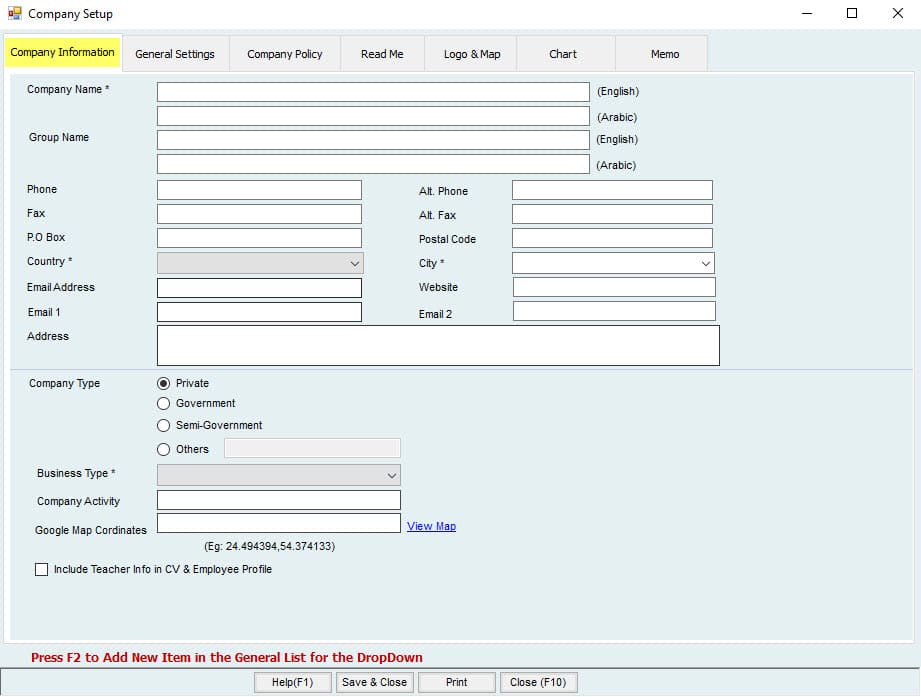
Fill in the Company name, phone, email, etc., email first tab.
Note:
Filling the name in English is a must. If a User needs to run the software in Arabic, he should fill in all the Arabicfeell.
Checkfeelox "Include teacher info in CV" if you are in school business. Use F2 to Quick Add more items or names in dropdown fields.
General Settings Tab
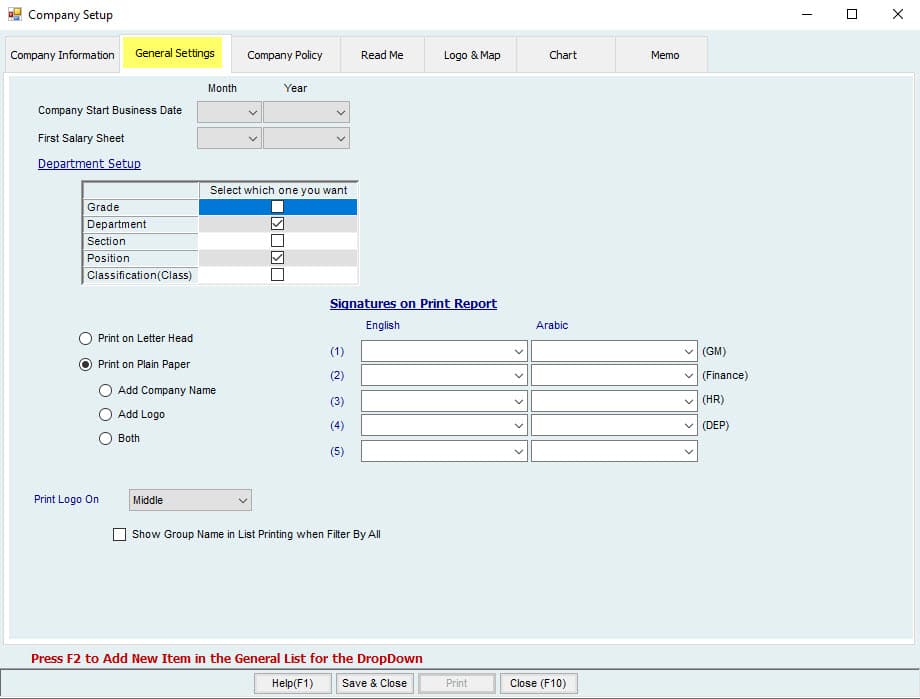
Business Start: Users can set the Month and Year of starting the business. Transaction entries before this Month/Year are not allowed before this Date.
Payroll Start: Users. Can set Can Month and Year of starting Payroll for the Company. Creating a Payroll before this Month/Year is not allowed.
e.g., Business Start: 01/2010, Payroll start: 01/2014, then for the chosen Company, the User can create new employees whose joining Date should be greater than the business start Date, i.e., 01/2010. And if an Employee's joining Date is 01/01/2011, then the set Salarysalary Effective Date should be greater than or equal to the joining Date.
The User cannot create ate Salary sheet for the Employee before 01/2014 since the Payroll started on 01/2014.
Depart Payroll up:
Here, the User can select what levels they want to use for the employees by checking the option wanted to Activate in the Company Default check Department and Position and the User them.
The User can add the d and link between the selected levels in Company Settings→ Company set up→ Department Setup and then add different departments and positions for the Company.
The User can view and select the levels (Department, position, etc.) whenever a new Employee is created.
For different levels, the User can use various Rent Activities p and set basic Salary & allowances benefit payment; the benefit provided Setup differently.
e.g., If the For IT department and Operation department are added in the department Setup, and Employees are added for each department, then, in that case, the User can have different activities and salsetupsetup for each department.
Print on Letter Head:
The User should check this if they want to print on the Company Letter Head.
Print on Plain Paper:
The User should check this option if they want to print the Company Name, Logo, or both in letters.
On there on the Report:
Here, the User can add the title to the reports. Fill in English if you are working in English and Arabic if you are in Arabic.
Print Logo on:
The User can select where to print the logo through the Dropdown.
Company Policy Tab:
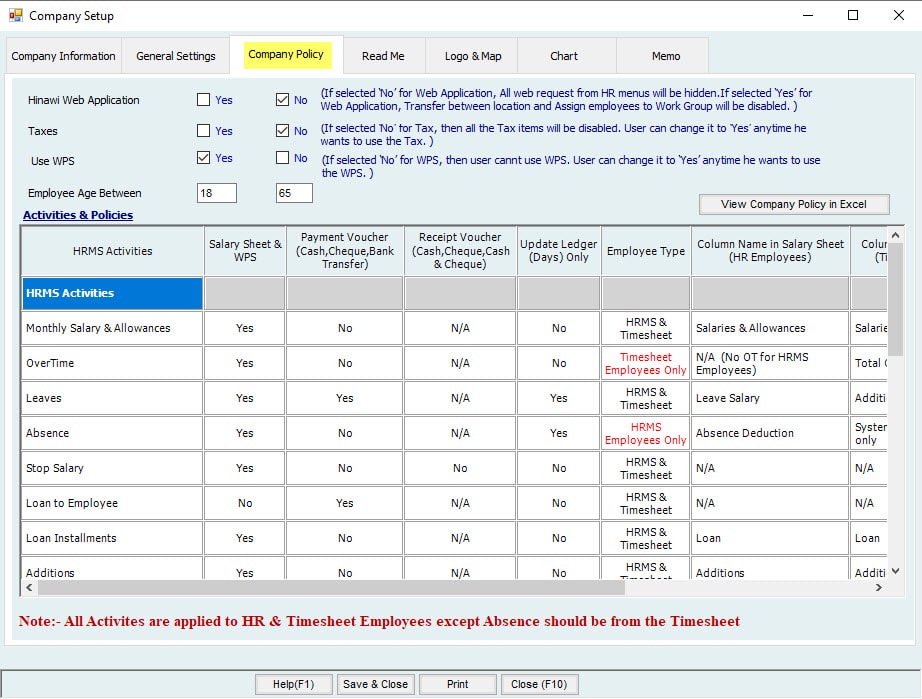
Please select the options whether the User wants to use the following. (Changes between Yes/No can be applied anytime with some conditions)
The User can view how the catamount areasareis paid\taken to\from the Employees. Here, the Payment mode will auto-fill from advanced settings for each activity. Users select the Payment mode from advanced settings for each activity. i.e., If the payment mode for
EOS is selected as "Pay through Salary sheet" from advanced settings; payment mode in this window for EOS will auto-fill the Value with "Pay through Salary sheet". ." changes in the payment mode from advanced activities will update in this window.
Important:
The Amount will be shown in a separate column as Total OT.
Read Me Tab:
When setting up a new Company, the User must read this part carefully.
Logo and Map Tab:
Here, the User can attach the Logo, Map, and Photo of the Company. When printed, the logo will display.
Chart Tab:
The User can define the organizational chart of the Company. Right-click on the area and Click Add head to add a head for the organization. This chart is not linked with the department Setup or any part\module in the System.
Management:
Here, the User can fill in the information Company of the management.
Memo Tab:
Users can add a general Company memo here.
CAUTION!
1. It is strongly recommended to APPROVE each transaction\activity if you believe there will be NO different chan. When an activity is approved, it will change the Employee's Status and affect the balance transaction.
2. Changes in the Setup are allowed in the future but will not affect the previously approved activities/transaction.
3. Once done from the Default Setup, the User can no longer change the settings since it's a 1-time Setup. Items theatre Setup will be grayed out. The User can go to Advanced Settings for more options.
4. Creating EOS will not affect any transaction activities unless approved.
5. We strongly recommend the Admin User not to share the admin paswithord with anyone since they may change the Company policy.
Note:
Approved activities can't be changed.
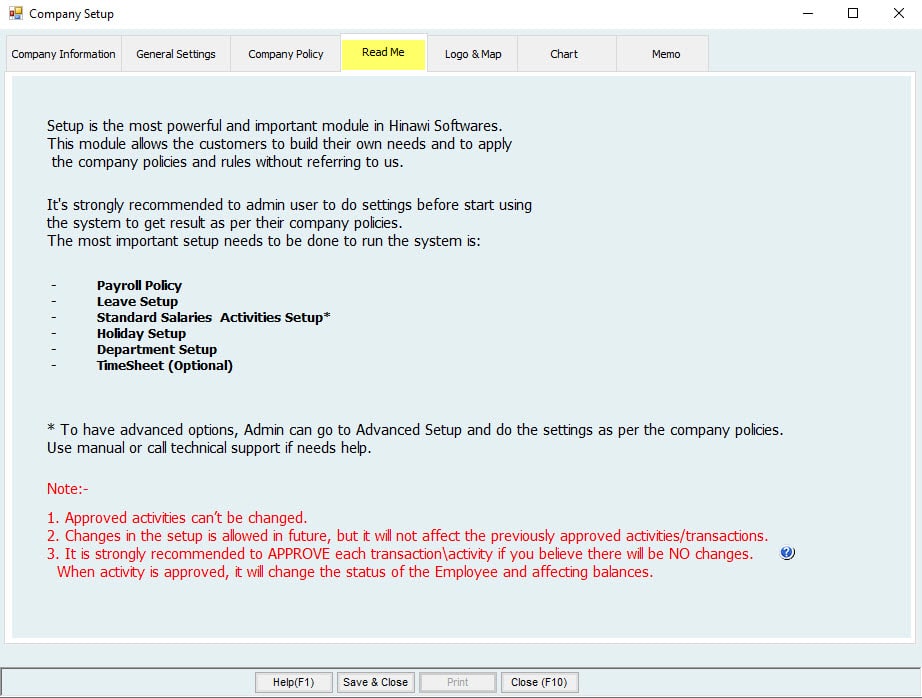
Because Setup is the most potent and vital Module in (Hinawi Software) and this Module allows the customers to build their own needs and to ly the Company policies and rules without referring to us, it's strongly recommended that the admin User make sure all settings are complete before starting to use the System to get accurate results as per their Company policy.
The default Setup required to be done before running the System is as follows:
*To have advanced options, the Admin can go to Advanced Setup and apply more settings per the Company policy. Use the manual or call technical support if any help is needed.
Please Read:
The User can split Employees into two categories, Employees in HR and Employees in Timesheet. They can decide how to categorize the employees. They are of them in one category or divided into two. The default feature in the System is to consider all employees as HR. To change to Timesheet, go to the Time Sheet Menu, then assign employees to Timesheet.
A Salary sheet is created automatically for HR Employees, but for Timesheet, an Employees Salary sheet is not created unless Timesheet is filled. The User must fill Timesheet for each Employee.
Changes between categories are possible.
Note:
1. Approved activities can't be changed.
2. Changes in the Setup are allowed in the future but will not affect the previously approved activities/transaction.
3. It is strongly recommended to APPROVE each transaction\activity if you believe there will be NO change. When an activity is approved, it will change the Employee's Status and affect the balance transaction.
1-2. Edit Company
Company Settings→ Company set up. Edit Company
Here the User can edit the Company Setup details as mentioned in steps 1-1
Payroll Policy
Company Settings → Company set up → Payroll Policy.
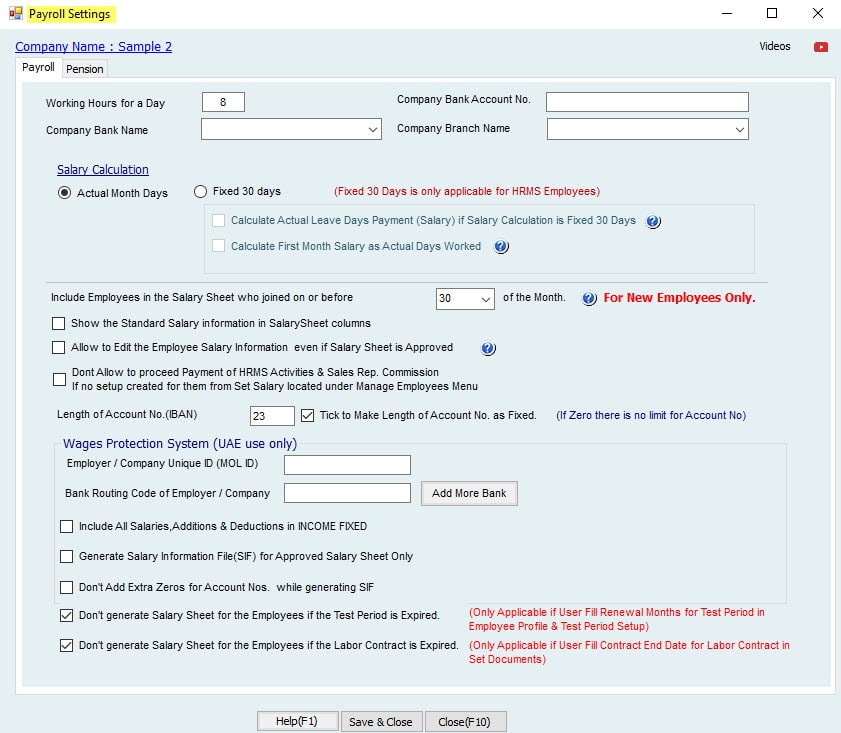
Payroll Tab:
Note:
It can vary from Company to Company: say 8 hours or 9 hours. This will be effected only by HR Employees.
Salary Calculation:
The user needs to understand the method of Salary calculation of the Employee and the relatedness with other activities such as absence, leave, and so on. This part will explain the process in detail for better understanding.
Hinawi Software has 2 ways of calculation basis: -
➔ Fixed 30 Days
In this Onassis this oasis, the system considers all months as fixed 30 days regardless of whether the month is January, February, or April.
➔ Actual Month Days
On this basis, the system calculates the Number of days in the month. Therefore, January is:31 days, February is 28/29 days, and April is 30 days.
Note:
Net to pay the amount in Salary sheet is rounding and no decimal points.
e.g., 29.22 will be 2903, and 2892.86 will be 2893, as shown in the above table.
i.e., 0,.5, and more will reconsider, as 1 and less than .5 will be ignored.
The user can do the settings from Additional Settings.
Both affect monthly Salary calculations for the following activities cases: Absence and Leave.
Case 1:
STANDARD Case. Employee Monthly Salary is 3000 AED, All Salary Item included for Leave calculation, no pension for Non- Locals, Leave Salary Calculation basis on 0 (zero) days, Absence setup is Deduct from Salary, No first month.
Case 2:
Employee Monthly Salary is 3000 AED, All Salary Items included for Leave calculation, no pension for Non- Locals, Leave Salary Calculation Basis on 0 (ZERO) Days, no first month, Setup is Fixed 30 days; Calculate Actual Leave Days if Salary Calculation basis is Fixed 30 Days box is checked.
Case 3:
Employee Monthly Salary is 3000 AED, All Salary Items included for Leave calculation, No pension for Non- Locals, Setup is Actual Month Days; Leave Salary Calculation Basis on 360 Days.
Important Information to help the user
Salary Calculation Policy:- | ||||
| Employee Salary | Fixed 30 Days | Actual Month Days | 360 Days | 365 Days |
| Employee Salary: | Yes | Yes | X | X |
| Absence Amount: | Yes | Yes | X | X |
| Absence Days: | X | Yes | X | X |
| Leave Amoun leave | Yes | Yes | Yes | Yes |
| Leave Days: | Ye s | Yes | X | X |
Actual Month Days:
On this basis, the system calculates the Number No numbers in the month. Therefore, January is 31 days,
February is: 28/2,9 days and April is: 30 days.
Fixed 30 Days:
On this basis, the system considers all months as fixed 30 days regardless of the month is January, February, or April.
Below are details of explanations for different cases:
| Absence Calculation (Month is Actual Month Days) Recommended | ||||||
| January | ||||||
| Salary | 3000 | 1 Day Absence During the month | 1 Day Absence 30 of the month | 1 Day Absence at the end of the month (On 31) | 5 Days absence from 27 of the month | Note |
| Actual Month Days | 31 | |||||
| Actual Absence Days. | 1 | 1 | 1 | 5 | This will Absence Latherer report and will be deducted from total Service Period. | |
| Description | Days are: January 27+28+29+30+31 | |||||
| Calculated Deductions Absence days | 1 | 1 | 1 | 5 | ||
| Description | One Day only | One Day only | One Day only | only days January 27+28+29+30+31 | ||
| Absence Amount | Total Salary / 31 X Absence days | 96.77 | 96.77 | 96.77 | 483.87 | The Absence amount will be lower if the month is 31 days. |
| Net Salary Amount | Total Salary Minus Absence Amount | 2903.23 | 2903.23 | 2903.23 | 2516.13 | |
Note: If the the Absance is 10 days, system will calculate the 5 Days in January as (3000 / 31 * 5) and 5 days in February as (3000 / (28 or 29) * 5) in the019.58 in the case of non leap year and 1,001.11 in case of leap year | ||||||
| February- Month is 28 Days (None Leap Year) | ||||||
| Salary | 3000 | 1 Day Absence During the month | 1 Day Absence 30 of the month | 1 Day Absence at the end of the month (On 28) | 5 Days absence from 27 of the month | Note |
| Actual Month Days | 28 | |||||
| Actual Absence Days. | 1 | N/A | 1 | 5 | the is willow in Absence the Ledger report and will be deducted from total Service Period. | |
| Description | Days are: February: 27+28 March: 1+2+3 | |||||
| Calculated Deductions Absence days | 1 | 0 | 1 | 5 | Days will be Split in to 2 Months | |
| 2 | 2 Days in February | |||||
| 3 | 3 Days in March | |||||
| Description | One Day only | _ | One Day only | Days are: February 27+28 March: 1+2+3 | ||
| 214.29 | Calculation of Absence Amount for February. | |||||
| 290.32 | Calculation of Absence Amount for March . | |||||
| Absence Amount | Total Salary / 28 X Absence days | 107.14 | 0 | 107.14 | 504.61 | The Absence amount will be higher if the month is 28 days. |
| Net Salary Amount | Total Salary Less Absence Amount | 2892.86 | 3000.00 | 2892.86 | 2495.39 | |
Note: If the the Absence is 10 days, system will calculate the 2 Days in February as (3000 / 28 * 2) and 8 days in March as (3000 / 31 * 8) = 988.47 | ||||||
| February - Month is 29 Days (Leap Year) | ||||||
| Salary | 3000 | 1 Day Absence During the month | 1 Day Absence 30 of the month | 1 Day Absence at the end of the month (On 29) | 5 Days absence from 27 of the month | Note |
| Actual Month Days | 29 | |||||
| Actual Absence Days. | 1 | N/A | 1 | 5 | This will Show in the Absence Ledger report and will be deducted from total Service Period. | |
| Description | Days are: February 27+28+29 March: 1+2 | |||||
| Calculated Deductions Absence days | 1 | 0 | 1 | 5 | Days will be Split in to 2 Months | |
| 3 | 3 Days in February | |||||
| 2 | 2 Days in March | |||||
| Description | One Day only days | _ | One Day only | Days are: February 27+28+29 March: 1+2 | ||
| 310.34 | Calculation of Absence Amount for February. | |||||
| 193.55 | Calculation of Absence Amount for March. | |||||
| Absence Amount | Total Salary / 29 X Absence days | 103.45 | 0.00 | 103.45 | 503.89 | Absence amount in February is higher than other months. |
| Net Salary Amount | Total Salary Less Absence Amount | 2896.55 | 3000.00 | 2896.55 | 2496.11 | |
Note: If the Absence is 10 days, the system will calculate the 3 Days in February as (3000 / 29 * 3) and 7 days in March as (3000 / 31 * 7) = 987.76 | ||||||
| March | ||||||
| Salary | 3000 | 1 Day Absence During the month | 1 Day Absence 30 of the month | 1 Day Absence at the end of the month (On 31) | 5 Days absence from 27 of the month | Note |
| Actual Month Days | 31 | |||||
| Actual Absence Days. | 1 | 1 | 1 | 5 | This will Absence Absence Ledger Report and will be deducted f rom total Service Period. | |
| Description | Days are: March 27+28+29+30+31 | |||||
| Calculated Deductions Absence days | 1 | 1 | 1 | 5 | ||
| Description | One Day only | One Day only | One Day only | Days are: March 27+28+29+30+31 | ||
| Absence Amount | Total Salary / 31 X Absence days | 96.77 | 96.77 | 96.77 | 483.87 | The Absence amount will be lower if the month is 31 days. |
| Net Salary Amount | Total Salary Less Absence Amount | 2903.23 | 2903.23 | 2903.23 | 2516.13 | |
Note: If the Absence is 10 days, the system will calculate the 5 Days in March as (3000 / 31 * 5) and 5 days in April as (3000 / 30 * 5) = 983.87 | ||||||
| April | ||||||
| Salary | 3000 | 1 Day Absence During the month | 1 Day Absence 30 of the month | 1 Day Absence at the end of the month (On 31) | 5 Days absence from 27 of the month | Note |
| Actual Month Days | 30 | |||||
| Actual Absence Days. | 1 | 1 | N/A | 5 | This will Show in Absence Ledger Report and will be deducted from total Service Period. | |
| Description | Days are: April27+28+29+30 and May 1 Day. | |||||
| Calculated Deductions Absence days | 1 | 1 | 0 | 5 | Days will be Split into 2 Months | |
| 4 | 4 Days in April | |||||
| 1 | 1 Days in May | |||||
| Description | One Day only | One Day only | April is 30 only days | Days in April are: 27.+28+29+30. and in Day on May | ||
| 400.00 | Calculation of Absence Amount for April. | |||||
| 96.77 | Calculation of Absence Amount for May. (May is 31 Days). | |||||
| Absence Amount | Total Salary / 30 X Absence days | 100.00 | 100.00 | 0.00 | 496.77 | |
| Net Salary Amount | Total Salary Less Absence Amount | 2900.00 | 2900.00 | 3000.00 | 2503.23 | |
Note: If the Absence is 10 days, the system will calculate the 4 Days in April as (3000 / 30 * 4) and 6 days in May as (3000 / 31 * 5) = 883.87 | ||||||
| Absence Calculation (Month is Fixed 30 Days) | ||||||
| January | ||||||
| Salary | 3000 | 1 Day Absence During the month | 1 Day Absence 30 of the month | 1 Day Absence at the end of the month (On 31) | 5 Days absence from 27 of the month | Note |
| Fixed Month Days | 30 | |||||
| Actual Absence Days. | 1 | 1 | 1 | 5 | This will Show in Absence Ledger Report and will be deducted from total Service Period. | |
| Description | Days are: January 27+28+29+30+31 | |||||
| Calculated Deductions Absence days | 1 | 1 | 0 | 4 | ||
| Description | One Day only days | One Day only | Days after 30 will not be considered | Days are: 27+28+29+30 31 will be not calculated | ||
| Absence Amount | Total Salary / 30 X Absence days | 100.00 | 100.00 | 0.00 | 400.00 | |
| Net Salary Amount | Total Salary Less Absence Amount | 2900.00 | 2900.00 | 3000.00 | 2600.00 | |
Note: If the Absence is 10 days, the system will calculate the 4 Days in January as (3000 / 30 * 4) and 5 days in February as (3000 / 30 * 5) [31 will not be calculated] = 900 | ||||||
| February - Month is 28 Days (Non-Leap Year) | ||||||
| Salary | 3000 | 1 Day Absence During the month | 1 Day Absence 30 of the month | 1 Day Absence at the end of the month (On 28) | 5 Days Absence from 27 of the month | Note |
| Fixed Month Days | 30 | |||||
| Actual Absence DaysAbsence | 1 | N/A | 1 | 5 | This will Show in Absence Ledger Report and will be deducted from total Service Period. | |
| Description | If th,e Absence is 2 Daye then the deducted days will be 4 | Days are: February: 27+28 March: 1+2+3 | ||||
| Calculated Deductions Absence days | 1 | 0 | 1 | 7 | The Absence Days will be more if the month is 28/29 days. | |
| 4 | 4 Days in February (27+28+29+30) | |||||
| 3 | 3 Days in March | |||||
| Description | One Day only | _ | One Day only | Days are: February 27+28+29+30 March: 1+2+3 | ||
| 400 | Calculation of Absence Amount for February. | |||||
| 300 | Calculation of Absence Amount for March. | |||||
| Absence Amount | Total Salary / 30 X Absence days | 100.00 | 0.00 | 100.00 | 700.00 | The Absence amount will be higher if the month is 28/29 days. |
| Net Salary Amount | Total Salary Less Absence Amount | 2900.00 | 3000.00 | 2900.00 | 2300.00 | |
Note If the Absence is the 10 days, system will calculate the 4 Days in February as (3000 / 30 * 4) and 8 days in March as (3000 / 30 * 8) = 1,200 | ||||||
| February - Month is 29 Days (Leap Year) | ||||||
| Salary | 3000 | 1 Day Absence During the month | 1 Day Absence 30 of the month | 1 Day Absence at the end of the month (On 29) | 5 Days absence from 27 of the month | Note |
| Fixed Month Days | 30 | |||||
| Actual Absence Days. | 1 | N/A | 1 | 5 | This will Show in Absence Ledger Report and will be deducted from to tal Service Period. | |
| Description | Days are: February: 27+28+29 March: 1+2 | |||||
| Calculated Deductions Absence days | 1 | 0 | 1 | 6 | Days will be Split in to 2 Months | |
| 4 | 4 Days in February (27+28+29+30) | |||||
| 2 | 2 Days in March | |||||
| Description | One Day only | _ | One Day only | Days are: February 27+28+29+30 March: 1+2 | ||
| 400 | ||||||
| 200 | ||||||
| Absence Amount | Total Salary / 30 X Absence days | 100.00 | 0.00 | 100.00 | 600.00 | The Absence amount will be higher if the month is 28/29 days. |
| Net Salary Amount | Total Salary Less Absence Amount | 2900.00 | 3000.00 | 2900.00 | 2400.00 | |
Note: If the Absence is 10 days, the system will calculate the 4 Days in February as (3000 / 30 * 4) and 7 days in March as (3000 / 30 * 7) = 1,100 | ||||||
| March | ||||||
| Salary | 3000 | 1 Day Absence During the month | 1 Day Absence 30 of the month | 1 Day Absence at the end of the month (On 31) | 5 Days absence from 27 of the month | Note |
| Fixed Month Days | 30 | |||||
| Actual Absence Days. | 1 | 1 | 1 | 5 | This will Show in Absence Ledger Report and will be deducted from total Service Period. | |
| Description | Days are: March 27+28+29+30+31 | |||||
| Calculated Deductions Absence days | 1 | 1 | 0 | 4 | ||
| Description | only days only | One Day only | Days after 30 considered days | Days are: 27+28+29+30 31 will not calculated | ||
| Absence Amount | Total Salary / 30 X Absence days | 100.00 | 100.00 | 0.00 | 400.00 | |
| Net Salary Amount | Total Salary Less Absence Amount | 2900.00 | 2900.00 | 3000.0the | 2600.00 | |
Note: If the Absence is 10 days, system will calculate the 4 Days in March as (3000 / 30 * 4) and 5 days in April as (3000 / 30 * 5) [31 will not be calculated] = 900 | ||||||
| April | ||||||
| Salary | 3000 | 1 Day Absence During the month | 1 Day Absence 30 of the month | 1 Day Absence at the end of the month (On 31) | 5 Days absence from 27 of the month | Note |
| Fixed Month Days | 30 | |||||
| Actual Absence Days. | 1 | 1 | N/A | 5 | This will Show in Absence Ledger Report and will be deducted from total Service Period. | |
| Description | Days are: April27+28+29+30 and May 1 Day. | |||||
| Calculated Deductions Absence days | 1 | 1 | 0 | 5 | Days will be Split in to 2 Months | |
| 4 | 4 Days in April | |||||
| 1 | 1 Days in May | |||||
| Description | One Day only | One Day only | April is 30 Days only | Days in April are: 2and28+29+in an 1 Day on May | ||
| 400 | Calculation of Absence Amount for April. | |||||
| 100 | Calculation of Absence Amount for May. | |||||
| Absence Amount | Total Salary / 30 X Absence days | 100.00 | 100.00 | 0.00 | 500.00 | |
| Net Salary Amount | Total Salary Less Absence Amount | 2900.00 | 2900.00 | 3ten0.00 | 2500.00 | |
Note: If the Absence is 10 days, system will calculate the 4 Days in April as (3000 / 30 * 4) and 6 days in May as (3000 / 30 * 6) = 1,000 | ||||||
| Leave Calculation (Month is Actual Month Days) | ||||||
| January | ||||||
| Salary | 3000 | 1 Day Leave During the month | 1 Day Leave on 30th of the month | 1 Day Leave at the end of the month (On 31) | 5 Days Leave from 27th of the month | Note |
| Actual Month Days | 31 | |||||
| Actual Leave Days. | 1 | 1 | 1 | 5 | This will Show in Leave Ledger Report . | |
| Description | Days are: January 27+28+29+30+31 | |||||
| Calculate Leave days | 1 | 1 | 1 | 5 | ||
| Calculate Working Days | 30 | 30 | 30 | 26 | ||
| Description | One Day Leave only | One Day Leave only | One Day Leave only | Days are: January 27+28+29+30+31 | ||
| Leave Amount | Total Salary / 31 X Leave days | 96.77 | 96.77 | 96.77 | 483.87 | |
| Working Days Salary | Total Salary / 31 X Working days | 2903.23 | 2903.23 | 2903.23 | 2516.13 | |
| Net Salary Amount | Total Working Days Salary + Leave Amount | 3000.00 | 3000.00 | 30ten.00 | 3000.00 | |
Note: If the Leave is ten 10 days, system will calculate the 5 Days in January as (3000 / 31 * 5) and 5 days in February as (3000 / (28 or 29) * 5) | ||||||
| February - Month is 28 Days (None Leap Year) | ||||||
| Salary | 3000 | 1 Day Leave During the month | 1 Day Leave 30 of the month | 1 Day Leave at the end of the month (On 28) | 5 Days Leave from 27 of the month | |
| Actual Month Days | 28 | |||||
| Actual Leave Days. | 1 | N/A | 1 | 5 | This will Show I n Leave Ledger Report. | |
| Description | Days are: February: 27+28 March: 1+2+3 | |||||
| Calculated Leave days | 1 | 0 | 1 | 5 | Days will be Split in to 2 Months | |
| 2 | 2 Days in February | |||||
| 3 | 3 Days in March | |||||
| Working Days | 27 | 28 | 27 | 26 | ||
| Description | One Day Leave only | _ | One Day Leave only | Days are: February 27+28 March: 1+2+3 | ||
| 214.29 | Calculation of Leave Amount for February. | |||||
| 290.32 | Calculation of Leave Amount for March. | |||||
| Leave Amount | Total Salary / 28 X Leave days | 107.14 | 0 | 107.14 | 504.61 | |
| Working Days Salary | Total Salary / 28 X Working days | 2892.86 | 3000.00 | 2892.86 | 2785.71 | |
| Net Salary Amount | Total Working Days Salary + Leave Amount | 3000.00 | 3000.00 | 3000.00 | 3290.32 | The Leave Salary of 3 days of March will also be included with .this Month In March Employee will get 28 Days salary. |
Note: If the Leave is ten days, system will calculate the 2 Days in February as (3000 / 28 * 2) and 8 days in March as (3000 / 31 * 8) | ||||||
| February - Month is 29 Days (Leap Year) | ||||||
| Salary | 3000 | 1 Day Leave During the month | 1 Day Leave 30 of the month | 1 Day Leave at the end of the month (On 29) | 5 Days Lea.ve from 27 of the month | |
| Actual Month Days | 29 | |||||
| Actual Leave Days. | 1 | N/A | 1 | 5 | This will Show in Leave Ledger Report. | |
| Description | Days are: February 27+28+29 March: 1+2 | |||||
| Calculated Leave days | 1 | 0 | 1 | 5 | Days will be Split in to 2 Months | |
| 3 | 3 Days in February | |||||
| 2 | 2 Days in March | |||||
| Calculate Working Days | 28 | 29 | 28 | 26 | ||
| Description | One Day Leave only | _ | One Day Leave only | Days are: February 27+28+29 March: 1+2 | ||
| 310.34 | Calculation of Leave Amount for February. | |||||
| 193.55 | Calculation of Leave Amount for March. | |||||
| Leave Amount | Total Salary / 29 X Leave days | 103.45 | 0.00 | 103.45 | 503.89 | |
| Working Days Salary | Total Salary / 29 X Working days | 2896.55 | 3000.00 | 2896.55 | 2689.66 | |
| Net Salary Amount | Total Working Days Salary + Leave Amount | 3000.00 | 3000.00 | 3000.00 | 3193.55 | The Leave Salary of 2 days of March will be also included with this Month In March employee will Salary Days salary. |
Note: If the Leave is 10 days, the system will calculate the 3 Days in February as (3000 / 29 * 3) and 7 days in March as (3000 / 31 * 7) | ||||||
| March | ||||||
| Salary | 3000 | 1 Day Leave During the month | 1 Day Leave 30 of the month | 1 Day Leave at the end of the month (On 31) | 5 Days Leave from 27 of the month | |
| Actual Month Days | 31 | |||||
| Actual Leave Days. | 1 | 1 | 1 | 5 | This will Show in Leave Ledger Report. | |
| Description | Days are: March 27+28+29+30+31 | |||||
| Calculated Leave days | 1 | 1 | 1 | 5 | ||
| Calculate Working Days | 30 | 30 | 30 | 26 | ||
| Description | One Day Leave only | One Day Leave only | One Day Leave only | Days are: March 27+28+29+30+31 | ||
| Leave Amount | Total Salary / 31 X Leave days | 96.77 | 96.77 | 96.77 | 483.87 | |
| Working Days Salary | Total Salary / 31 X Working days | 2903.23 | 2903.23 | 2903.23 | 2516.13 | |
| Net Salary Amount | Total Working Days Salary + Leave Amount | 3000.00 | 3000.00 | 300the 0.00 | 3000.00 | |
Leaves If ttheyLeave 10 days, system will calculate the 5 Days in March as (3000 / 31 * 5) and 5 days in April as (3000 / 30 * 5) | ||||||
| April | ||||||
| Salary | 3000 | 1 Day Leave During the month | 1 Day Leave 30 of the month | 1 Day Leave at the end of the month (On 31) | 5 Days Leave from 27 of the month | |
| Actual Month Days | 30 | |||||
| Actual Leave Days. | 1 | 1 | N/A | 5 | This Report in Leave Ledger Re port. | |
| Description | Days are: April 27+28+29+30 and May 1 Day. | |||||
| Calculated Leave days | 1 | 1 | 0 | 5 | Days will be into in to 2 Months | |
| 4 | 4 Days in April | |||||
| 1 | 1 Days in May | |||||
| Calculate Working Days | 29 | 29 | 30 | 26 | ||
| Description | One Day Leave only | only April leave only | April is 30 Days only. | Days in April are: 27+28+29+30 and 1 Day in May | ||
| 400.00 | Calculation of Leave Amount for April. | |||||
| 96.77 | Calculation of Leave Amount for May. | |||||
| Leave Amount | Total Salary / 30 X Leave days | 100.00 | 100.00 | 0.00 | 496.77 | |
| Working Days Salary | Total Salary / 30 X Working days | 2900.00 | 2900.00 | 3000.00 | 2600.00 | |
| Net Salary Amount | Total Working Days Salary + Leave Amount | 3000.00 | 3000.00 | 3000.00 | 3096.77 | The Leave Salary of 1 day of May will be also included with this Month. In May Salary will get 30 Days Salary |
N ote: If the Leave is 10 days, system will calculate the 4 Days in April as (3000 / 30 * 4)six and 6 days in May as (3000 / 31 * 5) | ||||||
| Leave Calculation (Month is Fixed 30 Days) | ||||||
| January | ||||||
| Salary | 3000 | 1 Day Leave During the month | 1 Day Leave 30 of the month | 1 Day Leave at the end of the month (On 31) | 5 Days Leave from 27 of the month | Note |
| Fixed Month Days | 30 | |||||
| Actual Leave Days. | 1 | 1 | 1 | 5 | This will Show in Leave Ledger Report. | |
| Description | Days are: January 27+28+29+30+31 | |||||
| Calculated Leave days | 1 | 1 | 0 | 4 | ||
| Calculate Working Days | 29 | 29 | 30 | 26 | ||
| Description | One Day Leave considered days | One Day Leave only | Days after 30 will not be considered | Days are: 27+28+29+30 31 will not calculated | ||
| Leave Amount | Total Salary / 30 X Leave days | 100.00 | 100.00 | 0.00 | 400.00 | |
| Working Days Salary | Total Salary / 30 X Working days | 2900.00 | 2900.00 | 3000.00 | 2600.00 | |
| Net Salary Amount | Total Working Days Salary + Leave Amount | 3000.00 | 3000.00 | 3000.00 | 3000.00 | |
| Note: If the Leave is 10 days, system will calculate the 4 Days in January as (3000 / 30 * 4) and 5 days in February as (3000 / 30 * 5) [31 will not be calculated] | ||||||
| February - Month is 28 Days (Non-Leap Year) | ||||||
| Salary | 3000 | 1 Day Leave During the month | 1 Day Leave 30 of the month | 1 Day Leave at the end of the month (On 28) | 5 Days Leave from 27 of the month | |
| Fixed Month Days | 30 | |||||
| Actual Leave Days. | 1 | N/A | 1 | 5 | This will Show in Leave Ledger Report. | |
| Description | Days are: February: 27+28 March: 1+2+3 | |||||
| Calculated Leave days | 1 | 0 | 1 | 7 | Days will be Split in to 2 Months | |
| 4 | 4 Days in February | |||||
| 3 | 3 Days in March | |||||
| Working Days | 29 | 30 | 29 | 26 | ||
| Description | One Day Leave only | _ | One Day Leave only | Days are: February 27+28+29+30 March: 1+2+3 | Tan here is option available in Payroll Settings to Calculate Actual Leave Days if Payroll Policy is Fixed 30 days. If user Tick this option System will Calculate only 27+281+2+3this5 Days) .In the case Leave Amount will be 500 | |
| 400 | Calculation of Leave Amount for February. | |||||
| 300 | Calculation of Leave Amount for March. | |||||
| Leave Amount | Total Salary / 30 X Leave days | 100.00 | 0.00 | 100.00 | 700.00 | |
| Working Days Salary | Total Salary / 30 X Working days | 2900.00 | 3000.00 | 2900.00 | 2600.00 | |
| Net Salary Amount | Total Working Days Salary + Leave Amount | 3000.00 | 3000.00 | 3000.00 | 3300.00 | The Leave Salary of 3 days of March will be also included with this Month. in March Employee will get 27 Days salary. |
| Note: If the Leave is 10 days, system will calculate the 4 Days in February as (3000 / 30 * 4) and 8 days in March as (3000 / 30 * 8) | ||||||
| February - Month is 29 Days (Leap Year) | ||||||
| Salary | 3000 | 1 Day Leave During the month | 1 Day Leave 30 of the month | 1 Day Leave at the end of the month (On 29) | 5 Days Leave from 27 of the month | |
| Fixed Month Days | 30 | |||||
| Actual Leave Days. | 1 | N/A | 1 | 5 | This will Show in Leave Ledger Report. | |
| Description | Days are: February: 27+28+29 March: 1+2 | |||||
| Calculated Leave days | 1 | 0 | 1 | 6 | Days will be Split in to 2 Months | |
| 4 | 4 Days in February | |||||
| 2 | 2 Days in March | |||||
| Calculate Working Days | 29 | 30 | 29 | 26 | ||
| Description | One Day Leave only | _ | One Day Leave only | Days are: February 27+28+29+30 March: 1+2 | There is option available in Payroll Settings to Calculate Actual Leave Days if Payroll Calculates Fixed 30 days. If user Tick this option System will Calculate only 27+28++23this5 Days) .In the case Leave Amount will be 500 | |
| 400 | Calculation of Leave Amount for February. | |||||
| 200 | Calculation of Leave Amount for March. | |||||
| Leave Amount | Total Salary / 30 X Leave days | 100.00 | 0.00 | 100.00 | 600.00 | |
| Working Days Salary | Total Salary / 30 X Working days | 2900.00 | 3000.00 | 2900.00 | 2600.00 | |
| Net Salary Amount | Total Working Days Salary + Leave Amount | 3000.00 | 3000.00 | 3000.00 | 3200.00 | The Leave Salary of 2 days of March will be also included with this Month. In March Employee will get 28 Days salary. |
| Note: If the Leave is 10 days, system will calculate the 4 Days in February as (3000 / 30 * 4) and 7 days in March as (3000 / 30 * 7) | ||||||
| March | ||||||
| Salary | 3000 | 1 Day Leave During the month | 1 Day Leave 30 of the month | 1 Day Leave at the end of the month (On 31) | 5 Days Leave from 27 of the month | |
| Fixed Month Days | 30 | |||||
| Actual Leave Days. | 1 | 1 | 1 | 5 | This will Show in Leave Ledger Report. | |
| Description | Days are: March 27+28+29+30+31 | |||||
| Calculated Leave days | 1 | 1 | 0 | 4 | ||
| Calculate Working Days | 29 | 29 | 30 | 26 | ||
| Description | One Day Leave only | One only days only | Days after 30 will not be considered | Days are: 27+28+29+30 31 will not calculated | ||
| Leave Amount | Total Salary / 30 X Leave days | 100.00 | 100.00 | 0.00 | 400.00 | |
| Working Days Salary | Total Salary / 30 X Working days | 2900.00 | 2900.00 | 3000.00 | 2600.00 | |
| Net Salary Amount | Total Working Days Salary + Leave Amount | 3000.00 | 3000.00 | 3000.00 | 3000.00 | |
| Note: If the Leave is 10 days, system will calculate the 4 Days in March as (3000 / 30 * 4) and 5 days in April as (3000 / 30 * 5) [31 will not be calculated] | ||||||
| April | ||||||
| Salary | 3000 | 1 Day Leave During the month | 1 Day Leave 30 of the month | 1 Day Leave at the end of the month (On 31) | 5 Days Leave from 27 of the month | |
| Fixed Month Days | 30 | |||||
| Actual Leave Days. | 1 | 1 | N/A | 5 | This will Show in Leave Ledger Report. | |
| Description | Days are: April 27+28+29+30intoMay 1 Day. | |||||
| Calculated Leave days | 1 | 1 | 0 | 5 | Days will be Split in to 2 Months | |
| 4 | 4 Days in April | |||||
| 1 | 1 Days in May | |||||
| Calculate Working Days | 29 | 29 | 30 | 26 | ||
| Description | One Day Leave only | One Day Leave only | April is 30 Days only | Days in April are: 27+28+29+30 and 1 Day on May | ||
| 400 | Calculation of Leave Amount for April. | |||||
| 100 | Calculation of Leave Amount for May. | |||||
| Leave Amount | Total Salary / 30 X Leave days | 100.00 | 100.00 | 0.00 | 500.00 | |
| Working Days Salary | Total Salary / 30 X Working days | 2900.00 | 2900.00 | 3000.00 | 2600.00 | |
| Net Salary Amount | Total Working Days Salary + Leave Amount | 3000.00 | 3000.00 | 3000.00 | 3100.00 | The Leave Salary of 1 day of May will be also included with this Month. In May Salary will get 29 Days salary. |
| Note: If the Leave is 10 days, system will calculate the 4 Days in April as (3000 / 30 * 4) and 6 days in May as (3000 / 30 * 6) | ||||||
Note:
The absence salary will be deducted from the Effective month while creating an absence. E.g., if an employee makingent from 29th Jan to 2nd Feb. this means that while creating the absence, if the effective month Salary as Feb, then salary will be deducted from Feb Monthly Salary.
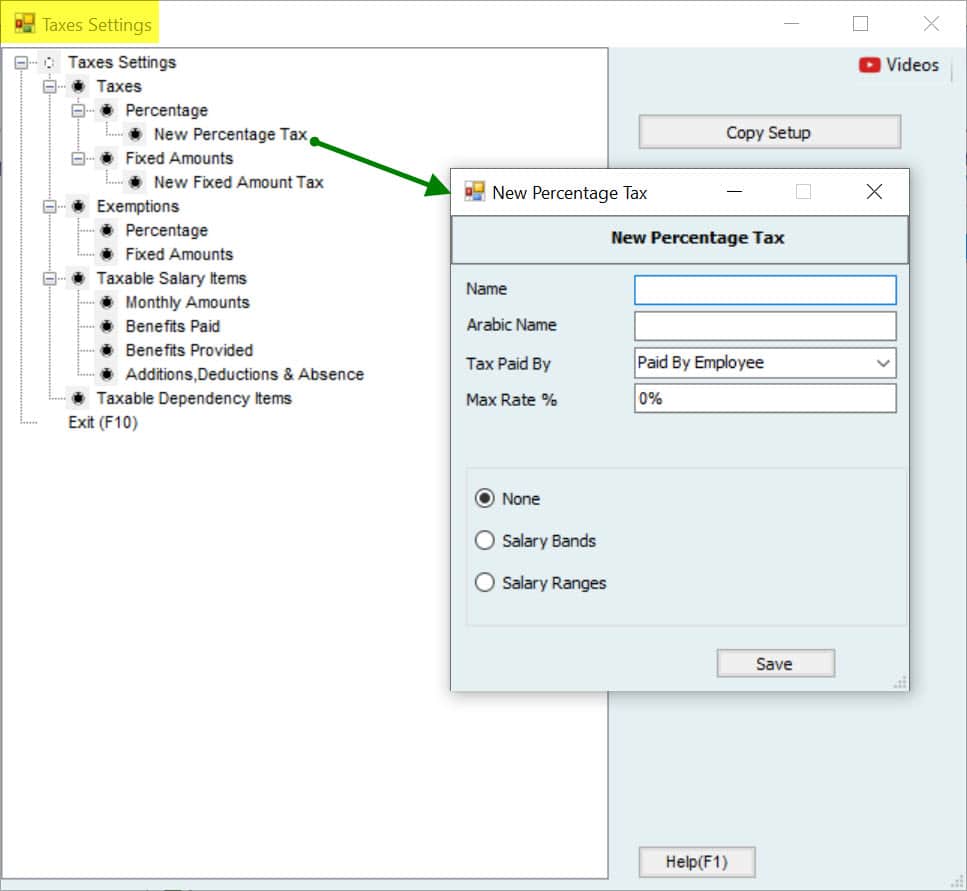
Image A:

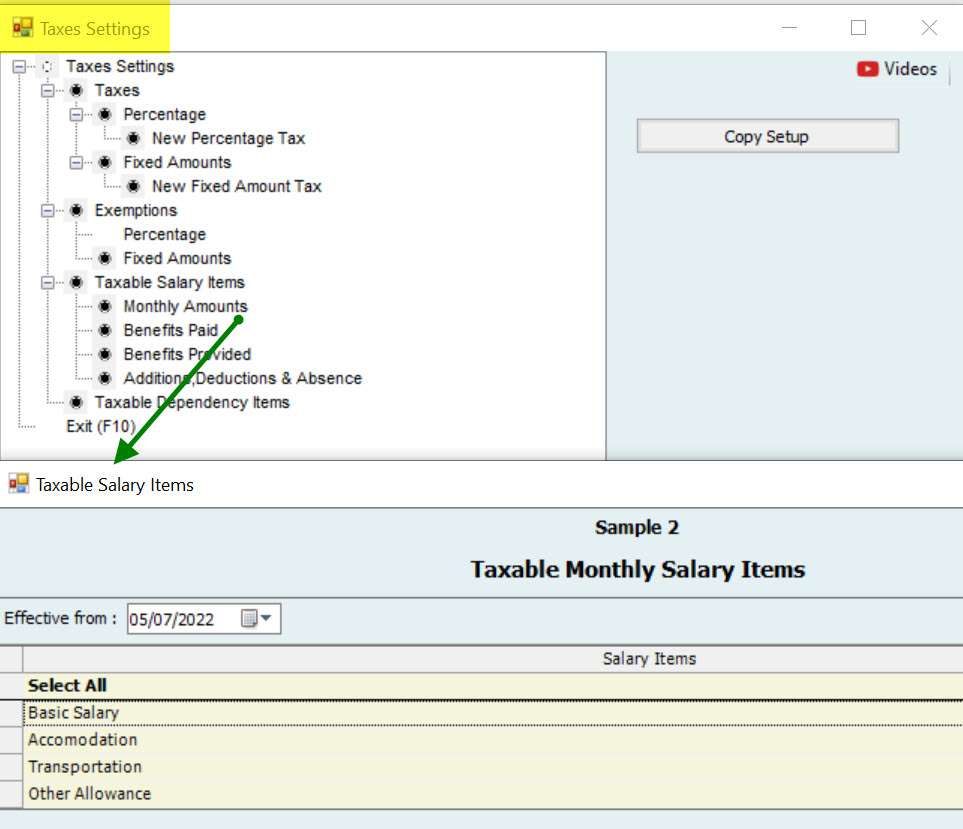
Image B:
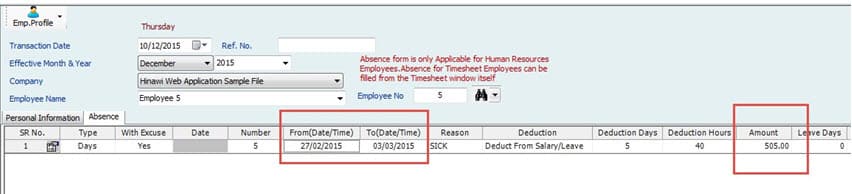
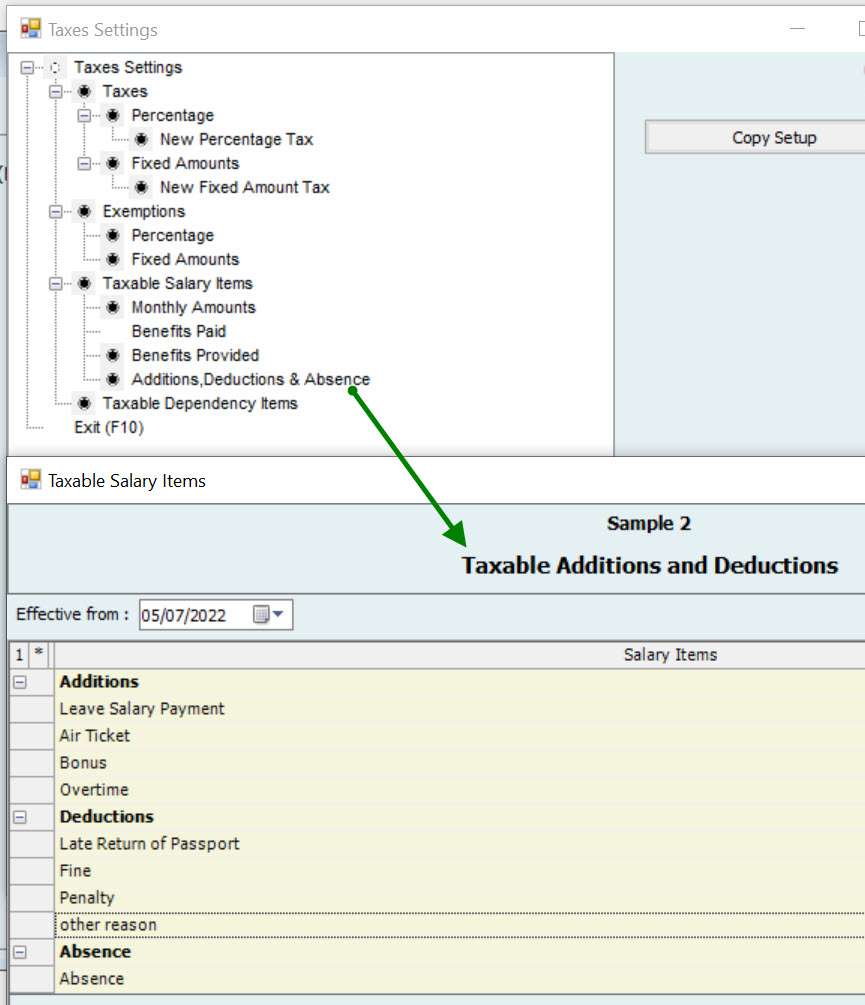
Image C:
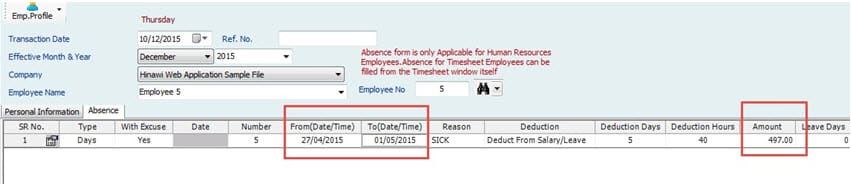
Image 01:
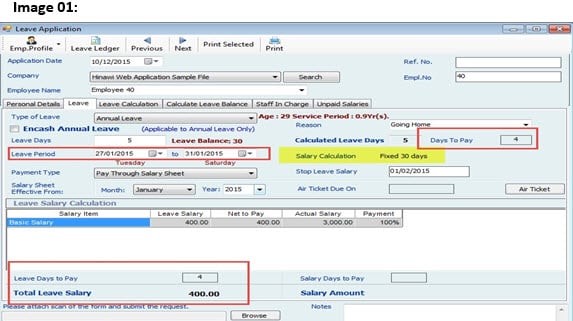
Image 02:

Image 03:

Image 04:

Image 05:
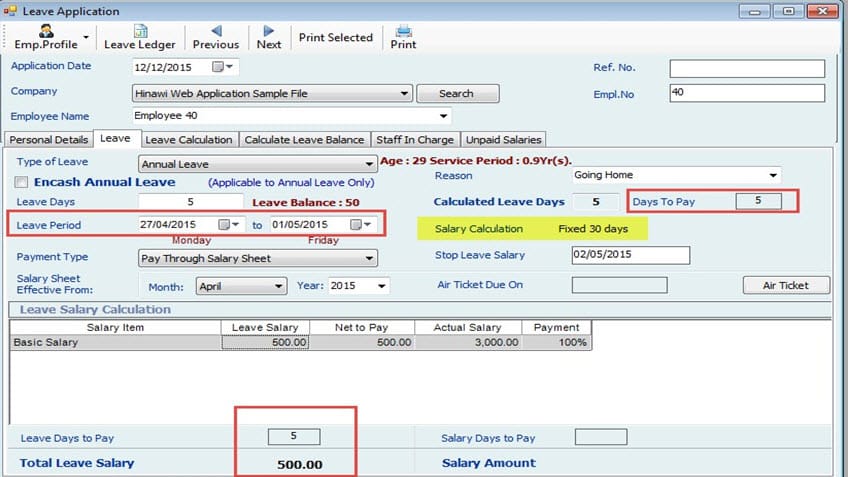
Image 06:

Fixed 30 days:
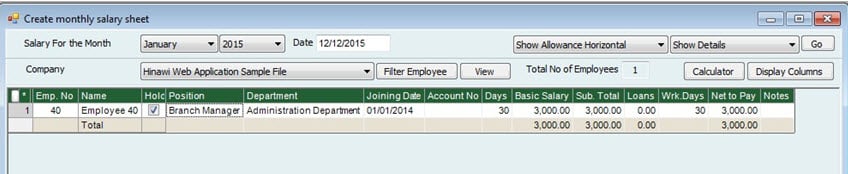
Salary sheet when there is No Absence and leave:
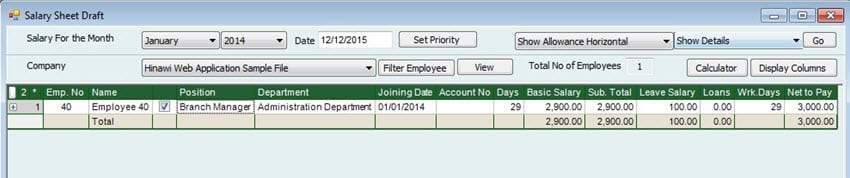
When there is 1 Day Leave:
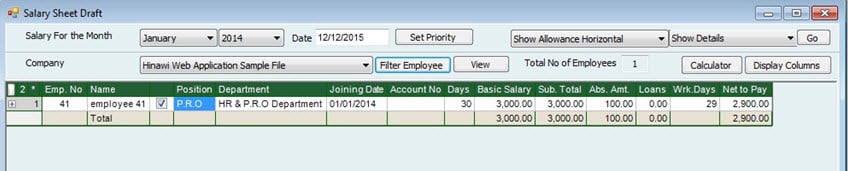
When there is 1 Day Absent:
Note:
1. Leave Salary Calculation Basis is enabled only If the salary calculation is Actual
Month Days. When salary calculation for n is Fixed 30 Days, this option is disabled.
2. If EOS is created for an employee (resign or terminated), the remaining of leave salary and unpaid salaries will show in EOS for
Calculate Actual Leave Days if salary calculation is Fixed 30 Days:
e.g.: If this option is checked, and an Employee takes a leave for 5 days on Feb 27, then the leave days will be 5 (27,28 & 1,2,3). If this option is not checked, the leave days calculated will be 7 (27, 28, 29, 30 & 1, 2, 3).
Note:
Special Cases When:
1. Setup is based on fixed 30 days. If an Employee was absent on Jwould1st, leave will be deducted from Leave Days if the setup is “Deduct from Salary”. And absent day salary will be deducted if the setup is “Deduct from Salary”.
2. Setup is based on fixed 30 days. If an Employee was absent on 28th Feb, then absent salary will be deducted from the effectiSetupnth if the setup is “deduct from salary”.
3. An absence is created for an employee, and the setup type is deducted from:
leaves → annual leaves, then it will deduct the leave days from the annual Leave Balance.
4. Setup is based on fixed 30 days. If an Employee goes for leave on Jan 31st, leave will be deducted from Annual Leave Days. But will not be paid for that 1 day sifornce it is fixed 30 days.
5. Setup is based on fixed 30 days. If an Employee goes for leave on 28th, leaves will be deducted from Annual Leave Days. Salary is calculated for 27 working Salary to + 1 day leave salary. For the next 2 days (29 and 30) salary needs to be added as separate in addition and deduction manually by the user. And next month salary (March) will be 30 Days and 2 days salary in the Addition column.
Important:
Changing between Basis of calculation:
When the user wants to change the Basis of calculation or anything else in SETUP, the activities like Leaves, absence, salary sheet and EOS must be approved before proceeding (if there will not be any further changes on activities in the future.)
Note:
before changing the setup.
Exceptional:
If thefor setup is fixed 30 days and the employee joining date is not 30 days month, calculate the working days based on the actual month.
Note:
By Default, this option will be checked. We strongly reclimitedkeeping this checked. e.g. Employee joined on 27/01 so total working days will be: 5 days and will be calculated as 5/30 X Total Salary.
Employee joined on 27/02 so total working days will be: 2 days and will be calculated as 2/30 X Total Salary.
e.g.: If an employee joins on 20th of a month and we set the above to 22, then he will be included form the salary sheet of this month.
Note:
Differences the the in the salary for previous period will be adjusted in the next salary sheets.
Wages Protection System (UAE Use Only):
Employer Unique Id: The user can provide the ID of the Employer here.
Bank Code of Employer: This is the bank code of the Employer and the user can add more banks here.
Includes All Salaries, Additions & Deductions in INCOME Fixed: This is a checkbox
Salary Information File (SIF) for Approved Salary Sheet Only: This is a checkbox.
Pension Settings Tab:

The user checks this option in case he/she wants to set pension for Non-Locals. Pension for Locals can be set from Default setup/Advanced Setup.
The user can check the option ‘Show the pension for Non-Locals in Separate column in Salary sheet’ if he/she wants the pension to be Salary rate column of the salary sheet.
The user can change the column name in Salary Sheet by giving a name in ‘Change the Column name in Salary Sheet as’
Deduct Company pension from Employees for Absence Days Locals % Non-Locals % The user can set the pension to be deducted from Employees for Absence Days.
1-4. Leave Policy
Leave Policy is one of the most important screens in the System. Kindly read carefully. You can contact us (End of Manual) for any further clarifications.
Company Settings → Company Setup → Leave Policy
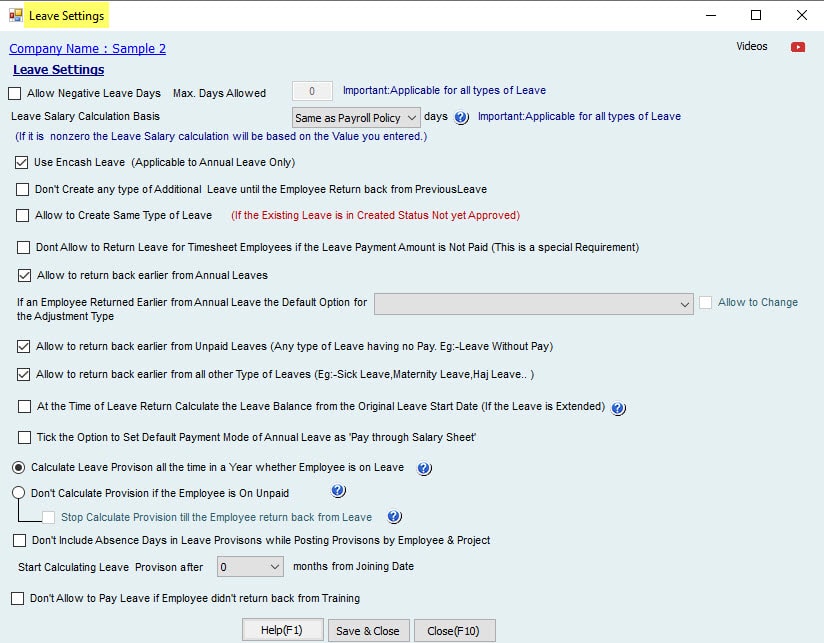
Leave Settings
Allows creating Leaves More than the Available Balance
Note:
If Negative Leave Days are filled in with the following Value: 5, an Employee has a Leave Balance of 15 days; then the System will allow creating a leave for 20 days as Negative days are filled. And this is Applicable to All types of leaves.
When "Allow Negative Leave Days" is checked and the Value is zero, it will allow creating leaves only as per the Leave balance. i.e., it simply means that this option is not checked when the Value is zero.
If the leave balance is zero or minus, the User should add an Admin password to allow the negative days.
This applies to both Timesheet and HR Employees.
As default (zero here), it reads from Payroll settings: Fixed 30 days or Actual month days.
If the User selects any Value, the System will ignore reading from the Payroll Settings and read from here as mentioned below:
If the User selects 360, the System will calculate Leave Salary through the following method:
{(Monthly Salary x 12)/360} x Leave Days
If 365, then as follows:
{(Monthly Salary x 12)/365} x Leave Days
This applies to both Timesheet and HR Employees.
Note:
- The User can change the basis of calculation only if the Setup is Actual Month Days.
- If the Setup is Fixed for 30 days, this option will be disabled.
This is applicable only for Time Sheet Employees, and the payment type of Leave is Pay Through Salary Sheet; when the User applies it, the System will calculate the leave salaries and add to the additions and deduction form in the Timesheet software, and it will be added to the salaries in the "Addition" column. If this option is not selected, no leave payment will occur on the Salary sheet. This is per Company policy.
If this option is checked, Leave Salary is paid separately as Cheque or Cash, and Leave Salary will not be added to the Salary sheet for Time Sheet Employees.
Note:
If an Employee is on Leave for ten days, that 10 days' Salary will be added to the Additions and Deductions form in the Salary sheet if the option 'Add Leave Salary Amount, in Addition, Column of Salary Sheet' is checked.
If this option is not checked, no leave payment will be on the Salary sheet. This is per Company's Policy.
Allows to Encash the Leave Days Balance for Annual Leave. For example, an Employee has an Annual Leave balance of 20 days, and they don't want to go home. They can take Cash for that leave balance. If the Employee takes EEncashment for 10 Days, leave, the next time they create a "Leave," their Leave Balance will show as 10 only. There are settings for selecting allowances for Encashment in the advanced Setup.
The User can select Encash Leave Items from the List in the advanced Setup.
When 'Encash Leave' is checked in the creation activity dialog, the Number of numbered days will be encashed per the Setup. Leave Days will be deducted from the Leave balance.
Note:
Negative Leave Days will not be Encashed.
This applies to both Timesheet and HR Employees.
If this box is checked, the Employee on Leave cannot extend or take any leaves until they return from Leave.
To create any leave, the User must return from the previous Leave. This applies to both Timesheet and HR Employees.
Create Loan:
e.g., An Employee goes on 20 days of paid leave, and they come back after 10 days, days leave back.
They must refund the leave Salary for ten days and get the 10
Deduct the Leave days only:
e.g., an Employee goes on 20 days of Leave and returns after 10 days, so if this option is selected, He doesn't have to refund the money, but his 10 days of Leave will be deducted.
Keep the Balance Leave Days:
E.g. an Employee who goes on 20 days of Leave and comes back by 10 (If the Company calls him back due to urgent work), if this option is selected, He doesn't have to refund the money, and Company will not deduct the leave balance from his leaves.
This applies to both Timesheet and HR Employees.
NOTE:
In all the above cases Employee will get a Salary.
Date (if the Leave is Extended):
e.g., if An Employee goes on Leave for 15 days and extends Leave for 5 days, the System will calculate the Leave Balance from the Leave start Date, i.e., 20 days, if this option is checked.
If not checked, his leave balance will be calculated from the extended Leave. [Clarification]
✓ Calculate the provision for working (Present) Days
✓ Calculate leave provision in all paid days (paid salaries + paid any Leave)
✓ Calculate the whole provision year regardless of availability or not (sick, annual sick Leave, absence paid, or unpaid Leave)
1-5. Holiday Setup
Company Settings--> Company set up-->Holidays Setup

Weekly off days tab: Here, the User can select what days represent the weekly day-offs. Public Holidays tab: Here, the User can select the public holidays: it can be fixed or variable.
e.g., Fixed: January 1 is New Year, a public holiday. Variable: Eid can be set as a variable holiday.
Note:
Holidays Setup affects calculations in many activities, such as salaries, leave, Timesheets, shifts, etc. This depends on the Setup of each activity.
1-6. Employee Profile Setup:
Company Settings-->Employee set up-->Employee Profile Setup
Employee Profile Setup: Here, the User can set up the Employee information that areis required in their profile where the User has three options (required but optional, required and mandatory, not required). The User can select whether the information is
required by checking Y or N. Also, the User can set the fill to be mandatory by checking the “Must fill” in the Data entry checkbox.
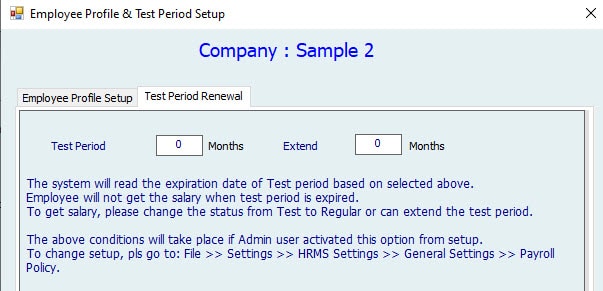
Test Period Renewal:
The User can set up the renewal period from “Employee Profile Setup.”
1-7. Department Setup:
Company Settings → Company Setup → Department Setup
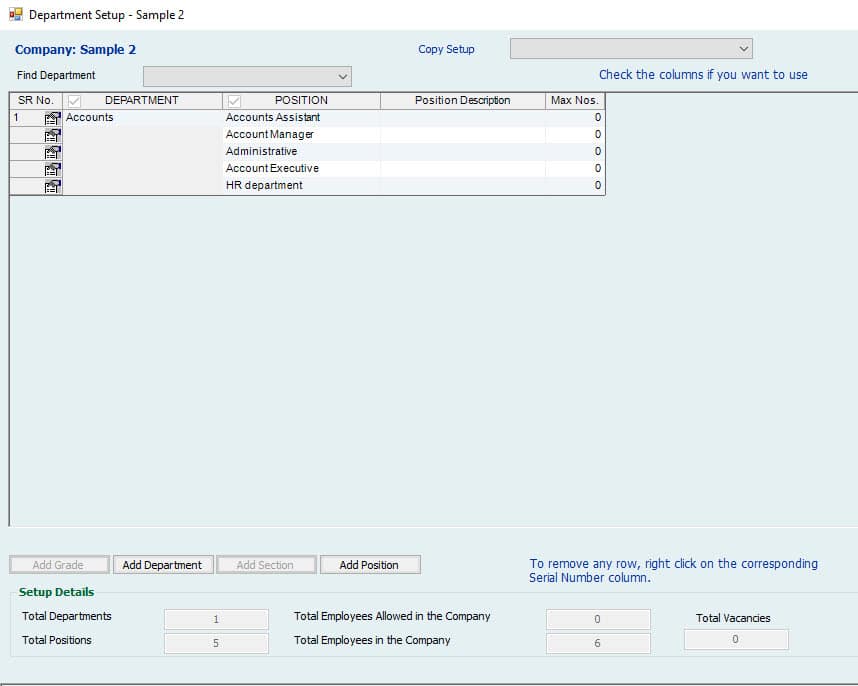
Here, the User can add different levels for Employees in the Company. The User can add the levels set on the Company Setup→General Setting. By default, the group User can add levels: Department and Position.
Find Department: The User can find the Departments added quickly whenever there are many Departments.
The User can add a Department using the “Add Department” option and can add a Position to the Department. e.g., The User can add the Department ‘Sales Department’ and Position ‘IT Assist Manager’ and Max no. of Employees with the position ‘IT Assist Manager’ in
the Department.
The Options “Add Grade” and “Add Section” will be enabled only if these levels are set in the General Settings.
Setup Details: The User can see the details in the above table. Copy Setup from The User can copy the Setup from other companies.
Remember: Whatever level you add to the department Setup will be seen in all the systems.
1-8. Budget – Salary Setup:
Company Settings → Company Setup → Budget – Salary Setup

Here, the User can set the budget for levels (Department, Position, etc.) monthly or yearly. It will List information at the selected level. E.g., If a Department is selected, it will List all the departments added to the Company. Select any department where the User can assign the Value for the budget in the Amount column.
Note: There is a Report for every activity.
1-9. Email Setup:
Company Settings → Company Setup → Email Setup
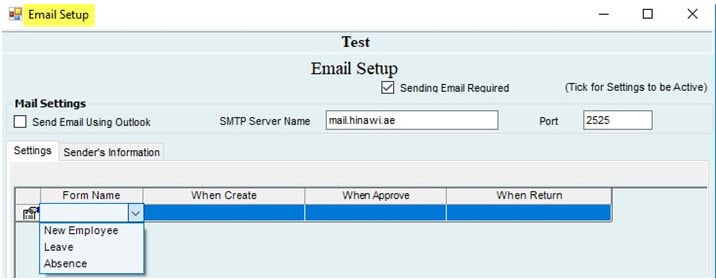
Here, the software provides an option for the User to send an email to the management when creating a new Employee or leave (create, approve, return) and for creating by sending emails from outlook.
Email.
Send Email Required: Check the box if the User wants to set the Send Email Using Outlook: Check this box if the User wants to send a mail using outlook. If checked, SMTP Server Name and Port will be disabled. The SMTP Server Name will be specific to the Company.
Settings: The User can select the Form name:
New Employee: If an Employee Joins the companyCompany. Absent: If an Employee is absent.
Leave: If an Employee is on Leave.
If an Employee is on Leave:
When created: Shows the created Date. When Approved: Shows the approved Date. When Return: Shows the return Date. Sender’s Information:
Provide the Senders information and Send By (Signature)
1-10. Evaluation Setup:
Company Settings→ Company Set Up→Evaluation Setup
For Employee Evaluation, this can be used. But it is not a Comprehensive Appraisal / Evaluation.
Image 1:

Image 2:

Image 3:

Here, you can define Different Evaluation Questions based on the Department and Positions.
In the System, you can enter the Values regarding each question first to get the Result.
Employee Category: Description is for the “Name of Evaluation.”
You can add more Departments and Positions by clicking on the icon at the left.
Note:
The User can add the levels set in the Company Setup→General Setting.
Evaluation: The User can add Questions for the Evaluation and specify the maximum number of points employees can reach in each question.
Grade: Define Grades by Assigning Marks Percentage.
Check the “Show Results” option to view it on the “Data Entry” Screen.
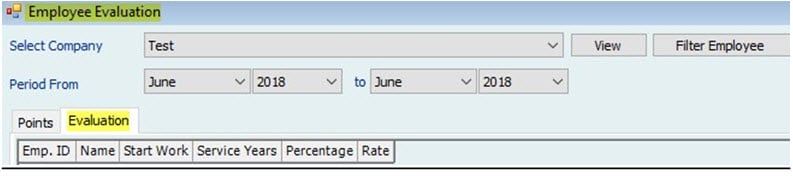
After setting up Evaluation, Go to Manage Employees → Other
Manage Employees → Employee Evaluation. Filter the employees you want to evaluate and select them. The “Evaluation Tab” will Show the Results.
Image 1:

Image 2:
1-11. Additional Setup:
Company Settings → Company Setup → Additional Settings

Here, the User can select how Employee numbers are generated for companies. If “Generate one Employee serial Number for all companies” is selected, Employee’s serial Number will be Company 1: 1,2,3... Company 2: 4,5,6…
If “Generate Serial Number by Company” is selected, Employee’s serial Number will be:
Company 1: 1,2,3… Company 2: 1,2,3…
Setup digits after decimal points and rounding: Here, users can set how many digits must be displayed after the decimal points; it’s also used for rounding the Total Amount.
Rounding Required: Users can select whether to round the Salary Amount. If Yes, increase the Number by one if the next digit is 5 or more.
Archiving of Timesheet Salary Sheets Required:
All the Timesheet Salary sheets will be archived if this option is checked. All the Timesheet Salary sheets will be archived if this option is checked.
Use Multicurrency:
If this option is checked, the User can set the currency for Salary. When the User checks it for the first time, it will display “No default currency Selected.” You must goList to “currency List” to set the default currency. The User can add any number of currencies and make one Default. Once the money is selected as Default, it cannot be changed later.
1-12. Employee Costing Setup:
Company Settings → Company Setup → Employee Costing Report Setup
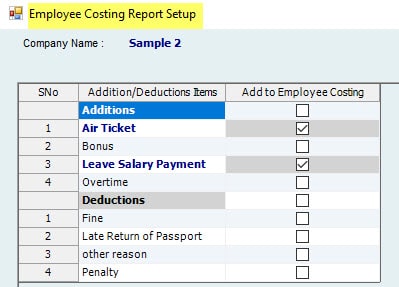
You can add any of the “Addition / Deduction” activities to the “Employee costing Report” so that it will calculate the addition or deduction added as Employee “Cost.”
1-13. Report Format Setup:
Company Settings→ Company set up →Report Format Setup different forms.
Select Format Tab:
Here, the User can set available formats to Add prefix text to the Employee’s Number, which will be added before the Employee Number. E.g., If the prefix set is ‘A’ and the Employee numbers are 01,02, the Employee numbers are A01, A02.
Report Margin tab:
The User can provide the margin details for reports.
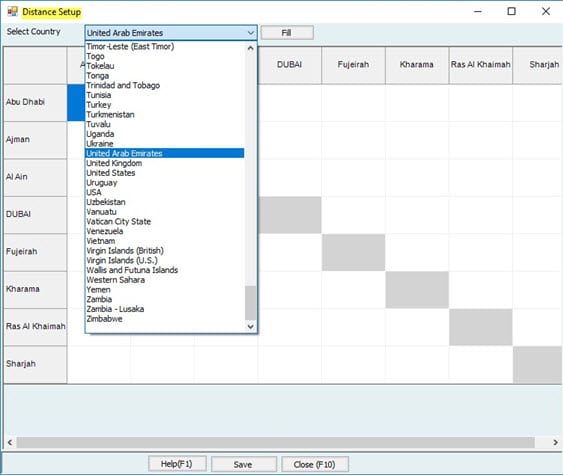
1-14. Distance Setup:
Company Settings→ Company set up→Distance Setup Country:
The User can select a country that will List the cities in that country and the distance between 2 cities. Countries or cities can be added from the “General List” under settings. The values in this screen are just information and will not affect any calculations in the System.
1-15. Standard Salaries & Activities Setup:
Company Settings → Standard Salaries & Activities Setup
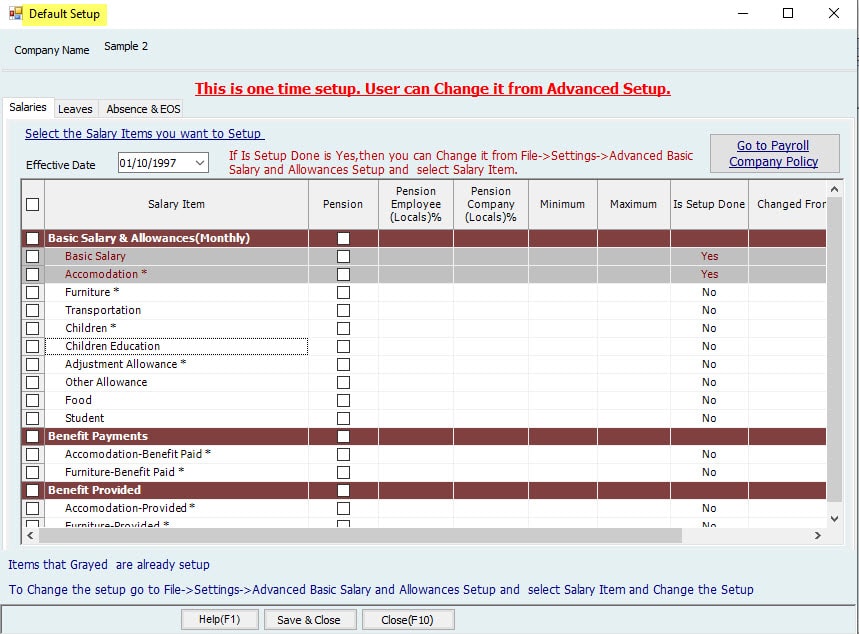
Salaries tab:
The User can select the Salary items to be included in the standard Setup. This is the minimum/standard Setup needed to run the System.
The User can set the minimum and maximum salaries for employees. Also, setting up the Pension to be deducted from the Company and the Employee in each Salary Item can be done.
If the User selects the Salary Item from here, it will be set for the Company. Once set, the User cannot change the settings from here, and things will be grayed out.
For more settings, the User can go to “Advanced Settings” for each Item. If users don’t want to set up from here, they can go to Advanced Settings.
The User can set “Pension” for Locals to be deducted from Employee and Company. After completing the Setup, it will be updated in the Advanced Setup. Moreover, the User can change this through an advanced Setup.
The User can set the minimum and maximum allowed Salary for each Item. After that, it will be updated in the Advanced Setup.
“Changed from Advanced Setup”: If the User changes from advanced Setup, this column will display ‘Yes.’
Leaves tab:
Users can select the type of leave wanted for Setup, E.g., Annual or Hajjor leave. If the items are selected, they will be set for the System. Users can go to Advanced Settings to make changes anytime. However, once set from here, the items will be grayed out and cannot be changed from here anymore.
If the User doesn’t want to set up the System from here, they can go to “Advanced Settings.”
Absence & EOS tab:
Users can select the activities required for Setup, E.g., Absence, EOS (Labor law), and Additions & Deductions.
If the activity items are selected, they will be set in the System. Users can go to Advanced Settings to make further changes anytime. Once set from here, the items will be grayed out and cannot be changed from here.
If the User doesn’t want to set up the System from here, they can go to “Advanced Settings.”
Note:
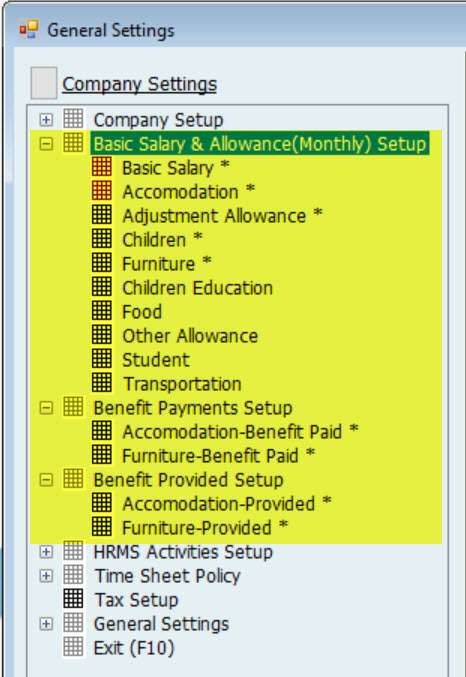

Summary of Setup to be done:
| Modules Settings | Name | Go to: File Menu --> Setup Modules -> HRMS Settings -> General Settings by the Admin use only. | Accounting Module Effect |
| Basic Salary & allowances (Monthly) Setup. Required. | Basic Salary Accommodations Adjustments Allowances Children Allowances And more must | Must be done to create the Salary Sheet | Link Salary Items and Allowances with Chart of Accounts. Go to: File -> Setup Module -> HRMS Settings |
| Benefit Payments Setup. Optional. | Accommodation - Benefit Paid Furniture - Benefits Paid | Go to Set Employee Salary (Optional) | At the time of Payment |
| Benefit Provided Setup. Optional. | Accommodation - Provided Furniture Provided | Go to Set Employee Salary (Optional) | At the time of getting Provided |
| HRMS Activities Setup. Required | Leave Setup: Annual Leave Setup, Leave Without Pay, Sick Leave- Full Day, Sick Leave- Half Day, Sick Leave- No Pay, Haj Leave, Maternity Leave, Paternity Leave, and Emergency Leave. Absence, Loan, Addition \ Deduction, End of Service (EOS), and other Activities. | It must be done in the Setup. It has a direct effect on HRMS Activities. | At the time of Posting, the timeline |
| Time Sheet Policy and Setup if used. Optional | Shift & Holiday Setup, Timesheet & OT Setup, Assign Employees to Timesheet - No Effect, Assign Employees to Project - No Effect, Assign Employees to Shift - No Effect, Project Name List and Sponsor List - No Effect. | They are required before starting to use Timesheet. | New projects will be updated on the Customer / Job List. Can add Project List to Customer / Job List. Accounting effect at the time of Posting |
| Setup Taxes: Setup Employee Tax if required. | By the Admin use only. | At the time when posting Salary Sheet. | |
Basic Salary & Allowance (Monthly) Setup

In this part, the User can set up Basic Salary and Allowances for his Company sorted by levels (Department, Position Grade...etc.). This depends on the items selected in the department Setup Users.
Users can select the Basic Salary & Allowances in Company settings --> Basic Salary & Allowances
Basic Salary Setup
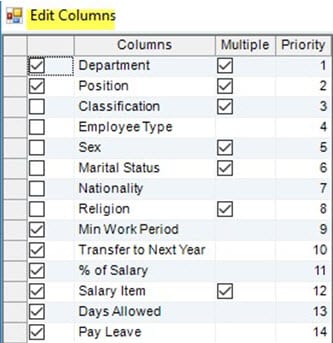
- Users can define which columns need to be displayed for the Basic Salary Setup using ‘Edit Columns.’
- The settings read from the standard Setup. Minimum, Maximum, and Pension will be read from the Default Setup. Users can change the settings from here.
Department and Position:
- Here, the User can define the Basic Salary for the levels: Department and Position.
- The User can select the option ‘All’ if they want to have the same Basic Salary set up for all.
Nationality:
- The User can select which nationality applies to these basic Salary settings.
- If Local is selected, the Basic Salary will be applied to Locals.
- The User can set different Basic Salary setups for Locals and Non-Locals.
Fixed:
- Users can define a fixed Amount as a basic Salary for the specified Employee.
- Users cannot enter the Minimum and Maximum columns if they set a fixed amount.
Minimum:
- Users can define the minimum basic Salary for the specified Employee.
Maximum:
- Users can define the maximum basic Salary for the specified Employee.
Pension (EMPLOYEE):
- Users can define the percentage of Salary to be deducted from the monthly Salary as a Pension from the Employee.
Pension (COMPANY):
- Users can define the percentage of Employee Salary to be deducted from the Company as a Pension.
Note:
Users cannot define Pension (EMP) and Pension (COMP) for Non-Locals unless the ‘Include Pension for Non-Locals’ is checked from the Leave & Pension Settings. The allowance Type is fixed for the Basic Salary Setup. It is always “paid” as a monthly Salary.
Users can set the Basic Salary for Employees from Manage Employees-->Set Salary & Benefits → Create / Adjust Single Salary.
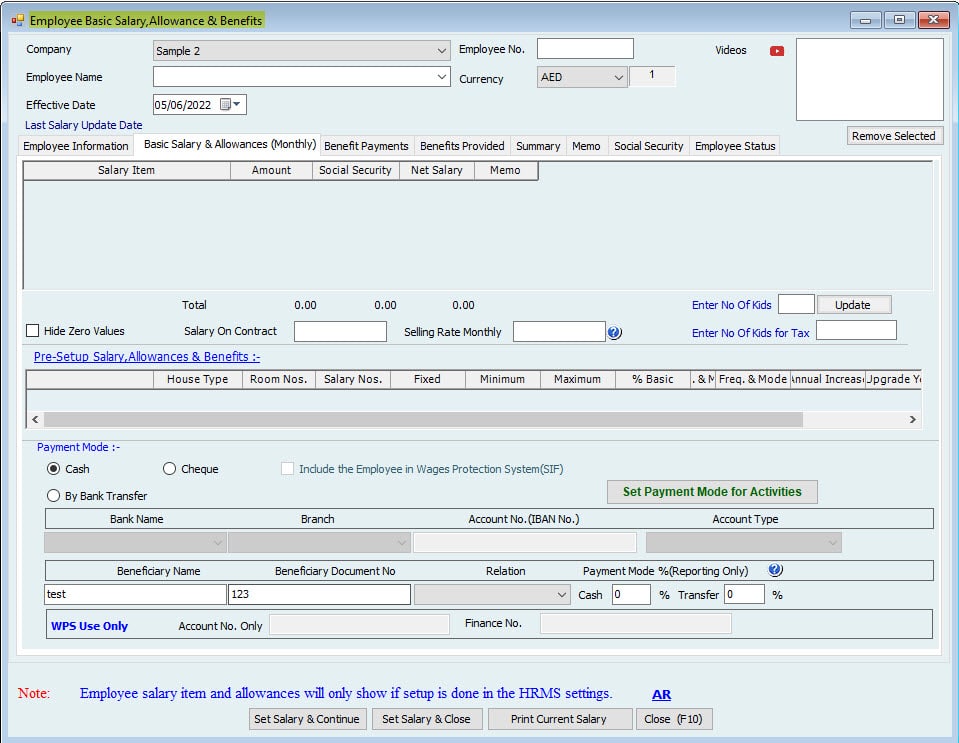
Users can set the Amount paid as Basic Salary and Allowances here. The Salary Item displayed here depends on the Setup done in Default Setup / Advanced Setup.
| Name | Go to: File Menu --> Setup Modules -> HRMS Settings -> General Settings by the Admin User only. | Accounting Module Effect | |
| Basic Salary & allowances (Monthly) Setup. Required. | Basic Salary Accommodations Adjustments Allowances Children Allowances And more must | Must be done to create the Salary Sheet | Link Salary Items and Allowances with Chart of Accounts. Go to: File -> Setup Module -> HRMS Settings |
| Benefit Payments Setup. Optional. | Accommodation - Benefit Paid Furniture - Benefits Paid | Go to Set Employee Salary (Optional) | At the time of Payment |
| Benefit Provided Setup. Optional. | Accommodation - Provided Furniture Provided | Go to Set Employee Salary (Optional) | At the time of getting Provided |
| HRMS Activities Setup. Required | Leave Setup: Annual Leave Setup, Leave Without Pay, Sick Leave- Full Day, Sick Leave- Half Day, Sick Leave- No Pay, Haj Leave, Maternity Leave, Paternity Leave, and Emergency Leave. Absence, Loan, Addition \ Deduction, End of Service (EOS), and other Activities. | It must be done in the Setup. It has a direct effect on HRMS Activities. | At the time of posting time |
| Time Sheet Policy and Setup if used. Optional | Shift & Holiday Setup, Timesheet & OT Setup, Assign Employees to TimeSheet - No Effect, Assign Employees to Project - No Effect, Assign Employees to Shift - No Effect, Project Name List and Sponsor List - No Effect. | It is required before starting to use TimeSheet. | New projects will be updated to the Customer / List List. Can add Project List to Customer / Job List. Accounting effect at the time of Posting |
| Setup Taxes: Setup Employee Tax if required. | By the Admin use only. | At the time when posting Salary Sheet. | |
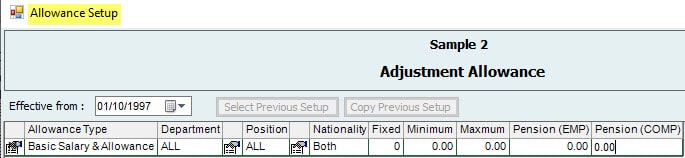
Accommodation Allowances Setup

Allowance Type:
Department and Position:
Nationality:
Users can select to which nationality to apply this basic Salary setting.
Fixed:
Minimum:
Maximum:
Pension (EMP):
The User can define the percentage of Salary to deduct from the monthly Salary as Pension from the Employee.
Pension (COMP):
Note: The User cannot define Pension (EMP) and Pension (COMP) for Non-Locals unless the 'Include Pension for Non-Locals' is checked from the Leave & Pension Settings.
Notes:
All the other allowances (Furniture, Transportation, etc.) The Setup is the same as the above Accommodation Setup.

2-3. Adjustment Allowance:
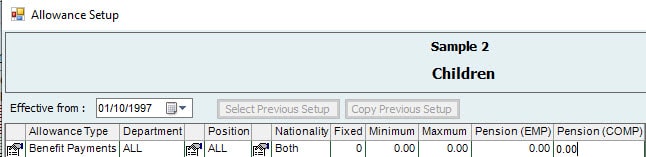
2-4. Children Setup:
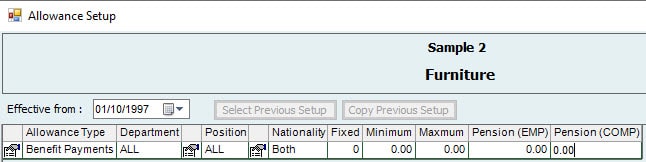
2-5. Furniture Setup:
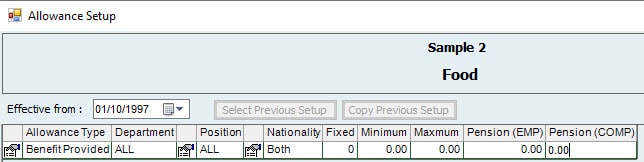
2-6. Food Setup:
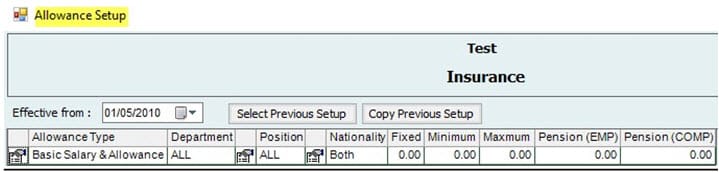
2-7. Insurance Setup:
2-8. Loan Deduction:

2-9. Maintenance Allowance:

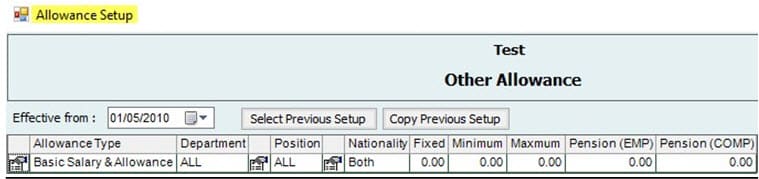
2-10. Other Allowance:
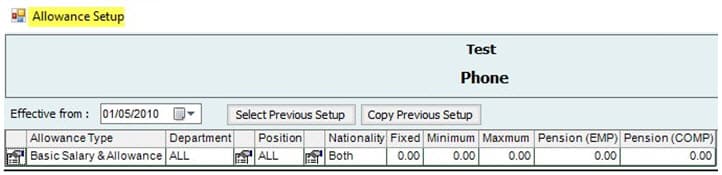
2-11. Phone Setup:
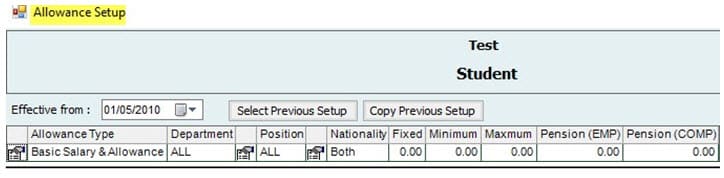
2-12. Student Setup:
2-13. Transportation:
![]()
More Items can be added under Basic Salary & Allowances as well.
Users can set Advanced Benefit Payment settings from here.
3-1. Accommodation –Benefits Paid:

Note:
-Users can define which columns must be displayed for the Benefit Payments Setup using ‘Edit Columns.’
-The settings read from the standard Setup. Minimum, Maximum, and Pension will be read from the Default Setup. Users can change the settings from here.
Allowance Type:
-It will List the types of allowance: Benefit Payment.
Department and Position:
-Here, the User can define two levels: Department and Position; Setup must be done on the settings.
-Users can select ‘All’ if they want the same Setup to apply for all.
Nationality:
-Users can select what nationalities apply to this benefit payment settings.
Fixed Amount:
-Users can define a fixed amount as a benefit payment for the specified employees.
Minimum Amount:
-Users can define the minimum Amount to be given as benefit payment for the specified Employee.
Maximum Amount:
-Users can define the maximum Amount to be given as benefit payment for the specified Employee.
Pension (EMP):
Employee.
Pension (COMP):
-Users can define the Amount to be deducted as pension from the
-Users can define the Amount to be deducted as a pension from the Company.
Note:
Users cannot define Pension (EMP) and Pension (COMP) for Non-Locals unless the ‘Include Pension for Non-Locals’ is checked from the Leave & Pension Settings.
Users can set the Benefit Payments for Employees from Manage Employees→Set Salary & Benefits→Create/Adjust Single Salary→Benefit Payments Tab.

Note:
Benefit Payment is not paid through the Salary sheet. Users must create benefits from HR Activities to pay the Employee by Cheque or Cash. This will not affect the Salary sheet.
3-2. Furniture-Benefit Paid:

-Users can define which columns need to be displayed for the Benefit Payments Setup using ‘Edit Columns.’
-The settings read from the standard Setup. Minimum, Maximum, and Pension will be read from the Default Setup. Users can change the settings from here.
Allowance Type:
-It will List the type of allowance: Benefit Payment.
Department and Position:
-Here, the User can define two levels: Department and Position. The setting needs to be set up.
-Users can select ‘All’ to have the same Setup for all.
Nationality:
-Users can select what nationalities apply to this benefit payment settings.
Fixed Amount:
-Users can define a fixed amount as a benefit payment for the specified employees.
Minimum Amount:
-Users can define the minimum Amount to be given as benefit payment for the specified employees.
Maximum Amount:
-Users can define the maximum Amount to be given as benefit payment for the specified employees.
Pension (EMP):
Users can define the Amount to be deducted as a pension from the Employee.
Pension (COMP):
-Users can define the Amount to be deducted as a pension from the Company.
Note:
Users cannot define Pension (EMP) and Pension (COMP) for Non-Locals unless the ‘Include Pension for Non-Locals’ is checked from the Leave & Pension Settings.
Users can set the Benefit Payments for Employees from Manage Employees→Set Salary & Benefits→Create/Adjust Single Salary→Benefit Payments Tab.
Users can set Advanced Benefit Provided settings from here.
4-1. Accommodation- Provided:
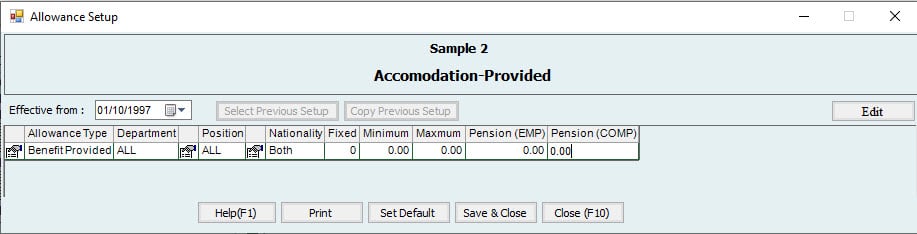
Note:
-Users can define which columns must be displayed for the Benefit provided Setup using ‘Edit Columns.’
-The settings read from the standard Setup. Minimum, Maximum, and Pension will be reading from the Default Setup if set any. Users can change the settings from here.
Allowance Type:
It will List the type of allowance: Benefits Provided.
Department and Position:
-Here, the User can define two levels: Department and Position. The setting needs to be set up.
-The User can select ‘All’ if they want the same Setup.
Nationality:
-Users can select to which nationality to apply this Benefit provided settings.
Fixed Amount:
-Users can define a fixed amount as a benefit for the specified employees.
Minimum Amount:
-Users can define the minimum Amount to be given as a Benefit provided for the specified employees.
Maximum Amount:
-Users can define the maximum Amount to be given as a Benefit provided for the specified employees.
Pension (EMP):
-Users can define the Amount to be deducted as pension from the Employees.
Pension (COMP):
-Users can define the Amount to be deducted as a pension from the Company.
Note:
Users cannot define Pension (EMP) and Pension (COMP) for Non-Local sunless the ‘Include Pension for Non-Locals’ is checked from the Leave & Pension Settings.
Users can set the Benefit Provided for Employees from Manage Employees→Set Salary & Benefit→ Create / Adjust Single Salary → Benefit Provided Tab.
4-2. Furniture –Benefits Provided:
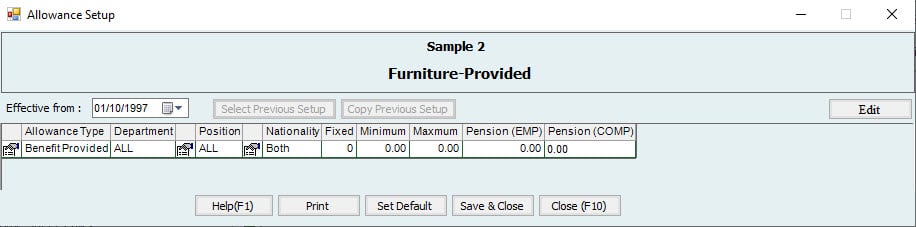
Note:
-Users can define which columns must be displayed for the Benefit provided Setup using ‘Edit Columns.’
-The settings read from the standard Setup. Minimum, Maximum, and Pension will be reading from the Default Setup if set any. Users can change settings from here.
Allowance Type:
-It will List the type of allowance: Benefits Provided.
Department and Position:
-Here, the User can define two levels: Department and Position. The settings need to be set up.
-Users can select ‘All’ if they want the same Setup.
Nationality:
-Users can select what nationalities apply to this Benefit provided settings.
Fixed Amount:
-Users can define a fixed amount as a benefit for the specified employees.
Minimum Amount:
-Users can define the minimum Amount to be given as a Benefit provided for the specified employees.
Maximum Amount:
-Users can define the maximum Amount to be given as a Benefit provided for the specified employees.
Pension (EMP):
Users can define the Amount to be deducted as a pension from Employees.
Pension (COMP):
-Users can define the Amount to be deducted as a pension from the Company.
Note:
Users cannot define Pension (EMP) and Pension (COMP) for Non-Locals unless the ‘Include Pension for Non-Locals’ is checked from the Leave & Pension Settings.
Users can set the Benefit Provided for Employees from Manage Employees→Set Salary & Benefits→Create/Adjust Single Salary→Benefit Provided Tab.
5-1. Leave Setup:
5-1-1. Annual Leave
Users can select the Activities Setup in Company settings→ HRMS Activities setup→ to leave Setup → Annual Leave Setup.
When users open the Setup for the first time, it will open the below window to select the columns to be displayed for the Setup:
By default, the ticked columns are selected. Users must "Save Settings & Close" to continue. In case multiple were checked, there will be multiple lines for the column type. I.e., users can have a different Setup for different lines.
Users can add more Leave types depending on the Company policy from General List. I.e., Lists→General list→Leave Type.

Note:
Users can define which columns must be displayed for the Annual Leave Setup using 'Edit Columns.'
Department and Position:
-Here, the User can define Annual Leave to be set for the levels: Department and Position.
-Users can select 'All' if they want the same Setup.
Minimum work Period:
-This is the Minimum work period the Employee needs to finish in the Company before creating the Leave.
-For example, if the User (Admin) puts six months, the System will not allow creating Leave before 6 months.
Mode:
-Users can define the mode as Month/Year/Days.
Transfer to Next year:
% of Salary:
-What percentage of the Defined Salary does the User want to pay in Leave Salary?
-If the percentage is 100 and the Salary is 1000, then the Employee will get 1000 as Leave Salary. If the percentage is 50 and the Salary is 1000, then the Employee will get 500 as the Leave Salary.
Salary Item:
-Define the Salary Components to be included in the Leave Salary. For example, as per Company policy, Basic Salary + Accommodation + Other Allowances or All Allowances.
Encash Leave:
-Users can define the Salary component to be given for the leave encashment if the Employee is not taking the Leave.
Month From / Month To:
-Define the period of Leave Calculation Days for Employees.
For example, from 0 to 6 means the first 6 months of the service period, 7 to 12 means after 6 months, and 12 to 0 means after a year. "0" here means infinite.
Days Allowed:
-Users can define the Maximum Number of days allowed for the calculation of Leave in a specified Service period (Specify the period by using month From / Month To).
-User can set 7-12-month duration, Days allowed as 24; then the maximum allowed leaves between 7-12 months will be 24 Days.
Duration:
-How many times does the User want to give these Allowed Days? Once a year or Monthly.
Mode:
-Users can define whether the allowed days are Monthly/Yearly.
Pay Leave:
-Users can select whether they want to pay the Leave or not for the employees.
Exclude Weekly off Days:
-Weekly off days (e.g., Friday) will be excluded from Leave Days. Weekly off Days can be defined from:
File→ Settings→ Company Setup→ Holidays Setup
For example, yearly allowed leaves are 30. If this option is checked, weekly off days are excluded from the annual Leave calculation, and the System will not include Fridays in the Leave Period. If an Employee is on a 30-day leave, the leave calculation will be 26, assuming 4 Fridays during their Leave.
Exclude Public Holidays:
-Public Holidays will be excluded from Leave Days. Public Holidays can be defined from:
File→ Settings→ Company Setup→ Holidays Setup
For example, if any Public Holiday comes during the Leave Period, and if this option is checked, it will not be considered in the leave calculation.
Exclude Used Annual Leave Days from Leave Calculation:
- The Leave period will be excluded from Leave Calculation.
For example, if the User selects this option, the System will not calculate (Accrued) Leaves for the created Leave period. This means that after one Month's Leave, the Employee will have to work for 12 months to get 30 days.
Note:
The set Default button should change the Setup to the default settings for annual leaves Setup, as below.

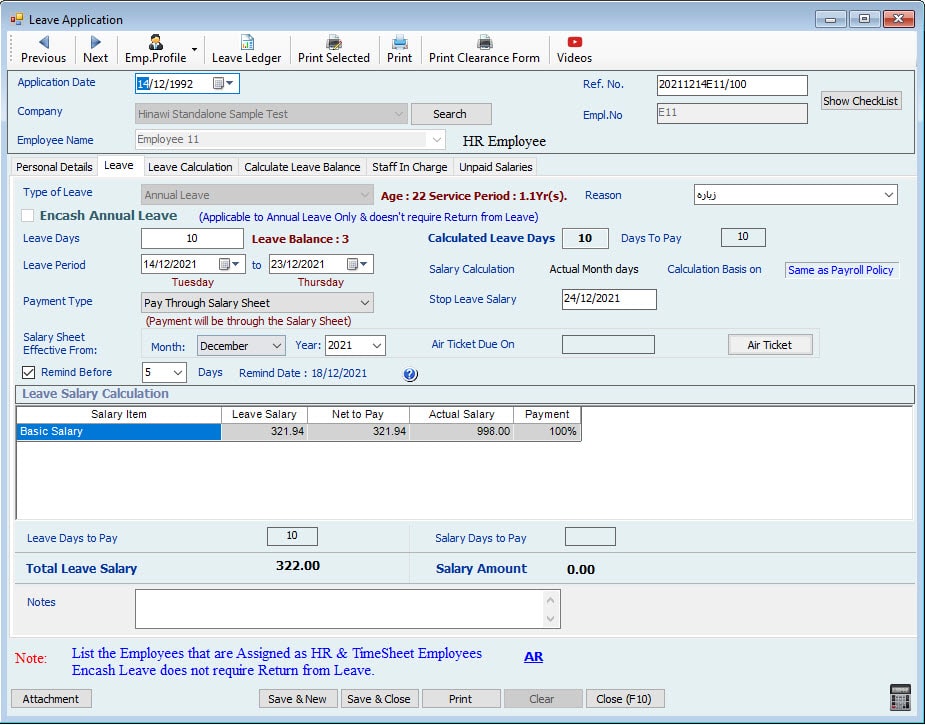
Users can create Annual Leave from Activities Menu→ Leaves→ Create Leave and select Type of Leave as Annual Leave. Users can select the payment type to be paid through the Salary sheet if they want the leave Salary to be paid as part of it. Users can also select Pay Now if they want to pay the leave Salary separately. The leave Amount is based on the Setup in Annual Leave Setup.
Users cannot create any other leave unless the created Leave is processed. I.e., Accept Leave, Leave return.
Note:
Haj Leave Setup:-
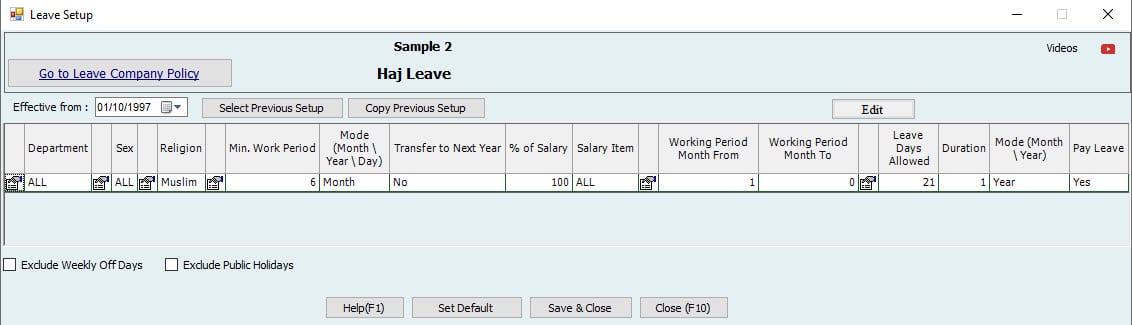
5-1-2. Haj Leave:
Note:
Users can define which columns must be displayed for the Haj Leave Setup using ‘Edit Columns.’
Department and Position:
-Here, the User can define Emergency Leave to be set for Department and Position levels.
-Users can select ‘All’ if they want the same Setup.
Religion:
-Religion should be Muslim to display Haj Leave in leave requests.
Minimum work Period:
- This is the Minimum working period required in the Company before creating the Leave.
- For example, if the User (Admin) puts six months, the System will not allow creating a Leave before 6 months.
Mode:
-Users can define the mode as Month/Year/Days.
Transfer to Next year:
-Transfer to next year means the Leave Balance will be carried forward to next year.
% of Salary:
- By Default, Transfer to Next Year is No for Haj Leave.
-What percentage of the Defined Salary does the User want to pay in Leave Salary
-If the percentage is 100 and the Salary is 1000, then Employee will get 1000 as a Leave Salary. If the percentage is 50 and the Salary is 1000, then the Employee will get 500 as Leave Salary.
Salary Item:
-Define the Salary Components to be included in the Leave Salary. For example, as per Company policy, Basic Salary + Accommodation + Other Allowances or All Allowances.
Month From / Month To:
-Define the Period for Leave Calculation Days of Employees.
For example, from 1 to 0 means throughout the service period.
Days Allowed:
-Users can define the Maximum days allowed for calculation of Leave in a specified Service period (Specify the Period by using Month From / Month To)
-Users can set the Days allowed as 21; then, the maximum allowed Emergency leaves will be 21 Days.
Duration:
-How many times does the User want to give these Allowed Days? Once a year or monthly.
Mode:
-Users can define whether the allowed days are in Month/Year.
Pay Leave:
-Users can select whether they want to pay the Leave or not for the employees.
Exclude Weekly off Days:
- Weekly off days (e.g., Friday) will be excluded from Leave Days. Weekly off Days can be defined from:
File→ Settings→ Company Setup→ Holiday Setup
For example, yearly allowed leaves are 10. If this option is checked weekly, off days are excluded from the Haj Leave calculation, and the System will not include Fridays in the Leave Period. This means that if an Employee is going for 10 leave days, and there are 2 weekly off days, the leave calculation will be 8.
Exclude Public Holidays:
-Public Holidays will be excluded from Leave Days. Public Holidays can be defined from:
File→ Settings→ Company Setup→ Set Holidays
For example, if any Public Holiday comes during the Leave Period, and if this option is checked, it will not be considered in the leave calculation.
Deduct Leave Days from Service Period:
-If this option is checked, the Leave period will be deducted from the calculation of the Service Period. Users can specify whether it applies to Locals or Non-locals.
-The Leave period will be deducted from the Service Period, which means that this Period will not be used for Accruing Annual Leave and will be deducted from the End of the Service
-For example, if this option is checked and an Employee has been working for 5 years in the Company. During this period, he took 10 days (which is deducted from the service period). His total service Period is as follows:
- (5 x 365) - 10 = 1815 Days.
Note:
Haj Leave applies only to Muslims. Users cannot use Encash Haj Leave.
| Departments: | This option enables users to select the departments that will be applied to the Setup. | |||||
| Positions: | This option enables users to select the positions from the selected departments that will be applied to the Setup. | |||||
| Religion: | This is where the religion for the row is selected regarding the selected departments and positions. | |||||
| Minimum Work Period: | This Field enables users to select the number of days, months, or years employees must work before receiving the balance. | |||||
| Mode: | Specifies the minimum work period in Days, Months, or Years. | |||||
| Transfer to Next Year: | This Field decides whether the remaining balance should be saved for next year. | |||||
| % of Salary: | This specifies how much is covered for this specific type of Leave. Ex: 100% should be covered for Haj Leave. | |||||
| Salary Item: | This specifies the items that will be considered in the percentages above. | |||||
| Month From: | The Setup starts from here, where this is the beginning of the month/year where the Employee will start getting balance. | |||||
| Month To: | This Setup decides the limit of the month/year where the Employee will keep getting the balance monthly / yearly. | |||||
| Days Allowed: | This is the balance allowed for employees regarding the 2 columns before it. | |||||
| Duration: | This is used to decide the total time in months/years to be followed by this Setup. | |||||
| Mode: | This decides whether months/years will be used for the duration Number before it. | |||||
| Pay Leave: | This is used to decide whether the employees or the Company pays the Leave. Ex: Haj leave is paid | |||||
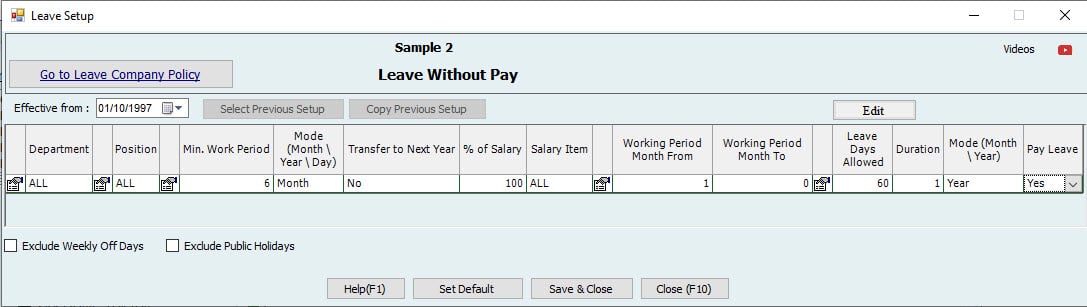
5-1-3. Leave without Pay Setup:
Note:
Users can define which columns must be displayed for the Leave without Pay Setup using ‘Edit Columns.’
Department and Position:
-Here, the User can define Leave without Pay to be set for the levels: Department and
Position.
-The User can select the option ‘All’ if they want to have the same Setup for all.
Minimum work Period:
-This is the Minimum working period employees must finish in the Company before creating the Leave.
-For example, if the User (Admin) puts 6 months, the System will not allow creating Leave before 6 months.
Mode:
-Users can define the mode as Month/Year/Days.
Transfer to Next year:
-Transfer to next year means the Leave Balance will be carried forward to next year.
- By default, “Transfer to Next Year” is No for Leave without Pay.
% of Salary:
-What percentage of the Defined Salary does the User want to pay in Leave? The percentage of Salary will not make any difference for the Setup since there is no payment for the Leave.
Salary Item:
-Define the Salary Components to be included in the Leave Salary. This will not make any difference since No payment is required for this Leave.
Month From / Month To:
-Define the Period for Leave Calculation Days for Employees.
For example, from 1 to 0 means throughout the service period.
Days Allowed:
-Users can define the Maximum days allowed for calculation of Leave in a specified Service period (Specify the Period by using Month From / Month To)
-Users can set “Days allowed” as 60, meaning the maximum allowed “Leave without pay” will be 60 days per year.
Duration:
-How many times the User wants to give these Allowed Days? Once a year or Month.
Mode:
-Users can define whether the allowed days are Monthly/Yearly.
Pay Leave:
-The User can select whether they want to pay the Leave or not for the employees.
-Pay Leave is “NO” for this Setup.
Exclude Weekly off Days:
- Weekly off days (e.g., Friday) will be excluded from Leave Days. Weekly off Days can be defined from:
File→ Settings→ Company Setup→ Set Holidays
For example, yearly allowed leaves are 60. If this option is checked, weekly off days are excluded from the “Leave without Pay” calculation, and the System will not include Fridays in the Leave Period. If an Employee is going for 10 days of Leave, and there are 2 weekly off days, the leave calculation will be 8.
Exclude Public Holidays:
Public Holidays will be excluded from Leave Days. Public Holidays can be defined from
File→ Settings→ Company Setup→ Set Holidays
For example, if any Public Holiday comes during the Leave Period, and if this option is checked, it will not be considered in the leave calculation.
Deduct Leave Days from Service Period:
-If this option is checked, the Leave period will be deducted from the calculation of the Service Period. Users can specify whether it applies to Locals or Non-locals.
-The Leave period will be deducted from the Service Period, which means that this Period will not be used for Accruing Annual Leave and will be deducted from the End of the Service
-For example, if this option is checked, an Employee has been working for 5 years in the Company. He took 10 days to leave during this Period (which is deducted from the service period). His total service Period is as follows:
- (5 x 365)- 10 = 1815 Days.
Note:
The User must set Pay Leave as NO for the Leave Type ‘Leave without Pay.’ Users can create Annual Leave from Activities Menu→ Leaves→ Create Leave and select Leave as Leave without Pay. The payment type will be disabled because there is no
payment of Leave.

5-1-4. Maternity Leave Setup:

Note:
Users can define which columns must be displayed for the Maternity Leave Setup using ‘Edit Columns.’
Department and Position:
-Here, the User can define Maternity Leave to be set for the levels: Department and Position.
-The User can select ‘All’ if they want the same setup.
Minimum work Period:
-This is the Minimum work period the Employee needs to finish in the Company before creating the Leave.
-For example, if the User (Admin) puts six months, the System will not allow creating a Leave before 6 months
Mode:
-Users can define the mode as Month/Year/Days.
Transfer to Next year:
- “Transfer to next year” means that the Leave Balance will be carried forward to next year and so on
- By Default, Transfer to Next Year is “No” for Maternity Leave
% of Salary:
-What percentage of the Defined Salary does the User want to pay in Leave Salary?
If the percentage is 100 and the Salary is 1000, then the Employee will get 1000 as Leave Salary. If the percentage is 50 and the Salary is 1000, then the Employee will get 500 as Leave Salary.
Salary Item:
-Define the Salary Components to be included in the Leave Salary. For example, as per Company policy, Basic Salary + Accommodation + Other Allowances or All Allowances.
Month From / Month To:
-Define the Period for Leave Calculation Days for Employees.
For example, from 1 to 0 means throughout the service period.
Days Allowed:
-Users can define the Maximum days allowed for calculation of Leave in a specified Service period (Specify the Period by using Month From / Month To)
-e.g., Users can set the Days allowed as 45. Therefore, the maximum allowed Maternity leaves will be 45 Days.
Duration:
-How many times does the User want to give these Allowed Days? Once a year or monthly.
Mode:
-Users can define whether the allowed days are Monthly/Yearly.
Pay Leave:
-The User can select whether they want to pay the Leave or not for the Employee.
Exclude Weekly off Days:
- Weekly off days (e.g., Friday) will be excluded from Leave Days. Weekly off Days can be defined from:
File→ Settings→ Company Setup→ Set Holidays
For example, yearly allowed leaves are 10. If this option is checked, weekly off days are excluded from the Maternity Leave calculation, and the System will not include Fridays in the Leave Period. This means that if an Employee is going for 10 leave days, and there are 2 weekly off days, the leave calculation will be 8.
Exclude Public Holidays:
- Public Holidays will be excluded from Leave Days. Public Holidays can be defined from:
File--> Settings--> Company Setup--> Set Holidays
For example, if any Public Holiday comes during the Leave Period, and if this option is checked, it will not be considered in the leave calculation.
Deduct Leave Days from Service Period:
-If this option is checked, the Leave period will be deducted from the calculation of the Service Period. Users can specify whether it applies to Locals or Non-locals.
-The Leave period will be deducted from the Service Period, which means that this Period will not be used for Accruing Annual Leave and will be deducted from the End of the Service
-For example, if this option is checked, and an Employee has been working for 5 years in the Company, and he took 10 leave days during this Period (which is deducted from the service period), his total service Period is as follows;
- (5 x 365)- 10 = 1815 Days.
Note:
Sex must be Female, and Marital Status must be married for Maternity Leave. Users cannot use Encash Maternity Leave.
5-1-5. Paternity Leave:
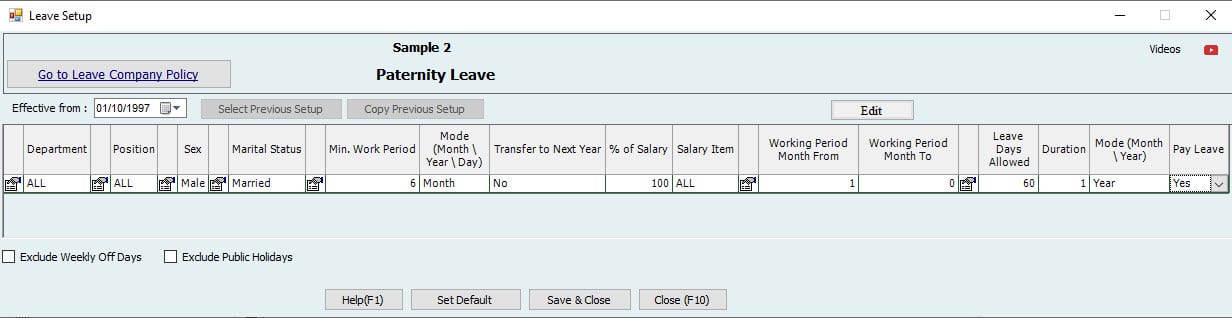
The same as maternity leave, but the difference is that paternity must be for Married Males ONLY.
5-1-6. Sick Leave – Full Pay:
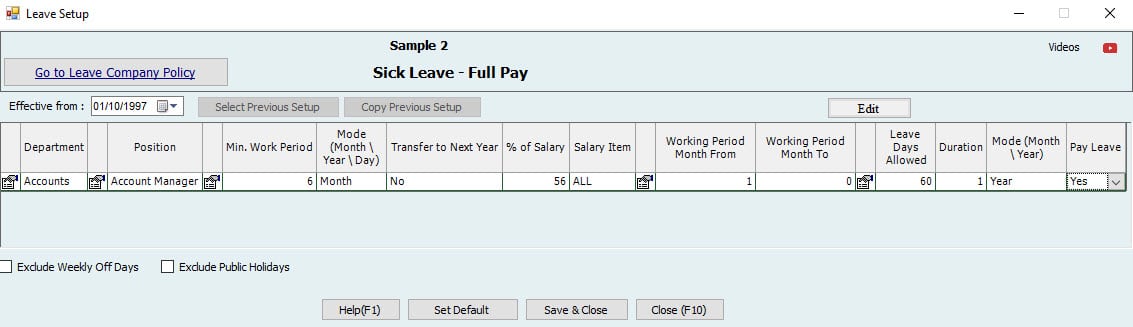
Note:
Users can define which columns must be displayed for the Sick Leave Setup using ‘Edit Columns.’
Department and Position:
Here, the User can define Sick Leave to be set for the levels: Department and Position.
-The User can select ‘All’ if they want the same setup.
Minimum work Period:
-This is the Minimum work period the Employee needs to finish in the Company before creating the Leave.
-For example, if the User (Admin) puts 6 months, the System will not allow creating Leave before 6 months
Mode:
-Users can define the mode as Month/Year/Days.
Transfer to Next year:
- “Transfer to next year” means the Leave Balance will be carried forward to next year.
- By Default, Transfer to Next Year is “No” for Sick Leave
% of Salary:
-What percentage of the Defined Salary does the User want to pay in Leave Salary?
-If the percentage is 100 and the Salary is 1000, then the Employee will get 1000 as Leave Salary. If the percentage is 50 and the Salary is 1000, then the Employee will get 500 as Leave Salary.
Salary Item:
-Define the Salary Components to be included in the Leave Salary. For example, as per Company policy, Basic Salary + Accommodation + Other Allowances or All Allowances.
Month From / Month To:
-Define the Period for Leave Calculation Days for Employees.
For example, from 1 to 0 means throughout the service period.
Days Allowed:
Users can define the Maximum Number of days allowed to calculate Leave in a specified Service period (Specify the Period by using Month From / Month To).
-Users can set the Days allowed as 21. Therefore, the maximum allowed Maternity leaves will be 21 Days.
Duration:
-How many times does the User want to give these Allowed Days? Once a year or monthly.
Mode:
-Users can define whether the allowed days in Month/Year.
Pay Leave:
-Users can select whether they want to pay the Leave or not for the employees.
Exclude Weekly off Days:
- Weekly off days (e.g., Friday) will be excluded from Leave Days. Weekly off Days can be defined from:
File→ Settings→ Company Setup→ Holiday Setup
For example, yearly allowed leaves are 10. If this option is checked, weekly off days are excluded from the Sick Leave calculation, and the System will not include Fridays in the Leave Period. This means that if an Employee is going for 10 leave days, and there are 2 weekly off days, the leave calculation will be 8.
Exclude Public Holidays:
-Public Holidays will be excluded from Leave Days. Public Holidays can be defined from:
File→ Settings→ Company Setup→ Set Holidays
For example, if any Public Holiday comes during the Leave Period, and if this option is checked, it will not be considered in the leave calculation.
Deduct Leave Days from Service Period:
-If this option is checked, the Leave period will be deducted from the calculation of the Service Period. Users can specify whether it applies to Locals or Non-locals.
-The Leave period will be deducted from the Service Period, which means that this Period will not be used for Accruing Annual Leave and will be deducted from the End of Service. For example, if this option is checked, and an Employee has been working for 5 years in the Company, and they he took 10 days (which is deducted from the service period), the total service Period is as follows;
- (5 x 365)- 10 = 1815 Days.
5-1-7. Sick Leave – half Pay:
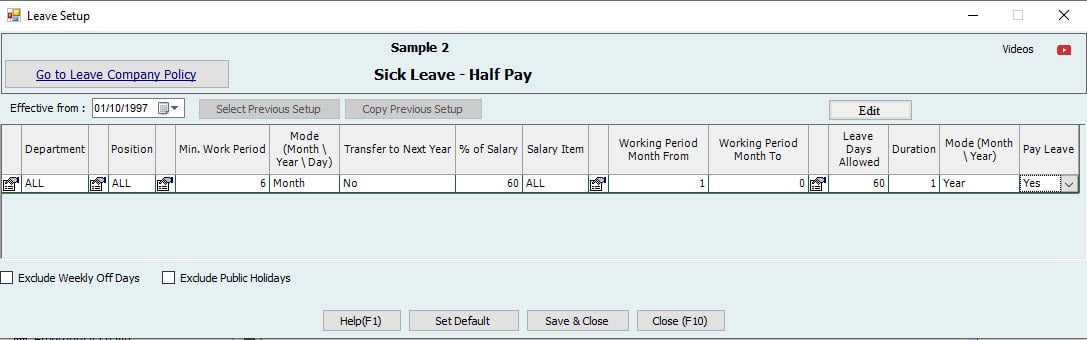
Note:
Users can define which columns need to be displayed for the Sick Leave-Half Pay Setup using ‘Edit Columns.’
Department and Position:
-Here, the User can define Sick Leave-Half Pay to be set for Department and Position levels.
-The User can select ‘All’ if they want the same Setup.
Minimum work Period:
-This is the Minimum work period the Employee needs to finish in the Company before creating the Leave.
-For example, if the User (Admin) puts 6 months, the System will not allow creating Leave before 6 months
Mode:
-User can define the mode as Month/Year/Days.
Transfer to Next Year:
“Transfer to next year” means the Leave Balance will be carried forward to next year.
- By Default, Transfer to Next Year is “No” for Sick Leave-Half Pay
% of Salary:
-What percentage of the Defined Salary does the User want to pay in Leave Salary?
-Users must specify the percentage to be 50 since the Setup is Sick Leave-Half Pay.
Salary Item:
-Define the Salary Components to be included in the Leave Salary. For example, Basic
Salary + Accommodation + Other Allowances or All Allowances as per Company policy.
Month From / Month To:
-Define the Period for Leave Calculation Days for Employees.
For example, from 1 to 0 means throughout the service period.
If the User sets 1 to 12, the User will be allowed to create this Leave only for the first year (1 to 12 months).
Days Allowed:
-Users can define the Maximum number of days allowed for Leave calculation in a specified Service period (Specify the Period by using Month From / Month To)
-Users can set the Days allowed as 21. Therefore, the maximum allowed Maternity leaves will be 21 Days.
Duration:
-How many times does the User want to give these Allowed Days? Once a year or monthly.
Mode:
-Users can define whether the allowed days are Monthly/Yearly.
Pay Leave:
-The User can select whether they want to pay the Leave or not for the Employee.
Exclude Weekly off Days:
Weekly off days (e.g., Friday) will be excluded from Leave Days. Weekly off Days can be defined from File→ Settings→ Company Setup→ Holiday Setup.
For example, yearly allowed leaves are 10. If this option is checked, weekly off days are excluded from the Sick Leave-Half Pay Leave calculation, and the System will not include Fridays in the Leave Period. This means that if an Employee is going for 10 leave days, and there are 2 weekly off days, the leave calculation will be 8.
Exclude Public Holidays:
-Public Holidays will be excluded from Leave Days. Public Holidays can be defined from
File→ Settings→ Company Setup→ Holiday Setup.
For example, if any Public Holiday comes during the Leave Period, and if this option is checked, it will not be considered in the leave calculation.
Deduct Leave Days from Service Period:
-If this option is checked, the Leave period will be deducted from the calculation of the Service Period. Users can specify whether it applies to Locals or Non-locals.
-The Leave period will be deducted from the Service Period, which means that this Period will not be used for Accruing Annual Leave and will be deducted from the End of the Service
-For example, if this option is checked, and an Employee has been working for 5 years in the Company, and he took 10 days to leave in this Period (which is deducted from the service period), his total service Period is as follows;
(5 x 365)- 10 = 1815 Days.
Note:
Users can create Annual Leave from Activities Menu→ Leaves→ Create Leave and select Type of Leave as Sick Leave-Half Pay. The User can select the payment type to be Paid through the Salary sheet if they want the leave Salary to be paid as part of it and Pay now if they want to pay the leave Salary separately. The leave Amount is based on the “Annual Leave Setup.” The salary Amount will be “half pay” as per the Setup.
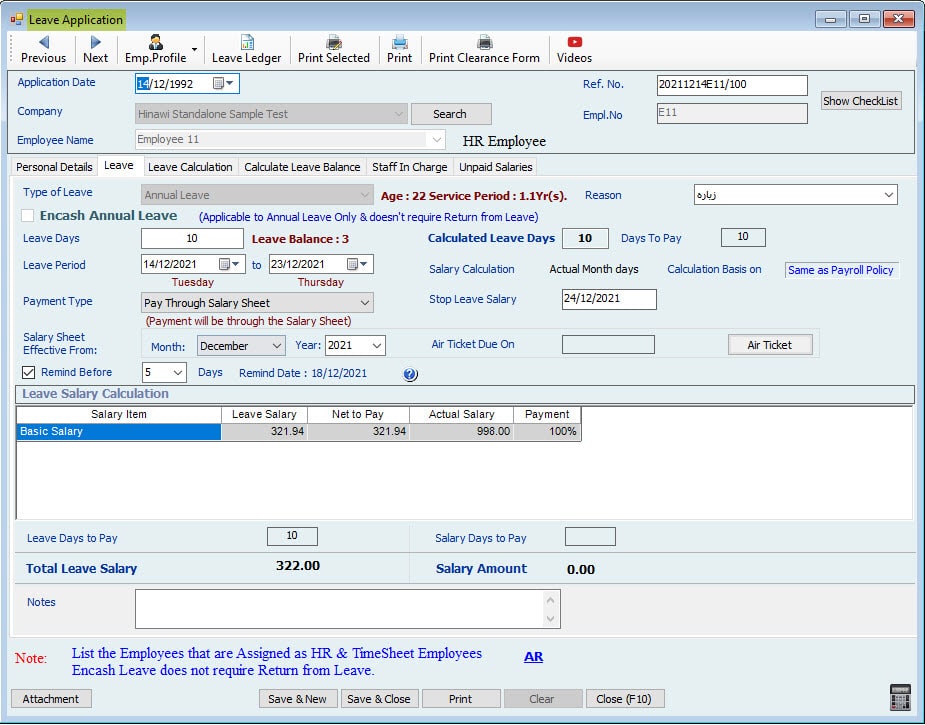
5-1-8. Sick Leave – No Pay:

Note:
Users can define which columns must be displayed for the Sick Leave-No Pay Setup using ‘Edit Columns.’
Department and Position:
Here, the User can define Sick Leave-No Pay to be set for department and position levels.
-The User can select ‘All’ if they want the same Setup.
Minimum work Period:
-This is the Minimum work period for employees to work in the Company before creating the Leave.
-For example, if the User (Admin) puts 6 months, the System will not allow creating a Leave before 6 months
Mode:
-Users can define the mode as Month/Year/Days.
Transfer to Next year:
- “Transfer to next year” means the Leave Balance will be carried forward to next year.
- By default, “Transfer to Next Year” is “No” for Sick Leave-No Pay
% of Salary:
-What percentage of the “Defined Salary” does the User want to pay in Leave?
-Percentage of Salary is zero for the Setup since there is no pay for this type of Leave
Salary Item:
-Define the Salary Components to be included in the Leave Salary. This will not make any difference since “No payment” is required for this type of Leave.
Month From / Month To:
-Define a period regarding “Leave Calculation Days” for Employees. For example, from 1 to 0 means throughout the service period. Days Allowed:
-Users can define the Maximum Number of days allowed for the calculation of Leave in a
specified Service period (Specify the Period by using Month From / Month To)
- Users can set Days allowed as 2. Therefore, the maximum allowed “Sick Leave No pay” will be 2 days per Month.
Duration:
How many times does the User want to give these Allowed Days? Once a year or monthly.
Mode:
-Users can define whether the allowed days are Monthly/Yearly.
Pay Leave:
-The User can select whether they want to pay the Leave or not for employees.
-Pay Leave is “No” for this Setup.
Exclude Weekly off Days:
- Weekly off days (e.g., Friday) will be excluded from Leave Days. Weekly off Days can be defined from:
File→ Settings→ Company Setup→ Set Holidays
For example, yearly allowed leaves are 10. If this option is checked weekly, off days are excluded from the Sick Leave-No Pay Leave calculation, and the System will not include Fridays in the Leave Period. This means that when an Employee is going for 10 leave days, and there are 2 weekly off days, the leave calculation will be 8.
Exclude Public Holidays:
-Public Holidays will be excluded from Leave Days. Public Holidays can be defined from:
File→ Settings→ Company Setup→ Set Holidays
For example, if any Public Holiday comes during the Leave Period, and if this option is checked, it will not be considered in the leave calculation.
Deduct Leave Days from Service Period:
- If this option is checked, the Leave period will be deducted from the calculation of the Service Period. Users can specify whether it applies to Locals or Non- locals.
- The Leave period will be deducted from the Service Period, which means that this Period will not be used for Accruing Annual Leave and will be deducted from the End of the Service
- For example, if this option is checked and an Employee has been working for 5 years in the Company, and he took 10 leave days during this Period (which is deducted from the service period), his total service Period is the following:
(5 x 365)- 10 = 1815 Days.
Note:
For Leave Type ‘Sick Leave-No Pay,’ the User needs to set Pay Leave as “No.”
Users can create Annual Leave from Activities Menu→ Leaves→ Create Leave and select Type of Leave as Sick Leave-No Pay. There will be no payment for this Leave as per.

Note:
The System allows the creation of more typical types of leaves. Setup for these other leaves can be defined as per Company Policy.
5-1-9. Emergency Leave:

Note:
Users can define which columns must be displayed for the Emergency Leave Setup using ‘Edit Columns.’
Department and Position:
-Here, the User can define Emergency Leave to be set for Department and Position levels.
-The User can select ‘All’ if they want the same setup.
Minimum work Period:
-This is the Minimum work period employees need in the Company before creating the leave.
- For example, if the User (Admin) puts 6 months, the System will not allow creating a Leave before 6 months
Mode:
-Users can define the mode as Month/Year/Days.
Transfer to Next year:
- “Transfer to next year” means the Leave Balance will be carried forward to next year.
-Transfer to Next Year is No, by default.
% of Salary:
-What percentage of the Defined Salary does the User want to pay in Leave Salary?
-If the percentage is 100 and the Salary is 1000, then the Employee will get 1000 as
Leave Salary. If the percentage is 50 and the Salary is 1000, then the Employee will get 500 as Leave Salary.
Salary Item:
-Define the Salary Components to be included in the Leave Salary. For example, as per Company policy, Basic Salary + Accommodation + Other Allowances or All Allowances.
Month From / Month To:
-Define the Period for Leave Calculation Days for Employees. For example, from 1 to 0 means throughout the service period.
Days Allowed:
-Users can define the Maximum days allowed for leave calculation in a specified Service period (Specify the Period by using Month From / Month To)
-Users can set “Days” allowed as 10; then the maximum allowed Emergency leaves will be 10 Days.
Duration:
-How many times does the User want to give these Allowed Days? Once a year or monthly.
Mode:
-The User can define whether the allowed days are Monthly/Yearly.
Pay Leave:
-The User can select whether they want to pay the leave or not for employees.
Exclude Weekly off Days:
- Weekly off days (e.g., Friday) will be excluded from Leave Days. Weekly off Days can be defined from:
File→ Settings→ Company Setup→ Holiday Setup
For example, yearly allowed leaves are 10. If this option is checked, weekly off days are excluded from the Emergency Leave calculation, and the System will not include Fridays in the Leave Period. This means that if an Employee is going for 10 leave days, and there are 2 weekly off Days, the leave calculation will be 8.
Exclude Public Holidays:
-Public Holidays will be excluded from Leave Days. Public Holidays can be defined from File--> Settings--> Company Setup--> Set Holidays
For example, if any Public Holiday comes during the Leave Period, and if this option is checked, it will not be considered in the leave calculation.
Deduct Leave Days from Service Period:
-If this option is checked, the Leave period will be deducted from the calculation of the Service Period. The User can specify whether it applies to Locals or Non-locals. The Leave period will be deducted from the Service Period, which means that this Period will not be used for Accruing Annual Leave and will be deducted from the End of Service.
-For example, if this option is checked, and an Employee has been working for 5 years in the Company, and he took 10 leave days throughout this Period (which is deducted from the service period), his total service Period is the following:
- (5 x 365)-10 = 1815 Days.
Note:
Users cannot use Encash Emergency Leave.
5-2. Absence Setup:
Note:
Users can define which columns must be displayed for the Absence Setup using ‘Edit Columns.’
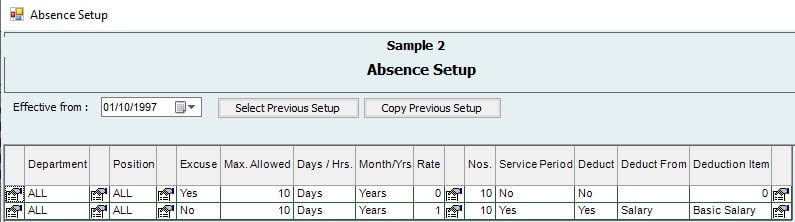
Department and Position:
-Here, the User can define Absence to be set for levels: Department and Position.
-The User can select ‘All’ if they want the same setup.
Excuse:
-The User can select Yes/No to set whether they have an excuse for the Absence.
Max. Allowed:
-Users can set the maximum number of days for Absence during the month/Year.
Days/Hours:
-Users can select either Days/Hours for the Absence.
Month/Years:
-Users can select Month/Years for the specified Number of Absences to be allowed in a Month or Year.
Deduction Rate:
-It is a Number from which the absence days are deducted. If the rate is two and absent days are 2, then 2 X 2 = 4 days will be deducted as Absence. If the rate is 0, then there’s no deduction.
No. of days to Deduct:
-It is the Number of Absences deducted from absence days. E.g., If the No. If the Employee is set as 2 and absent for 5 days, the Deduction of days will only be 2.
Deduction from Service Period:
-User can select Yes/No to set whether the Absence is to be deducted from the Service period.
-If selected as yes, the absence days will be deducted from the service period.
Deduction from Salary Sheet:
-Users can select Yes/No to set whether to deduct the Absence from Salary/Leave.
-If selected yes, the Absence will be deducted from Salary/Leave.
Deduct From:
-Users can specify the Absence to be deducted from Leave/Salary.
-If Salary is selected, the Absence will be deducted from Salary.
-If Leave is selected, the Absence will be deducted from Leaves.
Deduct Item:
-Users can select the items from which the Absence is deducted.
-If the deduct from is ‘Salary,’ then “Deduct Item” will List all the Salary items, i.e., Basic, accommodation, etc.
-If the deduct form is ‘Leave’ then “Deduct Item” will List all the Leave items, i.e., Annual Leave, Emergency, Hajj Leave, etc.
Note:
If the absence Setup is “With Excuse” and the Deduction is ‘Deduct from Leave,’ then Deduct from Leave’ will not deduct the leave balance for the Absence.

If the Setup is with Excuse and Deduction is ‘Deduct from Salary,’ then no Amount will be deducted from the Salary.
If “Update Days Ledger” is selected with the excuse, only leave ledger days will be updated with no deduction in any Amount.
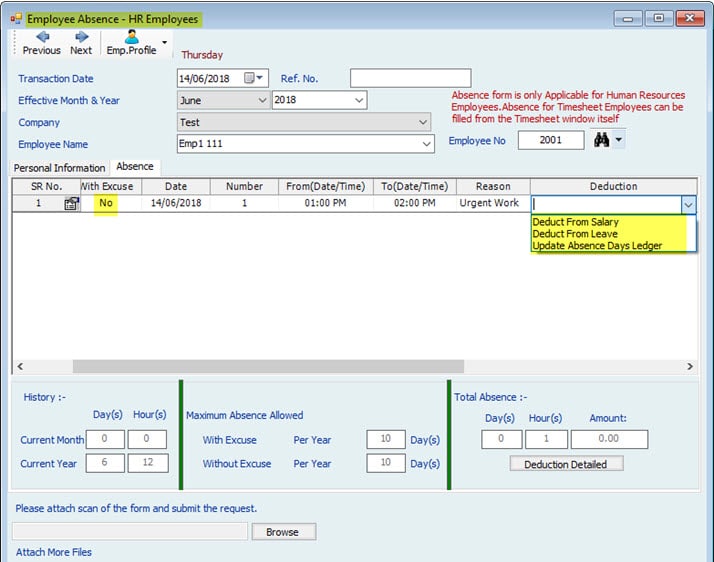
There will be an actual deduction if there’s no excuse for any deduction types.
“Deduct from Salary” will deduct the required Amount from the Salary Sheet, “Deduct from Leave” will deduct from the Annual leave balance days for the Employee, and “Update Absence Days Ledger” will update the absence ledger in the Report and deduct from absence days.
5-3. Loan Setup:

The above window enables users to set up the “Loan process” in Hinawi Software according to their Company policy. Permitting specific actions and having certain restrictions provides more flexibility and assures accurate results.

The above image displays the window used to create loans.
This includes the reason for creating this Loan, the Amount required for the Loan, the starting month and year of the Loan, the Number of installments needed, and of course, the installment Amount, which reads from the Loan Amount combined with the Number of installments chosen.
5-4. Addition / Deduction Setup:
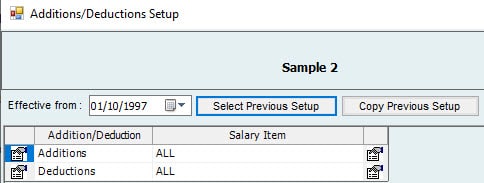
E.g., If there is an Addition for the Employee, like a Bonus, and Pay On is 1 Month, it will add 1-month Salary in the Addition column.

If there's a deduction for the Employee, like Fine and Pay On is 15 Days, it will deduct 15 days' Salary and be shown in the Deduction column in the Salary sheet.
Note:
If there is no Setup for Addition, and the User creates an addition with Pay on 1 month, there will be no Value (Zero) in the addition column since there is no Setup. This is as per Company policy.
If there is no Setup for Deduction, and the User creates a deduction with Pay on 1 month, there will be no deduction since the Value to be deducted will be zero. This is as per Company policy.
5-5. End of Service (EOS):
By default, the End of Service Setup is per the country's Labor Law. The System does not allow calculating EOS if the Service period is less than a year. EOS Setup can be adjusted as per the Company policy. Below are details for TERMS used in Setup:
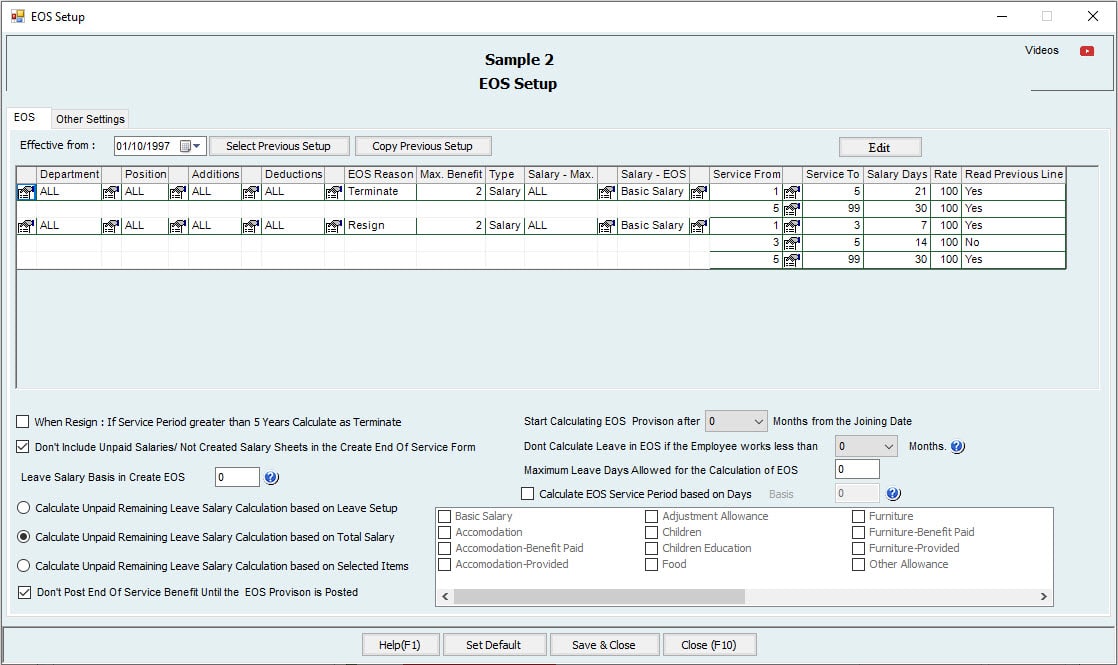
Note:
- The User can define which columns must be displayed for the EOS Setup.
- All the columns displayed here are per the Setup in Edit columns.
Department and Position:
- Here, the User can define EOS for Department and Position levels.
- The User can select 'All' if they want the same Setup.
EOS Reason:
-Users can define the reason for creating EOS (specified in edit columns), whether an Employee Resigned or is Terminated. In UAE, there are separate settings in Each Case.
If Resign:
If Terminated:
Note:
There is an option to Calculate EOS in Resignation as a Termination if the Service period is more than 5 years.
Max-Month\Amount:
- The User can define the maximum benefit for the Employee.
- I.e., maximum month Salary or Amount to be given as maximum benefit.
Type:
- The User can define what Type is for Max Benefit. Two options are available, total monthly Salary or Amount.
- E.g., It can be 24 times the total monthly Salary or 1000 to be the Amount.
- By default, the total monthly Salary allowed for max benefit is 24 times the total Salary.
Salary Items:
-If Salary is selected as Type, select which Salary components to include in Max benefit here.
Salary– EOS:
-Users can define which Salary components to be included in EOS calculation. The User can add components like Basic Salary and allowances depending on their Setup.
Service From/Service To:
-Defines the period of service from and to for the EOS calculation.
Salary Days:
-Users can define the Salary days for EOS calculation.
Percentage to pay:
-Users can define the percentage of the Amount to be paid as an EOS Amount from the EOS calculation.
-E.g., If the EOS Amount is 1000 and the percentage to pay is 100, then the Amount to be paid is 1000 (total Amount), and if the percentage to pay is 50, the Amount to be paid will be 500.
Note:
1. Max benefit means: What is the maximum EOS that can be paid to Employee
2. EOS Amount or Max benefit, which one is lower, will be paid.
Dependable:
-Users can select either Yes or No for 'Dependable.'
- The first line is always 'Yes' for dependable since there is nothing to depend on from a previous line.
-If the option is "Yes" from years 1 to 3 and 3 to 5, calculated days are 7 days for 1 to 3 years and 14 days for 3 to 5 years as per the EOS Setup.
-If the option "No" is selected from years 3 to 5, calculated days are 7 for 1 to 3 years, but any sooner Employee who has a service period that exceeds 3 years will enable getting 14 days for all previous years as well.
Note:
All the columns above are as per the settings in Edit Columns.
Maximum Leave Days Allowed for the calculation of EOS:
-Users can set the maximum number of leaves allowed while calculating EOS.
-If an Employee has 40 day leave balance and the 'Maximum Leave Days Allowed for the calculation of EOS' is 10, they will be paid only for 10 days. This is as per the Company policy.
Calculate Unpaid Leave Salary Calculation based on Leave Setup:
-If this box is checked, the unpaid Salary will be calculated based on the Leave Setup.
-I.e., Company Setting→Advanced Activities Setup→Annual Leave Setup
Calculate Unpaid Leave Salary Calculation based on Total Salary:
-If this box is checked, the unpaid Salary will be calculated based on the Total Salary.
Calculate Unpaid Leave Salary Calculation based on Salary Items:
-If this box is checked, the unpaid Salary will be calculated based on the Salary Items listed: Basic Salary, Accommodation, Furniture, etc. Users can select the Salary Item to be included in the EOS calculation.
- E.g., Users can select the Basic Salary, Accommodation, etc.
Leave Calculation Basis:
-Users can check the box and set the basis to 360 or 365 Days.
-By default, this option is unchecked with a Value zero (i.e., the basis is not set), meaning the leave calculation is based on the Salary Setup.
-If the basis is not set and leave days are 10, the Salary calculation is: Actual Month Days: Leave Salary Calculation will be: 3000*12*10
365
Fixed 30 Days: Leave Salary Calculation will be: 3000*12*10
360
When Resigns; If the service period exceeds five years, calculate as Terminate:
-If the option is checked for any Employee after 5 years, calculate EOS as Termination when they resign.
Omit Unpaid Salaries/Not Created Salary Sheets in the Create End of Service form:
-If this option is checked, unpaid salaries and not created Salary sheets are not included in the EOS calculation.
Date:
Start Calculating EOS provision after---- Months from Joining
-Users can set the Number of months to start calculating EOS provision from the joining Date.
- E.g., if 6 months is selected, the System will start calculating the EOS provision after 6 months of the joining Date.
Calculate EOS Service Period based on Days Basis Days:
- EOS Service Period can be calculated on a different day's basis. It could be 365 or 360 days on any basis as per Company policy.
- If 'Calculate EOS Service Period based on Days' is not set, then the service period will be calculated as 3 + (4 / 12) + (2 / 365) = 3.338813 if Employee worked for 3 Years 4 Months and 2 Days.
- If 'Calculate EOS Service Period based on Days' is 360 Days, then the service period will be calculated as 1221 / 360 = 3.391 if the Employee worked for 1221 days. (1221 is the Number of calendar days worked from the joining Date to EOS Date).
Note:
When the User selects Set Default, it should go to the default settings of EOS as per UAE (country). Set default should read from the country EOS Setup.
Note:
Creating EOS will not affect any transaction/activities unless EOS is approved.
E.g., For a Timesheet Employee, if the User wants to create an EOS Date on 12 June, then they need to do the following:
Now to cause an effect on activities, the User must approve EOS.
In the Additions & Deductions Tab, the User can add the additions and deductions to be added for the EOS Employee as below:
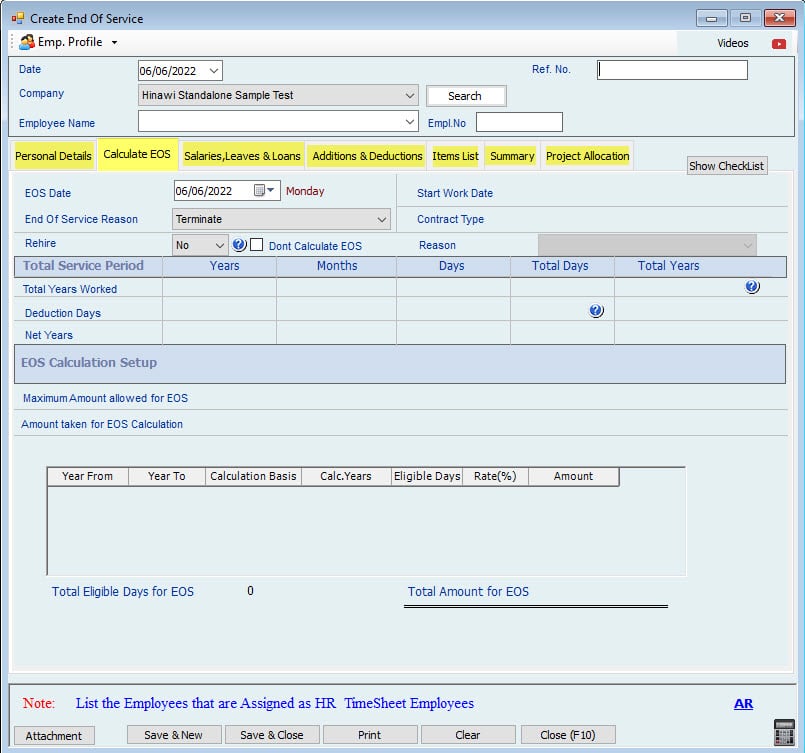
If the User wants to make any Adjustment in the total amount, they can do it from the Summary Tab as below:
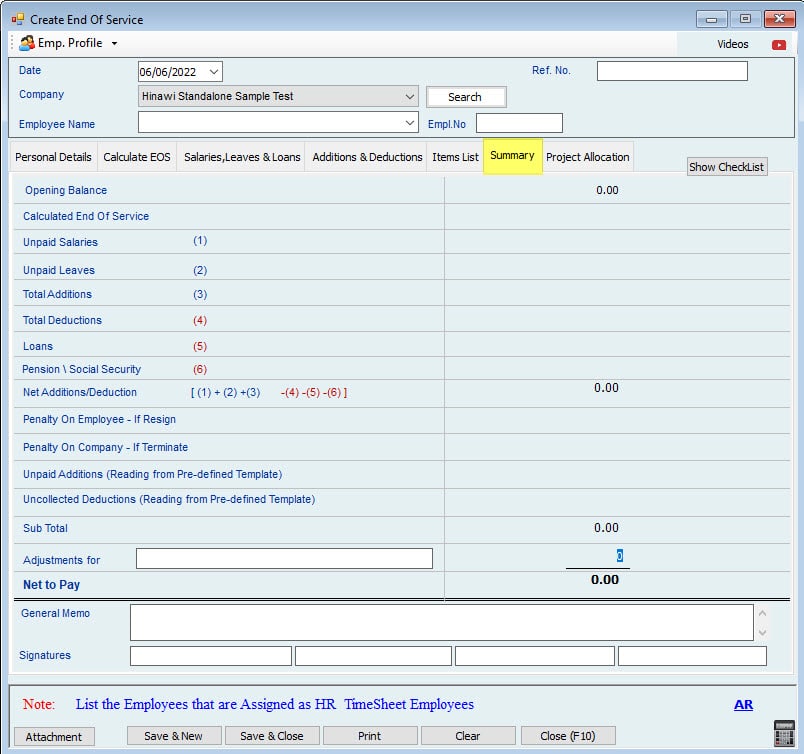
Different Cases:
If the Employee's Salary is 3000, Calculate the Unpaid Leave Salary Calculation Based on Leave Setup (Leave Setup is to include All Salary Items and Transfer To Next Year is Yes), Employee works for 3 years,4 months, and 2 days and EOS Setup is as below: the Default Setup.
The Calculation summary is the following:
Note:
If the Leave Salary Calculation basis is 0 Days, it will read the Setup from Payroll Settings. If the Setup is actual month days, then the leave days are divided by 365 Days. If Setup is fixed by 30 days, then leave days are divided by 360.

The image above represents a close-up view of the EOS Setup where users can choose and apply suitable actions and requirements.
Moreover, the cases below represent several calculations regarding the End of Service.
However, the results might vary between one User and another depending on how the Setup is made among users
Case 1:
If the Setup is
![]()
And Leave Salary Calculation basis is 360 Days, EOS basis =360 in EOS Setup:
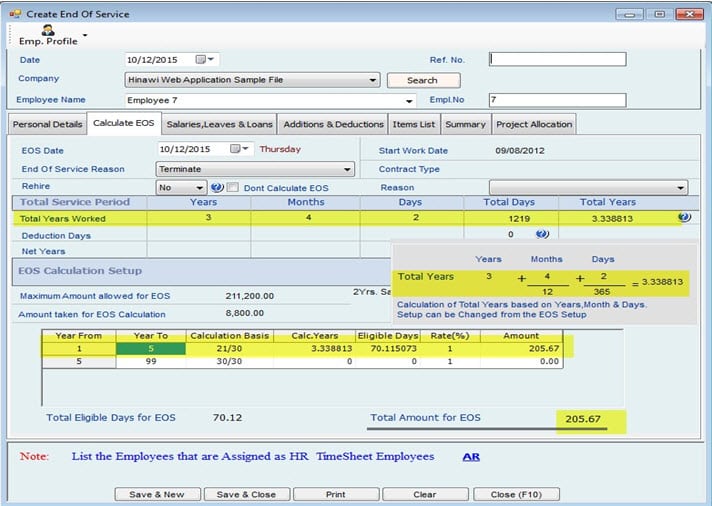
Here, 1-day Salary = 3000*12 =100
360
100 X 70.115073 (Eligible Days) =7011.51
If EOS basis = 365, then the calculation will be as follows:
1-day Salary = 3000 *12 =98.63, then the Total Amount for EOS will be
365
98.63 * 70.115073 (Eligible Days) = 6915.459
Note:
1. Total Days is calculated as the total no of Calendar Days. i.e., 1219 days her
2. When 'Calculate EOS Service Period based on Days' is not set (By Default zero), then the years calculated as (as the example shown above) 3 + (4 / 12) + (2 / 365) = 3.338813 of 3 Years 4 Months and 2 Days.
And If the Maximum Leave Allowed for Calculating EOS is set as 10, then the Leave Salary will be (3000 * 12 * 10) / 360 = 1000 [basis: 360].

Case 2:
If the Setup is
![]()
And Leave Salary Calculation basis is 365 Days,
EOS basis = 360 in EOS Setup:
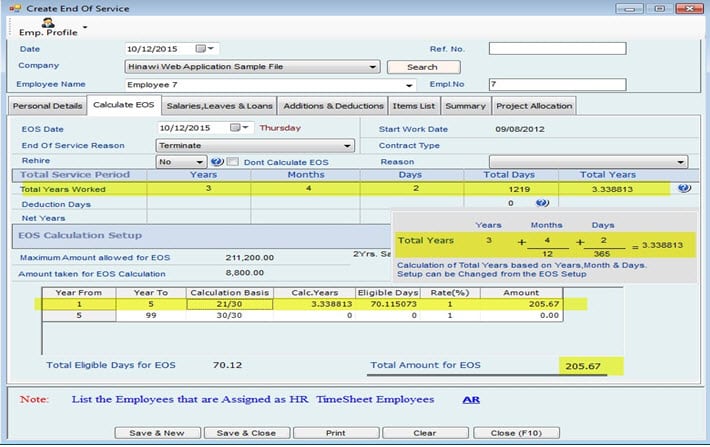
Here, 1-day Salary = 3000*12 =100, then the total amount for EOS will be
360
100 * 70.115073 (Eligible Days) = 7011.51
If EOS basis = 365, then the calculation will be the following:
1-day Salary = 3000 *12 =98.63, then the Total Amount for EOS will be
365
98.63 * 70.115073 (Eligible Days) = 6915.459
And If the Maximum Leave Allowed for Calculating EOS is 10, then the Leave Salary will be: (3000*12*10) / 365 = 986 [basis: 365]

Case 3:
If the Setup is
![]()
And Leave Salary Calculation basis is 360 Days,
EOS basis =360 in EOS Setup:
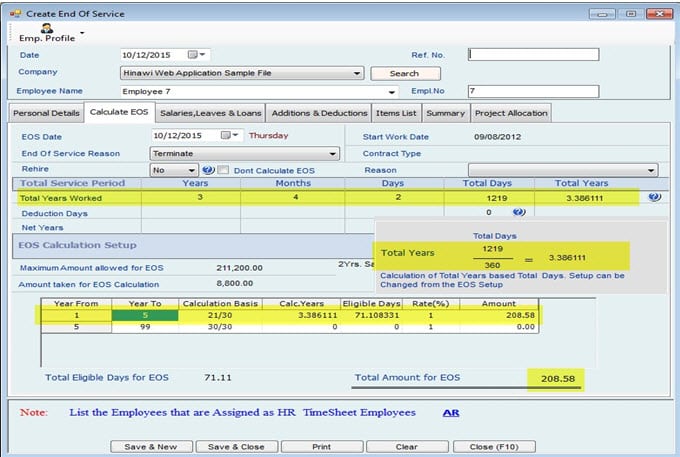
Here, 1-day Salary = 3000*12 =100, then the total amount for EOS will be
360
100 * 71.108331 (Eligible Days) = 7110.8331
If EOS basis = 365, then the calculation will be the following:
1-day Salary = 3000 *12 =98.63, then the Total Amount for EOS will be
365
98.63 * 71.108331 (Eligible Days) = 7013.4
And If the Maximum Leave Allowed for Calculating EOS is 10, then the Leave Salary will be (3000*12*10) / 360 = 1000 [basis: 360].
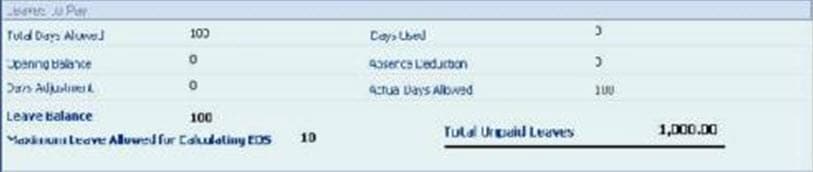
Case 4:
If the Setup is
![]()
And leave Salary calculation basis is 365 Days
EOS basis = 360 in EOS Setup:
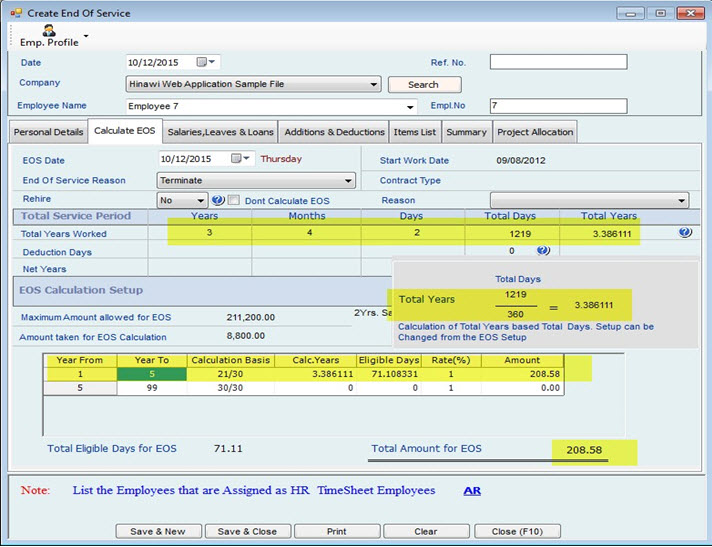
Here, 1-day Salary = 3000*12 =100, then the total amount for EOS will be
360
100 * 71.108331 (Eligible Days) = 7110.8331
If EOS basis = 365, then the calculation will be as follows:
1-day Salary = 3000 *12 =98.63, then the Total Amount for EOS will be
365
98.63 * 71.108331 (Eligible Days) = 7013.4
And If the Maximum Leave Allowed for Calculating EOS is 10, then the Leave Salary will be:
(3000*12*10) / 360 = 1000 [basis: 360].

Case 5:
If the Setup is
![]()
And leave Salary calculation basis is 360 Days,
EOS basis = 365 in EOS Setup:

Here, 1-day Salary = 3000*12 =100, then the total amount for EOS will be
360
100 * 70.134246 (Eligible Days) = 7013.4246
If EOS basis = 365, then the calculation will be as follows:
1-day Salary = 3000 *12 =98.63, then the Total Amount for EOS will be
365
98.63 * 70.134246 (Eligible Days) = 6917.34
And If the Maximum Leave Allowed for Calculating EOS is 10, then the Leave Salary will be: (3000*12*10)/360=1000 [basis: 360]

Case 6:
If the Setup is
![]()
And leave Salary calculation basis is 365 days,
EOS basis is = 365 in EOS Setup:

Here, 1-day Salary = 3000*12 =100, then the total amount for EOS will be
360
100 * 70.134246 (Eligible Days) = 7013.4246
If EOS basis = 365, then the calculation will be the following:
1-day Salary = 3000 *12 =98.63, then the Total Amount for EOS will be:
365
98.63 * 70.134246 (Eligible Days) = 6917.34
And If the Maximum Leave Allowed for Calculating EOS is 10, then the Leave Salary will be: (300*12*10)/ 365 = 986 [basis: 365]

Note:
- Users can have separate settings for EOS regardless of the Company Setup. They can also have the same settings as per the Company policy.
-In EOS, the System will calculate the actual leave days. i.e., If the Transfer to next year is No (In Leave Setup) and EOS is created for the Employee in March, the Leave days will be 7 or 8 days.
- If the Leave Salary Calculation basis is Not checked, then it will be calculated Based on the Salary calculation Setup:
i.e., If the Maximum Leave Allowed for Calculating EOS is 10
1. Fixed 30 Days: Leave Salary Calculation will be: (3000 * 12 * 10) / 360
2. Actual Month Days: Leave Salary Calculation will be: (3000 * 12 *10) / 365

6. Timesheet Policy
Company Settings--> Company set up-->Timesheet Setup
The Timesheet is based on Actual month days. There are no fixed 30 days for the time sheet. Time Sheet has three types: Detailed Timesheet, Summary Timesheet, and Monthly Timesheet.
Important Note:
After completing the Setup of Time Sheet, it’s strongly recommended that the User do the following:
Assign Employees to Time Sheet Assign Employees to Project Assign Employees to Shift Assign Employees to Supervisor (This is for Web application Users) Do this from Timesheet main Menu.
6-1. Timesheet Setup

There are three types of Timesheets, Detailed, Summary, and Monthly.
-In Time Sheet Detailed, Entries are made on Daily Basis (By Date)
-Presence hours are prefilled as fully Present (Based on Autofill Setup or manually filled)
-Each Day should be filled, including the Absence Hours (if any).
-Shift Setup can be in Hours or Days.
-Users can select the option; Use Time Reader Machine’ if they have any.
- In the Time Sheet Summary, Entries can be made monthly
If the option “Deduct Holidays” when the Labor is absent, the System will deduct the Salary of holidays and off days based on the percentage of Absence from the whole month
If the shift is Setup in hours, then monthly present Hours
If the shift is Setup in days, then the number of days present
Basis of Calculation of Absence(Hours) and Basis of Calculation of Absence(Days): If the User fills the Basis of Calculation of Absence, the System will calculate the absence hours separately based on the Basis that the User filled and Subtract from the total Monthly Salary. If the User keeps this blank, the System will calculate present hours only.
E.g.: (Month is January: 31 Days (248 Hours)). The monthly Salary of the Employee is 3000. The Employee is absent for 5 days (40 hours)
If not filled: The System will calculate by taking the present Hours only (248-40=208) Salary=3000*208/248=2516.12
If filled as 240 hours Basis: The System will calculate absent days first and deduct them from the total monthly Salary
Absence=3000*40/240=500
Salary=3000-500=2500
Only the present days are available in Time Sheet (Monthly Basis).
Overtime Hours per Day (Normal): The maximum number of hours an Employee can work overtime on normal days.
Overtime Hours per Day (Holidays): The maximum hours an Employee can work overtime on Holidays.
A maximum Number of days Labor can work: Users can set the maximum number of holidays they can work.
Note:
1. Most users use detailed Timesheet
2. Both can use this Timesheet; Labors and Employee
3. Users cannot switch (change) between 3 tabs in the same month. However, the User can do this in the next month after creating and approving the Salary sheet of the previous month and when there are no leaves effective on the next month.
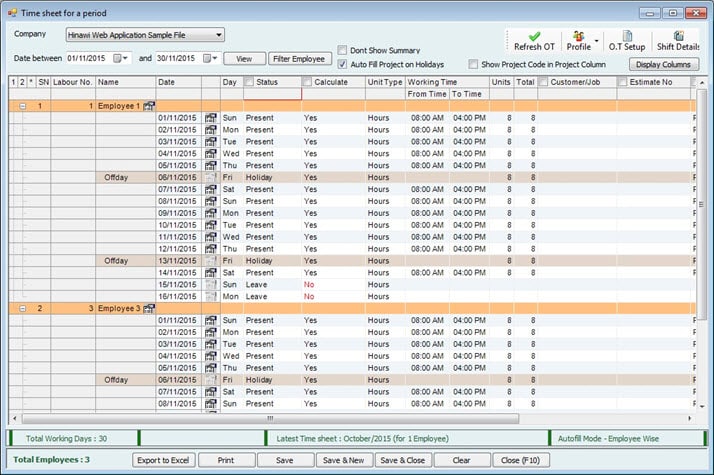
Note:
When the status is selected as Leave or Holiday (which cannot be set as status from here), a message saying ‘It is automatically from activities, can’t be selected from Time Sheet’ will pop up.
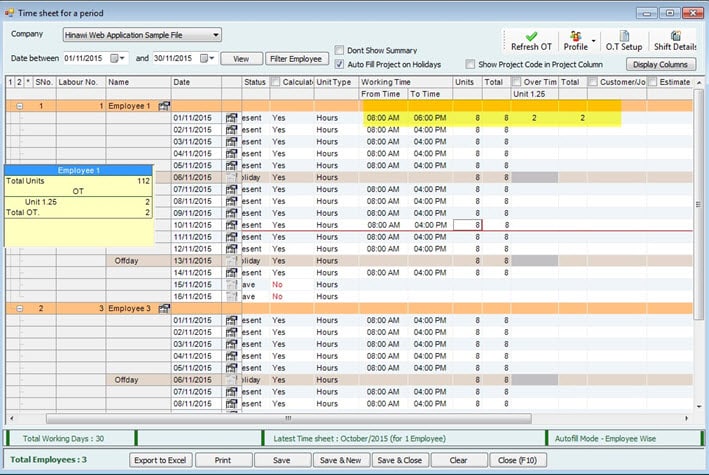
In the above example, when the User changes ‘From Time/To Time’ of the morning (1st)
shift, the hours will be added to Units, and the Salary will be for the total no. of units (248 +3= 251 hours here). When the User changes the “To Time” of the evening (2nd) shift, it will be added as overtime and paid as OT.
Notes:
1. The Status ‘Leave’ is from the HR activity. For Timesheet Employees, Leaves can be created from HR activities.
2. The Status ‘Absence’ is set from her. When Absence is selected, “calculate” will be set to ‘No’ by default.
3. Users can set Calculate = ’Yes’ for Absence. Then, the absence day will be paid as any other Working d, I.e., that day will be calculated for monthly Salary calculation.
4. Users cannot create an Absence from HR Activity
5. When absence creation dialog is opened from HR activities, it will List only the HR Employee
6. Users can select “absent” as a status from Timesheet.
7. While creating Leave (from activities), users cannot have the “Payment Type” to be ‘Pay Now’ for Timesheet Employees.
Each Time Sheet can be linked to Projects.
The time Sheet can be changed from Detailed to Summary and Summary to Detailed.
Deduct Absent days from the service period for Timesheet Employees:
If this option is checked, the absence days will not be included in the service period for Timesheet Employees.
Note:
When Leave is created, it affects Timesheet. The status will default to “Leave” in the Timesheet as per the created leave Date.
6-2. Unit List:
It shows the available units and notes:
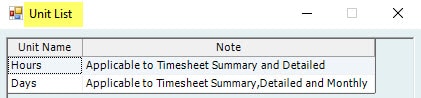
Hours: Applicable to Timesheet Summary and Detailed
Days: Applicable to Timesheet Summary, Detailed, and Monthly.
6-3. Shift & Holiday Setup
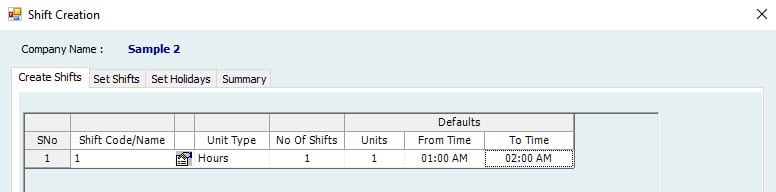
Setting up of Shifts To Setup shifts, go to File → Settings → Time Sheet → Shift & Holiday Setup
- Shifts can be created based on Business Activity
- In Create Shifts, define Shift code (e.g., Morning / Evening, Day / Night, etc.)
- Select the type of Shift from a Dropdown Menu (e.g., Day / Hours). Users must specify the shift timings when the Unit Type is Hours.
When Shift is of Unit Type ‘Hours,’ users can split the time, i.e., Split the Shift into two as below: Morning and Afternoon. In this case, Timesheet will have 2 entries for each case.

When Shifts of Unit Type are ‘Days,’ timing will not be shown in the Timesheet. And default hours will be taken for the calculation.

- No. of Shifts means, if there is a break in the Working hours, the User can Setup 2 shifts, e.g., 8-1 and 4-8 (Only applicable if the Type is Hours)
- Units mean: How many Hours in a shift (Only applicable if shift Type is Hours)
- More Shifts can be created based on the Company Setup.
- The maximum number of shifts will always be one of the shift Setup is by the day
Note:
- If there is no Shift Setup, the System will read working hours from the Box at the bottom of this tab.
1. With this facility helps the User to use this Setup in all types of business
2. The Timesheet will be filled automatically based on this shift Setup. Therefore, at the time of filling out the Timesheet for laborers, the number of hours will be displayed automatically
3. Users can assign employees to multiple shifts (HOURS shift and DAYS shift) for different periods.
4. Users cannot assign employees to multiple shifts (HOURS shift and DAYS shift) for the SAME period.
5. Users can have two Hourly shifts in one month.
Set Shift-Tab:
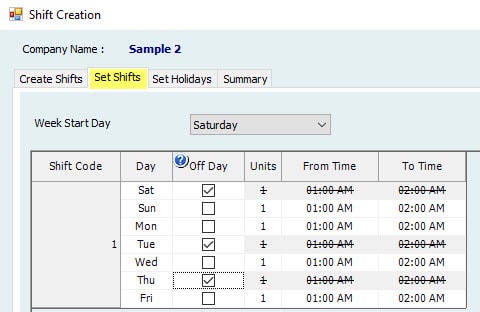
- Here, users can select the “Start Day” of the week.
- Check the Day to make it a “Day off.”
- Allow to Change Holiday.
1. It applies only to Summary Time Sheet
2. If this option is Activated, Holiday Hours can be modified manually in Summary Time Sheet. For Example, in a month, there are 4 Fridays, so 32 hours are Holiday Hou. We can change 32 to 24 or 40 as off hours.
- Include Holiday Units in the Total Month Units. There is No Absence.
Checking and unchecking this Box will not affect the Salary sheet if
If Box is selected, the Salary calculation will be as below:
Monthly Salary ={Current Monthly Salary X No. of Hours worked}
31 * 8
If Box is NOT selected, Salary calculation will be as below:
Monthly Salary =
{Current Monthly Salary X No. of Hours worked}
27 * 8
Note:
Salary will be the same if there is NO Absence. For Example,
The month is January, No. of hours per day is 8 hours, 4 holidays (Friday). Employee Salary is AED 3000. He was absent for 1 day in the month. The calculation in both cases will be as follows:
- If ticked, total No. of Hours worked= 248– 8 = 240 Hours
{3000*240} = 2903
31 * 8
- If not ticked, Holiday hours will be excluded: No. of Hours worked= 216 – 8 = 208 Hours
{3000*208} = 2889
27 * 8
Set Holidays Tab:

- This tab reads Holidays from Company Settings, and more Holidays can be added in Set Holidays. I.e., Company Setup→ Holliday Settings→Public Holidays Tab
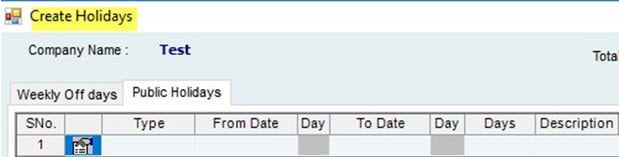
In this window, users can assign the holidays to shift. If the Box is checked, the Company will pay the holiday days to laborers under this Shift.
-Note that the number of shifts displayed in this window is based on the number of shifts Setup reading from Tab 1.
- The Company can define paid holidays for some or all shifts.
-The Company can define which types of holidays can be paid. E.g., fixed holidays can be paid or not.
Summary Tab:
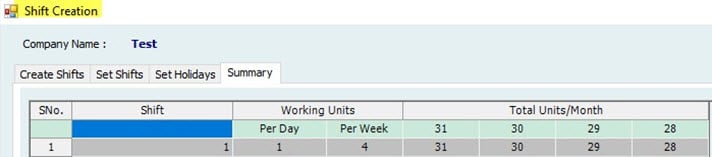
- Summary shows the Setup for Each Shift and the Calculations for the Shift Hours.
- Show the total working units per week and month.
6-4. Timesheet & OT Time:

Over Time (OT) is one of the main features that allow customization of the User (Admin) requirements and needs per the Company and country policy.
Shift:
Select Shift code from the Dropdown
Max OT:
Put here the Maximum Overtime allowed for that Shift per Day.
OT:
Check this option to enable Over Time Calculation. Please uncheck this box will not allow the User to enter settings for Overtime calculation (It will be disabled) from here, and In Timesheet, there will be no calculation for OT.
Basis:
Here, users can put the Basis for Over Time calculation. Overtime calculation will be divided by the Value entered. If No Value is entered, the System will use Actual Month Hours as the basis.
For Example, an Employee's monthly Salary is AED 3,000. OT rate is 1.25 hours, and he worked 20 hours as OT. Calculations will be the following:
Day:
Here, the User can define Multiple Days for OT rates. For Example, Normal Days, Holidays, and Other Days (Festivals / National Days, etc.)
Rate:
Define over Time Rate as per Day types defined. For Example, the normal day rate could be 1.5; Holidays could be 1.5; festival days could be 2, and so on, as per Company policy.
Normal Days:
The total working Hours in a Day is 8 hours, and If an Employee works for 10 hours, an extra 2 hours will be paid as Overtime per the rate (1.25) specified.
Off Days (Fridays):
Suppose an Employee works on Friday, a paid day, and the Company wants to consider this Day as 2 days, meaning that the Company wants to pay 16 hours. In that case, we will convert the one Day (8 Hours) into OT hours like this: 4 Hours OT with Rate2, so the total is: 8 hours will be paid along with the average paid Friday.
Holidays:
Same as off days.
Hours:
Here, define the maximum hours for a defined rate. For Example, if the User puts 4 here on Normal days, they can work a maximum of 4 hours at the rate of 1.25.
Autofill:
Select Yes / No from the Autofill. This helps in automatically filling the Overtime. For Example, the standard shift time is 8 hours. In the Time Sheet, the time is filled for Employee from 9 am to 8 pm. The System will automatically fill OT 3 hours if Autofill is "Yes" is selected. Otherwise, fill Over time Manually.
Calculate OT:
Fill yes if a calculation for OT is required. If the calculation is "No," then the Employee can enter OT in Timesheet, but the System will not calculate the Overtime, and it will not be paid in the Salary sheet. This is as per Company Policy.
Salary Item:
Select which Salary Item User wants to pay over time. Generally, Overtime is paid on a Basic Salary, but the User can add different Salary items for OT calculation.
-Allow changing Over Time Manually
By selecting this option, the User can change the OT manually in the Time Sheet. If not selected, the User cannot change OT manually. The User must change the Shift time in Time Sheet.
E.g., If this option is checked, the Employee can enter OT under different rates. If not checked, the User must change the To Time to update the OT for the corresponding rate.
-Automatically adjust the time
By selecting this option, the System will automatically update the Shift time once the User changes OT in Time Sheet. If not selected, the User must adjust the time manually.
Note:
HR Employees are not applicable for Overtime Setup.
6-5. Sample Calculation:
It gives Information in General: Calculations for standard hourly Rates and average daily rates, Overtime rates for regular and Holidays.
E.g.:
If the requirement of the Company to calculate overtime is as below: Regular days:
Rate per hour X Number of Overtime hours X 1.25
After 21:00 (after 9 PM)
Rate per hour X Number of Overtime hours X 1.50
Official holidays (If compensated with other days) rate per hour X Number of Overtime hours X 1.50
Fridays Days Off (If compensated with other days)
Rate per hour X Number of Overtime hours X 1.50
Official holidays (If not compensated with other days) Rate per hour X Number of Overtime hours X 2.50
Then he can do the OT Setup as below

The User can put OT at the rate of 1.25 on regular days till 21:00 and after that at 1.50. OT on Holidays (Friday), if compensated with other days, they can put in a rate of 1.50. OT on official days, if compensated with other days, can put on a rate of 1.5, and if not compensated with other days, they can put on a rate of 2.50. Therefore, the User can do accordingly as per their requirement.

Setup is the most potent and inessential Module in Hinawi Software. We are proud to introduce this Module that allows the customers to build their own needs and ay the company policies and rules.
Under company settings, we merge both informal setup information and later activities in one place, so users can easily understand.
It’s strongly recommended that the admin user do settings before using the system to get results as per their company policy.
Note:
Only the Admin user is authorized to have access to settings. Therefore, the user used in this document is Admin.
File → Setup Modules → HRMS Settings → General Settings has the following:
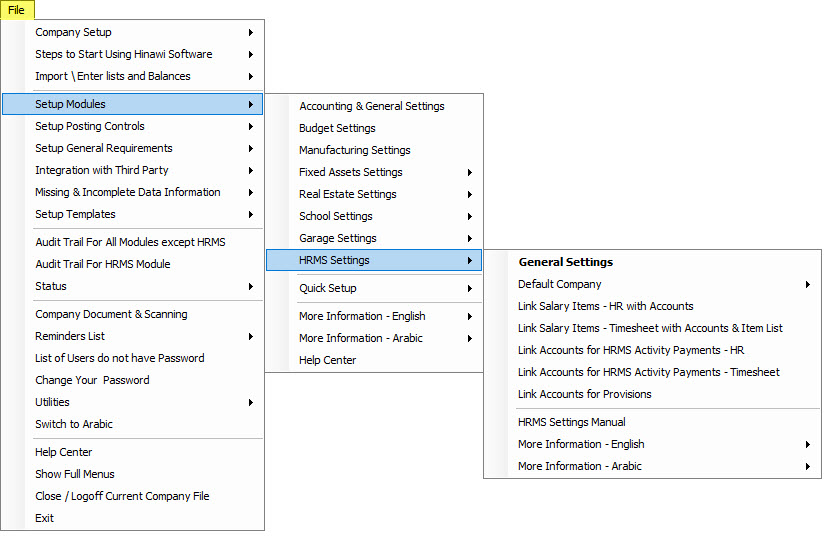

1. Company Setup
2. Basic Salary & Allowances (Monthly) Setup
3. Benefit Payment Setup
4. Benefit Provided Setup
5. HRMS Activities Setup
6. Timesheet Policy
7. Tax Setup
8. General Settings
9. Exit
1. Company Settings
Here, the user can create a new company. The system allows users to create any number of companies in the same database or can create separate databases for each company. This feature helps hold Companies. There will be a separate setup, reports and level of acclevelsor each company.
Note:
When the icon is Gray, the setup is not done.
1-1. New Company / Company wizard:
To create a new company, go to:
File → Setup Modules → HRMS Settings → General Settings → Company Setup →New Company
All Information with (*) is a must to fill.
Company Information Tab
Fill in the Company name, phone, email ,etc,emailed first tab.
Note:
Filling the name in English is a must. If a user needs to run the software in Arabic, he should fill all the Arabic feel.
Check feel ox “Include teacher info in CV” if you are in school business. Use F2 to Quick Add more items or names in dropdown fields.
General Settings Tab
Business Start: Users can set the Month and Year of starting the business. Transaction entries before this Month/Year are not allowed before this date.
Payroll Start: Users. can set Can Month and Year of starting payroll for the Company. Creating a Payroll before this Month/Year is not allowed.
e.g., Business Start: 01/2010, Payroll start: 01/2014, then for the chosen company, the user can create new employees whose joining date should be greater than the business start date, i.e., 01/2010. And if an employee’s joining date is 01/01/2011, then set salary effective date should be greater than or equal to the joining date.
The user cannot create ate salary sheet for the employee before 01/2014 since the payroll strain at 01/2014.
Department Setup:
Here, the user can select what levels he/she wants to use for the employees by checking the Option wanted to Activate in the Company Default check Department and Positional and the user can’t remove them.
The user can add and link between the selected levels in Company Settings→ Company set up Department Setup and then add different departments and position for the company.
The user will be able to view and select the levels (Department, position etc.) whenever a new employee is created.
For different levels, the user can various rent Activities p and can set basic salary & allowances benefit paymen the, benefit provide Setupup differently.
e.g the ., If IT department and Operation department are added in the department setup and Employees are added for each department, then in that case, the user can have different activities and sal setup for each department.
Print on Letter Head:
The user should check this if he/she wants to print on the Company Letter Head.
Print on Plain Paper:
The user should check this option if they wants to print the Company Name or Logo or both in letters.
on the ture on the report:
Here, the user can add the title on the reports. Fill in English if you are working in English and Arabic if in Arabic
Print Logo on:
The user can select where to print the logo on through the Dropdown.
Company Policy Tab:
Please select the options whether the user wants to use the following or not. (Changes between Yes/No can be applied anytime with some conditions)
The user can view how the catamount areasareis paid\taken to\from the Employees. Here, Payment mode will auto fill from advanced settings for each activity. User select the Payment mode from advanced settings for each activity. i.e., If the payment mode for
EOS is selected as “Pay through Salary sheet” from advanced settings, payment mode in this window for EOS will auto fill the value with “Pay through Salary sheet”. .”angels in the payment mode from advanced activities will update in this window.
Important:
The Amount will be shown in a separate column as Total OT.
Read Me Tab:
When setting up a new company, User must read this part carefully.
Logo and Map Tab:
Here, the user can attach the Logo,, Map and Photo of the company. When printed, the logo will display.
Chart Tab:
The user can define the organization chart of the company. Right-click on the area and Click Add head to add a head for the organization. This chart is not linked with the department setup or any part\module in the system.
Management:
Here, the user can fill the in information of the management.
Memo Tab:
Users can add a general company memo here.
CAUTION!
1. It is strongly recommended to APPROVE each transaction\activity if you believe that there will be NO further Chan When an activity is approved, it will change the status of the Employee and affects the balances transaction.
2. Changes in the setup are allowed in the future they but it will not affect the previously approved activities/transaction.
3. Once done from the Default Setup, the user cannot change the settings from there anymore since it’s a 1-time setup. Items theater setup will be grayed out. The user can go to Advanced Settings for more option.
4. Creating EOS will not affect any transaction\activities unless EOS is approved.
5. We strongly recommend the Admin user not to share the admin paswithord to anyone since they may change the company police.
Note:
Approved activities can’t be changed.
Because setup is the most powerful and important module in (Hinawi Software) and this module allows the customers to build their own needs and to ly the company policies and rules without referring to us, it’s strongly recommended for ththat the admin usersure all settings are complete before starting to use the system to get accurate results as per their Companyolicy.
The default setup required to be done before running the the system is:
*To have advanced options, the Admin can go to Advanced Setup and apply more settings as per the company policy. Use the manual or call technical support if any help is needed.
Please Read:
The user can split Employees to two categories, Employees in HR and Employees in Timesheet. He/she can decide on how to categorize the employees. He/she They all of them in one category or divide them to two. The default feature in the system is to consider all employees as HR. To change to Timesheet the , go to Tithe me Sheet menu then assign employees to Timesheet.
For HR Employees, salary sheet is created automatically, but for Timesheet Employees salary sheet is not created unless Timesheet is filled. The user must fill Timesheet for each employee.
Changes between categories are possible.
Note:
1. Approved activities can’t be changed.
2. Changes in the setup are allowed in the future, but it walnut affects the previously approved activities/transaction.
3. It is strongly recommended to APPROVE each transaction\activity if you believe there will be NO change When an activity is approved, it will change the status of the Employee and affects the balances transaction.
1-2. Edit Company
Company Settings→ Company set up. Edit Company
Here the user can edit the company set up details as mentioned in step 1-1
5-2. Absence Setup:
Note:
User can define which columns required to be displayed for the Absence setup using ‘Edit Columns’.
Department and Position:
-Here, the user can define Absence to be set for levels: Department and Position.
-The user can select ‘All’ if he/she wants to have the same setup for all.
Excuse:
-The user can select Yes/No to set whether he/she has an excuse for the absence or not.
Max. Allowed:
-Users can set the maximum allowed days for absence during the month/Year.
Days/Hours:
-Users can select either Days/Hours for the absence.
Month/Years:
-Users can select Month/Years for the specified number of absence to be allowed in a Month or Year.
Deduction Rate:
-It is a number in which the absence days are deducted. If the rate is 2 and absent days are 2, then 2 X 2 = 4 days will be deducted as absence. If the rate is 0, then there’s no deduction.
No. of days to Deduct:
-It is the number of absence deducted from absence days. E.g. If the No. is set as 2, and employee is absent for 5 days, the deduction of days will only be 2.
Deduction from Service Period:
-User can select Yes/No to set whether the absence to be deducted from Service period or not.
-If selected as yes, the absence days will be deducted from the service period.
Deduction from Salary Sheet:
-Users can select Yes/No to set whether to deduct the absence from Salary/Leave.
-If selected yes, the absence will be deducted from Salary/Leave.
Deduct From:
-Users can specify the absence to be deducted from Leave/Salary.
-If Salary is selected, the absence will be deducted from Salary.
-If Leave is selected, the absence will be deducted from Leaves.
Deduct Item:
-Users can select the items from which the absence is deducted.
-If the deduct from is ‘Salary’, then “Deduct item” will list all the salary items, i.e. Basic, accommodation etc.
-If the deduct from is ‘Leave’ then “Deduct item” will list all the Leave items, i.e. Annual Leave, Emergency, Hajj leave etc.
Note:
If the absence setup is “With Excuse” and Deduction is ‘Deduct from Leave’, then Deduct from Leave’ will not deduct leave balance for the absence.
If the setup is with Excuse and Deduction is ‘Deduct from Salary’, then no amount will be deducted from the Salary.
If “Update Days Ledger” is selected with excuse, only leave ledger days will be updated with no deduction in any amount.
If there’s no excuse for any of the deduction types, there will be an actual deduction.
“Deduct from Salary” will deduct the required amount from the Salary Sheet, “Deduct from Leave” will deduct from the Annual leave balance days for the employee, and “Update Absence Days Ledger” will update the absence ledger in the report and deduct from absence days.
5–3. Loan Setup:
The window displayed above enables users to setup the “Loan process” in Hinawi Software according to their company policy. Permitting certain actions and having certain restrictions provides more flexibility and assures accurate results.
The above image displays the window used to create loans.
This includes the reason of creating this loan, the amount required for the loan, the starting month and year of the loan, the number of installments needed, and of course the installment amount which reads from the loan amount combined with the number of installments chosen.
5–4. Addition / Deduction Setup:
E.g.: If there is an Addition for the Employee like a Bonus, and Pay On is 1 Month, it will add 1-month salary in the Addition column.
If there’s a deduction for the Employee like Fine, and Pay On is 15 Days, it will deduct 15 days salary and will be shown in the Deduction column in the salary sheet.
Note:
If there is no setup for Addition, and the user creates an addition with Pay on 1 month, there will be no value (Zero) in the addition column since there is no setup. This is as per company policy.
If there is no setup for Deduction, and the user creates a deduction with Pay on 1 month, there will be no deduction since the value to be deducted will be zero. This is as per company policy.
5–5. End of Service (EOS):
By default, End of Service Setup is per Labor Law of the country. The system does not allow to calculate EOS if Service period is less than a year. EOS setup can be adjusted as the Company policy. Below are details for TERMS used in setup:
Note:
– The user can define which columns required to be displayed for the EOS setup.
– All the columns displayed here are as per the setup in Edit columns.
Department and Position:
– Here, the user can define EOS to be set for the levels: Department and Position.
– The user can select ‘All’ if he /she wants to have the same setup for all.
EOS Reason:
-Users can define the reason for creating EOS (specified in edit columns). Whether an employee Resigned or is Terminated. In UAE, there are separate settings in Each Case.
If Resign:
If Terminated:
Note:
There is an option to Calculate EOS in Resignation as a Termination if the Service period is more than 5 years.
Max-Month\Amount:
– The user can define the maximum benefit to be given for the employee.
– I.e., maximum month salary or amount to be given as maximum benefit.
Type:
– The user can define what type is for Max Benefit. Two options are available, total monthly salary or Amount.
– E.g.: It can be 24 times total monthly salary or 1000 to be the Amount.
– By default, the total monthly salary allowed for max benefit is 24 times the total monthly salary.
Salary Items:
-If Salary is selected as Type, select here which Salary components to be included in Max benefit.
Salary– EOS:
-Users can define which salary components to be included in EOS calculation. It means that the user can add components like Basic salary and allowances depending on their setup.
Service From/Service To:
-Defines the period of service from and to for the EOS calculation.
Salary Days:
-Users can define the salary days for EOS calculation.
Percentage to pay:
-Users can define the percentage of amount to be paid as EOS amount from the EOS calculation.
-E.g. If the EOS amount is 1000 and the percentage to pay is 100, then the amount to be paid is 1000 (full amount) and if the percentage to pay is 50, the amount to be paid will be 500.
Note:
1. Max benefit means: What is the maximum EOS that can be paid to Employee
2. EOS amount or Max benefit, which one is lower will be paid.
Dependable:
-Users can select either Yes or No for ‘Dependable’
– First line is always ‘Yes’ for dependable since there is nothing to depend on from a previous line.
-If the option is “Yes” from years 1 to 3 and 3 to 5, calculated days are 7 days for 1 to 3 years, and 14 days for 3 to 5 years as per the EOS setup.
-If option “No” is selected from years 3 to 5, calculated days are 7 for 1 to 3 years, but any sooner employee who has a service period that exceeds 3 years will enable getting 14 days for all previous years as well.
Note:
All the columns above are as per the settings in Edit Columns.
Maximum Leave Days Allowed for the calculation of EOS:
-Users can set the maximum number of leaves allowed while calculating EOS.
-If an employee has 40 days leave balance and if ‘Maximum Leave Days Allowed for the calculation of EOS’ is 10, he/she will be paid only for 10 days. This is as per the company policy.
Calculate Unpaid Leave Salary Calculation based on Leave Setup:
-If this box is checked, the unpaid salary will be calculated based on Leave setup.
-I.e., Company Setting→Advanced Activities Setup→Annual Leave Setup
Calculate Unpaid Leave Salary Calculation based on Total Salary:
-If this box is checked, the unpaid salary will be calculated based on the Total Salary.
Calculate Unpaid Leave Salary Calculation based on Salary Items:
-If this box is checked, the unpaid salary will be calculated based on Salary Items listed: Basic Salary, Accommodation, Furniture etc. Users can select the salary item to be included for the EOS calculation.
– E.g. Users can select the Basic salary, Accommodation etc.
Leave Calculation Basis:
-Users can check the box and set the basis to 360 or 365 Days.
-By Default, this option is unchecked with a value zero (i.e., basis is not set) which means that the leave calculation is based on the salary setup.
-If the basis is not set and leave days are 10 the salary calculation is: Actual Month Days: Leave Salary Calculation will be: 3000*12*10
365
Fixed 30 Days: Leave Salary Calculation will be: 3000*12*10
360
When Resigns; If service period exceeds 5 years, calculate as Terminate:
-If the option is checked, for any employee after 5 years calculate EOS as Termination when he/she resigns.
Don’t Include Unpaid Salaries/Not Created Salary Sheets in the Create End of Service form:
-If this option is checked, unpaid salaries and not created salary sheets are not included in the EOS calculation.
Date:
Start Calculating EOS provision after—- Months from Joining
-Users can set the number of months to start calculating EOS provision from the joining date.
– E.g., if 6 months is selected, the system will start calculating the EOS provision after 6 months of joining date.
Calculate EOS Service Period based on Days Basis Days:
– EOS Service Period can be calculated on different day’s basis. It could be 365 or 360 days or any basis as per company policy.
– If ‘Calculate EOS Service Period based on Days’ is not set, then the service period will be calculated as 3 + (4 / 12) + (2 / 365) = 3.338813 if Employee worked for 3 Years 4 Months and 2 Days.
– If ‘Calculate EOS Service Period based on Days’ is 360 Days, then the service period will be calculated as 1221 / 360 = 3.391 if the Employee worked for 1221 days. (1221 is the number of calendar days worked from joining date to EOS date).
Note:
When the user selects Set Default, it should go to the default settings of EOS as per UAE (country). Set Default should read from the country EOS setup.
Note:
Creating EOS will not affect any transaction / activities unless EOS is approved.
E.g.: For a Timesheet Employee, if the user wants to create EOS date on 12 June, then he/she needs to do the following:
Now to cause an effect on activities, the user must approve EOS.
In the Additions & Deductions Tab, the user can add the additions and deductions to be added for the EOS Employee as below:
If the user wants to make any Adjustment in the total amount, he/she can do it from the Summary Tab as below:
Different Cases:
If the employee Salary is 3000; Calculate Unpaid Leave Salary Calculation Based on Leave Setup, (Leave Setup is to include All Salary Items and Transfer To Next Year is Yes), Employee works for 3 year,4 month and 2 days and EOS Setup is as below: the Default setup.
The Calculation summary is the following:
Note:
If Leave Salary Calculation basis is 0 Days, then it will read the setup from Payroll Settings. If setup is actual month days, then the leave days is divided by 365 Days, if setup is fixed 30 days, then leave days is divided by 360 Days.
The image displayed above represents a closeup view of the EOS Setup where users get to choose and apply the suitable actions and requirements.
Moreover, the cases displayed below represents several calculations regarding the End of Service.
However, the results might vary between one user and another depending on how the setup is made among users
Case 1:
If the setup is
![]()
And Leave Salary Calculation basis is 360 Days, EOS basis =360 in EOS Setup:
Here, 1-day salary = 3000*12 =100
360
100 X 70.115073 (Eligible Days) =7011.51
If EOS basis = 365, then calculation will be as follows:
1-day salary = 3000 *12 =98.63, then Total amount for EOS will be
365
98.63 * 70.115073 (Eligible Days) = 6915.459
Note:
1. Total Days is calculated as total no of Calendar Days. i.e., 1219 days her
2. When ‘Calculate EOS Service Period based on Days’ is not set (By Default zero), then the years calculated as (as example shown above) 3 + (4 / 12) + (2 / 365) = 3.338813 if 3 years 4 Months and 2 Days.
And If Maximum Leave Allowed for Calculating EOS is set as 10, then Leave salary will be: (3000 * 12 * 10) / 360 = 1000 [basis: 360].
Case 2:
If the setup is
![]()
And Leave Salary Calculation basis is 365 Days,
EOS basis = 360 in EOS Setup:
Here, 1-day salary = 3000*12 =100, then, the total amount for EOS will be
360
100 * 70.115073 (Eligible Days) = 7011.51
If EOS basis = 365, then calculation will be the following:
1-day salary = 3000 *12 =98.63, then the Total amount for EOS will be
365
98.63 * 70.115073 (Eligible Days) = 6915.459
And If the Maximum Leave Allowed for Calculating EOS is 10, then Leave salary will be: (3000*12*10) / 365 = 986 [basis: 365]
Case 3:
If the setup is
![]()
And Leave Salary Calculation basis is 360 Days,
EOS basis =360 in EOS Setup:
Here, 1-day salary = 3000*12 =100, then the total amount for EOS will be
360
100 * 71.108331 (Eligible Days) = 7110.8331
If EOS basis = 365, then the calculation will be the following:
1-day salary = 3000 *12 =98.63, then Total amount for EOS will be
365
98.63 * 71.108331 (Eligible Days) = 7013.4
And If Maximum Leave Allowed for Calculating EOS is 10, then Leave salary will be: (3000*12*10) / 360 = 1000 [basis: 360].
Case 4:
If the setup is
![]()
And leave salary calculation basis is 365 Days
EOS basis = 360 in EOS setup:
Here, 1-day salary = 3000*12 =100, then the total amount for EOS will be
360
100 * 71.108331 (Eligible Days) = 7110.8331
If EOS basis = 365, then calculation will be as follows:
1-day salary = 3000 *12 =98.63, then the Total amount for EOS will be
365
98.63 * 71.108331 (Eligible Days) = 7013.4
And If the Maximum Leave Allowed for Calculating EOS is 10, then the Leave salary will be:
(3000*12*10) / 360 = 1000 [basis: 360].
Case 5:
If the setup is
![]()
And leave salary calculation basis is 360 Days,
EOS basis = 365 in EOS setup:
Here, 1-day salary = 3000*12 =100, then total amount for EOS will be
360
100 * 70.134246 (Eligible Days) = 7013.4246
If EOS basis = 365, then calculation will be as follows:
1-day salary = 3000 *12 =98.63, then the Total amount for EOS will be
365
98.63 * 70.134246 (Eligible Days) = 6917.34
And If the Maximum Leave Allowed for Calculating EOS is 10, then Leave salary will be: (3000*12*10)/360=1000 [basis: 360]
Case 6:
If the setup is
![]()
And leave salary calculation basis is 365 days,
EOS basis is = 365 in EOS Setup:
Here, 1-day salary = 3000*12 =100, then the total amount for EOS will be
360
100 * 70.134246 (Eligible Days) = 7013.4246
If EOS basis = 365, then the calculation will be the following:
1-day salary = 3000 *12 =98.63, then Total amount for EOS will be:
365
98.63 * 70.134246 (Eligible Days) = 6917.34
And If the Maximum Leave Allowed for Calculating EOS is 10, then Leave salary will be: (300*12*10)/ 365 = 986 [basis: 365]
Note:
– Users can have separate settings for EOS regardless of the Company setup. They can also have the same settings as per the company policy.
-In EOS, the system will calculate the actual leave days. i.e., If the Transfer to next year is No (In Leave setup) and EOS is created for the Employee in March, the Leave days will be 7 or 8 days.
– If the Leave Salary Calculation basis is Not checked, then it will be calculated Based on the Salary calculation setup:
i.e., If the Maximum Leave Allowed for Calculating EOS is 10
1. Fixed 30 Days: Leave Salary Calculation will be: (3000 * 12 * 10) / 360
2. Actual Month Days: Leave Salary Calculation will be: (3000 * 12 *10) / 365
7. General Settings
Go to: File→ Settings→General Settings.
7-1. General List:
It will list all the items and values available in the drop down for each item. E.g.: Grade: Grade01, Grade02, Grade03 etc.
Leave Type: Emergency, Haj Type, Sick Leave etc.
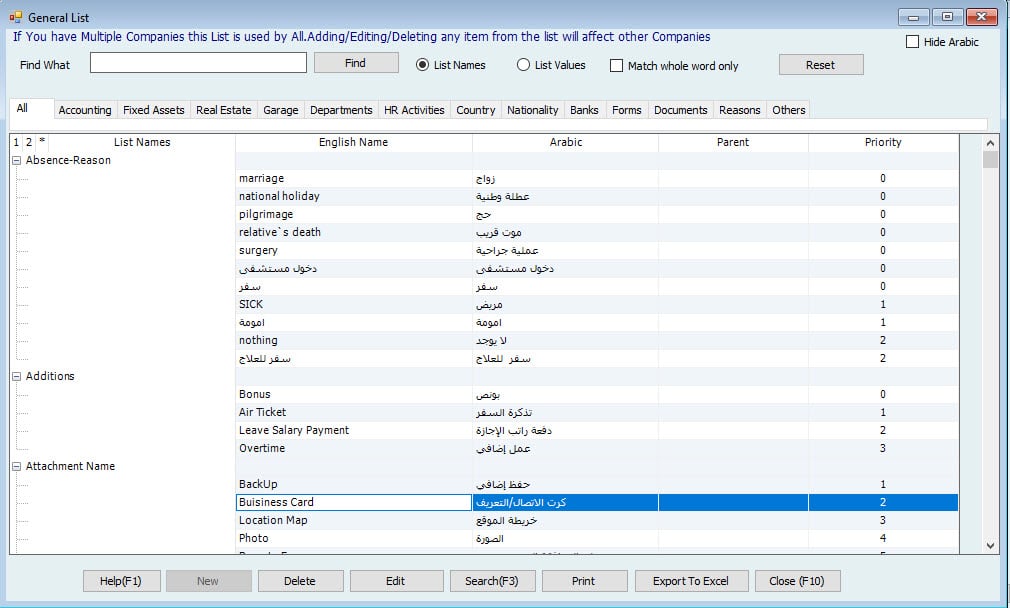
Note:
Users can add items for each list by selecting on the List and then clicking on New.
7-2. Custom Fields:
When the user wants to add any new field in Employee profile, he/she can add from here. Users can add Custom Fields clicking on New. Users can view where the field is added in Custom Information of Employee form.
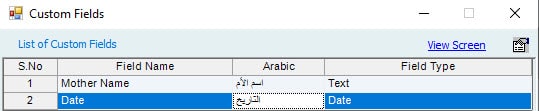
Users can Edit/Delete the custom fields from here. Users can add these fields in Employee Profile→ Custom tab as shown below.
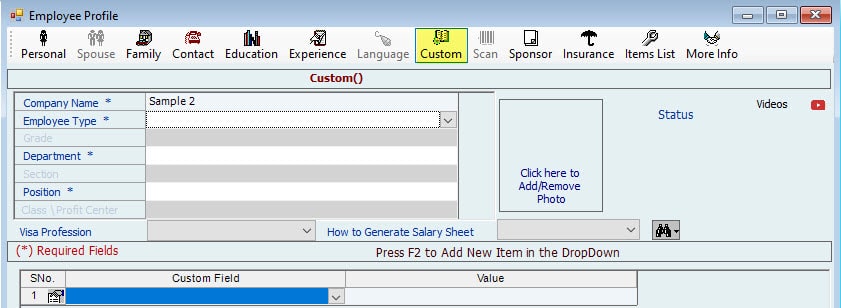
Users can view the Report for Custom Fields from Reports→Employee Basic Information→Employee Custom Field Report.
7-3. Setup Employee Document:
Users can setup the required information about Documents as displayed below.
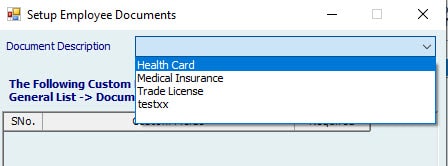
Users can add fields for Custom Fields from General List. For each document, users can specify the fields required or not required. When the user selects Location and Field Required for Health Insurance, it will be shown in Manage Employees→Set Documents→Create Single Document→Other Documents and select Health Insurance, it will show the fields ‘Location’ and ‘Field’.
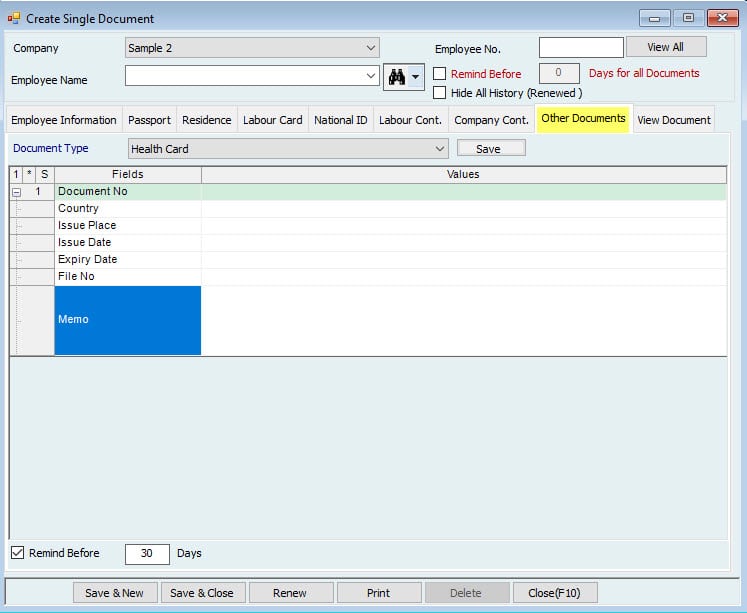
7-4. Banking Rout Codes:
Users can set the details of routs codes for each bank.

To see the Branch Name and to Enter Routing codes and CBID codes, user must select the branch name for the bank from Manage employees→ Set Salary & Benefits→create/Adjust Single Salary and click on Transfer to Bank under Payment Mode, then provide the bank details.
Company Settings → Company set up → Payroll Policy.
Payroll Tab:
Note:
Can vary from company to company: say 8 hours or 9 hours. This will be affected onlyborn HR Employees.
Salary Calculation:
It’s important for the user to understand the method of salary calculation of the employee and the relatedness with other activities such as absence, leave and so on. In this part, we will explain the process in detail for better understanding.
Hinawi Software has 2 ways of calculation basis: –
➔ Fixed 30 Days
In this basis, the system considers all months as fixed 30 days regardless if the month is January, February or April.
➔ Actual Month Days
In this basis the system calculates the number of days in the month. Therefore, January is:31 days, February is: 28/29 days, and April is: 30 days.
Note:
Net to pay the amount in Salary sheet is rounding and no decimal points.
e.g. 29.22 will be ,2903 and 2892.86 ,will be 2893 as shown in the above table.,
i.e. 0.5 and more will be consonedered, as 1 and less than .5 will be ignored.
The user can do the settings from Additional Settings.
Both affect the calculations of monthly salary for the following activities cases: Absence and Leave.
Case 1:
STANDARD Case. Employee Monthly Salary is 3000 AED, All Salary Item included for Leave calculation, no pension for Non- Locals, Leave Salary Calculation basis on 0 (zero) days, Absence setup is Deduct from Salary, No first month.
Case 2:
Employee Monthly Salary is 3000 AED, All Salary Items included for Leave calculation, no pension for Non- Locals, Leave Salary Calculation Basis on 0 (ZERO) Days, no first month, Setup is Fixed 30 days; Calculate Actual Leave Days if Salary Calculation basis is Fixed 30 Days box is checked.
Case 3:
Employee Monthly Salary is 3000 AED, All Salary Items included for Leave calculation, No pension for Non- Locals, Setup is Actual Month Days; Leave Salary Calculation Basis on 360 Days.
Important Information to help the user
Salary Calculation Policy:- | ||||
| Employee Salary | Fixed 30 Days | Actual Month Days | 360 Days | 365 Days |
| Employee Salary: | Yes | Yes | X | X |
| Absence Amount: | Yes | Yes | X | X |
| Absence Days: | X | Yes | X | X |
| Leave Amount leave | Yes | Yes | Yes | Y es |
| Leave Days: | Yes | Yes | X | X |
Actual Month Days:
On this basis, the system calculates the number of days in the month. Therefore, January is 31 days,
February is: 28/2,9 days and April is: 30 days.
Fixed 30 Days:
On this basis, the system considers all months as fixed 30 days regardless of the month is January, February, or April.
Below are details of explanations for different cases:
| Absence Calculation (Month is Actual Month Days) Recommended | ||||||
| January | ||||||
| Salary | 3000 | 1 Day Absence During the month | 1 Day Absence 30 of the month | 1 Day Absence at the end of the month (On 31) | 5 Days absence from 27 of the month | Note |
| Actual Month Days | 31 | |||||
| Actual Absence Days. | 1 | 1 | 1 | 5 | This will Absence Ledger report and will be deducted from total Service Period. | |
| Description | Days are: January 27+28+29+30+31 | |||||
| Calculated Deductions Absence days | 1 | 1 | 1 | 5 | ||
| Description | One Day only | One Day only | One Day only | Days are: January 27+28+29+30+31 | ||
| Absence Amount | Total Salary / 31 X Absence days | 96.77 | 96.77 | 96.77 | 483.87 | The Absence amount will be lower if the month is 31 days. |
| Net Salary Amount | Total Salary Minus Absence Amount | 2903.23 | 2903.23 | 2903.23 | 2516.13 | |
Note: If the Absence is 10 days, system will calculate the 5 Days in January as (3000 / 31 * 5) and 5 days in February as (3000 / (28 or 29) * 5) = 1,019.58 in case of non leap year and 1,001.11 in case of leap year | ||||||
| February- Month is 28 Days (None Leap Year) | ||||||
| Salary | 3000 | 1 Day Absence During the month | 1 Day Absence 30 of the month | 1 Day Absence at the end of the month (On 28) | 5 Days absence from 27 of the month | Note |
| Actual Month Days | 28 | |||||
| Actual Absence Days. | 1 | N/A | 1 | 5 | the is will Show in Absence Ledger report and will be deducted from total Service Period. | |
| Description | Days are: February: 27+28 March: 1+2+3 | |||||
| Calculated Deductions Absence days | 1 | 0 | 1 | 5 | Days will be Split in to 2 Months | |
| 2 | 2 Days in February | |||||
| 3 | 3 Days in March | |||||
| Description | One Day only | _ | One Day only | Days are: February 27+28 March: 1+2+3 | ||
| 214.29 | Calculation of Absence Amount for February. | |||||
| 290.32 | Calculation of Absence Amount for March. | |||||
| Absence Amount | Total Salary / 28 X Absence days | 107.14 | 0 | 107.14 | 504.61 | The Absence amount will be higher if the month is 28 days. |
| Net Salary Amount | Total Salary Less Absence Amount | 2892.86 | 3000.00 | 2892.86 | 2495.39 | |
Note: If the the Absence is 10 days, system will calculate the 2 Days in February as (3000 / 28 * 2) and 8 days in March as (3000 / 31 * 8) = 988.47 | ||||||
| February – Month is 29 Days (Leap Year) | ||||||
| Salary | 3000 | 1 Day Absence During the month | 1 Day Absence 30 of the month | 1 Day Absence at the end of the month (On 29) | 5 Days absence from 27 of the month | Note |
| Actual Month Days | 29 | |||||
| Actual Absence Days. | 1 | N/A | 1 | 5 | This will Show the in Absence Ledger report and will be deducted from total Service Period. | |
| Description | Days are: February 27+28+29 March: 1+2 | |||||
| Calculated Deductions Absence days | 1 | 0 | 1 | 5 | Days will be Split in to 2 Months | |
| 3 | 3 Days in February | |||||
| 2 | 2 Days in March | |||||
| Description | One Day only | _ | One Day only | Days are: February 27+28+29 March: 1+2 | ||
| 310.34 | Calculation of Absence Amount for February. | |||||
| 193.55 | Calculation of A bsence Amount for March. | |||||
| Absence Amount | Total Salary / 29 X Absence days | 103.45 | 0.00 | 103.45 | 503.89 | Absence amount in February is highr from other months. |
| Net Salary Amount | Total Salary Less Absence Amount | 2896.55 | 3000.00 | 2896.55 | 2496.11 | |
Note: If the Absence is 10 days, system will calculate the 3 Days in February as (3000 / 29 * 3) and 7 days in March as (3000 / 31 * 7) = 987.76 | ||||||
| March | ||||||
| Salary | 3000 | 1 Day Absence During the month | 1 Day Absence 30 of the month | 1 Day Absence at the end of the month (On 31) | 5 Days absence from 27 of the month | Note |
| Actual Month Days | 31 | |||||
| Actual Absence Days. | 1 | 1 | 1 | 5 | This will Absence Absense Ledger Report and will be deducted f rom total Service Period. | |
| Description | Days are: March 27+28+29+30+31 | |||||
| Calculated Deductions Absence days | 1 | 1 | 1 | 5 | ||
| Description | One Day only | One Day only | One Day only | Days are: March 27+28+29+30+31 | ||
| Absence Amount | Total Salary / 31 X Absence days | 96.77 | 96.77 | 96.77 | 483.87 | The Absence amount will be lower if the month is 31 days. |
| Net Salary Amount | Total Salary Less Absence Amount | 2903.23 | 2903.23 | 2903.23 | 2516.13 | |
Note: If the Absence is 10 days, system will calculate the 5 Days in March as (3000 / 31 * 5) and 5 days in April as (3000 / 30 * 5) = 983.87 | ||||||
| April | ||||||
| Salary | 3000 | 1 Day Absence During the month | 1 Day Absence 30 of the month | 1 Day Absence at the end of the month (On 31) | 5 Days absence from 27 of the month | Note |
| Actual Month Days | 30 | |||||
| Actual Absence Days. | 1 | 1 | N/A | 5 | This will Show in Absence Ledger Report and will be deducted from total Service Period. | |
| Description | Days are: April27+28+29+30 and May 1 Day. | |||||
| Calculated Deductions Absence days | 1 | 1 | 0 | 5 | Days will be Split into 2 Months | |
| 4 | 4 Days in April | |||||
| 1 | 1 Days in May | |||||
| Description | One Day only | One Day only | April is 30 Days only | Days in April are: 27.+28+29+30 and 1 Day on May | ||
| 400.00 | Calculation of Absence Amount for April. | |||||
| 96.77 | Calculation of Absence Amount for May. (May is 31 Days). | |||||
| Absence Amount | Total Salary / 30 X Absence days | 100.00 | 100.00 | 0.00 | 496.77 | |
| Net Salary Amount | Total Salary Less Absence Amount | 2900.00 | 2900.00 | 3000.00 | 2503.23 | |
Note: If the Absence is 10 days, the system will calculate the 4 Days in April as (3000 / 30 * 4) and 6 days in May as (3000 / 31 * 5) = 883.87 | ||||||
| Absence Calculation (Month is Fixed 30 Days) | ||||||
| January | ||||||
| Salary | 3000 | 1 Day Absence During the month | 1 Day Absence 30 of the month | 1 Day Absence at the end of the month (On 31) | 5 Days absence from 27 of the month | Note |
| Fixed Month Days | 30 | |||||
| Actual Absence Days. | 1 | 1 | 1 | 5 | This will Show in Absense Ledger Report and will be deducted from total Service Period. | |
| D escription | Days are: January 27+28+29+30+31 | |||||
| Calculated Deductions Absence days | 1 | 1 | 0 | 4 | ||
| Description | One Day only | One Day only | Days after 30 will not be considered | Days are: 27+28+29+30 31 will not calculated | ||
| Absence Amount | Total Salary / 30 X Absence days | 100.00 | 100.00 | 0.00 | 400.00 | |
| Net Salary Amount | Total Salary Less Absence Amount | 2900.00 | 2900.00 | 3000.00 | 2600.00 | |
Note: If the Absence is 10 days, system will calculate the 4 Days in January as (3000 / 30 * 4) and 5 days in February as (3000 / 30 * 5) [31 will not be calculated] = 900 | ||||||
| February – Month is 28 Days (Non-Leap Year) | ||||||
| Salary | 3000 | 1 Day Absence During the month | 1 Day Absence 30 of the month | 1 Day Absence at the end of the month (On 28) | 5 Days Absence from 27 of the month | Note |
| Fixed Month Days | 30 | |||||
| Actual Absence DaysAbsence | 1 | N/A | 1 | 5 | This will Show in Absence Ledger Report and will be deducted from total Service Period. | |
| Description | If the Absence is 2 daye then the deducted days will be 4 | Days are: February: 27+28 March: 1+2+3 | ||||
| Calculated Deductions Absence days | 1 | 0 | 1 | 7 | The Absence Days will be more if the month is 28/29 days. | |
| 4 | 4 Days in February (27+28+29+30) | |||||
| 3 | 3 Days in March | |||||
| Description | One Day only | _ | One Day only | Days are: February 27+28+29+30 March: 1+2+3 | ||
| 400 | Calculation of Absence Amount for February. | |||||
| 300 | Calculation of Absence Amount for March. | |||||
| Absence Amount | Total Salary / 30 X Absence days | 100.00 | 0.00 | 100.00 | 700.00 | The Absence amount will be higher if the month is 28/29 days. |
| Net Salary Amount | Total Salary Less Absence Amount | 2900.00 | 3000.00 | 2900.00 | 2300.00 | |
Note: If the Absence is 10 days, system will calculate the 4 Days in Feightbruary as (3000 / 30 * 4) and 8 days in March as (3000 / 30 * 8) = 1,200 | ||||||
| February – Month is 29 Days (Leap Year) | ||||||
| Salary | 3000 | 1 Day Absence During the month | 1 Day Absence 30 of the month | 1 Day Absence at the end of the month (On 29) | 5 Days absence from 27 of the month | Note |
| Fixed Month Days | 30 | |||||
| Actual Absence Days. | 1 | N/A | 1 | 5 | This will Show in Absencee Ledger Report and will be deducted from total Service Period. | |
| Description | Days are: February: 27+28+29 March: 1+2 | |||||
| Calculated Deductions Absence days | 1 | 0 | 1 | 6 | Days will be Split in to 2 Months | |
| 4 | 4 Days in February (27+28+29+30) | |||||
| 2 | 2 Days in March | |||||
| Description | One Day only | _ | One Day only | Days are: February 27+28+29+30 March: 1+2 | ||
| 400 | ||||||
| 200 | ||||||
| Absence Amount | Total Salary / 30 X Absence days | 100.00 | 0.00 | 100.00 | 600.00 | The Absence amount will be higher if the month is 28/29 days. |
| Net Salary Amount | Total Salary Less Absence Amount | 2900.00 | 3000.00 | 2900.00 | 2400.00 | |
Note: If the Absence is 10 days, the system will calculate the 4 Days in February as (3000 / 30 * 4) and 7 days in March as (3000 / 30 * 7) = 1,100 | ||||||
| March | ||||||
| Salary | 3000 | 1 Day Absence During the month | 1 Day Absence 30 of the month | 1 Day Absence at the end of the month (On 31) | 5 Days absence from 27 of the month | Note |
| Fixed Month Days | 30 | |||||
| Actual Absence Days. | 1 | 1 | 1 | 5 | This will Show in Absence Ledger Report and will be deducted from total Service Period. | |
| Description | Days are: March 27+28+29+30+31 | |||||
| Calculated Deductions Absence days | 1 | 1 | 0 | 4 | ||
| Description | One Day only | One Day only | Days after 30 will not be considerd | Days are: 27+28+29+30 31 will not calculated | ||
| Absence Amount | Total Salary / 30 X Absence days | 100.00 | 100.00 | 0.00 | 400.00 | |
| Net Salary Amount | Total Salary Less Absence Amount | 2900.00 | 2900.00 | 3000.0the | 2600.00 | |
Note: If the Absence is 10 days, system will calculate the 4 Days in March as (3000 / 30 * 4) and 5 days in April as (3000 / 30 * 5) [31 will not be calculated] = 900 | ||||||
| April | ||||||
| Salary | 3000 | 1 Day Absence During the month | 1 Day Absence 30 of the month | 1 Day Absence at the end of the month (On 31) | 5 Days absence from 27 of the month | Note |
| Fixed Month Days | 30 | |||||
| Actual Absence Days. | 1 | 1 | N/A | 5 | This will Show in Absense Ledger Report and will be deducted from total Service Period. | |
| Description | Days are: April27+28+29+30 and May 1 Day. | |||||
| Calculated Deductions Absence days | 1 | 1 | 0 | 5 | Days will be Split in to 2 Months | |
| 4 | 4 Days in April | |||||
| 1 | 1 Days in May | |||||
| Description | One Day only | One Day only | April is 30 Days only | Days in April are: 27+28+29+30 an 1 Day on May | ||
| 400 | Calculation of Absence Amount for April. | |||||
| 100 | Calculation of Absence Amount for May. | |||||
| Absence Amount | Total Salary / 30 X Absence days | 100.00 | 100.00 | 0.00 | 500.00 | |
| Net Salary Amount | Total Salary Less Absence Amount | 2900.00 | 2900.00 | 3ten0.00 | 2500.00 | |
Note: If the Absence is 10 days, system will calculate the 4 Days in April as (3000 / 30 * 4) and 6 days in May as (3000 / 30 * 6) = 1,000 | ||||||
| Leave Calculation (Month is Actual Month Days) | ||||||
| January | ||||||
| Salary | 3000 | 1 Day Leave During the month | 1 Day Leave on 30th of the month | 1 Day Leave at the end of the month (On 31) | 5 Days Leave from 27th of the month | Note |
| Actual Month Days | 31 | |||||
| Actual Leave Days. | 1 | 1 | 1 | 5 | This will Show in Leave Ledger Report . | |
| Description | Days are: January 27+28+29+30+31 | |||||
| Calculate Leave days | 1 | 1 | 1 | 5 | ||
| Calculate Working Days | 30 | 30 | 30 | 26 | ||
| Description | One Day Leave only | One Day Leave only | One Day Leave only | Days are: January 27+28+29+30+31 | ||
| Leave Amount | Total Salary / 31 X Leave days | 96.77 | 96.77 | 96.77 | 483.87 | |
| Working Days Salary | Total Salary / 31 X Working days | 2903.23 | 2903.23 | 2903.23 | 2516.13 | |
| Net Salary Amount | Total Working Days Salary + Leave Amount | 3000.00 | 3000.00 | 30ten.00 | 3000.00 | |
Note: If the Leave is the 10 days, system will calculate the 5 Days in January as (3000 / 31 * 5) and 5 days in February as (3000 / (28 or 29) * 5) | ||||||
| February – Month is 28 Days (None Leap Year) | ||||||
| Salary | 3000 | 1 Day Leave During the month | 1 Day Leave 30 of the month | 1 Day Leave at the end of the month (On 28) | 5 Days Leave from 27 of the month | |
| Actual Month Days | 28 | |||||
| Actual Leave Days. | 1 | N/A | 1 | 5 | This will Show in Leave Ledger Report. | |
| Description | Days are: February: 27+28 March: 1+2+3 | |||||
| Calculated Leave days | 1 | 0 | 1 | 5 | Days will be Split in to 2 Months | |
| 2 | 2 Days in February | |||||
| 3 | 3 Days in March | |||||
| Working Days | 27 | 28 | 27 | 26 | ||
| Description | One Day Leave only | _ | One Day Leave only | Days are: February 27+28 March: 1+2+3 | ||
| 214.29 | Calculation of Leave Amount for February. | |||||
| 290.32 | Calculation of Leave Amount for March. | |||||
| Leave Amount | Total Salary / 28 X Leave days | 107.14 | 0 | 107.14 | 504.61 | |
| Working Days Salary | Total Salary / 28 X Working days | 2892.86 | 3000.00 | 2892.86 | 2785.71 | |
| Net Salary Amount | Total Working Days Salary + Leave Amount | 3000.00 | 3000.00 | 3000.00 | 3290.32 | The Leave Salary of 3 days of March will also be included with this Month In March Employee will get 28 Days salary. |
Note: If the Leave is ten days, system will calculate the 2 Deightys in February as (3000 / 28 * 2) and 8 days in March as (3000 / 31 * 8) | ||||||
| February – Month is 29 Days (Leap Year) | ||||||
| Salary | 3000 | 1 Day Leave During the month | 1 Day Leave 30 of the month | 1 Day Leave at the end of the month (On 29) | 5 Days Leave from 27 of the month | |
| Actual Month Days | 29 | |||||
| Actual Leave Days. | 1 | N/A | 1 | 5 | This will Show in Leave Ledger Report. | |
| Description | Days are: February 27+28+29 March: 1+2 | |||||
| Calculated Leave days | 1 | 0 | 1 | 5 | Days will be Split in 2 Months | |
| 3 | 3 Days in February | |||||
| 2 | 2 Days in March | |||||
| Calculate Working Days | 28 | 29 | 28 | 26 | ||
| Description | One Day Leave only | _ | One Day Leave only | Days are: February 27+28+29 March: 1+2 | ||
| 310.34 | Calculation of Leave Amount for February. | |||||
| 193.55 | Calculation of Leave Amount for March. | |||||
| Leave Amount | Total Salary / 29 X Leave days | 103.45 | 0.00 | 103.45 | 503.89 | |
| Working Days Salary | Total Salary / 29 X Working days | 2896.55 | 3000.00 | 2896.55 | 2689.66 | |
| Net Salary Amount | Total Working Days Salary + Leave Amount | 3000.00 | 3000.00 | 3000.00 | 3193.55 | The Leave Salary of 2 days of March will be also included with this Month. In March Employee will get 29 Days salary. |
Note: If the Leave is 10 days, the system will calculate the 3 Days in February as (3000 / 29 * 3) and 7 days in March as (3000 / 31 * 7) | ||||||
| March | ||||||
| Salary | 3000 | 1 Day Leave During the month | 1 Day Leave 30 of the month | 1 Day Leave at the end of the month (On 31) | 5 Days Leave from 27 of the month | |
| Actual Month Days | 31 | |||||
| Actual Leave Days. | 1 | 1 | 1 | 5 | This will Show in Leave Ledger Report. | |
| Description | Days are: March 27+28+29+30+31 | |||||
| Calculated Leave days | 1 | 1 | 1 | 5 | ||
| Calculate Working Days | 30 | 30 | 30 | 26 | ||
| Description | One Day Leave only | One Day Leave only | One Day Leave only | Days are: March 27+28+29+30+31 | ||
| Leave Amount | Total Salary / 31 X Leave days | 96.77 | 96.77 | 96.77 | 483.87 | |
| Working Days Salary | Total Salary / 31 X Working days | 2903.23 | 2903.23 | 2903.23 | 2516.13 | |
| Net Salary Amount | Total Working Days Salary + Leave Amount | 3000.00 | 3000.00 | 300the 0.00 | 3000.00 | |
Note: If the Leave 10 days, system will calculate the 5 Days in March as (3000 / 31 * 5) and 5 days in April as (3000 / 30 * 5) | ||||||
| April | ||||||
| Salary | 3000 | 1 Day Leave During the month | 1 Day Leave 30 of the month | 1 Day Leave at the end of the month (On 31) | 5 Days Leave from 27 of the month | |
| Actual Month Days | 30 | |||||
| Actual Leave Days. | 1 | 1 | N/A | 5 | This will Show in Leave Ledger Re port. | |
| Description | Days are: April 27+28+29+30 and May 1 Day. | |||||
| Calculated Leave days | 1 | 1 | 0 | 5 | Days will be into in to 2 Months | |
| 4 | 4 Days in April | |||||
| 1 | 1 Days in May | |||||
| Calculate Working Days | 29 | 29 | 30 | 26 | ||
| Description | One Day Leave only | One Day Leave only | April is 30 Days only. | Days in April are: 27+28+29+30 and 1 Day o.n May | ||
| 400.00 | Calculation of Leave Amount for April. | |||||
| 96.77 | Calculation of Leave Amount for May. | |||||
| Leave Amount | Total Salary / 30 X Leave days | 100.00 | 100.00 | 0.00 | 496.77 | |
| Working Days Salary | Total Salary / 30 X Working days | 2900.00 | 2900.00 | 3000.00 | 2600.00 | |
| Net Salary Amount | Total Working Days Salary + Leave Amount | 3000.00 | 3000.00 | 3000.00 | 3096.77 | The Leave Salary of 1 day of May will be also included with this Month. In May Employee will get 30 Days salary. |
Note: If the Leave is 10 days, system will calculate the 4 Days in April as (3000 / 30 * 4)six and 6 days in May as (3000 / 31 * 5) | ||||||
| Leave Calculation (Month is Fixed 30 Days) | ||||||
| January | ||||||
| Salary | 3000 | 1 Day Leave During the month | 1 Day Leave 30 of the month | 1 Day Leave at the end of the month (On 31) | 5 Days Leave from 27 of the month | Note |
| Fixed Month Days | 30 | |||||
| Actual Leave Days. | 1 | 1 | 1 | 5 | This will Show in Leave Ledger Report. | |
| Description | Days are: January 27+28+29+30+31 | |||||
| Calculated Leave days | 1 | 1 | 0 | 4 | ||
| Calculate Working Days | 29 | 29 | 30 | 26 | ||
| Description | One Day Leave considered days | One Day Leave only | Days after 30 will not be considered | Days are: 27+28+29+30 31 will not calculated | ||
| Leave Amount | Total Salary / 30 X Leave days | 100.00 | 100.00 | 0.00 | 400.00 | |
| Working Days Salary | Total Salary / 30 X Working days | 2900.00 | 2900.00 | 3000.00 | 2600.00 | |
| Net Salary Amount | Total Working Days Salary + Leave Amount | 3000.00 | 3000.00 | 3000.00 | 3000.00 | |
| Note: If the Leave is 10 days, system will calculate the 4 Days in January as (3000 / 30 * 4) and 5 days in February as (3000 / 30 * 5) [31 will not be calculated] | ||||||
| February – Month is 28 Days (Non-Leap Year) | ||||||
| Salary | 3000 | 1 Day Leave During the month | 1 Day Leave 30 of the month | 1 Day Leave at the end of the month (On 28) | 5 Days Leave from 27 of the month | |
| Fixed Month Days | 30 | |||||
| Actual Leave Days. | 1 | N/A | 1 | 5 | This will Show in Leave Ledger Report. | |
| Description | Days are: February: 27+28 March: 1+2+3 | |||||
| Calculated Leave days | 1 | 0 | 1 | 7 | Days will be Split in to 2 Months | |
| 4 | 4 Days in February | |||||
| 3 | 3 Days in March | |||||
| Working Days | 29 | 30 | 29 | 26 | ||
| Description | One Day Leave only | _ | One Day Leave only | Days are: February 27+28+29+30 March: 1+2+3 | Tan here is option available in Payroll Settings to Calculate Actual Leave Days if Payroll Policy is Fixed 30 days. If user Tick this option System will Calculate only 27+28+1+2+3 ( 5 Days) .In the case Leave Amount will be 500 | |
| 400 | Calculation of Leave Amount for February. | |||||
| 300 | Calculation of Leave Amount for March. | |||||
| Leave Amount | Total Salary / 30 X Leave days | 100.00 | 0.00 | 100.00 | 700.00 | |
| Working Days Salary | Total Salary / 30 X Working days | 2900.00 | 3000.00 | 2900.00 | 2600.00 | |
| Net Salary Amount | Total Working Days Salary + Leave Amount | 3000.00 | 3000.00 | 3000.00 | 3300.00 | The Leave salary of 3 days of March will be also included with this Month. In March Employee will get 27 Days salary. |
| Note: If the Leave ithe s 10 days, system wileight calculate the 4 Days in February as (3000 / 30 * 4) and 8 days in March as (3000 / 30 * 8) | ||||||
| February – Month is 29 Days (Leap Year) | ||||||
| Salary | 3000 | 1 Day Leave During the month | 1 Day Leave 30 of the month | 1 Day Leave at the end of the month (On 29) | 5 Days Leave from 27 of the month | |
| Fixed Month Days | 30 | |||||
| Actual Leave Days. | 1 | N/A | 1 | 5 | This will Show in Leave Ledger Report. | |
| Description | Days are: February: 27+28+29 March: 1+2 | |||||
| Calculated Leave days | 1 | 0 | 1 | 6 | Days will be Split in to 2 Months | |
| 4 | 4 Days in February | |||||
| 2 | 2 Days in March | |||||
| Calculate Working Days | 29 | 30 | 29 | 26 | ||
| Description | One Day Leave only | _ | One Day Leave only | Days are: February 27+28+29+30 March: 1+2 | There is option available in Payroll Settings to Calculate Actual Leave Days if Payrol Calculateis Fixed 30 days. If user Tick this option System will Calculate only 27+28+1+2+3this5 Days) .In the case Leave Amount will be 500 | |
| 400 | Calculation of Leave Amount for February. | |||||
| 200 | Calculation of Leave Amount for March. | |||||
| Leave Amount | Total Salary / 30 X Leave days | 100.00 | 0.00 | 100.00 | 600.00 | |
| Working Days Salary | Total Salary / 30 X Working days | 2900.00 | 3000.00 | 2900.00 | 2600.00 | |
| Net Salary Amount | Total Working Days Salary + Leave Amount | 3000.00 | 3000.00 | 3000.00 | 3200.00 | The Leave Salary of 2 days of March will be also included with this Month. In March Employee will get 28 Days salary. |
| Note: If the Leave is 10 days, system will calculate the 4 Days in February as (3000 / 30 * 4) and 7 days in March as (3000 / 30 * 7) | ||||||
| March | ||||||
| Salary | 3000 | 1 Day Leave During the month | 1 Day Leave 30 of the month | 1 Day Leave at the end of the month (On 31) | 5 Days Leave from 27 of the month | |
| Fixed Month Days | 30 | |||||
| Actual Leave Days. | 1 | 1 | 1 | 5 | This will Show in Leave Ledger Report. | |
| Description | Days are: March 27+28+29+30+31 | |||||
| Calculated Leave days | 1 | 1 | 0 | 4 | ||
| Calculate Working Days | 29 | 29 | 30 | 26 | ||
| Description | One Day Leave only | One Day Leave only | Days after 30 will not be considered | Days are: 27+28+29+30 31 will not calculated | ||
| Leave Amount | Total Salary / 30 X Leave days | 100.00 | 100.00 | 0.00 | 400.00 | |
| Working Days Salary | Total Salary / 30 X Working days | 2900.00 | 2900.00 | 3000.00 | 2600.00 | |
| Net Salary Amount | Total Working Days Salary + Leave Amount | 3000.00 | 3000.00 | 3000.00 | 3000.00 | |
| Note: If the Leave is 10 days, system will calculate the 4 Days in March as (3000 / 30 * 4) and 5 days in April as (3000 / 30 * 5) [31 will not be calculated] | ||||||
| April | ||||||
| Salary | 3000 | 1 Day Leave During the month | 1 Day Leave 30 of the month | 1 Day Leave at the end of the month (On 31) | 5 Days Leave from 27 of the month | |
| Fixed Month Days | 30 | |||||
| Actual Leave Days. | 1 | 1 | N/A | 5 | This will Show in Leave Ledger Report. | |
| Description | Days are: April 27+28+29+30intoMay 1 Day. | |||||
| Calculated Leave days | 1 | 1 | 0 | 5 | Days will be Split in to 2 Months | |
| 4 | 4 Days in April | |||||
| 1 | 1 Days in May | |||||
| Calculate Working Days | 29 | 29 | 30 | 26 | ||
| Description | One Day Leave only | One Day Leave only | April is 30 Days only | Days in April are: 27+28+29+30 and 1 Day on May | ||
| 400 | Calculation of Leave Amount for April. | |||||
| 100 | Calculation of Leave Amount for May. | |||||
| Leave Amount | Total Salary / 30 X Leave days | 100.00 | 100.00 | 0.00 | 500.00 | |
| Working Days Salary | Total Salary / 30 X Working days | 2900.00 | 2900.00 | 3000.00 | 2600.00 | |
| Net Salary Amount | Total Working Days Salary + Leave Amount | 3000.00 | 3000.00 | 3000.00 | 3100.00 | The Leave Salary of 1 day of May will be also included with this Month. In May Employee will get 29 Days salary. |
| Note: If the Leave is 10 days, system will calculate the 4 Days in April as (3000 / 30 * 4) and 6 days in May as (3000 / 30 * 6) | ||||||
Note:
The absence salary will be deducted from the Effective month while creating an absence. E.g., if an employee making from 29th Jan to 2nd Feb. this means that while creating the absence, if the effective month is selected as Feb, then the absence salary will be deducted from Feb Monthly Salary.
Image A:
Image B:
Image C:
Image 01:
Image 02:
Image 03:
Image 04:
Image 05:
Image 06:
Fixed 30 days:
Salary sheet when there is No Absence and leave:
When there is 1 Day Leave:
When there is 1 Day Absent:
Note:
1. Leave Salary Calculation Basis is enabled only If the salary calculation is Actual
Month Days. When salary calculation is Fixed 30 Days, this option is disabled.
2. If EOS is created for an employee (resign or terminated), the remaining of leave salary and unpaid salaries will show in EOS for
Calculate Actual Leave Days if salary calculation is Fixed 30 Days:
e.g.: If this option is checked, and an Employee takes a leave for 5 days on Feb 27, then the leave days will be 5 (27,28 & 1,2,3). If this option is not checked, the leave days calculated will be 7 (27, 28, 29, 30 & 1, 2, 3).
Note:
Special Cases When:
1. Setup is based on fixed 30 days. If an Employee was absent on Jan 31st, leave will be deducted from Leave Days if the setup is “Deduct from Leaves”. And absent day salary will be deducted if the setup is “Deduct from Salary”.
2. Setup is based on fixed 30 days. If an Employee was absent on 28th Feb, then absent salary will be deducted from the effective month if the setup is “deduct from salary”.
3. An absence is created for an employee, and the setup type is deducted from:
leaves → annual leaves, then it will deduct the leave days from the annual Leave Balance.
4. Setup is based on fixed 30 days. If an Employee goes for leave on Jan 31st, leave will be deducted from Annual Leave Days. But will not be paid for that 1 day since it is fixed 30 days.
5. Setup is based on fixed 30 days. If an Employee goes for leave on 28th, leaves will be deducted from Annual Leave Days. Salary is calculated for 27 working days to + 1 day leave salary. For the next 2 days (29 and 30) salary needs to be added as separate in addition and deduction manually by the user. And next month salary (March) will be fotwo 30 Days and 2 days salary in the Addition column.
Important:
Changing between Basis of calculation:
When the user wants to change the Basis of calculation or anything else in SETUP, the activities like Leaves, absence, salary sheet and EOS must be approved before proceeding (if there will not be any further changes on activities in the future.)
Note:
before changing the setup.
Exceptional:
If thefor setup is fixed 30 days and the employee joining date is not 30 days month, calculate the working days based on the actual month.
Note:
By Default, this option will be checked. We strongly reclaimed keeping this checked. e.g. Employee joined on 27/01 so total working days will be: 5 days and will be calculated as 5/30 X Total Salary.
Employee joined on 27/02 so total working days will be: 2 days and will be calculated as 2/30 X Total Salary.
e.g.: If an employee joins on 20th of a month and we set the above to 22, then he will be included in the salary sheet of this month.
Note:
Differences the in the salary for previous period will be adjusted in the next salary sheets.
Wages Protection System (UAE Use Only):
Employer Unique Id: The user can provide the ID of the Employer here.
Bank Code of Employer: This is the bank code of the Employer and the user can add more banks here.
Includes All Salaries, Additions & Deductions in INCOME Fixed: This is a checkbox
Salary Information File (SIF) for Approved Salary Sheet Only: This is a checkbox.
Pension Settings Tab:
The user checks this option in case he/she wants to set pension for Non-Locals. Pension for Locals can be set from Default setup/Advanced Setup.
The user can check the option ‘Show the pension for Non-Locals in Separate column in Salary sheet’ if he/she wants the pension to be in separate column of the salary sheet.
The user can change the column name in Salary Sheet by giving a name in ‘Change the Column name in Salary Sheet as’
Deduct Company pension from Employees for Absence Days Locals % Non-Locals % The user can set the pension to be deducted from Employees for Absence Days.
Leave Policy is one of the most important screens in the system. Kindly read carefully. You can contact us (End of Manual) for any further clarifications.
Company Settings → Company Setup → Leave Policy
Leave Settings
Allows creating Leaves More than the available Balance
Note:
if Negative Leave Days is filled in with the following value: 5, an Employee has Leave Balance of 15 days; then the system will allow creating a leave for 20 days as Negative days are filled. And this is Applicable for All types of leaves.
When “Allow Negative Leave Days” is checked and the value is zero, it will allow creating leaves only as per the Leave balance. i.e., it simply means as if this option is not checked when the value is zero.
If the leave balance is zero or minus, the user should add Admin password to allow the negative days.
This applies to both Timesheet and HR Employees.
As default (zero here) it is reading from Payroll settings: Fixed 30 days or Actual month days.
If the user selects any value, the system will ignore reading from the Payroll Settings and reads from here as mentioned below:
If the user selects 360, the system will calculate Leave Salary through the following method:
{(Monthly Salary x 12)/360} x Leave Days
If 365, then as follows:
{(Monthly Salary x 12)/365} x Leave Days
This applies to both Timesheet and HR Employees.
Note:
– The user can change the basis of calculation only if the setup is Actual Month Days.
– If the setup is Fixed 30 days, this option will be disabled.
This is applicable only for Time Sheet Employees and the payment type of leave is Pay Through Salary Sheet; when the user applies it, the system will calculate the leave salaries and add to the additions and deduction form in the Timesheet software and it will be added to the salaries in the “Addition” column. If this option is not selected, no payment of leave will take place in the Salary sheet. This is per company policy.
If this option is checked, Leave Salary is paid separately as Cheque or Cash, and Leave salary will not be added in the salary sheet for Time Sheet Employees.
Note:
If an employee is on leave for 10 days, that 10 days salary will be added in the Additions and Deductions form in the salary sheet if the option ‘Add Leave salary amount in Addition Column of Salary Sheet’ is checked.
If this option is not checked, there will be no payment of leave in the salary sheet. This is per company’s policy.
Allows to Encash the Leave Days Balance for Annual Leave. For example, an Employee has Annual Leave balance of 20 days and he/she doesn’t want to go home. He/she can take Cash for that leave balance. If the Employee takes encashment for 10 Days Leave, then the next time he/she creates a “Leave”, his/her Leave Balance will show as 10 only. There are settings for selection of allowances for Encashment in the advanced setup.
The user can select Encash Leave Items from the list in the advanced setup.
When ‘Encash Leave’ is checked in the leave’s creation activity dialog, the number of leave days will be encashed as per the setup. Leave Days will be deducted from the Leave balance.
Note:
Negative Leave Days will not be Encashed.
This applies to both Timesheet and HR Employees.
If this box is checked, the employee on leave cannot extend or take any leaves until he/she returns from leave.
To create any leave, user must return from the previous leave. This applies to both Timesheet and HR Employees.
Create Loan:
e.g.: An employee goes on 20 days paid leave and he/she comes back after 10 days, days leave back.
He/she must refund the leave salary for 10 days and get the 10
Deduct the leave days only:
e.g.: Employee goes on 20 days leave and he/she comes back after 10 days, so if this option is selected He doesn’t have to refund the money, but his 10 days leaves will be deducted.
Keep the Balance Leave Days:
E.g. Employee goes for 20 days leave and he comes back by 10 (If the company calls him back due to urgent work), if this option is selected He doesn’t have to refund the money and Company will not deduct the leave balance from his leaves.
This applies to both Timesheet and HR Employees.
NOTE:
In all the above cases Employee will get salary.
Date (if the Leave is Extended):
e.g.: An Employee goes on leave for 15 days and he extends leave for 5 days, the system will calculate the Leave Balance from the Leave start date, i.e., 20 days if this option is checked.
If not checked, his leave balance will be calculated from the extended leave. [Clarification]
✓ Calculate the provision for working (Present) Days
✓ Calculate leave provision in all paid days (paid salaries + paid any type of leave)
✓ Calculate provision whole year regardless of availability or not (sick , annual leave , absence , paid or unpaid leave)
Salaries tab:
The user can select the salary items to be included for the standard setup. This is the minimum / standard setup needed to be done to run the system.
The user can set the minimum and maximum salaries to be given for Employees. Also, setting up the Pension to be deducted from both the company and the employee in each salary item can be done as well.
If the user selects the salary item from here, it will be set for the company. Once set, the user cannot change the settings from here and items will be grayed out.
For more settings, the user can go to “Advanced Settings” for each item. If the user doesn’t want to setup from here, he/she can go to Advanced Settings.
The user can set “Pension” for Locals to be deducted from Employee and Company. After completing the setup, it will be updated in the advanced setup. Moreover, the user can change this through advanced setup.
The user can set the minimum and maximum allowed salary for each salary item. After that, it will be updated in the advanced setup.
“Changed from Advanced Setup”: If the user makes changes from advanced setup, this column will display ‘Yes’.
Leaves tab:
Users can select the type of leave wanted for setup, E.g.: Annual leave, Hajj leave. If the items are selected, it will be set for the system. Users can go to Advanced Settings to make changes anytime. However, once set from here, the items will be grayed out and cannot be changed from here anymore.
If the user doesn’t want to setup the system from here, he/she can go to “Advanced Settings”.
Absence & EOS tab:
Users can select the activities required for setup, E.g.: Absence, EOS (Labor law), and Additions & Deductions.
If the activity items are selected, it will be set in the system. Users can go to Advanced Settings to make further changes anytime. Once set from here, the items will be grayed out and cannot be changed from here.
If the user doesn’t want to setup the system from here, he/she can go to “Advanced Settings”.
Note:
In this part, users can setup Basic Salary and Allowances for their company sorted by levels (Department, Position or Grade…etc.). This depends on the items selected in department setup.
Users can select the Basic Salary & Allowances in company settings→ Basic Salary & Allowances.
Basic Salary Setup:

Note:
– Users can define which columns needed to be displayed for the Basic Salary setup using ‘Edit Columns’.
– The settings read from the standard setup. Minimum, Maximum and Pension will be reading from the Default setup. Users can change the settings from here.
Department and Position:
– Here, the user can define Basic Salary to be set for the levels: Department and Position.
– The user can select the option ‘All’ if he/she wants to have the same Basic Salary set up for all.
Nationality:
– The user can select which nationality applies to this basic salary settings.
– If Local is selected, the Basic salary will be applied to Locals.
– The user can set different Basic Salary setup for Locals and Non-Locals.
Fixed:
– Users can define a fixed amount to be given as basic salary for the specified employee.
– If the user set a fixed amount, then he/she cannot enter the columns Minimum and Maximum.
Minimum:
– Users can define the minimum basic salary to be given for the specified employee.
Maximum:
– Users can define the maximum basic salary to be given for the specified employee.
Pension (EMP):
– Users can define the percentage of salary to be deducted from the monthly salary as Pension from the employee.
Pension (COMP):
– Users can define the percentage of salary of the Employee to be deducted from the Company as Pension.
Note:
Users cannot define Pension (EMP) and Pension (COMP) for Non-Locals unless the ‘Include Pension for Non-Locals’ is checked from the Leave & Pension Settings. Allowance Type is fixed for Basic salary setup. It is always “paid” as monthly salary.
Users can set the Basic Salary for Employees from Manage Employees–>Set Salary & Benefits → Create / Adjust Single Salary.
The user can set the amount to be paid as “Basic Salary and Allowances” here. The Salary item displayed here are depending on the setup done in the Default Setup / Advanced Setup.

Note:
– The user can define which columns needed to be displayed for the Accommodation setup using ‘Edit Columns’.
– The settings read from the standard setup. Minimum, Maximum and Pension will be reading from the Default setup if any is set. The user can change settings from here.
Allowance Type:
– The user can select the allowance type to show how the accommodation needs to be paid.
– E.g. If “Benefit Payments” is selected as Allowance type then accommodation is paid as Benefit Payments and Accommodation will be moved under Benefit Payments.
Department and Position:
– Here, the user can define the Accommodation allowance to be set for the levels: Department and Position.
– The user can select ‘All’ if he/she wants to have the same set up for all.
Nationality:
Users can select which nationality applies to this basic salary settings.
– If Local is selected, the Accommodation allowance will be applied to Locals.
Fixed:
– Users can define a fixed amount to be given as Accommodation for the specified employee.
Minimum:
– Users can define the minimum Accommodation to be given for the specified employee.
Maximum:
– Users can define the maximum Accommodation to be given for the specified employee.
Pension (EMP):
Users can define the percentage of salary to be deducted from monthly salary as Pension from the employee.
Pension (COMP):
– Users can define the percentage of salary from Employees to be deducted from the Company as Pension.
Note:
Users cannot define Pension (EMP) and Pension (COMP) for Non-Locals unless the ‘Include Pension for Non-Locals’ is checked from the Leave & Pension Settings.
Notes:
I.e., whenever a new item is created, allowance type will be Basic Salary & Allowances.
All the other allowances (Furniture, Transportation etc.) setup is the same as the above Accommodation setup.
5-1. Leave Setup:
5-1-1. Annual Leave
Users can select the Activities setup in company settings→ HRMS Activities setup→ leave Setup → Annual Leave setup.
When users open the setup for the first time, it will open the below window to select the columns to be displayed for the setup:
By default, the ticked columns are selected, users must “Save Settings & Close” to continue. In case multiple were checked, there will be multiple lines for the column type. I.e., users can have different setup for different lines.
Users can add more Leave types depending on the Company policy from General List. I.e., Lists→General list→Leave Type.
Note:
User can define which columns need to be displayed for the Annual Leave setup using ‘Edit Columns’.
Department and Position:
-Here the user can define Annual Leave to be set for the levels: Department and Position.
-User can select ‘All’ if he/she wants to have the same setup for all.
Minimum work Period:
-This is the Minimum work period the employee needs to finish in the company before creating the leave.
-For example, if the user (Admin) puts 6 months, the system will not allow to create Leave before 6 months.
Mode:
-Users can define the mode as Month/Year/Days.
Transfer to Next year:
% of Salary:
-What percentage of Defined Salary does the user want to pay in Leave salary?
-If the percentage is 100 and the salary is 1000, then the employee will get 1000 as Leave salary. If the percentage is 50 and the salary is 1000, then the employee will get 500 as the Leave salary.
Salary Item:
-Define the Salary Components to be included in the Leave Salary. For example, Basic Salary + Accommodation + Other Allowances or All Allowances as per company policy.
Encash Leave:
-Users can define the salary component to be given for the leave encashment if the employee is not taking the leave.
Month From / Month To:
-Define period of Leave Calculation Days for Employees.
For example, from 0 to 6 means first 6 months of service period, 7 to 12 means after 6 months and 12 to 0 means after a year. “0” here means infinite.
Days Allowed:
-Users can define Maximum days allowed for calculation of Leave in a specified Service period (Specify the period by using Month From / Month To).
-User can set 7-12-month duration, Days allowed as 24; then the maximum allowed leaves between 7-12 months will be 24 Days.
Duration:
-How many times does the user want to give these Allowed Days? Once a year or Monthly.
Mode:
-Users can define whether the allowed days is Monthly/Yearly.
Pay Leave:
-Users can select whether he/she wants to pay the leave or not for the employees.
Exclude Weekly off Days:
-Weekly off days (e.g. Friday) will be excluded from Leave Days. Weekly off Days can be defined from:
File→ Settings→ Company Setup→ Holidays Setup
For example, yearly allowed leaves are 30. If this option is checked, weekly off days are excluded from annual Leave calculation, and the system will not include Fridays in the Leave Period. It means that if an employee is going for a 30 days leave, the leave calculation will be 26 assuming 4 Fridays during its Leave.
Exclude Public Holidays:
-Public Holidays will be excluded from Leave Days. Public Holidays can be defined from:
File→ Settings→ Company Setup→ Holidays Setup
For example, if any Public Holiday comes during the Leave Period, and if this option is checked, it will not be considered in the leave calculation.
Exclude Used Annual Leave Days from Leave Calculation:
– The Leave period will be excluded from Leave Calculation.
For example, if the user selects this option, the system will not calculate (Accrued) Leaves for created Leave period. This means that after one month leave, the employee will have to work for 12 months to get 30 days.
Note:
Set Default button should change the setup to the default settings for annual leaves setup, as below.
Users can create Annual Leave from: Activities Menu→ Leaves→ Create Leave and select Type of Leave as Annual Leave. Users can select the payment type to be Pay through salary sheet if he/she wants the leave salary to be paid as part of the salary sheet. Users can also select Pay Now if he/she wants to pay the leave salary separately. Leave amount is based on the setup in the Annual Leave Setup.
Users cannot create any other leave unless the created leave is processed. I.e., Accept Leave, Leave return.
Note:
Employees.
5-1-2. Haj Leave:
Note:
Users can define which columns need to be displayed for the Haj Leave setup using ‘Edit Columns’.
Department and Position:
-Here, the user can define Emergency Leave to be set for the levels: Department and Position.
-Users can select ‘All’ if he/she wants to have the same setup for all.
Religion:
-Religion should be Muslim to display Haj Leave in leave requests.
Minimum work Period:
– This is the Minimum working period required in the company before creating the leave.
– For example, if the user (Admin) puts 6 months, the system will not allow creating a Leave before 6 months.
Mode:
-Users can define the mode as Month/Year/Days.
Transfer to Next year:
-Transfer to next year means that the Leave Balance will be carried forward to next year and so on.
% of Salary:
– By Default, Transfer to Next Year is No for Haj Leave.
-What percentage of Defined Salary does the user want to pay in Leave Salary
-If percentage is 100 and the salary is 1000, then employee will get 1000 as Leave salary. If percentage is 50 and the salary is 1000, then the employee will get 500 as Leave salary.
Salary Item:
-Define the Salary Components to be included in the Leave Salary. For example, Basic Salary + Accommodation + Other Allowances or All Allowances as per company policy.
Month From / Month To:
-Define period for Leave Calculation Days of Employees.
For example, from 1 to 0 means throughout the service period.
Days Allowed:
-Users can define Maximum days allowed for calculation of Leave in a specified Service period (Specify the period by using Month From / Month To)
-Users can set Days allowed as 21; then, the maximum allowed Emergency leaves will be 21 Days.
Duration:
-How many times does the user want to give these Allowed Days? Once a year or monthly.
Mode:
-Users can define whether the allowed days are in Month/Year.
Pay Leave:
-Users can select whether he/she wants to pay the leave or not for the employees.
Exclude Weekly off Days:
– Weekly off days (e.g. Friday) will be excluded from Leave Days. Weekly off Days can be defined from:
File→ Settings→ Company Setup→ Holiday Setup
For example, yearly allowed leaves are 10. If this option is checked weekly, off days are excluded from Haj Leave calculation, and the system will not include Fridays in the Leave Period. This means that if an employee is going for 10 leave days, and there are 2 weekly off days, the leave calculation will be 8.
Exclude Public Holidays:
-Public Holidays will be excluded from Leave Days. Public Holidays can be defined from:
File→ Settings→ Company Setup→ Set Holidays
For example, if any Public Holiday comes during the Leave Period, and if this option is checked, it will not be considered in the leave calculation.
Deduct Leave Days from Service Period:
-If this option is checked, the Leave period will be deducted from the calculation of Service Period. Users can specify whether it is applicable for Locals or Non-locals.
-The Leave period will be deducted from Service Period which means that this Period will not be used for Accruing Annual Leave and deducted from End of Service
-For example, if this option is checked and an employee has been working for 5 years in the company, and during this period, he took 10 days (which is deducted from service period), his total service Period is as follows:
– (5 x 365) – 10 = 1815 Days.
Note:
Haj Leave is applicable only for Muslims. Users cannot Encash Haj Leave.
5-1-3. Leave without Pay Setup:
Note:
Users can define which columns required to be displayed for the Leave without Pay setup using ‘Edit Columns’.
Department and Position:
-Here, the user can define Leave without Pay to be set for the levels: Department and
Position.
-The user can select option ‘All’ if he/she wants to have the same setup for all.
Minimum work Period:
-This is Minimum working period employees need finish in the company before creating the leave.
-For example, if the user (Admin) puts 6 months, the system will not allow creating Leave before 6 months.
Mode:
-Users can define the mode as Month/Year/Days.
Transfer to Next year:
-Transfer to next year means that the Leave Balance will be carried forward to next year and so on.
– By Default, “Transfer to Next Year” is No for Leave without Pay.
% of Salary:
-What percentage of Defined Salary does the user want to pay in Leave? Percentage of salary will not make any difference for the setup since there is No payment for the leave.
Salary Item:
-Define the Salary Components to be included in the Leave Salary. This will not make any difference here since No payment is required for this leave.
Month From / Month To:
-Define period for Leave Calculation Days for Employees.
For example, from 1 to 0 means throughout the service period.
Days Allowed:
-Users can define Maximum days allowed for calculation of Leave in a specified Service period (Specify the period by using Month From / Month To)
-Users can set “Days allowed” as 60; which therefore means that the maximum allowed “Leave without pay” will be 60 days per year.
Duration:
-How many times the user wants to give these Allowed Days? Once a year or month.
Mode:
-Users can define whether the allowed days is Monthly/Yearly.
Pay Leave:
-The user can select whether he/she wants to pay the leave or not for the employees.
-Pay Leave is “NO” for this setup.
Exclude Weekly off Days:
– Weekly off days (e.g. Friday) will be excluded from Leave Days. Weekly off Days can be defined from:
File→ Settings→ Company Setup→ Set Holidays
For example, yearly allowed leaves are 60. If this option is checked, weekly off days are excluded from “Leave without Pay” calculation, and the system will not include Fridaysin the Leave Period. This means that if an employee is going for 10 days leave, and thereare 2 weekly off days, the leave calculation will be 8.
Exclude Public Holidays:
Public Holidays will be excluded from Leave Days. Public Holidays can be defined from
File→ Settings→ Company Setup→ Set Holidays
For example, if any Public Holiday comes during the Leave Period, and if this option is checked, it will not be considered in leave calculation.
Deduct Leave Days from Service Period:
-If this option is checked, the Leave period will be deducted from the calculation of Service Period. Users can specify whether it is applicable for Locals or Non-locals.
-The Leave period will be deducted from Service Period which means that this Period will not be used for Accruing Annual Leave and deducted from End of Service
-For example, if this option is checked, and an employee has been working for 5 years in the company, and he took 10 days leave during this period (which is deducted from service period), his total service Period is as follows:
– (5 x 365)- 10 = 1815 Days.
Note:
For the Leave Type ‘Leave without Pay’, the user needs to set Pay Leave as NO. Users can create Annual Leave from: Activities Menu→ Leaves→ Create Leave and select Type of Leave as Leave without Pay. The payment type will be disabled because there is no
payment of leave.
5-1-4. Maternity Leave Setup:
Note:
Users can define which columns need to be displayed for the Maternity Leave setup using ‘Edit Columns’.
Department and Position:
-Here, the user can define Maternity Leave to be set for the levels: Department and Position.
-The user can select ‘All’ if he/she wants to have the same setup for all.
Minimum work Period:
-This is the Minimum work period the employee needs to finish in the company before creating the leave.
-For example, if the user (Admin) puts 6 months, the system will not allow creating a Leave before 6 months
Mode:
-Users can define the mode as Month/Year/Days.
Transfer to Next year:
– “Transfer to next year” means that the Leave Balance will be carried forward to next year and so on
– By Default, Transfer to Next Year is “No” for Maternity Leave
% of Salary:
-What percentage of Defined Salary does the user want to pay in Leave Salary?
If percentage is 100 and the salary is 1000, then the employee will get 1000 as Leave salary. If percentage is 50 and the salary is 1000, then the employee will get 500 as Leave salary.
Salary Item:
-Define the Salary Components to be included in the Leave Salary. For example, Basic Salary + Accommodation + Other Allowances or All Allowances as per company policy.
Month From / Month To:
-Define period for Leave Calculation Days for Employees.
For example, from 1 to 0 means throughout the service period.
Days Allowed:
-Users can define Maximum days allowed for calculation of Leave in a specified Service period (Specify the period by using Month From / Month To)
-e.g. Users can set Days allowed as 45. Therefore, the maximum allowed Maternity leaves will be 45 Days.
Duration:
-How many times does the user want to give these Allowed Days? Once a year or monthly.
Mode:
-Users can define whether the allowed days are Monthly/Yearly.
Pay Leave:
-The user can select whether he/she wants to pay the leave or not for the employee.
Exclude Weekly off Days:
– Weekly off days (e.g. Friday) will be excluded from Leave Days. Weekly off Days can be defined from:
File→ Settings→ Company Setup→ Set Holidays
For example, yearly allowed leaves are 10. If this option is checked, weekly off days are excluded from Maternity Leave calculation, and the system will not include Fridays in the Leave Period. This means that if an employee is going for 10 leave days, and there are 2 weekly off days, the leave calculation will be 8.
Exclude Public Holidays:
– Public Holidays will be excluded from Leave Days. Public Holidays can be defined from:
File–> Settings–> Company Setup–> Set Holidays
For example, if any Public Holiday comes during the Leave Period, and if this option is checked, it will not be considered in the leave calculation.
Deduct Leave Days from Service Period:
-If this option is checked, the Leave period will be deducted from the calculation of Service Period. Users can specify whether it is applicable for Locals or Non-locals.
-The Leave period will be deducted from Service Period which means that this Period will not be used for Accruing Annual Leave and Deducted from End of Service
-For example, if this option is checked, and an employee has been working for 5 years in the company, and he took 10 leave days during this period (which is deducted from service period), his total service Period is as follows;
– (5 x 365)- 10 = 1815 Days.
Note:
Sex must be Female and Marital Status must be married for Maternity Leave. Users cannot Encash Maternity Leave.
5-1-5. Paternity Leave:
Same as the Maternity Leave, but the difference is that paternity must be for Married Male ONLY.
5-1-6. Sick Leave – Full Pay:
Note:
Users can define which columns need to be displayed for the Sick Leave setup using ‘Edit Columns’.
Department and Position:
Here, the user can define Sick Leave to be set for the levels: Department and Position.
-The user can select ‘All’ if he/she wants to have the same setup for all.
Minimum work Period:
-This is Minimum work period the employee needs finish in the company before creating the leave.
-For example, if the user (Admin) puts 6 months, the system will not allow creating Leave before 6months
Mode:
-Users can define the mode as Month/Year/Days.
Transfer to Next year:
– “Transfer to next year” means the Leave Balance will be carried forward to next year and so on.
– By Default, Transfer to Next Year is “No” for Sick Leave
% of Salary:
-What percentage of Defined Salary does the user want to pay in Leave Salary?
-If percentage is 100 and the salary is 1000, then the employee will get 1000 as Leave salary. If percentage is 50 and the salary is 1000, then the employee will get 500 as Leave salary.
Salary Item:
-Define the Salary Components to be included in the Leave Salary. For example, Basic Salary + Accommodation + Other Allowances or All Allowances as per company policy.
Month From / Month To:
-Define period for Leave Calculation Days for Employees.
For example, from 1 to 0 means throughout the service period.
Days Allowed:
Users can define Maximum days allowed for calculation of Leave in a specified Service period (Specify the period by using Month From / Month To).
-Users can set Days allowed as 21. Therefore, the maximum allowed Maternity leaves will be 21 Days.
Duration:
-How many times does the user want to give these Allowed Days? Once a year or monthly.
Mode:
-Users can define whether the allowed days in Month/Year.
Pay Leave:
-Users can select whether he/she wants to pay the leave or not for the employees.
Exclude Weekly off Days:
– Weekly off days (e.g. Friday) will be excluded from Leave Days. Weekly off Days can be defined from:
File→ Settings→ Company Setup→ Holiday Setup
For example, yearly allowed leaves are 10. If this option is checked, weekly off days are excluded from Sick Leave calculation, and the system will not include Fridays in the Leave Period. This means that if an employee is going for 10 leave days, and there are 2 weekly off days, the leave calculation will be 8.
Exclude Public Holidays:
-Public Holidays will be excluded from Leave Days. Public Holidays can be defined from:
File→ Settings→ Company Setup→ Set Holidays
For example, if any Public Holiday comes during the Leave Period, and if this option is checked, it will not be considered in the leave calculation.
Deduct Leave Days from Service Period:
-If this option is checked, the Leave period will be deducted from the calculation of the Service Period. Users can specify whether it is applicable for Locals or Non-locals.
-The Leave period will be deducted from Service Period which means that this Period will not be used for Accruing Annual Leave and deducted from End of Service For example, if this option is checked, and an employee has been working for 5 years in the company, and he/she he took 10 days (which is deducted from service period), the total service Period is as follows;
– (5 x 365)- 10 = 1815 Days.
5-1-7. Sick Leave – half Pay:
Note:
Users can define which columns need to be displayed for the Sick Leave-Half Pay setup using ‘Edit Columns’.
Department and Position:
-Here, the user can define Sick Leave-Half Pay to be set for the levels: Department and Position.
-The user can select ‘All’ if he/she wants to have the same setup for all.
Minimum work Period:
-This is Minimum work period the employee needs to finish in the company before creating the leave.
-For example, if the user (Admin) puts 6 months, the system will not allow creating Leave before 6 months
Mode:
-User can define the mode as Month/Year/Days.
Transfer to Next Year:
“Transfer to next year” means the Leave Balance will be carried forward to next year and so on.
– By Default, Transfer to Next Year is “No” for Sick Leave-Half Pay
% of Salary:
-What percentage of Defined Salary does the user want to pay in Leave Salary?
-Users must specify the percentage to be 50 since the setup is Sick Leave-Half Pay.
Salary Item:
-Define the Salary Components to be included in the Leave Salary. For example, Basic
Salary + Accommodation + Other Allowances or All Allowances as per company policy.
Month From / Month To:
-Define period for Leave Calculation Days for Employees.
For example, from 1 to 0 means throughout the service period.
If the user sets 1 to 12, the user will be allowed to create this leave only for the first year (1 to 12 months).
Days Allowed:
-Users can define the Maximum days allowed for Leave calculation in a specified Service period (Specify the period by using Month From / Month To)
-Users can set Days allowed as 21. Therefore, the maximum allowed Maternity leaves will be 21 Days.
Duration:
-How many times does the user want to give these Allowed Days? Once a year or monthly.
Mode:
-Users can define whether the allowed days are Monthly/Yearly.
Pay Leave:
-The user can select whether he/she wants to pay the leave or not for the employee.
Exclude Weekly off Days:
Weekly off days (e.g. Friday) will be excluded from Leave Days. Weekly off Days can be defined from, File→ Settings→ Company Setup→ Holiday Setup.
For example, yearly allowed leaves are 10. If this option is checked, weekly off days are excluded from Sick Leave-Half Pay Leave calculation, and the system will not include Fridays in the Leave Period. This means that if an employee is going for 10 leave days, and there are 2 weekly off days, the leave calculation will be 8.
Exclude Public Holidays:
-Public Holidays will be excluded from Leave Days. Public Holidays can be defined from
File→ Settings→ Company Setup→ Holiday Setup.
For example, if any Public Holiday comes during the Leave Period, and if this option is checked, it will not be considered in the leave calculation.
Deduct Leave Days from Service Period:
-If this option is checked, the Leave period will be deducted from the calculation of Service Period. User can specify whether it is applicable for Locals or Non-locals.
-The Leave period will be deducted from Service Period which means that this Period will not be used for Accruing Annual Leave and deducted from End of Service
-For example, if this option is checked, and an employee has been working for 5 years in the company, and he took 10 days leave in this period (which is deducted from service period), his total service Period is as follows;
(5 x 365)- 10 = 1815 Days.
Note:
Users can create Annual Leave from: Activities Menu→ Leaves→ Create Leave and select Type of Leave as Sick Leave-Half Pay. The ser can select the payment type to be Pay through salary sheet if he/she wants the leave salary to be paid as part of the salary sheet and Pay now if he/she wants to pay the leave salary separately. Leave amount is based on the setup in “Annual Leave Setup”. Salary Amount will be “half pay” as per the setup.
5-1-8. Sick Leave – No Pay:
Note:
Users can define which columns are needed to be displayed for the Sick Leave-No Pay setup using ‘Edit Columns’.
Department and Position:
Here, the user can define Sick Leave-No Pay to be set for the levels: Department and Position.
-The user can select ‘All’ if he/she wants to have the same setup for all.
Minimum work Period:
-This is the Minimum work period for employees to work in the company before creating the leave.
-For example, if the user (Admin) puts 6 months, the system will not allow creating a Leave before 6 months
Mode:
-Users can define the mode as Month/Year/Days.
Transfer to Next year:
– “Transfer to next year” means the Leave Balance will be carried forward to next year and so on.
– By Default, “Transfer to Next Year” is “No” for Sick Leave-No Pay
% of Salary:
-What percentage of the “Defined Salary” does the user want to pay in Leave?
-Percentage of salary is zero for the setup since there is No pay for this type of leave
Salary Item:
-Define the Salary Components to be included in the Leave Salary. This will not make any difference here since there’s “No payment” required for this type of leave.
Month From / Month To:
-Define a period regarding “Leave Calculation Days” for Employees. For example, from 1 to 0 means throughout the service period. Days Allowed:
-Users can define the Maximum days allowed for the calculation of Leave in a
specified Service period (Specify the period by using Month From / Month To)
– Users can set Days allowed as 2. Therefore, the maximum allowed “Sick Leave No pay” will be 2 days per month.
Duration:
How many times does the user want to give these Allowed Days? Once a year or monthly.
Mode:
-Users can define whether the allowed days are Monthly/Yearly.
Pay Leave:
-The user can select whether he/she wants to pay the leave or not for employees.
-Pay Leave is “No” for this setup.
Exclude Weekly off Days:
– Weekly off days (e.g. Friday) will be excluded from Leave Days. Weekly off Days can be defined from:
File→ Settings→ Company Setup→ Set Holidays
For example, yearly allowed leaves are 10. If this option is checked weekly, off days are excluded from Sick Leave-No Pay Leave calculation, and the system will not include Fridays in the Leave Period. This means that when an employee is going for 10 leave days, and there are 2 weekly off days, the leave calculation will be 8.
Exclude Public Holidays:
-Public Holidays will be excluded from Leave Days. Public Holidays can be defined from:
File→ Settings→ Company Setup→ Set Holidays
For example, if any Public Holiday comes during the Leave Period, and if this option is checked, it will not be considered in the leave calculation.
Deduct Leave Days from Service Period:
– If this option is checked, the Leave period will be deducted from the calculation of Service Period. Users can specify whether it is applicable for Locals or Non- locals.
– The Leave period will be deducted from Service Period which means that this Period will not be used for Accruing Annual Leave and deducted from End of Service
– For example, if this option is checked and an employee has been working for 5 years in the company and he took 10 leave days during this period (which is deducted from service period), his total service Period is the following:
(5 x 365)- 10 = 1815 Days.
Note:
For Leave Type ‘Sick Leave-No Pay’, the user needs to set Pay Leave as “No”.
Users can create Annual Leave from: Activities Menu→ Leaves→ Create Leave and select Type of Leave as Sick Leave-No Pay. There will be no payment for this leave as per
Note:
The system allows creating more typical type of leaves. Setup for these other leaves can be defined as per company Policy.
5-1-9. Emergency Leave:
Note:
Users can define which columns needed to be displayed for the Emergency Leave setup using ‘Edit Columns’.
Department and Position:
-Here, the user can define Emergency Leave to be set for the levels: Department and Position.
-The user can select ‘All’ if he/she wants to have the same setup for all.
Minimum work Period:
-This is the Minimum work period employees needed in the company before creating the leave.
– For example, if the user (Admin) puts 6 months, the system will not allow creating a Leave before 6 months
Mode:
-Users can define the mode as Month/Year/Days.
Transfer to Next year:
– “Transfer to next year” means that the Leave Balance will be carried forward to next year and so on.
-Transfer to Next Year is No, by default.
% of Salary:
-What percentage of Defined Salary does the user want to pay in Leave Salary?
-If the percentage is 100 and the salary is 1000, then the employee will get 1000 as
Leave salary. If the percentage is 50 and the salary is 1000, then the employee will get 500 as Leave salary.
Salary Item:
-Define the Salary Components to be included in the Leave Salary. For example, Basic Salary + Accommodation + Other Allowances or All Allowances as per company policy.
Month From / Month To:
-Define the period for Leave Calculation Days for Employees. For example, from 1 to 0 means throughout the service period.
Days Allowed:
-Users can define the Maximum days allowed for leave calculation in a specified Service period (Specify the period by using Month From / Month To)
-Users can set “Days” allowed as 10; then the maximum allowed Emergency leaves will be 10 Days.
Duration:
-How many times does the user want to give these Allowed Days? Once a year or monthly.
Mode:
-The user can define whether the allowed days are Monthly/Yearly.
Pay Leave:
-The user can select whether he/she wants to pay the leave or not for employees.
Exclude Weekly off Days:
– Weekly off days (e.g. Friday) will be excluded from Leave Days. Weekly off Days can be defined from:
File→ Settings→ Company Setup→ Holiday Setup
For example, yearly allowed leaves are 10. If this option is checked, weekly off days are excluded from Emergency Leave calculation, and the system will not include Fridays in the Leave Period. This means that if an employee is going for 10 leave days, and there are 2 weekly off Days, the leave calculation will be 8.
Exclude Public Holidays:
-Public Holidays will be excluded from Leave Days. Public Holidays can be defined from: File–> Settings–> Company Setup–> Set Holidays
For example, if any Public Holiday comes during the Leave Period, and if this option is checked, it will not be considered in the leave calculation.
Deduct Leave Days from Service Period:
-If this option is checked, the Leave period will be deducted from the calculation of Service Period. The user can specify whether it is applicable for Locals or Non-locals. The Leave period will be deducted from Service Period which means that this Period will not be used for Accruing Annual Leave and deducted from End of Service.
-For example, if this option is checked, and an employee has been working for 5 years in the company and he took 10 leave days throughout this period (which is deducted from service period), his total service Period is the following:
– (5 x 365)-10 = 1815 Days.
Note:
Users cannot Encash Emergency Leave.
Note:
User can define which columns are required to be displayed for the Absence setup using ‘Edit Columns’.
Department and Position:
-Here, the user can define Absence to be set for levels: Department and Position.
-The user can select ‘All’ if he/she wants to have the same setup for all.
Excuse:
-The user can select Yes/No to set whether he/she has an excuse for the absence or not.
Max. Allowed:
-Users can set the maximum allowed days for absence during the month/Year.
Days/Hours:
-Users can select either Days/Hours for the absence.
Month/Years:
-Users can select Month/Years for the specified number of absence to be allowed in a Month or Year.
Deduction Rate:
-It is a number in which the absence days are deducted. If the rate is 2 and absent days are 2, then 2 X 2 = 4 days will be deducted as absence. If the rate is 0, then there’s no deduction.
No. of days to Deduct:
-It is the number of absence deducted from absence days. E.g. If the No. is set as 2, and employee is absent for 5 days, the deduction of days will only be 2.
Deduction from Service Period:
-User can select Yes/No to set whether the absence to be deducted from Service period or not.
-If selected as yes, the absence days will be deducted from the service period.
Deduction from Salary Sheet:
-Users can select Yes/No to set whether to deduct the absence from Salary/Leave.
-If selected yes, the absence will be deducted from Salary/Leave.
Deduct From:
-Users can specify the absence to be deducted from Leave/Salary.
-If Salary is selected, the absence will be deducted from Salary.
-If Leave is selected, the absence will be deducted from Leaves.
Deduct Item:
-Users can select the items from which the absence is deducted.
-If the deduct from is ‘Salary’, then “Deduct item” will list all the salary items, i.e. Basic, accommodation etc.
-If the deduct from is ‘Leave’ then “Deduct item” will list all the Leave items, i.e. Annual Leave, Emergency, Hajj leave etc.
Note:
If the absence setup is “With Excuse” and Deduction is ‘Deduct from Leave’, then Deduct from Leave’ will not deduct leave balance for the absence.
If the setup is with Excuse and Deduction is ‘Deduct from Salary’, then no amount will be deducted from the Salary.
If “Update Days Ledger” is selected with excuse, only leave ledger days will be updated with no deduction in any amount.
There will be an actual deduction if there’s no excuse for any of the deduction types.
“Deduct from Salary” will deduct the required amount from the Salary Sheet, “Deduct from Leave” will deduct from the Annual leave balance days for the employee, and “Update Absence Days Ledger” will update the absence ledger in the report and deduct from absence days.
The window displayed above enables users to setup the “Loan process” in Hinawi Software according to their company policy. Permitting certain actions and having certain restrictions provides more flexibility and assures accurate results.
The above image displays the window used to create loans.
This includes the reason of creating this loan, the amount required for the loan, the starting month and year of the loan, the number of installments needed, and of course the installment amount which reads from the loan amount combined with the number of installments chosen.
E.g.: If there is an Addition for the Employee like a Bonus, and Pay On is 1 Month, it will add 1-month salary in the Addition column.
If there’s a deduction for the Employee like Fine, and Pay On is 15 Days, it will deduct 15 days salary and will be shown in the Deduction column in the salary sheet.
Note:
If there is no setup for Addition, and the user creates an addition with Pay on 1 month, there will be no value (Zero) in the addition column since there is no setup. This is as per company policy.
If there is no setup for Deduction, and the user creates a deduction with Pay on 1 month, there will be no deduction since the value to be deducted will be zero. This is as per company policy.
Loan Deduction
Maintenance Allowance
Other Allowance
Transportation
Please see the below explanations:
Loan Deduction:
Maintenance Allowance:
Other Allowance:
Transportation:
![]()
More Items can be added under Basic Salary & Allowances as well.
Benefit Payment Setup
User can set Advanced Benefit Payment settings from here.
Note:
-Users can define which columns required to be displayed for the Benefit Payments setup using ‘Edit Columns’.
-The settings read from the standard setup. Minimum, Maximum and Pension will be reading from Default setup. Users can change the settings from here.
Allowance Type:
-It will list the types of allowance: Benefit Payment.
Department and Position:
-Here, the user can define two levels: Department and Position. Setup needs to be done on the settings.
-Users can select ‘All’ if they want to have the same setup to apply for all.
Nationality:
-Users can select what nationalities apply to this benefit payment settings.
Fixed Amount:
-Users can define a fixed amount to be given as benefit payment for the specified employees.
Minimum Amount:
-Users can define the minimum amount to be given as benefit payment for the specified employee.
Maximum Amount:
-Users can define the maximum amount to be given as benefit payment for the specified employee.
Pension (EMP):
Employee.
Pension (COMP):
-Users can define the amount to be deducted as pension from the
-Users can define the amount to be deducted as pension from the Company.
Note:
Users cannot define Pension (EMP) and Pension (COMP) for Non-Locals unless the ‘Include Pension for Non-Locals’ is checked from the Leave & Pension Settings.
Users can set the Benefit Payments for Employees from Manage Employees→Set Salary & Benefits→Create/Adjust Single Salary→Benefit Payments Tab.
Note:
Benefit Payment is not paid through salary sheet. Users need to create benefit from HR Activities where they can pay to the Employee by cheque or cash. This will not affect the salary sheet.
-Users can define which columns must be displayed for the Benefit Payments setup using ‘Edit Columns’.
-The settings read from the standard setup. Minimum, Maximum, and Pension will be reading from the Default setup. Users can change the settings from here.
Allowance Type:
-It will list the type of allowance: Benefit Payment.
Department and Position:
-Here, the user can define two levels: Department and Position. The setting needs to be setup.
-Users can select the option ‘All’ if they want the same set up for all.
Nationality:
-Users can select what nationalities apply to this benefit payment settings.
Fixed Amount:
-Users can define a fixed amount as benefit payment for the specified employees.
Minimum Amount:
-Users can define the minimum amount for benefit payment for the specified employees.
Maximum Amount:
-Users can define the maximum amount to be given as benefit payment for the specified employees.
Pension (EMP):
Users can define the amount to be deducted as pension from the Employee.
Pension (COMP):
-Users can define the amount to be deducted as pension from the Company.
Note:
Users cannot define Pension (EMP) and Pension (COMP) for Non-Locals unless the ‘Include Pension for Non-Locals’ is checked from the Leave & Pension Settings.
Users can set the Benefit Payments for Employees from Manage Employees→Set Salary & Benefits→Create/Adjust Single Salary→Benefit Payments Tab.
Benefit Provided Setup
User can set Advanced Benefit Provided settings from here.
Note:
-Users can define which columns need to be displayed for the Benefit provided setup using ‘Edit Columns’.
-The settings read from the standard setup. Minimum, Maximum and Pension will be reading from Default setup if set any. Users can change the settings from here.
Allowance Type:
It will list the type of allowance: Benefit Provided.
Department and Position:
-Here, the user can define two levels: Department and Position. Setting needs to be setup.
-The user can select ‘All’ if he/she wants to have the same set up for all.
Nationality:
-Users can select to which nationality to apply this benefit provided settings.
Fixed Amount:
-Users can define a fixed amount as a benefit provided for the specified employees.
Minimum Amount:
-Users can define the minimum amount to be given as a benefit provided for the specified employees.
Maximum Amount:
-Users can define the maximum amount to be given as a benefit provided for the specified employees.
Pension (EMP):
-Users can define the amount to be deducted as pension from the Employees.
Pension (COMP):
-Users can define the amount to be deducted as a pension from the Company.
Note:
Users cannot define Pension (EMP) and Pension (COMP) for Non-Local sunless the ‘Include Pension for Non-Locals’ is checked from the Leave & Pension Settings.
Users can set the Benefit Provided for Employees from Manage Employees→Set Salary & Benefit→ Create / Adjust Single Salary → Benefit Provided Tab.
Note:
-Users can define which columns need to be displayed for the Benefit provided setup using ‘Edit Columns’.
-The settings read from the standard setup. Minimum, Maximum and Pension will be reading from Default setup if set any. Users can change settings from here.
Allowance Type:
-It will list the type of allowance: Benefit Provided.
Department and Position:
-Here, the user can define two levels: Department and Position. The settings need to be setup.
-User can select ‘All’ if he/she wants to have the same setup for all.
Nationality:
-Users can select to what nationalities apply to this benefit provided settings.
Fixed Amount:
-Users can define a fixed amount to be given as benefit provided for the specified employees.
Minimum Amount:
-Users can define the minimum amount to be given as benefit provided for the specified employees.
Maximum Amount:
-Users can define the maximum amount to be given as benefit provided for the specified employees.
Pension (EMP):
Users can define the amount to be deducted as pension from Employees.
Pension (COMP):
-Users can define the amount to be deducted as pension from the Company.
Note:
Users cannot define Pension (EMP) and Pension (COMP) for Non-Locals unless the ‘Include Pension for Non-Locals’ is checked from the Leave & Pension Settings.
Users can set the Benefit Provided for Employees from Manage Employees→Set Salary & Benefits→Create/Adjust Single Salary→Benefit Provided Tab.
Company Settings–> Company set up–>Timesheet Setup
Time sheet is based on Actual month days. There is no fixed 30 days for time sheet. Time Sheet has three types: Detailed Timesheet, Summary Timesheet and Monthly Timesheet.
The following are steps to Setup Time sheet:
i. Time Sheet Setup
ii.Unit list
iii.Shift and Holiday setup
i Timesheet and OT Setup v. Sample Calculation
Important Note:
After completing the setup of Time Sheet, it’s strongly recommended for the user to do the following:
Assign Employees to Time Sheet Assign Employees to Project Assign Employees to Shift Assign Employees to Supervisor (This is for Web application user) Do this from Timesheet main menu.
6–1. Timesheet Setup
There are three Types of Time Sheet, Detailed, Summary and Monthly.
-In Time Sheet Detailed, Entries are made on Daily Basis (By Date)
-Presence hours are prefilled as fully Present (Based on Auto fill setup or manually fill)
-Each Day should be filled including the Absence Hours (if any).
-Shift setup can be in Hours or Days.
-Users can select the option; Use Time Reader Machine’ if they have any.
– In Time Sheet Summary, Entries can be made on Monthly basis
If the option “Deduct Holidays” when the Labor is absent, the system will deduct the salary of holidays and off days based on the percentage of absence from the whole month
If shift is setup in hours, then monthly present Hours
If shift is setup in days, then number of days present
Basis of Calculation of Absence(Hours) and Basis of Calculation of Absence(Days): If the user fills the Basis of Calculation of Absence; the system will calculate the absence hours separately based on the Basis that the user filled and Subtracted from the total Monthly salary. If the user keeps this blank, the system will calculate present hours only.
E.g.: (Month is January: 31 Days (248 Hours)). Monthly salary of the employee is 3000, Employee is absent for 5 days (40 hours)
If not filled: The system will calculate by taking the present Hours only (248-40=208) Salary=3000*208/248=2516.12
If filled as 240 hours basis: The system will calculate absent days first and deduct from the total monthly salary
Absence=3000*40/240=500
Salary=3000-500=2500
In Time Sheet (Monthly basis), only the present days are available.
Overtime Hours per Day (Normal): The maximum hours an employee can work overtime in normal days.
Overtime Hours per Day (Holidays): The maximum hours an employee can work overtime in Holidays.
Maximum number of days Labor can work: Users can set the maximum number of holidays he/she can work.
Note:
1. Most users use detail Timesheet
2. This Timesheet can be used by both; Labors and Employee
3. Users cannot switch (change) between 3 tabs in the same month. However, the user can do this in the next month after creating and approving the salary sheet of the previous month and when there are no leaves effective on the next month.
Note:
When the status is selected as Leave, Holiday (which cannot be set as status from here), a message saying ‘It is automatically from activities, can’t be selected from Time Sheet’ will pop up.
In the above example, when the user changes ‘From Time/To Time’ of morning (1st)
shift, the hours will be added to Units and the salary will be for total no. of units (248 +3= 251 hours here). When the user changes the “To Time” of evening (2nd) shift, it will be added as overtime and paid as OT amount.
Notes:
1. The Status ‘Leave’ is from the HR activit For Timesheet Employees, Leaves can be created from HR activities.
2. The Status ‘Absence’ is set from her When Absence is selected, “calculate” will be set to ‘No’ by default.
3. Users can set Calculate = ’Yes’ for Absence, then, absence day will be paid as any other Working d I.e., that day will be calculated for monthly salary calculation.
4. Users cannot create absence from HR Activit
5. When absence creation dialog is opened from HR activities, it will list only the HR Employee
6. Users can select “absent” as a status from Timesheet.
7. While creating Leave (from activities), users cannot have the “Payment Type” to be ‘Pay Now’ for Timesheet Employees.
Each Time Sheet can be linked to Projects.
Time Sheet can be changed from Detailed to Summary and Summary to Detailed
Deduct Absent days from the service period for Timesheet Employees:
If this option is checked, the absence days will not be included in the service period for Timesheet Employees.
Note:
When leave is created, it affects Timesheet. The status will be changed by default to “Leave” in the Timesheet as per the created leave date.
6-2. Unit List:
It shows the available units and notes:
Hours: Applicable to Timesheet Summary and Detailed
Days: Applicable to Timesheet Summary, Detailed and Monthly.
Create Shift Tab:
6–3. Shift & Holiday Setup
Setting up of Shifts To setup shifts, go to File → Settings → Time Sheet → Shift & Holiday Setup
– Shifts can be created based on Business Activity
– In Create Shifts, define Shift code (e.g. Morning / Evening, Day / Night etc.)
– Select what is the type of Shift from a Dropdown Menu (e.g. Day / Hours). Users must specify the shift timings when Unit Type is Hours.
When Shift is of Unit Type ‘Hours’, users can split the time, i.e., Split the shift into two as below: Morning and Afternoon. In this case, timesheet will have 2 entries for each case.
When Shifts of Unit Type is ‘Days’, timing will not be shown in the timesheet. And default hours will be taken for calculation.
– No. of Shifts means, if there is a break in the Working hours, the user can setup 2 shifts e.g.: 8-1 and 4-8 (Only applicable if Type is Hours)
– Units mean: How many Hours in a shift (Only applicable if shift Type is Hours)
– More Shifts can be created based on the Company setup.
– The maximum number of shifts will always be one if the shift setup is by day
Note:
– In case there is no setup of the shift, the system will read working hours from the box at the bottom of this tab.
1. With this facility, it helps the user to use this setup in all type of busin
2. The Timesheet will be filled automatically based on this shift setup. Therefore, at the time of filling Timesheet for labors, the number of hours will be displayed automatic
3. Users can assign the Employees to more than one shift (HOURS shift and DAYS shift) for Different period.
4. Users cannot assign the Employees to more than one shift (HOURS shift and DAYS shift) for the SAME period.
5. Users can have two Hourly shifts in one month.
Set Shift Tab:
– Here, users can select the “Start Day” of the week.
– Check the Day to make it “Day off”.
– Allow to Change Holiday.
1. It is applicable only for Summary Time Sheet
2. If this option is Activated, Holiday Hours can be modified manually in Summary Time Sheet. For example, in a month, there are 4 Fridays so 32 hours are Holiday Hou We can change 32 to 24 or 40 whatever as off hours.
– Include Holiday Units in the Total Month Units there is No Absence.
Checking and unchecking this box will not affect the salary sheet if
If Box is selected, salary calculation will be as below:
Monthly Salary ={Current Monthly Salary X No. of Hours worked}
31 * 8
If Box is NOT selected, salary calculation will be as below:
Monthly Salary =
{Current Monthly Salary X No. of Hours worked}
27 * 8
Note:
Salary will be the same if there is NO Absence. For Example,
Month is January, No. of hours per day is 8 hours, 4 holidays (Friday) Employee salary is AED 3000. He was absent for 1 day in the month. The calculation in both cases will be as follows:
– If ticked, total No. of Hours worked= 248– 8 = 240 Hours
{3000*240} = 2903
31 * 8
– If not ticked, Holiday hours will be excluded: No. of Hours worked= 216 – 8 = 208 Hours
{3000*208} = 2889
27 * 8
Set Holidays Tab:
– This Tab is reads Holidays from Company Settings and more Holidays can be added in Set Holidays. I.e., Company Setup→ Holliday Settings→Public Holidays Tab
In this window, users can assign the holidays to shift, this means if the box is checked, the company will pay the holiday days to labors under this shift.
-Note that the number of shifts displayed in this window is based on the number of shifts setup reading from Tab 1.
– The company can define paid holidays to some or all shifts.
-The company can define which types of holidays can be paid or not. E.g. fixed holidays can be paid or not.
Summary Tab:
– Summary shows the Setup for Each Shift and the Calculations for the Shift Hours.
– Show the total working units per week and month.
6-4. Timesheet & OT Time:
Over Time (OT) is one of the main features which provides the ability to customize the user (Admin) requirements and needs as per the company and country policy.
Shift:
Select Shift code from Dropdown
Max OT:
Put here the Maximum Overtime allowed for that Shift per Day.
OT:
Check this option to enable Over Time Calculation. Uncheck this box will not allow the user to enter settings for Overtime calculation (It will be disabled) from here and In Timesheet there will be no calculation for OT.
Basis:
Here, users can put the Basis for Over Time calculation. Over time calculation will be divided by the Value entered. If No value is entered, the system will use Actual Month Hours as basis.
For Example, an Employee monthly salary is AED 3,000. OT rate is 1.25 hours and he worked for 20 hours as OT. Calculations will be the following:
Day:
Here, the user can define Multiple Days for OT rates. For example, Normal Days, Holidays and / or Other Days (Festivals / National Day etc.)
Rate:
Define over Time Rate as per Day types defined. For Example, normal day rate could be1.25, Holidays could be 1.5 and festival days could be 2 and so on as per company policy.
Normal Days:
Total working Hours in a Day is 8 hours and If an employee works for 10 hours, extra 2 hours will be paid as overtime as per the rate (1.25) specified.
Off Days (Fridays):
If an employee works on Friday which is a paid day and the company wants to consider this day as 2 days, meaning that the Company wants to pay 16 hours, we will convert the one day (8 Hours) into OT hours like this: 4 Hours OT with Rate2 so total is: 8 hours will be paid along with the normal paid Friday.
Holidays:
Same as off days.
Hours:
Here, define the maximum hours for a defined rate. For example, in Normal days, if the user puts 4 here, he/she can work maximum 4 hours at the rate 1.25.
Autofill:
Select Yes / No from Auto fill. This helps in automatically filling the over time. For example, standard shift time is 8 hours. In the Time Sheet, the time is filled for employee from 9am to 8pm. The system will automatically fill OT 3 hours if Auto fill is “Yes” is selected, otherwise fill Over time Manually.
Calculate OT:
Fill yes if calculation for OT is required. If calculate is “No”, then the employee will be able to enter OT in Timesheet, but the system will not calculate the overtime and it will not be paid in the salary sheet. This is as per Company Policy.
Salary item:
Select which Salary item user want to pay over time. Normally over time is paid on Basic Salary, but the user can add different salary items for OT calculation.
–Allow to change Over Time Manually
By selecting this option, user can change the OT manually in the Time Sheet. If not selected, user cannot change OT manually. User must change the Shift time in Time Sheet.
For e.g.: If this option is checked, then employee can enter OT under different rates. If not checked, user must change the To Time, which will update the OT for corresponding rate.
-Automatically adjust time
By selecting this option, once the user changes OT in Time Sheet, the system will automatically update the Shift time. If not selected, the user must adjust time manually.
Note:
HR Employees are not applicable for Overtime Setup
6-5. Sample Calculation:
It gives Information in General: Calculations for normal hourly rate and normal daily rates, Overtime rate for normal and Holidays.
E.g.:
If the requirement of the company to calculate overtime is as below: Regular days:
Rate per hour X Number of Overtime hours X 1.25
After 21:00 (after 9 PM)
Rate per hour X Number of Overtime hours X 1.50
Official holidays (If compensated with other days) Rate per hour X Number of Overtime hours X 1.50
Fridays Days Off (If compensated with other days)
Rate per hour X Number of Overtime hours X 1.50
Official holidays (If not compensated with other days) Rate per hour X Number of Overtime hours X 2.50
Then he can do the OT Setup as below
The user can put OT in the rate 1.25 on regular days till 21:00 and after that in rate 1.50. OT on Holidays (Friday) if compensated with other days, he/she can put in rate 1.50. OT on official days if compensated with other days, he/she can put on rate 1.5 and if not compensated with other days, he/she can put on rate 2.50. Therefore, the user can do accordingly as per their requirement.
Time Sheet main menu:
To assign Employees to Time Sheet, go to:
Time Sheet Menu → Assign Employees to Time Sheet, then click view. Here, the system will show either to Generate Salary sheet from HR or Time Sheet. Select the Employees under Time Sheet for salary through Time sheet.
Users can change the Employee from HR to Time Sheet or vice versa, prior to Salary sheet created. It is changing since last salary sheet created.
To assign Employees to Projects, go to
Time Sheet Menu → Assign Employees to Project, then click on search and filter
Employees to assign to Projects. To add projects, go to manage employee’s main menu → Location/project list.
iii.Assign Employee to Shift
To Assign Employee to Shift, go to
Time Sheet → Assign Employee to Shift, then select Dates from / to and then filter Employees and select the relevant shift.
To create time Sheet, go to
Time Sheet → Create Time Sheet, then select the Dates and filter Employees and fill in Time Sheet and Over Times based on Setup.
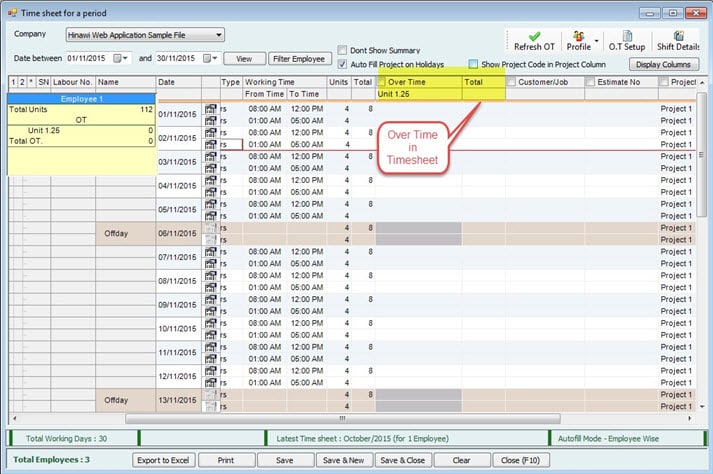
After it is done, save Time Sheet and go to Payroll for Salary Sheet.
Note:
If there is more than 1 shift for a month, users must assign the different shifts before creating Timesheet.
E.g. Ramadan Timing for a company is 6 Hours (8 AM to 2 PM), if it started on June 29, and the user wants the timesheet entry to have 6 hours, then
-Create 1 new shift ‘RAMADAN’ from Create Shifts Tab

– Assign employees to shift for Ramadan month (June 29th to July 27th)
– i.e. Assign Employee to shift as below:
Image 1:

Image 2:

Now while creating the Timesheet for June, last 2 entries will be for 6 hours as below.
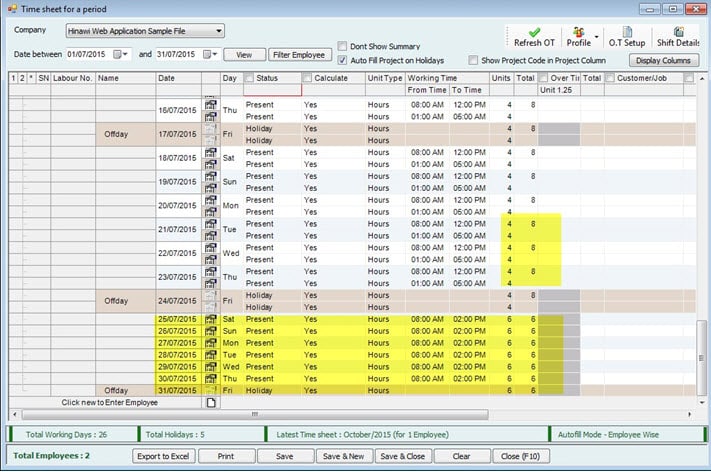
Note:
If the user forgets to assign different shift for Ramadan, and the timesheet is created for Normal shift, he/she must delete the Created Timesheet for month of Ramadan and Assign Employees to ‘RAMADAN’ shift and recreate the Timesheet again to cause effect.
Case 1:
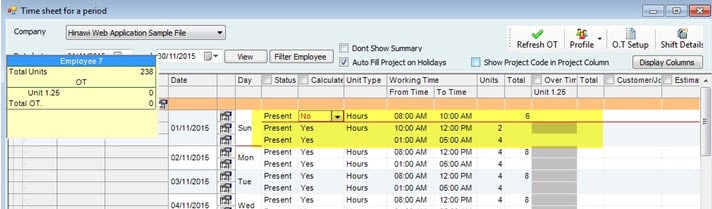
Timesheet Employees, for e.g., timing is 08:00 AM to 05:00 PM; if the Employee is late for 2 hours and he/she comes at 10:00 AM, then the user can set the First 2 hours (08:00 AM to 10:00 AM) as Status = ‘Present’ and Calculate = ’No’ and next 6 hours (10:00 AM to 12:00 PM) as Status = ‘Present’ and Calculate = ’Yes’, and (01:00 PM to 05:00 PM) as Status = ‘Present’ and Calculate = ’Yes’ Then the Total units for calculation will be 6 hours. (As shown in the image above).
Case 2:
If the OT Hours per Day (Normal) is set as 2 (In Company Setup) and Overtime Hours is set as 4 (In Timesheet and OT Setup), then the Employee will be allowed to work for 4 hours OT in Normal Day and it will be paid for 4 Hours as OT in the salary sheet. But as the user set OT Hours per Day (Normal)=2, which can be viewed from the report that OT is for 2 hours and rest 2 hours OT will be paid as Addition.
Case 3:

If the user sets Calculate = ‘No’ in the time Sheet setup, then even if the user put OT in Timesheet, it will not be calculated. The Overtime amount will not be shown\added in the salary sheet. This is per company policy.
By default, End of Service Setup is per the country’s Labor Law. The system does not allow to calculate EOS if Service period is less than a year. EOS setup can be adjusted as the Company policy. Below are details for TERMS used in setup:
Note:
– The user can define which columns required to be displayed for the EOS setup.
– All the columns displayed here are as per the setup in Edit columns.
Department and Position:
– Here, the user can define EOS to be set for the levels: Department and Position.
– The user can select ‘All’ if he /she wants to have the same setup for all.
EOS Reason:
-Users can define the reason for creating EOS (specified in edit columns). Whether an employee Resigned or is Terminated. In UAE, there are separate settings in Each Case.
If Resign:
If Terminated:
Note:
There is an option to Calculate EOS in Resignation as a Termination if the Service period is more than 5 years.
Max-Month\Amount:
– The user can define the maximum benefit to be given for the employee.
– I.e., maximum month salary or amount to be given as maximum benefit.
Type:
– The user can define what type is for Max Benefit. Two options are available, total monthly salary or Amount.
– E.g.: It can be 24 times total monthly salary or 1000 to be the Amount.
– By default, the total monthly salary allowed for max benefit is 24 times the total monthly salary.
Salary Items:
-If Salary is selected as Type, select here which Salary components to be included in Max benefit.
Salary– EOS:
-Users can define which salary components to be included in EOS calculation. It means that the user can add components like Basic salary and allowances depending on their setup.
Service From/Service To:
-Defines the period of service from and to for the EOS calculation.
Salary Days:
-Users can define the salary days for EOS calculation.
Percentage to pay:
-Users can define the percentage of amount to be paid as EOS amount from the EOS calculation.
-E.g. If the EOS amount is 1000 and the percentage to pay is 100, then the amount to be paid is 1000 (full amount) and if the percentage to pay is 50, the amount to be paid will be 500.
Note:
1. Max benefit means: What is the maximum EOS that can be paid to Employee
2. EOS amount or Max benefit, which one is lower will be paid.
Dependable:
-Users can select either Yes or No for ‘Dependable’
– First line is always ‘Yes’ for dependable since there is nothing to depend on from a previous line.
-If the option is “Yes” from years 1 to 3 and 3 to 5, calculated days are 7 days for 1 to 3 years, and 14 days for 3 to 5 years as per the EOS setup.
-If option “No” is selected from years 3 to 5, calculated days are 7 for 1 to 3 years, but any sooner employee who has a service period that exceeds 3 years will enable getting 14 days for all previous years as well.
Note:
All the columns above are as per the settings in Edit Columns.
Maximum Leave Days Allowed for the calculation of EOS:
-Users can set the maximum number of leaves allowed while calculating EOS.
-If an employee has 40 days leave balance and if ‘Maximum Leave Days Allowed for the calculation of EOS’ is 10, he/she will be paid only for 10 days. This is as per the company policy.
Calculate Unpaid Leave Salary Calculation based on Leave Setup:
-If this box is checked, the unpaid salary will be calculated based on Leave setup.
-I.e., Company Setting→Advanced Activities Setup→Annual Leave Setup
Calculate Unpaid Leave Salary Calculation based on Total Salary:
-If this box is checked, the unpaid salary will be calculated based on the Total Salary.
Calculate Unpaid Leave Salary Calculation based on Salary Items:
-If this box is checked, the unpaid salary will be calculated based on Salary Items listed: Basic Salary, Accommodation, Furniture etc. Users can select the salary item to be included for the EOS calculation.
– E.g. Users can select the Basic salary, Accommodation etc.
Leave Calculation Basis:
-Users can check the box and set the basis to 360 or 365 Days.
-By Default, this option is unchecked with a value zero (i.e., basis is not set) which means that the leave calculation is based on the salary setup.
-If the basis is not set and leave days are 10 the salary calculation is: Actual Month Days: Leave Salary Calculation will be: 3000*12*10
365
Fixed 30 Days: Leave Salary Calculation will be: 3000*12*10
360
When Resigns; If service period exceeds 5 years, calculate as Terminate:
-If the option is checked, for any employee after 5 years calculate EOS as Termination when he/she resigns.
Don’t Include Unpaid Salaries/Not Created Salary Sheets in the Create End of Service form:
-If this option is checked, unpaid salaries and not created salary sheets are not included in the EOS calculation.
Date:
Start Calculating EOS provision after—- Months from Joining
-Users can set the number of months to start calculating EOS provision from the joining date.
– E.g., if 6 months is selected, the system will start calculating the EOS provision after 6 months of joining date.
Calculate EOS Service Period based on Days Basis Days:
– EOS Service Period can be calculated on different day’s basis. It could be 365 or 360 days or any basis as per company policy.
– If ‘Calculate EOS Service Period based on Days’ is not set, then the service period will be calculated as 3 + (4 / 12) + (2 / 365) = 3.338813 if Employee worked for 3 Years 4 Months and 2 Days.
– If ‘Calculate EOS Service Period based on Days’ is 360 Days, then the service period will be calculated as 1221 / 360 = 3.391 if the Employee worked for 1221 days. (1221 is the number of calendar days worked from joining date to EOS date).
Note:
When the user selects Set Default, it should go to the default settings of EOS as per UAE (country). Set Default should read from the country EOS setup.
Note:
Creating EOS will not affect any transaction / activities unless EOS is approved.
E.g.: For a Timesheet Employee, if the user wants to create EOS date on 12 June, then he/she needs to do the following:
Now to cause an effect on activities, the user must approve EOS.
In the Additions & Deductions Tab, the user can add the additions and deductions to be added for the EOS Employee as below:
If the user wants to make any Adjustment in the total amount, he/she can do it from the Summary Tab as below:
Different Cases:
If the employee Salary is 3000; Calculate Unpaid Leave Salary Calculation Based on Leave Setup, (Leave Setup is to include All Salary Items and Transfer To Next Year is Yes), Employee works for 3 year,4 month and 2 days and EOS Setup is as below: the Default setup.
The Calculation summary is the following:
Note:
If Leave Salary Calculation basis is 0 Days, then it will read the setup from Payroll Settings. If setup is actual month days, then the leave days is divided by 365 Days, if setup is fixed 30 days, then leave days is divided by 360 Days.
The image displayed above represents a closeup view of the EOS Setup where users get to choose and apply the suitable actions and requirements.
Moreover, the cases displayed below represents several calculations regarding the End of Service.
However, the results might vary between one user and another depending on how the setup is made among users
Case 1:
If the setup is
![]()
And Leave Salary Calculation basis is 360 Days, EOS basis =360 in EOS Setup:
Here, 1-day salary = 3000*12 =100
360
100 X 70.115073 (Eligible Days) =7011.51
If EOS basis = 365, then calculation will be as follows:
1-day salary = 3000 *12 =98.63, then Total amount for EOS will be
365
98.63 * 70.115073 (Eligible Days) = 6915.459
Note:
1. Total Days is calculated as total no of Calendar Days. i.e., 1219 days her
2. When ‘Calculate EOS Service Period based on Days’ is not set (By Default zero), then the years calculated as (as example shown above) 3 + (4 / 12) + (2 / 365) = 3.338813 if 3 years 4 Months and 2 Days.
And If Maximum Leave Allowed for Calculating EOS is set as 10, then Leave salary will be: (3000 * 12 * 10) / 360 = 1000 [basis: 360].
Case 2:
If the setup is
![]()
And Leave Salary Calculation basis is 365 Days,
EOS basis = 360 in EOS Setup:
Here, 1-day salary = 3000*12 =100, then, the total amount for EOS will be
360
100 * 70.115073 (Eligible Days) = 7011.51
If EOS basis = 365, then calculation will be the following:
1-day salary = 3000 *12 =98.63, then the Total amount for EOS will be
365
98.63 * 70.115073 (Eligible Days) = 6915.459
And If the Maximum Leave Allowed for Calculating EOS is 10, then Leave salary will be: (3000*12*10) / 365 = 986 [basis: 365]
Case 3:
If the setup is
![]()
And Leave Salary Calculation basis is 360 Days,
EOS basis =360 in EOS Setup:
Here, 1-day salary = 3000*12 =100, then the total amount for EOS will be
360
100 * 71.108331 (Eligible Days) = 7110.8331
If EOS basis = 365, then the calculation will be the following:
1-day salary = 3000 *12 =98.63, then Total amount for EOS will be
365
98.63 * 71.108331 (Eligible Days) = 7013.4
And If Maximum Leave Allowed for Calculating EOS is 10, then Leave salary will be: (3000*12*10) / 360 = 1000 [basis: 360].
Case 4:
If the setup is
![]()
And leave salary calculation basis is 365 Days
EOS basis = 360 in EOS setup:
Here, 1-day salary = 3000*12 =100, then the total amount for EOS will be
360
100 * 71.108331 (Eligible Days) = 7110.8331
If EOS basis = 365, then calculation will be as follows:
1-day salary = 3000 *12 =98.63, then the Total amount for EOS will be
365
98.63 * 71.108331 (Eligible Days) = 7013.4
And If the Maximum Leave Allowed for Calculating EOS is 10, then the Leave salary will be:
(3000*12*10) / 360 = 1000 [basis: 360].
Case 5:
If the setup is
![]()
And leave salary calculation basis is 360 Days,
EOS basis = 365 in EOS setup:
Here, 1-day salary = 3000*12 =100, then total amount for EOS will be
360
100 * 70.134246 (Eligible Days) = 7013.4246
If EOS basis = 365, then calculation will be as follows:
1-day salary = 3000 *12 =98.63, then the Total amount for EOS will be
365
98.63 * 70.134246 (Eligible Days) = 6917.34
And If the Maximum Leave Allowed for Calculating EOS is 10, then Leave salary will be: (3000*12*10)/360=1000 [basis: 360]
Case 6:
If the setup is
![]()
And leave salary calculation basis is 365 days,
EOS basis is = 365 in EOS Setup:
Here, 1-day salary = 3000*12 =100, then the total amount for EOS will be
360
100 * 70.134246 (Eligible Days) = 7013.4246
If EOS basis = 365, then the calculation will be the following:
1-day salary = 3000 *12 =98.63, then Total amount for EOS will be:
365
98.63 * 70.134246 (Eligible Days) = 6917.34
And If the Maximum Leave Allowed for Calculating EOS is 10, then Leave salary will be: (300*12*10)/ 365 = 986 [basis: 365]
Note:
– Users can have separate settings for EOS regardless of the Company setup. They can also have the same settings as per the company policy.
-In EOS, the system will calculate the actual leave days. i.e., If the Transfer to next year is No (In Leave setup) and EOS is created for the Employee in March, the Leave days will be 7 or 8 days.
– If the Leave Salary Calculation basis is Not checked, then it will be calculated Based on the Salary calculation setup:
i.e., If the Maximum Leave Allowed for Calculating EOS is 10
1. Fixed 30 Days: Leave Salary Calculation will be: (3000 * 12 * 10) / 360
2. Actual Month Days: Leave Salary Calculation will be: (3000 * 12 *10) / 365
Holiday Settings:
Employee Profile Setup:
Department Setup:
Budget – Salary Setup:
Email Setup:
Evaluation Setup:
Additional Setup:
Employee Costing Setup:
Report Format Setup:
Distance Setup:
Below is the explanation for each one
Holiday Settings
Company Settings–> Company set up–>Holidays Setup
Weekly off days tab: Here, the user can select what days represent the weekly day offs. Public Holidays tab: Here, the user can select the public holidays: it can be fixed or variable.
e.g.: Fixed: January 1 is New Year which is a public holiday. Variable: Eid can be set as variable holiday.
Note:
Holidays setup affects calculations in many activities such as: salaries, leave, Time sheet, shift etc. This depends on the setup of each activity.
Employee Profile Setup:
Company Settings–>Employee set up–>Employee Profile Setup
Employee Profile Setup: Here, the user can setup the employee information that are required in his/her profile where the user has three options (required but optional, required and mandatory, not required). The user can select whether the information is
required or not by checking Y or N. Also, the user can set the filled to be mandatory by checking the “Must fill” in the Data entry checkbox.
Test Period Renewal:
The user can setup the renewal period from “Employee Profile Setup”.
Department Setup:
Company Settings → Company Setup → Department Setup
Here, the user can add different levels for Employees in the company. The user will be able to add the levels which are set on the Company Setup→General Setting By default, the user can add levels: Department and Position.
Find Department: The user can find the Departments added quickly whenever there are many number of Departments.
The user can add a Department using “Add Department” option and can add Position to the Department. e.g.: The user can add the Department ‘Sales Department’ and Position ‘IT Assist Manager’ and Max no. of Employees with the position ‘IT Assist Manager’ in
the Department.
The Options “Add Grade” and “Add Section” will be enabled only if these levels are set in the General Settings.
Setup Details: The user can see the details as per added in the above table. Copy Setup from: The user can copy the setup from other companies.
Remember: Whatever level you add in the department setup will be seen in all the system.
Budget – Salary Setup:
Company Settings → Company Setup → Budget – Salary Setup
Here, the user can set the budget for levels (Department, Position etc.) on a monthly or yearly basis. It will list information as the selected level. E.g. If a Department is selected, it will list all the departments added for the company. Select any department where the user can assign the value for budget in the amount column.
Note: There is a report for every activity.
Email Setup:
Company Settings → Company Setup → Email Setup
Here, the software provides an option for the user to send an email to the management when creating a new employee or leave (create, approve, return), and for create, by sending emails from outlook.
email.
Send Email Required: Check the box if the user wants to set the Send Email Using Outlook: Check this box if the user wants to send a mail using outlook. If checked, SMTP Server Name and Port will be disabled. The SMTP Server Name will be specific to the company.
Settings: The user can select the Form name:
New Employee: If an Employee Joins the company. Absent: If an Employee is absent.
Leave: If an Employee is on Leave.
If an Employee is on Leave:
When created: Shows the created date. When Approved: Shows the approved Date. When Return: Shows the returning Date. Sender’s Information:
Provide the Senders information and Send By (Signature)
Evaluation Setup:
Company Settings→ Company Set Up→Evaluation Setup
For Employee Evaluation, this can be used. But it is not a Comprehensive Appraisal / Evaluation.
Image 1:
Image 2:
Image 3:
Here, you can just define Different Evaluation Questions based on the Department and Positions.
In the system, you’ll be able to enter the Values regarding each of the Question first to get the Result.
Employee Category: Description is for the “Name of Evaluation”.
By clicking on the icon at the left, you can more add Departments and Positions.
Note:
The user will be able to add the levels which are set in the Company Setup→General Setting.
Evaluation: The user can add Questions for the Evaluation and specify the maximum points employees can reach in each question.
Grade: Define Grades by Assigning Marks Percentage.
Check the option “Show Results” to be able to view it in the “Data Entry” Screen.
After setting up Evaluation, Go to Manage Employees → Other
Manage Employees → Employee Evaluation. Filter the employees you want to evaluate and select them. “Evaluation Tab” will Show the Results.
Image 1:
Image 2:
Additional Setup:
Company Settings → Company Setup → Additional Settings
Here, the user can select how employee’s numbers are generated for companies. If “Generate one Employee serial number for all companies” is selected, employee’s serial number will be: company 1: 1,2,3… Company 2: 4,5,6…
If “Generate serial number by company” is selected, employee’s serial number will be:
company 1: 1,2,3… Company 2: 1,2,3…
Setup digits after decimal points and rounding: Here, users can set how many digits required to be displayed after the decimal points; it’s also used for rounding in the Total amount.
Rounding Required: Users can select whether he/she wants to round the salary’s amount. If Yes, increase number by 1 in case the next digit is 5 or more.
Archiving of Timesheet Salary Sheets Required:
If this option is checked, then all the Timesheet salary sheets will be archived.
Use Multicurrency:
If this option is checked, the user will be able to set the currency for Salary. When the user checks it for the first time, it will display the message “No default currency Selected”. You must go to “currency list” to set the default currency. The user can add any number of currencies and make one default. Once a currency is set as Default, it cannot be changed later.
Employee Costing Setup:
Company Settings → Company Setup → Employee Costing Report Setup
You can add any of the “Addition / Deduction” activities to the “Employee costing report”, so that it will calculate the addition or deduction added as employee “Cost”.
Report Format Setup:
Company Settings→ Company set up→Report Format Setup different forms.
Select Format Tab:
Here, the user can set available formats to Add prefix text to the employee’s number, and the text will be added before the Employee Number. For e.g.: If the prefix set is ‘A’ and the Employee numbers are 01,02, the Employee numbers are A01, A02
Report Margin tab:
The user can provide the margin details for reports.
Distance Setup:
Company Settings→ Company set up→Distance Setup
Country:
The user can select a country which will list the cities in that country and the distance between 2 cities. Countries or cities can be added from “General List” under settings. The values in this screen are just information and will not affect any calculations in the system.
Go to: File→ Settings→General Settings.
General List:
It will list all the items and values available in the drop down for each item. E.g.: Grade: Grade01, Grade02, Grade03 etc.
Leave Type: Emergency, Haj Type, Sick Leave etc.
Note:
Users can add items for each list by selecting on the List and then clicking on New.
Custom Fields:
When the user wants to add any new field in Employee profile, he/she can add from here. Users can add Custom Fields clicking on New. Users can view where the field is added in Custom Information of Employee form.
Users can Edit/Delete the custom fields from here. Users can add these fields in Employee Profile→ Custom tab as shown below.
Users can view the Report for Custom Fields from Reports→Employee Basic Information→Employee Custom Field Report.
Setup Employee Document:
Users can setup the required information about Documents as displayed below.
Users can add fields for Custom Fields from General List. For each document, users can specify the fields required or not required. When the user selects Location and Field Required for Health Insurance, it will be shown in Manage Employees→Set Documents→Create Single Document→Other Documents and select Health Insurance, it will show the fields ‘Location’ and ‘Field’.
Banking Rout Codes:
Users can set the details of routs codes for each bank.
To see the Branch Name and to Enter Routing codes and CBID codes, user must select the branch name for the bank from Manage employees→ Set Salary & Benefits→create/Adjust Single Salary and click on Transfer to Bank under Payment Mode, then provide the bank details.
| |||||||||||||||||||||||||||||||||||||||||||||||||||||||||||||||||||||||||||||||||||||||||||||||||||||||||||||||||||||||||||||||||||||||||||||
General Settings. Recommended
| General List | You might find it on most screens in the System. | |
| Custom Fields | Set up additional information for Employees. | |
| Setup Employee Documents | There is a link along with the reminder List. Also, the scanning feature is available. | |
| Bank routing Codes | Required for Wages Protection System (WPS). | |
General List
It will List all the items and values in each item's dropdown.
E.g., Grade: Grade01, Grade02, Grade03, etc.
Leave Type: Emergency, Haj Type, Sick Leave, etc.

Note: The users can add items for each List by selecting the List and clicking New.
Custom Fields
When the User wants to add any new Field in the Employee profile, he can add it here. Users can add Custom Fields by clicking on New. Users can view where the Field is added in the Customs Information of Employee form.

Users can Edit/Delete the custom fields from here. Users can add these fields in Employee Profile --> Custom tab, as shown below.
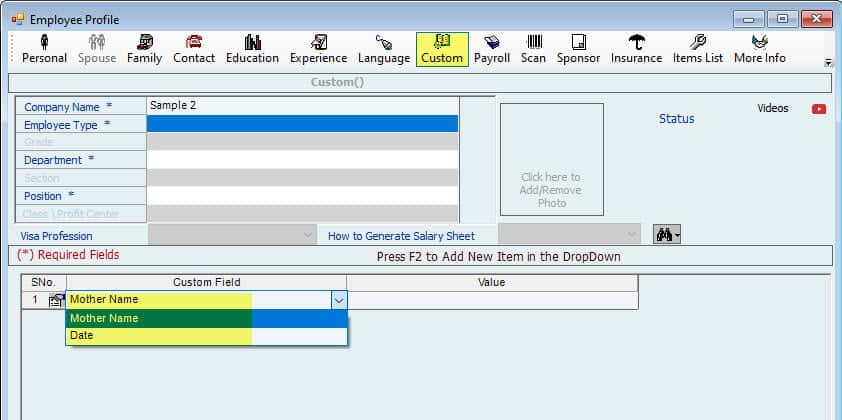
Users can view the Report for Custom Fields from Reports --> Employee Basic Information --> Employee Custom Field Report.
Setup Employee Document
Users can set up the information about the Documents.
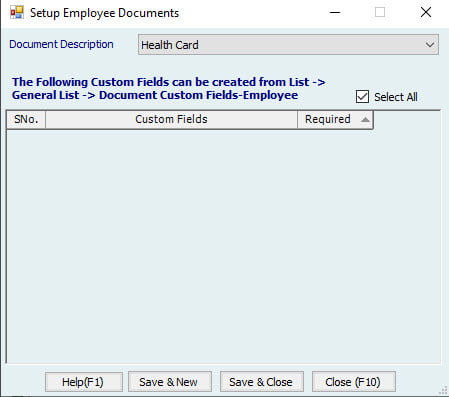
Users can add fields for Custom Fields from General List. For each document, the User can specify whether the fields are required or Not. When the User selects Location and Field Required for Health Insurance, it will be shown in Manage Employees --> Set Documents --> Create Single Document --> Other Documents and select Health Insurance. It will show the fields 'Location' and 'Field.'
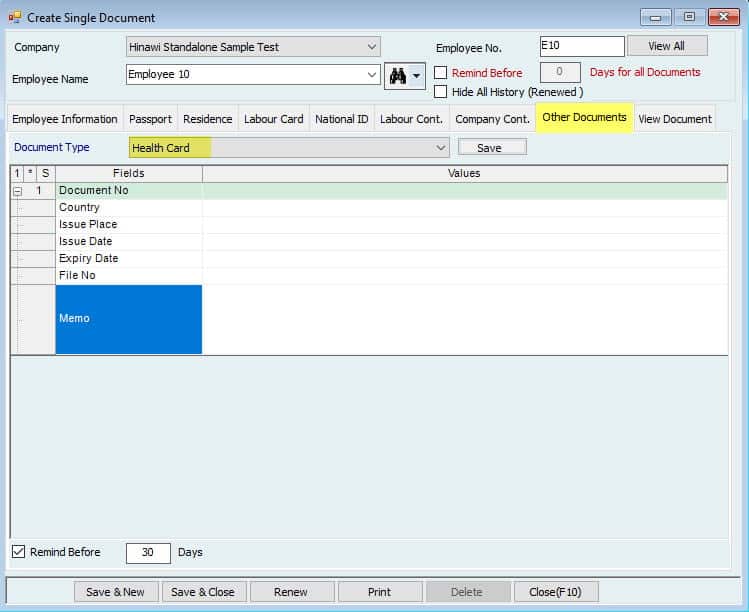
Banking Rout Codes
Users can set the details of route codes for each bank.

To see the Branch Name and Enter Routing and CBID codes, the User must select the branch name for the bank from Manage employees --> Set Salary & Benefits --> create/Adjust Single Salary and click on Transfer to Bank under Payment Mode, then provide the bank details.