
1. Before you start, change the account type in the Hinawi software chart of accounts regarding Cash Type, PDC, and CUC Account type.
2. All Hinawi software users must have a username in QuickBooks with full privileges.
3. If you have already created a QuickBooks data file and now want to use Hinawi software, the following must be verified in the QuickBooks file before using our software:
Make sure that the settings have been made and completed correctly.
Ensure you have made assignments between vendor payments and bills; the Report Unpaid bills Detail report under Vendors and the Payables report should not show any unlinked amounts. The same applies to the Open Invoices report under Customers and Receivables, which should not show unlinked amounts.
4. Users in QuickBooks must have full permission to access the activity forms they used in Hinawi software. For example:
Creating a new transaction in Hinawi Software: the User must have permission in QuickBooks to create a transaction for that particular transaction (form activity).
To edit a transaction in Hinawi Software: the User must have permission in QuickBooks to create, modify, and delete that transaction. This is an important point. If no permission is specified above, the transaction will be duplicated in QuickBooks.
If the User makes Edit the Cheque and his Setup is “Automatic posting,” the system will delete the original transaction and create the same one automatically. To avoid deletion, set the closing date in QuickBooks every month.
5. Do not merge or delete accounts in QuickBooks’s Chart of Accounts list or vendors, customers, or employees.
6. Do not convert the names in the Other Names list in QuickBooks to the Vendors, Customers, or Employees list.
7. To switch between multiple accounting files, close Hinawi software and open the QuickBooks file.
8. When you edit transactions in Hinawi software, QuickBooks deletes the original transaction and creates a new one. QuickBooks does not allow editing in Hinawi Software if this transaction is before the specified closing dates. To avoid deletion, set a closing date in QuickBooks each month.
9. Be sure to close all windows in QuickBooks that affect the integration in progress, such as windows from, videos, settings, set close date, set user, company information, add multiple entries, edit, review, recreate, or purge data, and any online QuickBooks windows opened from QuickBooks or the Set Credit window in Accounts Receivable and Accounts Payable. And QuickBooks does not open company information in the company menu during integration or posting.
10. If the User enters the transaction through Hinawi software and later changes it in QuickBooks, it will not affect Hinawi software. So, the User must ALL work in Hinawi to ensure balances match.
11. The Hinawi software does not read multi-currencies from QuickBooks. However, when you create a transaction in Hinawi software, it automatically reads the currency from QuickBooks, except for the journal voucher, where the User must select the currency for each transaction.
12. We recommend administrators perform a “data close” in QuickBooks at the end of each month. This way, no transactions can be entered or edited by Hinawi Software.
13. Ensure the person in charge is the only one using the Admin User.
Do not share the password with other users.
14. Do not share the admin password for daily use
15. The date setting on all computers and servers is dd/mm/yyyy. Example: 31/12/2022
16. If you want to run the software in Arabic, fill in the required fields from ALL in Arabic. The missing Arabic fields are located in the “File” menu.
17. Keep the data updated to avoid missing information in reports or activities – the missing data report is in the “File” menu.
Important Notes and instructions for Integrating Between Hinawi ERP with QuickBooks
1. Before you start, change the type of Account in the Hinawi ERP chart regarding Cash Type, PDC, and CUC Account type.
2. All users of Hinawi ERP must have used an m e in QuickBooks and permissions too.
3. If you have already created a QuickBooks data file and now you want to use Hinawi ERP Software, the following points must be checked in the QuickBooks file before start using our software: –
4. The users in QuickBooks must have Full Permission to access the activity forms they used in Hinawi ER. For Example:
– Creating new Transaction in Hinawi ERP: –
The user must have permission in QuickBooks to Create a Transaction for that Transaction (Form Activity).
– For Editing Transaction in Hinawi ERP: –
The user must have permission in QuickBooks to Create, Modify & Delete the Transaction. This is an important point; if no permission is specified above, the transaction will duplicate in QuickBooks.
– If t h e user makes an “Edit” write a check and his Setup is “Automatic,” the system will delete the original transaction and create the same automatically. To avoid deleting, set a closing date in QB every month.
5. Do not Merge or delete Accounts in the Chart of Account list, vendors, customers, or employees in QuickBooks.
6. Do not convert the names in the `Other Names` list in QuickBooks to the Vendors or Customers or Employees List.
7. To switch between multiple Accounting files in QuickBooks. First, you must close Hinawi ERP and then open the QuickBooks file.
8. By editing transactions in Hinawi ERP, QuickBooks will delete the original one and create a new one. If this transaction is before the set closing dates, QuickBooks will not allow editing in Hinawi ERP. To avoid deleting, set a closing date in QuickBooks every month.
9. Make sure to close all kinds of windows in QuickBooks that affect running integration, e.g., Windows of, Videos, preferences, set closing date, setup users, Company information, Add \ Edit Multiple Entries, Verify, Rebuild or clean data and any online QuickBooks services window that opened from QuickBooks or Set Credit` window in Accounts Receivables and Payables. And QuickBooks does not open company information under the company menu during integration or posting.
10. If the User enters the Transaction through Hinawi ERP and later modifies the same Transaction from QuickBooks, it will not affect Hinawi ER So, the user must do ALL his work from Hinawi to guarantee a match of balances.
11. Hinawi ERP does not read Multi-Currency from QuickBooks. Still, when creating a transaction in Hinawi ERP, it will automatically read the currency in QuickBooks, except for the Journal Voucher, where the user must select the currency of each transaction.
12. We recommend Admin user does ‘closing of data’ in QuickBooks at the end of each month. By this, no transactions can be entered or edited from Hinawi ERP.
13. Ensure the person in charge is the only one to use the Admin user. Do not give the password to another user
14. Do not give Admin passwords to normal users.
15. The date setup in all computers and servers is dd/mm/yyyy. Example: 31/12/2021
16. If you want to run software in Arabic, filling ALL required fields in Arabic is very important. Missing Arabic fields are located under the File menu.
17. Keep data updated to avoid missing information in reports or activities. The Missing data report is located under the File menu.
Important:
All Setup done by the customer is his FULL responsibility.
Settings: –
Complete all settings
Templates
Complete all Templates
Chart of Account Type
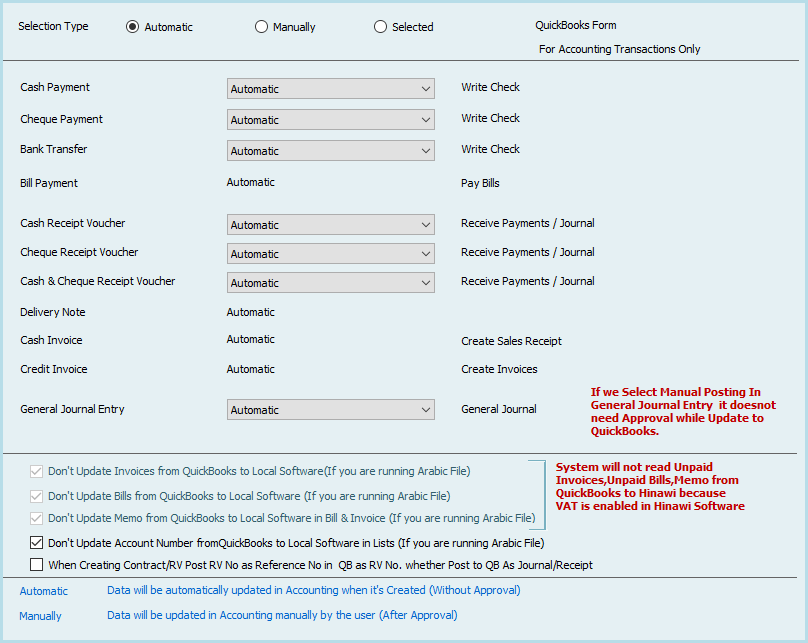
Integration Settings:
Make sure to select the integration method that meets your needs.
Sample of process if select manual posting:
Users must update QuickBooks in the below way. In Automatic Setup, all transactions will be posted to QuickBooks automatically.
Attachment Setup:
Make sure is done to save all types of attachments
Things to do in QuickBooks before and during using Hinawi ERP: –
If the customer already has QuickBooks data, the user must work in the below for better use of both QuickBooks and Hinawi ERP
1. Make sure there are no Arabic names in all lists
2. Merge similar names in all lists
3. Create an Account in Chart of Account no. 99 Intermediate Account
4. Make sure that Account no. 30000 opening Balance is created
5. Delete unnecessary names
6. Make sure that preference is done properly and completed.
7. Make sure you made allocations between payments to suppliers and bills; the report Unpaid bi tells Detail under Vendors, and Payables Report should not show any negative amounts.
8. Same for report Open Inv voices under Customers and R receive ables should not have negative amounts.
9. Rearrange the accounts of Fixed Asset
10. Import Fixed Assets
11. Rearrange the accounts of Cheques under Collections (CUC) and Post Dated Cheques (PDC). Edit account type in hinawi Chart of Account to PDC or CUC type
12. Set a closing date
13. Set Preferences
Extra features from Hinawi ERP Software that I s not available in QuickBooks:
1. Fully integrated with all versions of QuickBooks.
2. Cover missing features in QuickBooks.
3. Real Estate Management Modul
4. Advanced Fixed Assets Modul
5. Complete Bilingual Language, Arabic, and English.
6. Calculate Commission for sales Re
7. Post multiple Receivables and Payables in one JV entry.
8. Create Receipt Vouchers (RV) from all kinds of na
9. Adding three new types in the Chart of Accounts (Cash, PDC & CUC).
10. Create 3 ways to post to QuickBooks. Real-Time, Batches, and Mix of two.
11. Control Post Dated Cheques Received & Issued with auto-revised entry.
12. Receive multiple cheques at one Receipt Voucher (RV).
13. Option to Not allow to post to the main Account
14. Option not to sell if there is not enough quantity
15. Option not to change the selling price
16. Allocate expenses to Fixed A
17. Photos of all kinds of na
18. Design and templates with Printing for all activity forms (Cheques, Payments, Collections, JV, SIV, SRV, Transfer Inventory, Inventory Adjustments, Enter Bill & more)
19. Complete the HR, Time Sheet, Payroll, WPS, and Tax Module.
Inventory:
1. Calculate the Landed Cost of the Inventory Item (Adding Shipping charges, customs, transportation, and Other expenses).
2. Multiple Inventory Adjustment entries in one form.
3. Movement and None Movement Inventory Item.
4. Advanced Physical Inventory Worksheet.
5. New look at Inventory Valuation Detail.
6. And more.
Reports:
1. Advanced Trial Balance (Beginning Balance, total movements, and Ending Balance).
2. Financial Ratios: Profitability, Activity & Liquidity.
3. Advanced Customer / Job profitability report in summary and detail.
4. Cashier Reports (Collections & Payments).
5. Advanced Audit Trail (Filter By user, activity form, and total entries by each).
6. Partial paid Invoices and Bi
7. Depreciation by Project.
8. You Can customize your required reports from QuickBooks data.
9. Reports in QuickBooks are seen from Hinawi ERP.
Report Center by:
1. Employee
2. Building and flat
3. Class
4. Fixed A
5. And more
Unfortunately, some users do not follow the instructions regarding recording transactions. So you see them making entries entirely in the QuickBooks software and not in the Hinawi, or you see them recording transactions in Hinawi but making changes in QuickBooks.
We created a report according to what you see below to make a permanent comparison for any selected period.
It is generally accepted that the data is the responsibility of the customer.