Installation Requirements and System Configuration
We have designated this page on our website for your valued company’s IT department to help you prepare the server and users’ computers according to the requirements of downloading and running the systems so that there will be no interruptions or delays.
IMPORTANT: Network MUST be DOMAIN, not workgroup.
(Please see the Comparison between Domain & Workgroup section to see more about this)
We want to point out that there is a big difference between the requirements for installing Hinawi software as a standalone software and for installing QuickBooks software. The requirements for installing Hinawi software are simple. They do not require any complications or high requirements for the server or the users’ computers. Installing QuickBooks software requires high requirements and large settings on the server and computers, through our experience of more than 20 years. Each new version’s requirements become increasingly complex, especially when the client works remotely on the server.
One of the client’s problems is asking the QuickBooks software to restart the server, displaying a clear message to the client. In this case, the client has no choice but to restart the server.
We ask for your attention and thank you for your cooperation.
This is a Page We Have Created To Let You Know We’re Going to Be Using TeamViewer in The New Customer Installation Sessions about Hinawi Software ERP, Which You Are Going to See.
Please Make Sure You Download TeamViewer as Displayed in this Form.
The Process Which Will be Followed in This Session Is Through The TeamViewer Audio Call, Which Will Enable You To Hear Our Voices and See the Screen As Well. Make Sure You Have A Proper Microphone and Speakers To Be Able To Talk And Hear Clearly. Once You Have Successfully Installed It, We’ll provide You with a Username and Password to access the PC.
Important Notes:
Please Test The Microphone and Speakers From Your Side Before We Begin The Session.
Also, Make Sure You’re Sitting In A Quiet Place And Avoid Any Noise.
Feel Free To Ask Us During The Session In Case You Have Any Questions.
We Will Not Use Zoom or Any Other Method; only TeamViewer Audio and Screen Sharing will be Used.
Hinawi Software
Before you start performing the Installation process, kindly read and understand the Installation System requirements document,
Programs will be installed on the Server and the Client Computers depending on the number of licenses Purchased. Moreover, if there is no server, the Company can save Data on any other computer and will therefore be considered the temporary Server. Later, Data will be transferred when the new Server is ready. Also, the Client's User must have "Full Read & write Access on this computer" [Client computers must have full access to the file location].
Server and Client PCs must be added under the same domain and network to avoid connection issues.
Data Security must be the Customer's responsibility; Better make a backup on an external drive as per what we scheduled on the Server.
Operating System
- Windows 11, 64-bit, natively installed.
- Windows 10, all 64-bit editions, natively installed.
- Windows Server 2022, Standard and Essentials
- Windows Server 2019, Standard and Essentials.
- Windows Server 2016, Standard and Essentials.
- Windows Server 2012 R2, Standard and Essentials.
- Windows Server 2012, Standard and Essentials.
(Microsoft will no longer provide security updates or support for PCs running Windows Standard and Essentials Server 2012 and Server 2012 R2 after Oct 10, 2023)
Database Servers
- Windows Server 2022, Standard and Essentials
- Windows Server 2019, Standard and Essentials.
- Windows Server 2016, Standard and Essentials.
- Windows Server 2012 R2, Standard and Essentials.
- Windows Server 2012, Standard and Essentials.
(Microsoft will no longer provide security updates or support for PCs running Windows Standard and Essentials Server 2012 and Server 2012 R2 after Oct 10, 2023) - Windows 10.
Note:
Windows 10 S mode is not supported.
(Windows 10 in S mode is a version of Windows 10 streamlined for security and performance while providing a familiar Windows experience. To increase security, it allows only apps from Microsoft Store and requires Microsoft Edge for safe browsing.)
Are you using Windows Server 2012?
Microsoft will no longer provide security updates or support for PCs running Windows Standard and Essentials Server 2012 and Server 2012 R2 after Oct 10, 2023.
For this reason, QuickBooks 2024 won't support Windows Server 2012 and can’t be installed on it.
Hinawi Software requires a 64-bit Windows operating system and won’t run on 32-bit.
Processor | 2.4 GHz minimum |
RAM | 8GB minimum for 64-bit, 16GB Recommended |
Server RAM requirements | 1-5 Users: 8GB RAM 10 Users: 12GB RAM 15 Users: 16GB RAM 20 Users: 20+GB RAM |
Disk space | 2.5GB of disk space (additional required for Data files). Additional software: 60MB for Microsoft .NET 4.8 Runtime, provided with the installation files. Note: Store your Hinawi Software Data file on a solid-state drive (SSD) for the best performance. |
Windows | North American version of Windows. Regional Settings are supported when set to English. Administrator rights are required for the server computer when hosting multi-user access. Natively installed and didn’t need to run in a virtual environment or emulation software. |
Screen resolution display | Display optimized for 1280 x 1024 screen resolution or higher with up to 2 extended monitors. |
Server:
A computer where the Data must be located, here we will install SQL to store the Hinawi Software Data. Also, there must be a folder in the server that has to be shared over the network. Furthermore, the Hinawi Software User must have complete (read/write permission on this folder). The folder structure must be as explained and demonstrated below:
Folder structure
Explorer Computer (Main Folder).
- Hinawi Software (Sub Folder)
Data
(a folder where the SQL database must be created, the SQL server must have full read and write permission in this folder).
Backup
(a folder where the SQL database backup must be stored, Hinawi software has an Auto Backup program, which will take database backup daily or weekly, depending on the Company's preference). Package / Settings (a folder where the Hinawi software package must be stored).
Please refer to the Screenshot below:

On the server, We need to Install the SQL server (for the Hinawi Software database), Hinawi Software. Therefore, some essential procedures must be done before we start the installation process.
What are they? Kindly follow the steps listed below, along with their Screenshots:
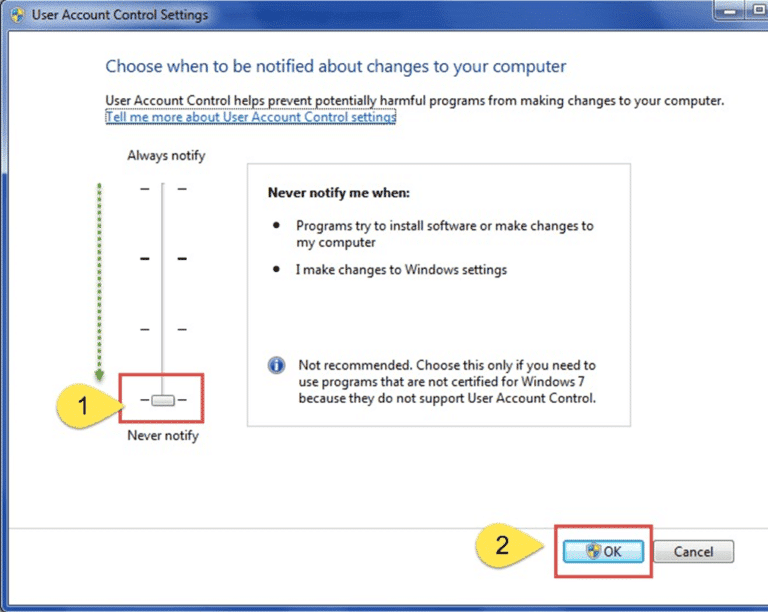
User Control Settings Must be set NEVER to NOTIFY MODE.
To do this, kindly go to CONTROL PANEL – USER ACCOUNTS & CLICK ON CHANGE USER ACCOUNT CONTROL SETTINGS.
Arabic must be installed on the server, and the System locale must be Arabic (U.A.E)
Theoretically, this is done through the following path: Go to Control Panel, then click on Region and language. How is this performed practically?
Kindly follow the Screenshots below.
The Screenshots displayed below will enable you to be acknowledged the changes required regarding
"Region and Language Settings."

Now, restart your Computer to update the changes you have made to the Computer.
After Installing Hinawi Software, kindly provide "full read and write permission" for the User's Computer to the following folders:
C:\Program Files (X86)\Explorer Computer\Hinawi Software
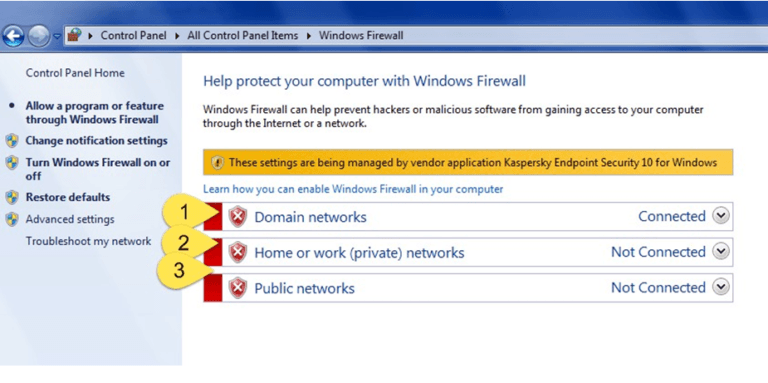
Windows firewall must be switched off.
Now Go to this folder:
C:\program files \Explorer Computer\Hinawi Software
(in a 64-bit computer, you can find this application path under program files (x86), after that, provide the same read and write permission for the User as mentioned above)
❖ If an Antivirus is blocking the software, it must be disabled.
❖ Install Team Viewer's latest version on the Customer Side to get remote support from Us.
System Requirement Summary
SERVER
There must be a SERVER (Physical Server) to store the data of the Software. The backend of the Software is the SQL server. Any version of the SQL server will be compatible with Hinawi Software. If the customer doesn't have a licensed ver. of SQL server, we will install the latest version of SQL Server Express edition.
Data will be stored on the drive of the SERVER computer and it will be shared over the network for the User PCs.
The Client PCs must have full read \ write privilege to the SERVER data.
The SERVER must have a minimum of 8 GB RAM and 500 GB hard disk space. (Please read the System Requirements for Hinawi Software - ERP detail section)
SERVER PC operating System requirement
- Windows Server 2022, Standard and Essentials
- Windows Server 2019, Standard and Essentials.
- Windows Server 2016, Standard and Essentials.
- Windows Server 2012 R2, Standard and Essentials.
- Windows Server 2012, Standard and Essentials.
(Microsoft will no longer provide security updates or support for PCs running Windows Standard and Essentials Server 2012 and Server 2012 R2 after Oct 10, 2023) - Windows 10.
Note:Windows 10 S mode is not supported.(Windows 10 in S mode is a version of Windows 10 streamlined for security and performance while providing a familiar Windows experience. To increase security, it allows only apps from Microsoft Store and requires Microsoft Edge for safe browsing.)
USER PC
Hinawi Software has to be installed on the User's PC with full access to the SERVER data.
- User must have Read & Write permission on the C:\Program Files(X86)\Explorer Computer\Hinawi Software (Installation path) folder
- User Control Settings must not block the Application.
- Windows firewall must be turned off.
- Antivirus must have an exception rule set for the Software.
Client PC Operating System requirement
- Windows 11, 64-bit, natively installed.
- Windows 10, all 64-bit editions, natively installed.
- Windows Server 2022, Standard and Essentials
- Windows Server 2019, Standard and Essentials.
- Windows Server 2016, Standard and Essentials.
- Windows Server 2012 R2, Standard and Essentials.
- Windows Server 2012, Standard and Essentials.
(Microsoft will no longer provide security updates or support for PCs running Windows Standard and Essentials Server 2012 and Server 2012 R2 after Oct 10, 2023)
Requirements to Update Hinawi Software to New Version:
To Upgrade your Current version to Hinawi Software, we need to follow the below mentioned:
- We need to take your Hinawi Data of all the files (if you have multiple files for Hinawi, we need to take all) and also QuickBooks Data. We will work on your Data here in our Office (Meantime, your users must be idle, do not work on Both Hinawi and QuickBooks Software at all).
- The up-gradation Process will take One Day; once it finishes, we will Restore the Data to your Company by remote (Team viewer) and Install the latest version on your User PCs.
Note:
Upgrade to the Latest version of Hinawi Software is very important; the Support for your current version has been Stopped.
SQL Server 2019 Installation Steps.
Download the SQL Express Edition
Click to download SQL server 2019 Express Edition
Double-click on the downloaded file to start installing SQL Server 2019.
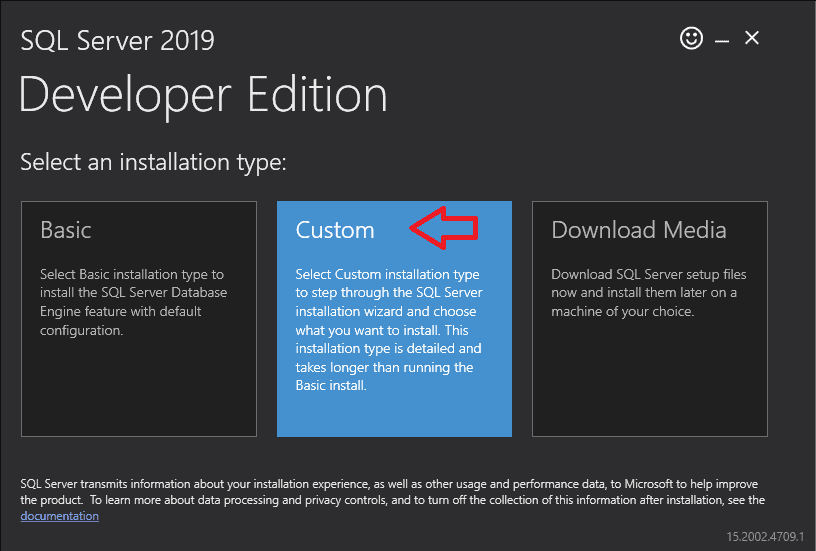
Select an Installation Type
Here, you have three choices.
- Basic
- Custom
- Download Media
The primary option installs only the essential features of SQL Server. It only asks for the License agreement and installation path.
Download Media allows you to download all the installations to a local folder. You can then unzip, run the Setup, and install the SQL Server without an internet connection.
The custom option allows you to pick and choose the features you wish to install. For this tutorial, let us choose the custom option.
Double-click on Custom
Select the Media download target location. You can use the downloaded files to install the SQL Server later.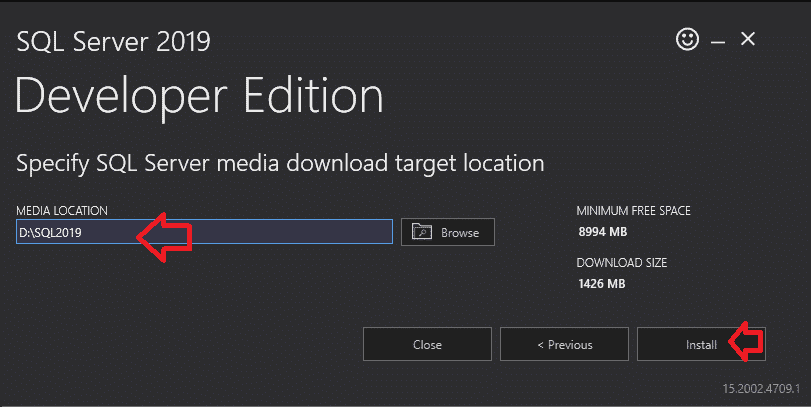
This will download the install package. The install package automatically starts the SQL Server installation center.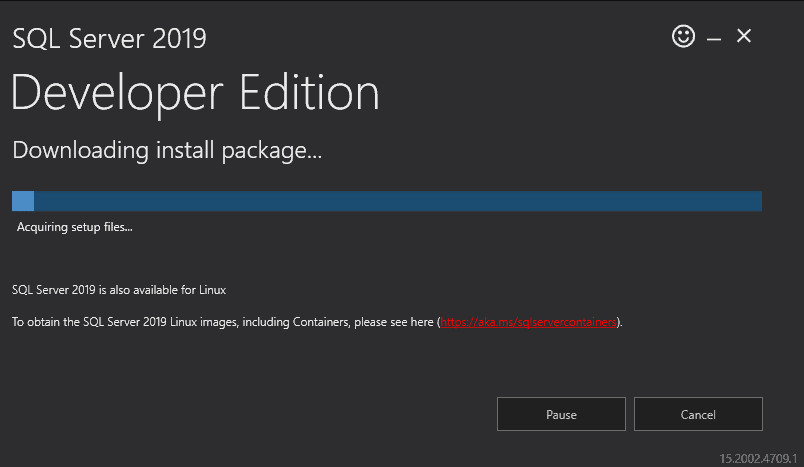
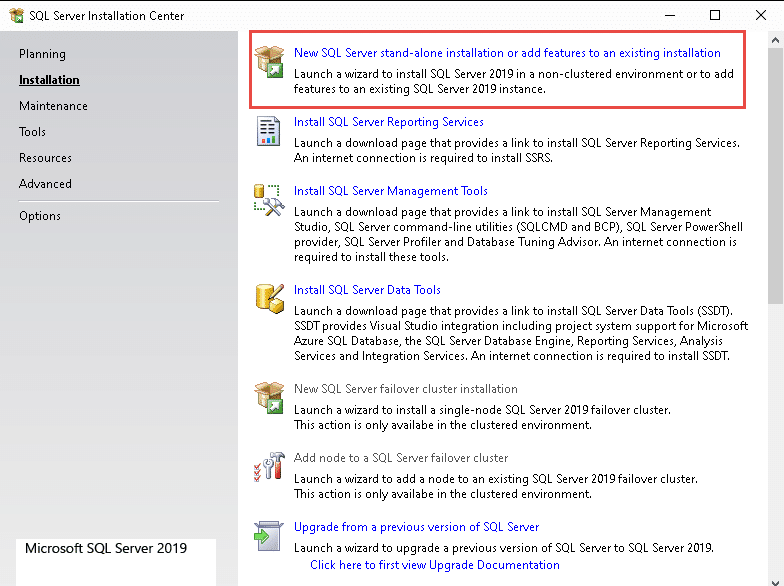
Select Installation & then click on "New SQL Server standalone installation or features to an existing instance" to begin the Installation.
Global Rules
The following window identifies and displays the problems that may occur while installing the SQL server Setup support files.
If there is any issue, those will be highlighted in red here. The Installation will not continue, and you will have to take necessary action depending on the issue.
Click next to continue.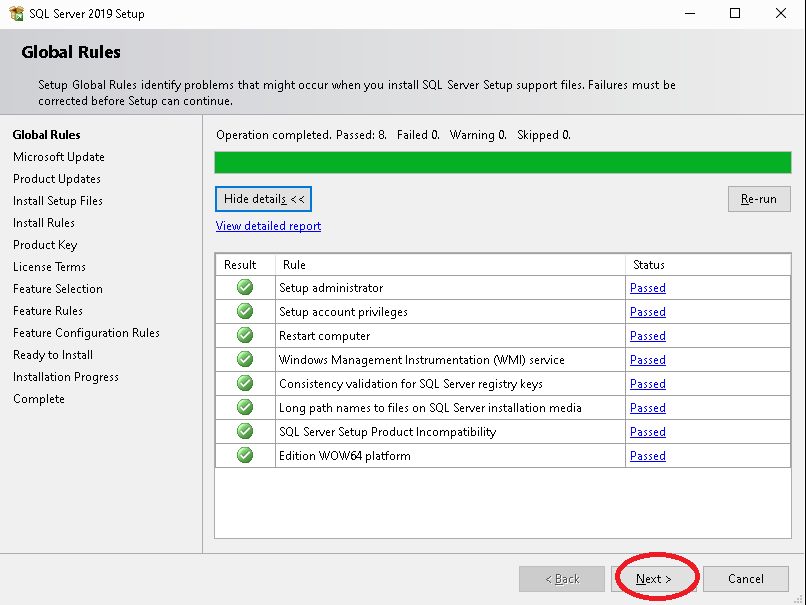
Microsoft Update
Choose yes, if you wish the installer to check the Microsoft update site and download and install the latest updates. Else leave it
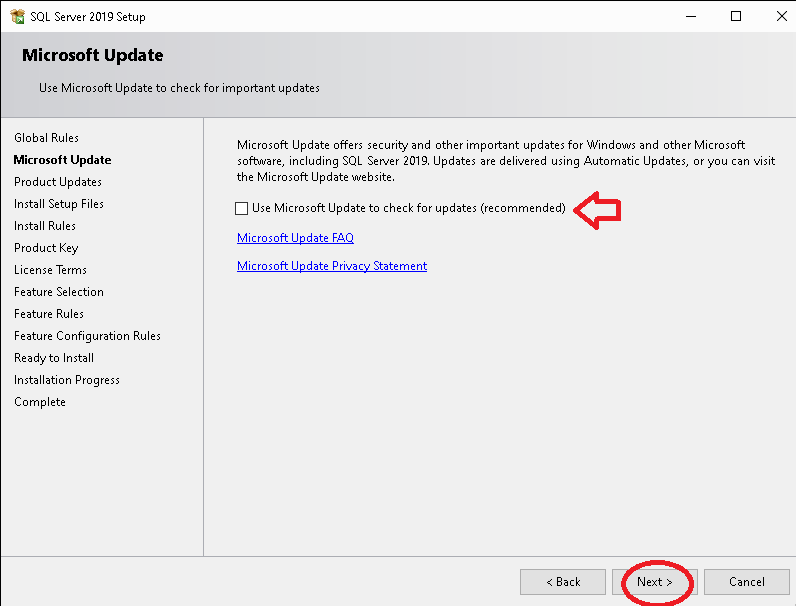
Click on Next. On the next page, it checks for the Global rules and gives status information about successful and failed rules. If there are any failed rules, we need to fix those before proceeding with the Installation.
We have selected show details, so it shows details.

Now we must select the features we need to install with this Installation.
Select the following
- Database Engine Services
- Client Tools Connectivity
- Client Tools for backward compatibility
- SQL Client Connectivity SDK
- Client Tools SDK

You can choose to install a default or named instance name.
We have selected your default instance. If you can only install a named instance, Provide an appropriate name for the named instance.

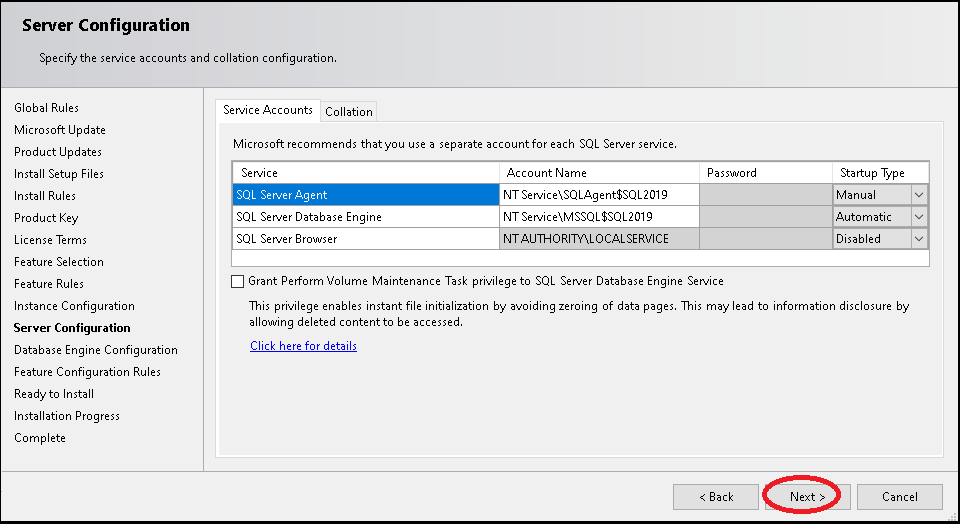
Server Configuration
The Next window List the various services which you can configure. This List of services displayed here depends on the Features selected.
Here, you need to specify each service's Account name, Password, and startup type.
Keep the defaults and click on Next
Database Engine Configuration
Here you are asked to configure the database by providing the authentication mode & Password for the SA User.
Under Authentication Mode, you have two options.
Windows Authentication
In this mode, the windows User is automatically recognized by SQL Server. The Windows security identifier (SID) is passed from Windows to SQL Server. The SQL Server does not store User information and trusts the Windows User. The SA User gets disabled when you use this.
Mixed Mode ( Windows Authentication and SQL Server authentication Mode)
In this mode, along with the Windows Users, the SQL Server stores the User name & Password in the database. In this scenario, you can connect to SQL Server either using the Windows Account and using the User name/password stored in SQL Server itself
Choose Mixed Mode.
You have to enter the SA User password.
Also, click on Add Current User to add the Current Logged-in User to SQL Server.
Other Configuration
Depending on the Features you have selected, you will be presented with the configuration option for each feature.
Ready to Install
Finally, once all the configurations are done, you will be presented with a summary of the configuration you have selected. If you wish to change any configuration, click the back button and update.
Click on Install to begin the Installation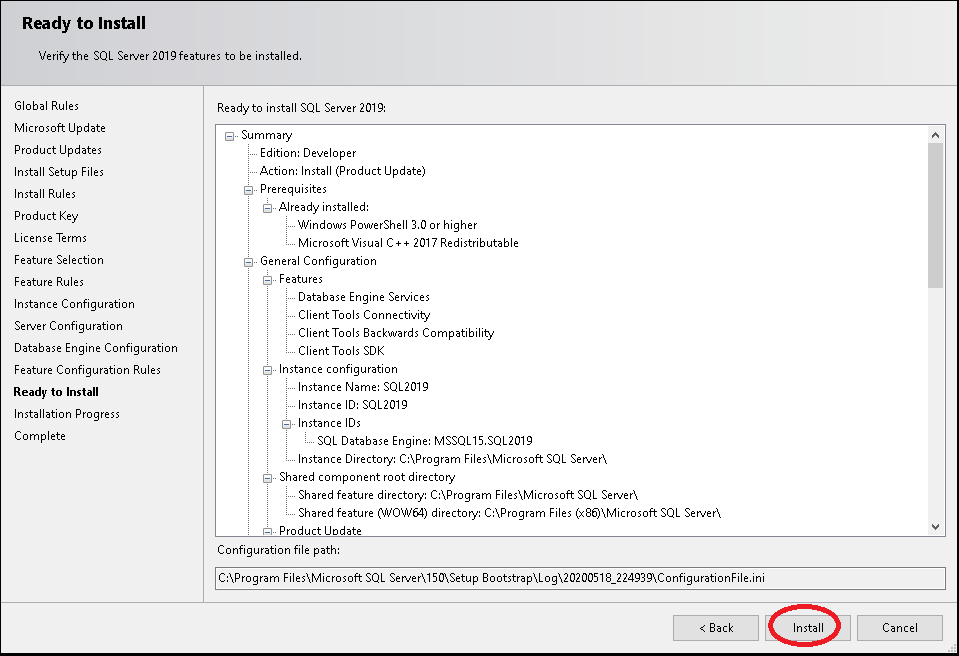
Installation Progress
The Installation will take some time.
Installation Complete
Once the Installation is complete, you will see the following window.
If there are any errors in Installation, you can open the installation log file to find out what went wrong.
Click on close to continue. Close the SQL Server Installation Center also
You may be asked to restart the computer.
Next Steps
You need to install SQL Server Management Studio to access and manage the SQL Server Installation. It is available as a separate package
SSMS download:
Download SQL Server Management Studio 18.0 (GA)
Supported OS
- Windows 10 (64-bit) *
- Windows 8.1 (64-bit)
- Windows Server 2019 (64-bit)
- Windows Server 2016 (64-bit) *
- Windows Server 2012 R2 (64-bit)
- Windows Server 2012 (64-bit)
- Windows Server 2008 R2 (64-bit)
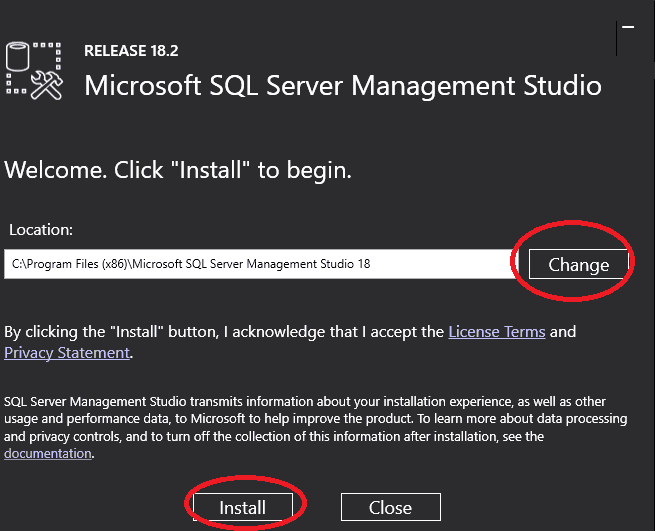
Select Install Location
Say yes, when prompted for "Do you want to allow the following to make a change to this computer? ". You will be taken to the Welcome screen.
You can change the installation location if you wish to. Click on the Install button to continue.
Installation Begins

Installation in Progress
The Installation will take time as it downloads the required packages from the internet.
Installation Complete
Installation completes. You may be asked to restart the PC.
Hinawi Online Setup Guide/Checklist
Information Needed
- Router Password
- Username and Password of Server
- Pre-utilization of Dydns for their Public IP
- Router Type (typically Etisalat provides it)
Server
- Open “Run” window (Windows + R) > cmd > type “ipconfig” > Note Down the information
- Network and Sharing Center > Local Area Connection > Properties > Double click Internet Protocol Version 4 (Ipv4) > Select “Use the following IP Address”
- Do as pointed out in the Screenshot:
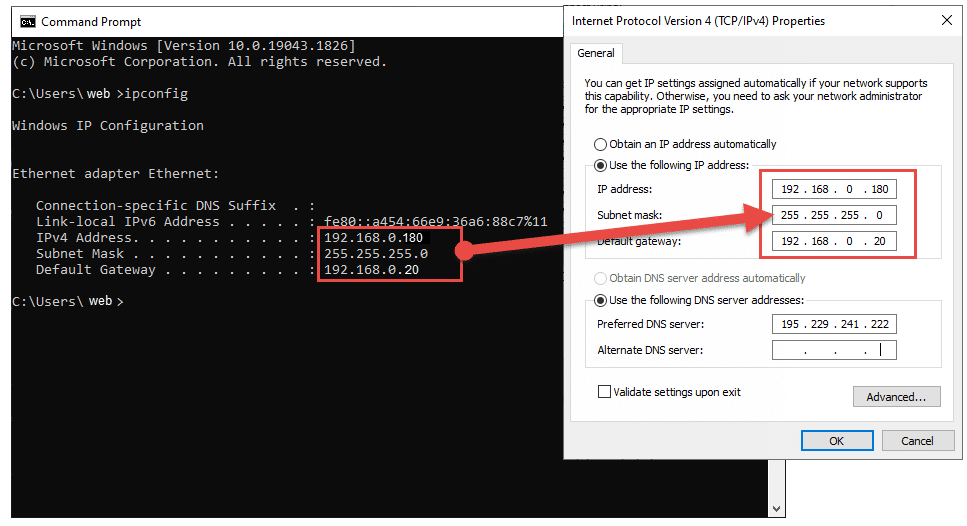
The CMD window should show the DNS server address; if the DNS server address is not shown, then go to Network and Sharing Center > Local Area Connection > Details > Note down IPv4 DNS Server
SQL Configuration
- Open SQL Server Configuration Manager > SQL Server 2005 Network Configuration > Protocol for SQLEXPRESS > Right Click TCP/IP > Properties > IP Addresses Tab > Type Port Number in the “TCP port” Field for all IPs (IP1, IP10…etc.) use 1433
- Open SQL Server Configuration Manager > SQL Server 2005 Network Services > Right.
- Click “SQL Server (SQL EXPRESS)” and select “restart.” Do the same for SQL Server Browser.
- SQL Server Management Studio > Type *PrivateIP\SQLEXPRESS* > Use the same Username and Pass. For example 192.168.0.180\sqlexpress
Firewall
- Inbound Rule: Open “Windows Firewall with Advanced Security” > Select “Inbound Rules” > Select “New Rule” > select “Port” > click “Next” > select “TCP” > select “Specific local ports” then type the chosen port Number.
- Outbound Rule: Same steps as Inbound Router Port Forwarding
- Open an Internet Browser (Chrome/Internet Explorer) > search “What is my IP?” > Note Public IP—for example, 192.168.0.32.
- Access the router page in the address bar by typing the IP address 192.168.0.32.
- Login > Virtual Servers (under firewall) > Write *CompanyNameOnline* in the description, specify the inbound port > Type “both” > type in the last digits of the Private IP address > specify the private port. (Note that every router has a different way of port forwarding, so use Google or YouTube to understand the router interface or environment)
Test if my public IP is usable.
- Open SQL Server Management Studio > Type *PublicIP\SQLEXPRESS, Port #*. For example, 192.168.0.32\sqlexpress, 1433.
- Login using your credentials.
Steps to Create \ Configure new Standalone file in Hinawi Software!
Step –1
Double Click on the Hinawi Software icon.

Step – 2
Click on the “Create / Configure File” button

Step – 3
Select “New File” and “Use Stand Alone Hinawi Software.”

Step – 4
Enter the Company Name you want for the New File & then click the SQL Connection button.

Step – 5
Click on the SQL Connection button.

Step – 6
Enter the details in fields as follows
Database Name:
Make sure to enter the database name similar to the Company name, without Special and Special Characters

Select Location:
Please select the location where you want to store the SQL Data on the server. It must be under local drive.


Click on Finish
Steps to Load Default Templates into Hinawi Software
In this document, we will demonstrate the steps to transfer and load ready templates created previously for the sake of time for the User to instantly use these default templates without wasting time creating new ones.
Kindly follow the Steps to learn "How to Load a Template into Hinawi Software?"
Step 1:
Go to the Template which you want to Load as the default Template! For that, Go to File - Setup Templates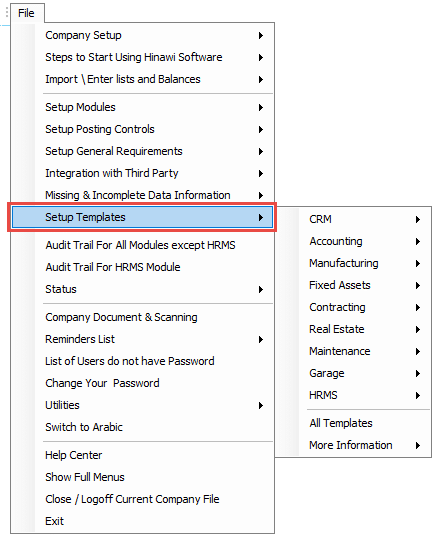
- Select the Transaction you need to Load the Template;
Step 2:
Click on Any transaction Template you want.
For example, you need to Load the default templates for Cash Invoice. Therefore, Click on Cash Invoice from the Menu & then Click on the NEW button in the form.
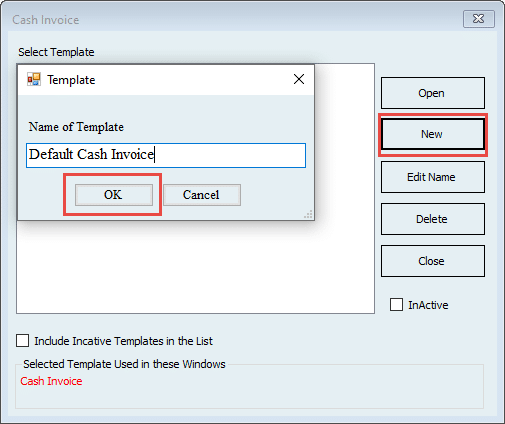
Step 3:
Select the Created One, Click on the Open Button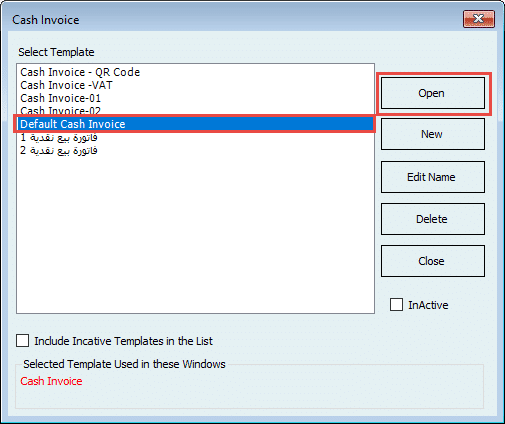
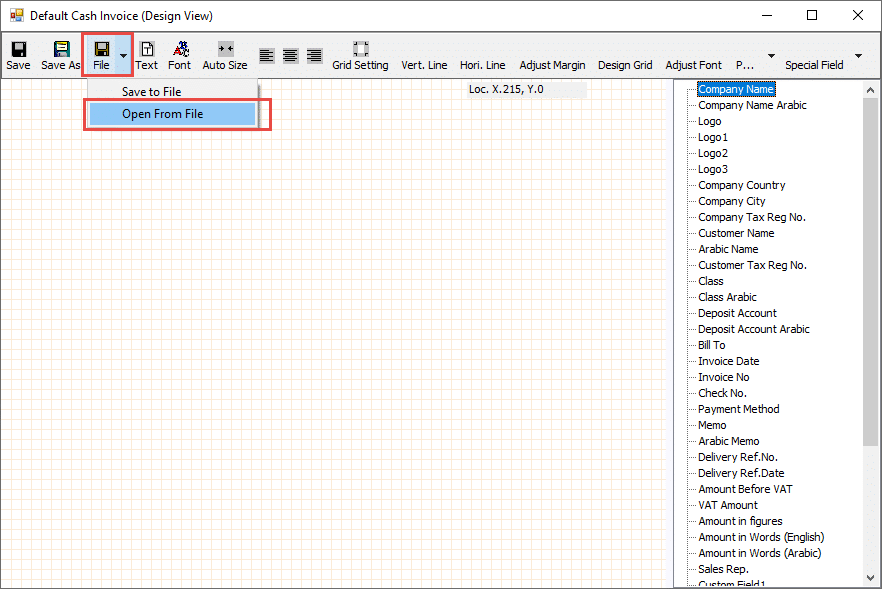
Here, the User can find all the default templates; You need to select the right one,
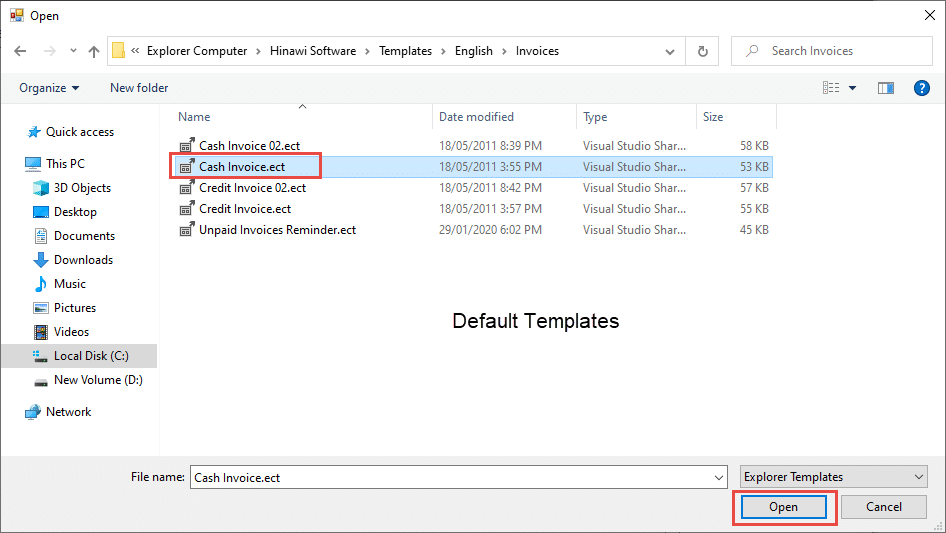
C:\Program Files(X86)\Explorer Computer\Hinawi Software\
In our case, we are trying to Load the default Template for Cash Invoice, So open the Folder called Invoices And Select Cash Invoice.ECT file.
As you see here, the System will load the default Template into the design area of the Template.
Make the Changes you want to do here & click on save the Template.
This way, the User can load any transaction Template from the Location Mentioned;
For ENGLISH Templates
C:\Program Files(X86)\Explorer Computer\Hinawi Software\
For ARABIC Templates
C:\Program Files(X86)\Explorer Computer\Hinawi Software\
Comparison between Domain and Workgroup
Domain Network (Recommended):
Domain is a client/server network where users can log in from any device in the office. Also known as Remote login. It has a centralized administration and all devices can be managed from a centralized device.
Workgroup Network:
A workgroup is a peer-to-peer Windows computer network, where users can use their login credentials only on their system and not others. It holds a distributed administration wherein each user can manage his machine independently. Most storage is distributed. Each device has its dedicated storage.
Difference between Domain and Workgroup:
Domain Network (Recommended) | Workgroup Network |
A domain is mainly to transfer and share sensitive and important data only. | A Workgroup is used to share less secure and personal data only due to less security. |
A domain is mainly preferred for large public and business networks. | A workgroup is mainly preferred for small local area networks like schools, colleges, buildings, etc. |
A domain is used to transfer and share sensitive and important data due to security. | A workgroup is used to share personal data as it is less secure. |
A domain can work better for large numbers of devices. | A workgroup works better for fewer computers. |
The domain names are provided by the domain controller based on IP address. | In the workgroup, there are no dependencies on any hardware components and server for assigning the name. |
Data can be recovered in a domain from the centralized storage. | Data recovery is not possible in a workgroup due to the local storage of each device. |
A Domain can be formed using the devices of one or more different network domains and adding all the intended devices to it. | The devices of the same network can only be added to a workgroup. |
A domain is a set of values that a column or attribute in a table can contain. | A workgroup is a group of users who collaborate on a project or task within an organization. |
Domain focuses on data management and organization | Workgroup focuses on collaboration and teamwork |
The purpose of a domain is to define and enforce data integrity and consistency within a database. | The purpose of a workgroup is to facilitate communication, collaboration, and teamwork among members of a group or team. |
Domain-level access control can be used to restrict access to specific values within a column or attribute. | Workgroup-level access control can be used to restrict access to specific files, folders, or applications within a team or group. |
What is the advantage of domain networking?
- Control all the user accounts from one central location
- The main benefit of a domain controller is controlling all your user accounts from one location. You can offboard or onboard users quickly, manage their passwords and usernames, and control access to specific files and programs
- The security measures provided in a workgroup are not as strong as those for a domain
- Workgroups are not suggested for sensitive data, transmitting networks, or business networks.
- There is no centralized management of the resources, unlike the domain network.
How to Backup Database using Hinawi Software and SQL server
Backup can be done in two ways:
1. From Hinawi Software
2. From SQL Server
1. From Hinawi Software
Users can do Backup & Restore from File -> Utilities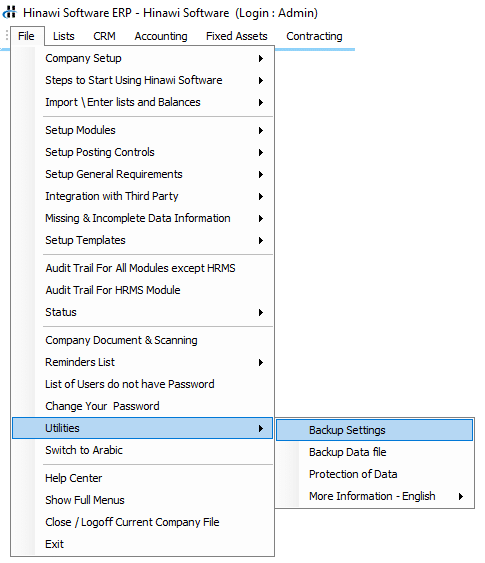
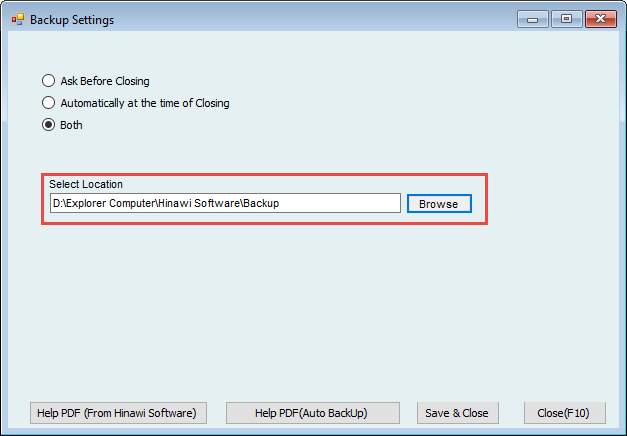
The user must do Settings for Backup. The user must select the Location where the backup is stored.
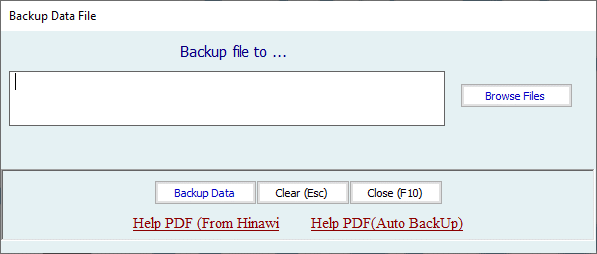
Users can select the Location for Backup from here and click on Backup Data
- From SQL Server
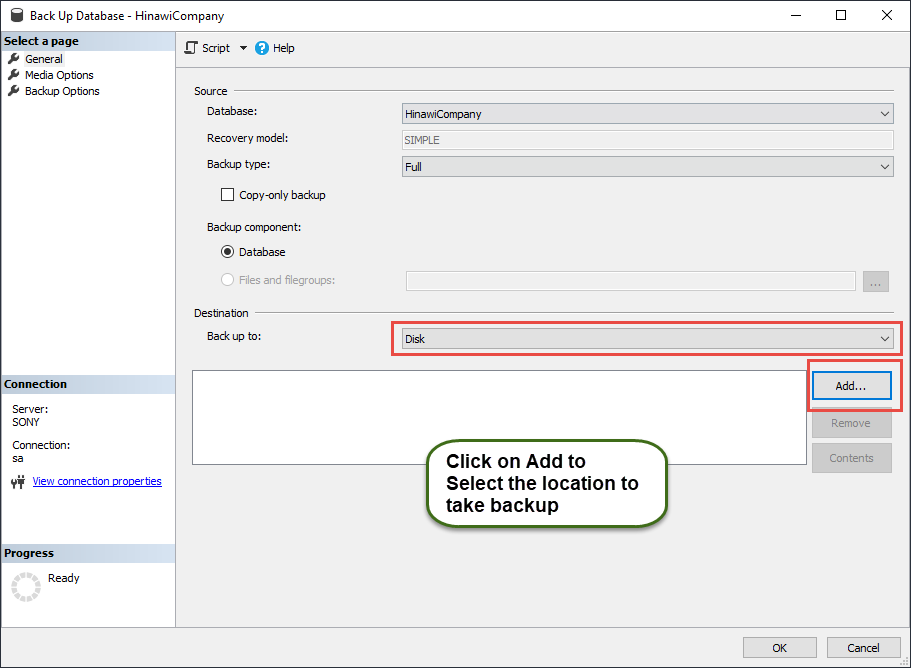
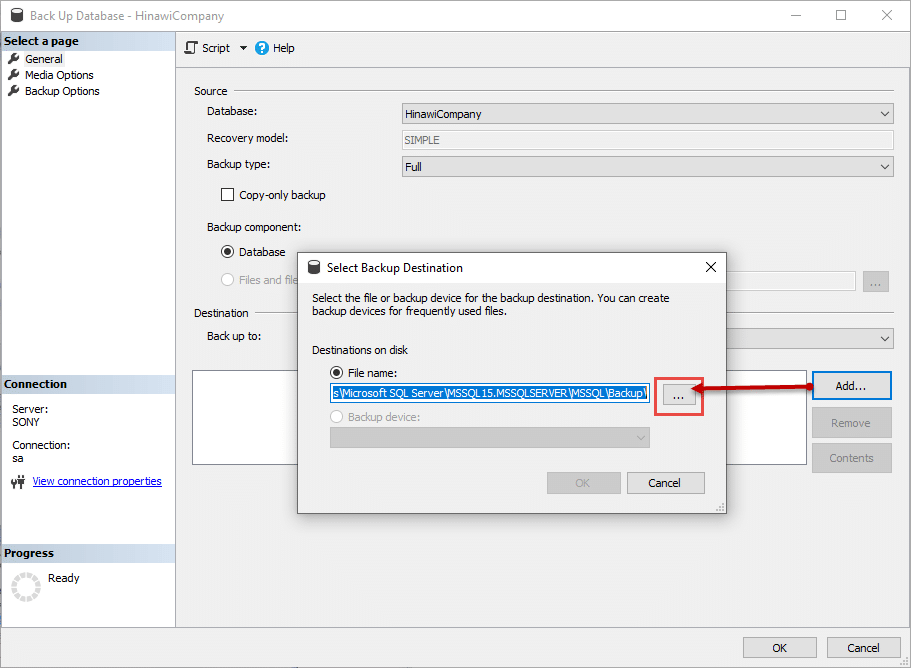
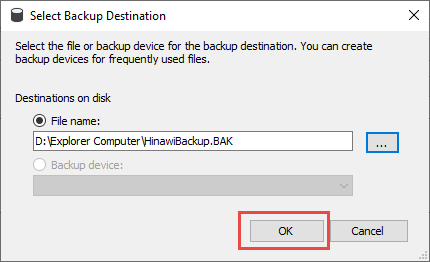
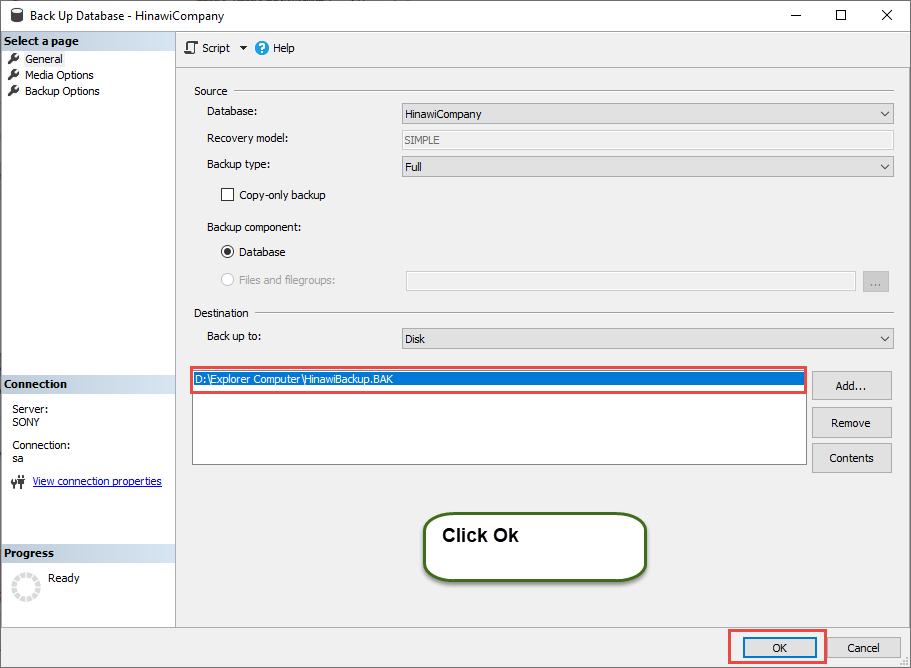
To do Back Up from SQL Server, do the followings:
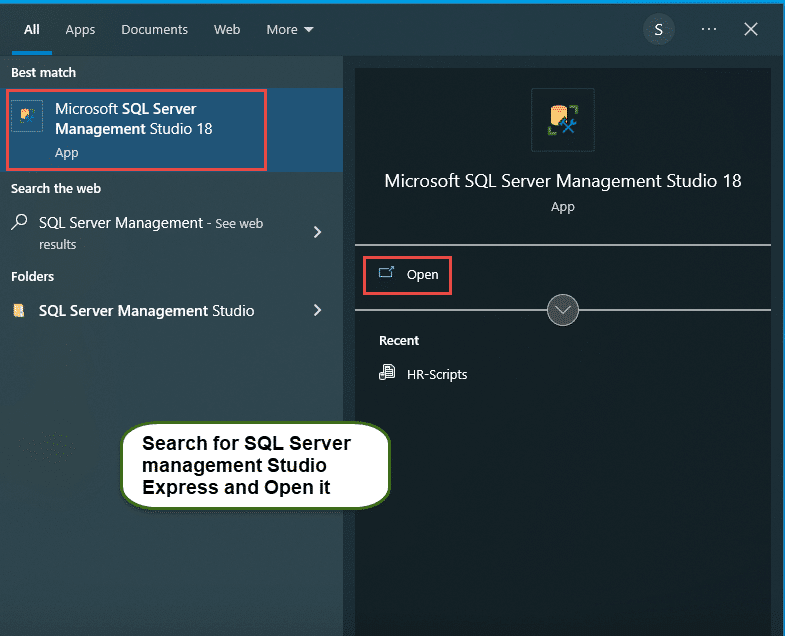
To take back up of any database of Hinawi Software from the SQL Server directly, first, run
The SQL Server Management Studio Express, which you can find from Start and Search for “SQL Server Management Studio Express.”



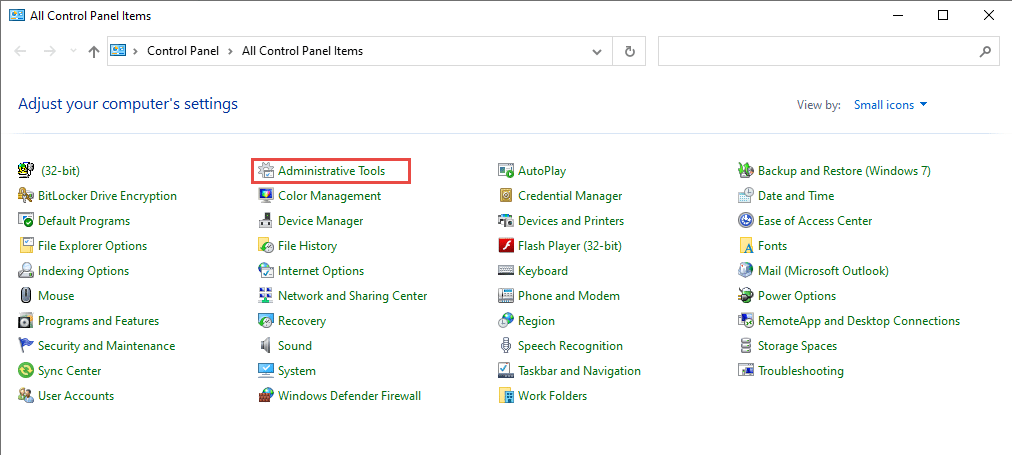
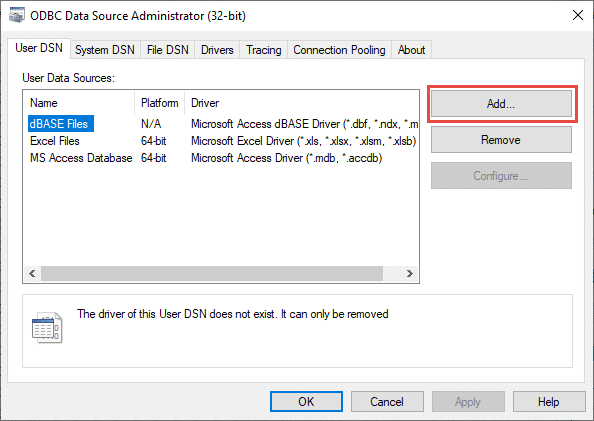
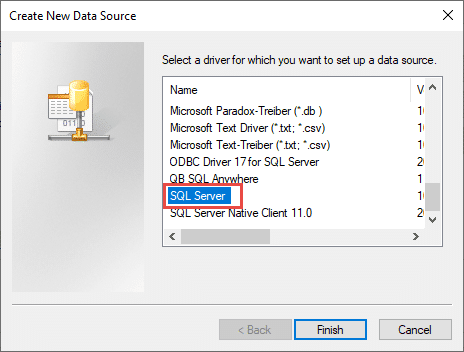
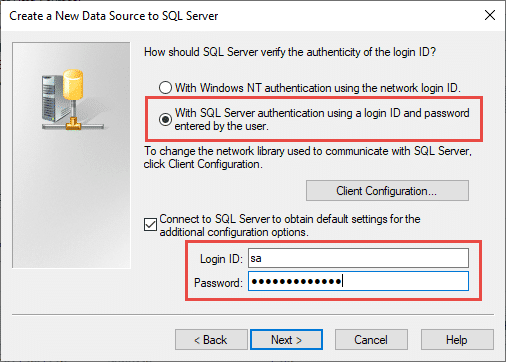
How to do SQL ODBC Test on Client PC.
Step 1-
go to Control Panel and then Click on Administrative tools


How to Make Auto Backup from Hinawi Software
Auto Backup helps you to keep your Data secure.
Backup can be used whenever your original file is corrupted or lost.
Important:
The Backup location is to be in the server and external drive.
Make sure that this Setup is applied to the server.
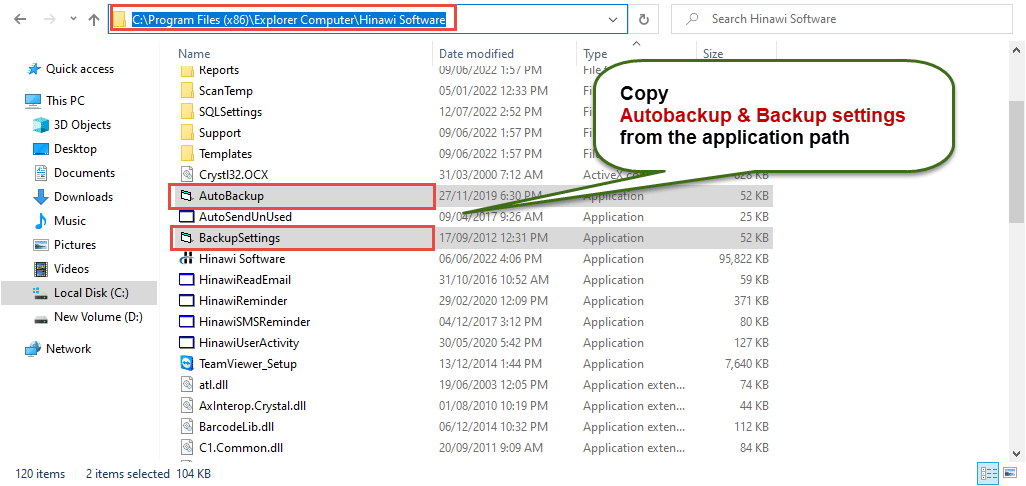
1. Go to:
Local Disk (C:) Program File (x86) or Program File- Explorer Computer- Hinawi Software
Then copy two files:
- AutoBackup
- BackupSettings
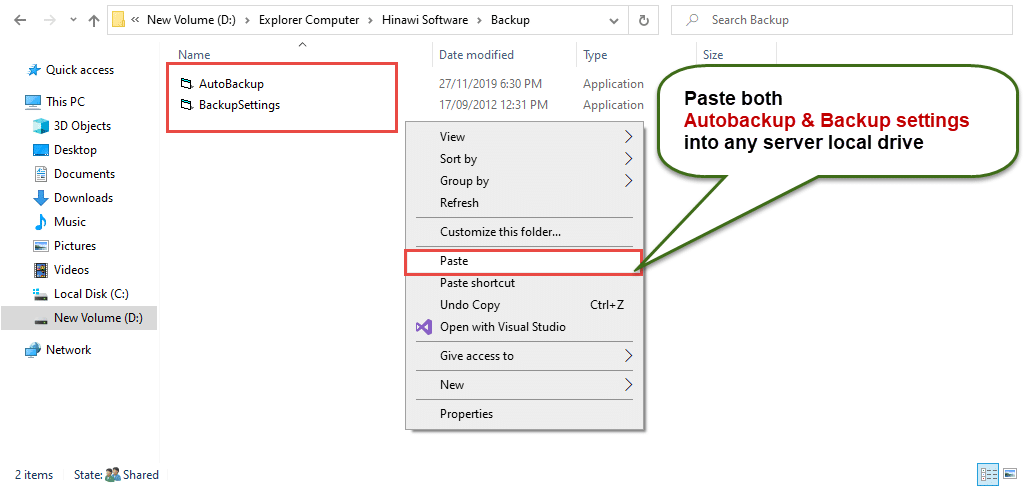
2. Paste the two files into the following:
Local Disk (D:) Explorer Computer -> Hinawi Software -> Backup folder
3. Then Double Click On BackupSettings; it will open this window; fill it as shown below:
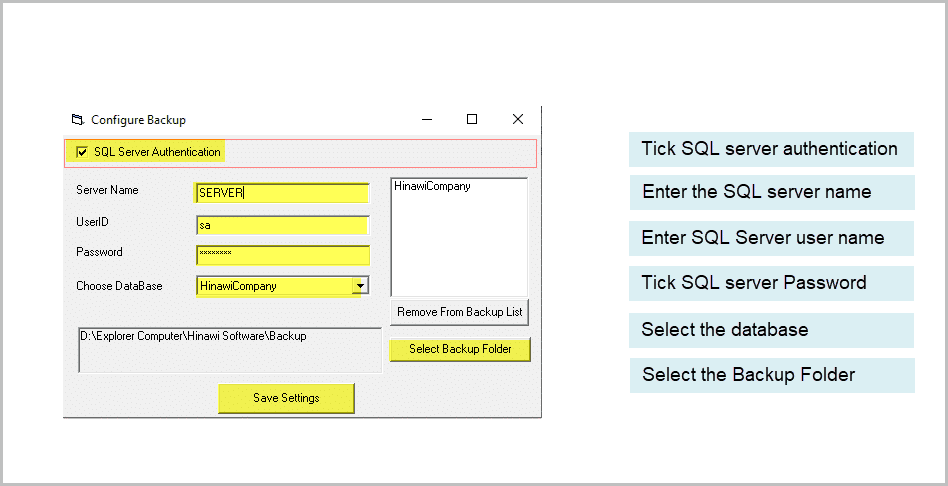
4. Click Save Settings, and you will note the creation of two new files.
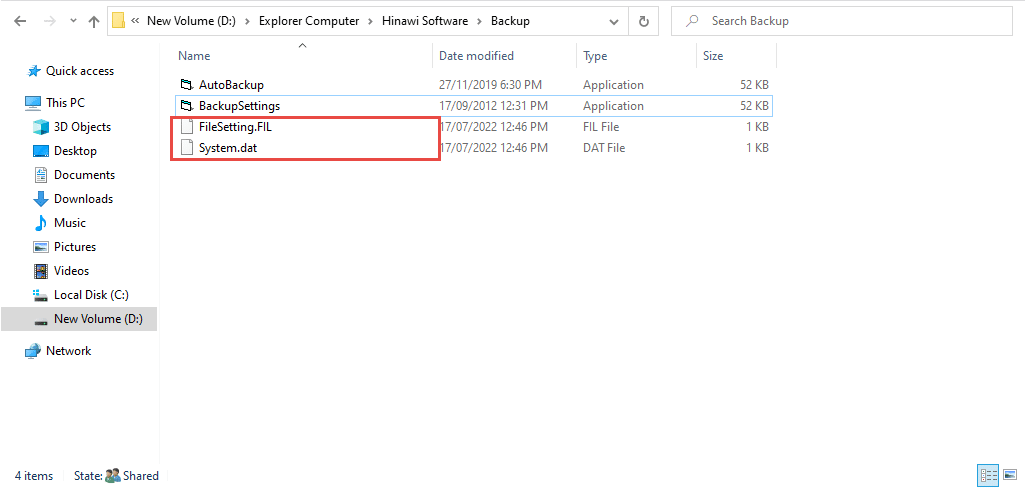
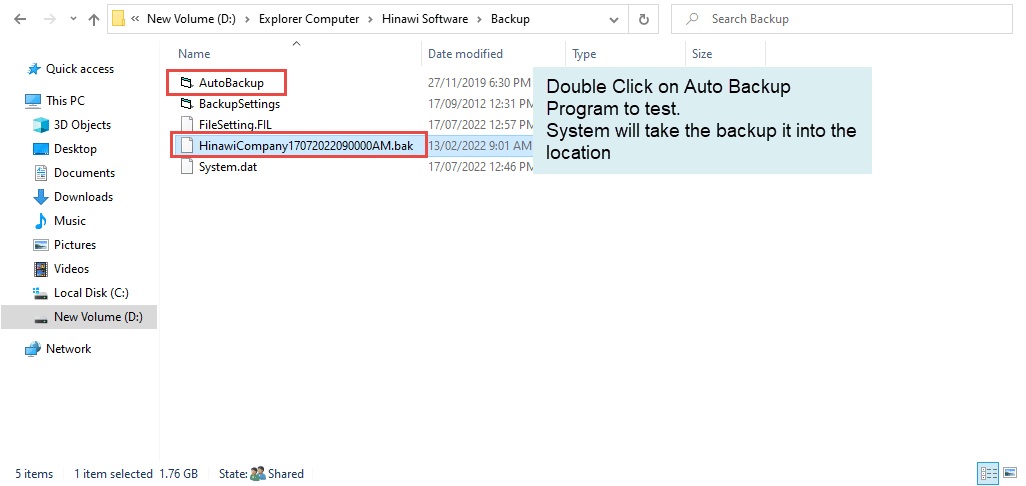
5. To ensure it is working correctly, double-click on AutoBackup, to get new backup files.
6. To make this Backup work automatically, go to Task Scheduler.

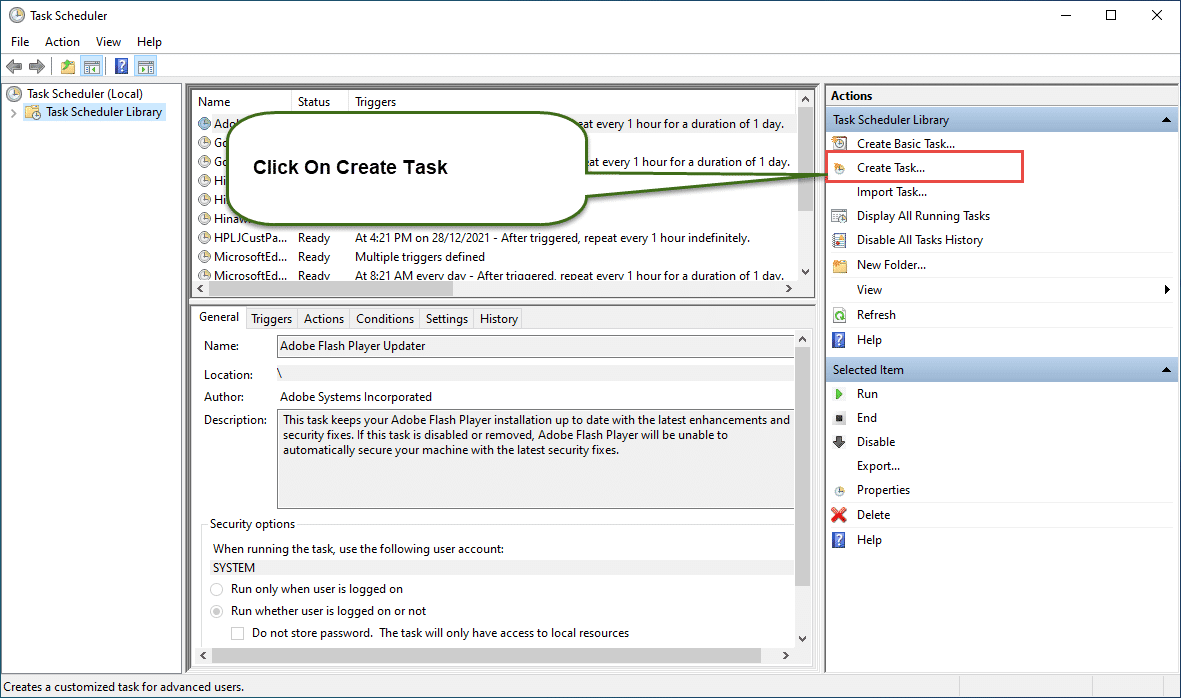
7. Fill in the Task Name and Description, then Next.

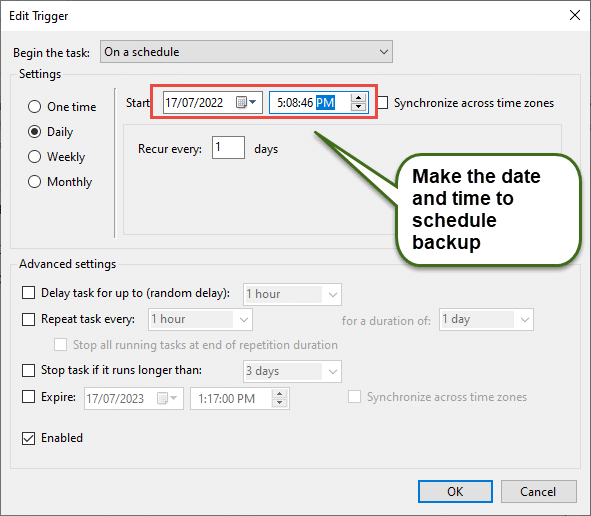
8. Go to Triggers Tab, click New Button & Choose Daily, then Click Ok.

9. Check the starting Date and Time, then Next.
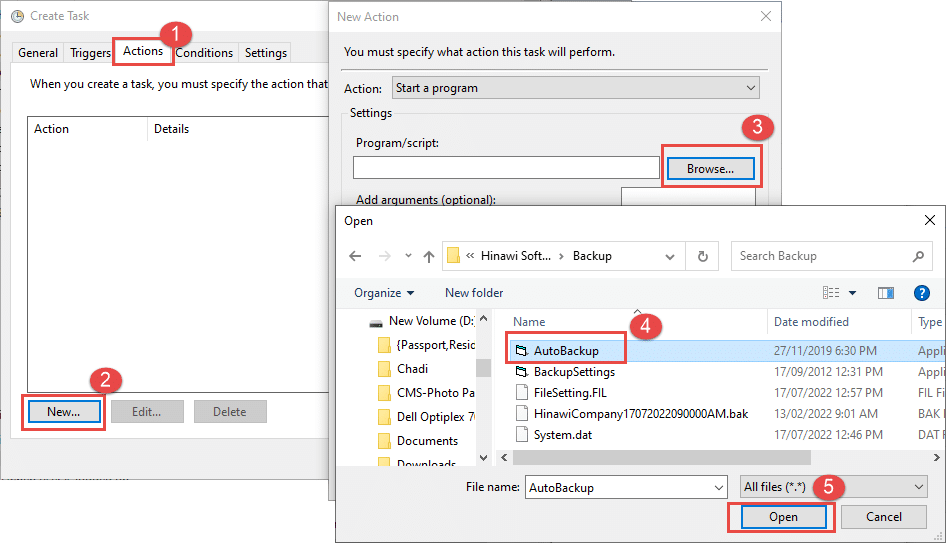
10. Go to the Actions Tab, then
- Click on New Button
- Browse the Auto backup Program from the location you copied
- Click Ok
12. Finally, Click Finish.
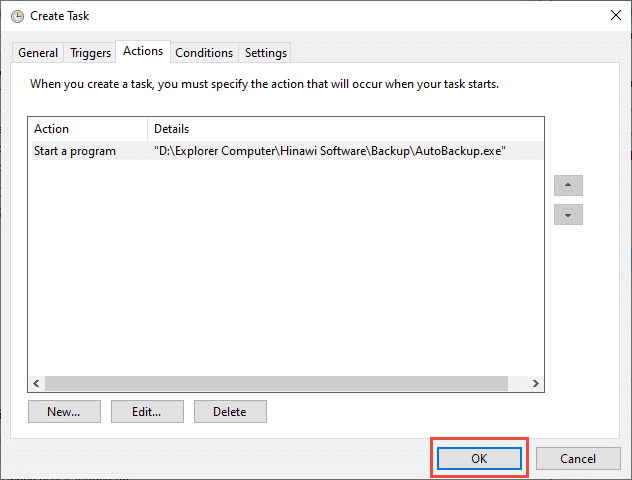
13. You will see the new Task on the Task Scheduler Library.

14. To Check if the Task is working correctly.

15. You will find that two new Backup files are coming.
Integration of Data from Third-Party Software
Introduction:
Dear Valued Users, thank you for using Hinawi ERP software. This manual is for Hinawi Business Management (Hinawi ERP) Software integration of Data from third-party software.
Settings Information:
File-> Import \ Enter Lists and Balances - > Import from Third Party Integration - > More Information


Below is the explanation for the above screen:-
1. Enabling the sales invoice Setup you will configure.

2. Use Third Party Invoice No.
If the User tick marks this option, the User must provide Invoice No. For the sales invoice. b. If the User doesn’t mark this option, the System will generate Invoice No. for each sale
invoice.
3. Use Items from Third Party Software
If the User tick marks this option, the User must provide the Items for each sales invoice transaction.
Note:
The User must first import the Item List to the System before the User can include the Item in importing using the standard CSV file.
b. If the User does not tick mark this option, the User must choose a default Item for all the sales invoice
4. Use Quantity
If the User tick marks this option, the User must provide the Number of Items for each sales invoice transaction.
b. If the User does not mark this option, the System will consider the Item Quantity as one (1) for all sales invoice transactions.
Note:
This option will be enabled if you tick mark the option for “Use Items from Third Party.
Software”
5. Use Terms (Terms can only be applied to Credit Invoice)
If the User tick marks this option, the User can include the payment terms for each sales invoice.
Note:
The User must first import the Terms of Payment List to the System before the User can include the terms in importing using the standard CSV file.
b. If the User does not tick mark this option, the User can’t include the payment terms for each sales invoice.
6. Default Deposit Account
- The User must choose the default deposit Account for Cash Invoices.
7. Default Item
- The User must choose a default Item for all sales invoice transactions.
Note:
Default Item can only be set if the User didn’t choose to mark the option “Use Items from Third Party Software.”
8. A/R Account
-The User must choose the default A/R Account for Credit Invoice.
9. Folder Name
-The User must locate the default folder name where the System will read the entire CSV file.
Note:
The User must have Full permission of the default folder location (After Importing the CSV file, the File will be moved to the Imported Files Folder, which the System will generate automatically).
Importing Sales Invoice
File -> Import \ Enter Lists and Balances -> From Third Party -> Import Cash Invoice / Import Credit Invoice.
Import Cash Invoice \ Credit Invoice

Folder Name
- Folder name will be filled automatically depending on the Setup.
Sample Format

- Choose the Standard CSV format for importing the Sales Invoice.
Read Files from the Folder

- After clicking “Read Files from Folder,” one selection box will open, and it shows all the
CSV files are available in that default folder
Note:
The File must contain Columns as per the Setup in the following order.
Standard with Totals:
1. Invoice No.
2. Customer Name (Must Match with the Same Customer Name in Hinawi ERP).
3. Invoice Date.
4. Amount.
5. Memo.
6. Terms (Optional).
Standard with Item Name:
1. Invoice No.
2. Customer Name (Must Match with the Same Customer Name in Hinawi ERP).
3. Invoice Date.
4. Amount.
5. Memo.
6. Terms (Optional).
7. Item Name.
8. Quantity (Optional: If there is no Quantity column System will consider Quantity as
1)
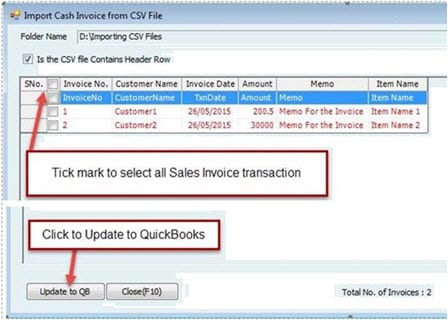
- Choose the CSV file you want to import to the System, tick mark the entire Sales invoice that will be imported to the System, then click “Update to QB.”
- The System will save the Invoice in Hinawi ERP and update it to QuickBooks afterward.
- After Importing, the CSV file will be moved to the Imported Files Folder.
Protection of Data
How to Protect your Data in Hinawi Software:-
- Data is the Customer's responsibility since the User(s) is the one who is engaged in its daily activities. To avoid loss of Data, please do the following:-
- Backing up your Data to the cloud is one of the best ways to guard against Data loss.
- Cloud Data backup should be done frequently and regularly; this is especially important for mission-critical Data whose loss or corruption can severely hinder normal business processes and operations. Backing up your Data to the cloud allows for easy scalability; your Data storage size can be readily expanded to accommodate your Data storage needs.
- Password control is the primary line of defense in safeguarding the Data within your network. Sensitive information should be password protected so only users who know the password can access the Data.
The password used to secure the Data should not be used for other applications or tools; it should be strong, with a combination of letters, numbers, and special characters, as well as unique.
In addition, the password should be provided only to individuals who need access to the Data to carry out their job duties. Furthermore, the password should be changed regularly. - Daily backup on external and Internal Hard Disks or the cloud.
- Install auto backup software on the server to make daily data backups.
- Virus protection software must be installed on Servers and computers.
- UPS machine for emergency purposes in case of electricity power shutdown. This will keep servers and client PCs working for some time.
- Other safety measures recommended by Customer IT staff or consultants and hardware supplier
- Daily, monthly, and yearly Data printing and reports to be kept safe.
QuickBooks
System requirements for QuickBooks Desktop
QuickBooks Software stored the Data as a file. The Data Data will be held in the local drive of the Server Computer, which will be shared over the network to get access to the users.
Users must have full privileges on the QuickBoDatadata storage folder.
Operating systems
- Windows 11, 64-bit, natively installed (QuickBooks Desktop 2022 R3 or later).
- Windows 10, all 64-bit editions, natively installed.
- Windows Server 2022, Standard and Essentials
- Windows Server 2019, Standard and Essentials.
- Windows Server 2016, Standard and Essentials.
Note:
QuickBooks requires you to use Windows natively, not through an emulator or virtual environment.
Database servers
- Windows Server 2022, Standard and Essentials
- Windows Server 2019, Standard and Essentials.
- Windows Server 2016, Standard and Essentials.
- Windows 10.
Note:
QuickBooks requires you to use Windows natively and not through an emulator or virtual environment.
QuickBooks Desktop requires a 64-bit Windows operating system and won’t run on 32-bit.
Are you using Windows Server 2012?
Microsoft will no longer provide security updates or support for PCs running Windows Standard and Essentials Server 2012 and Server 2012 R2 after Oct 10, 2023.
For this reason, QuickBooks latest version won't support Windows Server 2012 and can’t be installed on it.
Note: Linux and Windows 10 S Mode not supported. QuickBooks requires you to use Windows natively and not through an emulator or virtual environment.
Browser requirements
QuickBooks desktop requires internet access and Google Chrome.
Hardware and operating system requirements
QuickBooks Desktop requires a 64-bit Windows operating system and won’t run on 32-bit.
Check which Windows you use.
- Select Windows Start.
- Select Settings.
- Select System, then About.
Under Device specifications, you’ll see the processor and operating system type.
Your options if you don’t have 64-bit system compatibility
We recommend one of the following:
- Upgrade your computer hardware / Windows operating system, or both, to provide 64-bit compatibility.
- Stay on your current version of QuickBooks Desktop. QuickBooks will remain 32-bit compatible with 2021, 2020, and 2019 versions, and support terms will remain unchanged.
Processor | 2.4 GHz minimum |
RAM | 8GB minimum for 64-bit, 16GB Recommended |
Server RAM requirements | 1-5 Users: 8GB RAM 10 Users: 12GB RAM 15 Users: 16GB RAM 20 Users: 20+GB RAM |
Disk space | 2.5GB of disk space (additional required for data files). Other software: 60MB for Microsoft .NET 4.8 Runtime, provided with the installation files. Additional requirements for Intuit Data Protect in QuickBooks Connected Services offerings: Require a minimum of 4.0GB of RAM Twice the size of the most extensive file set to back up + 100MB or twice the size to restore. The space is only required from the work folder LocalApplicationData+” Intuit\Intuit Data Protect.” Note: Store your QuickBooksDataa file on a solid-state drive (SSD) for the best performance. |
Windows | North American version of Windows. Regional settings are supported when set to English. Administrator rights are required for the server computer when hosting multi-user access. Natively installed and didn’t need to run in a virtual environment or emulation software. |
Screen resolution display | Display optimized for 1280 x 1024 screen resolution or higher with up to 2 extended monitors. |
Important Notes and instructions for Integrating Between Hinawi ERP with QuickBooks
1. Before you start, change the type of Account in the Hinawi ERP chart regarding Cash Type, PDC, and CUC Account type.
2. All users of Hinawi ERP must have used an m e in QuickBooks and permissions too.
3. If you have already created a QuickBooks data file and now you want to use Hinawi ERP Software, the following points must be checked in the QuickBooks file before start using our software: -
- Make sure that preference is done properly and completed.
- Make sure you did allocations between payments to suppliers and bills, the report.
- Unpaid bills Detail under Vendors and Payables Report should not show any negative amount.
- Same for the report Open Invoices under Customers and Receivables should not have negative amounts.
4. The users in QuickBooks must have Full Permission to access the activity forms they used in Hinawi ER. For Example:
- Creating new Transaction in Hinawi ERP: -
The user mu s t h a v e p er mis sio n in QuickBooks to Create a Transaction for that Transaction (Form Activity).
- For Editing Transaction in Hinawi ERP: -
The user must have permission in QuickBooks to Create, Modify & Delete the Transaction. This is an important point; if no permission is specified above, the transaction will duplicate in QuickBooks.
- If t h e user makes "anEdit" write a check and his Setup is "Automatic," the system will delete the original transaction and create the same automatically. To avoid deleting, set a closing date in QB every month.
5. Do not Merge or delete Accounts in the Chart of Account list, vendors, customers, or employees in QuickBooks.
6. Do not convert the names in the `Other Names` list in QuickBooks to the Vendors or Customers or Employees List.
7. To switch between multiple Accounting files in QuickBooks. First, you must close Hinawi ERP and then open the QuickBooks file.
8. By editing transactions in Hinawi ERP, QuickBooks will delete the original one and create a new one. If this transaction is before the set closing dates, QuickBooks will not allow editing in Hinawi ERP. To avoid deleting, set a closing date in QuickBooks every month.
9. Make sure to close all kinds of windows in QuickBooks that affect running integration, e.g., Windows of, Videos, preferences, set closing date, setup users, Company information, Add \ Edit Multiple Entries, Verify, Rebuild or clean data and any online QuickBooks services window that opened from QuickBooks or Set Credit` window in Accounts Receivables and Payables. And QuickBooks does not open company information under the company menu during integration or posting.
10. If the User enters the Transaction through Hinawi ERP and later modifies the same Transaction from QuickBooks, it will not affect Hinawi ER So, the user must do ALL his work from Hinawi to guarantee a match of balances.
11. Hinawi ERP does not read Multi-Currency from QuickBooks. Still, when creating a transaction in Hinawi ERP, it will automatically read the currency in QuickBooks, except for the Journal Voucher, where the user must select the currency of each transaction.
12. We recommend Admin user does 'closing of data' in QuickBooks at the end of each month. By this, no transactions can be entered or edited from Hinawi ERP.
13. Ensure the person in charge is the only one to use the Admin user. Do not give the password to another user
14. Do not give Admin passwords to normal users.
15. The date setup in all computers and servers is dd/mm/yyyy. Example: 31/12/2021
16. If you want to run software in Arabic, filling in ALL required fields in Arabic is very important. Missing Arabic fields are located under the File menu.
17. Keep data updated to avoid missing information in reports or activities. The Missing data report is located under the File menu.
Important:
All Setup done by the customer is his FULL responsibility.
Settings: -
Complete all settings
Templates
Complete all Templates
Chart of Account Type
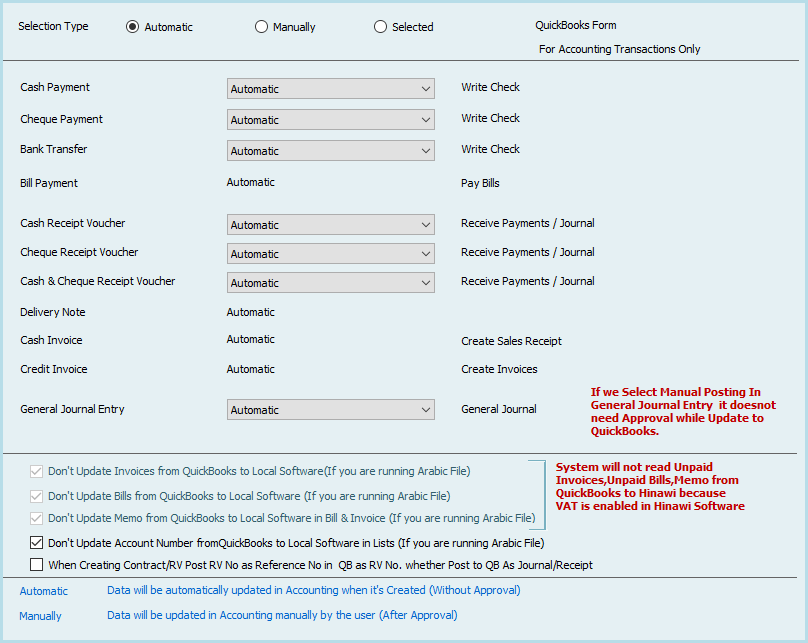
Integration Settings:
Make sure to select the integration method that meets your needs.
Sample of process if select manual posting:
Users must update QuickBooks in the below way. In Automatic Setup, all transactions will be posted to QuickBooks automatically.
Attachment Setup:
Make sure is done to save all types of attachments
Things to do in QuickBooks before and during using Hinawi ERP: -
If the customer already has QuickBooks data, the user must work in the below for better use of both QuickBooks and Hinawi ERP
1. Make sure there are no Arabic names in all lists
2. Merge similar names in all lists
3. Create an Account in Chart of Account no. 99 Intermediate Account
4. Make sure that Account no. 30000 opening Balance is created
5. Delete unnecessary names
6. Make sure that preference is done properly and completed.
7. Make sure you made allocations between payments to suppliers and bills; the report Unpaid bi tells Detail under Vendors, and the Payables Report should not show any negative amounts.
8. Same for report Open Inv voices under Customers and R receive ables should not have negative amounts.
9. Rearrange the accounts of Fixed Asset
10. Import Fixed Assets
11. Rearrange the accounts of Cheques under Collections (CUC) and Post Dated Cheques (PDC). Edit account type in hinawi Chart of Account to PDC or CUC type
12. Set a closing date
13. Set Preferences
Extra features from Hinawi ERP Software that I s not available in QuickBooks:
1. Fully integrated with all versions of QuickBooks.
2. Cover missing features in QuickBooks.
3. Real Estate Management Modul
4. Advanced Fixed Assets Modul
5. Complete Bilingual Language, Arabic, and English.
6. Calculate Commission for sales Re
7. Post multiple Receivables and Payables in one JV entry.
8. Create Receipt Vouchers (RV) from all kinds of na
9. Adding three new types in the Chart of Accounts (Cash, PDC & CUC).
10. Create 3 ways to post to QuickBooks. Real-Time, Batches, and Mix of two.
11. Control Post Dated Cheques Received & Issued with auto-revised entry.
12. Receive multiple cheques at one Receipt Voucher (RV).
13. Option to Not allow to post to the main Account
14. Option not to sell if there is not enough quantity
15. Option not to change the selling price
16. Allocate expenses to Fixed A
17. Photos of all kinds of na
18. Design and templates with Printing for all activity forms (Cheques, Payments, Collections, JV, SIV, SRV, Transfer Inventory, Inventory Adjustments, Enter Bill & more)
19. Complete the HR, Time Sheet, Payroll, WPS, and Tax Module.
Inventory:
1. Calculate the Landed Cost of the Inventory Item (Adding Shipping charges, customs, transportation, and Other expenses).
2. Multiple Inventory Adjustment entries in one form.
3. Movement and None Movement Inventory Item.
4. Advanced Physical Inventory Worksheet.
5. New look at Inventory Valuation Detail.
6. And more.
Reports:
1. Advanced Trial Balance (Beginning Balance, total movements, and Ending Balance).
2. Financial Ratios: Profitability, Activity & Liquidity.
3. Advanced Customer / Job profitability report in summary and detail.
4. Cashier Reports (Collections & Payments).
5. Advanced Audit Trail (Filter By user, activity form, and total entries by each).
6. Partial paid Invoices and Bi
7. Depreciation by Project.
8. You Can customize your required reports from QuickBooks data.
9. Reports in QuickBooks are seen from Hinawi ERP.
Report Center by:
1. Employee
2. Building and flat
3. Class
4. Fixed A
5. And more
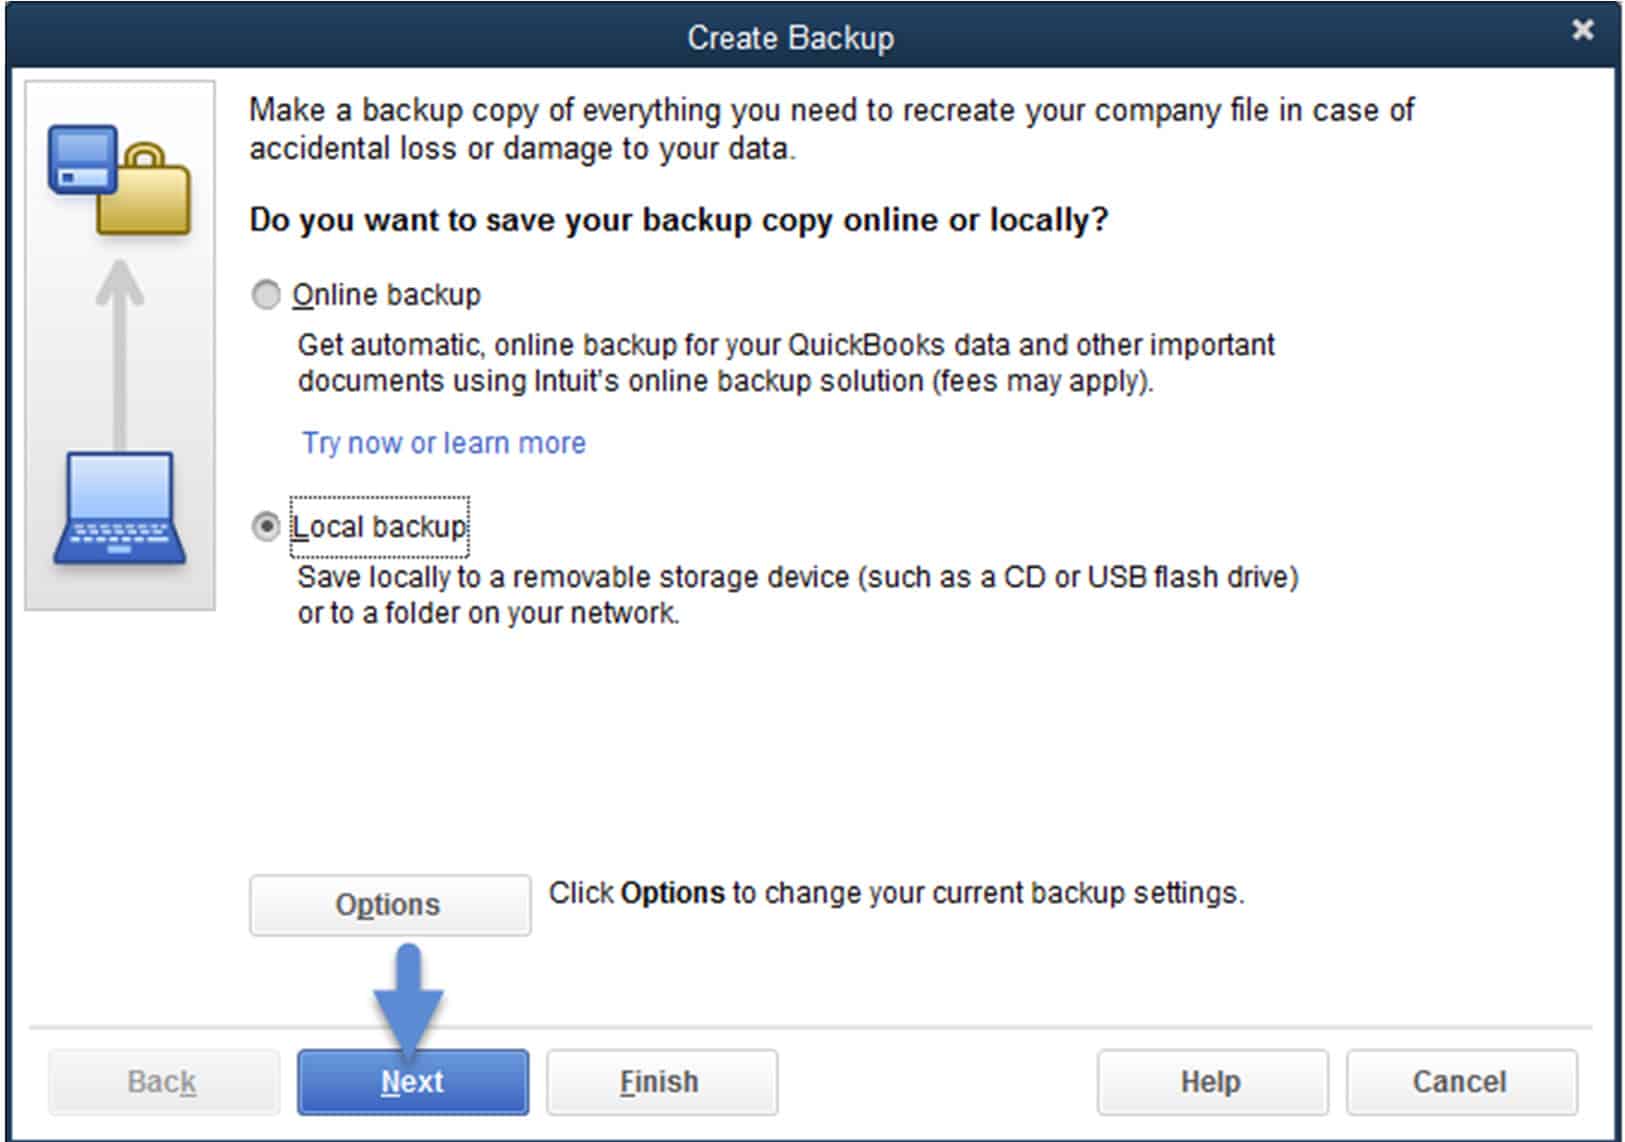
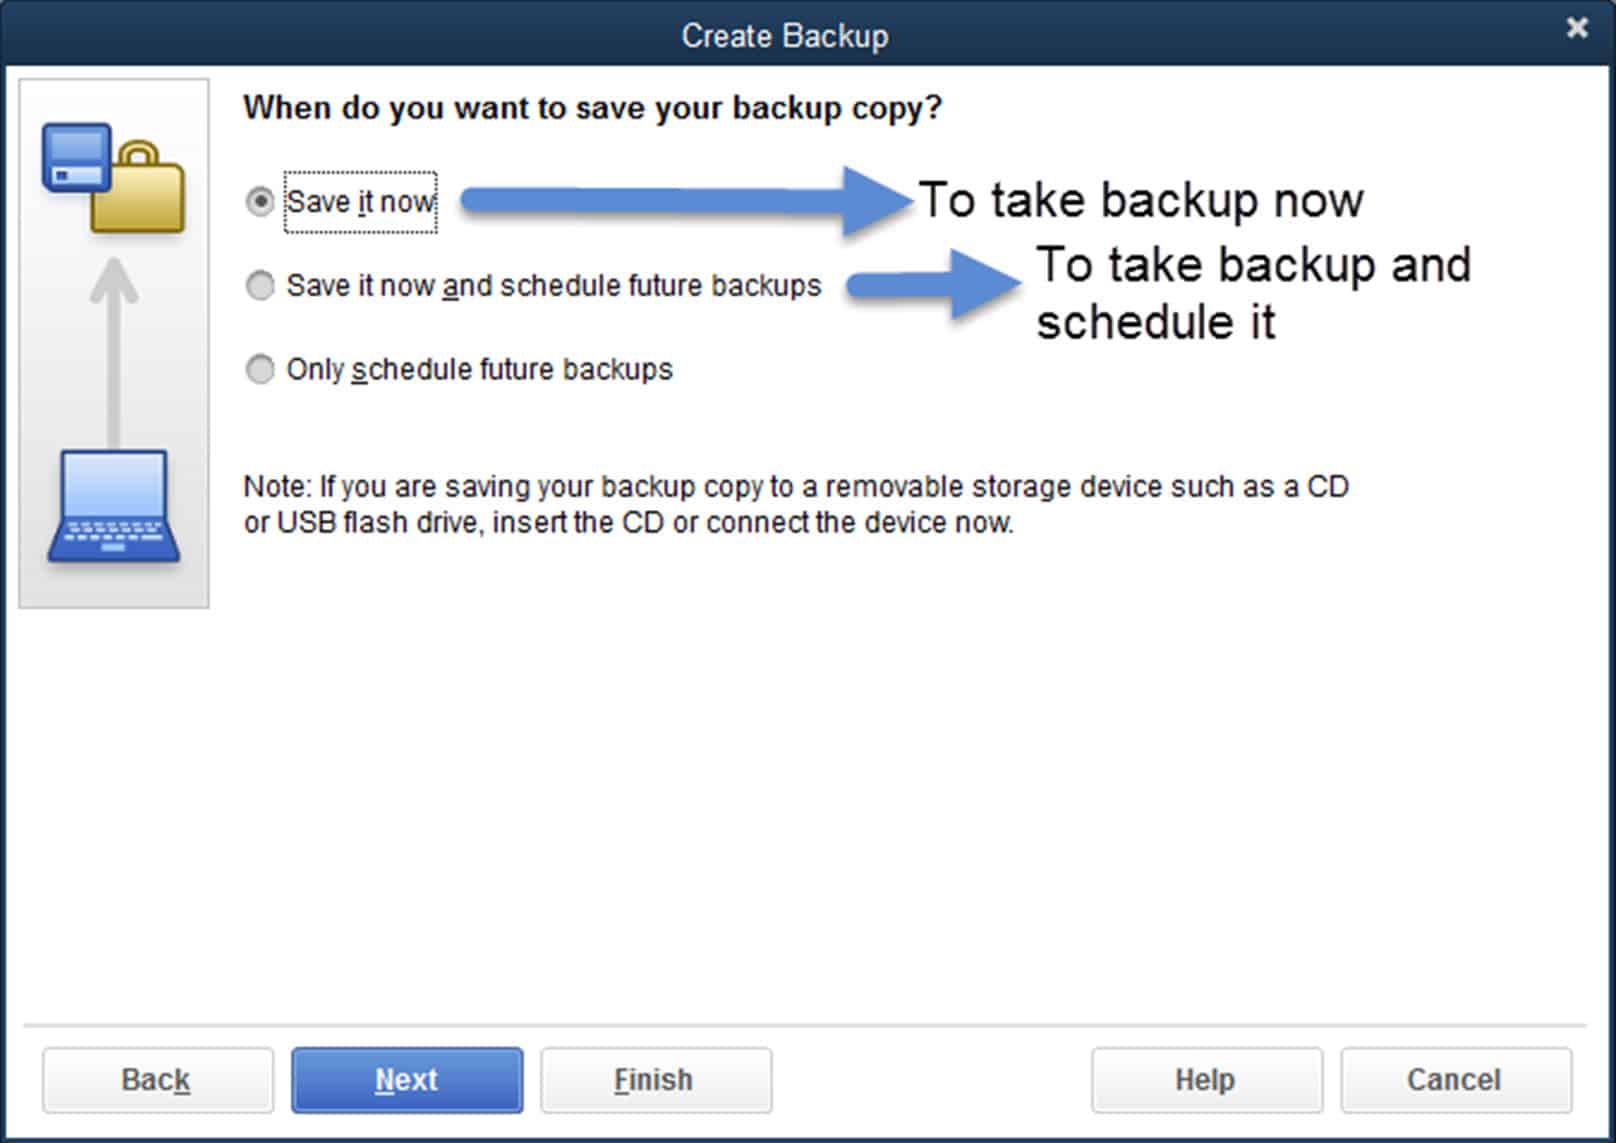
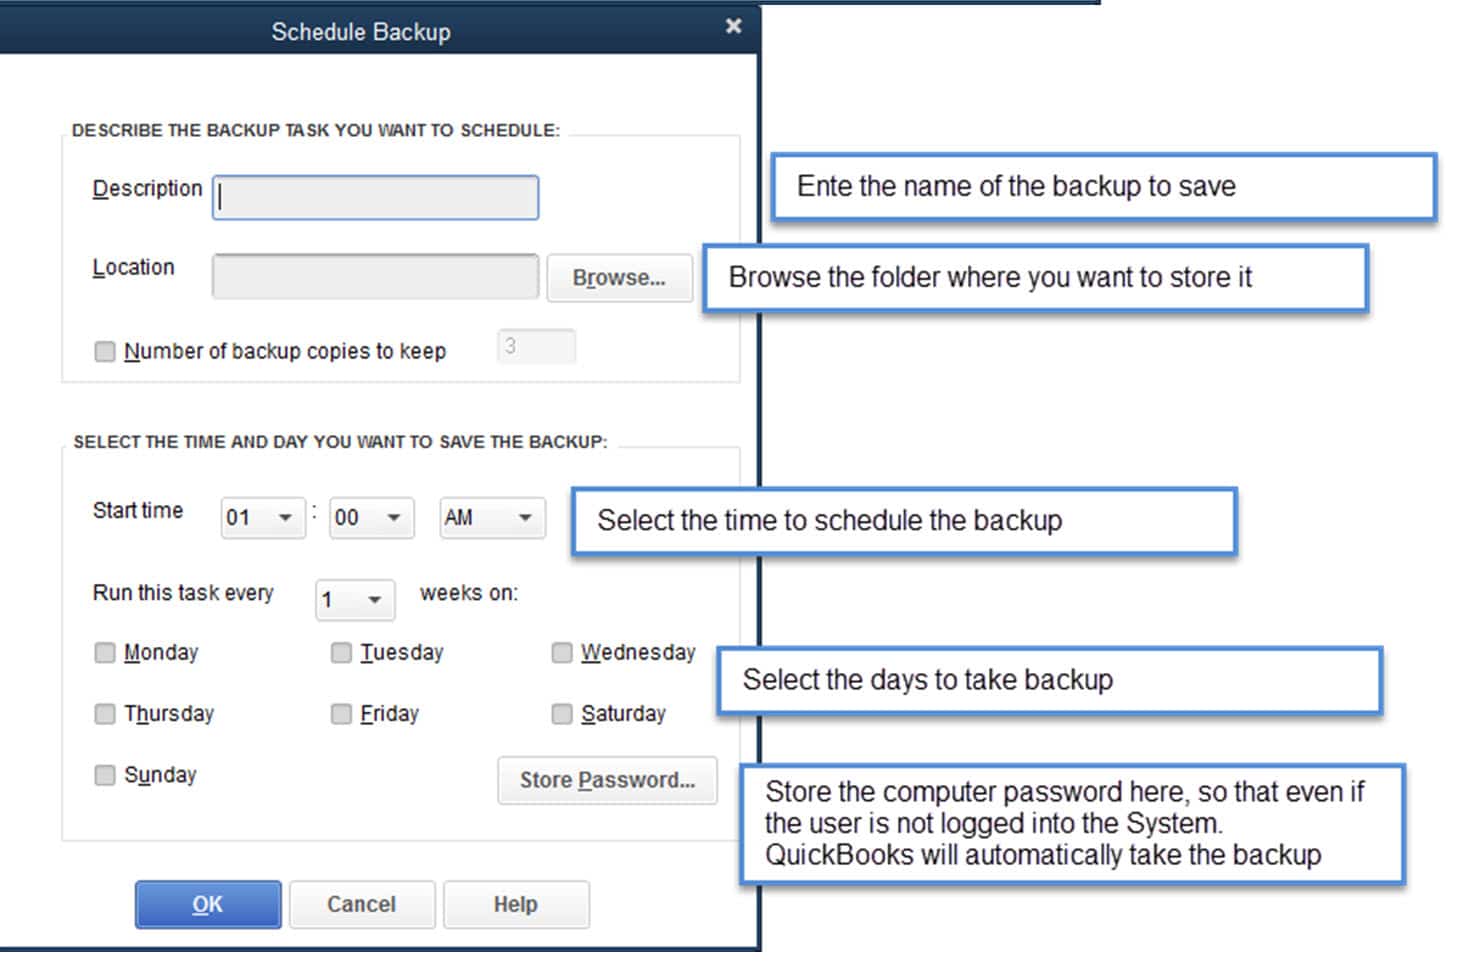
How to schedule an auto backup in QuickBooks Company File.


Main Causes of QuickBooks Hosting Issue
>>A firewall is blocking the connection between the two computers.
Make sure to turn off the firewall that is blocking the Connection b/w client and Server PC or make an exemption
>>QuickBooks isn't running with admin permissions.
QuickBooks users must have full permission on the file and its related folders
>>User doesn't have enough permission on the QuickBooks Data folder.
Client User Must have fully read \ write permission on the server location where the QuickBooks file is stored
>>User doesn't have administrative privileges on his\her Computer.
The user must be an Administrator on his \ her Computer.
User control Settings must be in never notify mode
>>.ND and . TLG files are damaged.
These are QuickBooks extensions that store network-related information. If any connection issue comes, rename the file with this extension and Re-run the QuickBooks database Server manager.
>>One of the Users, by default, opened the file as single user mode, and when he closed the Company file, instances remained in the task Manager
we need to restart the Server to disconnect the file with the Users rather than all the users to restart their PCs
>>Setup hosting is enabled on one of the User computers.
Hosting must be enabled only on Server Computer. If any users enabled it by mistake, disable it by going to QuickBooks -> File->Utilities and ensuring it's written "Host Multiuser access."
QuickBooks Software Issues and Solutions
These solutions are from Intuit US [QuickBooks Software Company]
QuickBooks ERROR Code: H202,H205,H505
Detail: when the User tries to switch the QuickBooks Company File to Multiuser mode, the system will throw an error with error code H202, H205 like the following screen
If you see Error H202 or H505 (or H101 and H103) when you try to switch to multiuser mode, we're here to help. These errors mean something is blocking the multiuser connection to your server. We'll show you how to fix the issue.
Run the QuickBooks Database Server Manager on your server with the QuickBooks Tool Hub.
Step 1: Download and install the QuickBooks Tools Hub on your server
The QuickBooks Tool Hub helps fix common errors. You'll need to close QuickBooks to use the tool hub. For the best experience, we recommend you use Tool Hub on Windows 10, 64-bit.
- Close QuickBooks.
- Download the most recent version (1.5.0.0) of the QuickBooks Tool Hub. Please save the file somewhere you can easily find it (like your Downloads folder or Windows desktop). Note: If you've installed Tool Hub before, you can find out which version you have. Select the Home tab. The version will be on the bottom.
- Open the File you downloaded (QuickBooksToolHub.exe).
- Follow the on-screen steps to install and agree to the terms and conditions.
- Double-click the icon on your Windows desktop to open the tool hub when the installation finishes.
Note: If you can't find the icon, search in Windows for QuickBooks Tool Hub and select the program.
Step 2: From the Tool Hub, run the QuickBooks Database Server Manager on your server
Your server computer is the one that stores your QuickBooks Company file(s). Your other computers connected to your network are your workstations.
- From the QuickBooks Tools Hub, select Network Issues.

- Select QuickBooks Database Server Manager. If QuickBooks isn't on your server, it'll prompt you to install it.
- Inside the QuickBooks Database Server Manager, select Start Scan if you see your Company file folder(s). If you don't, Browse to the location of your company file and then select Start Scan.

- The QuickBooks Database Server Manager will repair your firewall permissions automatically when the scan finishes; select Close.
- Open QuickBooks on each workstation where you see Error H202. Select File and Switch to Multiuser Mode. If you use your server computer as a workstation, check it too.
Step 3: From the Tool Hub, run the File Doctor.
- From the tool hub, select Company File Issues.

- Select Run QuickBooks, File Doctor. It can take up to one minute for the file doctor to open. (Note: If the QuickBooks File Doctor doesn't open, search for QuickBooks Desktop File Doc and open it manually.)
- In QuickBooks File Doctor, select your company file from the dropdown menu. If you don't see your File, select Browse and search to find your File.
- Select Check your File (middle option only) and then Continue.
- Enter your QuickBooks admin password and then select Next.
Everything is fixed if your workstations can go into multiuser mode without issues.
If you still see Error H202, continue to our other solutions.
Fix Error H202 manually
Solution 1: Check the services on your server
Make sure QuickBooks services are running on your server computer. Follow these steps to check QuickbooksDBXX. Then repeat them for QBCFMonitorService.
- Open the Windows Start Menu on your server computer.
- Type "Run" into the search and open Run.
- Type "services. msc" into the Run window and press Enter.
- Find and double-click QuickBooksDBXXon the List. XX notes your version of QuickBooks.
- Select Automatic for the Startup Type.
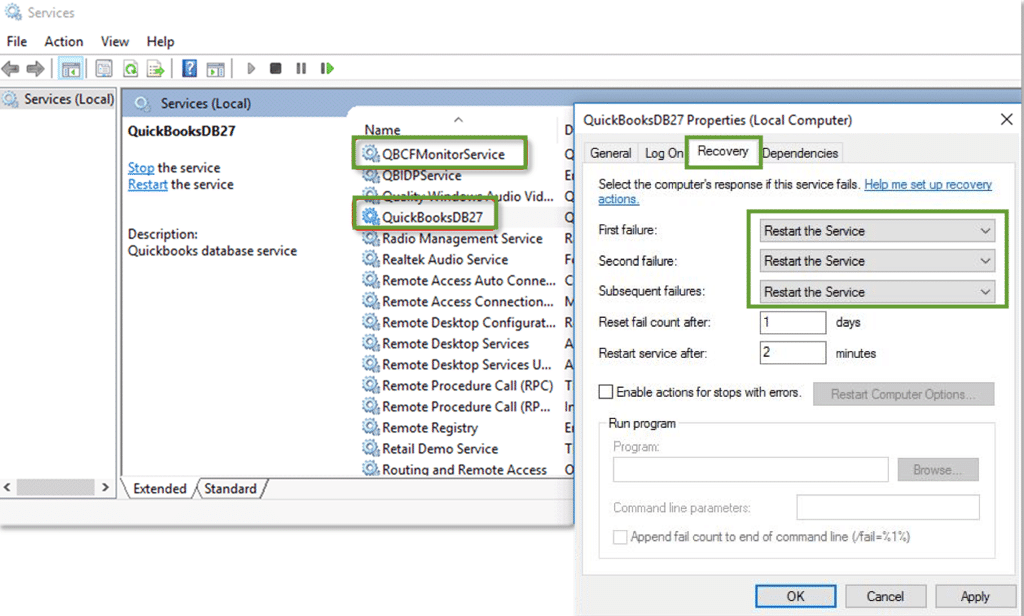
- Ensure the Service status is either Running or Started if it's neither, selects Start.
- Select the Recovery tab.
- Select Restart the Service from these dropdown menus: First, Second, and Subsequent failures.
- Select Apply and then select OK to save the changes.
- Repeat these steps for QBCFMonitorService.
When you're done, open QuickBooks on each workstation. Go to the File menu and select Switch to Multiuser Mode. If everything opens correctly, the problem is fixed.
If you still see Error H202, move on to Solution 2.
Solution 2: Add services to your Windows admin group on your server
If you haven't already, give QuickBooksDBXX and QBCFMonitorService admin permissions on your server computer. See set Windows access permissions to share company files for instructions.
When you're done, open QuickBooks on your server computer and workstations. If you still see Error H202, move on to Solution 3.
Solution 3: Configure your firewall settings on your server
Make sure your server computer is set to allow QuickBooks through your firewall.
- See configure Firewall and Internet security settings for QuickBooks Desktop for instructions on how to set up Windows firewall exceptions.
- After setting your firewall permissions, open QuickBooks on your workstations.
- Go to the File Menu and select Switch to Multiuser Mode.
If everything works, you will fix the issue. If you still see Error H202, move on to Solution 4.
Solution 4: Ping your server from a workstation
Ping your server from a workstation to check the connection. Ping your server from each workstation, getting Error H202.
To start, turn on Network Discovery on your server computer and any workstations with Error H202:
- Open the Windows Start Menu on your server and workstations.
- Type "Network" into the search and open Network and Sharing Center.
- Select Change advanced sharing settings.
- Ensure Turn on network discovery is selected in the Network Discovery and File and Printer sharing sections.
Next, get your server name from your server:
- Open the Windows Start Menu on your server computer.
- Type "Run" into the search and open Run.
- Type "CMD" into the Run window, and then press Enter.
- Type "ipconfig/all" into the CMD window and press Enter.
- Find the Host Name in the Windows IP Configuration section. Your server name is on the right.
Please write down the hostname or copy it to a word document so you can access it quickly.
Go back to your workstation to test the server. These steps can get complex, so you may want to contact an IT professional for help.
- Open the Windows Start Menu from a workstation.
- Type "Run" into the search and open Run.
- Type "CMD" into the Run window, and then press Enter.
Type "ping [your server name]," then press Enter. Don't include the brackets around your server name.
- Repeat these steps for each workstation that gets Error H202.
Your server is working fine if you get a reply for each packet with no loss. Move on to Solution 5.
If there's packet loss or a long reply, stop. Reach out to an IT professional for help with your network.
Solution 5: Add your server to your Windows hosts File
See edit Windows hosts file for instructions.
When you're done, open QuickBooks on your workstations. If everything opens correctly, the problem is fixed.
If you still see Error H202, please contact our support team via messenger. We can help you get QuickBooks running again.
Fix Error H101, H303, and H505
If you see Error H101, H303, or H505, one or more of your workstations is set to be the server for QuickBooks. Your server (the computer hosting your Company files) should be the only one to host multiuser mode.
The Host Multiuser Access option should be turned off on your workstations. These computers on your network don't host your Company files. Your server computer should be the only one hosting.
| Note: You can do these steps before opening a Company file. |
- Open QuickBooks Software on any workstations where you see H101, H303, or H505
- Don't open your company file. Instead, select the File Menu and hover over Utilities.
- If you see the Host Multiuser Access option, don't select it. Move on to the next workstation. This one isn't causing the problem.
If Stop Hosting Multiuser Access is an option, select it.
- Repeat these steps on all workstations where you see Error H101, H303, or H505.
After you check your workstations, move on to your server computer. The server is the computer that usually hosts your Company files.
- Open QuickBooks on your server computer.
- Open the File Menu and hover over Utilities.
- If Host Multiuser Access is an option, select it. If Stop Hosting Multiuser Access is an option, don't select it.
QuickBooks ERROR Code: 6190 and 816
You'll get error codes -6190 and -816 when another User is logged in to the Company file in a single-user mode. There are several solutions we can try to resolve this.
Let's first make sure that your QuickBooks release is up-to-date. Then, rename the ND and TLG files to repair the Company damaged Data files.
Here's how:
- Open the folder that contains your Company file.
- Find the files with the same name as your Company files but with extensions.ND and.TLG.
- company_file.qbw.nd
- company_file.qbw.tag
- Right-click each file and select Rename. Add the word OLD at the end of each file name. Ex: company_file.qbw.nd.OLD
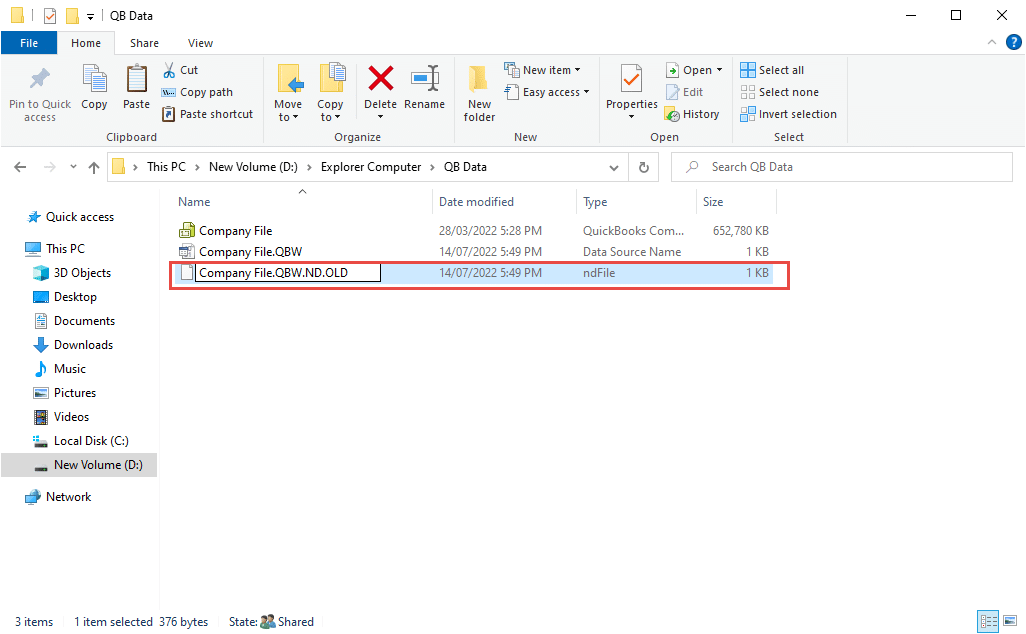
- Open QuickBooks again and try to sign in to your Company file. If the same issue occurs, proceed to solution 2.
When opening a Company file, check out this article for more troubleshooting steps about the error -6000: Resolve Error -6000.
I'd also suggest calling us so one of our Technical Support specialists can guide you through the process. Here's how to get in touch with our QuickBooks Desktop Customer Care:
- Go to https://help.quickbooks.intuit.com/en_US/contact
- Select QuickBooks for Windows.
- Select your QuickBooks for Windows version.
- Select a topic.
- Click on the Get Phone Number button.
QuickBooks ERROR Code:6000,83
Solution 1: Turn off hosting on your workstations
If you're hosting your Company files over a network, ensure the Host Multiuser Access option is off on your workstations. These computers connected to your network don't host your Company files. Your server computer should be the only one hosting.
- Open QuickBooks on one of your workstations
- Don't open your company file. Instead, select the File Menu and hover over Utilities.
- If you see the "Host Multiuser Access" option, don't select it. Move on to the next workstation. This one isn't causing the problem.
- If Stop Hosting Multiuser Access is an option, select it.
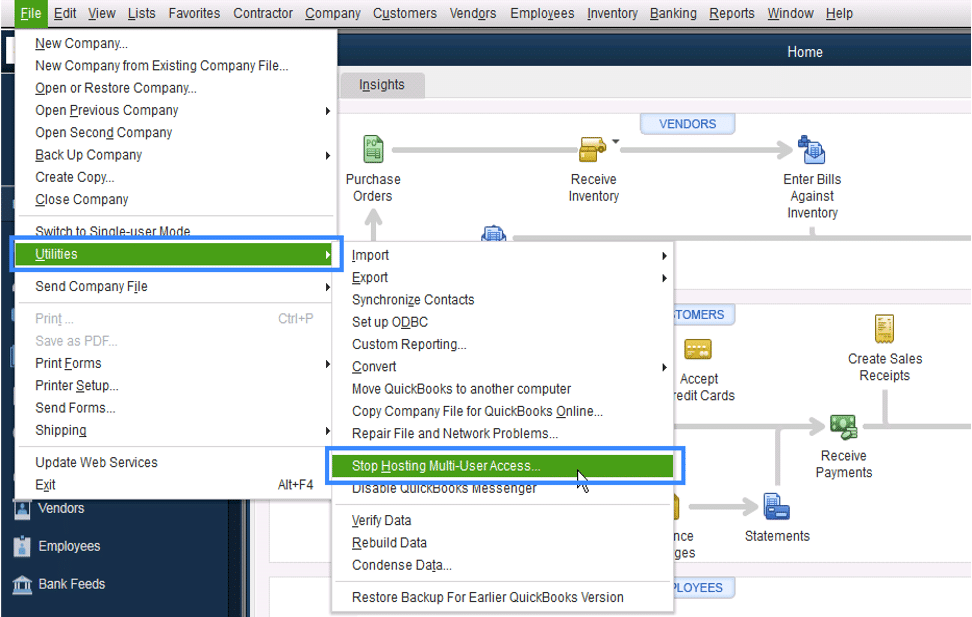
- Repeat these steps on all of your workstations
If you still see Error -6000,-83, move on to Solution 2.
Solution 2: Use QuickBooks File Doctor
Follow the steps to download File Doctor and use it to scan your Company file. Let it fix any issues it finds.
Solution 3: Configure your host file
First, ping your server to get your server name and IP address:
- On one of the computers connected to the network, open the Windows Start Menu.
- Type "CMD" into the search and open Command.
- Type "Ping[Name of your Linux server]" in the window and press Enter.
- Write down the server name and the IP address.
Next, edit the host files. Ensure all the computers connected to your server have the correct IP address and Linux server name. Start with the computer where you see Error -6000,-83.
- Close QuickBooks on all of the computers connected to your network. Go to FiMenuenu and select Quit QuickBooks Desktop.
- Open the Windows StaMenuenu.
- Type "File Explorer" into the search and open File Explorer.
- Select My Computer from the navigation bar. This is sometimes called "This PC."
- Open your C: drive. Then open your Windows folder.
- Find the System32 folder. Open the Drivers folder and then the ETC folder
- Right-click the File called C: Windows-System32-drivers-etc-hosts. Select Open with and then Notepad
- Go to the bottom of the File. Add the Linux server IP address to the end of the text. Then press the Tab key and add your Linux server name. Note: Linux systems files are case-sensitive. Make sure you enter names with the correct case.
- Select File and then Save. Then close Notepad
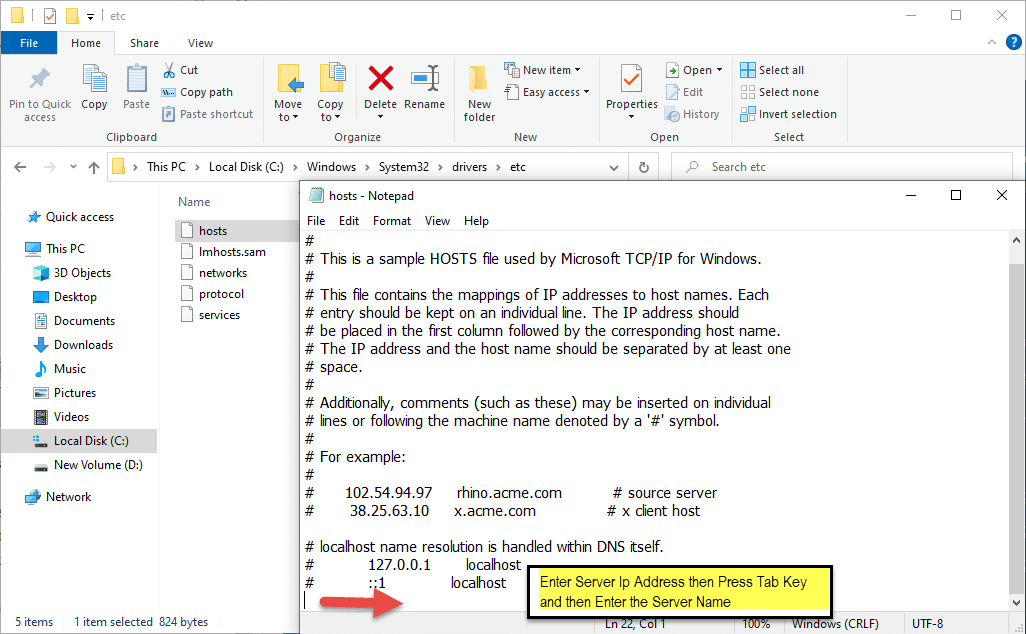
QuickBooks ERROR Code: 6176
Causes for QuickBooks Error -6176, 0
- A firewall is blocking the connection between the two computers
- .ND and . TLG files are damaged
- QuickBooks isn't running with admin permissions
Step 1: Update QuickBooks Desktop
- Open QuickBooks Desktop
- Then go to Help > Update QuickBooks Desktop
- Then click on Update Now in the top right corner
- Now make a, check on Reset Update and click Get Updates (See an image below)
- Once the Update is complete, close QuickBooks
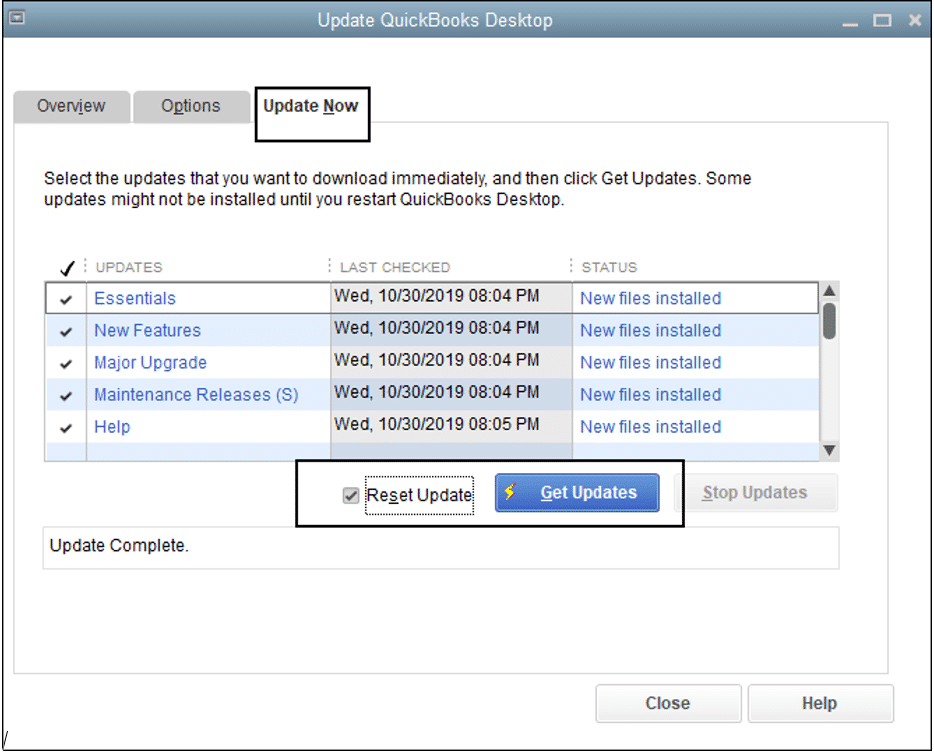
Step 2: Download and Run QuickBooks File Doctor
- Download QuickBooks Tool Huband go to your downloads by pressing CTRL+J
- Under your downloaListist, click on exe
- Click Yes to allow this app to make changes
- Now click Next to install it, then click Yes again to accept the license agreement.
- Click on Next and then Install (It may take some time)
- Once the installation is complete, click on Finish
- Now open QuickBooks Tool Hub (Icon will be available on your desktop)
Under the Company File Issues tab, click on Run QuickBooks File Doctor
Step 3: Rename the.ND and . TLG Files
.ND and . TLG files help you to run QuickBooks company files on network and multiuser mode. If these files are damaged or corrupted, that can cause you QuickBooks Error 6000 107, and renaming these files can help you to resolve it.
- Open your QuickBooCompanyany file location.
C:-Users-Public-Documents-Intuit-QuickBooks-Company File[Default Location] - Now look for the files that have.ND and . TLG extensions.
- Make a right-click on them and select Rename; now type ".OLD" at the end of the File.
For Example,
CompanyName.qbw.ND now changes it to be. ND.OLD
CompanyName.qbw.TLG now changes it to CompanyName.qbw.TLG.OLD - Click Yes to confirm.
Common Steps to Resolve QuickBooks Multi-User Hosting Issue
Close QuickBooks and all related Instances from all the QuickBooks User PCs.
To do this, you have to Close the Company file Opened in QuickBooks and Exit
Go to Task Manager - then go to Process and Find QBW32.EXE from the Process list and End Process
Now go to the Server where the QuickBooks company File is stored / Located
Open QuickBooks Database Server Manager on the Server
Run the QuickBooks Database Server Manager as follows
Now Open Services. msc from the Server
Go to Start Program - Type Run on the Search, then on the Run dialogue, enter services.MSc
Find QuickBooksDB24 (if it is QuickBooks version 17 then QuickBooksDB27 or wiseversa)
right click on it and Select Properties
Now open the QuickBooks Company File on the Server as Admin User
Check this in all the User PCs, Open QuickBooks, and Check the Hosting.
If any of the Users are showing as Stop Hosting Multi-User Access, then Click on it and Stop because the Hosting must be active only on the Server.
