the timeSheet activities Help page
Setup
Feature setup is essential for setting the company’s regulations, arrangements, and control policy.
Before recording any operations, the user must set up the company file.
If these settings are not made, the customer may find that the results do not comply with its policies and need to re-enter its operations.
Therefore, settings are vital when using the software. It’s very important to understand this. The setup unit is the most important step and must be done before using the software.
timeSheet activities
Introduction
Our Timesheet in Hinawi ERP software covers every element of time tracking, from simple daily time tracking to tracking specific projects and tasks. Real-time data feeds to keep your HR system up to date,
With our Timesheet form, you benefit from accurate real-time data that keeps you current. Key metrics are compiled into simple and effective timesheets, with automatic populations eliminating tedious manual data entry and lengthy time management discussions. This gives you more time to focus on the important things.
Read and understand the following information before using the HRMS module to ensure results according to company policies.

Time Sheet
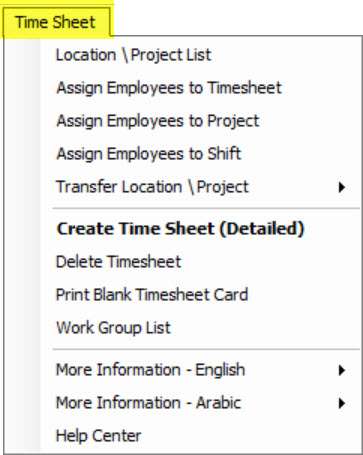
Time Sheet Main Menu:
i. Assign Employees to Time Sheet
To assign Employees to Time Sheet, go to:
Time Sheet Menu → Assign Employees to Time Sheet, then click view. Here, the system will show either to Generate Salary sheet from HR or Time Sheet. Select the Employees under Time Sheet for Salary through Time Sheets.
Users can change the Employee from HR to Time Sheet or vice versa before creating the Salary sheetIt has been changed since the last Salary sheet crew was rated.
ii. Assign Employees to Project
To assign Employees to Projects, go to
Time Sheet Menu → Assign Employees to Project, then click on search and filter.
Employees assigned to Projects. To add projects, go to manage Employee's main Menu → Location/Project List.
iii. Assign Employee to Shift
To Assign an Employee to a Shift, go to
Time Sheet → Assign Employee to Shift, select Dates from/to, filter Employees, and select the relevant Shift.
I Create a Time Sheet
To create a time Sheet, go to
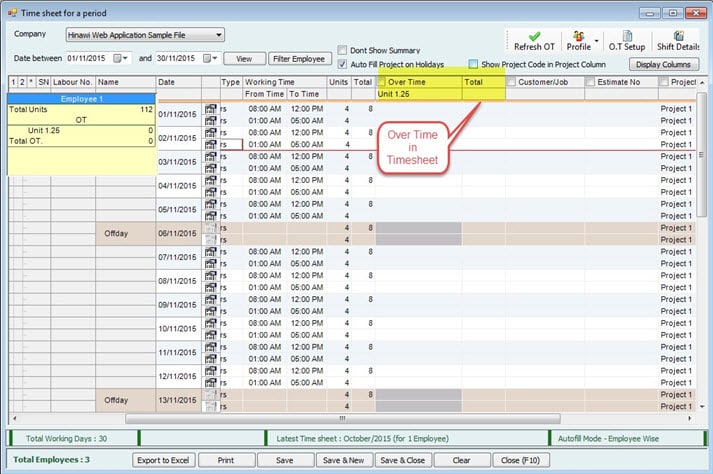
Time Sheet → Create a Time Sheet, then select the Dates, filter Employees, and fill in Time Sheet and Over Times based on Setup.

After it is done, save Time Sheet and go to Payroll for Salary Sheet.
Note:
If there is more than 1 shift for a month, users must assign the different shifts before creating Timesheet.
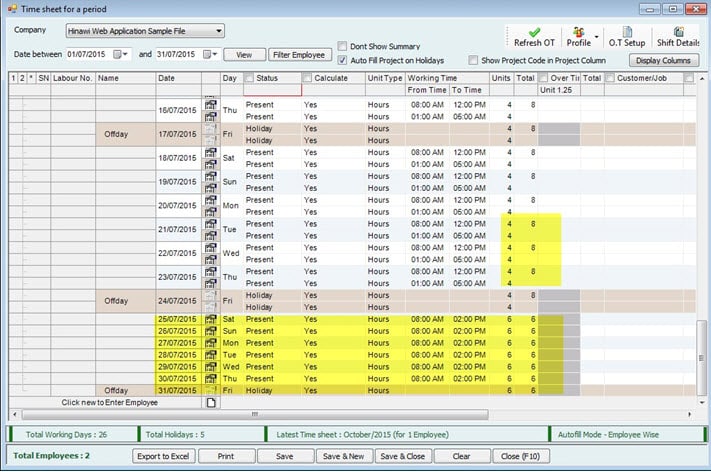
E.g., Ramadan Timing for a Company is 6 Hours (8 AM to 2 PM); if it started on June 29, and the user wants the Timesheet entry to have 6 hours, then.
-Create 1 new shift, 'RAMADAN' from Create Shifts Tab

- Assign employees to shift for Ramadan month (June 29th to July 27th)
- i.e., Assign Employee to shift as below:
Image 1:

Image 2:

Now while creating the Timesheet for June, the last 2 entries will be for 6 hours, as below.

Note:
Suppose the user forgets to assign a different shift for Ramadan, and a Timesheet is created for the Normal Shift. In that case, they must delete the Created Timesheet for the month of Ramadan, Assign Employees to the 'RAMADAN' Shift, and recreate the Timesheet again for cause-effect.
Case 1:

Timesheet Employees, e.g., timing is 08:00 AM to 05:00 PM; if the Employee is late for 2 hours and they come at 10:00 AM, then the user can set the First 2 hours (08:00 AM to 10:00 AM) as Status = 'Present' and Calculate =' No' and next 6 hours (10:00 AM to 12:00 PM) as Status = 'Present' and Calculate =' Yes,' and (01:00 PM to 05:00 PM) as Status = 'Present' and Calculate =' Yes' Then the Total units for calculation will be 6 hours. (As shown in the image above).
Case 2:
If the OT Hours per Day (Normal) are set as 2 (In-Company Setup) and Overtime Hours are set as 4 (In Timesheet and OT Setup), then the Employee will be allowed to work for 4 hours OT on Normal Day and it will be paid for 4 Hours as OT in the Salary sheet. But as the user set OT Hours per Day (Normal)=2, which can be viewed from the report that OT is for 2 hours, and the rest 2 hours of OT will be paid as an Addition.
Case 3:

If the user sets Calculate = 'No' in the time Sheet Setup, it will not be calculated even if the user puts OT in Timesheet. The Overtime amount will not be shown\added in the Salary sheet. This is per Company policy.
Timesheet Salary Calculations are based on Actual month days only. There are no fixed 30 days for the time sheet. Time Sheet is for Time Sheet Employees, NOT HR Employees.
Settings Time Sheet:
Go to:
File Menu à Setup Modules à HRMS Settings à Time Sheet Setup
Time Sheet Main Menu:
- Assign Employees to Time Sheet
To assign Employees to Time Sheet, go to
Time Sheet Menu > Assign Employees to Time Sheet, then click view. Here system will show options either to Generate a Salary sheet from HR or a Time Sheet. Select the Employees under Time Sheet for Salary through Time Sheets.
Users can change the Employee from HR to Time Sheet or vice versa before the Salary sheet is created. It has been changed since the last Salary sheet was created.
Without this step, the user will not filter the employees to fill in the Timesheet.
- Assign Employees to Project
To assign Employees to Projects, go to:
Time Sheet Menu > Assign Employees to Project, click on search, and filter Employees to assign to Projects. Go to Manage Employee's main menuàLocation/project List to add projects.
- Assign Employee to Shift
To Assign an Employee to a Shift, go to
Time Sheet > Assign Employee to Shift, then select Dates from to and then filter Employees and select for the relevant Shift.
- Create Time Sheet
Introduction: -
To create a time Sheet, go to Time Sheet > Create Time Sheet, select the Dates, filter Employees, and fill in Time Sheet and Over Time based on Setup.
Reading from the Shift and the project can automatically fill the time sheet. If a project and Shift are already assigned to employees so, while creating the Timesheet, it will be automatically filled even if the user has hundreds or thousands of employees.
Note:
If there is more than 1 shift for a month, the user must assign the different shifts before creating Timesheet.
E.g., Ramadan Timing for a Company is 6 Hours (8 AM to 2 PM). If it started on June 29, and the user wants the Timesheet entry to have 6 hours, then.
- Create 1 new shift, 'RAMADAN' from Create Shifts Tab:
- Assign employees to shift for Ramadan month (June 29th to July 27th)
- e., Assign Employees to Shifts as below:
Busi
Types of Time Sheets:
There are three types of timesheets.
- Detailed Timesheet:
- Summary Timesheet:
- Monthly Timesheet:
Detailed Timesheet: -
We will explain about Detailed Timesheet because companies mostly use it.
Status Available in Time Sheet Form:
Detailed Timesheets can be created daily (by date or day by day). The full month will be seen; the user must fill in all the columns.
Status:
- Present:
The system will automatically fill the Shift Hours. The user can split the Lines if the Employee works on different Projects on the Same Day.
If the Shift Hours are eight and the user Fills 6 Hours, the system will accept and calculate only 6 Hours for that day. But in this way, there is no full Salary.
There is an option if Company does not want to calculate the Salary to the Employee for specific hours by selecting NO in the Calculate Column.
- Holiday:
It Reads from the Holidays Setup.
Create the Holidays from the Menu (File -> Setup Modules -> HRMS Settings -> General Settings -> Holidays Setup)
Setup the Holidays for the Shift from the Menu (File -> Setup Modules -> HRMS Settings -> General Settings -> Timesheet Policy -> Shift & Holiday setup)
The user cannot Change the Holiday Status.
- Leave: (Annual, Sick, Emergency, maternity, paternity, leave without pay, etc.):
This option is reading from the Leave Application Form from the HRMS Activities Menu. The user cannot change the Status manually. The Timesheet will Display as Leave till the Employee Returns. If the Employee is on leave, his Salary can be stopped in
the Salary sheet, and Timesheet cannot be filled until he returns, and the left return is created against that Employee.
- Absence:
The user can change the Status to absent. When the Status is missing, the system will remove the Shift Line's Time and Number of Hours to be Nothing.
For the Timesheet, Employee's Absence is always filled from the Timesheet. The meaning of Absence is the following:
When Absence is selected in the Timesheet, calculate will be set to 'No' by default. Users can choose "Yes" or "No" from the Calculate column.
- If the Calculate is "Yes," Salary will not be deducted for the Absence days, and Absence days will be paid to the employees, and that day will not be deducted from the Total Service (Actual working days).
- If the Calculate is "No," so Salary will be deducted for the Absence days from the total Salary, and that day will also be deducted from the Total service (Actual Working Days).
Unit Type:
The unit type is reading from the Setup, what is a type of Shift (e.g., Day / Hours). Users must specify the shift timings when the Unit Type is Hours.
When Shift is of Unit Type' Hours,' the user can split the time, i.e., Split the Shift into two or more. Morning and Afternoon. In this case, the Timesheet will have 2 entries for each case.
The below screens contain the Setup window: -
When Shift is of Unit Type is 'Days,' timing will not be shown in the Timesheet. And default hours will be taken for the calculation.
No. of Shifts means if there is a break in Working hours, the user can set up 2 shifts.
E.g., 8-1 and 4-8 (Only applicable if Type is Hours.
Customer/Job:
When we fill the Project Customer/Job will be filled automatically and vice versa. This automatically fills in the reading when you create the Customer Job or project.
Now while creating the Timesheet for June, the last 2 entries will be for 6 Hours, as below.
Note:
Suppose the user forgets to assign a different shift for Ramadan, and the Timesheet is created for the Normal Shift. In that case, He must delete the Created Timesheet for the r month of Ramadan, Assign Employees to the 'RAMADAN' shift and recreate the Timesheet again to take effect.
- Edit Timesheet:
The time sheet can be edited anytime, even if the Salary sheet is created. But when the Salary Sheet is approved Timesheet cannot be edited.
- One level:
Timesheet has one level only. Create Timesheet—no other level of Approval.
- Create a Salary sheet:
After saving Time Sheet, go to Payroll to create the Salary sheet.
- Payment of Salary Sheet:
There are two methods of payment: WPS or Cash, Cheque & Bank Transfer
Summary Steps for Time Sheet Employees:
- Create a Time Sheet.
- Create a Salary Sheet
- Approve Salary Sheet
- Create WPS
- Posting Salaries to Accounting (QuickBooks)
- Payment Salary
Posting of Salaries to Accounting (QuickBooks):-
Important:
Before Posting to Accounting, please ensure that ALL Employee's Salary Sheet has been created.
THE SYSTEM HAS ONE TIME POSTING OF SALARIES FOR ONE MONTH.
Go to Update QuickBooks Menu ---> Post Timesheet Salary Sheet All Payment Modes.
Payment:-
Go to Payroll Menu ---> Payment of Salary Sheet
There are 2 Methods of Payment:
- Pay Non-WPS Employees (Cash, Cheque & Bank Transfer):-
Go to Payroll Menu ---> Pay Non-WPS Employees - Timesheet Employees
Then Create a Payment Voucher (Cash, Cheque, or Bank Transfer).
- Pay WPS Employees:-
Go to Payroll Menu ---> Payment of Salary Sheet ---> Create & Change
Status of Payment WPS Employees - Timesheet Employees.
Posting of Payment to Accounting (QuickBooks) for WPS Employees only:-
Go to Update QuickBooks Menu ---> Post Timesheet Salary Payment (Created from WPS). The user has generated SIF from step 2 above to see the posting date.
Summary Steps for HR Employees:
- Create a Salary Sheet
- Approve Salary Sheet
- Create WPS
- Posting Salaries to Accounting (QuickBooks)
- Payment Salary
Posting of Salaries to Accounting (QuickBooks):-
Important:
Before posting to Accounting, please ensure that ALL Employee's Salary Sheet has been created.
THE SYSTEM HAS ONE TIME POSTING OF SALARIES FOR ONE MONTH.
Go to Update QuickBooks Menu ---> Post HR Salary Sheet All Payment Modes.
Payment:-
Go to Payroll Menu ---> Payment of Salary Sheet
There are 2 Methods of Payment
- Pay Non-WPS Employees (Cash, Cheque & Bank Transfer):-
Go to Payroll Menu ---> Pay Non-WPS Employees - HR Employees
Then Create a Payment Voucher (Cash, Cheque, or Bank Transfer).
- Pay WPS Employees:-
Go to Payroll Menu ---> Payment of Salary Sheet ---> Create & Change
Status of Payment WPS Employees - HR Employees.
Posting of Payment to Accounting (QuickBooks) for WPS Employees only:-
Go to Update QuickBooks Menu ---> Post HR Salary Payment (Created from WPS). The user has to generate SIF from step 2 above to see the posting date.

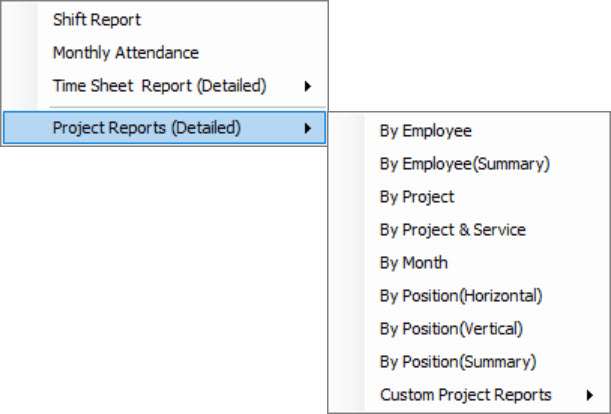
Users can create reports in various formats. Reports for different content are available. HRMS Reports include more than 40 reports:
- Timesheet by Employee Report
- Projects Report
- Leave, Loan, absence, end of service …etc.
- Salary Sheet Detailed Report
- Time Sheet Detailed Reports Salary slip
- Ledgers for Employees, leave, Loan, and more
- Payments for all types
- WPS
- Recruitment Report
- Provisions for leave and end of service
- Reminders for all more documents
- Printings and exporting to excel.
- And many more
Note:
All reports can be exported to excel.
HRMS Module is linked with other modules as below:-
In Accounting Module:
All HRMS activities can be paid from the accounting Module using a Cash, Cheque, or Bank Transfer Payment voucher. Also, generating Journal Entries for Salary sheets and monthly provision of End of service and Leave.
In Real Estate Module:
If a Company rents a building for its staff, the User can link the flat with Employee reading from the real estate Module in HRMS. The monthly Rent will be added to Employee costing.
In-School Module:-
If teachers have kids studying in the school where he works, the System will calculate the discount for kids reading the father / Guardian's name from HRMS.
In Fixed Assets Module:-
If the Company provides a Car or Laptop to their employees, these items will be added as Custody of the Employee System. The System will calculate the monthly depreciation to the Employee Cost Report.
In Garage Module:-
While creating a job card, the System will read the labor System from the Employee List HRMS.
Integrated with Hinawi Web and Mobile application
Integrated with QuickBooks Accounting
- The admin User can do internal control by the followings:-
Set the Posting controls window located under File Menu >> Company.
- The level of access is located under File Menu >> Company. Admin User can allow the User to create transactions but not edit. Or to approve but not pay. Or to read reports only….etc.
By default, the User can’t change the transactions when approved. The User can’t change the transactions when
- User activity Report is located in the Menu, and HRMS Report Menu reads every change on each transaction and lists with Date and time.
- And many more.
- Reminder for expiry Date for all types of documents related to Employee or Company documents.
- Reminder for expiry Date for family members.
- Leave return.
- Benefits due Date.
- Birthday.
- And more.
All options above add more flexibility for Admin User to build the Company policy. The Admin User is the decision maker to build the Company needs without any additional charges from Hinawi. The integration modules save a lot of time.
Importing option helps users to start immediately using Hinawi Software. Users don’t need to wait months or years to run the software.
