Protect of QuickBooks Data
How to Protect your Data in QuickBooks Software:-
- Data is the Customer's responsibility since the User(s) is the one who is engaged in its daily activities. To avoid loss of Data, please do the following:-
- Backing up your Data to the cloud is one of the best ways to guard against Data loss.
- Cloud Data backup should be done frequently and regularly; this is especially important for mission-critical Data whose loss or corruption can severely hinder normal business processes and operations. Backing up your Data to the cloud allows for easy scalability; your Data storage size can be readily expanded to accommodate your Data storage needs.
- Password control is the primary line of defense in safeguarding the Data within your network. Sensitive information should be password protected so only users who know the password can access the Data.
The password used to secure the Data should not be used for other applications or tools; it should be strong, with a combination of letters, numbers, and special characters, as well as unique.
In addition, the password should be provided only to individuals who need access to the Data to carry out their job duties. Furthermore, the password should be changed regularly. - Daily backup on external and Internal Hard Disks or the cloud.
- Install auto backup software on the server to make daily data backups.
- Virus protection software must be installed on Servers and computers.
- UPS machine for emergency purposes in case of electricity power shutdown. This will keep servers and client PCs working for some time.
- Other safety measures recommended by Customer IT staff or consultants and hardware supplier
- Daily, monthly, and yearly Data printing and reports to be kept safe.
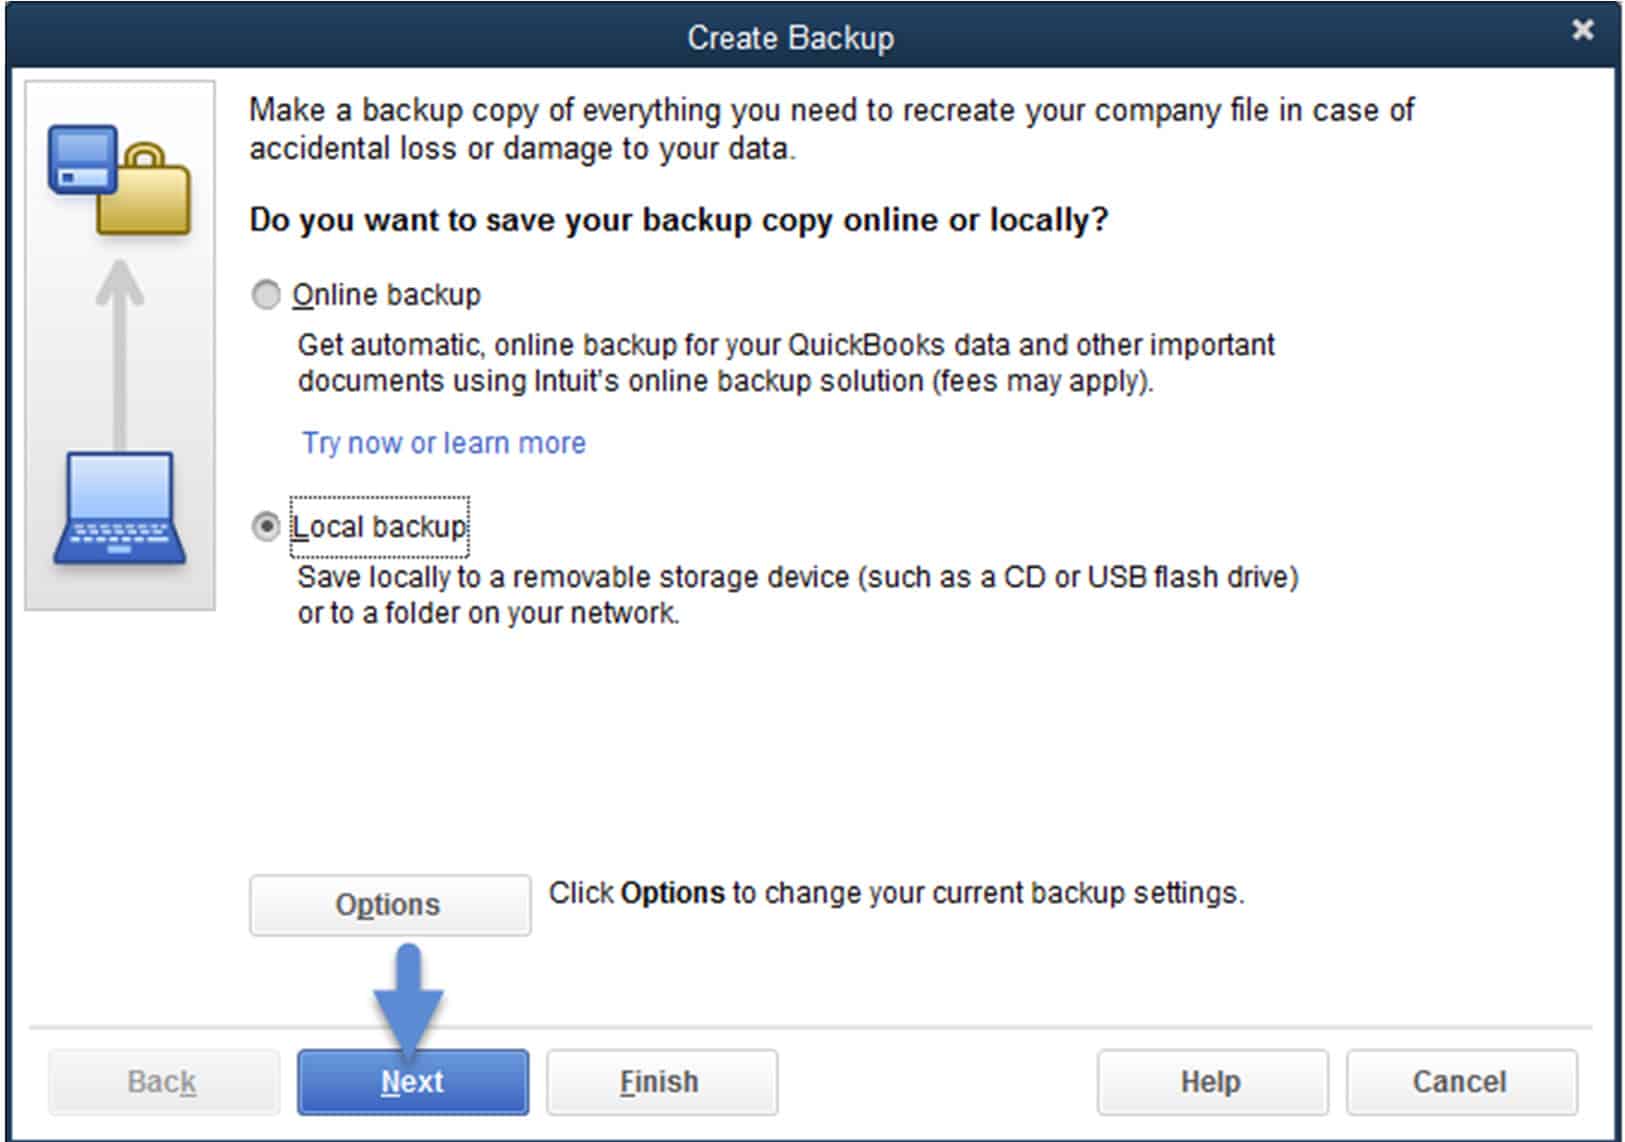
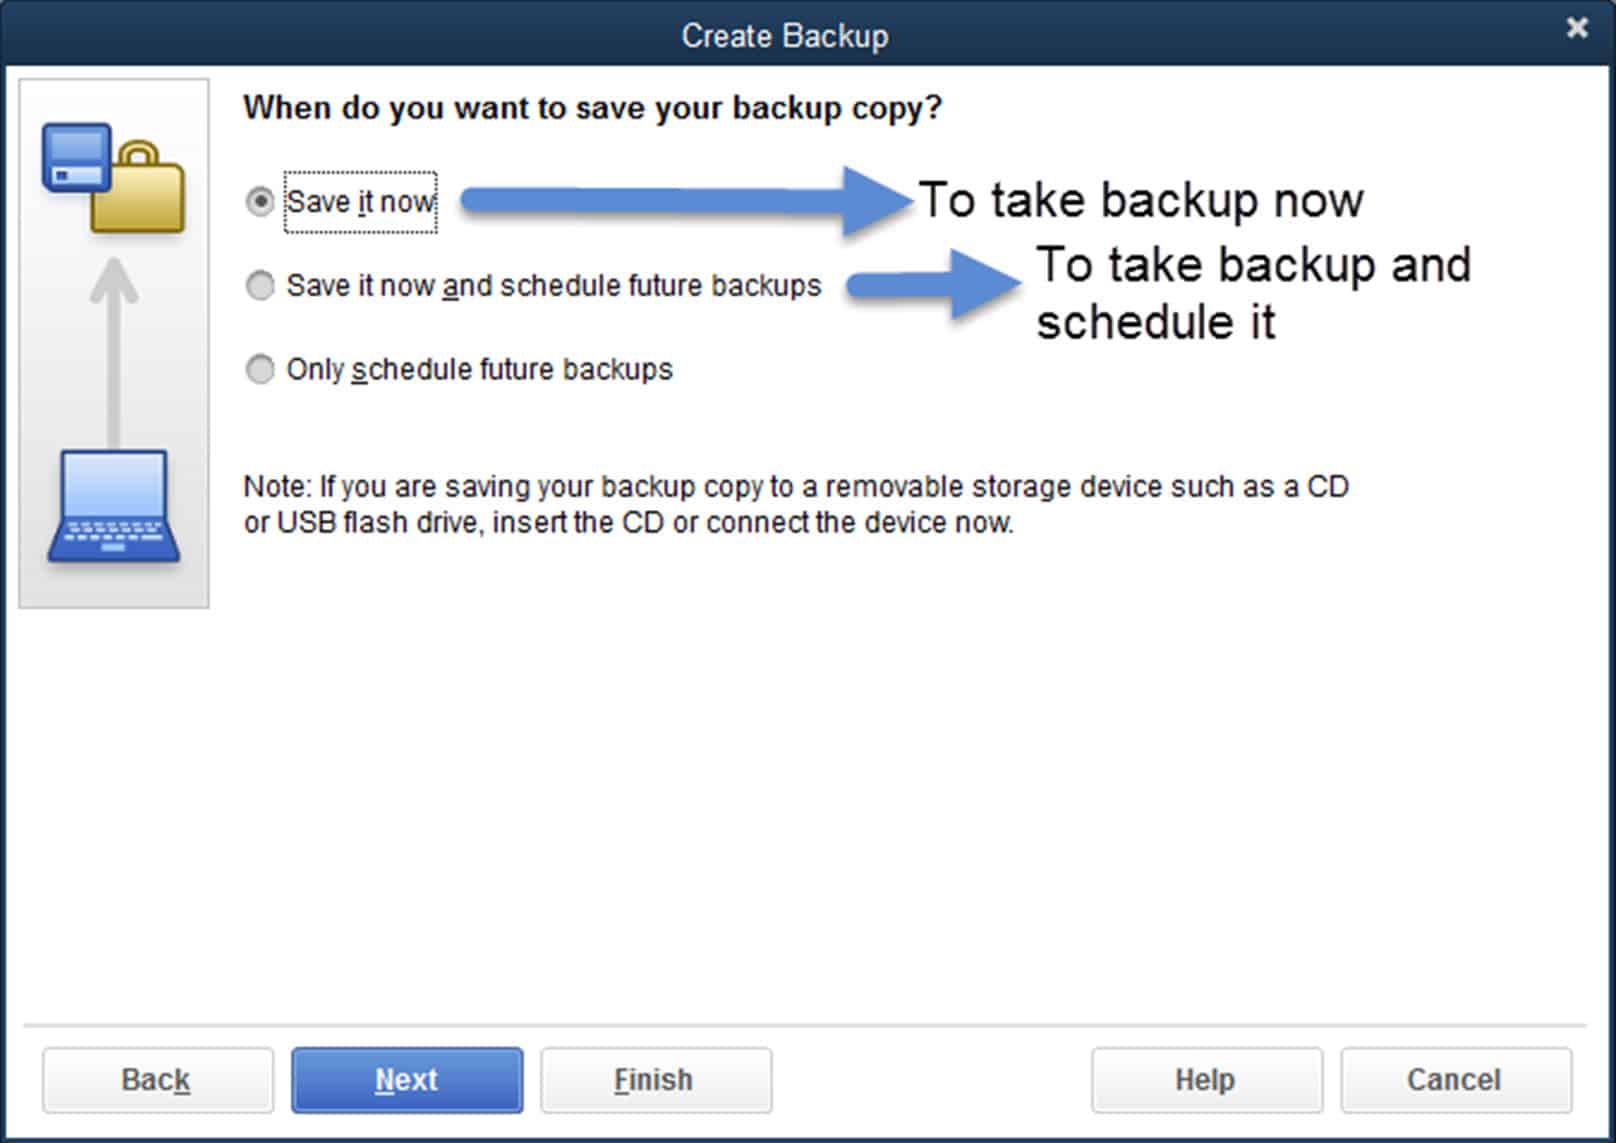
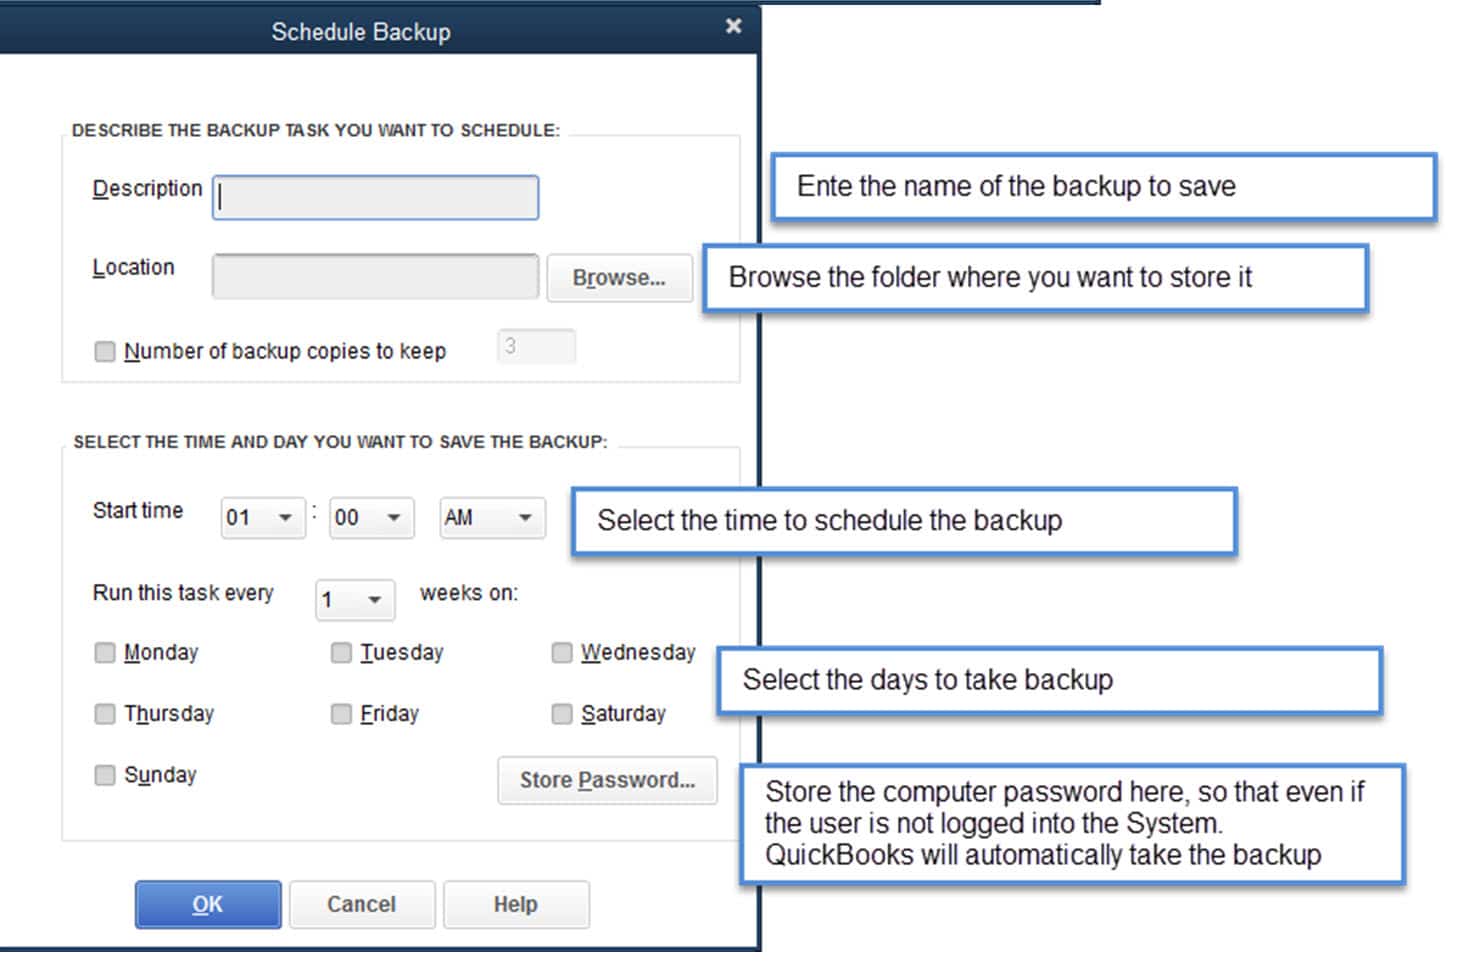
How to schedule an auto backup in QuickBooks Company File.


Important Notes and instructions for Integrating Between Hinawi ERP with QuickBooks
1. Before you start, change the type of account in the Hinawi ERP chart regarding Cash Type, PDC, and CUC Account type.
2. All users of Hinawi ERP must have used an m e in QuickBooks and permissions too.
3. If you have already created a QuickBooks data file and now you want to use Hinawi ERP Software, the following points must be checked in the QuickBooks file before start using our software: -
- Make sure that preference is done properly and completed.
- Make sure you did allocations between payments to suppliers and bills, the report.
- Unpaid bills Detail under Vendors and Payables Report should not show any negative amount.
- Same for the report Open Invoices under Customers and Receivables should not have negative amounts.
4. The users in QuickBooks must have Full Permission to access the activity forms they used in Hinawi ER. For Example:
- Creating new Transaction in Hinawi ERP: -
The user mu s t h a v e p er mis sio n in QuickBooks to Create a Transaction for that Transaction (Form Activity).
- For Editing Transaction in Hinawi ERP: -
The user must have permission in QuickBooks to Create, Modify & Delete the Transaction. This is an important point; if no permission is specified above, the transaction will duplicate in QuickBooks.
- If t h e user makes "anEdit" write a check and his Setup is "Automatic," the system will delete the original transaction and create the same automatically. To avoid deleting, set a closing date in QB every month.
5. Do not Merge or delete Accounts in the Chart of Account list, vendors, customers, or employees in QuickBooks.
6. Do not convert the names in the `Other Names` list in QuickBooks to the Vendors or Customers or Employees List.
7. To switch between multiple Accounting files in QuickBooks. First, you must close Hinawi ERP and then open the QuickBooks file.
8. By editing transactions in Hinawi ERP, QuickBooks will delete the original one and create a new one. If this transaction is before the set closing dates, QuickBooks will not allow editing in Hinawi ERP. To avoid deleting, set a closing date in QuickBooks every month.
9. Make sure to close all kinds of windows in QuickBooks that affect running integration, e.g., Windows of, Videos, preferences, set closing date, setup users, Company information, Add \ Edit Multiple Entries, Verify, Rebuild or clean data and any online QuickBooks services window that opened from QuickBooks or Set Credit` window in Accounts Receivables and Payables. And QuickBooks does not open company information under the company menu during integration or posting.
10. If the User enters the Transaction through Hinawi ERP and later modifies the same Transaction from QuickBooks, it will not affect Hinawi ER So, the user must do ALL his work from Hinawi to guarantee a match of balances.
11. Hinawi ERP does not read Multi-Currency from QuickBooks. Still, when creating a transaction in Hinawi ERP, it will automatically read the currency in QuickBooks, except for the Journal Voucher, where the user must select the currency of each transaction.
12. We recommend Admin user does 'closing of data' in QuickBooks at the end of each month. By this, no transactions can be entered or edited from Hinawi ERP.
13. Ensure the person in charge is the only one to use the Admin user. Do not give the password to another user
14. Do not give Admin passwords to normal users.
15. The date setup in all computers and servers is dd/mm/yyyy. Example: 31/12/2021
16. If you want to run software in Arabic, filling in ALL required fields in Arabic is very important. Missing Arabic fields are located under the File menu.
17. Keep data updated to avoid missing information in reports or activities. The Missing data report is located under the File menu.
Important:
All Setup done by the customer is his FULL responsibility.
Settings: -
Complete all settings
Templates
Complete all Templates
Chart of Account Type
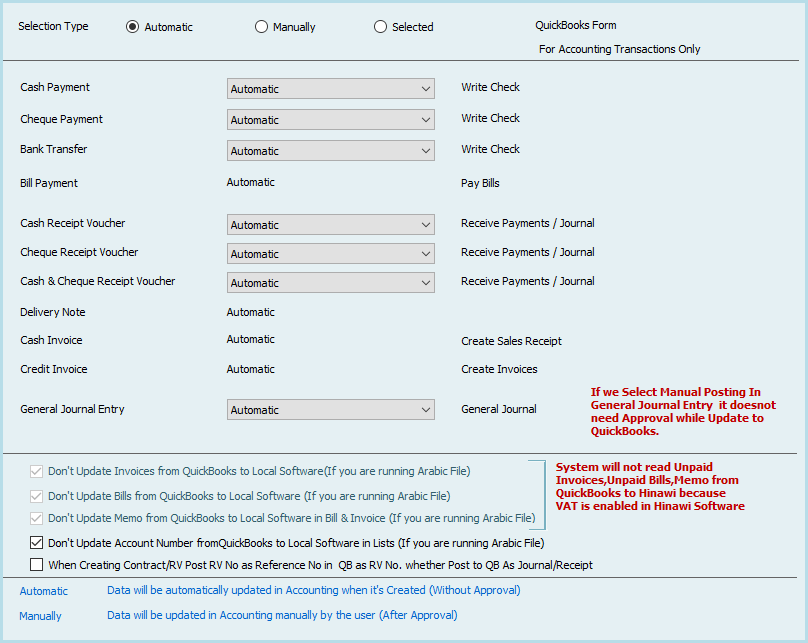
Integration Settings:
Make sure to select the integration method that meets your needs.
Sample of process if select manual posting:
Users must update QuickBooks in the below way. In Automatic Setup, all transactions will be posted to QuickBooks automatically.
Attachment Setup:
Make sure is done to save all types of attachments
Things to do in QuickBooks before and during using Hinawi ERP: -
If the customer already has QuickBooks data, the user must work in the below for better use of both QuickBooks and Hinawi ERP
1. Make sure there are no Arabic names in all lists
2. Merge similar names in all lists
3. Create an Account in Chart of Account no. 99 Intermediate Account
4. Make sure that Account no. 30000 opening Balance is created
5. Delete unnecessary names
6. Make sure that preference is done properly and completed.
7. Make sure you made allocations between payments to suppliers and bills; the report Unpaid bi tells Detail under Vendors, and the Payables Report should not show any negative amounts.
8. Same for report Open Inv voices under Customers and R receive ables should not have negative amounts.
9. Rearrange the accounts of Fixed Asset
10. Import Fixed Assets
11. Rearrange the accounts of Cheques under Collections (CUC) and Post Dated Cheques (PDC). Edit account type in hinawi Chart of Account to PDC or CUC type
12. Set a closing date
13. Set Preferences
Extra features from Hinawi ERP Software that I s not available in QuickBooks:
1. Fully integrated with all versions of QuickBooks.
2. Cover missing features in QuickBooks.
3. Real Estate Management Modul
4. Advanced Fixed Assets Modul
5. Complete Bilingual Language, Arabic, and English.
6. Calculate Commission for sales Re
7. Post multiple Receivables and Payables in one JV entry.
8. Create Receipt Vouchers (RV) from all kinds of na
9. Adding three new types in the Chart of Accounts (Cash, PDC & CUC).
10. Create 3 ways to post to QuickBooks. Real-Time, Batches, and Mix of two.
11. Control Post Dated Cheques Received & Issued with auto-revised entry.
12. Receive multiple cheques at one Receipt Voucher (RV).
13. Option to Not allow to post to the main Account
14. Option not to sell if there is not enough quantity
15. Option not to change the selling price
16. Allocate expenses to Fixed A
17. Photos of all kinds of na
18. Design and templates with Printing for all activity forms (Cheques, Payments, Collections, JV, SIV, SRV, Transfer Inventory, Inventory Adjustments, Enter Bill & more)
19. Complete the HR, Time Sheet, Payroll, WPS, and Tax Module.
Inventory:
1. Calculate the Landed Cost of the Inventory Item (Adding Shipping charges, customs, transportation, and Other expenses).
2. Multiple Inventory Adjustment entries in one form.
3. Movement and None Movement Inventory Item.
4. Advanced Physical Inventory Worksheet.
5. New look at Inventory Valuation Detail.
6. And more.
Reports:
1. Advanced Trial Balance (Beginning Balance, total movements, and Ending Balance).
2. Financial Ratios: Profitability, Activity & Liquidity.
3. Advanced Customer / Job profitability report in summary and detail.
4. Cashier Reports (Collections & Payments).
5. Advanced Audit Trail (Filter By user, activity form, and total entries by each).
6. Partial paid Invoices and Bi
7. Depreciation by Project.
8. You Can customize your required reports from QuickBooks data.
9. Reports in QuickBooks are seen from Hinawi ERP.
Report Center by:
1. Employee
2. Building and flat
3. Class
4. Fixed A
5. And more
QuickBooks Software Issues and Solutions
These solutions are from Intuit US [QuickBooks Software Company]
QuickBooks ERROR Code: H202,H205,H505
Detail: when the User tries to switch the QuickBooks Company File to Multiuser mode, the system will throw an error with error code H202, H205 like the following screen
If you see Error H202 or H505 (or H101 and H103) when you try to switch to multiuser mode, we're here to help. These errors mean something is blocking the multiuser connection to your server. We'll show you how to fix the issue.
Run the QuickBooks Database Server Manager on your server with the QuickBooks Tool Hub.
Step 1: Download and install the QuickBooks Tools Hub on your server
The QuickBooks Tool Hub helps fix common errors. You'll need to close QuickBooks to use the tool hub. For the best experience, we recommend you use Tool Hub on Windows 10, 64-bit.
- Close QuickBooks.
- Download the most recent version (1.5.0.0) of the QuickBooks Tool Hub. Please save the file somewhere you can easily find it (like your Downloads folder or Windows desktop). Note: If you've installed Tool Hub before, you can find out which version you have. Select the Home tab. The version will be on the bottom.
- Open the File you downloaded (QuickBooksToolHub.exe).
- Follow the on-screen steps to install and agree to the terms and conditions.
- Double-click the icon on your Windows desktop to open the tool hub when the installation finishes.
Note: If you can't find the icon, search in Windows for QuickBooks Tool Hub and select the program.
Step 2: From the Tool Hub, run the QuickBooks Database Server Manager on your server
Your server computer is the one that stores your QuickBooks Company file(s). Your other computers connected to your network are your workstations.
- From the QuickBooks Tools Hub, select Network Issues.

- Select QuickBooks Database Server Manager. If QuickBooks isn't on your server, it'll prompt you to install it.
- Inside the QuickBooks Database Server Manager, select Start Scan if you see your Company file folder(s). If you don't, Browse to the location of your company file and then select Start Scan.

- The QuickBooks Database Server Manager will repair your firewall permissions automatically when the scan finishes; select Close.
- Open QuickBooks on each workstation where you see Error H202. Select File and Switch to Multiuser Mode. If you use your server computer as a workstation, check it too.
Step 3: From the Tool Hub, run the File Doctor.
- From the tool hub, select Company File Issues.

- Select Run QuickBooks, File Doctor. It can take up to one minute for the file doctor to open. (Note: If the QuickBooks File Doctor doesn't open, search for QuickBooks Desktop File Doc and open it manually.)
- In QuickBooks File Doctor, select your company file from the dropdown menu. If you don't see your File, select Browse and search to find your File.
- Select Check your File (middle option only) and then Continue.
- Enter your QuickBooks admin password and then select Next.
Everything is fixed if your workstations can go into multiuser mode without issues.
If you still see Error H202, continue to our other solutions.
Fix Error H202 manually
Solution 1: Check the services on your server
Make sure QuickBooks services are running on your server computer. Follow these steps to check QuickbooksDBXX. Then repeat them for QBCFMonitorService.
- Open the Windows Start Menu on your server computer.
- Type "Run" into the search and open Run.
- Type "services. msc" into the Run window and press Enter.
- Find and double-click QuickBooksDBXXon the List. XX notes your version of QuickBooks.
- Select Automatic for the Startup Type.
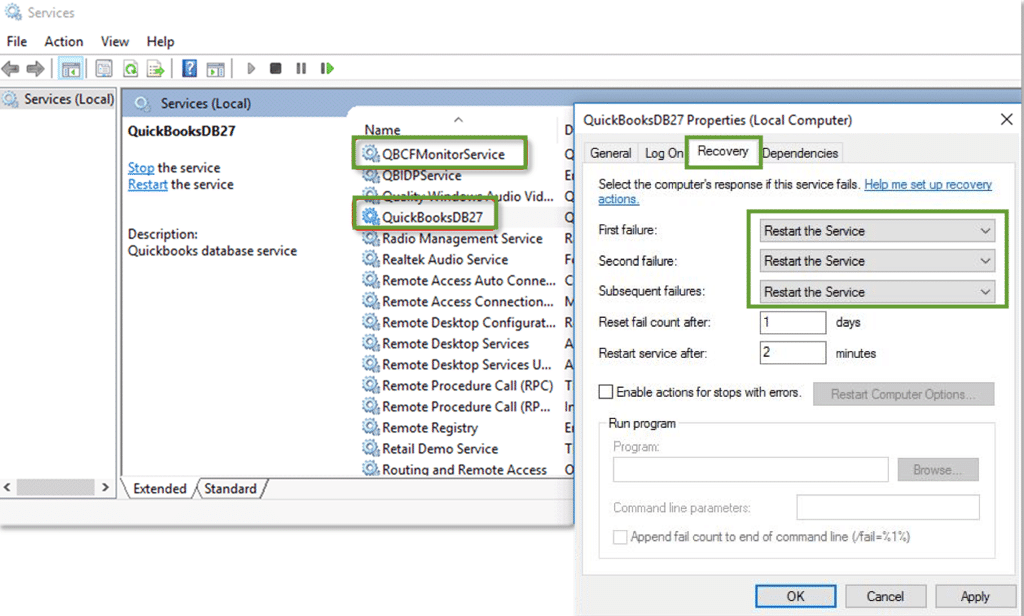
- Ensure the Service status is either Running or Started if it's neither, selects Start.
- Select the Recovery tab.
- Select Restart the Service from these dropdown menus: First, Second, and Subsequent failures.
- Select Apply and then select OK to save the changes.
- Repeat these steps for QBCFMonitorService.
When you're done, open QuickBooks on each workstation. Go to the File menu and select Switch to Multiuser Mode. If everything opens correctly, the problem is fixed.
If you still see Error H202, move on to Solution 2.
Solution 2: Add services to your Windows admin group on your server
If you haven't already, give QuickBooksDBXX and QBCFMonitorService admin permissions on your server computer. See set Windows access permissions to share company files for instructions.
When you're done, open QuickBooks on your server computer and workstations. If you still see Error H202, move on to Solution 3.
Solution 3: Configure your firewall settings on your server
Make sure your server computer is set to allow QuickBooks through your firewall.
- See configure Firewall and Internet security settings for QuickBooks Desktop for instructions on how to set up Windows firewall exceptions.
- After setting your firewall permissions, open QuickBooks on your workstations.
- Go to the File Menu and select Switch to Multiuser Mode.
If everything works, you will fix the issue. If you still see Error H202, move on to Solution 4.
Solution 4: Ping your server from a workstation
Ping your server from a workstation to check the connection. Ping your server from each workstation, getting Error H202.
To start, turn on Network Discovery on your server computer and any workstations with Error H202:
- Open the Windows Start Menu on your server and workstations.
- Type "Network" into the search and open Network and Sharing Center.
- Select Change advanced sharing settings.
- Ensure Turn on network discovery is selected in the Network Discovery and File and Printer sharing sections.
Next, get your server name from your server:
- Open the Windows Start Menu on your server computer.
- Type "Run" into the search and open Run.
- Type "CMD" into the Run window, and then press Enter.
- Type "ipconfig/all" into the CMD window and press Enter.
- Find the Host Name in the Windows IP Configuration section. Your server name is on the right.
Please write down the hostname or copy it to a word document so you can access it quickly.
Go back to your workstation to test the server. These steps can get complex, so you may want to contact an IT professional for help.
- Open the Windows Start Menu from a workstation.
- Type "Run" into the search and open Run.
- Type "CMD" into the Run window, and then press Enter.
Type "ping [your server name]," then press Enter. Don't include the brackets around your server name.
- Repeat these steps for each workstation that gets Error H202.
Your server is working fine if you get a reply for each packet with no loss. Move on to Solution 5.
If there's packet loss or a long reply, stop. Reach out to an IT professional for help with your network.
Solution 5: Add your server to your Windows hosts File
See edit Windows hosts file for instructions.
When you're done, open QuickBooks on your workstations. If everything opens correctly, the problem is fixed.
If you still see Error H202, please contact our support team via messenger. We can help you get QuickBooks running again.
Fix Error H101, H303, and H505
If you see Error H101, H303, or H505, one or more of your workstations is set to be the server for QuickBooks. Your server (the computer hosting your Company files) should be the only one to host multiuser mode.
The Host Multiuser Access option should be turned off on your workstations. These computers on your network don't host your Company files. Your server computer should be the only one hosting.
| Note: You can do these steps before opening a Company file. |
- Open QuickBooks Software on any workstations where you see H101, H303, or H505
- Don't open your company file. Instead, select the File Menu and hover over Utilities.
- If you see the Host Multiuser Access option, don't select it. Move on to the next workstation. This one isn't causing the problem.
If Stop Hosting Multiuser Access is an option, select it.
- Repeat these steps on all workstations where you see Error H101, H303, or H505.
After you check your workstations, move on to your server computer. The server is the computer that usually hosts your Company files.
- Open QuickBooks on your server computer.
- Open the File Menu and hover over Utilities.
- If Host Multiuser Access is an option, select it. If Stop Hosting Multiuser Access is an option, don't select it.
QuickBooks ERROR Code: 6190 and 816
You'll get error codes -6190 and -816 when another User is logged in to the Company file in a single-user mode. There are several solutions we can try to resolve this.
Let's first make sure that your QuickBooks release is up-to-date. Then, rename the ND and TLG files to repair the Company damaged Data files.
Here's how:
- Open the folder that contains your Company file.
- Find the files with the same name as your Company files but with extensions.ND and.TLG.
- company_file.qbw.nd
- company_file.qbw.tag
- Right-click each file and select Rename. Add the word OLD at the end of each file name. Ex: company_file.qbw.nd.OLD
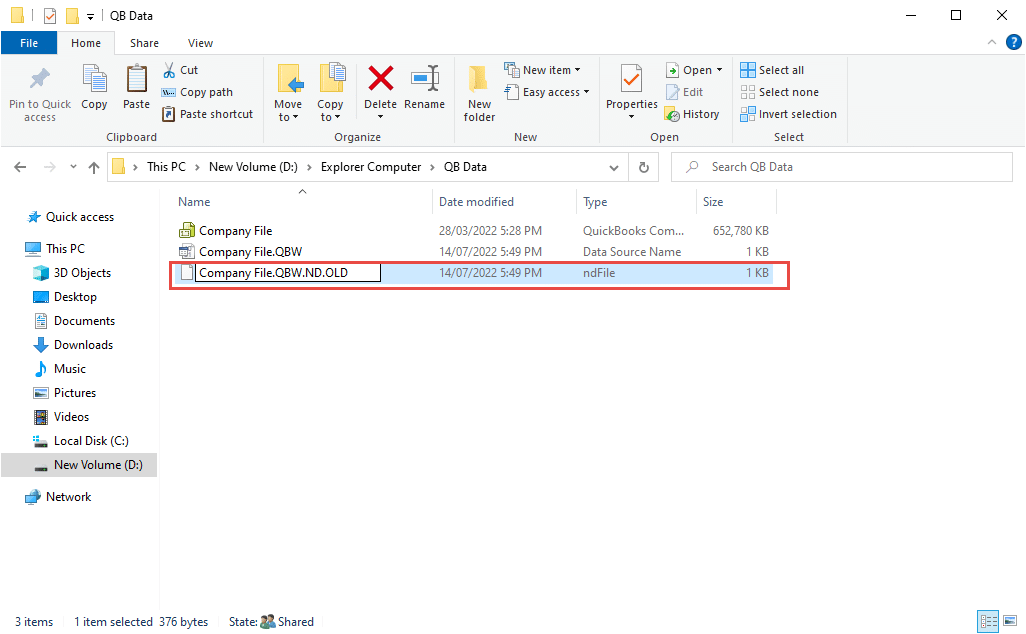
- Open QuickBooks again and try to sign in to your Company file. If the same issue occurs, proceed to solution 2.
When opening a Company file, check out this article for more troubleshooting steps about the error -6000: Resolve Error -6000.
I'd also suggest calling us so one of our Technical Support specialists can guide you through the process. Here's how to get in touch with our QuickBooks Desktop Customer Care:
- Go to https://help.quickbooks.intuit.com/en_US/contact
- Select QuickBooks for Windows.
- Select your QuickBooks for Windows version.
- Select a topic.
- Click on the Get Phone Number button.
QuickBooks ERROR Code:6000,83
Solution 1: Turn off hosting on your workstations
If you're hosting your Company files over a network, ensure the Host Multiuser Access option is off on your workstations. These computers connected to your network don't host your Company files. Your server computer should be the only one hosting.
- Open QuickBooks on one of your workstations
- Don't open your company file. Instead, select the File Menu and hover over Utilities.
- If you see the "Host Multiuser Access" option, don't select it. Move on to the next workstation. This one isn't causing the problem.
- If Stop Hosting Multiuser Access is an option, select it.
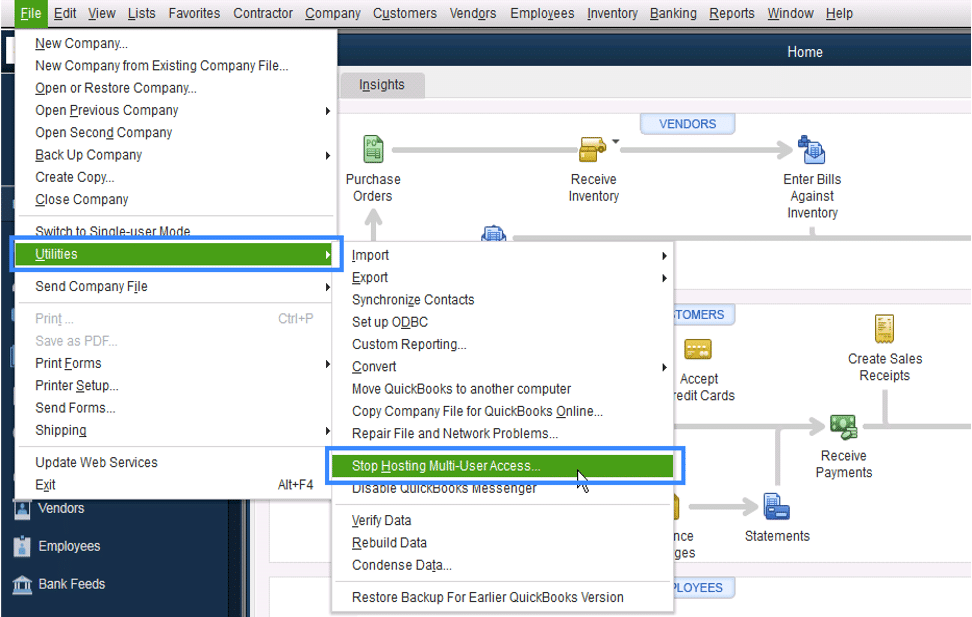
- Repeat these steps on all of your workstations
If you still see Error -6000,-83, move on to Solution 2.
Solution 2: Use QuickBooks File Doctor
Follow the steps to download File Doctor and use it to scan your Company file. Let it fix any issues it finds.
Solution 3: Configure your host file
First, ping your server to get your server name and IP address:
- On one of the computers connected to the network, open the Windows Start Menu.
- Type "CMD" into the search and open Command.
- Type "Ping[Name of your Linux server]" in the window and press Enter.
- Write down the server name and the IP address.
Next, edit the host files. Ensure all the computers connected to your server have the correct IP address and Linux server name. Start with the computer where you see Error -6000,-83.
- Close QuickBooks on all of the computers connected to your network. Go to FiMenuenu and select Quit QuickBooks Desktop.
- Open the Windows StaMenuenu.
- Type "File Explorer" into the search and open File Explorer.
- Select My Computer from the navigation bar. This is sometimes called "This PC."
- Open your C: drive. Then open your Windows folder.
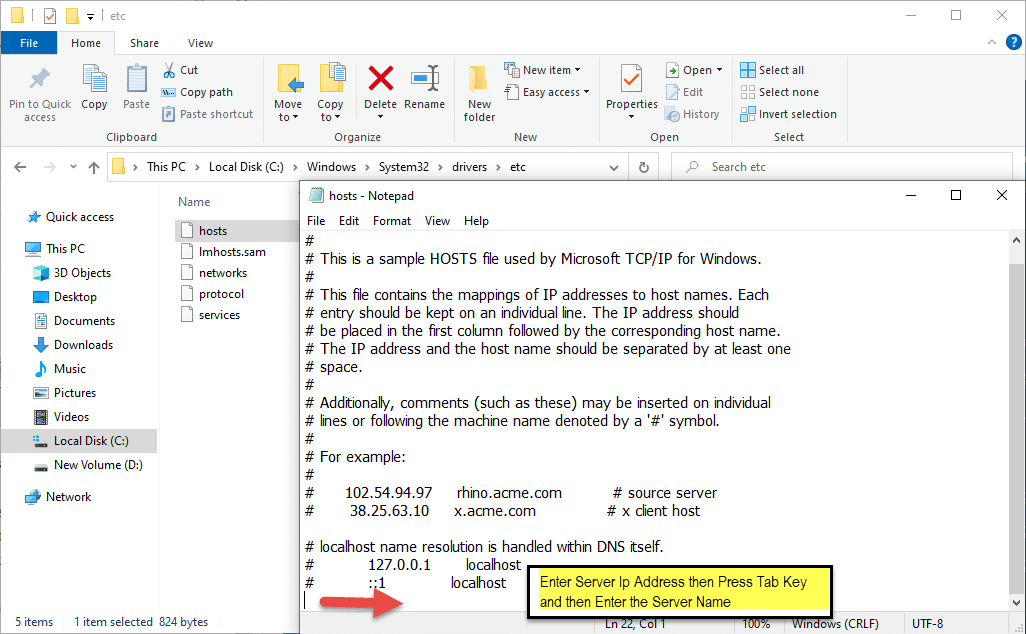
- Find the System32 folder. Open the Drivers folder and then the ETC folder
- Right-click the File called C: Windows-System32-drivers-etc-hosts. Select Open with and then Notepad
- Go to the bottom of the File. Add the Linux server IP address to the end of the text. Then press the Tab key and add your Linux server name. Note: Linux systems files are case-sensitive. Make sure you enter names with the correct case.
- Select File and then Save. Then close Notepad
QuickBooks ERROR Code: 6176
Causes for QuickBooks Error -6176, 0
- A firewall is blocking the connection between the two computers
- .ND and . TLG files are damaged
- QuickBooks isn't running with admin permissions
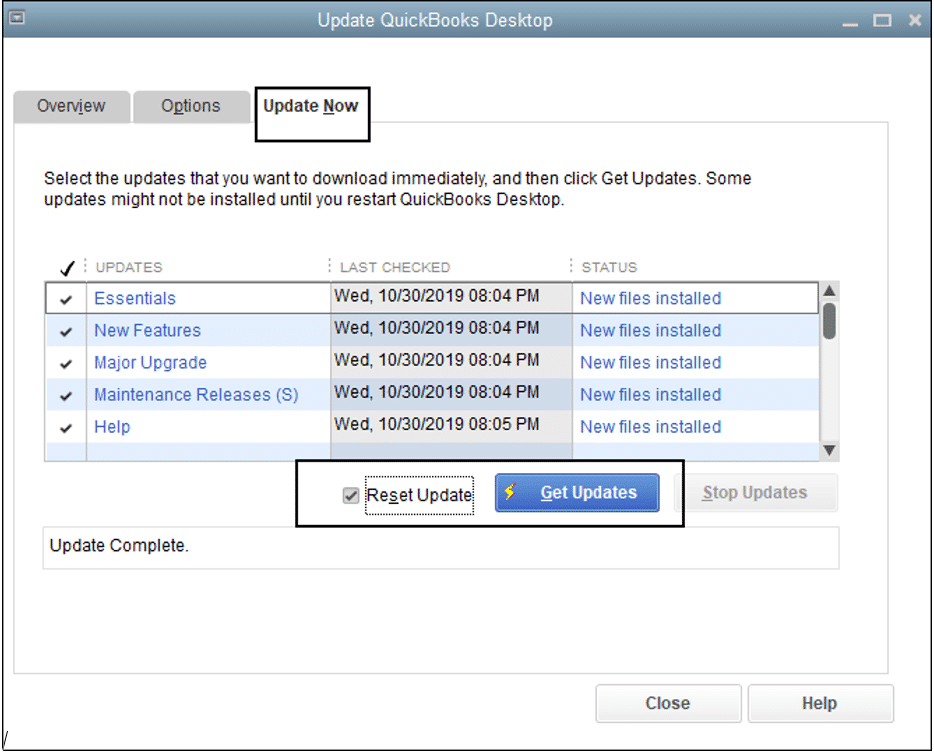
Step 1: Update QuickBooks Desktop
- Open QuickBooks Desktop
- Then go to Help > Update QuickBooks Desktop
- Then click on Update Now in the top right corner
- Now make a, check on Reset Update and click Get Updates (See an image below)
- Once the Update is complete, close QuickBooks
Step 2: Download and Run QuickBooks File Doctor
- Download QuickBooks Tool Huband go to your downloads by pressing CTRL+J
- Under your downloaListist, click on exe
- Click Yes to allow this app to make changes
- Now click Next to install it, then click Yes again to accept the license agreement.
- Click on Next and then Install (It may take some time)
- Once the installation is complete, click on Finish
- Now open QuickBooks Tool Hub (Icon will be available on your desktop)
Under the Company File Issues tab, click on Run QuickBooks File Doctor
Step 3: Rename the.ND and . TLG Files
.ND and . TLG files help you to run QuickBooks company files on network and multiuser mode. If these files are damaged or corrupted, that can cause you QuickBooks Error 6000 107, and renaming these files can help you to resolve it.
- Open your QuickBooCompanyany file location.
C:-Users-Public-Documents-Intuit-QuickBooks-Company File[Default Location] - Now look for the files that have.ND and . TLG extensions.
- Make a right-click on them and select Rename; now type ".OLD" at the end of the File.
For Example,
CompanyName.qbw.ND now changes it to be. ND.OLD
CompanyName.qbw.TLG now changes it to CompanyName.qbw.TLG.OLD - Click Yes to confirm.
Main Causes of QuickBooks Hosting Issue
>>A firewall is blocking the connection between the two computers.
Make sure to turn off the firewall that is blocking the Connection b/w client and Server PC or make an exemption
>>QuickBooks isn't running with admin permissions.
QuickBooks users must have full permission on the file and its related folders
>>User doesn't have enough permission on the QuickBooks Data folder.
Client User Must have fully read \ write permission on the server location where the QuickBooks file is stored
>>User doesn't have administrative privileges on his\her Computer.
The user must be an Administrator on his \ her Computer.
User control Settings must be in never notify mode
>>.ND and . TLG files are damaged.
These are QuickBooks extensions that store network-related information. If any connection issue comes, rename the file with this extension and Re-run the QuickBooks database Server manager.
>>One of the Users, by default, opened the file as single user mode, and when he closed the Company file, instances remained in the task Manager
we need to restart the Server to disconnect the file with the Users rather than all the users to restart their PCs
>>Setup hosting is enabled on one of the User computers.
Hosting must be enabled only on Server Computer. If any users enabled it by mistake, disable it by going to QuickBooks -> File->Utilities and ensuring it's written "Host Multiuser access."
Important Note:
QuickBooks is not mentioning that QuickBooks will work on the virtual machine. So to avoid such troubles, QuickBooks strongly recommend running the Server as a normal windows Server.
Kindly check the server requirements for QuickBooks software as follows
- Windows Server 2019, Standard and Essentials
- Windows Server 2016, Standard and Essentials
- Windows Server 2012 R2, Standard and Essentials
- Windows Server 2012, Standard and Essentials
Steps to resolve QuickBooks Multi User issue.
Following Steps are provided by Intuit US QuickBooks Software. All the help tools are provided by them only.
Step 1: Restart the Server
Step 2: Close the QuickBooks company file on all the User PCs.
Step 3: Open the Computer where the Multi-User issue occurring
Here we will store the Host Server details in the Client Machine.
- Go to C:\Windows\System32\drivers\etc Folder. Click on the file named hosts with notepad.
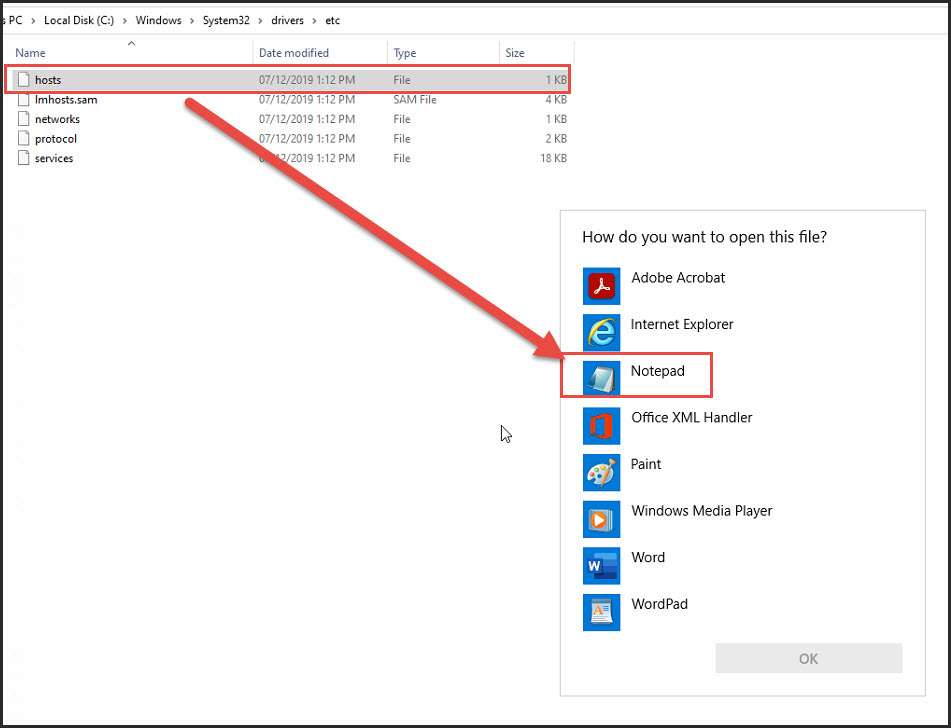

- Edit the notepad by entering the Server IP Address, then Press Tab Button and enter the Server name
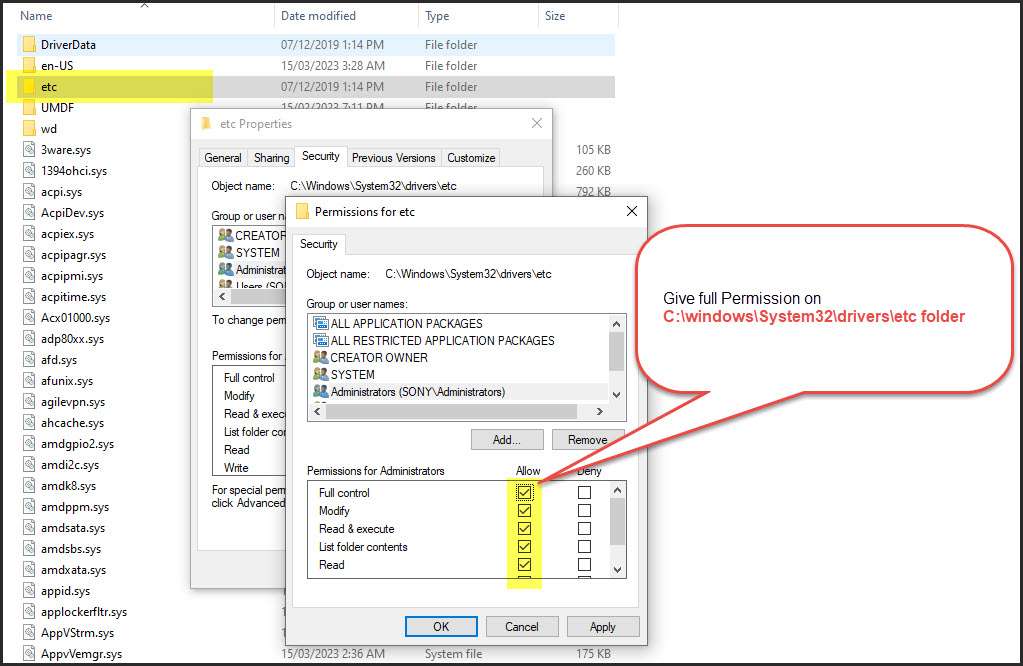
- Try to save. If there is a permission issue in saving Close the notepad and give full permission to the C:\Windows\System32\drivers\etc folder, do the above, and save.
- After this, try to Restart the Server and open the Company File.
If the above steps do not work, please see the following solutions.
How to fix Error H202 and H505
SOLVED•by QuickBooks•87•Updated 1 month ago
Learn what Errors H202 and H505 are and what to do if you see them in QuickBooks Desktop.
If you see Error H202 or H505 (or H101 and H103) when you switch to multi-user mode, we’re here to help. These errors mean something is blocking the multi-user connection to your server. We'll show you how to fix the issue.
Using another hosting solution
If you use another solution like Enterprise Hosting through Right Networks or one of our affiliated Intuit Hosting Providers, contact them directly. You’ll need to work with them as you troubleshoot.
Important: The QuickBooks Database Server Manager doesn't support devices like Network Attached Storage (NAS). |
Host your own network with Windows Server 2012 Essentials R2
Follow these steps if you use Windows Server 2012 Essentials R2, to host your network.
Fix Error H202
How you host your company files
Host your own network
If you haven’t already, follow the steps to install QuickBooks Database Server Manager on your server for each version of QuickBooks you use. Your server is the computer that hosts your company files. After you install Database Server Manager:
There are two ways to set up QuickBooks Database Server Manager:
- The Full Program option: You install the full version of QuickBooks Desktop and Database Server Manager on your server computer.
- The Server Only option: You only install Database Server Manager on your server computer.
Run the QuickBooks Database Server Manager on your server with the QuickBooks Tool Hub
Step 1: Download and install the QuickBooks Tools Hub on your server
The QuickBooks Tool Hub helps fix common errors. You'll need to close QuickBooks to use the tool hub. For the best experience, we recommend you use Tool Hub on Windows 10, 64-bit.
- Close QuickBooks.
- Download the most recent version (1.6.0.3) of the QuickBooks Tool Hub. Save the file somewhere you can easily find it (like your Downloads folder or your Windows desktop). Note: If you've installed Tool Hub before, you can find out which version you have. Select the Home tab. The version will be on the bottom.
- Open the file you downloaded (QuickBooksToolHub.exe).
- Follow the on-screen steps to install and agree to the terms and conditions.
- Double-click the icon on your Windows desktop to open the tool hub when the installation finishes.
Note: If you can't find the icon, search in Windows for QuickBooks Tool Hub and select the program.
Step 2: From the Tool Hub, run the QuickBooks Database Server Manager on your server
Your server computer is the one that stores your QuickBooks company file(s). Your other computers connected to your network are your workstations.
- From the QuickBooks Tools Hub, select Network Issues.
- Select QuickBooks Database Server Manager. If QuickBooks isn’t on your server, it'll prompt you to install it.
- Inside the QuickBooks Database Server Manager, select Start Scan if you see your company file folder(s). If you don't, Browse to the location of your company file and then select Start Scan.
- QuickBooks Database Server Manager repairs your firewall permissions automatically. When the scan finishes, select Close.
- Open QuickBooks on each workstation where you see Error H202. Select File, then Switch to Multi-user Mode. If you use your server computer as a workstation, be sure to check it too.
Step 3: From the Tool Hub, run the File Doctor.
- From the tool hub, select Company File Issues.
- Select Run QuickBooks, File Doctor. It can take a minute for it to open. (Note: If the QuickBooks File Doctor doesn't open, search for QuickBooks Desktop File Doc and open it manually.)
- In QuickBooks File Doctor, select your company file from the dropdown menu. If you don’t see your file, select Browse and search for your file.
- Select Check your file (middle option only) and then Continue.
- Enter your QuickBooks admin password and then select Next.
Everything is fixed if your workstations can go into multi-user mode without any issues.
If you still see Error H202, continue to our other solutions.
Fix Error H202 manually
Solution 1: Check the services on your server
Solution 2: Add services to your Windows admin group on your server
Solution 3: Configure your firewall settings on your server
Solution 4: Ping your server from a workstation
Solution 5: Add your server to your Windows hosts file
Fix Error H101, H303, and H505
If you see Error H101, H303, or H505, one or more of your workstations is set to be the server for QuickBooks. Your server (the computer hosting your company files) should be the only one to host multi-user mode.
The Host Multi-User Access option should be turned off on your workstations. These computers on your network don’t host your company files. Your server computer should be the only one hosting.
Note: You can do these steps before opening a company file. |
- Open QuickBooks on any workstation where you see H101, H303, or H505.
- Don't open your company file. Instead, select File, then Utilities.
- If you see the Host Multi-User Access option, don’t select it. Move on to the next workstation. This one isn’t causing the problem.
If Stop Hosting Multi-User Access is an option, select it.
- Repeat these steps on all workstations where you see Error H101, H303, or H505.
After you check your workstations, move on to your server computer. This is the computer that normally hosts your company files.
- Open QuickBooks on your server computer.
- Select File, then Utilities.
- If Host Multi-User Access is an option, select it. If Stop Hosting Multi-User Access is an option, don’t select it.
There's a new QuickBooks Software Update waiting for you.
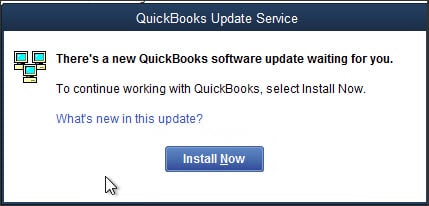
Usually this message occurs when you try to run quickBooks Software by Clicking on the QuickBooks icon to open the file.
Please follow the steps below to resolve the issue.
- Click Install now button displays on the message. QuickBooks will automatically download the latest release update and install it for you.
If Install Now is not functioning well after clicking, Please follow the steps below.
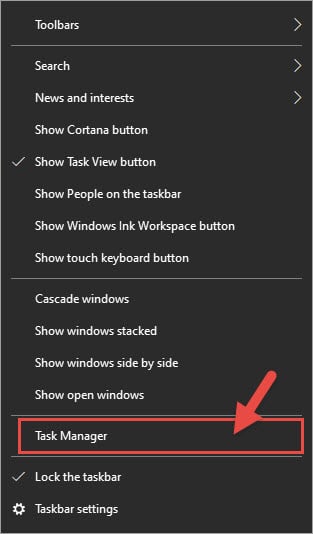
- Go to Task Manage by Clicking on the Status bar of the Computer and Select Task Manager
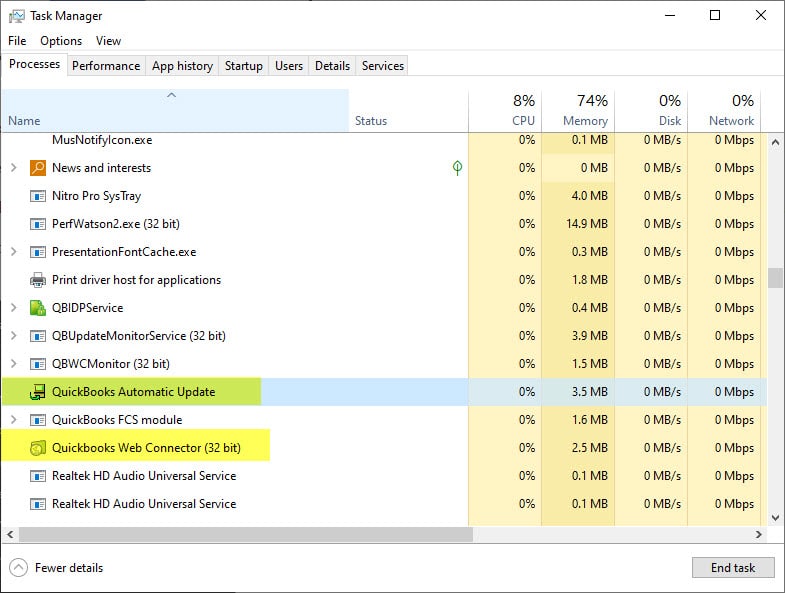
- Close all the Instances of QuickBooks from the Task Manager
- After that, Restart the Computer
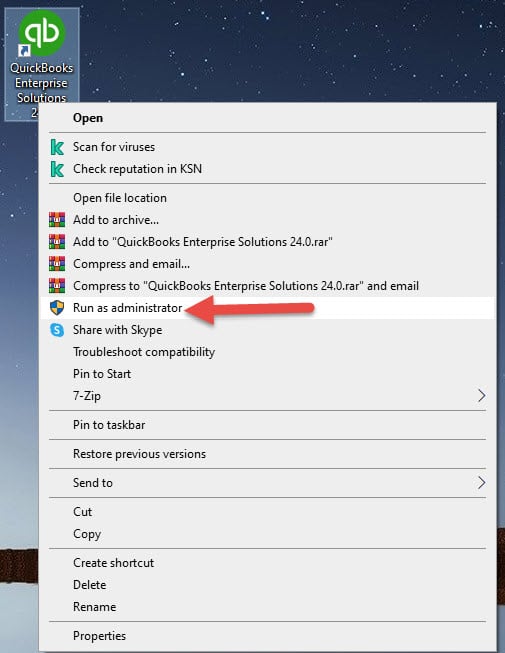
- Right Click on the QuickBooks Desktop Icon and Select Run as Administrator
- Try to Install Now, hopefully it will work automatically.
- If the above steps not working, Please follow the steps below
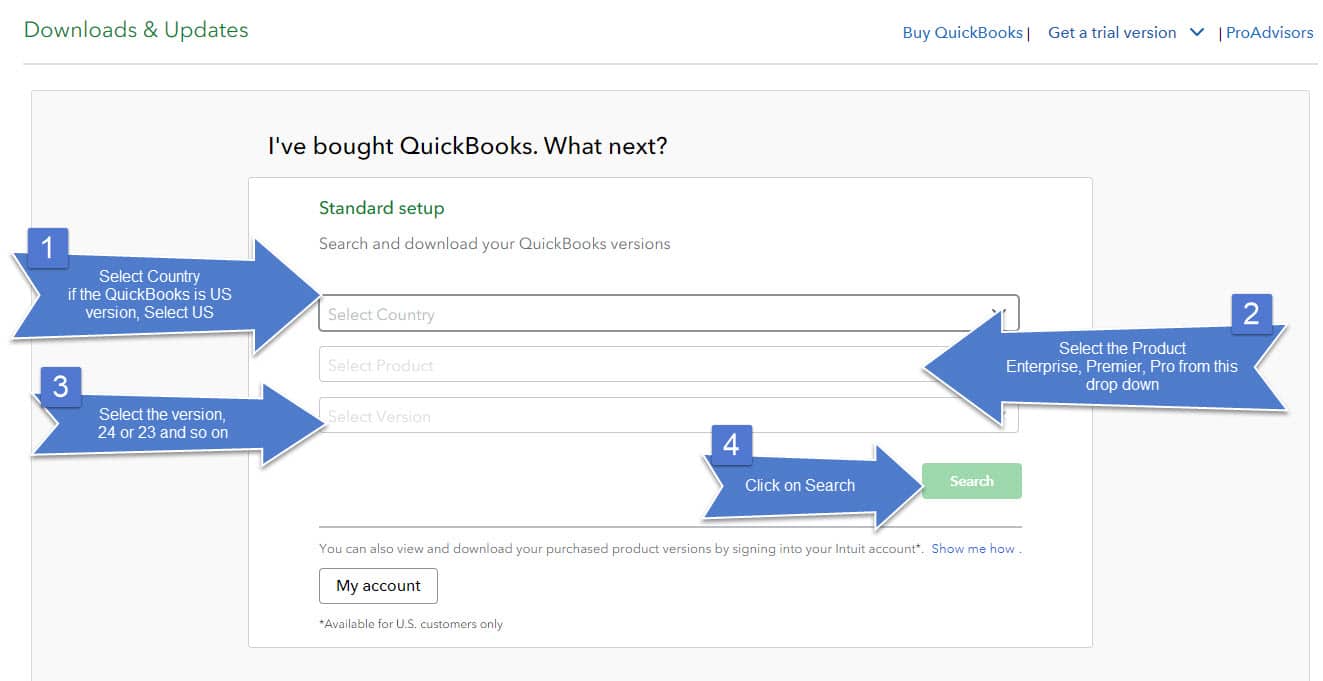
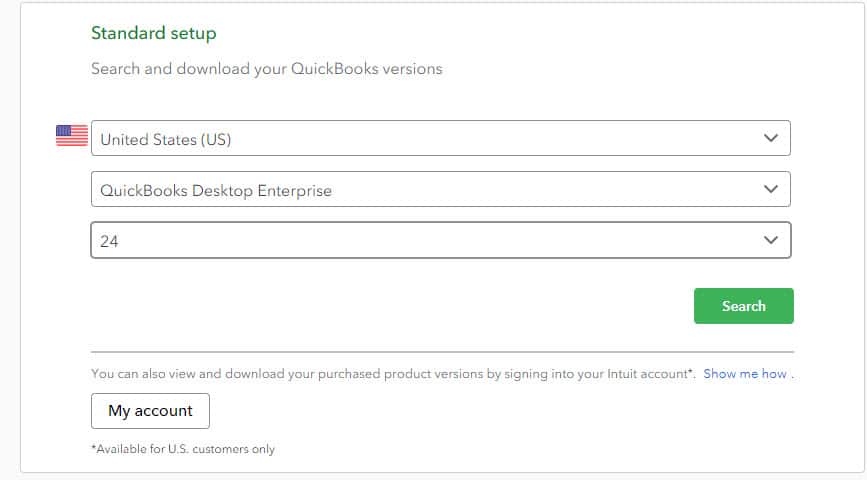
- Browse the URL
https://downloads.quickbooks.com/app/qbdt/products - Now Search the Product from the web page
- Download the Latest release from the Page
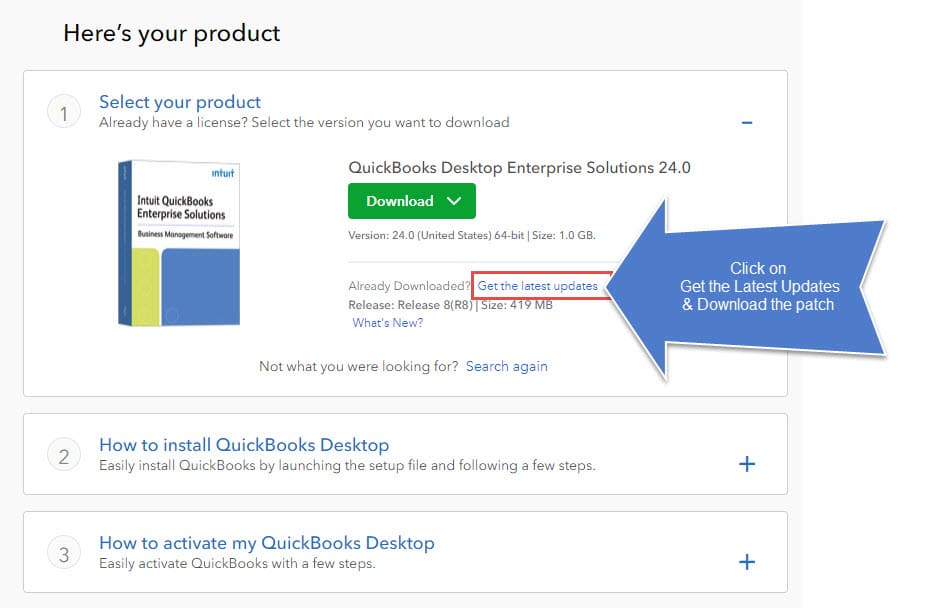
- Install web patch

- Double Click on the en_qbwebpatch and install it
- Restart the computer if required
- Finish
