Protect Hinawi ERP Data
Protection of Data
How to Protect your Data in Hinawi Software:-
- Data is the Customer's responsibility since the User(s) is the one who is engaged in its daily activities. To avoid loss of Data, please do the following:-
- Backing up your Data to the cloud is one of the best ways to guard against Data loss.
- Cloud Data backup should be done frequently and regularly; this is especially important for mission-critical Data whose loss or corruption can severely hinder normal business processes and operations. Backing up your Data to the cloud allows for easy scalability; your Data storage size can be readily expanded to accommodate your Data storage needs.
- Password control is the primary line of defense in safeguarding the Data within your network. Sensitive information should be password protected so only users who know the password can access the Data.
The password used to secure the Data should not be used for other applications or tools; it should be strong, with a combination of letters, numbers, and special characters, as well as unique.
In addition, the password should be provided only to individuals who need access to the Data to carry out their job duties. Furthermore, the password should be changed regularly. - Daily backup on external and Internal Hard Disks or the cloud.
- Install auto backup software on the server to make daily data backups.
- Virus protection software must be installed on Servers and computers.
- UPS machine for emergency purposes in case of electricity power shutdown. This will keep servers and client PCs working for some time.
- Other safety measures recommended by Customer IT staff or consultants and hardware supplier
- Daily, monthly, and yearly Data printing and reports to be kept safe.
How to Backup Database using Hinawi Software and SQL server
Backup can be done in two ways:
1. From Hinawi Software
2. From SQL Server
1. From Hinawi Software
Users can do Backup & Restore from File -> Utilities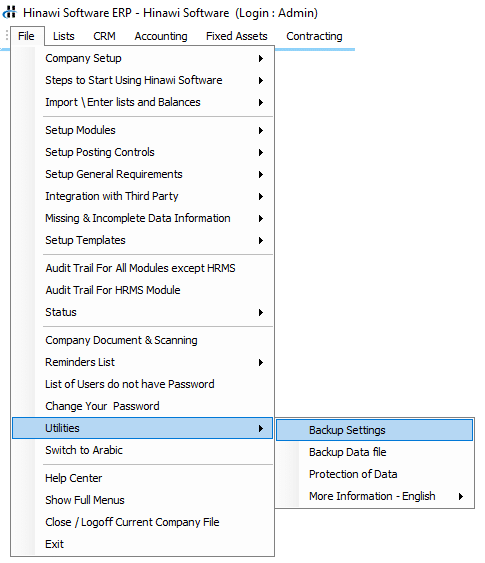
The user must do Settings for Backup. The user must select the Location where the backup is stored.
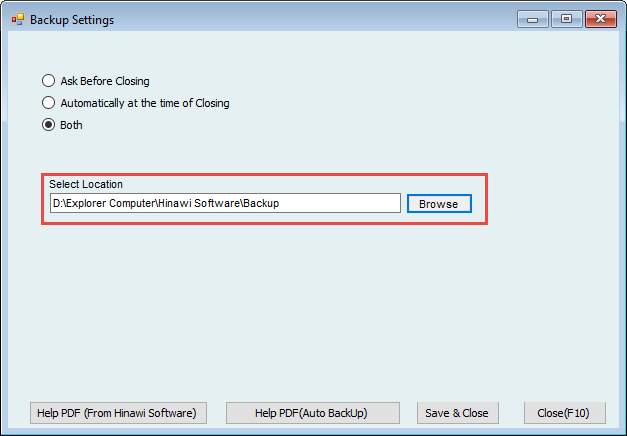
Users can select the Location for Backup from here and click on Backup Data
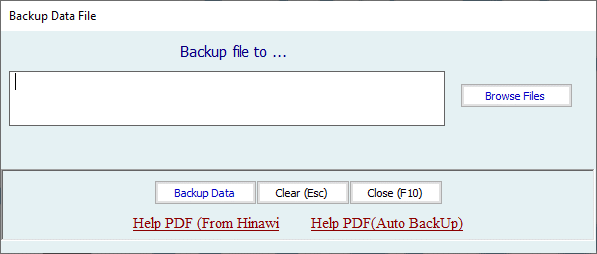
- From SQL Server
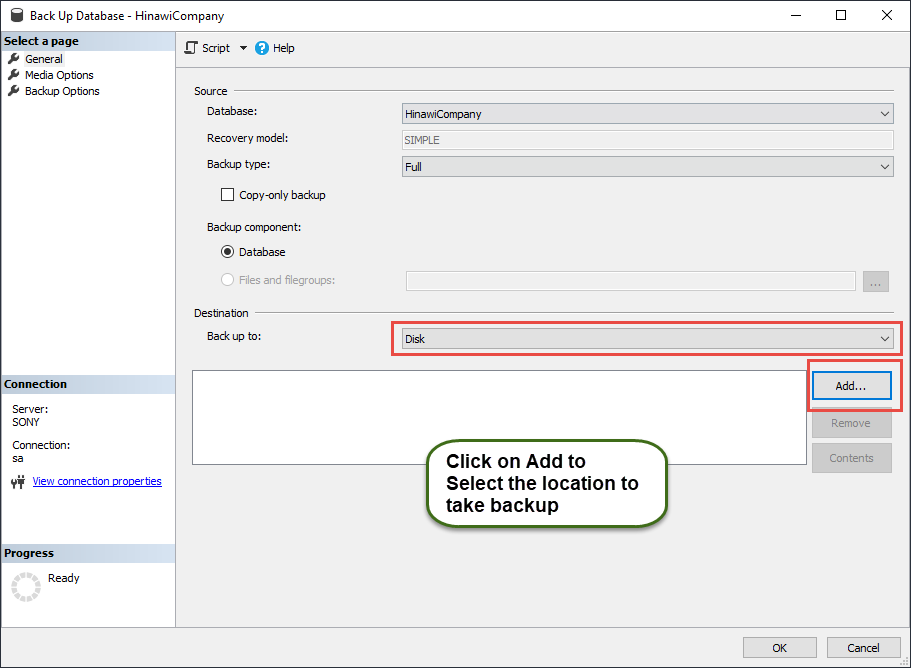
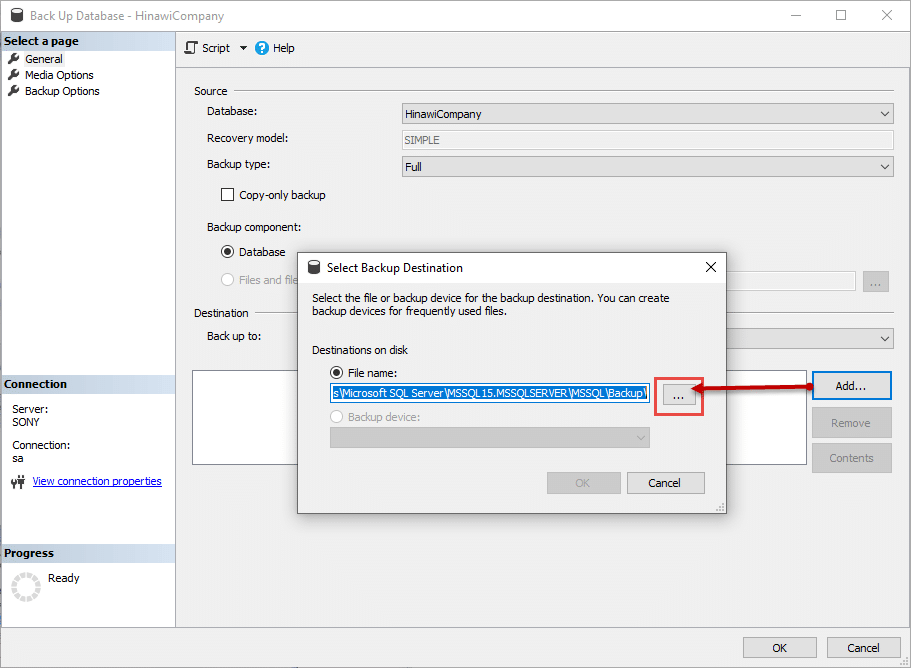
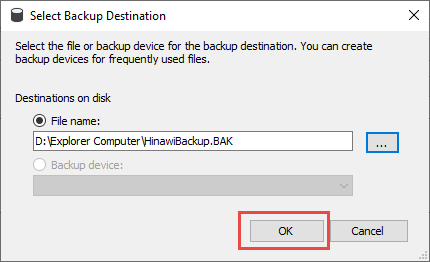
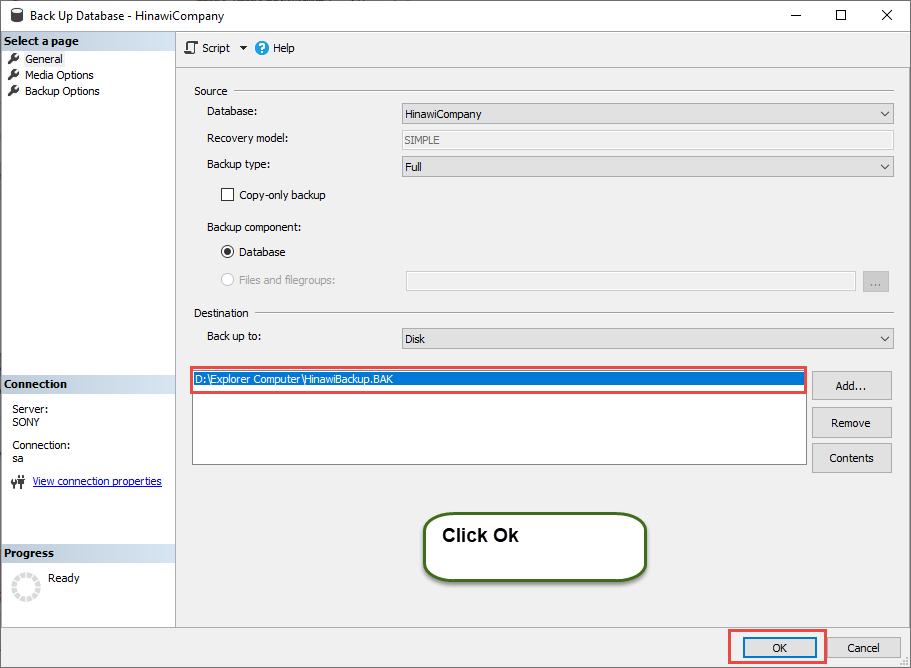
To do Back Up from SQL Server, do the followings:
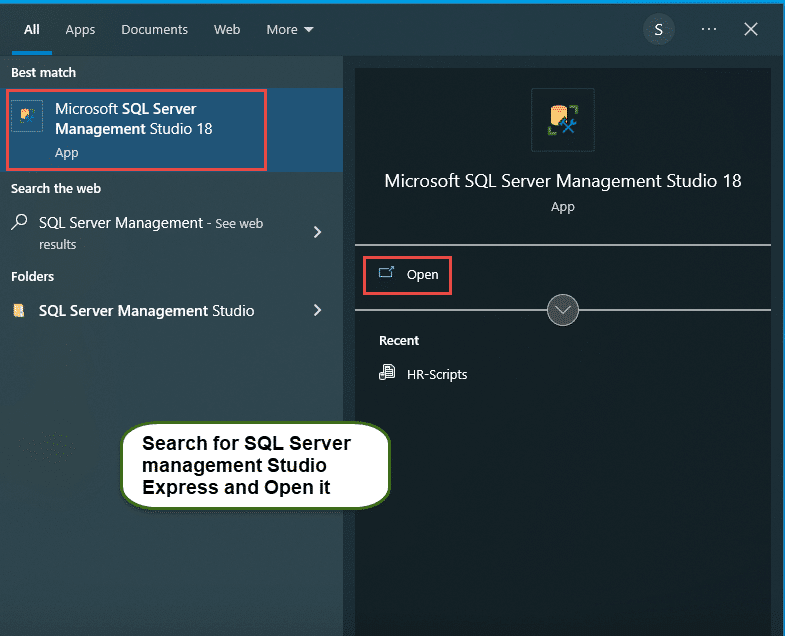
To take back up of any database of Hinawi Software from the SQL Server directly, first, run
The SQL Server Management Studio Express, which you can find from Start and Search for “SQL Server Management Studio Express.”



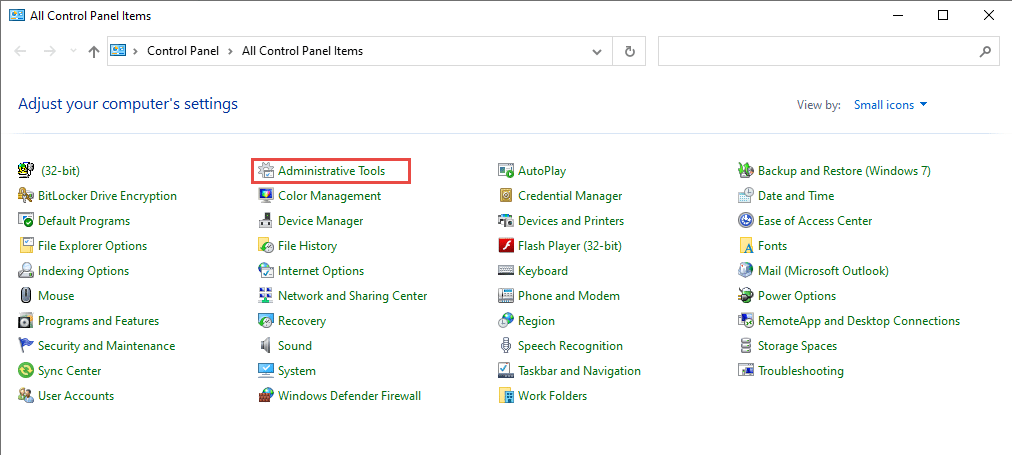
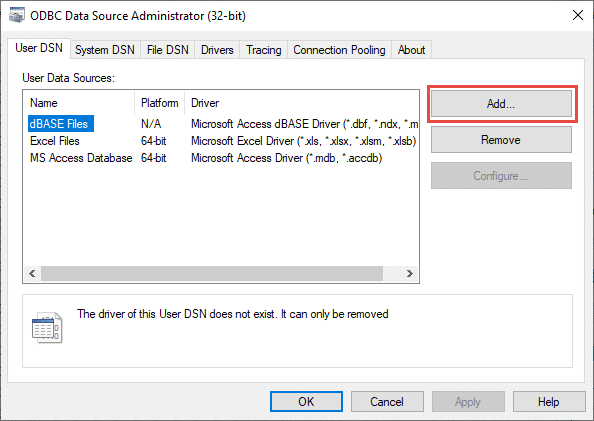
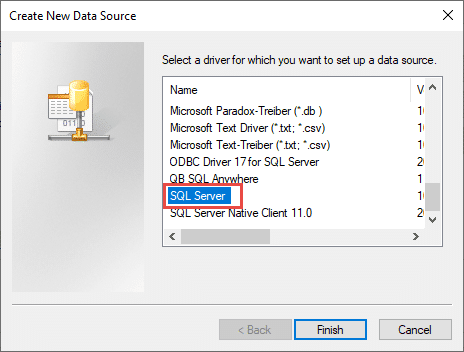
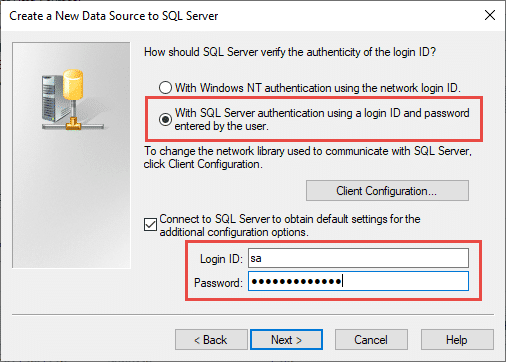
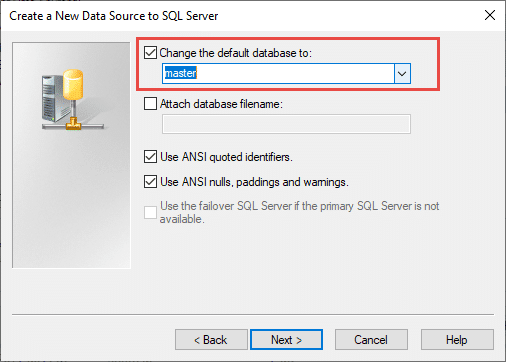
How to do SQL ODBC Test on Client PC.
Step 1-
go to Control Panel and then Click on Administrative tools


How to Make Auto Backup from Hinawi Software
Auto Backup helps you to keep your Data secure.
Backup can be used whenever your original file is corrupted or lost.
Important:
The Backup location is to be in the server and external drive.
Make sure that this Setup is applied to the server.
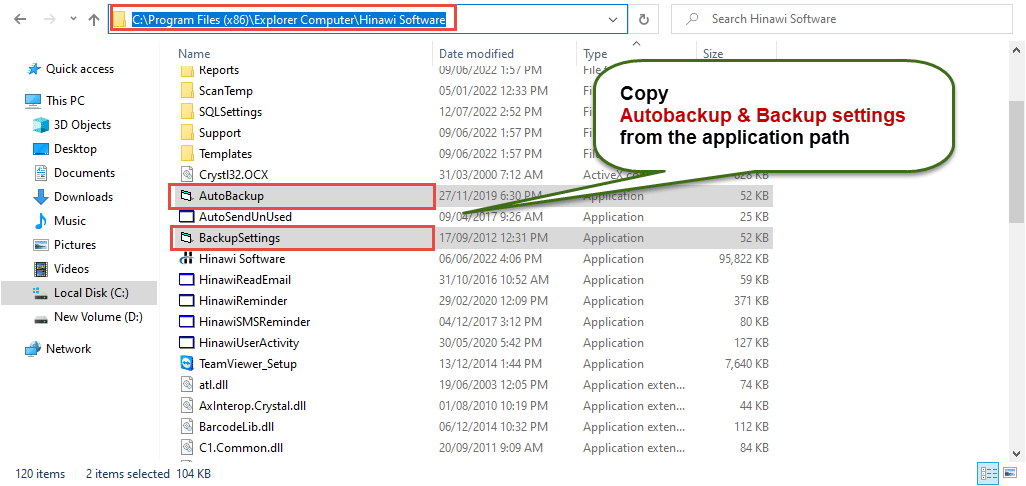
1. Go to:
Local Disk (C:) Program File (x86) or Program File- Explorer Computer- Hinawi Software
Then copy two files:
- AutoBackup
- BackupSettings
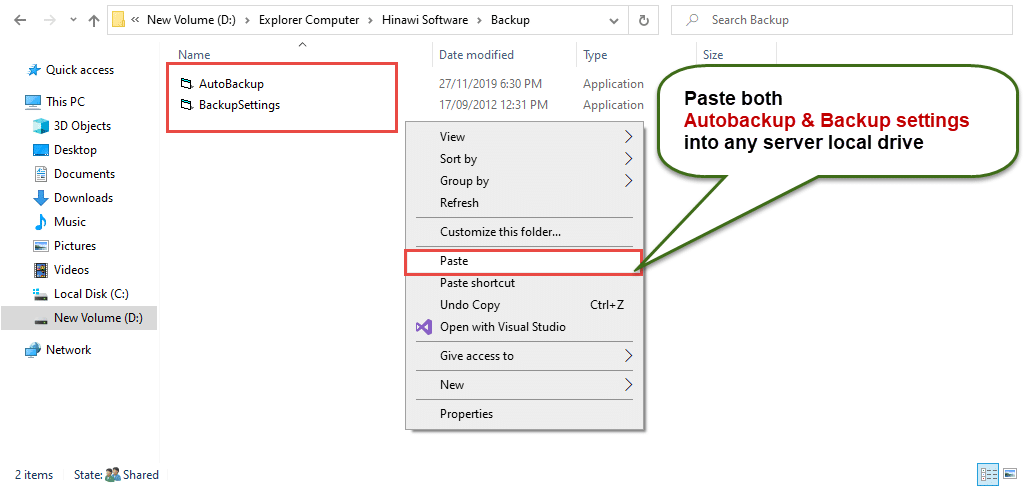
2. Paste the two files into the following:
Local Disk (D:) Explorer Computer -> Hinawi Software -> Backup folder
3. Then Double Click On BackupSettings; it will open this window; fill it as shown below:
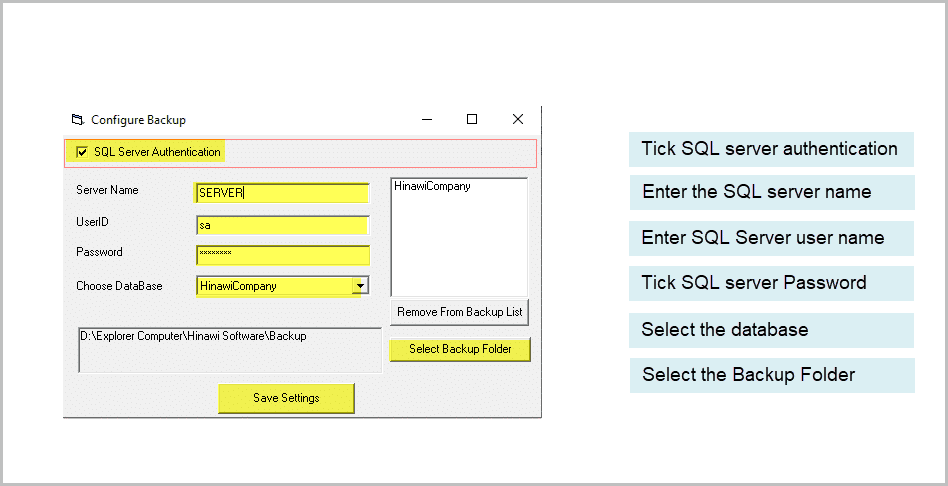
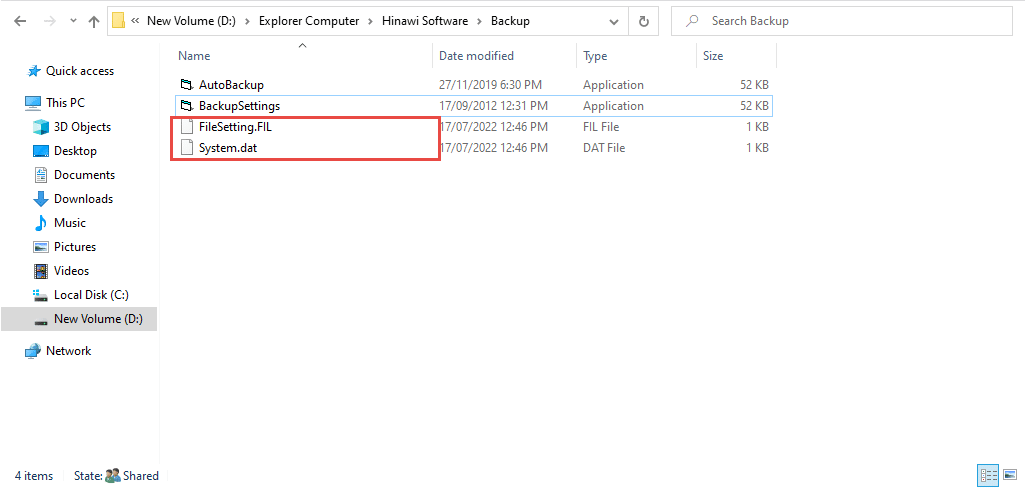
4. Click Save Settings, and you will note the creation of two new files.
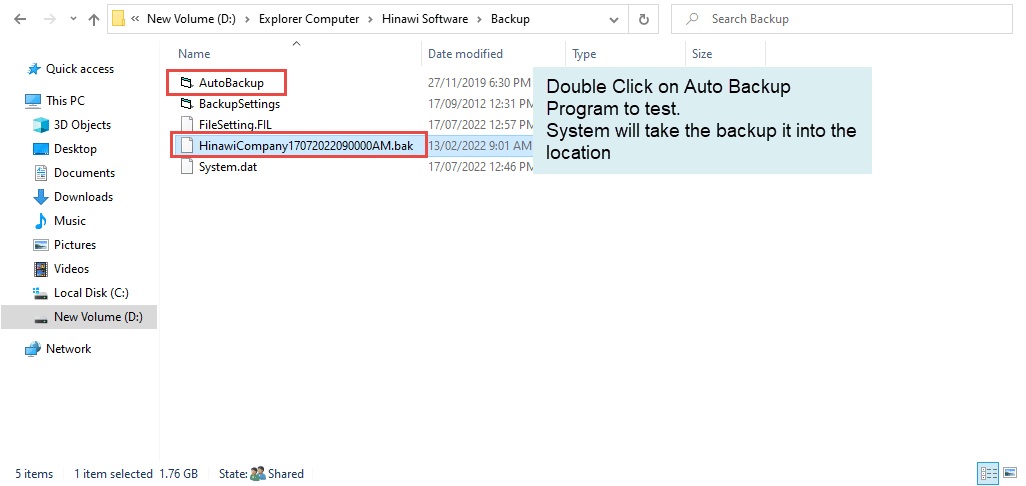
5. To ensure it is working correctly, double-click on AutoBackup, to get new backup files.
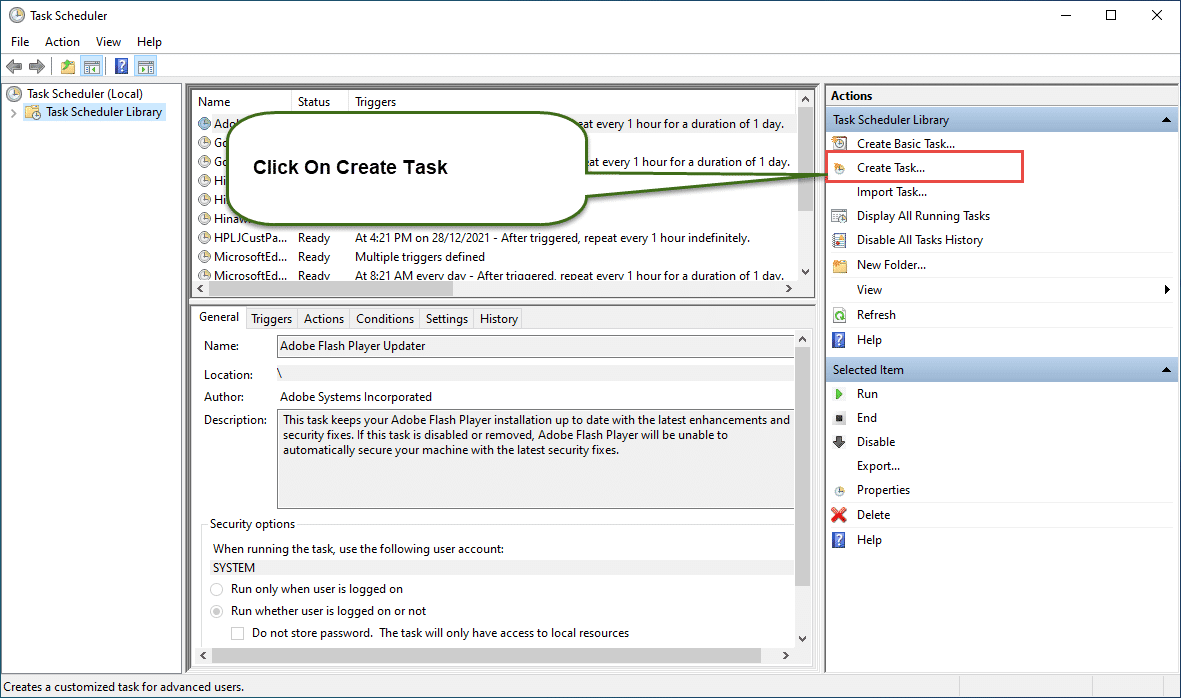
6. To make this Backup work automatically, go to Task Scheduler.

7. Fill in the Task Name and Description, then Next.

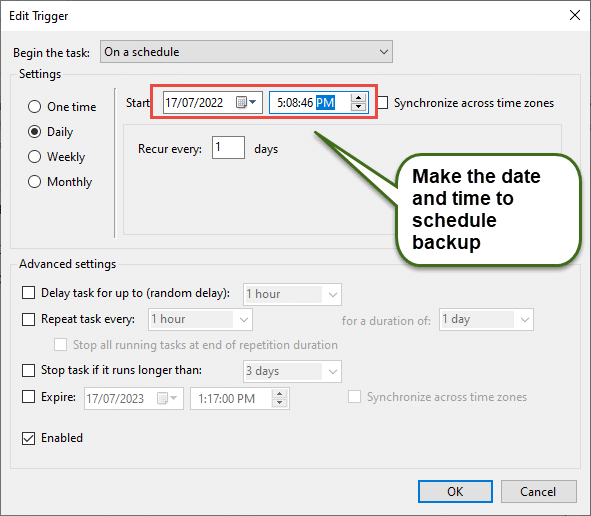
8. Go to Triggers Tab, click New Button & Choose Daily, then Click Ok.

9. Check the starting Date and Time, then Next.
10. Go to the Actions Tab, then
- Click on New Button
- Browse the Auto backup Program from the location you copied
- Click Ok
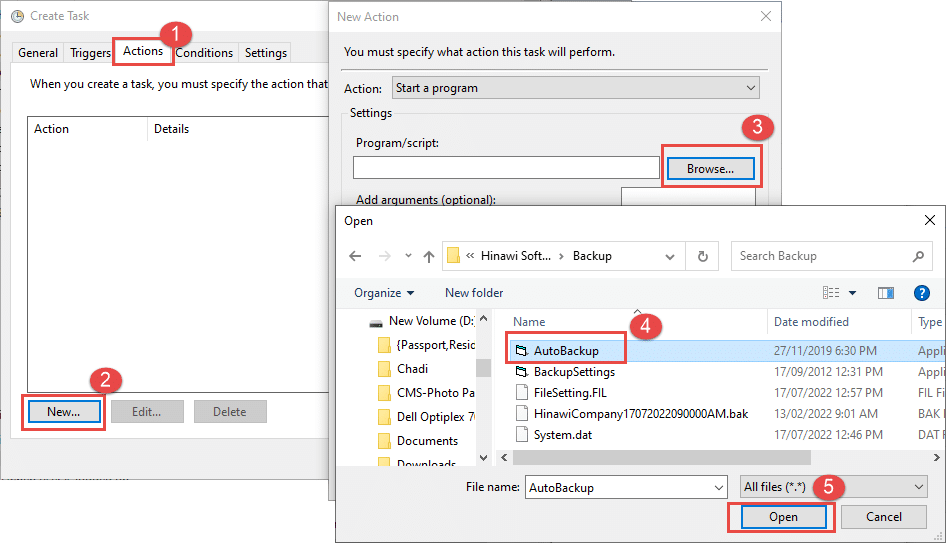
12. Finally, Click Finish.
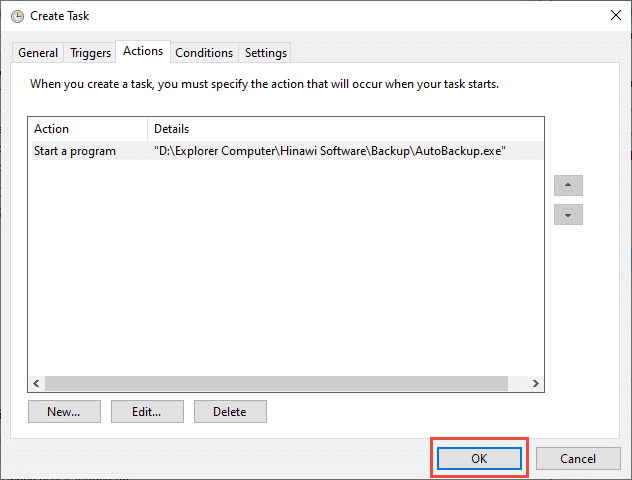
13. You will see the new Task on the Task Scheduler Library.

14. To Check if the Task is working correctly.

15. You will find that two new Backup files are coming.
Integration of Data from Third-Party Software
Introduction:
Dear Valued Users, thank you for using Hinawi ERP software. This manual is for Hinawi Business Management (Hinawi ERP) Software integration of Data from third-party software.
Settings Information:
File-> Import \ Enter Lists and Balances - > Import from Third Party Integration - > More Information


Below is the explanation for the above screen:-
1. Enabling the sales invoice Setup you will configure.

2. Use Third Party Invoice No.
If the User tick marks this option, the User must provide Invoice No. For the sales invoice. b. If the User doesn’t mark this option, the System will generate Invoice No. for each sale
invoice.
3. Use Items from Third Party Software
If the User tick marks this option, the User must provide the Items for each sales invoice transaction.
Note:
The User must first import the Item List to the System before the User can include the Item in importing using the standard CSV file.
b. If the User does not tick mark this option, the User must choose a default Item for all the sales invoice
4. Use Quantity
If the User tick marks this option, the User must provide the Number of Items for each sales invoice transaction.
b. If the User does not mark this option, the System will consider the Item Quantity as one (1) for all sales invoice transactions.
Note:
This option will be enabled if you tick mark the option for “Use Items from Third Party.
Software”
5. Use Terms (Terms can only be applied to Credit Invoice)
If the User tick marks this option, the User can include the payment terms for each sales invoice.
Note:
The User must first import the Terms of Payment List to the System before the User can include the terms in importing using the standard CSV file.
b. If the User does not tick mark this option, the User can’t include the payment terms for each sales invoice.
6. Default Deposit Account
- The User must choose the default deposit Account for Cash Invoices.
7. Default Item
- The User must choose a default Item for all sales invoice transactions.
Note:
Default Item can only be set if the User didn’t choose to mark the option “Use Items from Third Party Software.”
8. A/R Account
-The User must choose the default A/R Account for Credit Invoice.
9. Folder Name
-The User must locate the default folder name where the System will read the entire CSV file.
Note:
The User must have Full permission of the default folder location (After Importing the CSV file, the File will be moved to the Imported Files Folder, which the System will generate automatically).
Importing Sales Invoice
File -> Import \ Enter Lists and Balances -> From Third Party -> Import Cash Invoice / Import Credit Invoice.
Import Cash Invoice \ Credit Invoice

Folder Name
- Folder name will be filled automatically depending on the Setup.
Sample Format

- Choose the Standard CSV format for importing the Sales Invoice.
Read Files from the Folder

- After clicking “Read Files from Folder,” one selection box will open, and it shows all the
CSV files are available in that default folder
Note:
The File must contain Columns as per the Setup in the following order.
Standard with Totals:
1. Invoice No.
2. Customer Name (Must Match with the Same Customer Name in Hinawi ERP).
3. Invoice Date.
4. Amount.
5. Memo.
6. Terms (Optional).
Standard with Item Name:
1. Invoice No.
2. Customer Name (Must Match with the Same Customer Name in Hinawi ERP).
3. Invoice Date.
4. Amount.
5. Memo.
6. Terms (Optional).
7. Item Name.
8. Quantity (Optional: If there is no Quantity column System will consider Quantity as
1)
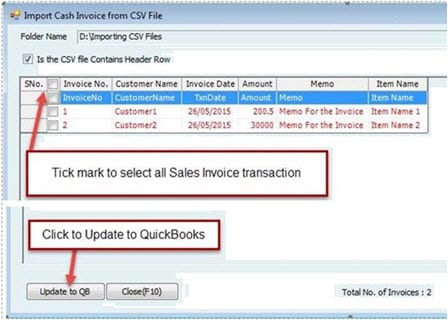
- Choose the CSV file you want to import to the System, tick mark the entire Sales invoice that will be imported to the System, then click “Update to QB.”
- The System will save the Invoice in Hinawi ERP and update it to QuickBooks afterward.
- After Importing, the CSV file will be moved to the Imported Files Folder.
Important Notes and instructions for Integrating Between Hinawi ERP with QuickBooks
1. Before you start, change the type of account in the Hinawi ERP chart regarding Cash Type, PDC, and CUC Account type.
2. All users of Hinawi ERP must have used an m e in QuickBooks and permissions too.
3. If you have already created a QuickBooks data file and now you want to use Hinawi ERP Software, the following points must be checked in the QuickBooks file before start using our software: -
- Make sure that preference is done properly and completed.
- Make sure you did allocations between payments to suppliers and bills, the report.
- Unpaid bills Detail under Vendors and Payables Report should not show any negative amount.
- Same for the report Open Invoices under Customers and Receivables should not have negative amounts.
4. The users in QuickBooks must have Full Permission to access the activity forms they used in Hinawi ER. For Example:
- Creating new Transaction in Hinawi ERP: -
The user mu s t h a v e p er mis sio n in QuickBooks to Create a Transaction for that Transaction (Form Activity).
- For Editing Transaction in Hinawi ERP: -
The user must have permission in QuickBooks to Create, Modify & Delete the Transaction. This is an important point; if no permission is specified above, the transaction will duplicate in QuickBooks.
- If t h e user makes an "Edit" write a check and his Setup is "Automatic," the system will delete the original transaction and create the same automatically. To avoid deleting, set a closing date in QB every month.
5. Do not Merge or delete Accounts in the Chart of Account list, vendors, customers, or employees in QuickBooks.
6. Do not convert the names in the `Other Names` list in QuickBooks to the Vendors or Customers or Employees List.
7. To switch between multiple Accounting files in QuickBooks. First, you must close Hinawi ERP and then open the QuickBooks file.
8. By editing transactions in Hinawi ERP, QuickBooks will delete the original one and create a new one. If this transaction is before the set closing dates, QuickBooks will not allow editing in Hinawi ERP. To avoid deleting, set a closing date in QuickBooks every month.
9. Make sure to close all kinds of windows in QuickBooks that affect running integration, e.g., Windows of, Videos, preferences, set closing date, setup users, Company information, Add \ Edit Multiple Entries, Verify, Rebuild or clean data and any online QuickBooks services window that opened from QuickBooks or Set Credit` window in Accounts Receivables and Payables. And QuickBooks does not open company information under the company menu during integration or posting.
10. If the User enters the Transaction through Hinawi ERP and later modifies the same Transaction from QuickBooks, it will not affect Hinawi ER So, the user must do ALL his work from Hinawi to guarantee a match of balances.
11. Hinawi ERP does not read Multi-Currency from QuickBooks. Still, when creating a transaction in Hinawi ERP, it will automatically read the currency in QuickBooks, except for the Journal Voucher, where the user must select the currency of each transaction.
12. We recommend Admin user does 'closing of data' in QuickBooks at the end of each month. By this, no transactions can be entered or edited from Hinawi ERP.
13. Ensure the person in charge is the only one to use the Admin user. Do not give the password to another user
14. Do not give Admin passwords to normal users.
15. The date setup in all computers and servers is dd/mm/yyyy. Example: 31/12/2021
16. If you want to run software in Arabic, filling in ALL required fields in Arabic is very important. Missing Arabic fields are located under the File menu.
17. Keep data updated to avoid missing information in reports or activities. The Missing data report is located under the File menu.
Important:
All Setup done by the customer is his FULL responsibility.
Settings: -
Complete all settings
Templates
Complete all Templates
Chart of Account Type
Integration Settings:
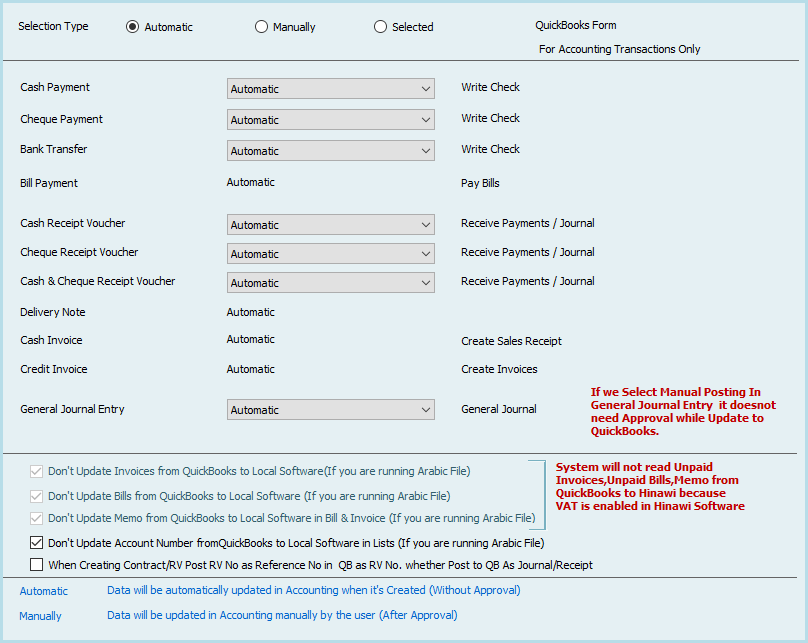
Make sure to select the integration method that meets your needs.
Sample of process if select manual posting:
Users must update QuickBooks in the below way. In Automatic Setup, all transactions will be posted to QuickBooks automatically.
Attachment Setup:
Make sure is done to save all types of attachments
Things to do in QuickBooks before and during using Hinawi ERP: -
If the customer already has QuickBooks data, the user must work in the below for better use of both QuickBooks and Hinawi ERP
1. Make sure there are no Arabic names in all lists
2. Merge similar names in all lists
3. Create an Account in Chart of Account no. 99 Intermediate Account
4. Make sure that Account no. 30000 opening Balance is created
5. Delete unnecessary names
6. Make sure that preference is done properly and completed.
7. Make sure you made allocations between payments to suppliers and bills; the report Unpaid bi tells Detail under Vendors, and Payables Report should not show any negative amounts.
8. Same for report Open Inv voices under Customers and R receive ables should not have negative amounts.
9. Rearrange the accounts of Fixed Asset
10. Import Fixed Assets
11. Rearrange the accounts of Cheques under Collections (CUC) and Post Dated Cheques (PDC). Edit account type in hinawi Chart of Account to PDC or CUC type
12. Set a closing date
13. Set Preferences
Extra features from Hinawi ERP Software that I s not available in QuickBooks:
1. Fully integrated with all versions of QuickBooks.
2. Cover missing features in QuickBooks.
3. Real Estate Management Modul
4. Advanced Fixed Assets Modul
5. Complete Bilingual Language, Arabic, and English.
6. Calculate Commission for sales Re
7. Post multiple Receivables and Payables in one JV entry.
8. Create Receipt Vouchers (RV) from all kinds of na
9. Adding three new types in the Chart of Accounts (Cash, PDC & CUC).
10. Create three ways to post to QuickBooks. Real-Time, Batches, and Mix of two.
11. Control Post Dated Cheques Received & Issued with auto-revised entry.
12. Receive multiple cheques at one Receipt Voucher (RV).
13. Option to Not allow to post to the main Account
14. Option not to sell if there is not enough quantity
15. Option not to change the selling price
16. Allocate expenses to Fixed A
17. Photos of all kinds of na
18. Design and templates with Printing for all activity forms (Cheques, Payments, Collections, JV, SIV, SRV, Transfer Inventory, Inventory Adjustments, Enter Bill & more)
19. Complete the HR, Time Sheet, Payroll, WPS, and Tax Module.
Inventory:
1. Calculate the Landed Cost of the Inventory Item (Adding Shipping charges, customs, transportation, and Other expenses).
2. Multiple Inventory Adjustment entries in one form.
3. Movement and None Movement Inventory Item.
4. Advanced Physical Inventory Worksheet.
5. New look at Inventory Valuation Detail.
6. And more.
Reports:
1. Advanced Trial Balance (Beginning Balance, total movements, and Ending Balance).
2. Financial Ratios: Profitability, Activity & Liquidity.
3. Advanced Customer / Job profitability report in summary and detail.
4. Cashier Reports (Collections & Payments).
5. Advanced Audit Trail (Filter By user, activity form, and total entries by each).
6. Partial paid Invoices and Bi
7. Depreciation by Project.
8. You Can customize your required reports from QuickBooks data.
9. Reports in QuickBooks are seen from Hinawi ERP.
Report Center by:
1. Employee
2. Building and flat
3. Class
4. Fixed A
5. And more
