The Fixed Assets Module Help Page
Setup
Feature setup is essential for setting the company’s regulations, arrangements, and control policy.
Before recording any operations, the user must set up the company file.
If these settings are not made, the customer may find that the results do not comply with its policies and need to re-enter its operations.
Therefore, settings are vital when using the software. It’s very important to understand this. The setup unit is the most important step and must be done before using the software.
Fixed assets module help
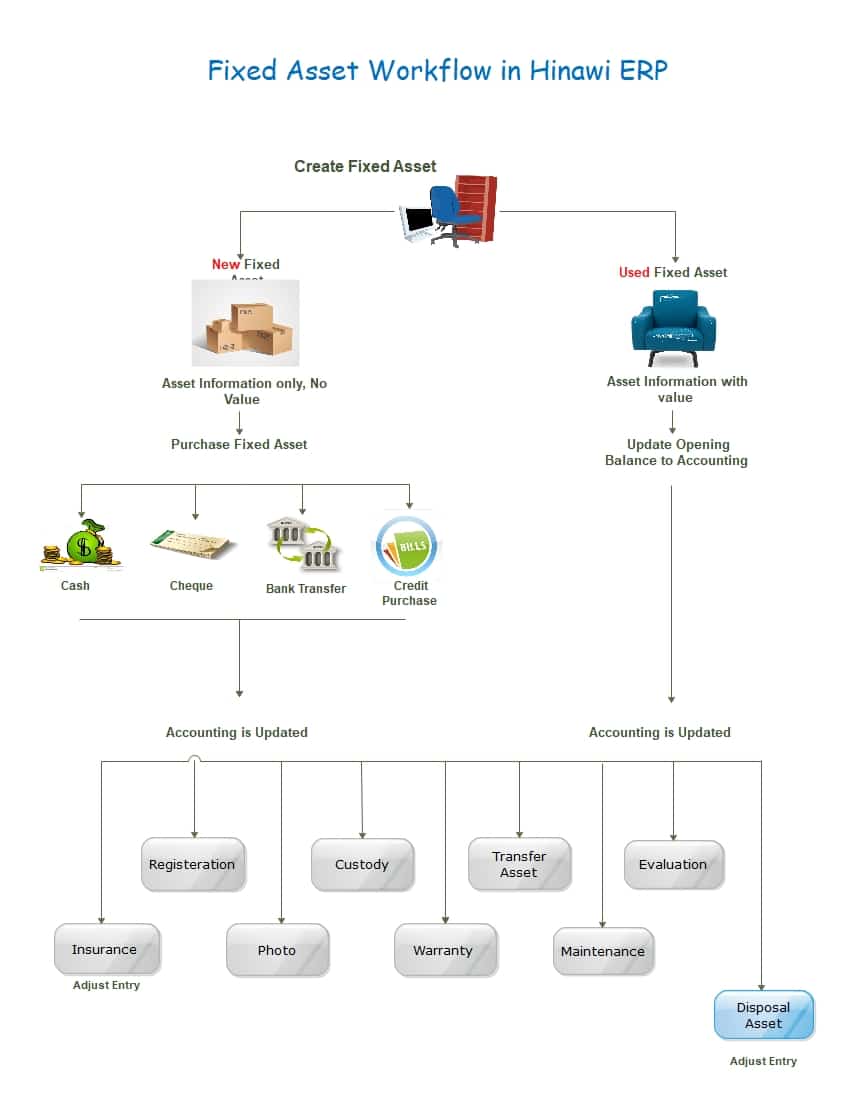
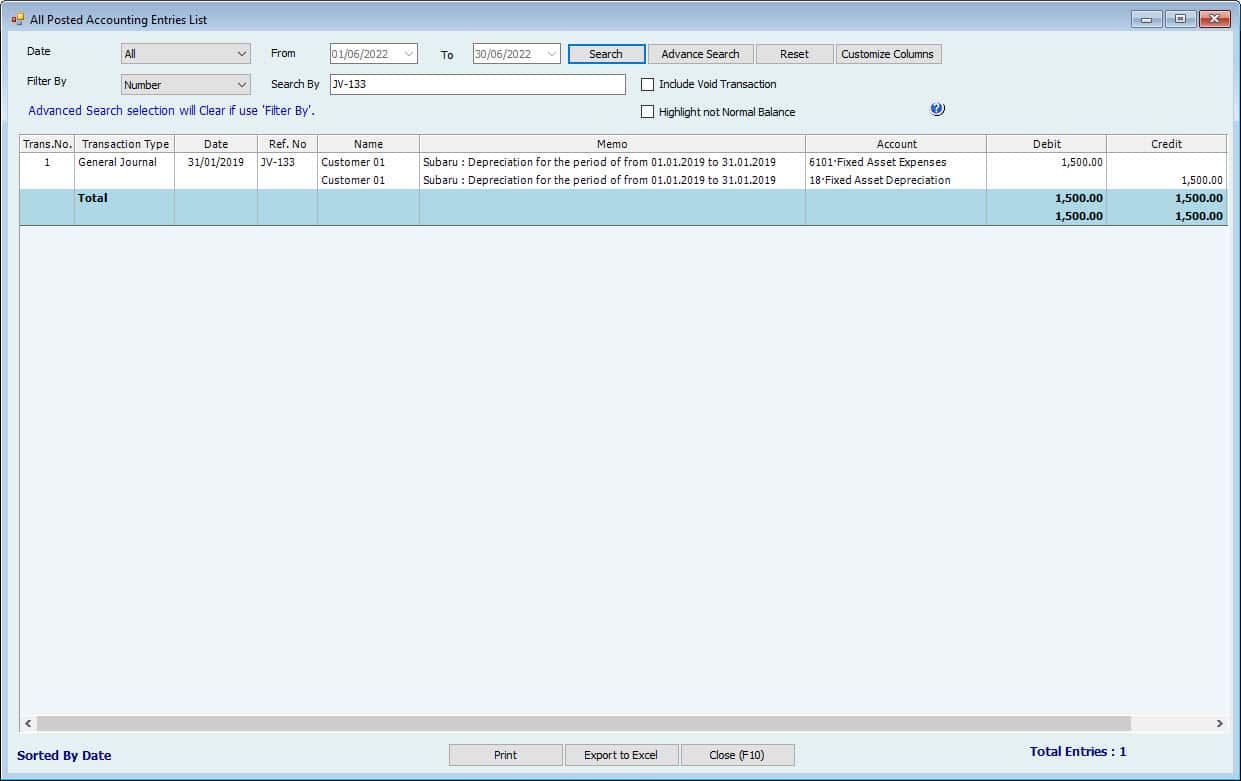
Case 1: Importing of Used Fixed Assets and Dispose of them After Expiry Date.




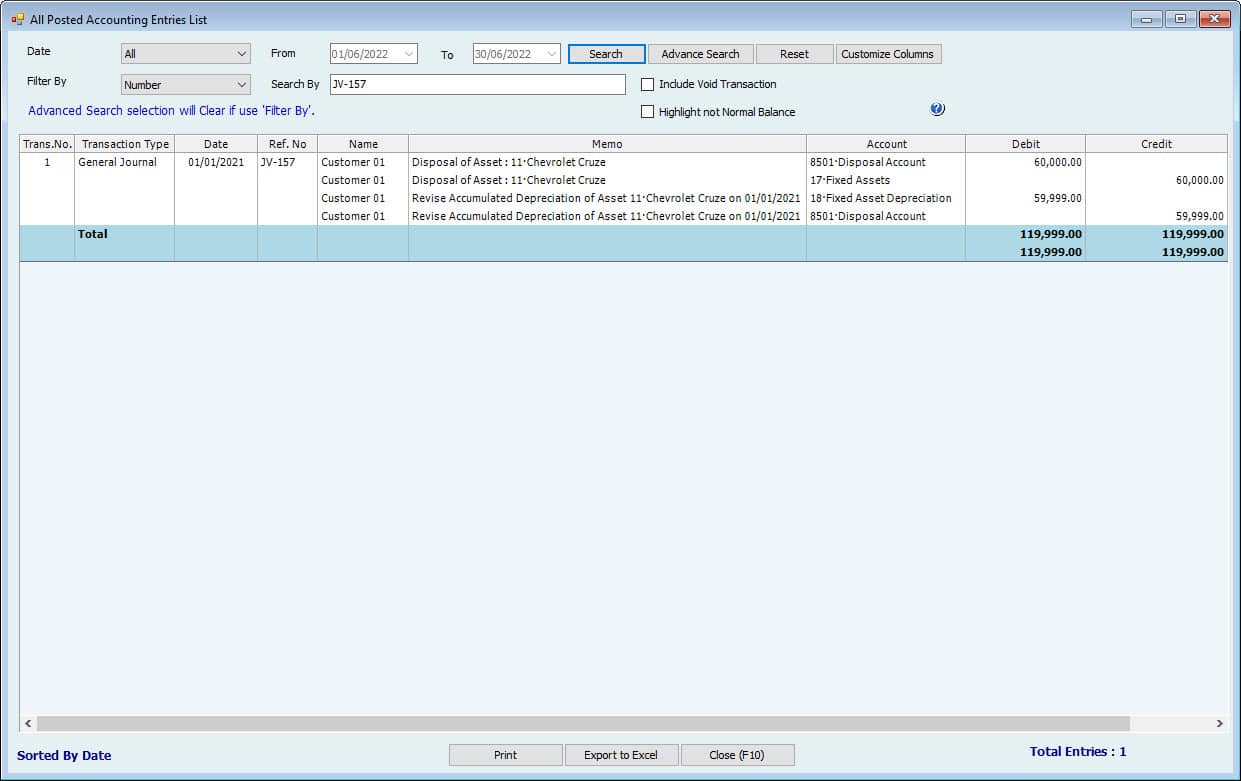
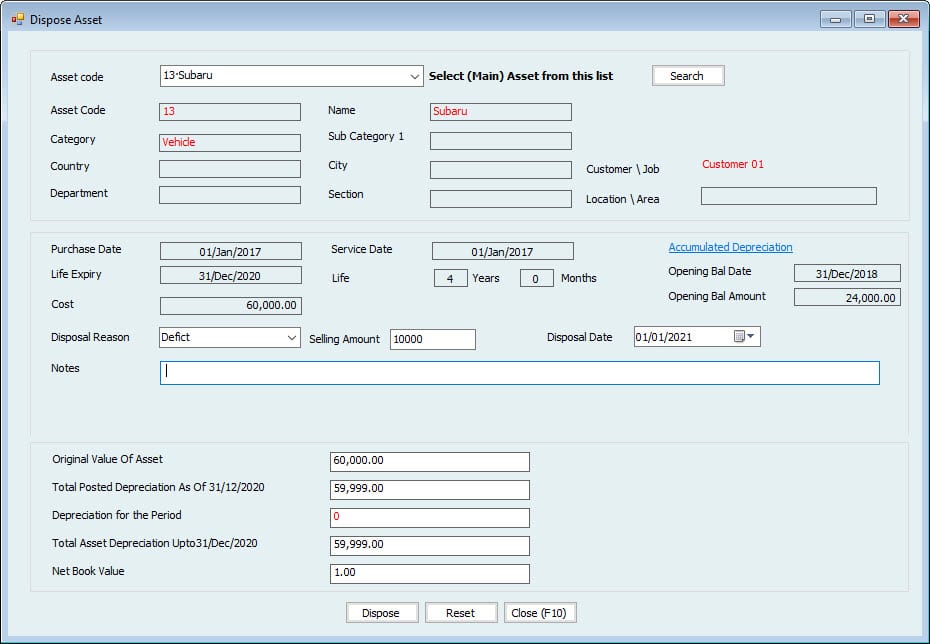
Case 2: Importing of Used Fixed Assets and Dispose of it before Expiry Date.
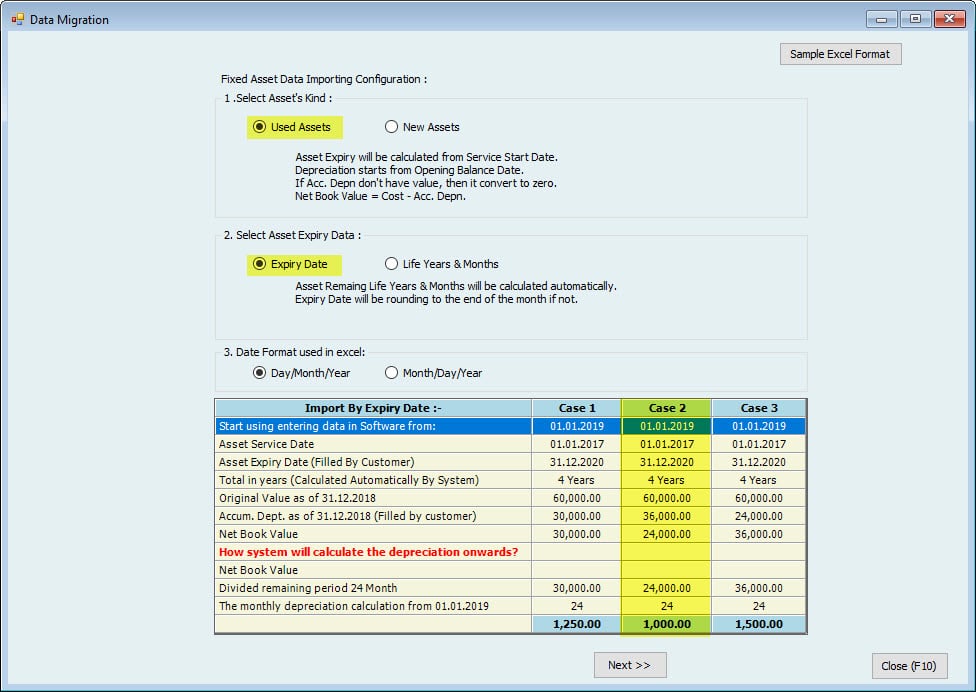
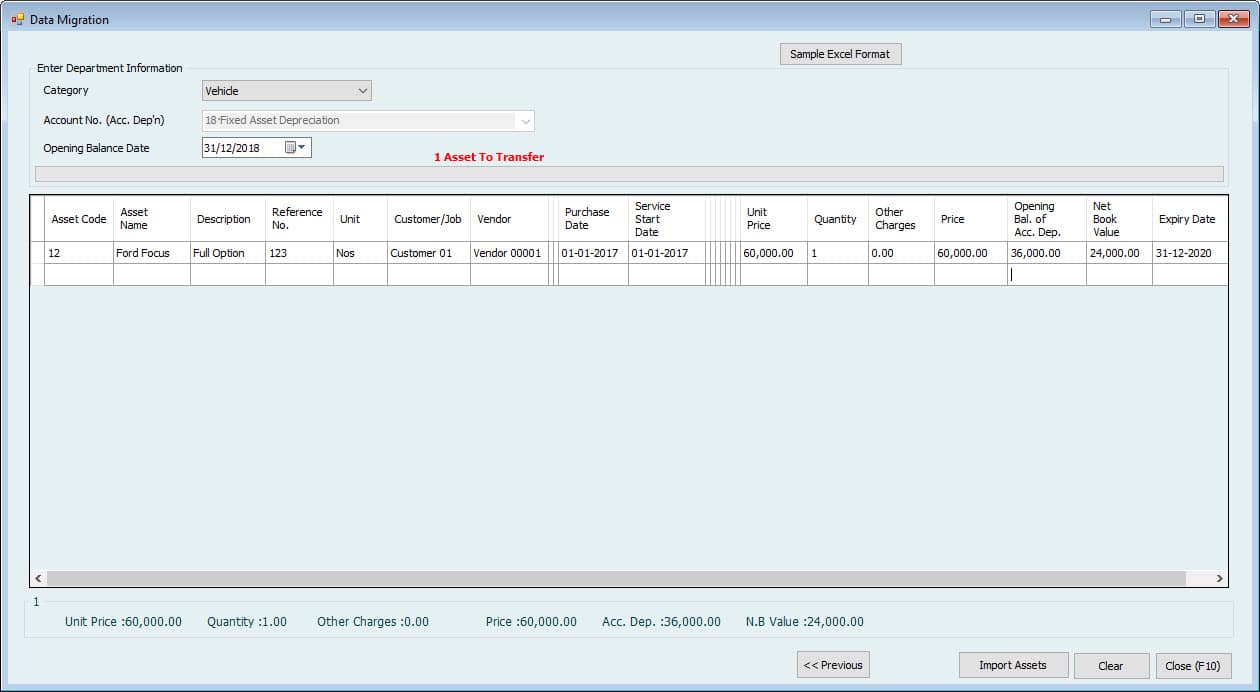
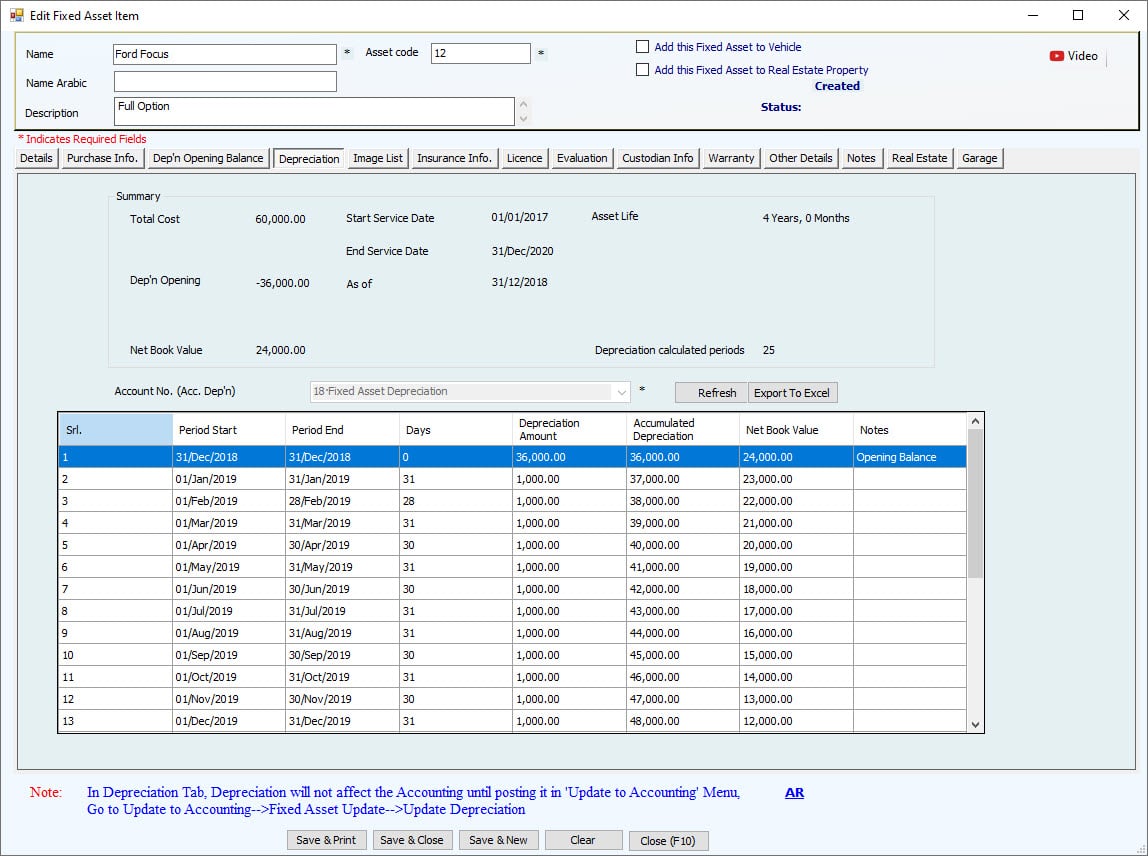

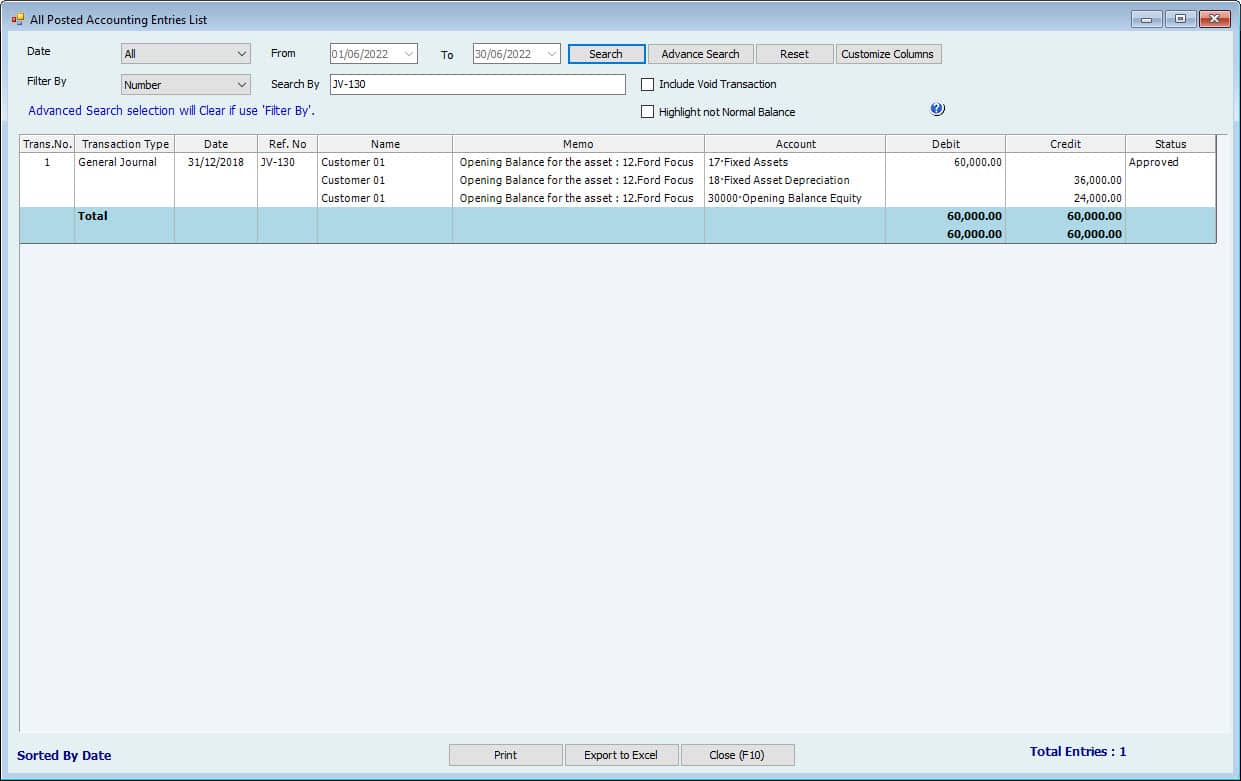

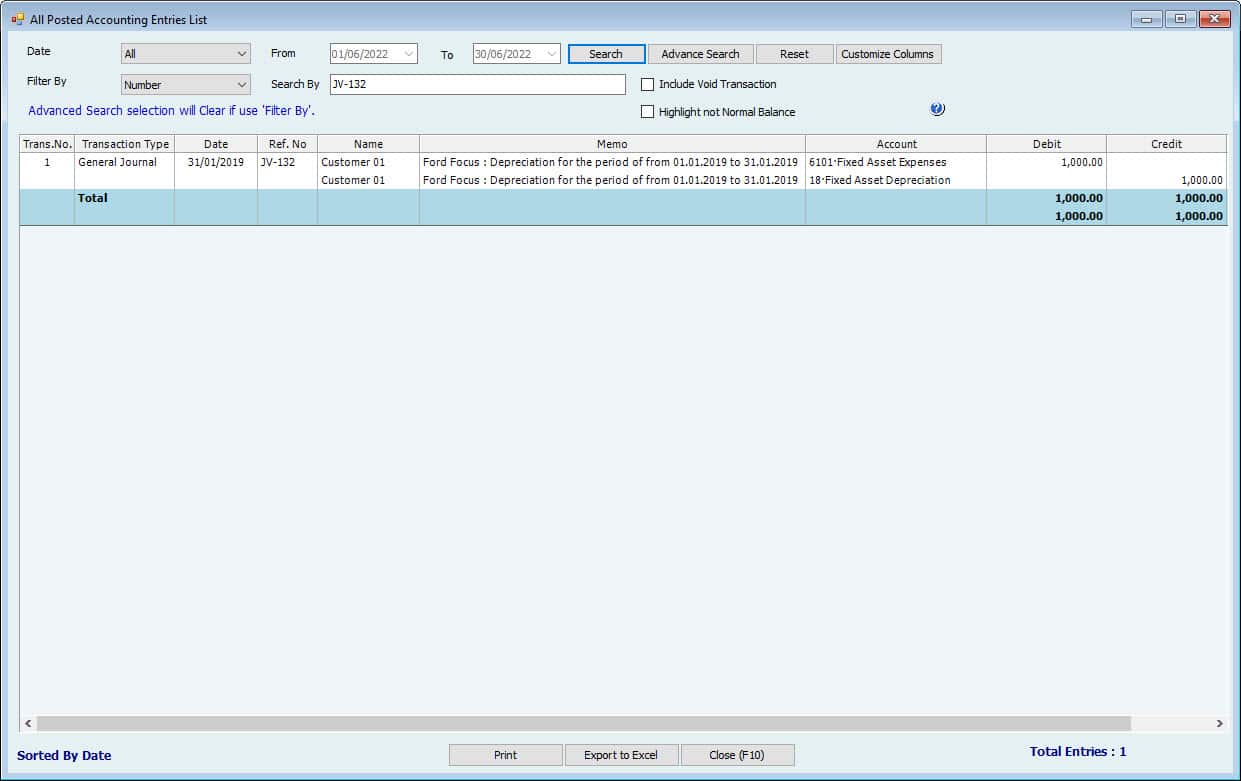
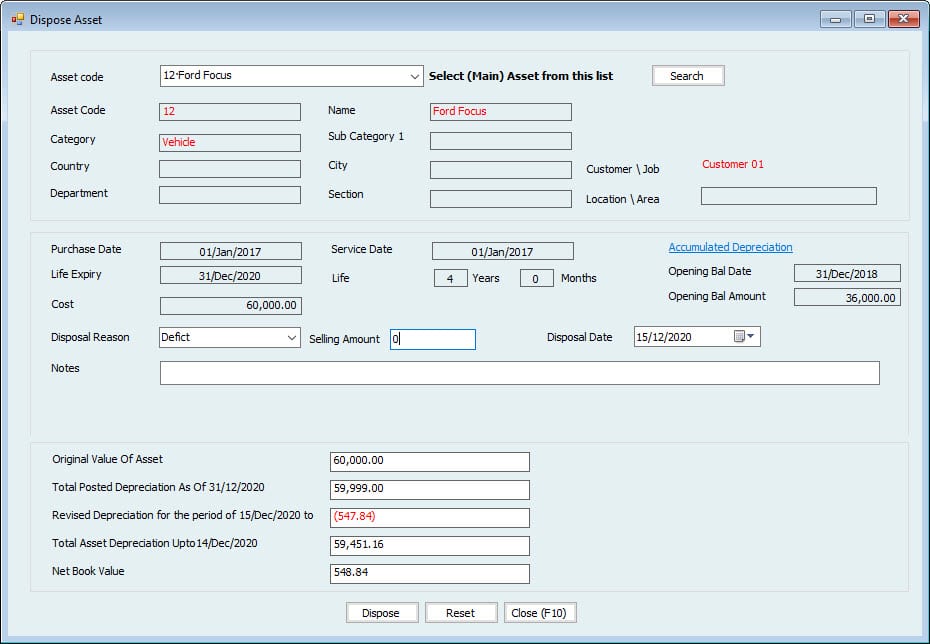

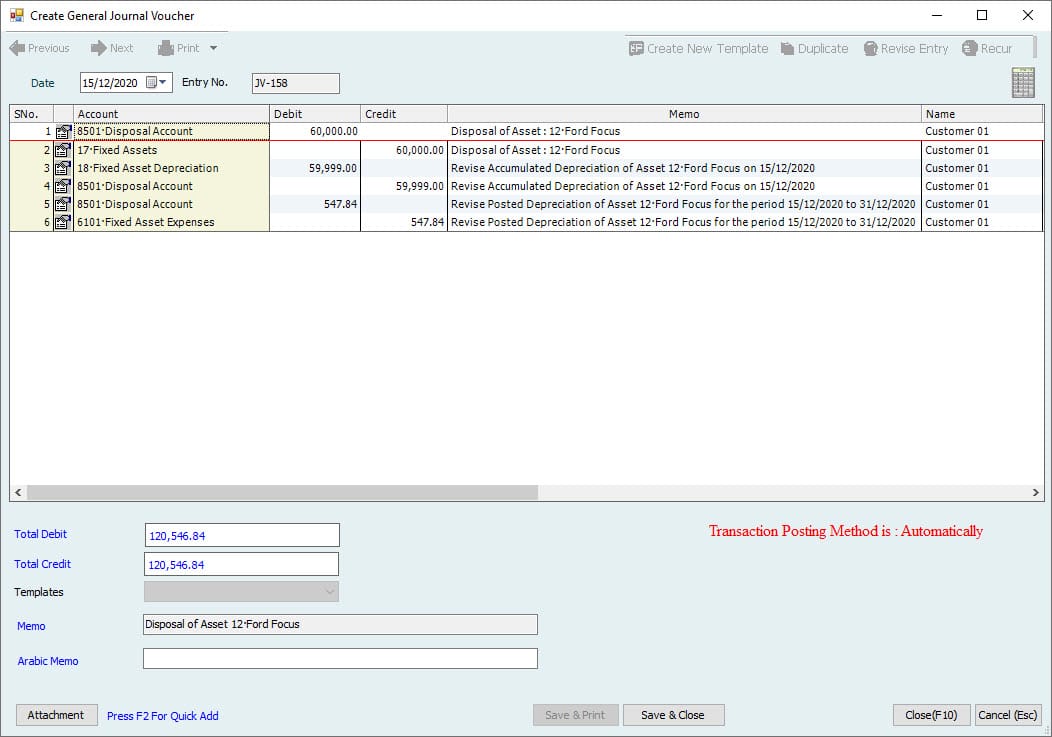
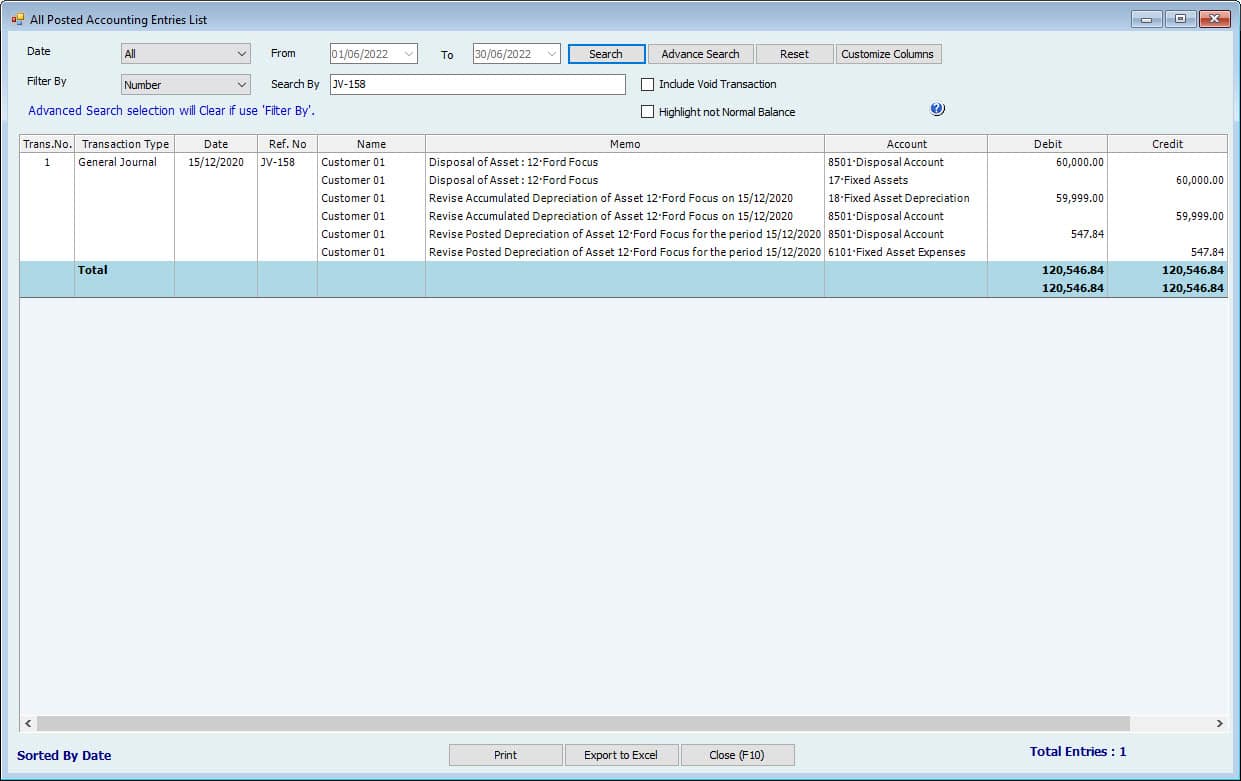
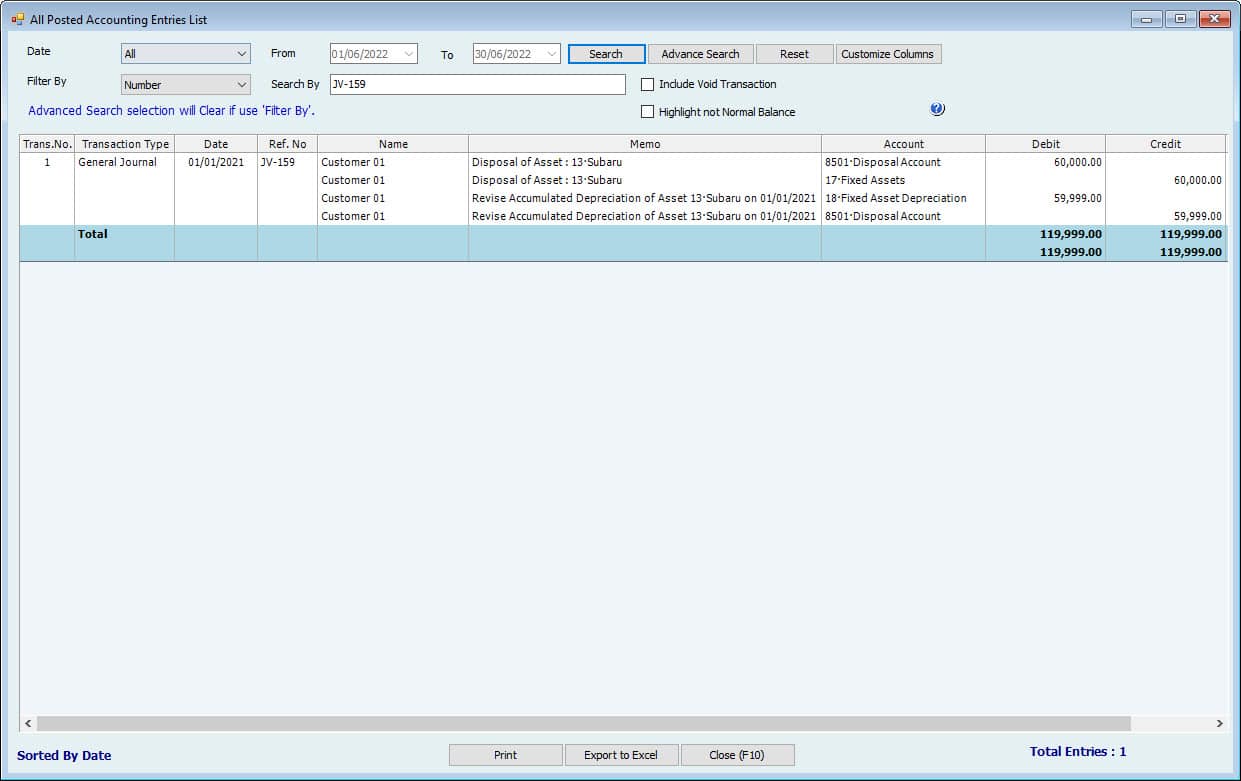
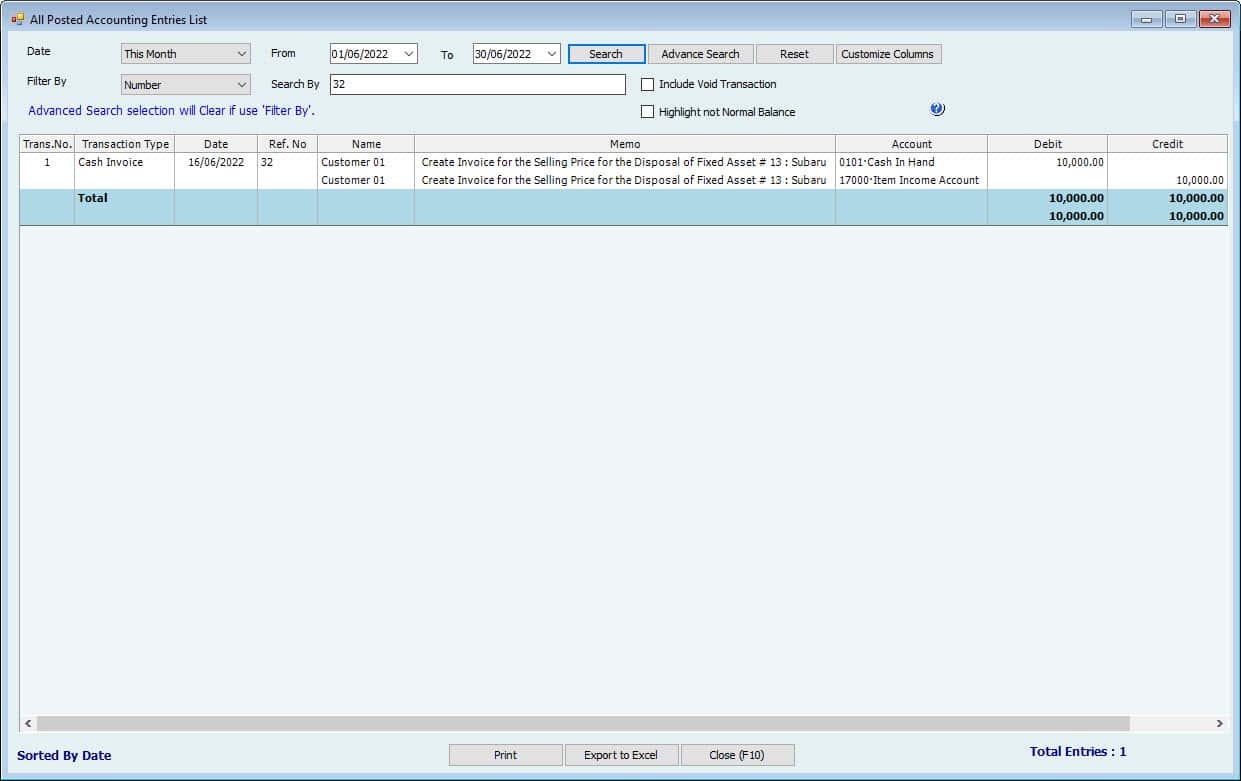
Case 3: Importing Used Fixed Assets and Dispose of them after Expiry Date with selling amount.


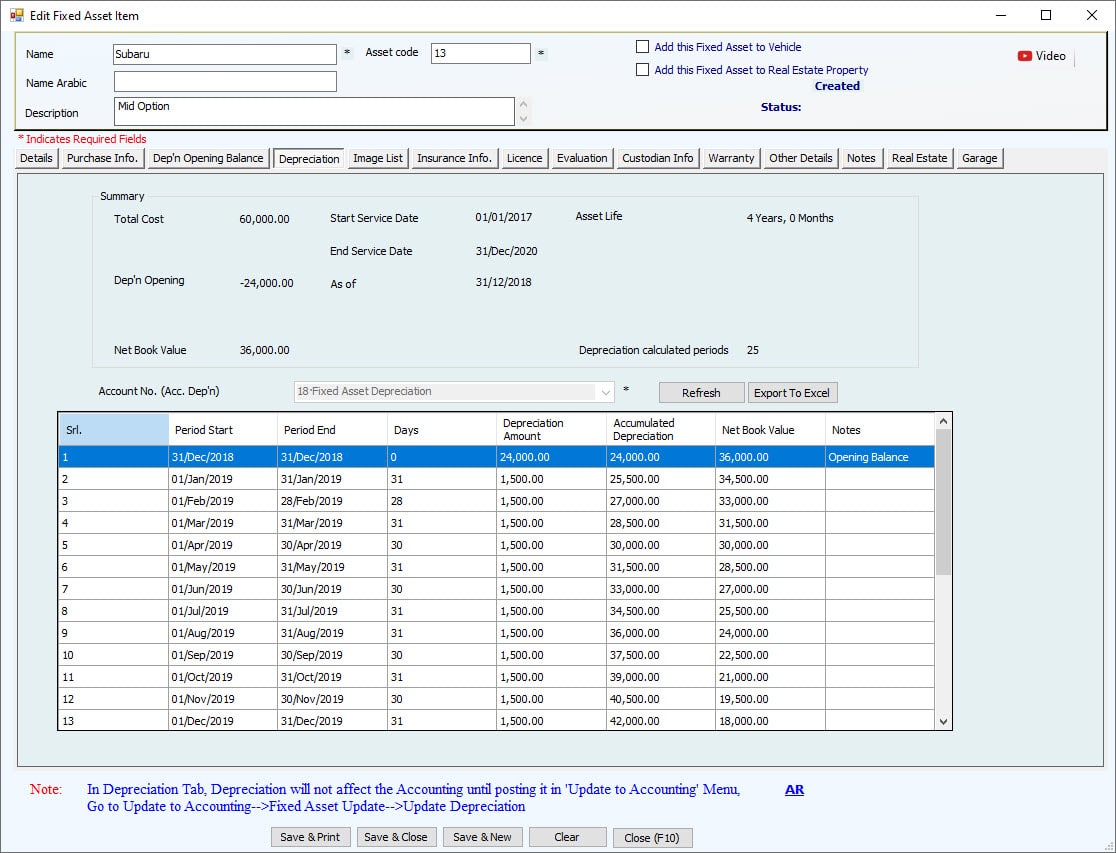

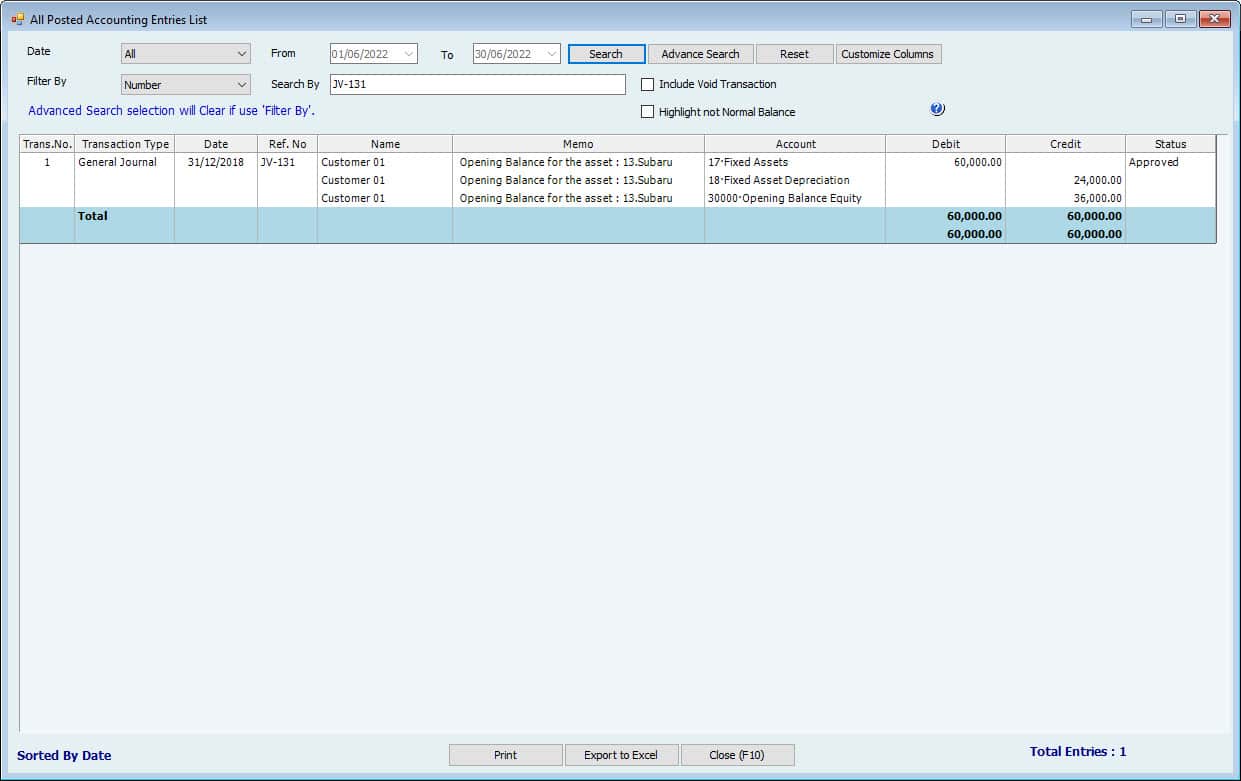
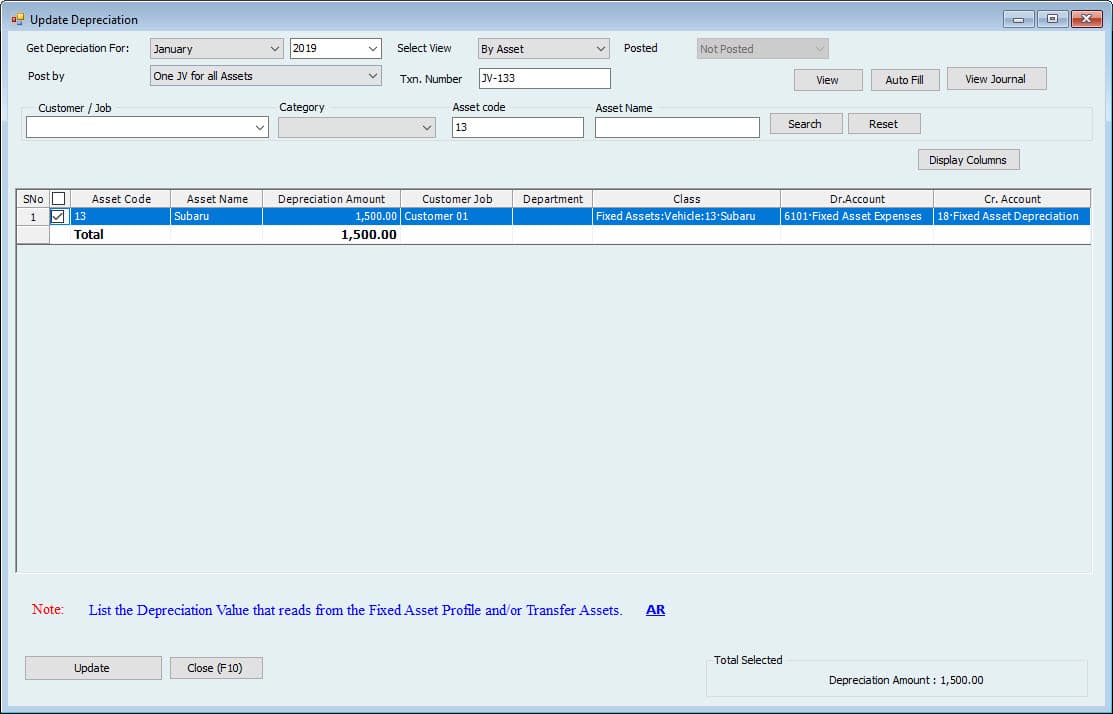




Case 4: Purchase new Fixed Assets.
When a User creates a new Asset, the Cost cannot be entered through the Asset profile window; hence, the depreciation schedule is not there. This Cost must be entered through the purchase new Asset Menu by creating a bill and then paying or making a direct payment.
Users can enter new assets into Hinawi Software by
- Import Fixed Assets from Excel
- Create a New \ Used Assets window
1. Import Fixed Assets From Excel
Go to File-->Import \ Enter Lists and Balances-->Fixed Assets-->Import Fixed Assets.
Now in this window, you have selected how you want to import.
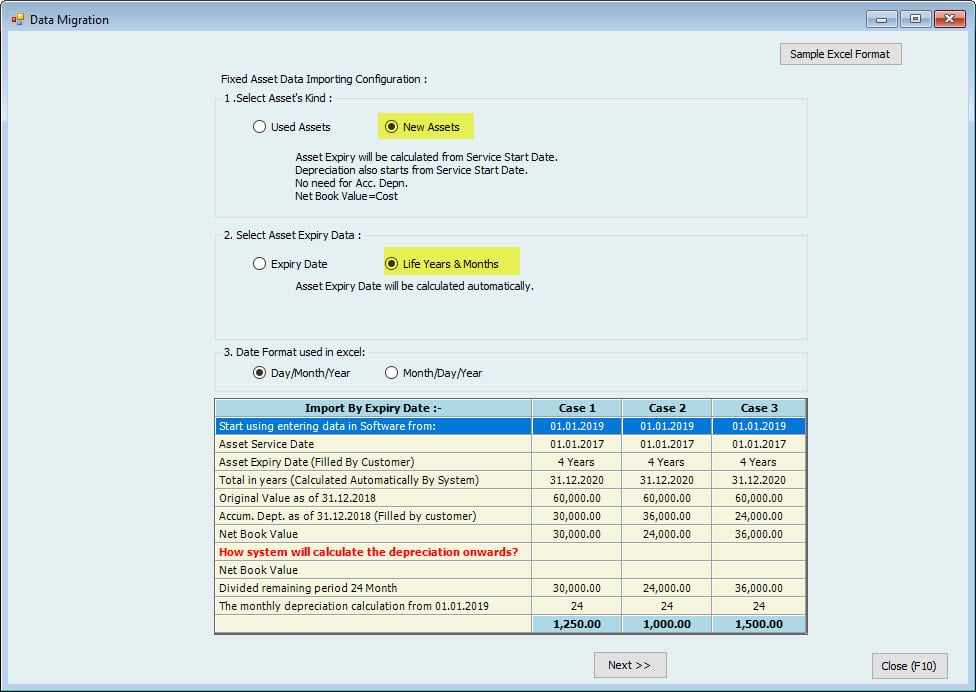
- Select Asset's Kind:
Select either Asset are used or new.
The difference between new and used will be these additional columns available only if you choose Used Assets. "Opening balance Date," "Opening balance of Accumulated depreciation," and "Net Book Value."
Both cases will start the Asset life from the service start Date.
- Select Asset Expiry Data:
Either you want to calculate the Life by the expiry Date or Life in years and months.
- Date Format used in excel:
Specify the Date format you have used in excel.
After selecting all these options, you can press next, opening the import window.
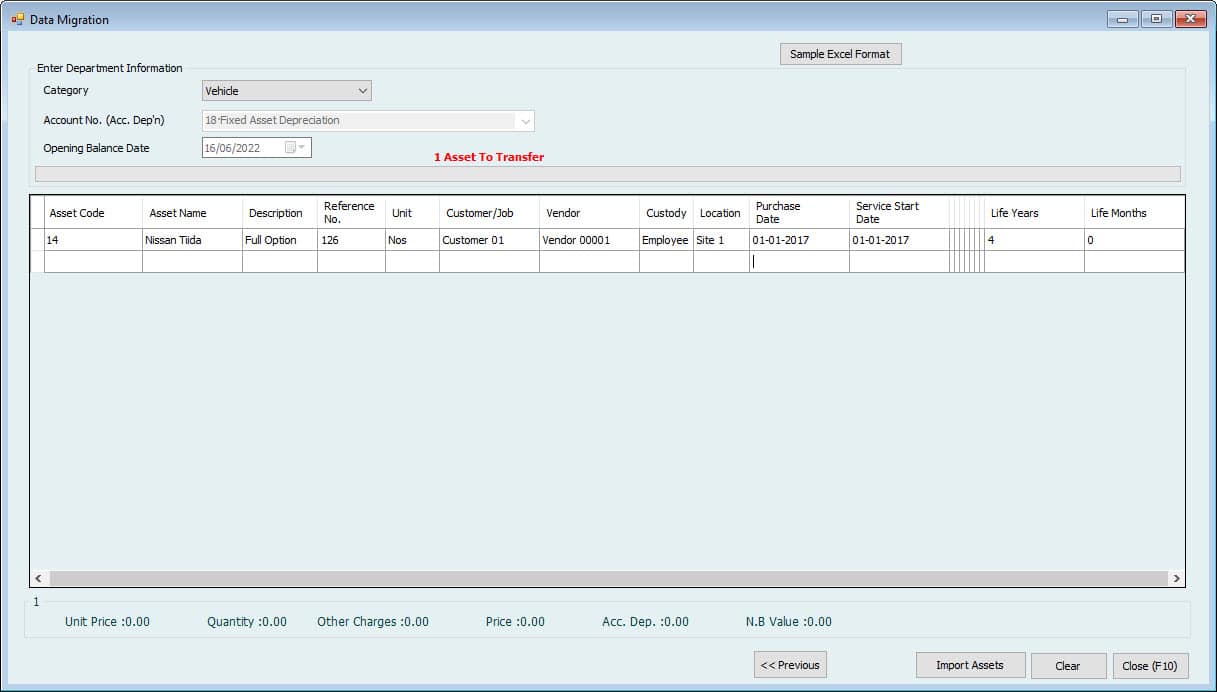
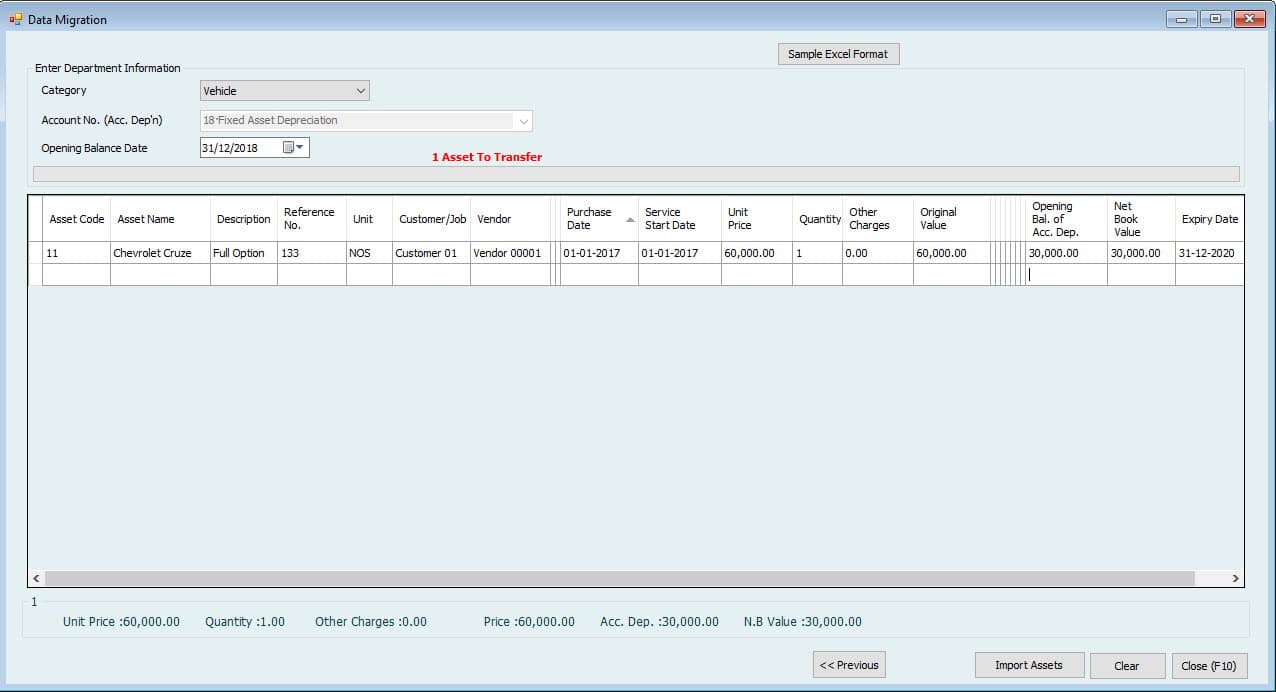
Select the category for which you want to import assets first.
Note:
Categories will import fixed assets. You cannot import assets together in one turn if you have more than categories.
After selecting the category, Account no. We are welcoming automatically from category settings.
Enter the opening balance Date if you selected used assets in the previous window.
Now you can see the same column name in excel. You have to copy the Data from excel and paste it here. You can copy the whole column for one category from excel, e.g., Asset code, and right-click on the first box here to paste.
Suppose you want to enter the same value for all the assets in one column. Enter the Data in the first column, right-click CK, and select copy down. It will copy all the columns down.
This way, you can fill all the columns and click on import assets to import fixed assets into the software
2. Create a New \ Used Asset
Go to Fixed Assets-->Create New \ Used Asset
Users can use this form to enter the Fixed Asset information directly into the System. 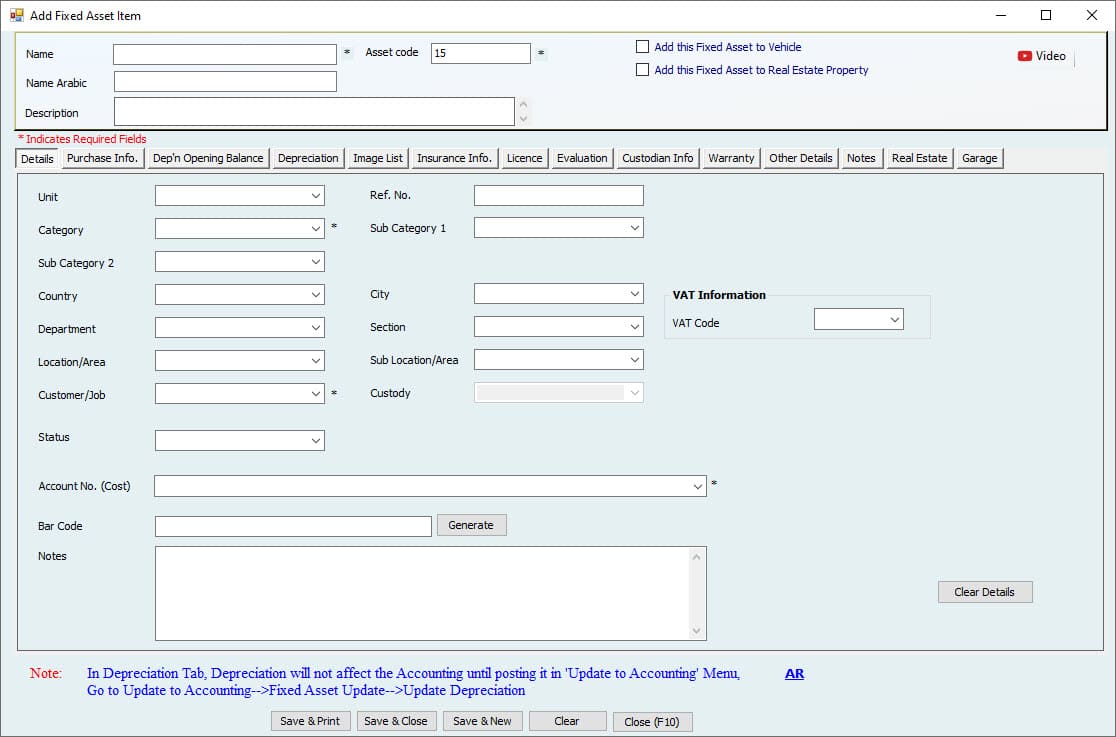
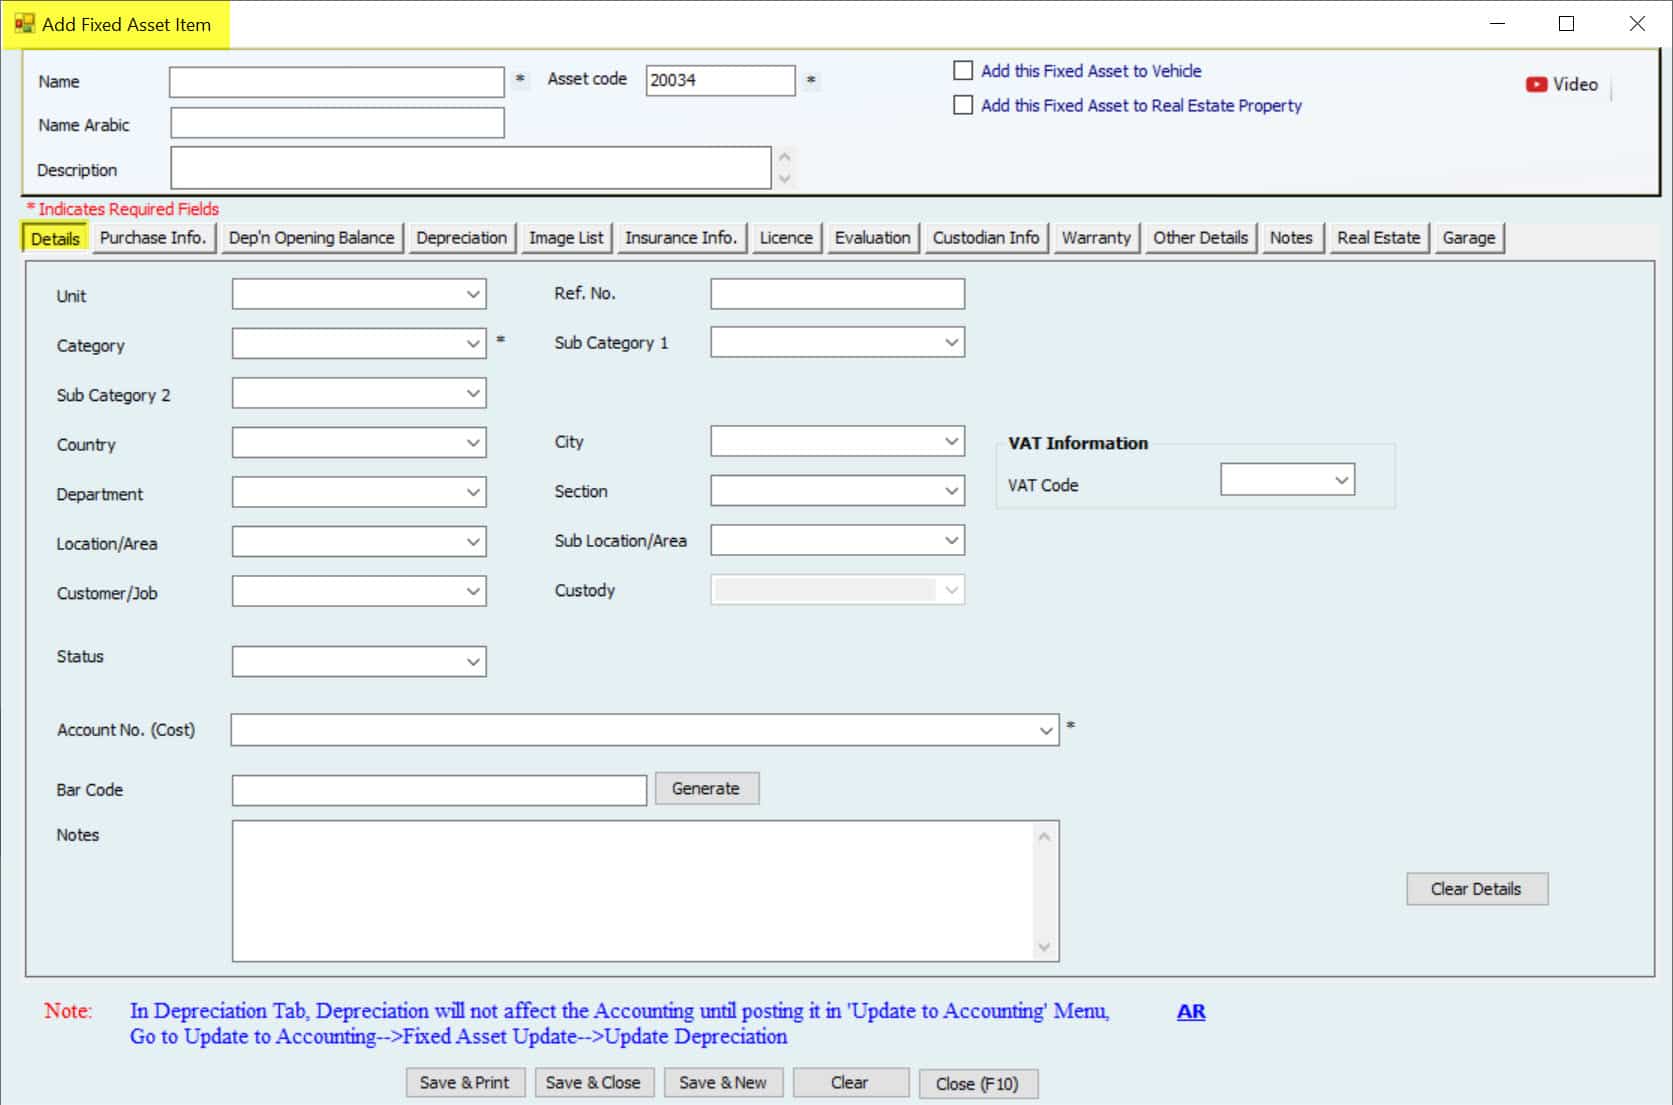
Make sure to Fill the all the mandatory information in the details tab.
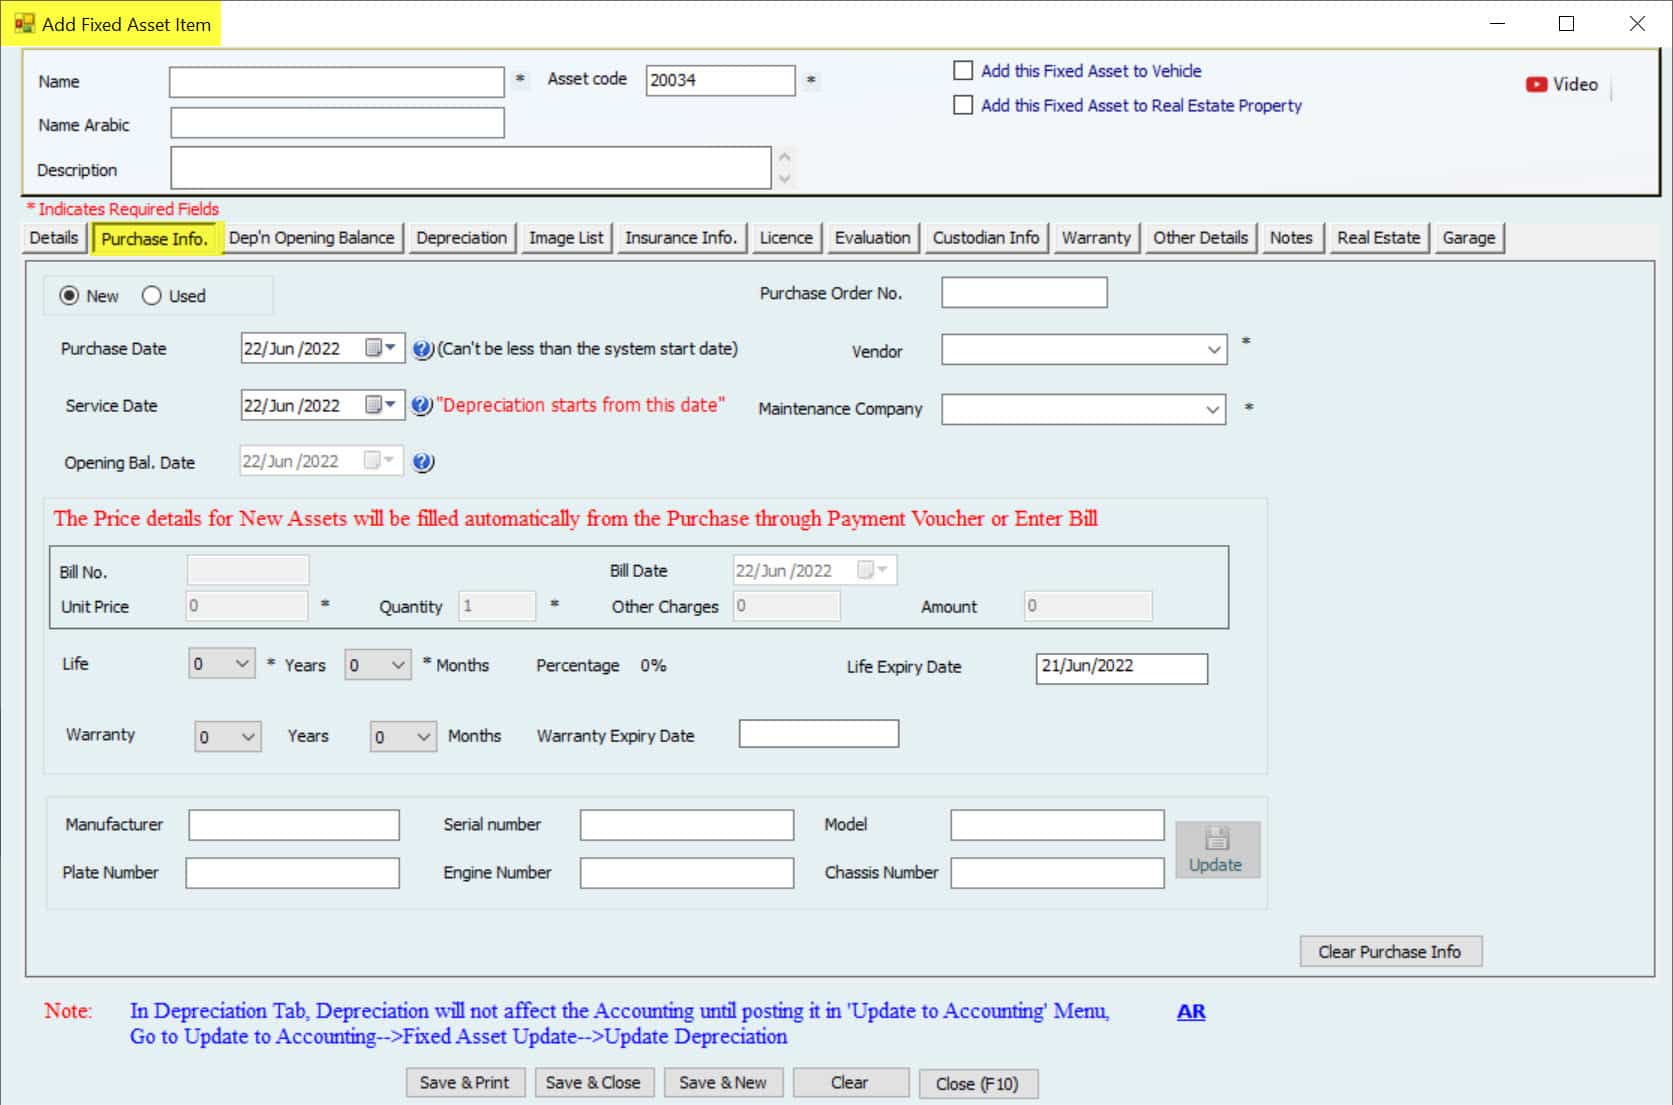
And then move on to Purchase Info Tab. The User must select "NEW" to save an Asset not yet purchased.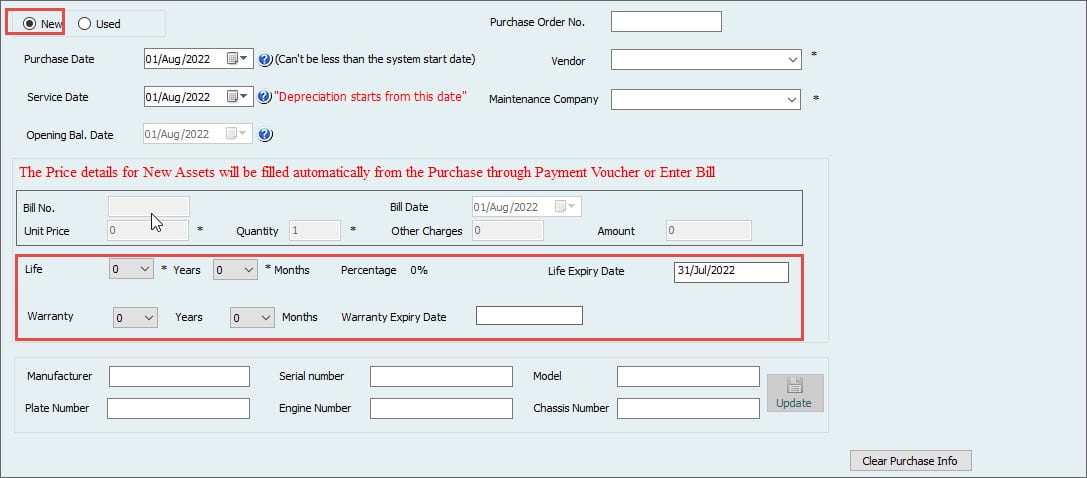
Option "NEW"
If the fixed Asset is new, some fields will be blocked. Users cannot enter those fields as they are for used assets. The Cost of new fixed assets will not be entered through this window. It will be entered through a bill or payment window. This will be covered later in the Purchase Asset Menu.
- Life of the fixed Asset to calculate Depreciation and expiry Date to be entered in years and months.
- Life Expiry Date is reading automatically from the purchase date and Life.
- The service Start Date is very important here. The Depreciation will not be started from the purchase Date. It will begin from the service Date when the Asset comes into service. This can be the same as the purchase Date.
- Warranty of the Asset. This will not affect anywhere in the accounts, but more information can be stored through the warranty tab.
Other details are extra fields for vehicles to enter their registration information. This can be updated anytime.
After saving the "NEW" Assets by any of the above methods (import from excel or create a new \ used Asset window), the User can purchase the New Asset.
Purchase Asset
As discussed earlier, when a User creates a new Asset, the Cost cannot be entered through the Asset profile window; hence, the depreciation schedule is not there. This Cost must be entered through the purchase new Asset Menu by creating a bill and then paying or making a direct payment.
To do this, Go to Fixed Assets-->Purchase Asset
To generate a bill for a new Asset,
Go to Fixed Assets-->Purchase New Asset-->Create Bill for New Asset
Create Bill for New Asset
Go to Fixed Assets-->Purchase Assets-->Create Bill for Purchase Asset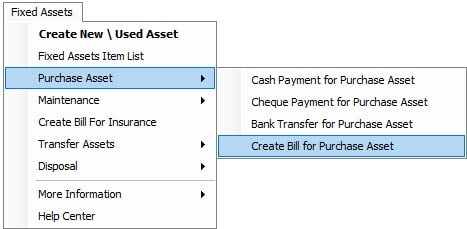
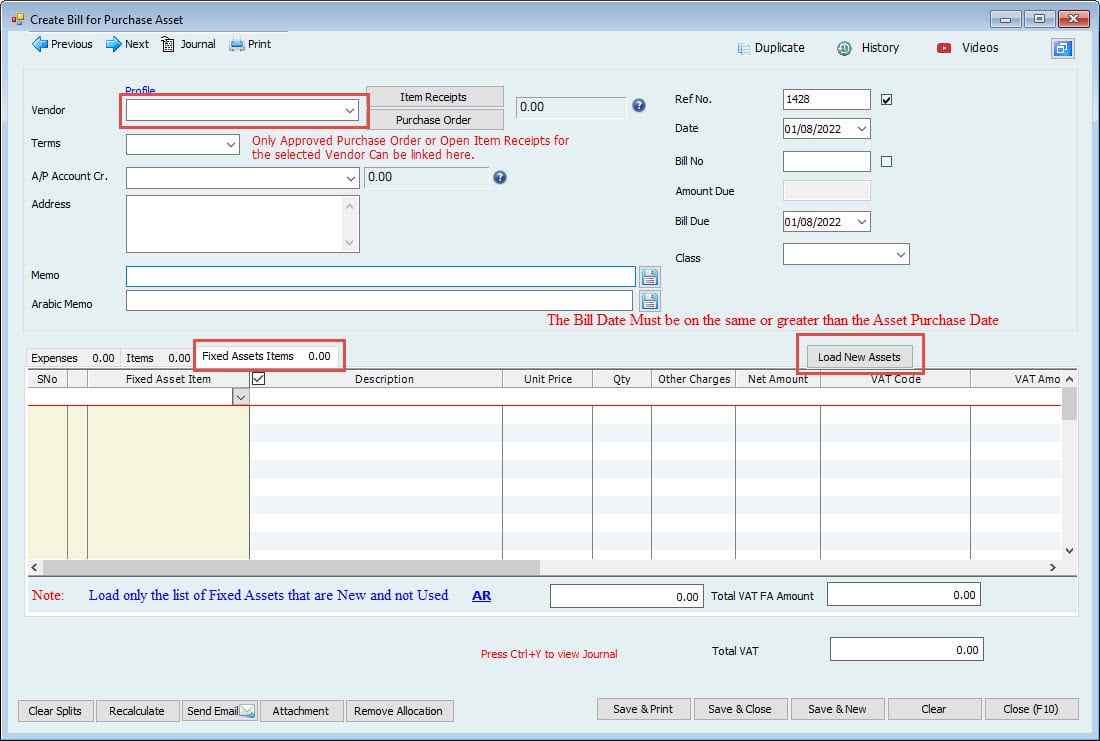
- Select the supplier name from which the fixed Asset is bought.
- Select the accounts payable Account (If more than 1) where the User wants to track this payable Amount.
- Enter the Ref. no of the bill
- Date of the bill
- Bill No
- Bill due Date
- Memo of transaction.
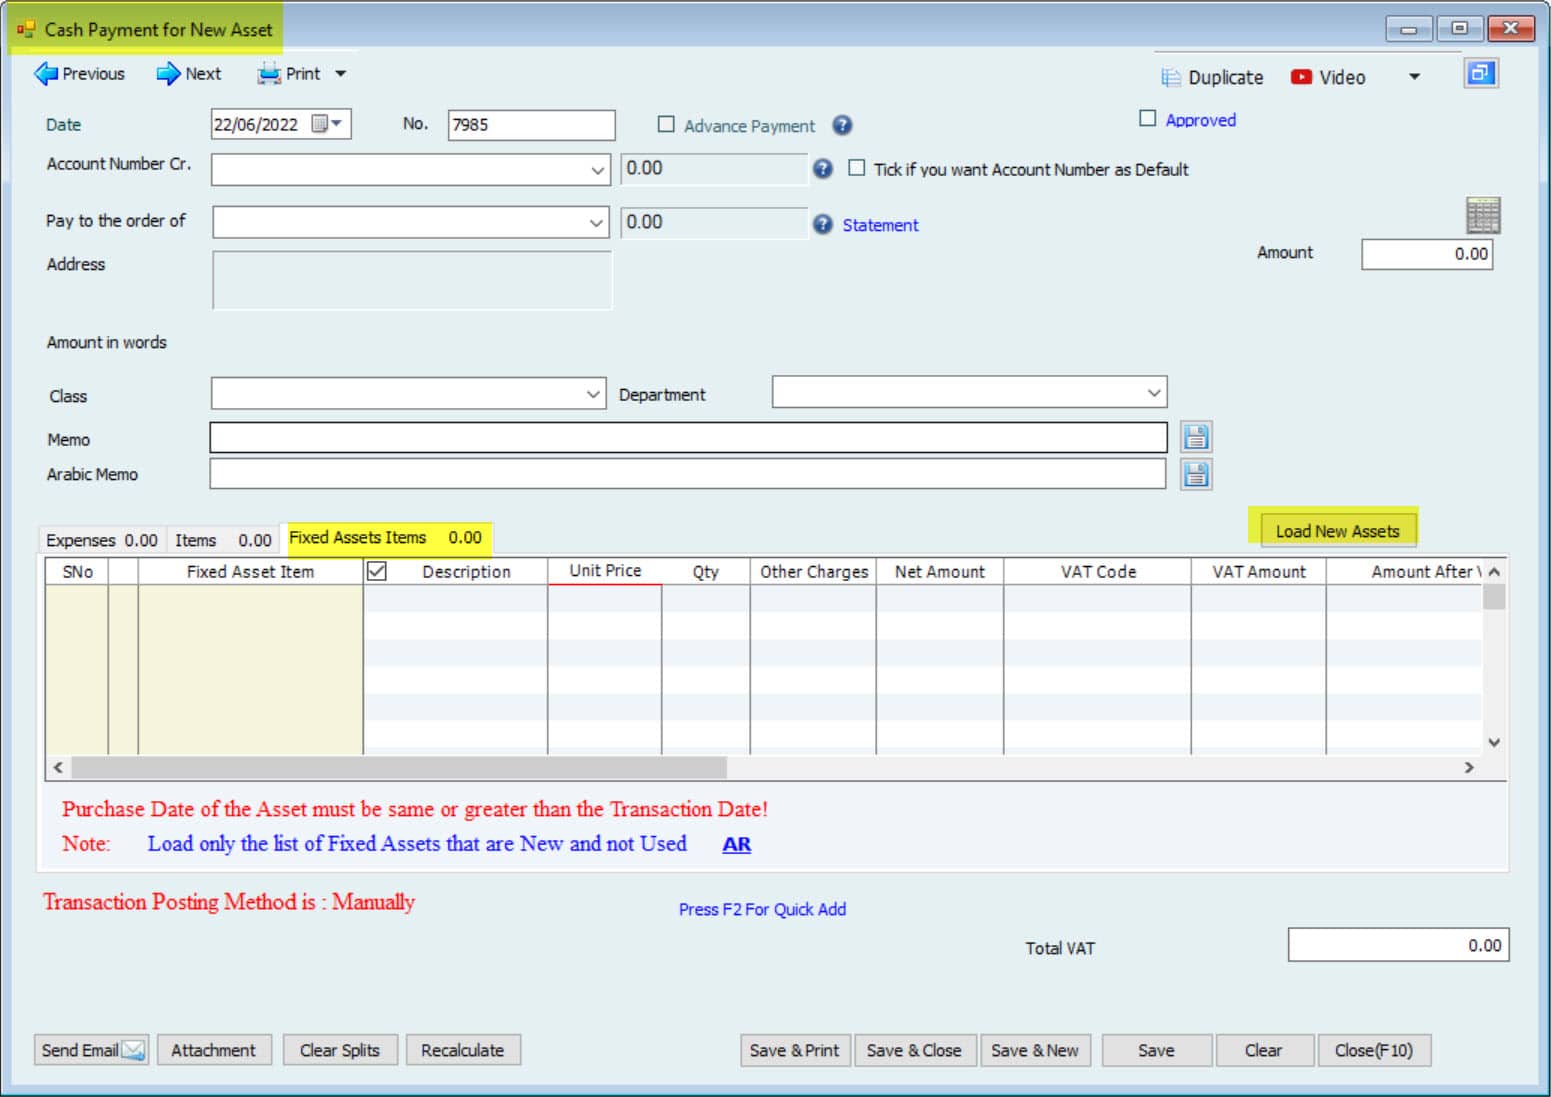
Then on the right side of the Fixed Asset tab, the User can see a button for Load New Assets. Click on this button to load new assets for this particular vendor. Remember, only the assets created as new and for this vendor will be shown here. Clicking on this button requires permission if the User wants to load a new Asset.
Click Yes, and the Asset (s) will be loaded into the column. Users can enter the Asset price, Quantity, other charges, or total Amount for the Fixed Asset. Whatever information entered here will be updated to the fixed Asset profile, and Depreciation will be scheduled automatically.
If the User enters the bill, this bill can be paid usually now through an accounting Module using any of these three windows.
- Cash to pay bills.
Go to Accounting-->Cash Payment-->Cash Pay Bills-->Create Cash Pay Bills - Cheque to pay bills
Go to Accounting-->Cheque Payment-->Cheque Pay Bills-->Create Cheque Pay Bills. - Bank transfer to pay bills
Go to Accounting-->Bank Transfer-->Bank Transfer To Pay Bills-->Create Bank Transfer To Pay Bills.
The other method is direct payment. Rather than entering the bill, the User can make direct payment for this fixed Asset. There will be no accounts payable in direct payment as we are recording the Cost and payment for the fixed Asset simultaneously. But the User has to select the Load New Asset button to load the Asset in these forms.
All three forms have the same procedure, but only the payment method differs.
- Cash Payment will be in Cash, and the Cost of assets will be recorded.
- Cheque payment is through the bank with additional columns for Cheque no and cheque Date.
- A Bank Transfer is a payment for a new Asset through a transfer from the bank.
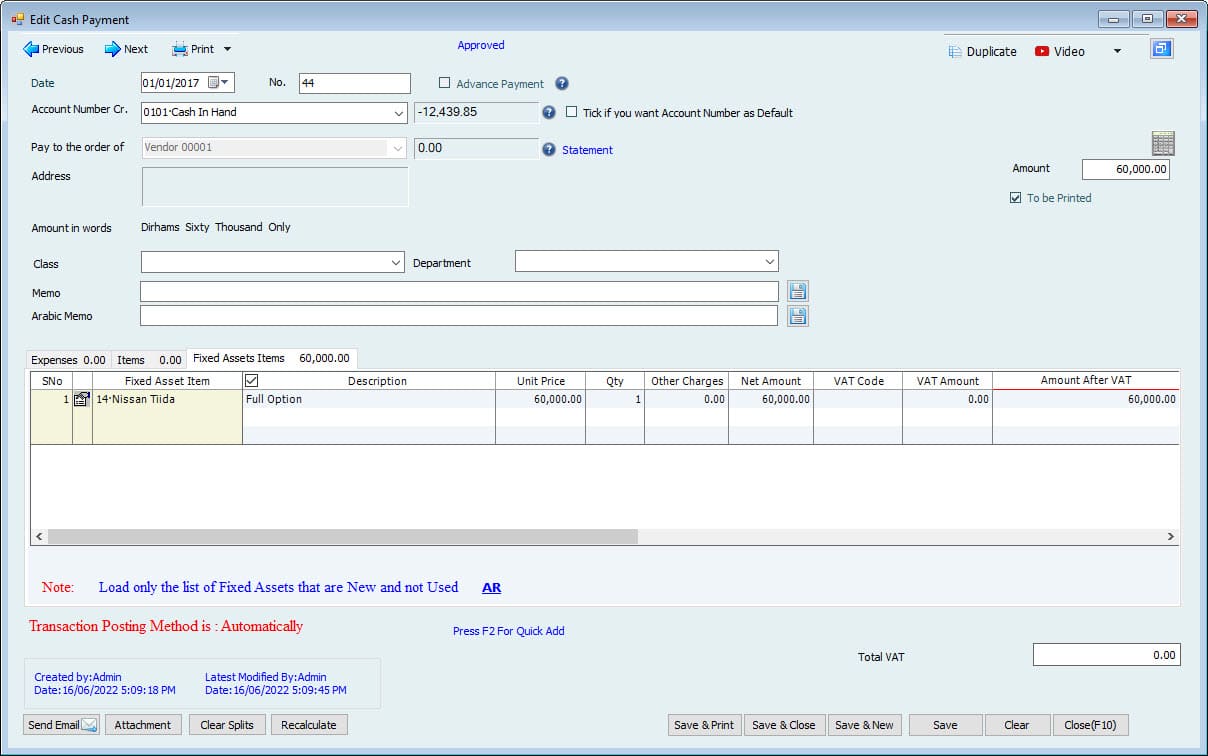
Important: The forms in the purchase new Asset window (Enter Bill, Cash payment, Cheque payment, or Bank transfer) are also available in the accounting Menu; the reason to use them from here is the option "Load New Asset," which is not available in accounting Menu.
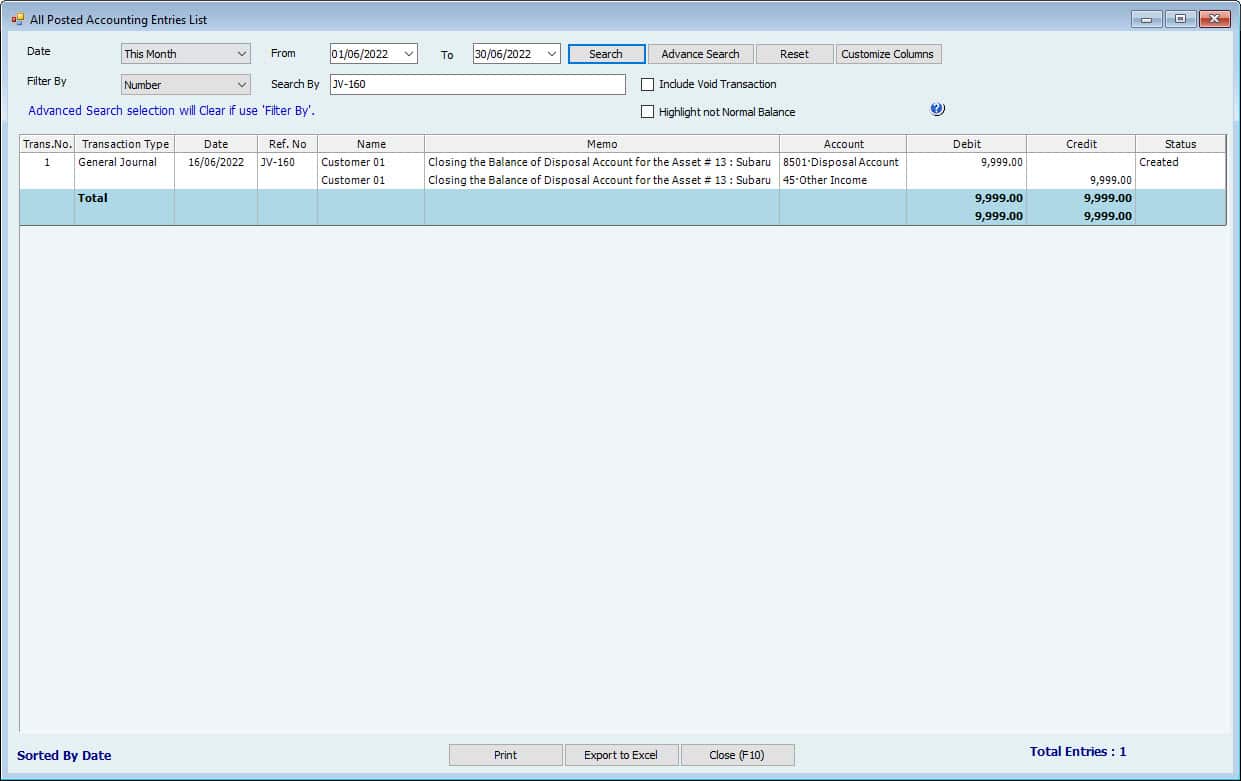
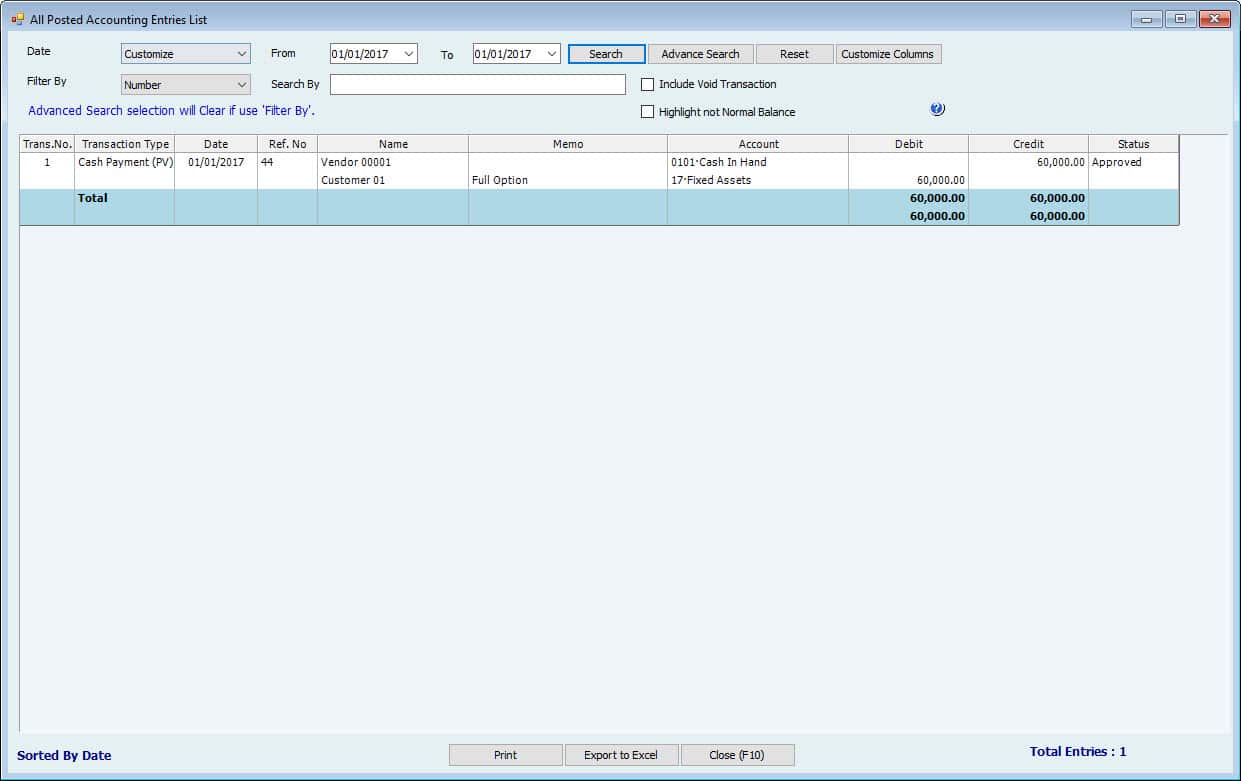
After purchasing, the Asset using payment, Go to Reports-->All Posted Accounting Entries List.
Users can see the Payment entry here.
Then Go to Fixed Assets-->Fixed Asset List, then search for the Asset created and Purchased.
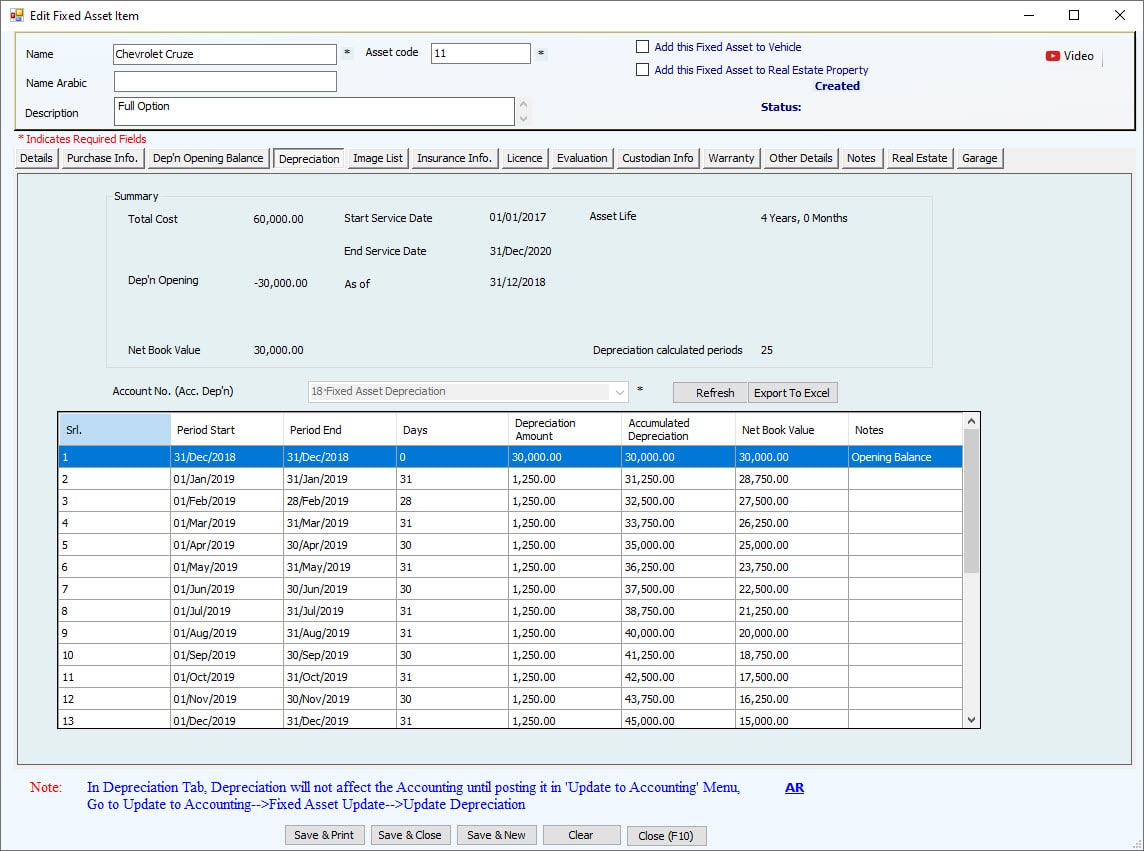
Go to Depreciation. Their User can now find the depreciation details
After entering the Cost of new assets, the Depreciation will show automatically in this window and reports.
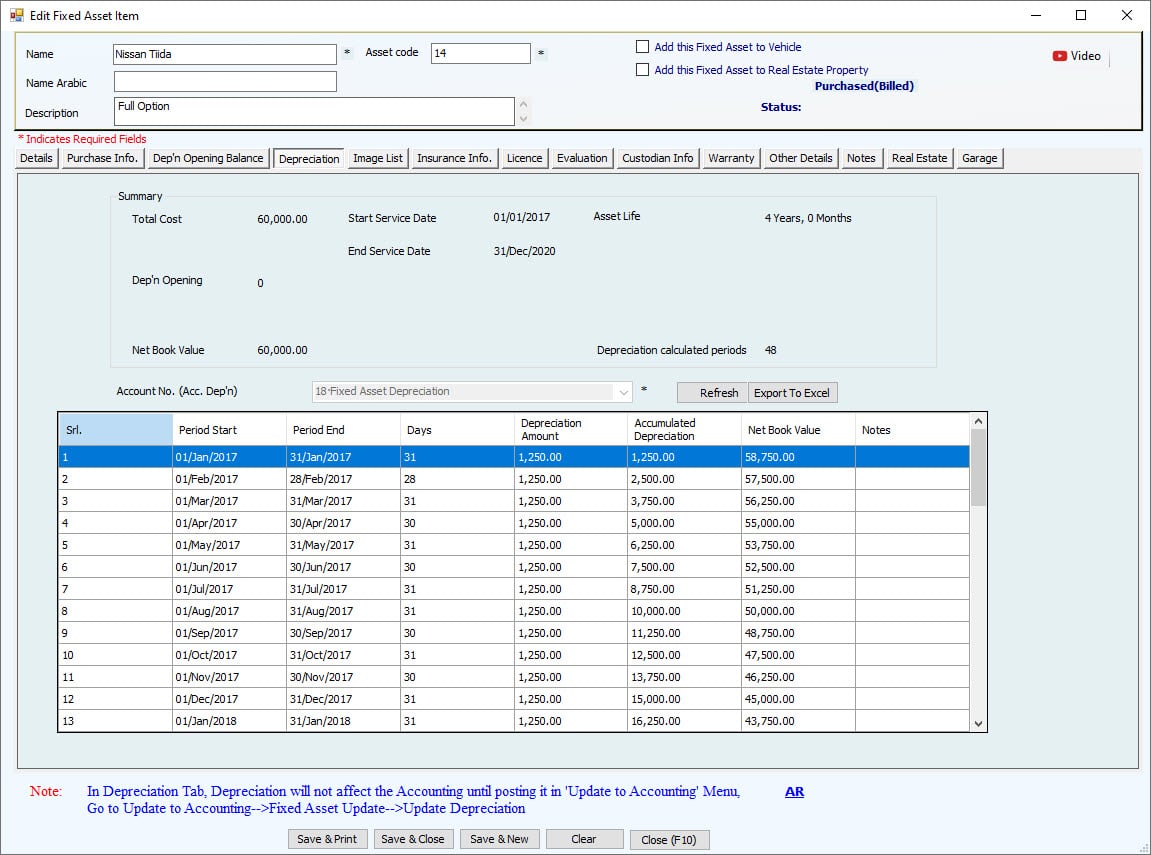
- The total cost of assets
- Service Start Date
- Asset life in years and months
- Expiry Date
- Opening Depreciation balance to be deducted from Cost and calculated net book value.
- Opening Balance Date
- Net Book Value of an Asset
- Remaining Life of the Asset as depreciation periods + 1 line for opening balance (e.g., remaining life 43 + 1=44 calculated periods) and Account No for Accumulated Depreciation, which is pre-filled if category settings exist.
The table shows monthly Depreciation for fixed assets equally for the remaining Life and netbook Value.
This schedule can be exported to excel by clicking the Export to Excel button.
Update Depreciation
After entering the Cost of a new Asset, the Depreciation is ready to be posted anytime for new and used assets. Depreciation is calculated automatically, but the User must click the Update button to update the monthly Depreciation.
To Do this, Go to Update to Accounting-->Fixed Assets Update-->Update Depreciation.
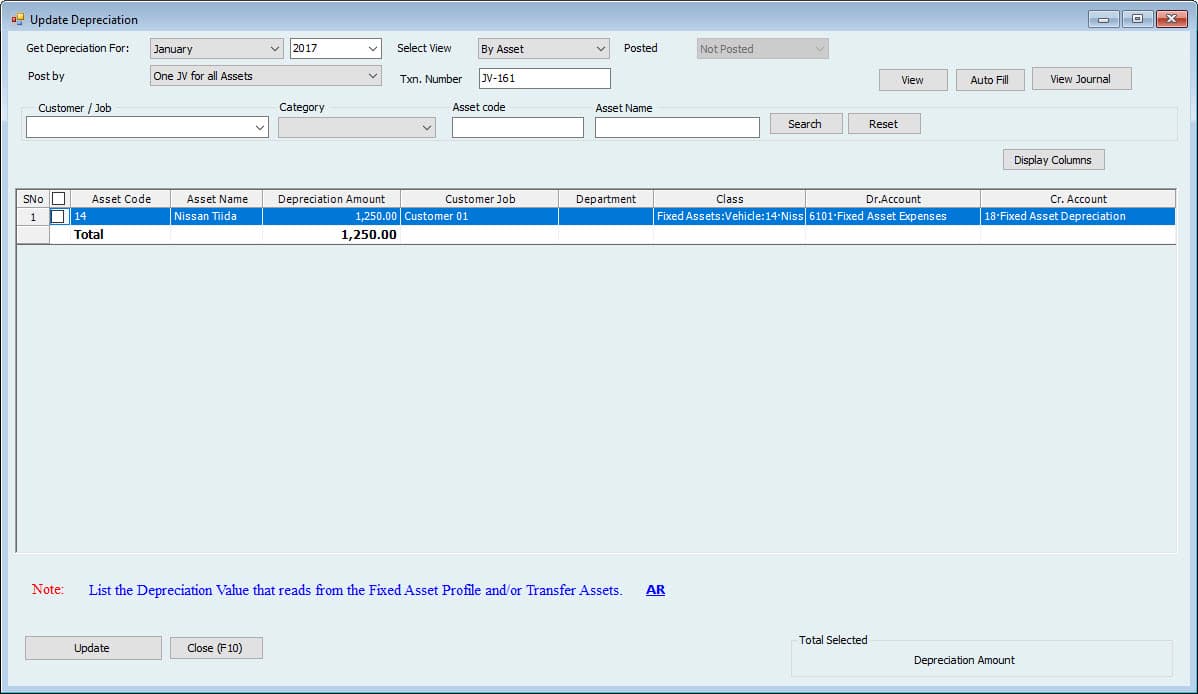
In this window, select the month for which the Depreciation needs to be posted.
Select View how the User wants to post Depreciation either by each Asset or by categories as one category total category Amount.
They posted a dropdown to select if the User wants to see the posted Depreciation or not posted.
Select the Number of JVs either User wants to post Accounting all assets in one JV or a separate JV for each Asset.
Enter the transaction Number. (By default, it's coming from the Journal voucher series)
Select the Customer name if Depreciation is for the Asset used for a specific Customer.
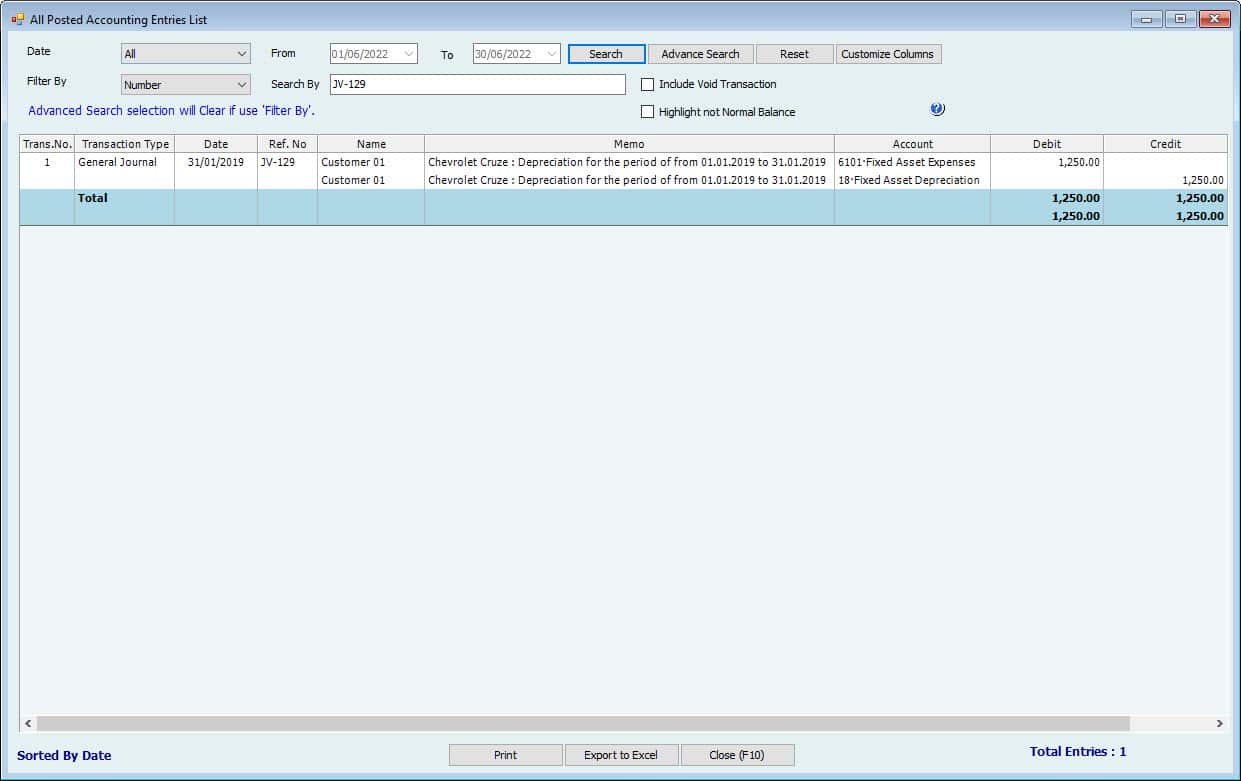
Tick mark the Asset (s) to post Depreciation and click the update Accounting button. Entry will be updated to Accounting.
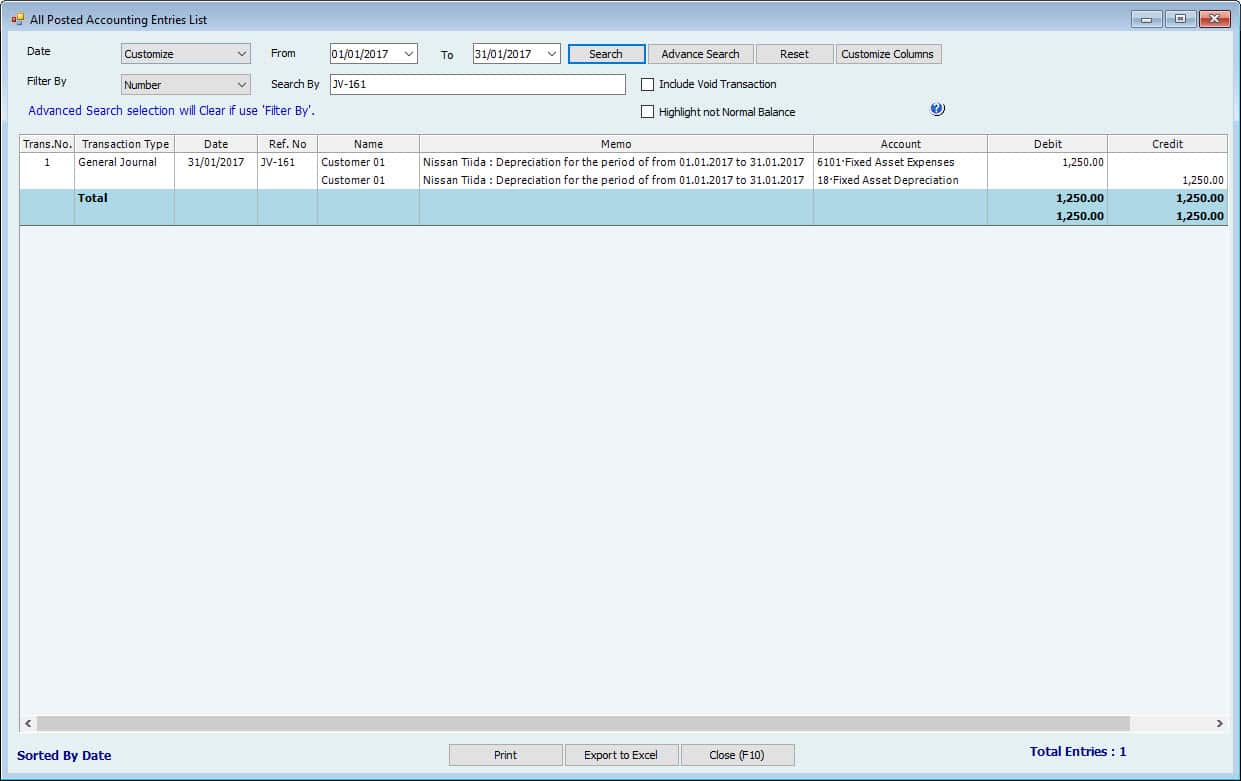
After that, Go to Reports-->All Posted Accounting Entries List
Users can see the Journal entry for the Posted Depreciation
Dispose of Asset
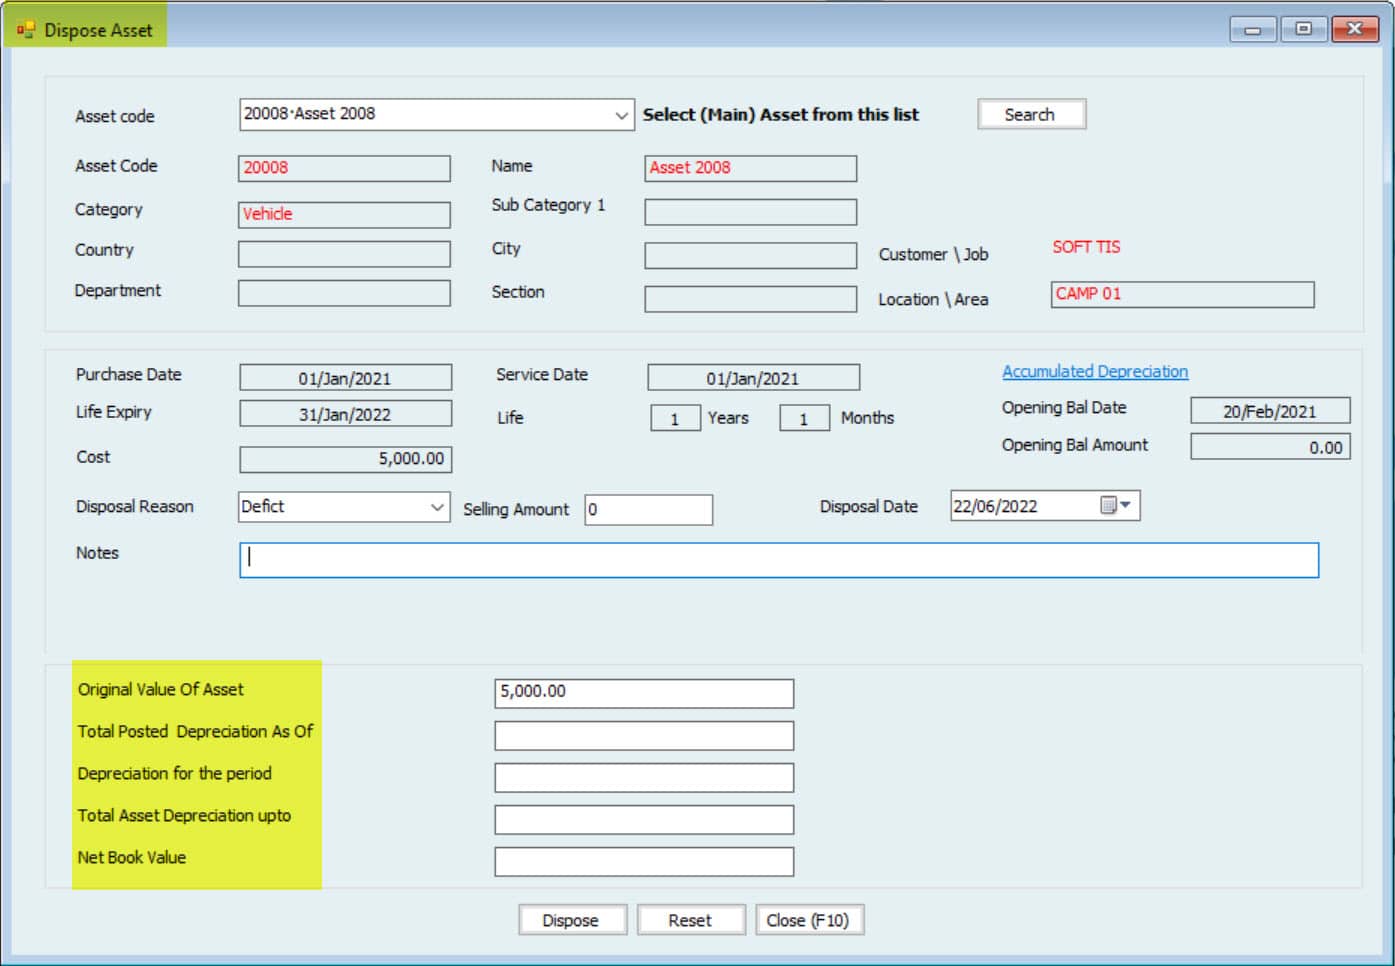
Now to Dispose of the Assets,
Go to Fixed Asset-->Disposal-->Dispose of Asset
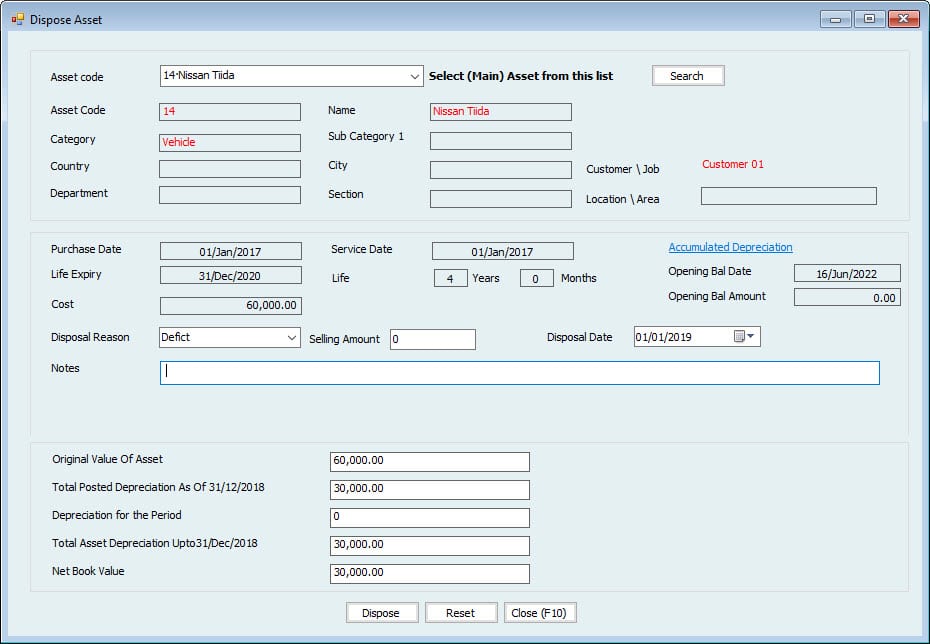
- Select the Asset from the dropdown.
- Asset information will be shown, including purchase Date, opening balance Date, price, Life, and netbook Value.
- Select the disposal reason.
- Write the disposal/selling Value in the selling Amount Field.
Important:
This Field will not affect any amounts in the automatic disposal entry in Hinawi Software. This is just a record, and the User will have to manually make the receipt or adjustment entry for the Amount received. - Select the Disposal Date. This Date is very important. Suppose Depreciation before this Date is not posted to Accounting. In that case, the System will not allow the Disposal of the Asset and will ask the User to update Depreciation to Accounting before this period.
- Write any additional notes.
- The original Value of an Asset,
- Down their User can see the Total Depreciation of this fixed Asset, including opening balance (if any) plus updated Depreciation to Accounting.
- Depreciation for the period is the difference in Depreciation posted for the month and when the Asset is disposed of (Disposal Date). E.g.. if the Asset is disposed of on 25 January, where the Depreciation for the whole month of January has already been posted to Accounting, this depreciation Value will be a reversal for seven days of January that are already posted.
- Total Asset depreciation is the difference between the above two amounts.
- Net Book Value is the difference between the original value and total Asset depreciation.
After entering this information, save the Disposal. This Disposal will not take effect before approval.
Update Disposal
Since the fixed Asset has been disposed of, the User can update this disposal entry to Accounting.
Go to: Update to Accounting-->Fixed Assets Update --> Update Disposal
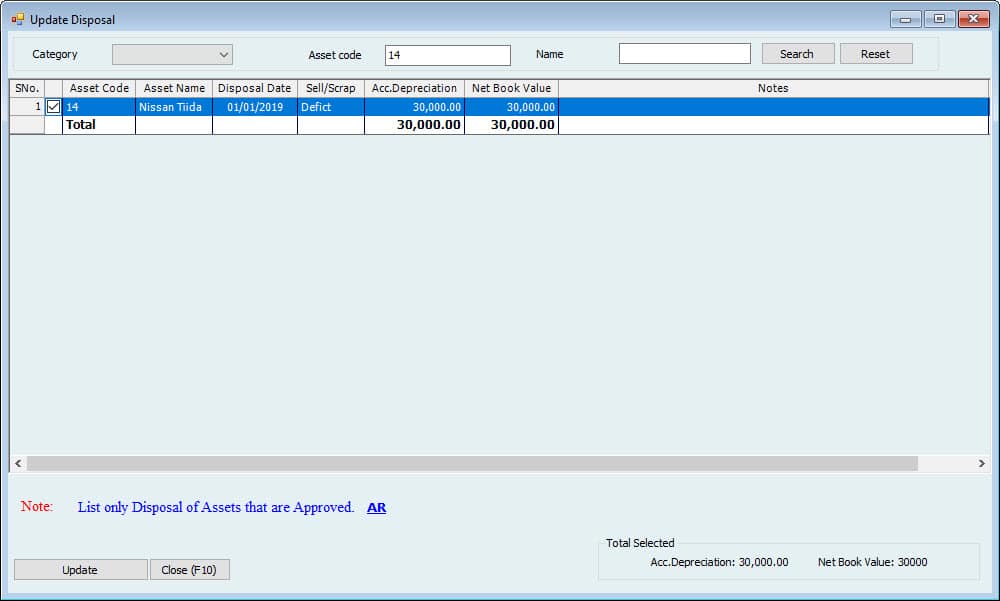
A window will appear with all approved disposals. Tick mark one to update and click on the Update Accounting button.
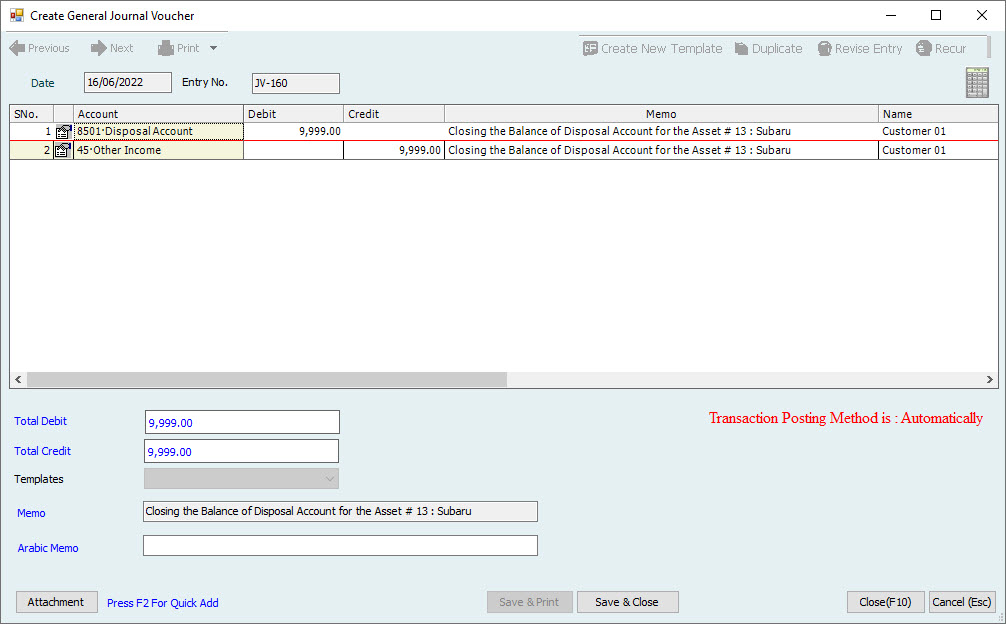
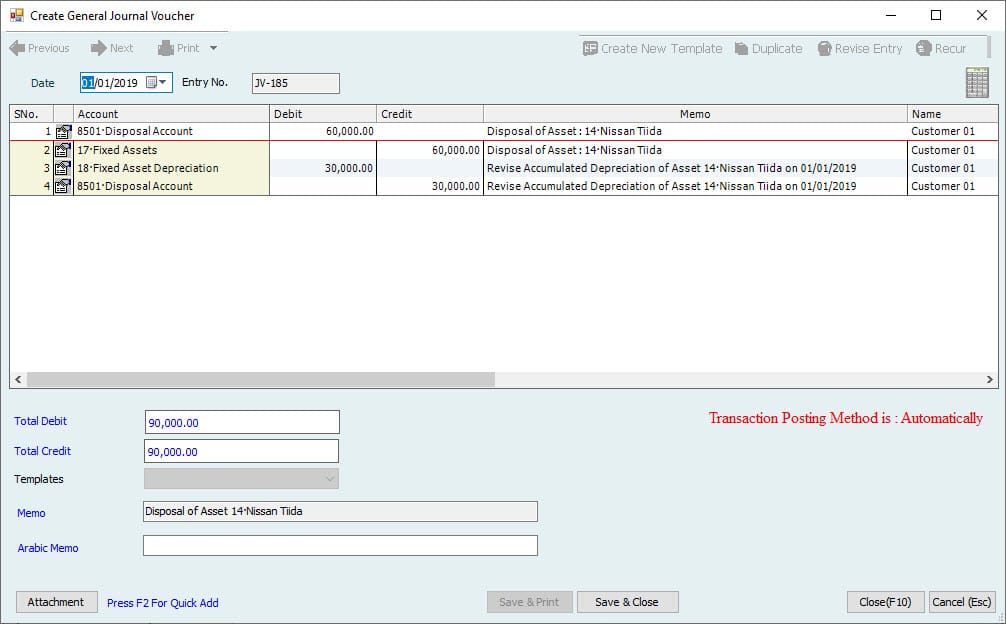
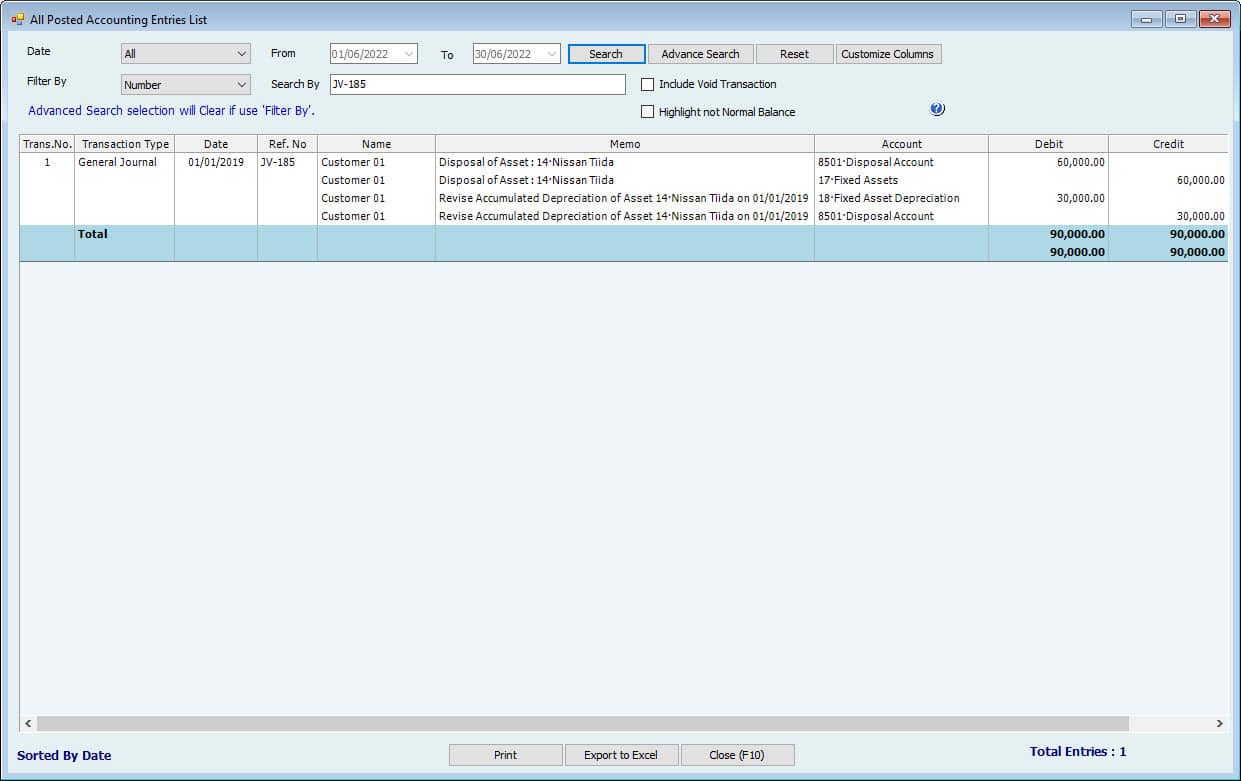
The System will open a new window with a JV showing the reversal of Cost and accumulated accounts and closing to Disposal accounts. These accounts are filled from category settings. Users cannot change anything in this entry and click the save button to post this entry to Accounting.
Important:
Remember, this will reverse the Cost and accumulated Depreciation, and the User must enter the Disposal receipt manually.
All the entries User can find it in the All Posted Accounting Entries List
Go to Reports-->All Posted Accounting Entries List
Activities in Fixed Asset | Accounting Entries | Memo |
Purchase New Fixed Asset | ||
Creating New Fixed Asset | Dr. Fixed Asset – Cost Cr. Vendor A/P | Cost can be entered only through Bills or Payment Vouchers. |
Payment for New Fixed Asset ( Direct Purchase ) | Dr. Fixed Asset- Cost Dr. Vendor A/P Cr. Cash Cr. Bank Cr. Post Dated Cheque Issued(PDC) | The Amount that will be paid for New Fixed Asset. |
Payment to vendor | Dr. Vendor A/P Cr. Cash Cr. Bank Cr. Post Dated Cheque Issued(PDC) | Payment to Vendor |
Posting PDC on the due Date | Dr. Post Dated Cheque Issued(PDC) Cr. Bank | On the due date, the post-dated Cheque will be debited to PDC Account from the Bank. |
Entering Used Fixed Assets | ||
Used Fixed assets | Dr. Fixed Assets – Cost Cr. Accum. Depreciation Cr. Opening Balance for Fixed Asset | Cost Amount is allowed to fill, and No need to create Bill or make Payments. This case is usually used for beginning balances when using the software. |
Maintenance Fixed Asset | ||
Direct Payment | Dr. Maintenance Expenses Cr. Cash Cr. Bank Cr. PDC | Purchase materials direct for maintaining the excellent condition of the Fixed Asset. |
Adding Spare Parts | Dr. Maintenance Expenses Cr. Inventory | This is the Cost of parts spent in maintaining the excellent condition of the Fixed Asset. |
Disposal Fixed Asset | ||
Dispose of Fixed Asset | Dr. Accum. Depreciation Dr. Cash/Bank Dr. Loss on sale of F.A Cr. Fixed Asset - Cost | The Amount will be credited to the Cost of the Fixed Asset (Original Value) that will go to the total Accumulated Depreciation of the Asset, Cash/Bank when selling the Asset, and Amount Loss when selling the Asset. Still, the selling Amount is less than the remaining amount of the Asset. |
The Fixed Assets Module is linked with other modules as follows:-
In HRMS Module:
She fixed Assets items like computers, mobiles …..etc. It can be used as custody with the Employee. The depreciation of these items will be added to Employee costing.
In Real Estate Module:
The Fixed Assets building can be converted to the Property List. So User should not enter the property name twice.
In-School Module:-
The bus in Fixed Assets will use for school when assigning students to the bus List.
In Garage Module:-
The tools and equipment to use for repairs.
Integrated with Hinawi Web and Mobile application
Integrated with QuickBooks Accounting
- The admin User can do internal control by the followings:-
- Set the Posting controls window located under File Menu >> Company
- The level of access is located under File Menu >> Company. Admin User can allow the User to create transactions but not edit. Or to approve but not pay. Or to read reports only….etc.
- By default, the User can’t change the transactions when approved.
- User activity Report is located in the Menu, and HRMS Report Menu reads every change on each transaction and lists with Date and time.
- And many more
Fixed Asset Manual
Category Settings:
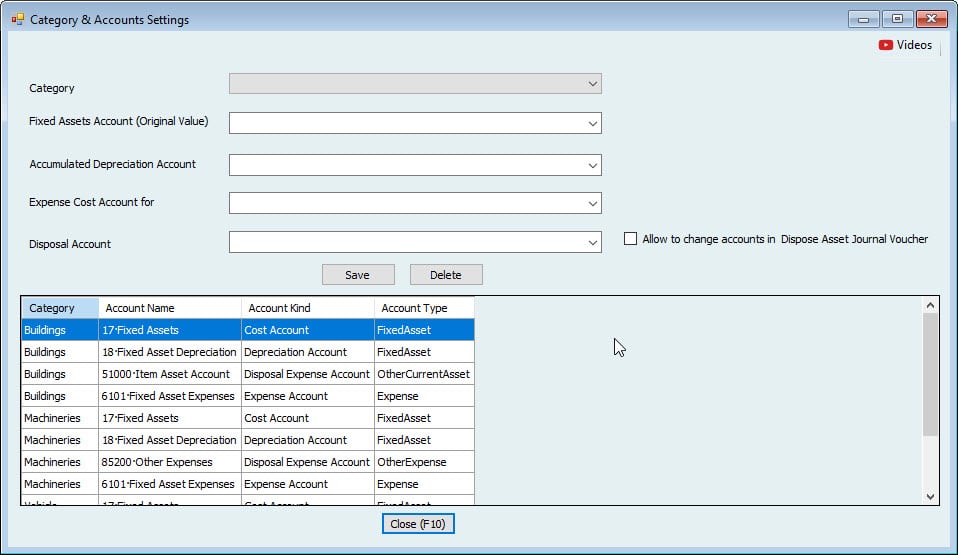
To use the fixed Asset assets Module, the first step is to set the categories with relevant accounts for fixed assets. You can do this from:
File --> Setup Modules--> Fixed Assets Settings-->Category Settings.

Note:
If you can’t see this Menu or cannot open it, you don’t have permission from the Admin.
Here we can set the categories for fixed assets. From the drop-down, you can select the category name under which you want to create a fixed asset:
To add a new category or change the existing category name, you can go to Lists à General List à “Fixed Assets” tab à Fixed Assets Category.
To add a new category, click “Fixed Assets Category” in the List name column and then click the “New” button at the bottom.
To edit a name, click on that name and then click on the edit button at the bottom.
After selecting the category, you have to select the relevant accounts for
- Cost of fixed assets.
- Accumulated depreciation.
- Depreciation expense.
- Disposal of fixed assets.
And then, click on the save button to save the category.
Example:
I chose the “Motors” category and selected the relevant accounts. After pressing the save button, I can see the category of motors in the box.
The checkboxes “Allow to change accounts in…..” against each account allows the user to change these accounts in the forms written there.
General Settings
The next step is to make some general settings, as seen in the image below.
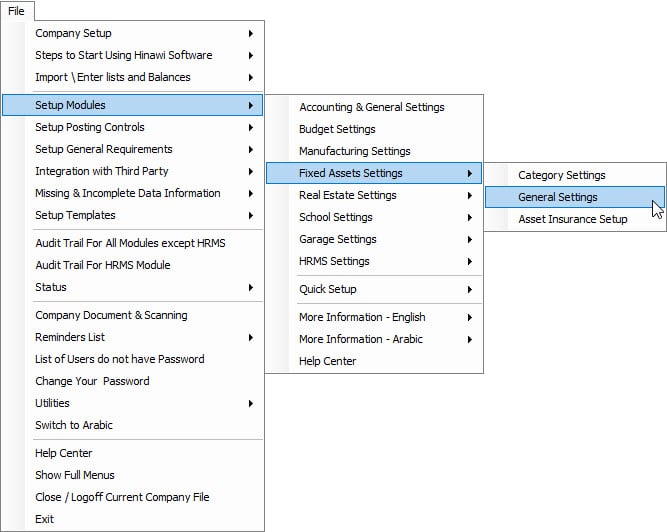
Go to File --> Setup Modules--> Fixed Assets Settings-->General Settings

- Minimum Purchase Date of Fixed Assets: The user can set the business start date here. You cannot create any assets before this date.
- Depreciation method: This is the method by which depreciation is calculated. For now, there is only a straight line.
- Set depreciation periods to Depreciation periods are months by default.
- Save assets images Here. You can locate where to save the images for assets.
Note: These images you will attach in the fixed assets item window. - Company Type: Company type can be either Contracting or Non-Contracting. If you select Contracting, you must have to select the Customer name at the time of creating a fixed asset.
However, if you select Non-Contracting, the Customer name will be an option and not a must to select. - User-defined fields: Hinawi software provides more flexibility by allowing the users to define additional fields which may not be available. You can set the field name here and enter Data Data in the relevant column in the fixed asset item.
Asset Insurance Setup:
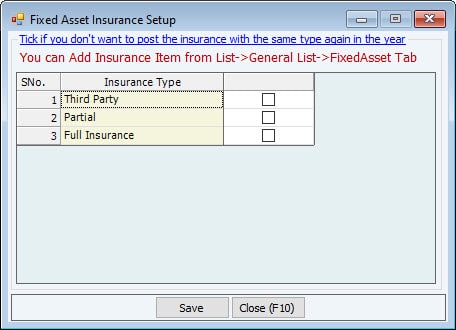
This option restricts the user from entering the same type of insurance more than once a year. Without this option, you can enter any insurance anytime.
Go to File --> Setup Modules--> Fixed Assets Settings-->Asset Insurance Setup.

Important:
After finishing the settings, you can either create new assets or users import them from Excel.
Activities:
Hinawi Software Fixed Asset activities allow the user to store their fixed asset Data, track their net book value anytime, and track deprecation, maintenance of assets, and transfer between locations and their disposal information.
Create New / Used Asset:
To create a New / Used asset, Go To:
Fixed Assets --> Create New / Used Asset

Details Tab:
The first Details tab shows the General Information about the Asset.
Press F2 to add new
- Asset Code: It is the code of fixed assets. Users can enter the standard code per their Company policy or any other.
- Name: Fixed asset name
- Add this fixed Asset to the Fixed Assets Property: Option will add the fixed Asset to the property List in Fixed Assets.
- Adding this Fixed Asset to the Vehicle: It will add the fixed Asset to the Vehicle List in the garage Module.
- Description: It can be used to describe fixed in detail.
- Unit: Select the Asset^ type if it’s an asset, piece, or other.
- Ref. No.
- The category: It is the type of fixed Asset. This category can be configured from fixed asset settings. If the category Setup is already done in the settings, accounts will be automatically populated here for cost and Accumulated depreciation.
- Sub Category 1: It can be selected after selecting the category.
- Sub-Category 2: It can be selected after selecting sub-category 1.
- Country: Select it from the drop-down for the location of a fixed asset.
- City: Select it from drop down the location of a fixed asset.
- Department: It can be used for the Company for the location of a fixed asset.
- Section: Section, If any, for the location of a fixed asset.
- Location/Area: Select details of asset location
- Sub Location/Area: It can be selected after selecting the location.
- Customer/Job: if the Asset will be used for any specific Customer or job.
- Custody: It will be used as the Employee's name with the Asset under their custody.
- Status: if it’s active or under repair etc.
- Account no. (Cost): It is the account where the fixed asset cost will be recorded.
Usually, this account will be pre-filled reading from the category settings, but the user can select the account manually if categories are not defined. The cost will be entered next to the tab Purchase Info for used assets, but for new assets, the cost will come from a bill or payment. The cost will be entered next to the tab Purchase Info for used assets. - Bar Code can be entered to store as it is.
- Notes contain any additional information.
- Clear Button: if clicked on, it will clear all the information from this details tab.
Purchase Info. Tab:
The next tab is for Purchase information on fixed assets.

- Purchase Order No., which was issued to purchase the fixed Asset.
- Purchase date of the fixed Asset. The depreciation will not be started from the purchase date. It will begin from the service start date when the Asset comes into service.
- Vendor from who the fixed Asset is bought.
- Maintenance Company is the Company responsible for maintenance. It can be the same vendor or any other vendor.
If Fixed Asset New
If the fixed Asset is new, some fields will be blocked. Users cannot enter those fields as they are for used assets. The cost of new fixed assets will not be entered through this window. It will be entered through a bill or payment window. This will be covered later in the purchase asset Menu.

- Life of the fixed Asset to calculate depreciation and expiry date to be entered in years and months.
- Life Expiry Date is reading automatically from the purchase date and Life.
- The service Start Date is very important here. The depreciation will not be started from the purchase date. It will begin from the service date when the Asset comes into service. This can be the same as the purchase date.
- Warranty of the Asset. This will not affect anywhere in the accounts, but more information can be stored through the warranty tab.
Other details are extra fields for vehicles to enter their registration information. This can be updated anytime.
If Asset is used
The information will be entered differently if the user creates a used fixed asset. Now more fields are open for writing reports. 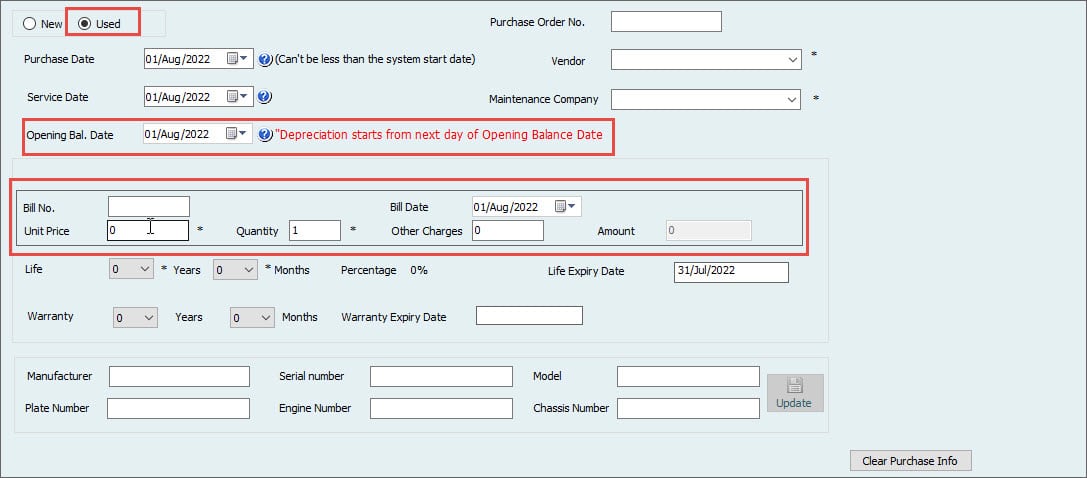
- Opening Balance Date: The opening balance Date is when the user wants to start calculating depreciation from the system. The opening balance of depreciation will be entered in the next tab as of this date. This date is important if the user wants to calculate the depreciation from the 1st of a month; this date should be the last day of the last month because it will start depreciation from the next day of this date.
- Bill No. is the Invoice Number from the supplier when purchasing the Asset.
- Bill Date: The date is the date of this invoice.
- Asset Price is the Asset's original costs set at the time of purchase.
- Quantity if the Asset is bought in more than one quantity. Select this quantity carefully, as later on, if the user wants to dispose of the support and the quantity is more than 1 (e.g., 5), one Asset cannot be disposed of out of 5. The greatest Asset has to be disposed of.
- Other Charges can be the direct cost of bringing the Asset into working condition and will be added to the total value of the fixed Asset.
- The amount is the total value of the Asset. I.e., Asset price * Quantity + Other charges.
- Life of the fixed Asset to calculate depreciation and expiry date to be entered in years and months. This Life will read from the purchase date, not the vice date.
- Life Expiry Date is reading automatically from the purchase date and Life.
- The service Start Date can be the same as the purchase date. Now the depreciation will not start from this date. This is just a record.
- Warranty of the Asset. This will not affect anywhere in the accounts, but more information can be stored through the warranty tab. This warranty will read from the purchase date, not the opening balance date.
Other details are extra fields for vehicles to enter their registration information. This can be updated anytime.
Depreciation Opening Balance Tab:
The depreciation Opening Balance tab is used to enter the opening balance of depreciation of used fixed assets. This tab cannot be used if the Asset is new.
- Has Opening Balance?: Tick marks the opening balance of the depreciation check box to enter the opening balance of the used fixed Asset.
- Depreciation Opening Balance: The amount will be the total depreciation of assets up to the opening balance date.
- This opening balance date is blocked and reading from the previous date. New depreciation will be started from the very next day of the opening balance date.
- The new depreciation period is the remaining Life of an asset from the opening balance date until the fixed Asset expires.
Depreciation Tab:
The depreciation tab will show the details of monthly depreciation.

This screen will be blank for New assets until the user enters the purchase information.
After entering the cost of new assets, the depreciation will show automatically in this window and reports.
For Used Assets, since the user has entered the cost and depreciation balance already, the depreciation is shown here.
At the top, a summary of the calculation basis is shown there.
- The total cost of assets
- Service start date
- Asset life in years and months
- Expiry date
- Opening balance of depreciation to be deducted from cost and calculate net book value
- Opening Balance Date
- Net Book value of an asset
- Remaining Life of the Asset as depreciation periods + 1 line for opening balance (e.g., remaining life 43 + 1=44 calculated periods) and Account No for Accumulated Depreciation, which is pre-filled if category settings exist.
The table shows monthly depreciation for fixed assets equally for the remaining Life and net book value.
This schedule can be exported to excel by clicking the Export to Excel button.
The next tab is for images of fixed assets.
More than one image age can be added for one Asset. To add an image, click the browse button and select the location of the image from the local drive. Write the name for the image and description (Optional). Then click on Add button to add this image to the List. Later, users can view or delete the image from the List.
Now the Asset can be saved without filling in the information in any other tab. Still, if the user enters information in any of the next tabs, all the mandatory fields must be filled in that particular tab to save the Asset.
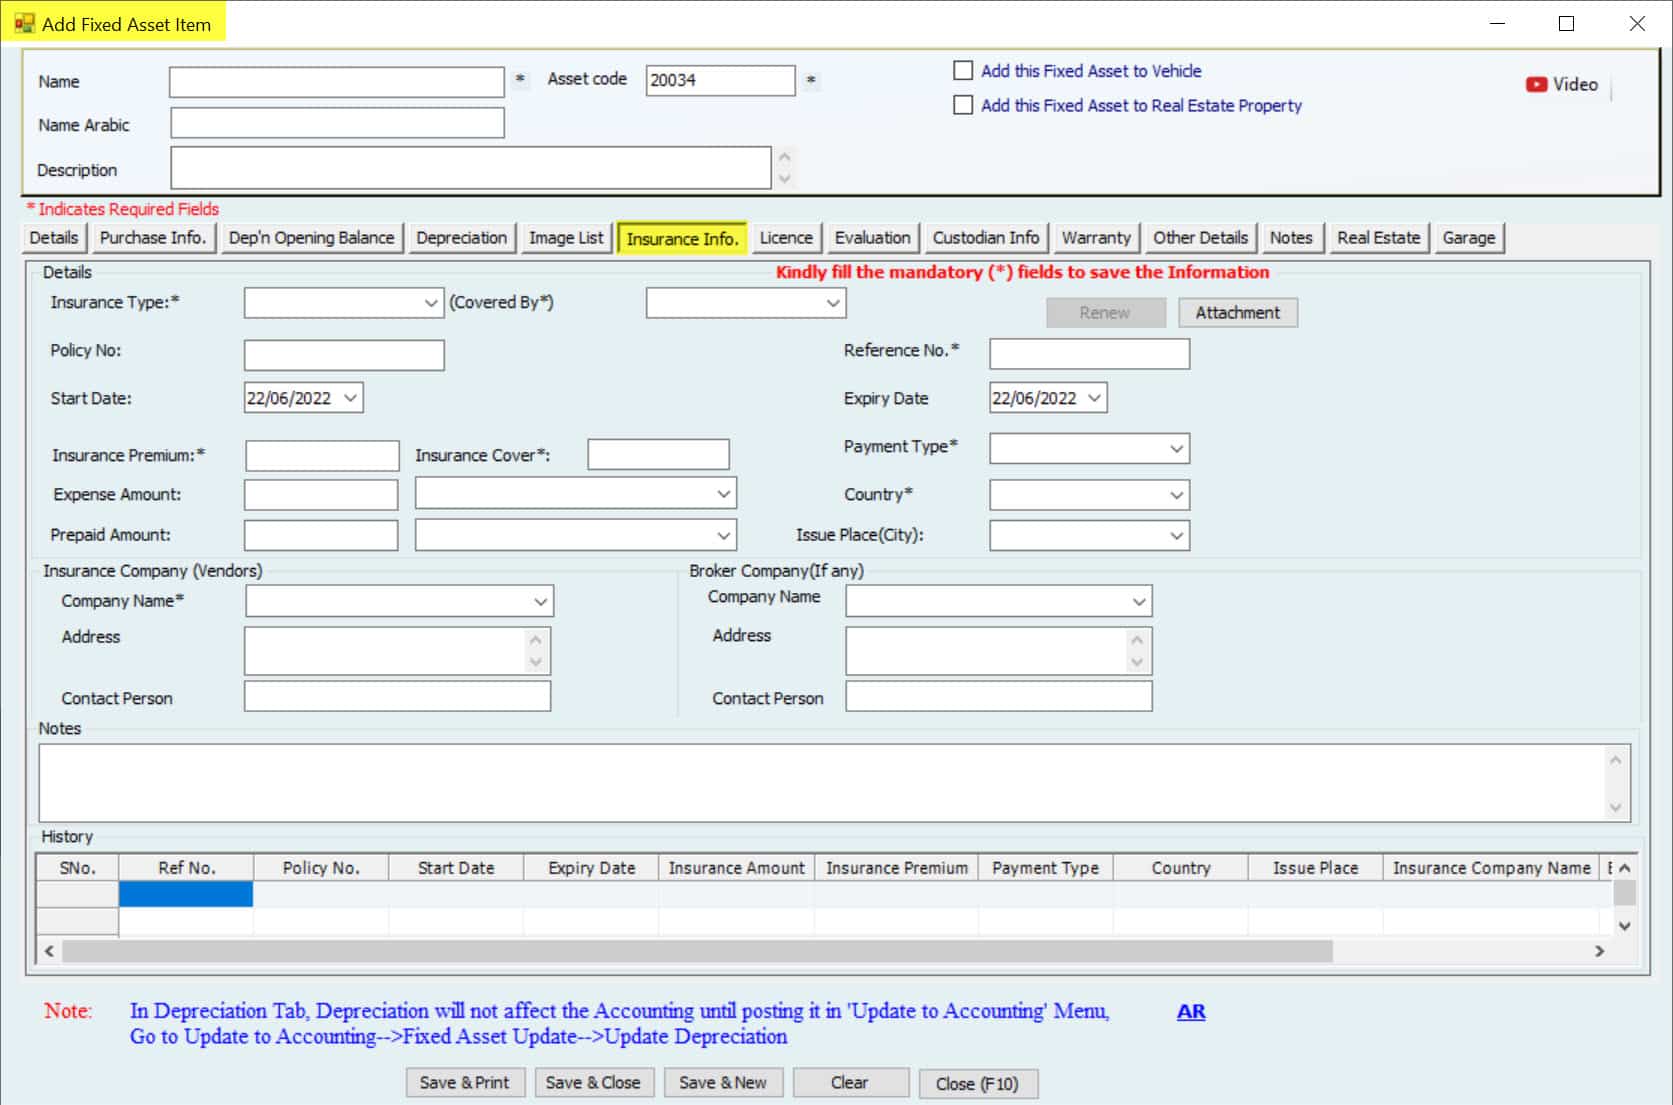
Insurance Info Tab:
Insurance info for the fixed Asset will be entered here.
Whatever information the user enters here, Later, a bill will be created from this information for insurance.

- Insurance Type is the type of insurance for assets,
- if partial, full, or other. Covered By is the coverage type of insurance.
- The attachment button can be used to attach the images of insurance.
- Policy No for the insurance.
- Reference No
- Start Date when the insurance is starting. It can be a future date.
- The Expiry Date is when the insurance will expire.
Important:
More than one type of insurance can be created in one year unless the user has blocked this option from the insurance Setup settings.
- Insurance Premium Is the premium amount for insurance.
- Insurance Cover is the total amount that insurance will cover in case of a claim.
- Payment Type if the premium is paid monthly, yearly, quarterly, etc.
- The expense Amount is the current year amount and is not affected by the payment type.
- The expense Account column is to select the account for the expense this year.
- Prepaid Amount is the prepaid amount for next year and is not affected by the payment type.
- The prepaid Account column selects the account for next year's prepaid amount.
- Country and City from where the insurance is issued.
- The insurance Company box includes the Company name (From Vendor), address, and contact person.
- The Broker Company box includes the Company name (From Vendor), address, and contact person. (Optional)
- Any Notes for the details of insurance?
The history table will show the history of previous insurances and can be seen at any time from the reports.
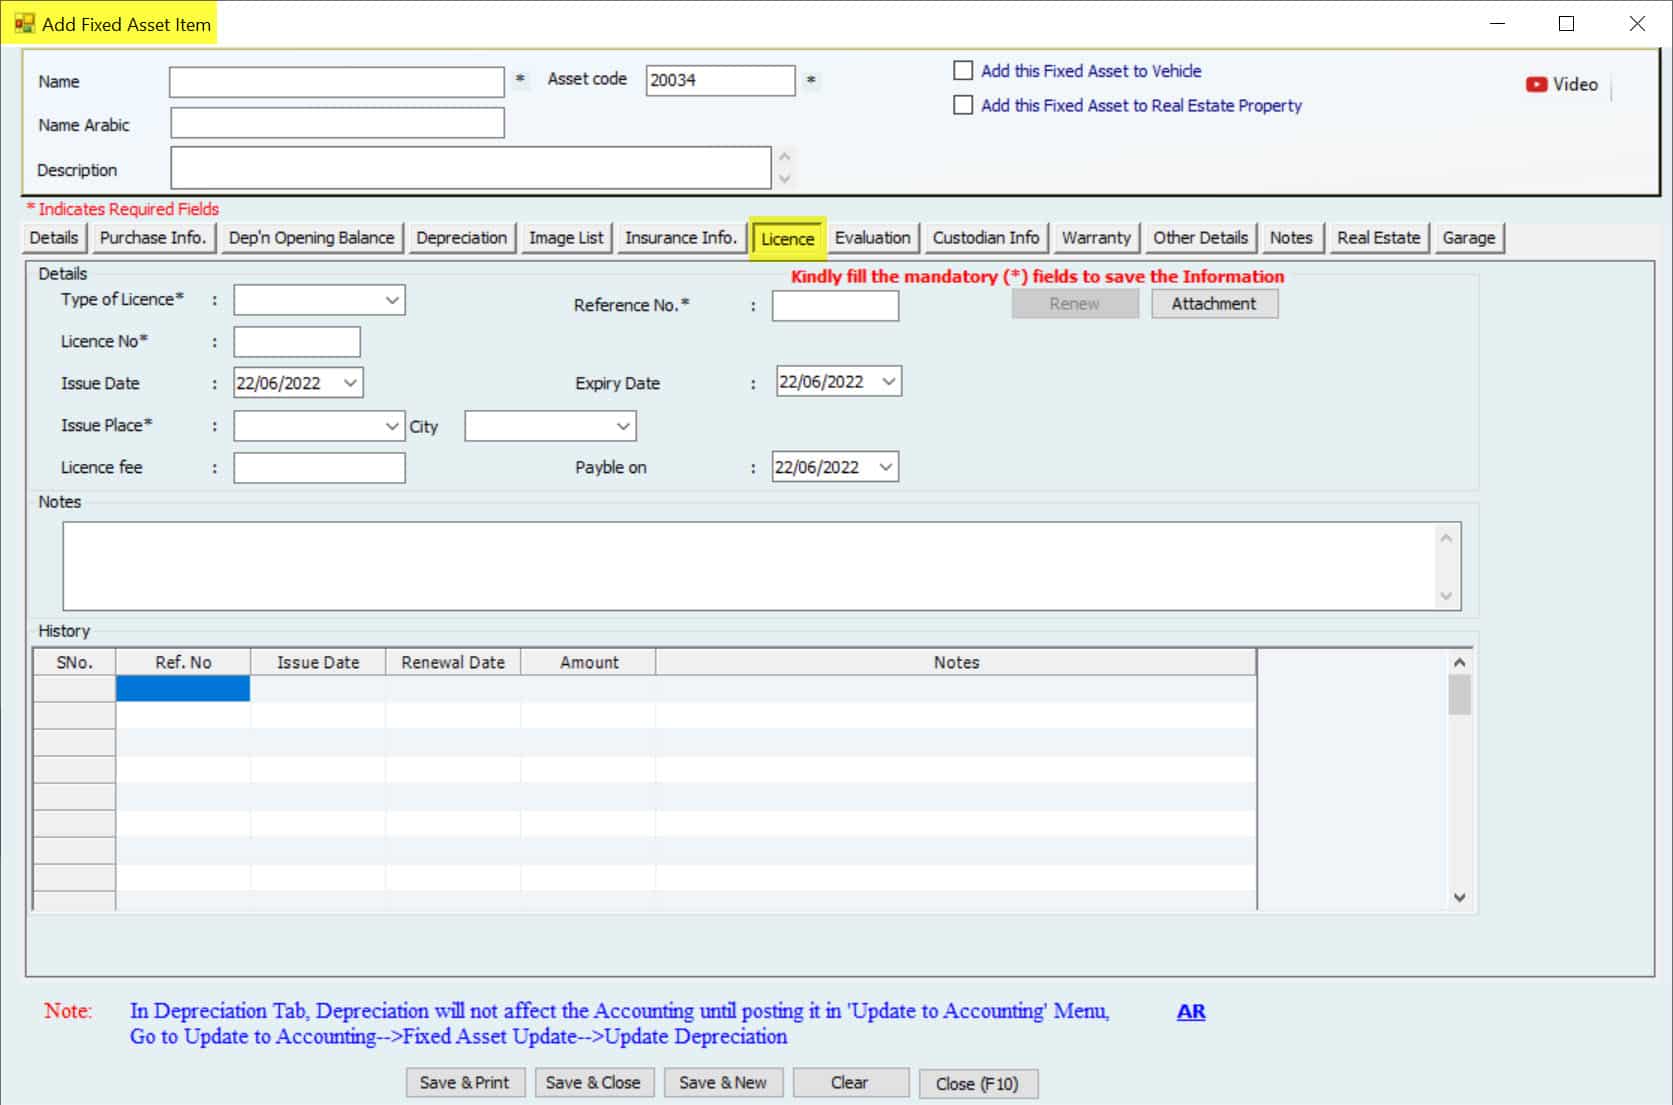
License Info Tab
A licensed window is available to enter the license information. This license record will also save as a record only and does not affect accounting or asset value.

- Type of License to select what license is available for this fixed Asset.
- Reference No of transaction.
- She was attached to the license images.
- License No
- Issue Date of license.
- Expiry Date of license.
- Issue Place of license.
- The License Fee is the cost of the license.
- Payable is the payable date for this cost.
- Notes for any additional details.
The history table will show the history of previous Licenses and can be seen at any time here or from the reports.
Evaluation Tab
The next tab is for the Evaluation of fixed assets. This Evaluation record will also save as a record only and does not affect accounting or asset value.
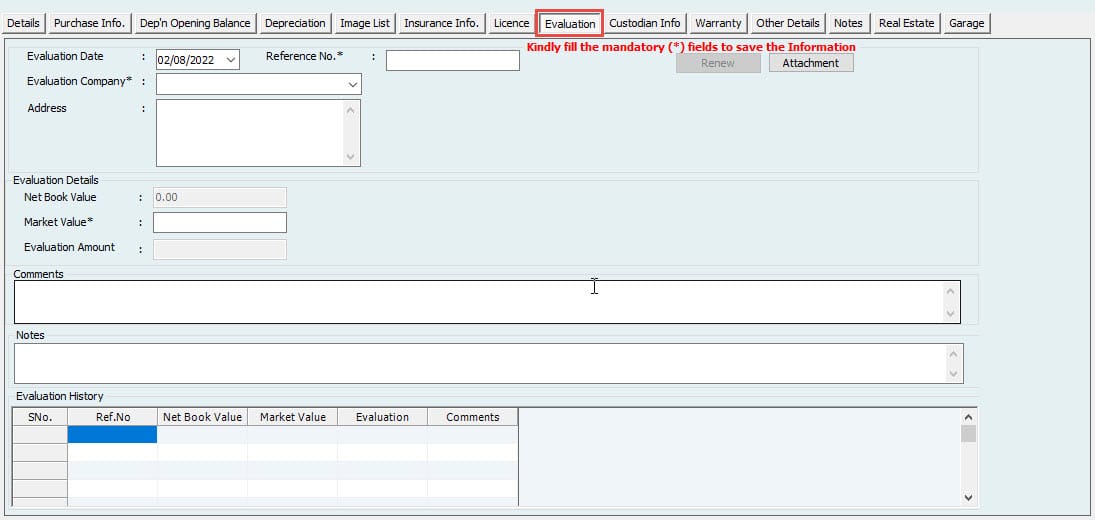
- The evaluation Date is the date when a fixed asset is evaluated.
- Reference No for the transaction.
- Evaluation Companies can be selected from vendors or other names.
- Evaluation Details contains three columns. First Net Book Value (NBV) column shows the NBV of an asset from the Depreciation tab.
- Market value can be entered as the new value, and If it’s more than NBV,
- the third column will show a positive amount as an increase in the value of an asset (difference between the first two columns). It will show negatively as a decrease in asset value if the market value is less than NBV.
The history table will show the history of Previous evaluation details
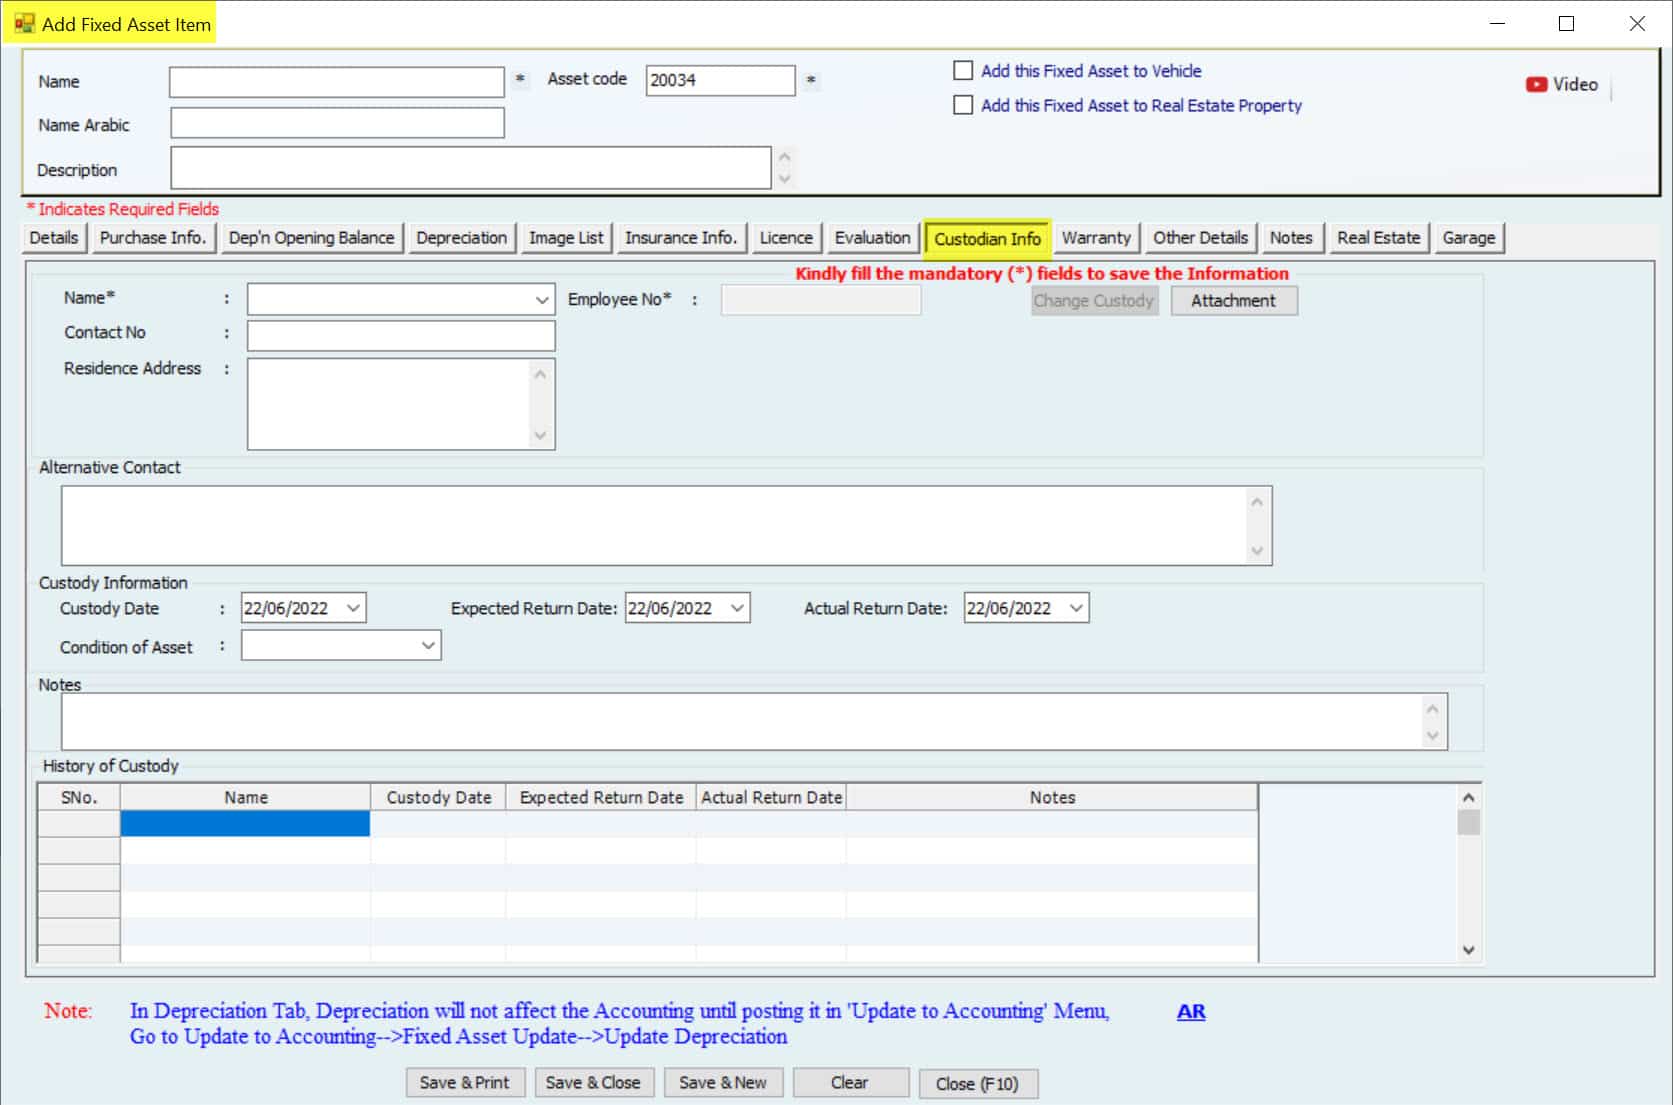
Custodian Info Tab
Custodian Info contains the details of a person with the Asset in his custody.

- It contains the name of the custodian (Employee)
- Employee no
- The contact No
- Address and Alternative contact.
- The Custody date is when the Asset has been given under someone’s custody; leave the date of custody.
Warranty Tab
The Warranty Tab shows the warranty details for this particular Asset.
Some information in this tab is pre-filled from purchase information as we gave the warranty period. But another user to mention here manually. This warranty record will also save as a record only and does not affect accounting or asset value.
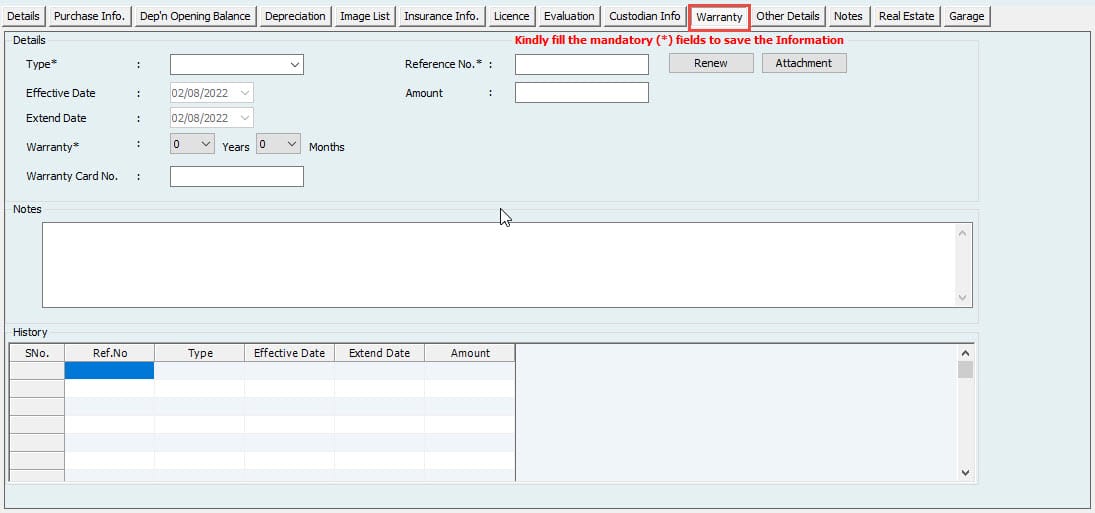
- Warranty Type is the type of warranty, if full, partial, or other.
- Amount of warranty, if any.
- Effective Date when the warranty period is starting.
- Extend the Date when the warranty is expiring and can be extended.
- The warranty period is in years and months.
- Warranty Card No.
In the other details tab, if the user feels this information is insufficient, more columns can be defined by the user.
Any additional notes can be written in the Notes tab.
The last two Fixed Assets and Garage tabs will be active if the user ticks the option on the top to convert this Asset.
Fixed Asset Item List
Go to Fixed Assets-->Fixed Asset List
Fixed assets contain the List of all fixed assets, either created or new. Users come to this window to see the List of fixed assets and can open any asset’s profile.
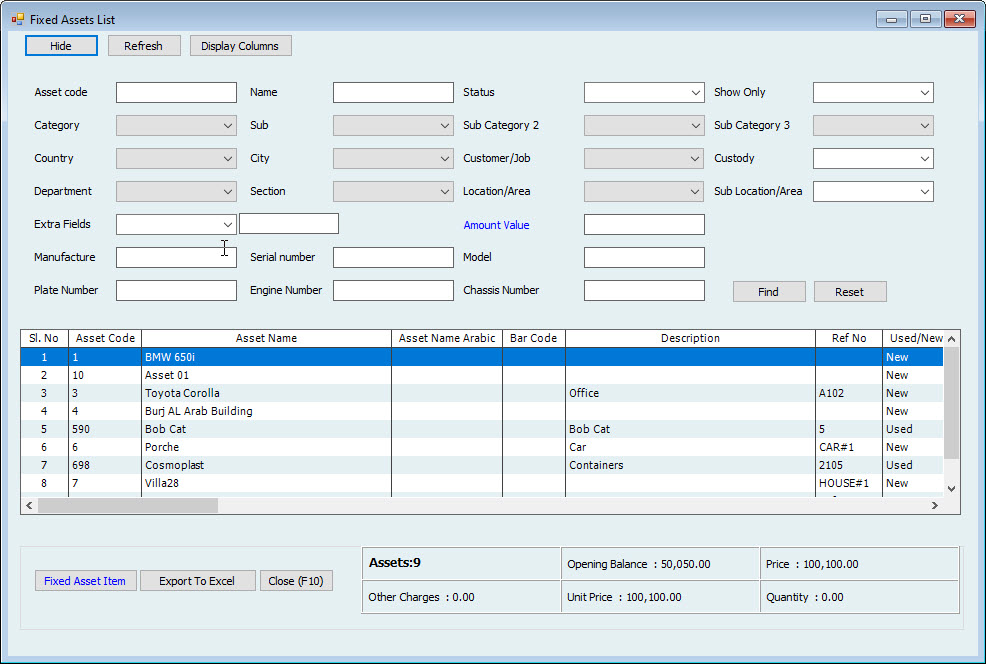
The filtration is comprehensive in this window; assets can be searched/filtered using various options. More than one filter can be applied together.
New Assets can be created from the beginning or copied from an existing asset using this window.
To add a new asset, click the fixed asset item button on the bottom left and click on new. To create an asset using the information from the existing Asset, click on the fixed asset item button on the bottom left and click on a copy. Users cannot create two fixed assets using the same code.
An asset can also be edited. To edit an investment, double-click an asset or the fixed asset item button on the bottom left and click on edit.
Update Used Fixed Asset
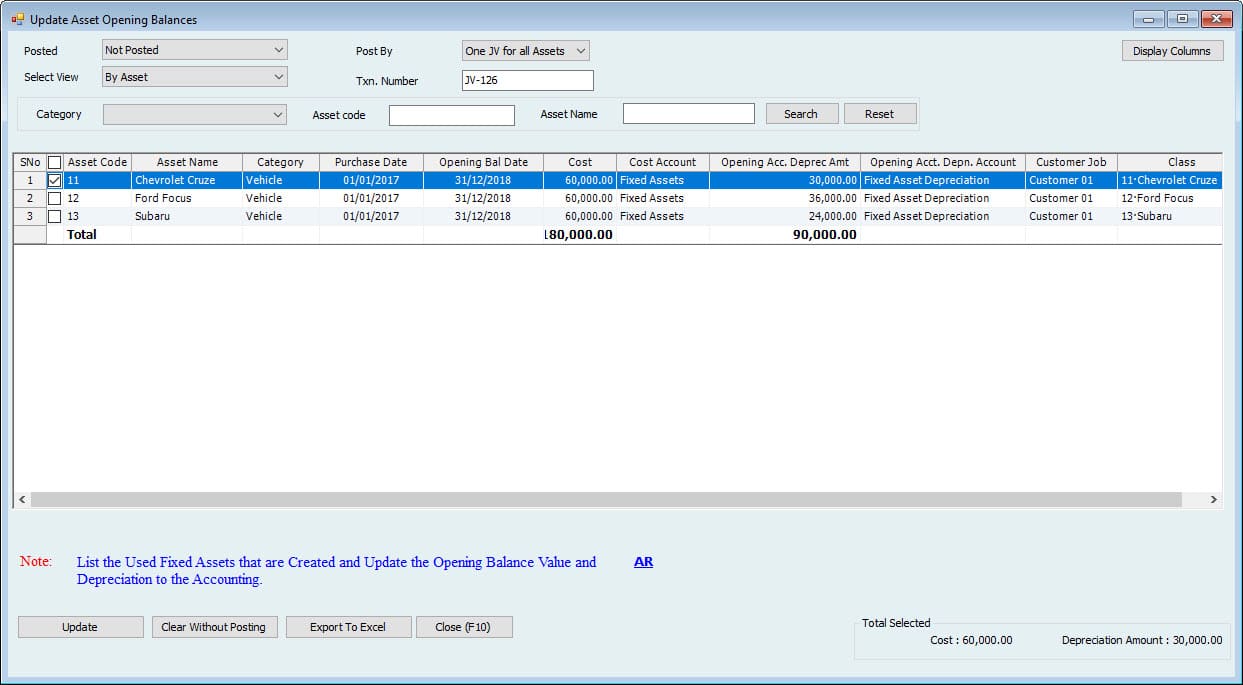
New fixed assets will automatically be updated to Accounting, but users must update their opening balances to Accounting for used assets.
Go to Update to Accounting --> Fixed Assets Update --> Update Used Fixed Assets.
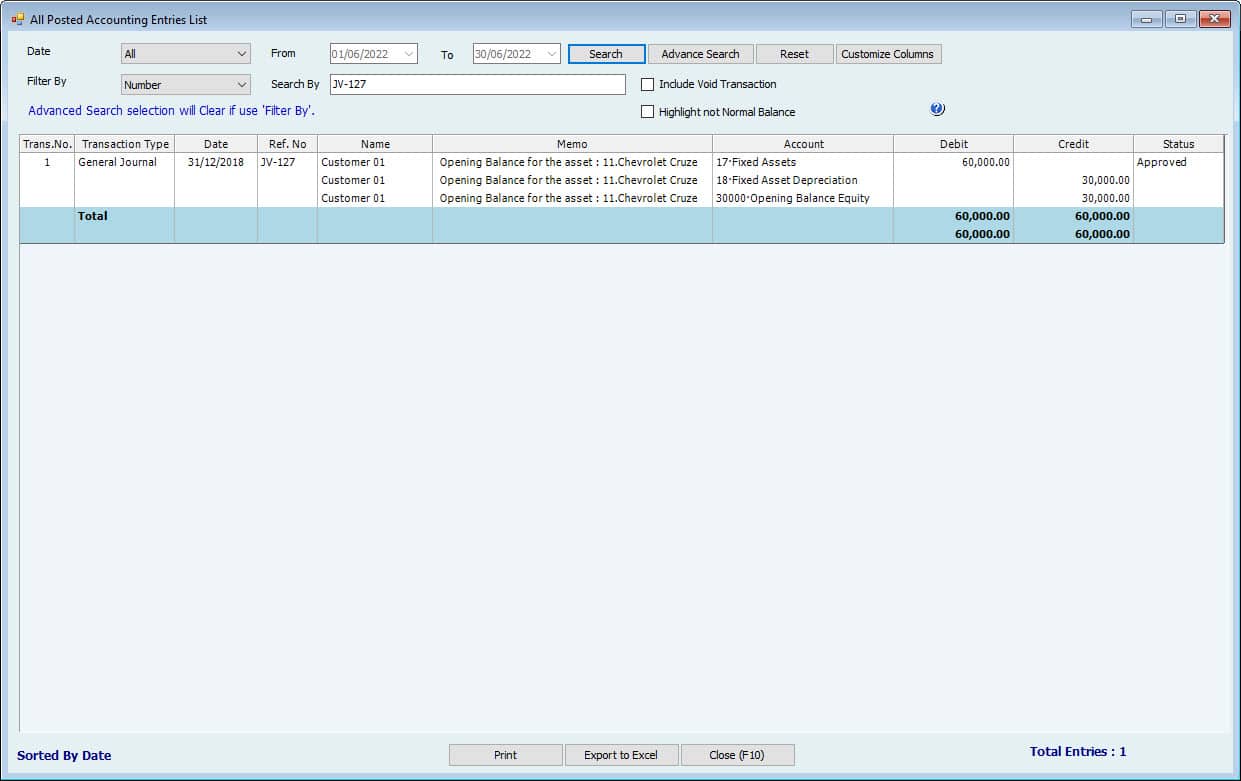
Select the Asset to update and click on Update to Accounting. One Journal Voucher will be updated to Accounting with three lines.
- Cost of a fixed asset (Account from Category settings)
- Opening Balance of accumulated depreciation (Account from category settings)
- The difference between the above two is the opening balance (Account From Accounting and general Settings)
Purchase New Asset
As discussed earlier, when a user creates a new asset, the cost cannot be entered through the asset profile window; hence, the depreciation schedule is not there. This cost must be entered through the purchase new asset Menu either by creating a bill and then paying or by making a direct payment. To generate a bill for a new asset,
Go to Fixed Assets-->Purchase New Asset-->Create Bill for New Asset
Create Bill for New Asset
Go to Fixed Assets-->Purchase Assets-->Create Bill for Purchase Asset

- Select the supplier name from which the fixed Asset is bought.
- Select the accounts payable account (If more than 1) where the user wants to track this payable amount.
- Enter the Ref. no of the bill
- Date of the bill
- Bill No
- Bill due date
- Memo of transaction.
Then on the right side of the Fixed Asset tab, the user can see a button for Load New Assets. Click on this button to load new assets for this particular vendor. Remember, only the assets created as new and for this vendor will be shown here. Clicking on this button requires permission if the user wants to load a new asset.
Click Yes, and the Asset (s) will be loaded into the column. Users can enter the asset price, quantity, other charges, or total amount for the fixed Asset. Whatever information entered here will be updated to the fixed asset profile, and depreciation will be scheduled automatically.
If the user enters the bill, this bill can be paid normally now through an accounting Module using any of these three windows.
- Cash to pay bills.
Go to Accounting-->Cash Payment-->Cash Pay Bills-->Create Cash Pay Bills - Cheque to pay bills
Go to Accounting-->Cheque Payment-->Cheque Pay Bills-->Create Cheque Pay Bills. - Bank transfer to pay bills
Go to Accounting-->Bank Transfer-->Bank Transfer To Pay Bills-->Create Bank Transfer To Pay Bills.
The other method is direct payment. Rather than entering the bill, the user can make direct payment for this fixed Asset. In direct payment, no accounts payable will be involved as we simultaneously record the cost and payment for the fixed Asset. But the user has to select the Load New Asset button to load the Asset in these forms.
All three forms have the same procedure, but only the payment method differs.
- Cash Payment will be in cash, and the cost of assets will be recorded.
- Cheque payment is through the bank with additional columns for cheque no and date.
- A Bank Transfer is a payment for a new asset through a transfer from the bank.
Important: The forms in the purchase new asset window (Enter Bill, Cash payment, Cheque payment, or Bank transfer) are also available in the accounting Menu; the reason to use them from here is the option “Load New Asset,” which is not available in accounting Menu.
Update Depreciation
After entering the cost of a new asset, the depreciation is ready to be posted anytime for new and used assets. Depreciation is calculated automatically, but the user must click the Update button to update the monthly depreciation.
Go to, Update to Accounting --> Fixed Assets Update --> Update Depreciation
In this window, select the month for which the depreciation needs to be posted.
Select View how the user wants to post depreciation by each Asset or category as one category total category amount.
They posted a dropdown to select if the user wants to see the posted depreciation or not posted.
Select the Number of JVs either the user wants to post Accounting all assets in one JV or a separate JV for each Asset.
Enter the transaction Number. (By default, it’s coming from the Journal voucher series)
Select the Customer name if depreciation is for the Asset used for a specific Customer.
Tick mark the Asset (s) to post depreciation and click the update Accounting button. Entry will be updated to Accounting.
Maintenance
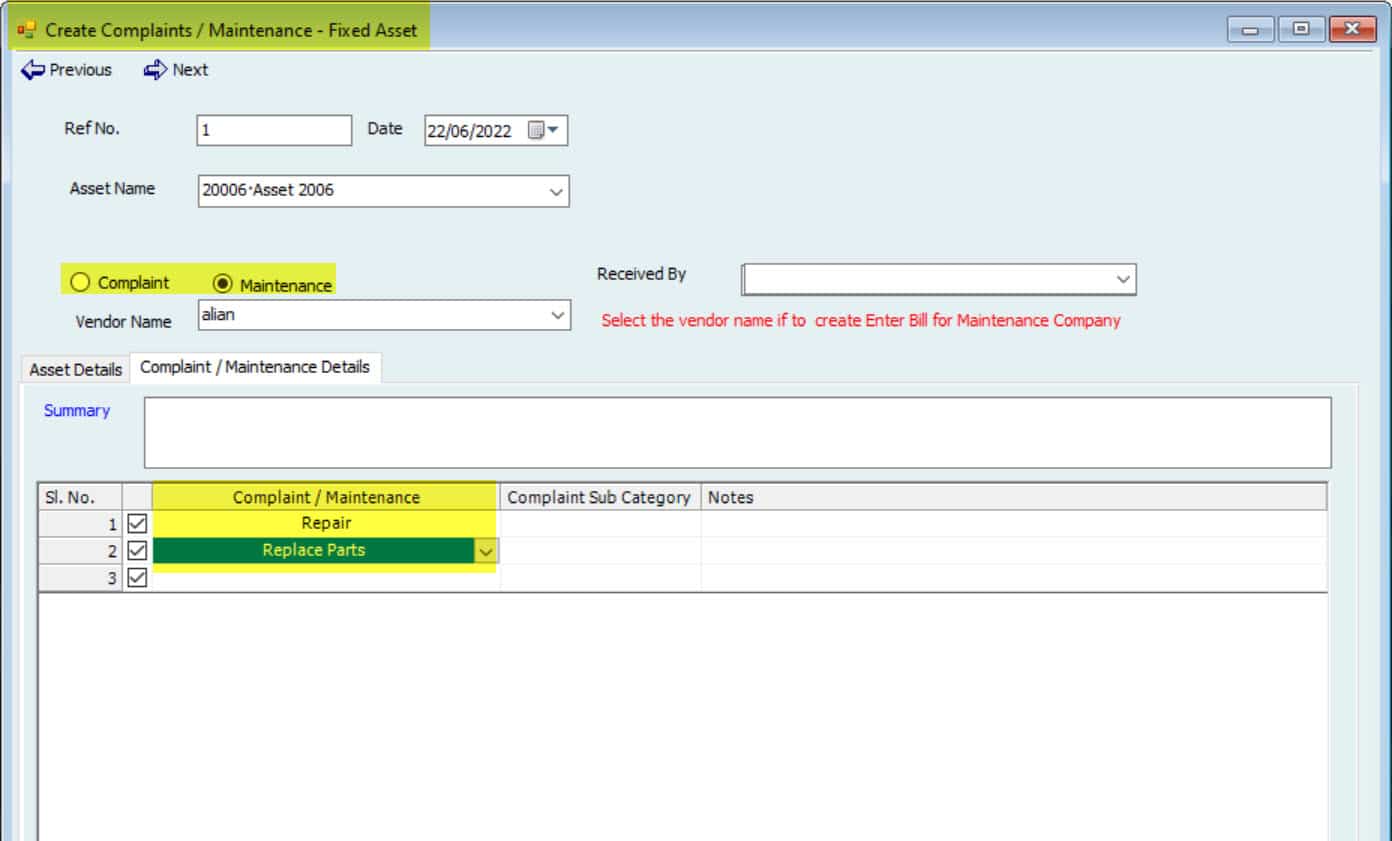
Hinawi Software maintenance for fixed assets allows users to enter any maintenance or complaint details for fixed assets.
Create Companies / Maintenance
Now users can create a complaint or maintenance from
Fixed Assets --> Maintenance --> Complaints / Maintenance --> Create Complaints / Maintenance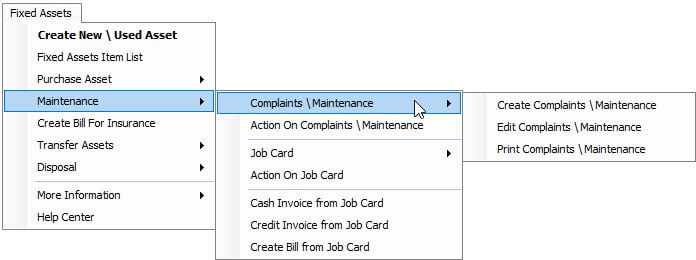
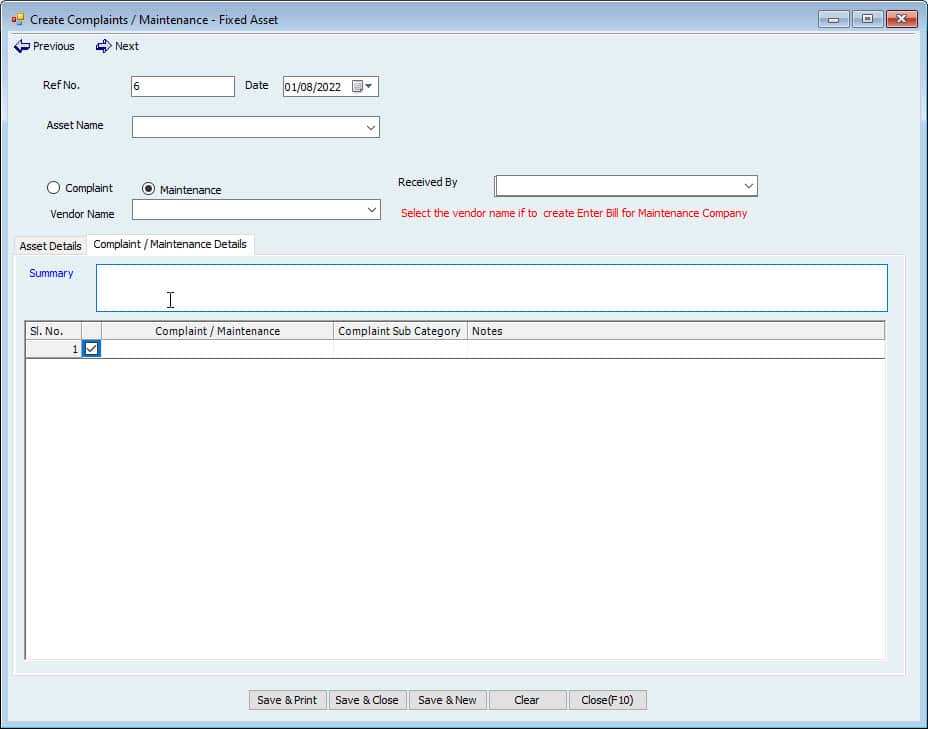
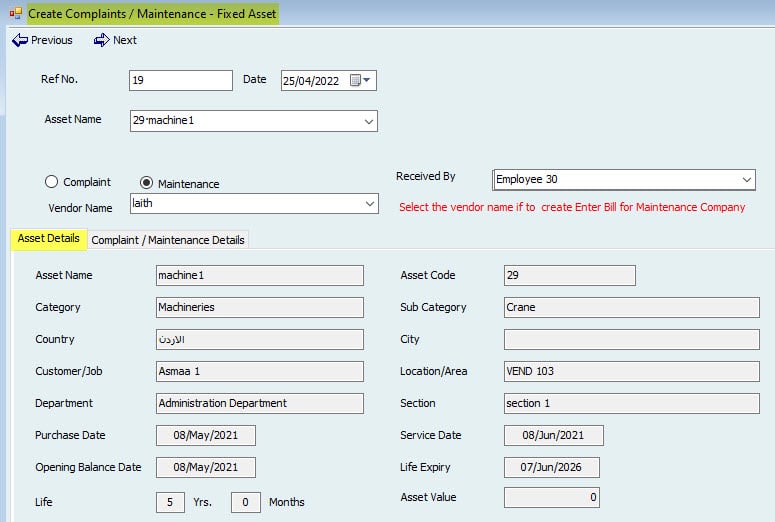
Select the Asset from the dropdown to create Complaints / Maintenance.
Select the name of the Employee who received the complaint/maintenance.
Select the option if it’s a request for complaint or maintenance.
Write the summary for the request.
The first tab for Asset Details will show the asset information.
The user can select the type from the second tab for complaint/maintenance details.
If the user selected a complaint from the option above, only complaint types would show; if maintenance is selected, the type will show in the dropdown.
More than one line can be added here.
Edit Companies / Maintenance
To edit complaint/maintenance,
Go to: Fixed Assets --> Maintenance --> Complaints / Maintenance --> Edit Complaints / Maintenance
Select from the created Complaints / Maintenance List and click the Action button to create a new, edit, or print List of Complaints / Maintenance.
Print Complaints / Maintenance
To print a Complaint / Maintenance,
Go to: Fixed Assets --> Maintenance --> Complaints / Maintenance --> Print Complaints / Maintenance.
Select from the List Complaints / Maintenance to print and click the print button.
Action on Complaints / Maintenance
After making sure the Complaints / Maintenance is fine, the user can take action.
Go to Fixed Assets --> Maintenance --> Action on Complaints / Maintenance.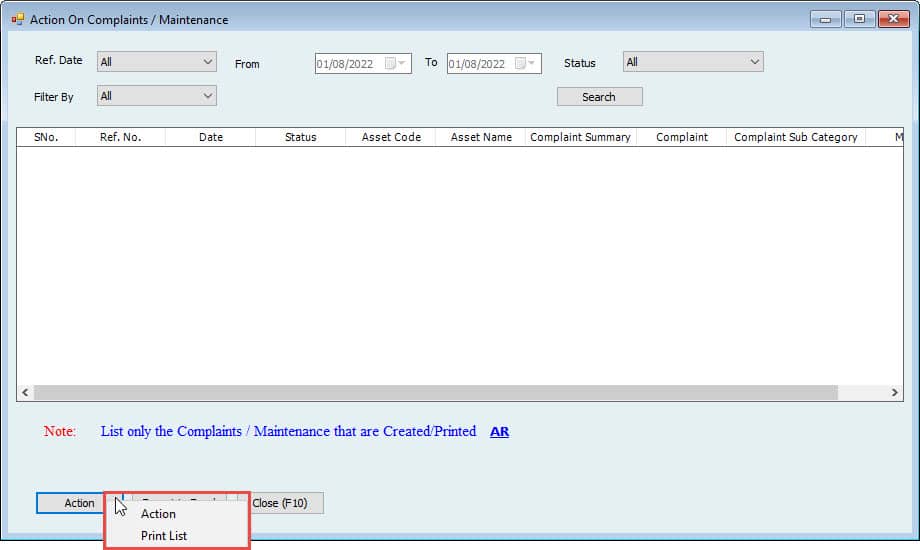
- Select Complaints / Maintenance, click on the Action button on the bottom left, and click on Other Action.
- A new window will appear in the middle.
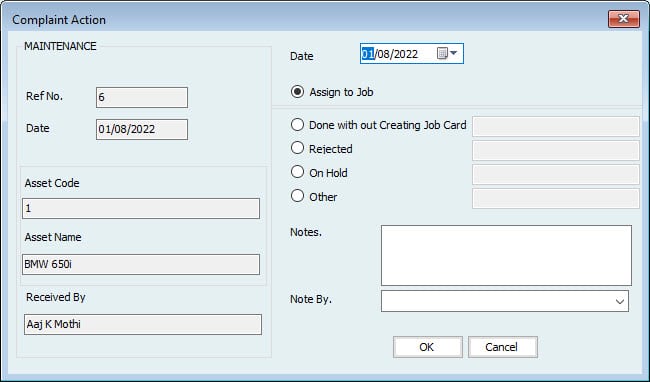
- Select the date of the action.
- Choose the action if the user wants to Assign to Job, close by selecting Done without creating Job Card, Reject put On Hold, or any Other.
- Write any additional Notes.
- Select from the dropdown the name of the Employee. The job card will now follow this action.
- A job card will follow this action because we selected Assign to Job.
Job Card
The job card contains information on services and items needed for the Complaints / Maintenance.
Create Job Card
Go to Fixed Assets --> Maintenance --> Job Card --> Create Job Card or Create Job Card from Complaints / Maintenance.


The difference between these two is
If the user selects the create option, the system will open the job card window as fresh, and the user needs to choose the Asset, services, and items. The user selects the create option; the system will open the job card window as fresh and the
If the user selects this as the second option to create from Complaints / Maintenance, the window would be pre-filled with all this information along with Complaints / Maintenance information the user has already assigned to Job.
The first tab for this window will show the asset details.
The second tab shows Complaints / Maintenance details.
Service The service tab selects the services from the Item List service type.
The description can be changed here.
Write the rate and quantity to calculate the amount.
Select the labor from the Employee List who will be doing this service.
The last tab is to select the Inventory items used in maintenance.
After selecting the required services and inventory, save the form.
Edit Job Card
To edit the job card, go to
Fixed Assets --> Maintenance --> Job Card -- > Edit Job Card.
Select the job card to edit from the List of created cards, click on Job Cards on the bottom left, and click on edit.
Print Job Card
To print the job card, go to
Fixed Assets --> Maintenance --> Job Card --> Print Job Card.
Select the job card to print from the List of available cards; tick marks the Job Cards to print and click on the print button on the bottom left.
Action on Job Card
No action can be taken for the job card.
Go to Fixed Assets --> Maintenance --> Action on Job Card.
In this List, users can see the List of job cards with their service and item details, including the amount. Select one for which the user wants to take action, click the Job card button on the bottom left, and select Other Action.
A window will appear in the middle.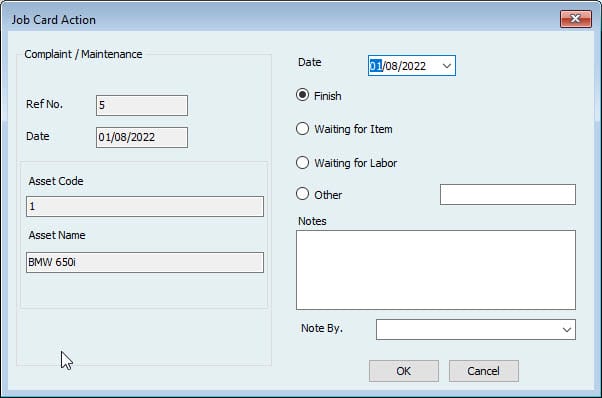
- Choose the Date of action.
- Choose the action to be taken if
- Finished
- Waiting for item
- Waiting for labor
- Other (Enter manually)
- Enter any additional notes.
- Select the Employee's name from the drop-down who noted this action.
Whatever status the user selects other than Finish, it will show in the status column in Actionthe on the Job Card window.
Once Finish is selected, this job card will disappear from this window.
Create a cash invoice from the job card.
After the Job card is finished, the user can make a cash invoice to the Customer.
Go to Fixed Assets --> Maintenance --> Create Cash Invoice from job Card.
This invoice can be created without charge. Select the Free of Charge box in the invoice window.
Create a Credit Invoice from the job
Users can also make a credit invoice for the finished Job card.
Go to Fixed Assets --> Maintenance --> Create Credit Invoice from the job.
An A-list of finished cards will show in the List. Select the one user wants to create an invoice for and click the Credit Invoice button on the bottom left.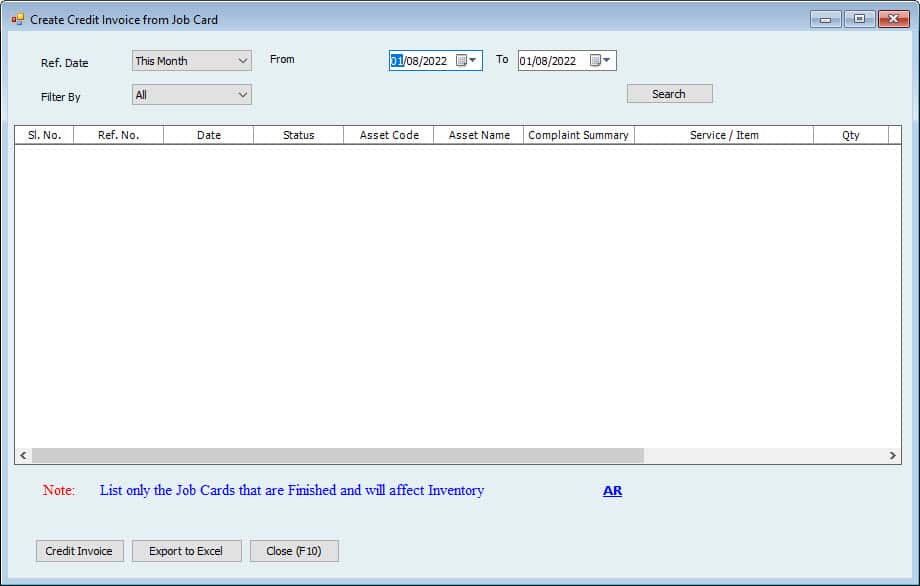
An invoice window will open for this job card.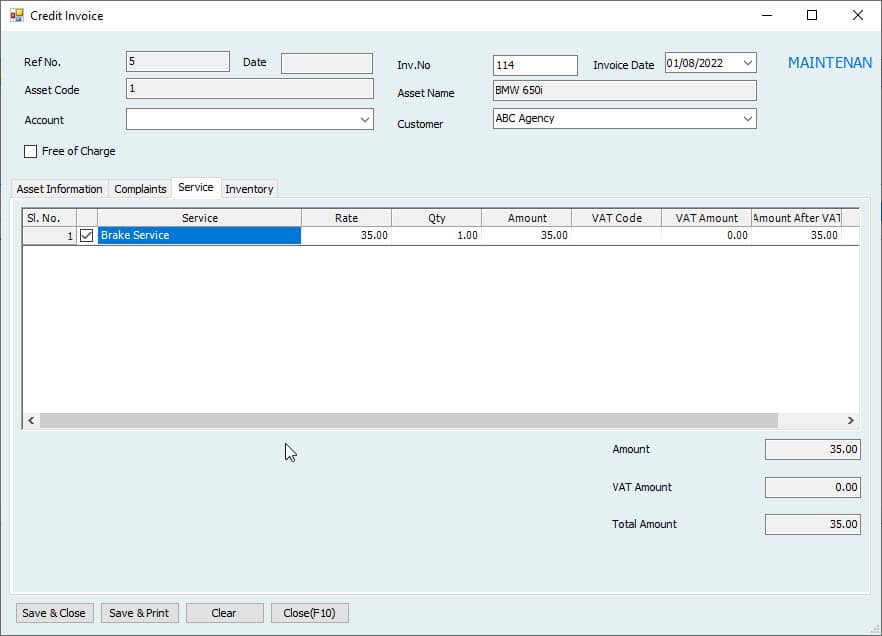
- Asset information is prefilled.
- Invoice No is coming from the Invoice series.
- Choose the Invoice Date.
- On the top right, the system will show the type of request if Complaints / Maintenance.
- Select the Account for credit invoice.
- Select the Customer's name.
- If the user doesn’t want to charge the Customer for Complaints / Maintenance, tick the Free of Charge box.
After filling in all the information, save the invoice.
Create Bill for Insurance
Since the user has entered the insurance expense information in the asset profile. A bill for this expense can be created through
Go to Fixed Assets-->Create Bill for Insurance.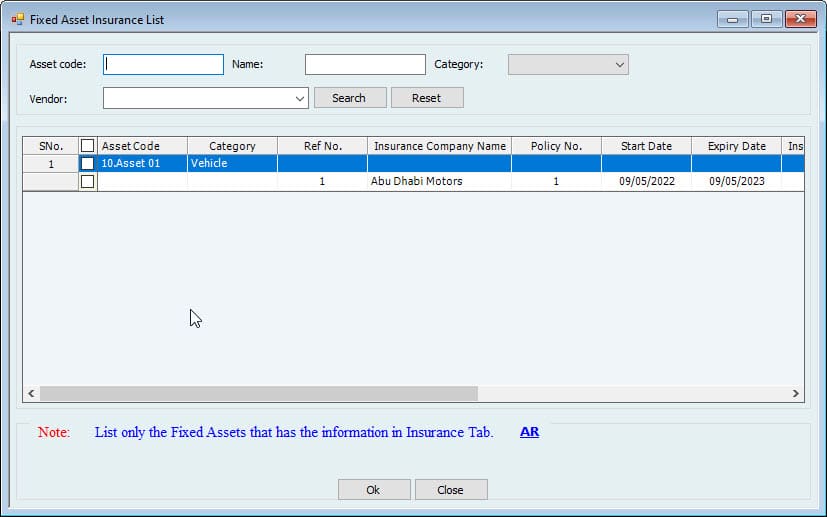
Users can see only the insurance information in this List, entered in the fixed asset profile “Insurance” tab.
Tick mark the one to create the bill for and click the OK button.
The Bill window will open, and all the fields are already populated with Data.
Users can make any changes if required and save the bill.
Asset Maintenance
There is one more option to record the history of asset maintenance. Users can enter the maintenance simply and quickly rather than following the procedure.
- Select the asset name from the drop-down.
- Enter the Service No.
- Select the date of service.
- The maintenance Company name will come automatically because the user entered this name in the Asset in the profile “Purchase info” tab. This name can be changed here if allowed to change from the asset profile.
- Contact information for the Company will be shown in columns. (If any)
- Enter the amount of maintenance.
- Enter the amount covered by the warranty. (If any)
- The net amount will be the difference between the maintenance and covered amounts.
After entering the information, press the save button, and this information will be saved in the maintenance history table as a record. When a user comes next time to this window, the record will be available in the table.
Transfer Asset
Fixed assets can be transferred from one customer/job/project to a new customer/job/project.
Go to Fixed Assets --> Transfer Assets. 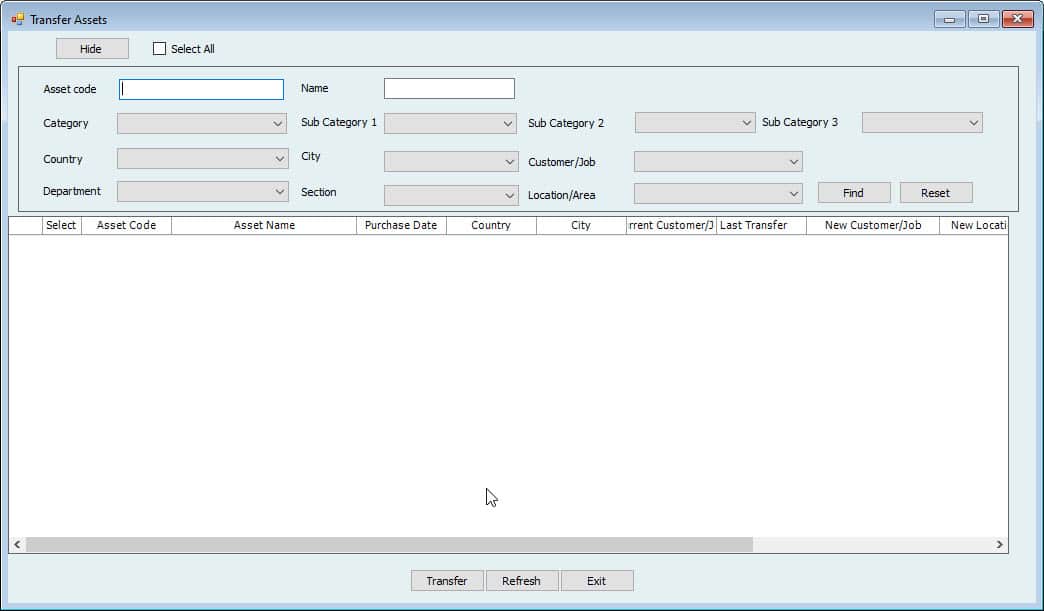
Users can filter the Asset from the List of assets by clicking the search button.
Tick mark the Asset (s) to transfer and select
- New Customer/job/project
- Transfer date
- Employee name from dropdown who instructed the transfer and
- Details of transfer.
Disposal
The last step for fixed asset flow is disposing of a fixed asset. To dispose of a fixed asset,
Go to Fixed Assets --> Disposal --> Dispose of Asset


- Select the Asset from the dropdown.
- Asset information will be shown, including purchase date, opening balance date, price, Life, and net book value.
- Select the disposal reason.
- Write the disposal/selling value in the selling amount field.
Important:
This field will not affect any amounts in the automatic disposal entry in Hinawi Software. This one is just a record, and the user must manually make the receipt or adjustment entry for the amount received. - Select the disposal date. This date is very important. Suppose depreciation before this date is not posted to Accounting. In that case, the system will not allow the asset's disposal and will ask the user to update depreciation to Accounting before this period.
- Write any additional notes.
- The original value of an asset,
- Down their user can see the Total depreciation of this fixed Asset, including opening balance (if any) plus updated depreciation to Accounting.
- Depreciation for the period is the difference in depreciation posted for the month and when the Asset is disposed of (Disposal date). E.g.. if the Asset is disposed of on 25 January where the depreciation for the whole month of January has already been posted to Accounting, this depreciation value will be a reversal for seven days of January that are already posted.
- Total asset depreciation is the difference between the above two amounts.
- Net Book value is the difference between the original value and total asset depreciation.
After entering this information, save the disposal. This disposal will not take effect before approval.
Edit Dispose of The Disposal
The disposal can be edited before approval. To edit a disposal
Go to Fixed Assets --> Disposal --> Edit Disposed Asset.
Select the Asset to edit disposal and click the edit button on the bottom left.
Approve Disposal
The final user can approve the disposal to dispose of a fixed asset.
Go to Fixed Assets --> Disposal --> Approve Disposal.
Select the disposal of approve and click on approve button.
Update Disposal
Since the fixed Asset has been disposed of, the user can update this disposal entry to Accounting.
Go to: Update to Accounting-->Fixed Assets Update --> Update Disposal
A window will appear with all approved disposals. Tick mark one to update and click on the Update Accounting button.
The system will open a new window with a JV showing the reversal of cost and accumulated accounts and closing to disposal accounts. These accounts are filled from category settings. Users cannot change anything in this entry and click the save button to post this entry to Accounting.
Important:
Remember, this will reverse the cost and accumulated depreciation, and the user must manually enter the disposal receipt.
Fixed Asset importing from Excel
You can import fixed assets from an excel file that needs to be filled in a standard format. Detailed instructions are given in excel on how to fill it.
After filling in the Data, you can go to: File --> Import \ Enter List and Balances--> Fixed Assets--> Import fixed asset.
Now in this window, you have selected how you want to import. 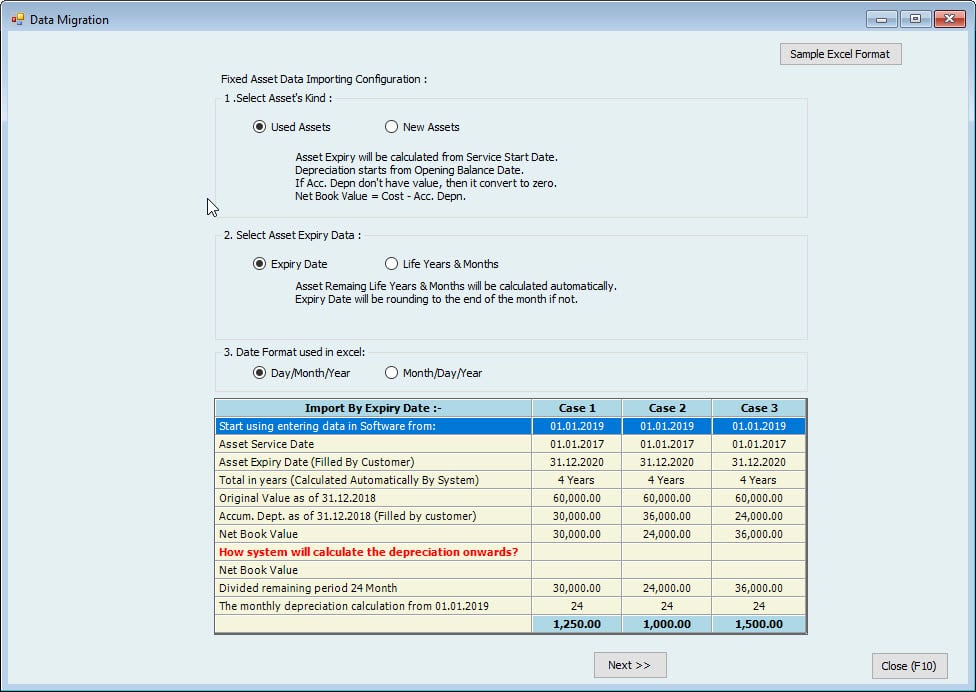
- Select Asset’s Kind:
Select either Asset that is used or new.
The difference between new and used will be these additional columns available only if you choose Used Assets. “Opening balance date,” “Opening balance of Accumulated depreciation,” and “Net Book Value.”
The asset life will be started from the service start date in both cases.
- Select Asset Expiry Data:
You want to calculate the Life by the expiry date or Life in years and months.
- Date Format used in excel:
Specify the date format you have used in excel.
After all these options are selected, you can press next, which will open the import window. 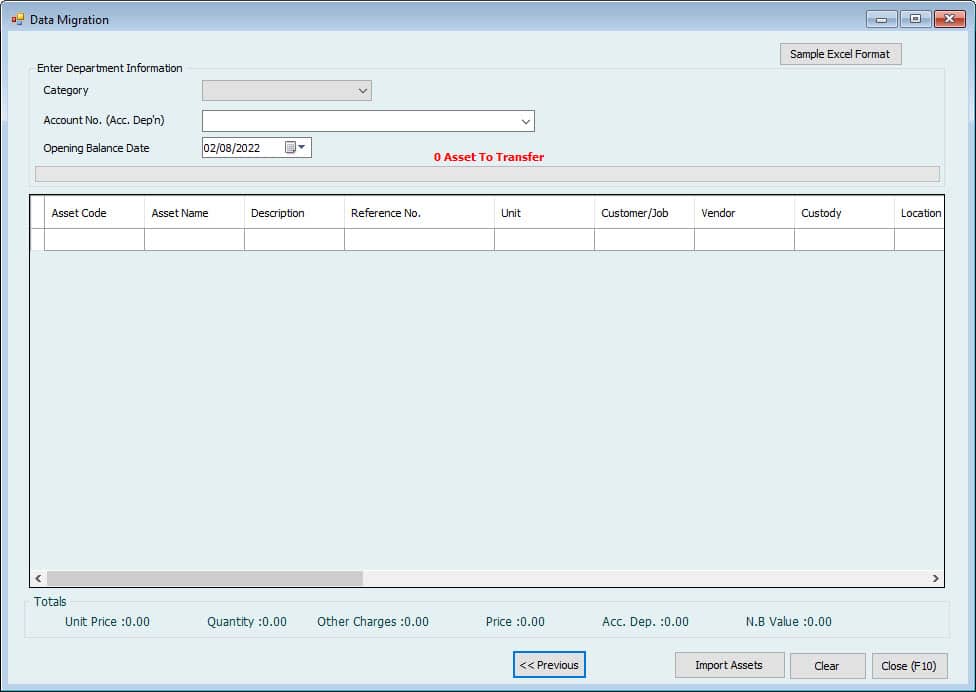
Select the category for which you want to import assets first.
Note:
Categories will import fixed assets. You cannot import assets together in one turn if you have more than categories.
After selecting the category, account no. We are welcoming automatically from category settings.
Enter the date of opening balance if you selected used assets in the previous window.
Now you can see the same column name in excel. You have to copy the Data from excel and paste it here. You can copy the whole column for one category from excel, e.g., Asset code, and right-click on the first box here to paste.
Suppose you want to enter the same value for all the assets in one column. Enter the Data in the first column, right-click CK, and select copy down. It will copy all the columns down.
This way, you can fill all the columns and click on import assets to import fixed assets into the software.
Design and Templates:
The Template is a compelling feature of Hinawi Software. We design templates so users can have them based on Company Policies.
Also, you can have the number of templates you want. Users can create any number of templates as much as they want.
And we provide default templates by our side if you want to use them, but it is still possible to design more and other templates.
To do this, Go to File-->Setup Templates-->Fixed Assets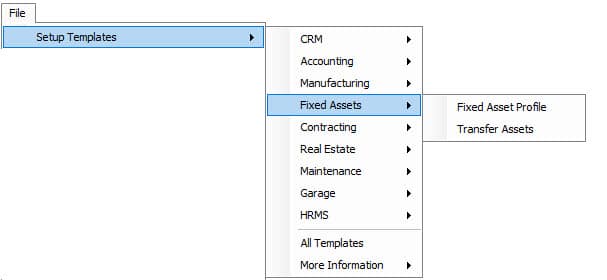
Because the User needs to print all entries in the System, like Asset profile, purchase new Asset …etc.
So we created the option to let the User build his forms for printing without additional charges. Aside from this, we prepared pre-defined templates for all activities to save the User's time.
Fixed Asset profile
Using this Customized Template, the User can print all the Asset information. Users can add \ remove fields from the Template edit area.
To Customize \ design the Template, Go to File-->Setup Templates-->Fixed Assets-->Fixed Asset Profile.
It will open a window with all the designs & some default templates coming along with the software.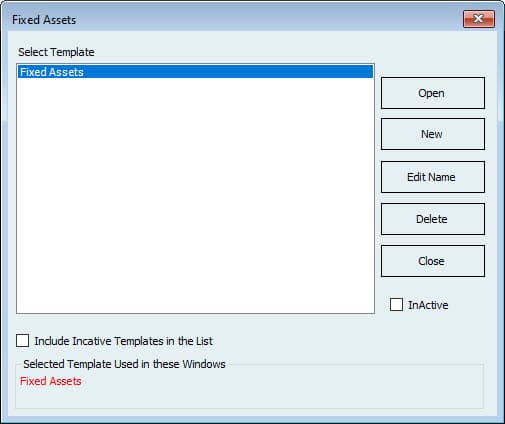
Open: Select the Template which already been created and click on the Open button to see the design area where the User can make changes to the design
New: Click on the NEW button to Create a new Template. Users can enter a new name for the Template.
Edit Name: The User can Edit the name of the Template
Delete: The User can delete the existing Template
In Active: If the User can make the Template Active, it will not reappear in the List.
Click "OPEN" or "NEW" to open the design area, and their System will show all the fields used in Asset Profile. Users can drag it into the edit section and make changes there.
Users can make their text or draw lines there and make it live.
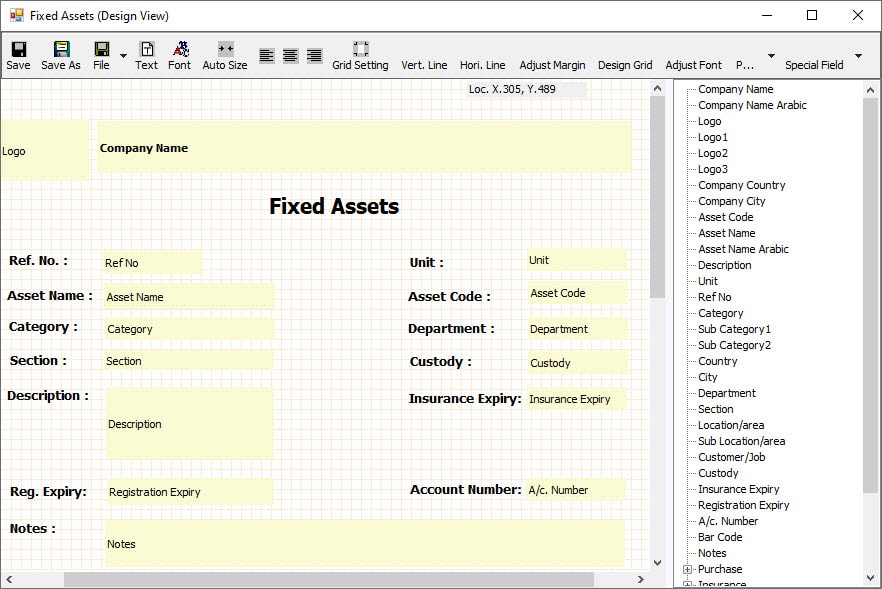
After you finish the design, click the Save button in the top left corner to save the design.
So that you can use it to Print Asset Information.
Now to Print the Template, Go to Fixed Asset-->Fixed Asset List.
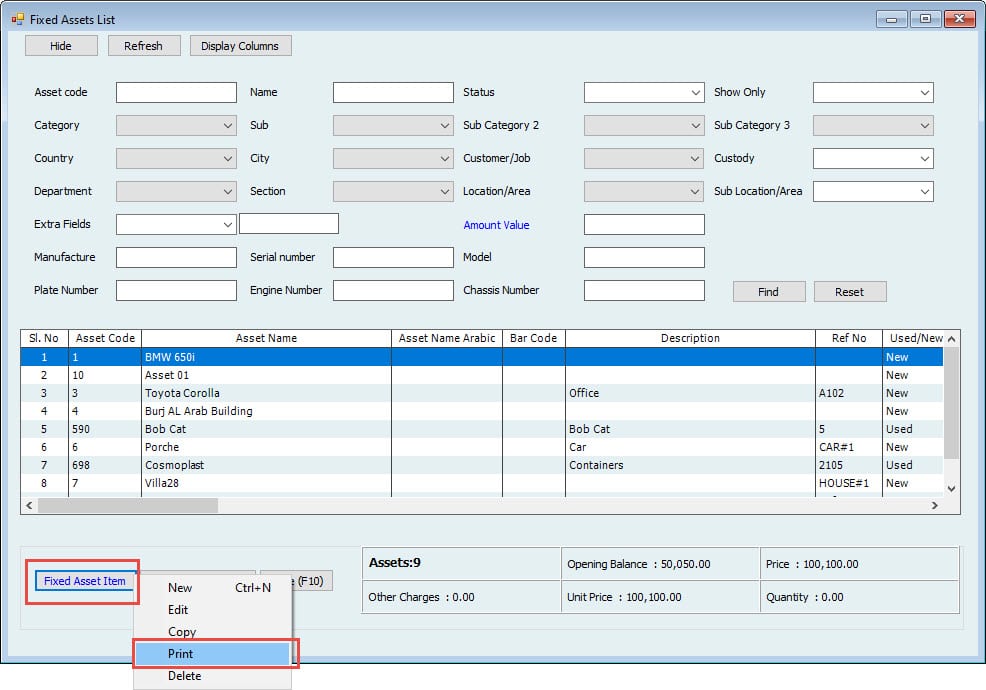

Select the Asset you want to Print, then click the "Fixed Asset Item " button in the bottom left corner. Then Click on "Print"
Or double-click the Asset row to go to Asset Profile and Click on the "Save & Print" button.
The System will display all the Created templates (If there is more than one Template); otherwise, it will directly open the Printer Properties.
Now Click Ok to Print the Asset Information with the Customized Template.
There are lists of Reminders available for the fixed Asset Module.
Reminder for the Expiry Date of;
- Asset Insurance
- License
- Custody
- Warranty
Go to File-->Reminders List-->Fixed Asset Menu to See the List of Reminders.

- Insurance Expiry
The List will display all the Assets with their insurance No, Date of Expiry, Insurance Company Name, and details. It will also show the Days Remaining to Expire.
Users can Export the List to Excel and also Print the List
A date filter option is available.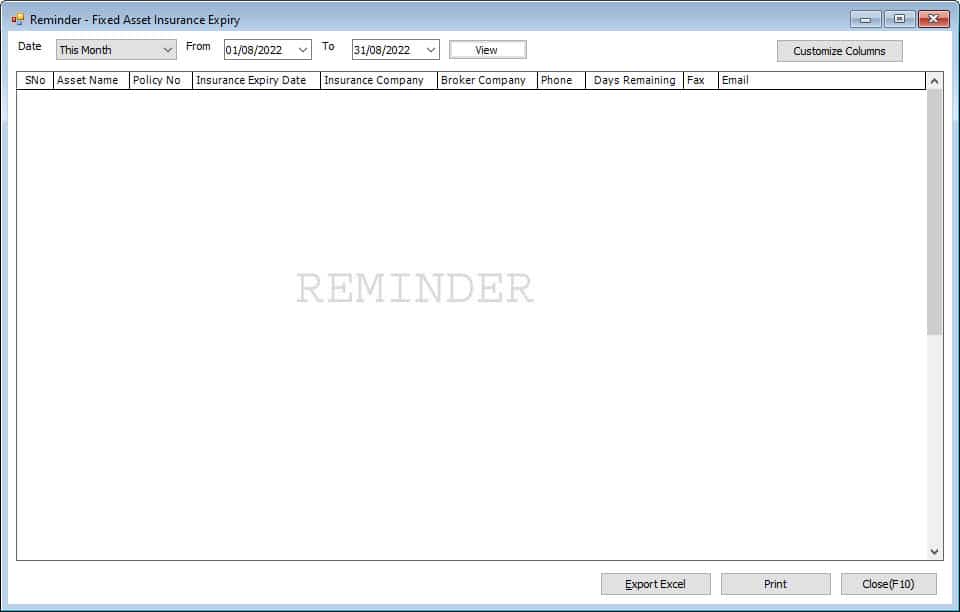
- License Expiry
The List will display all the Assets with their License No, Date of Expiry, License Fees, and Notes. It will also show the Days Remaining to Expire.
Users can Export the List to Excel and also Print the List
A date filter option is available.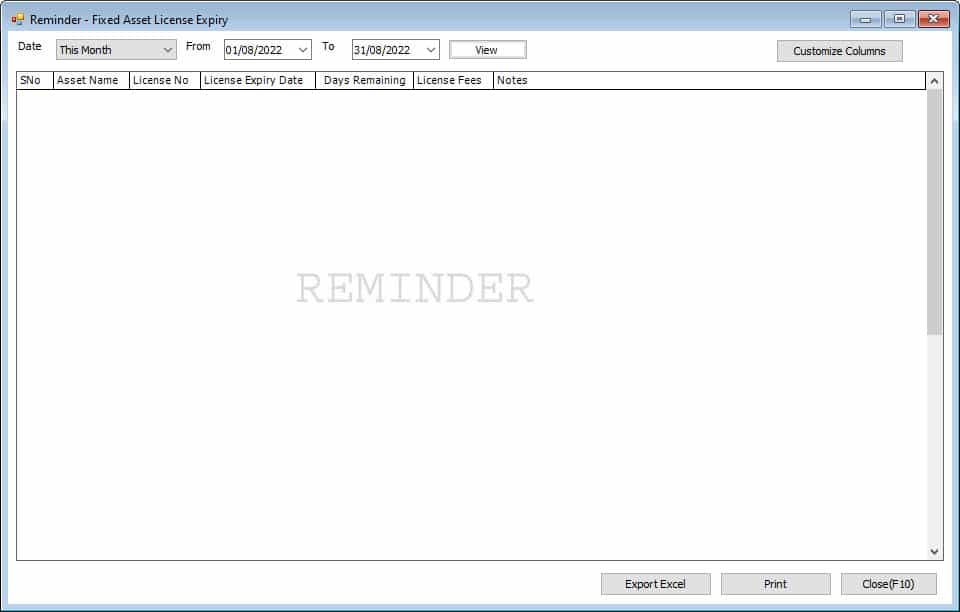
- Custody Expiry
The List will display all the Assets with their Custodian Information. Custodian Name, Date of Expiry. It will also show the Days Remaining to Expire.
Users can Export the List to Excel and also Print the List
A date filter option is available.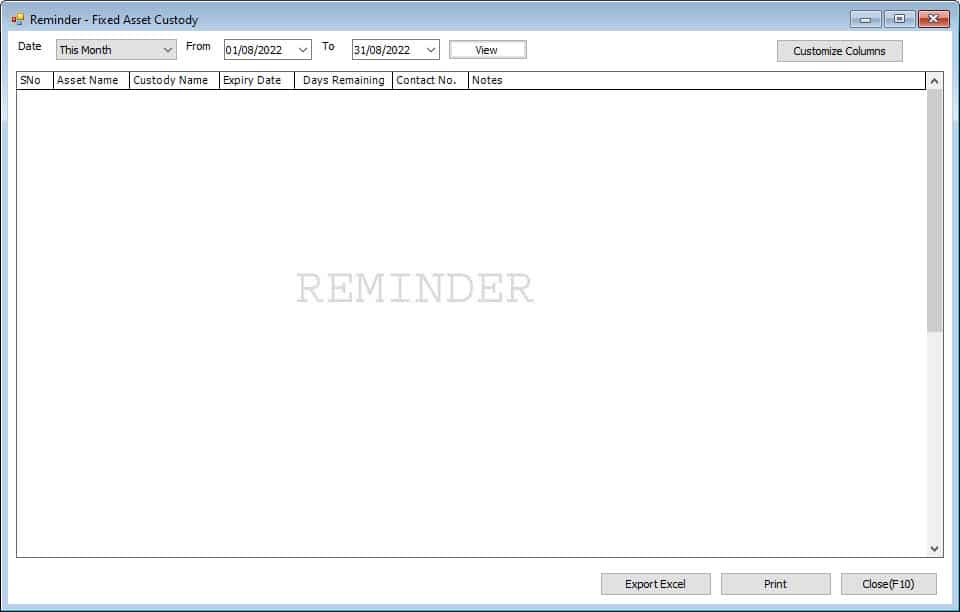
- Warranty Expiry
The List will display all the Assets with warranty information and days remaining to expire.
Users can Export the List to Excel and also Print the List
A date filter option is available.
Fixed Asset List:
Fixed Assets Reports are beneficial to have in Hinawi Software. The main reason behind that is the amount of information they contain and provide to users. Moreover, flexibility is the first thing you’ll notice in these reports since there is a wide range of reports. Also, exporting to Excel and printing these forms are available. Finally, column customization is allowed per User needs. The following categories further display these reports.
View the relevant content as needed. System users can filter content by Category of Fixed Asset, a specific purchase Date, etc.
Depreciation:
The users can generate reports of Monthly Depreciation, Yearly Depreciation, etc. Aside from fully depreciated Assets. Also, depreciation Report by the project.
Insurance Reports:
This will show the Fixed Assets and the associated Insurance Coverage, aside from the expiry Date of the policy insurance.
Maintenance Report:
List all assets under maintenance and calculate the Cost of this maintenance. The price is for services and spare parts.
Fixed Asset List
➢ Fixed Asset List Detailed
➢ Fully Depreciated Assets
➢ Depreciation by Asset
➢ Monthly Depreciation
➢ Yearly Depreciation
➢ Depreciation by Customer/Job
➢ Asset Disposal Report
➢ Expiry Dates Report
➢ Insurance Report
➢ Summary of Total Accumulated
➢ Fixed Assets Maintenance Reports
Fixed Asset Complaint List
Fixed Asset Job Card List
Comprehensive Complaint List
Comprehensive Job Card List
➢ Fixed Asset Attachments
➢ Asset Transfer history
Note:
All reports can be exported to excel.
Settings are the most potent and important Module. It allows you to set rules and requirements according to your Company policy. Our software is customizable for any business as per their requirement. We have flexible settings for each Module separately.
The software has a pre-defined Setup for each Module, as the standard practice of companies, allowing the User to start using the program quickly. This Module has a checklist that gauges the control of users over function. If the Setup posting control window is open, System will not allow the User to save the task unless they follow the procedure set by the admin.
The followings are examples of Fixed Assets Module Settings:-
- Category Setting: Admin User can create a category. These categories must link with the chart of accounts to avoid mistakes and control when creating new Assets.
- General Settings: Here, you can add 16 additional pre-defined details of the Asset.
