IT Support
Introduction
Dear ,
Thank you for doing business with us.
We have designated this page on our website for your valued company’s IT department to provide them with all the information they need to avoid problems running Hinawi software and QuickBooks software. This information will help you prepare the server and users’ computers according to the requirements of downloading and running the systems, so that there will be no interruptions or delays.
We would like to point out that there is a big difference between the requirements for installing Hinawi software as a standalone software and for installing QuickBooks software. The requirements for installing Hinawi software are simple. They do not require any complications and high requirements, neither for the server nor for the computers of the users, while the installation of QuickBooks software requires high requirements and large settings on the server and computers. Through our experience of more than 20 years. These requirements become more and more complex with each new version, especially when the client works remotely on the server.
One of the client’s problems is asking the QuickBooks software to restart the server, displaying a clear message to the client. In this case, the client has no choice but to restart the server.
At this point, we would like to clarify something important, which is that we strongly recommend separating the Hinawi software from the QuickBooks software to get more convenience by running one system instead of two, and also to reduce the high annual cost of QuickBooks.
We ask for your attention and thank you for your cooperation.
Installation Requirements for Hinawi Software - ERP
Before you start performing the Installation process, kindly read and understand the Installation System requirements document,
Programs will be installed on the Server and the Client Computers depending on the Number of licenses Purchased. Moreover, if there is no server, the Company can save Data on any other computer and will therefore be considered the temporary Server. Later, Data will be transferred when the new Server is ready. Also, the Client's User must have "Full Read & write Access on this computer" [Client computers must have full access to the file location]
Data Security must be Customer's responsibility; Better make a backup on an external drive as per what we scheduled on the Server.
Operating System
- Windows 11, 64-bit, natively installed.
- Windows 10, all 64-bit editions, natively installed.
- Windows Server 2019, Standard and Essentials.
- Windows Server 2016, Standard and Essentials.
- Windows Server 2012 R2, Standard and Essentials.
- Windows Server 2012, Standard and Essentials.
Database Servers
- Windows Server 2019, Standard and Essentials.
- Windows Server 2016, Standard and Essentials.
- Windows Server 2012 R2, Standard and Essentials.
- Windows Server 2012, Standard and Essentials.
- Windows 10.
Note:
Windows 10 S mode is not supported.
(Windows 10 in S mode is a version of Windows 10 that's streamlined for security and performance while providing a familiar Windows experience. To increase security, it allows only apps from Microsoft Store and requires Microsoft Edge for safe browsing.)
Hinawi Software requires a 64-bit Windows operating System and won’t run on 32-bit.
Processor | 2.4 GHz minimum |
RAM | 8GB minimum for 64-bit, 16GB Recommended |
Server RAM requirements | 1-5 Users: 8GB RAM 10 Users: 12GB RAM 15 Users: 16GB RAM 20 Users: 20+GB RAM |
Disk space | 2.5GB of disk space (additional required for Data files). Additional software: 60MB for Microsoft .NET 4.8 Runtime, provided with the installation files. Note: Store your Hinawi Software Data file on a solid-state drive (SSD) for the best performance. |
Windows | North American version of Windows. Regional Settings are supported when set to English. Administrator rights are required for the server computer when hosting multi-user access. Natively installed and doesn’t need to run in a virtual environment or emulation software. |
Screen resolution display | Display optimized for 1280 x 1024 screen resolution or higher with up to 2 extended monitors. |
Server:
A computer where the Data must be located, here we will install SQL to store the Hinawi Software Data. Also, there must be a folder in the server which has to be shared over the network. Furthermore, the Hinawi Software User must have complete (read/write permission on this folder). The folder structure must be as explained and demonstrated below:
Folder structure
Explorer Computer (Main Folder).
- Hinawi Software (Sub Folder)
Data
(a folder where the SQL database must be created, the SQL server must have full read and write permission in this folder).
Backup
(a folder where the SQL database backup must be stored, Hinawi software has an Auto Backup program, which will take database backup daily or weekly, depending on the Company's preference). Package / Settings (a folder where the Hinawi software package must be stored).
Please refer to the Screenshot below:
On the server, We need to Install the SQL server (for the Hinawi Software database), Hinawi Software. Therefore, some essential procedures must be done before we start the installation process.
What are they? Kindly follow the steps listed below, along with their Screenshots:
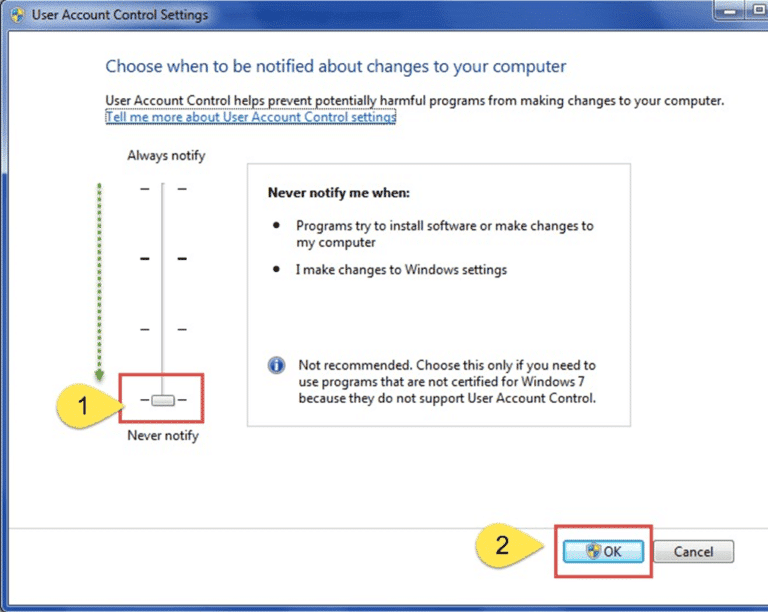
User Control Settings Must be set NEVER to NOTIFY MODE.
To do this, kindly go to CONTROL PANEL – USER ACCOUNTS & CLICK ON CHANGE USER ACCOUNT CONTROL SETTINGS.
Arabic must be installed on the server, and the System locale must be Arabic (U.A.E)
Theoretically, this is done through the following path: Go to Control Panel, then click on Region and language. How is this performed practically?
Kindly follow the Screenshots below.
The Screenshots displayed below will enable you to be acknowledged the changes required regarding
"Region and Language Settings."
Now, restart your Computer to update the changes you have made to the Computer.
After Installing Hinawi Software, kindly provide "full read and write permission" for the User's Computer to the following folders:
C:\Program Files (X86)\Explorer Computer\Hinawi Software
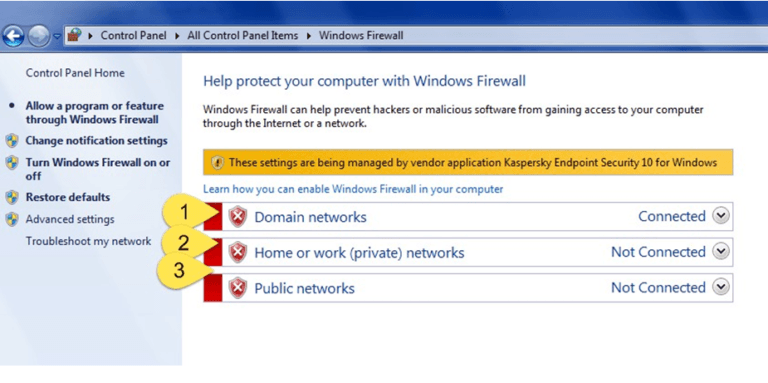
Windows firewall must be switched off.
Now Go to this folder:
C:\program files \Explorer Computer\Hinawi Software
(in a 64-bit computer, you can find this application path under program files (x86), after that, provide the same read and write permission for the User as mentioned above)
❖ If an Antivirus is blocking the software, it must be disabled.
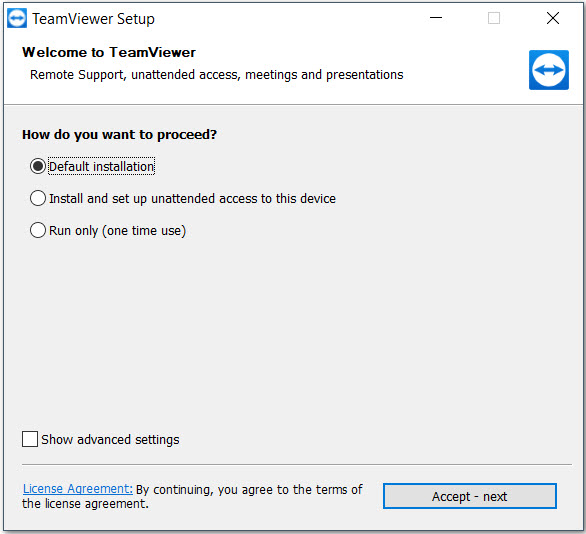
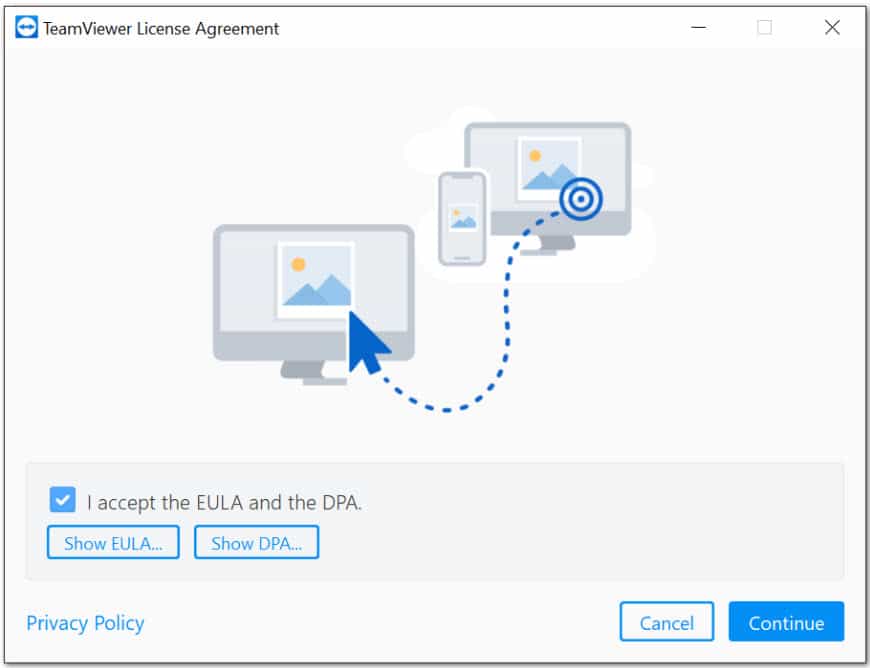
❖ Install Team Viewer's latest version on the Customer Side to get remote support from Us.
Requirements to Update Hinawi Software to New Version:
To Upgrade your Current version to Hinawi Software, we need to follow the below mentioned:
- We need to take your Hinawi Data of all the files (if you have multiple files for Hinawi, we need to take all) and also QuickBooks Data. We will work on your Data here in our Office (Meantime, your users have to be idle, do not work on Both Hinawi and QuickBooks Software at all).
- The up-gradation Process will take One Day; once it finishes, we will Restore the Data to your Company by remote (Team viewer) and Install the latest version on your User PCs.
Note:
Upgrade to the Latest version of Hinawi Software is very important; because the Support for the current version you are using has been Stopped.
SQL Server 2019 Installation Steps.
Download the SQL Express Edition
Click to download SQL server 2019 Express Edition
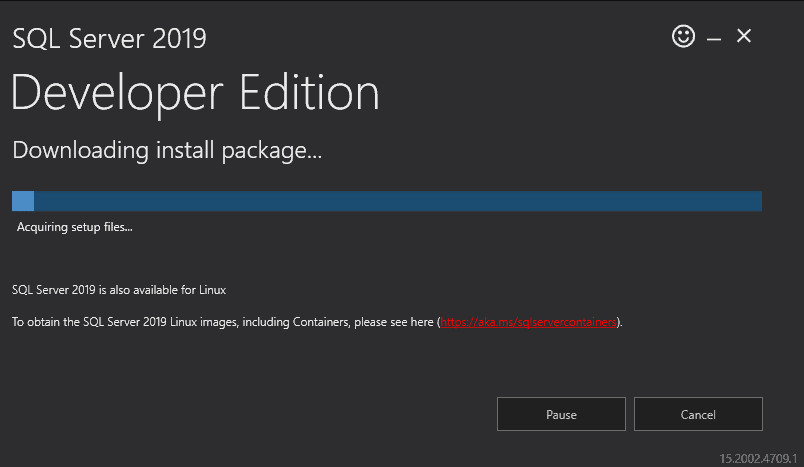
Double-click on the downloaded file to start installing SQL Server 2019.
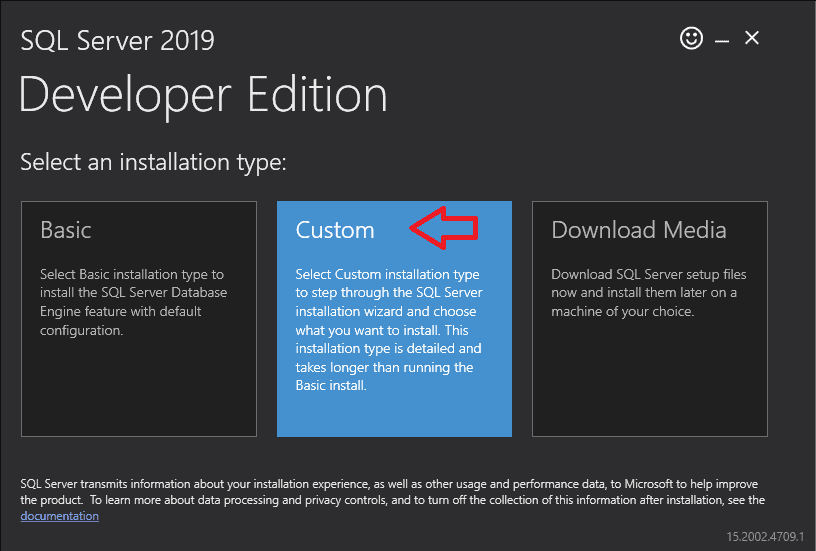
Select an Installation Type
Here, you have three choices.
- Basic
- Custom
- Download Media
The primary option installs only the essential features of SQL Server. It only asks for the License agreement and installation path.
Download Media allows you to download all the installations to a local folder. You can then unzip and run the Setup and install the SQL Server without needing an internet connection.
The custom option allows you to pick and choose the features you wish to install. For this tutorial, let us choose the custom option.
Double-click on Custom
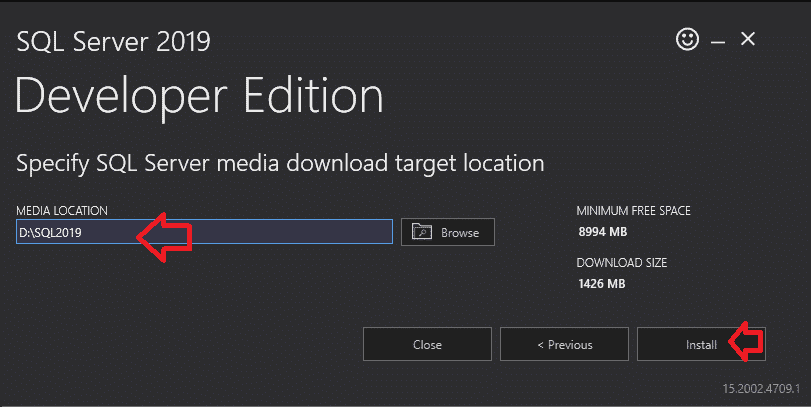
Select the Media download target location. You can use the downloaded files to install the SQL Server later.
This will download the install package. The install package automatically starts the SQL Server installation center.
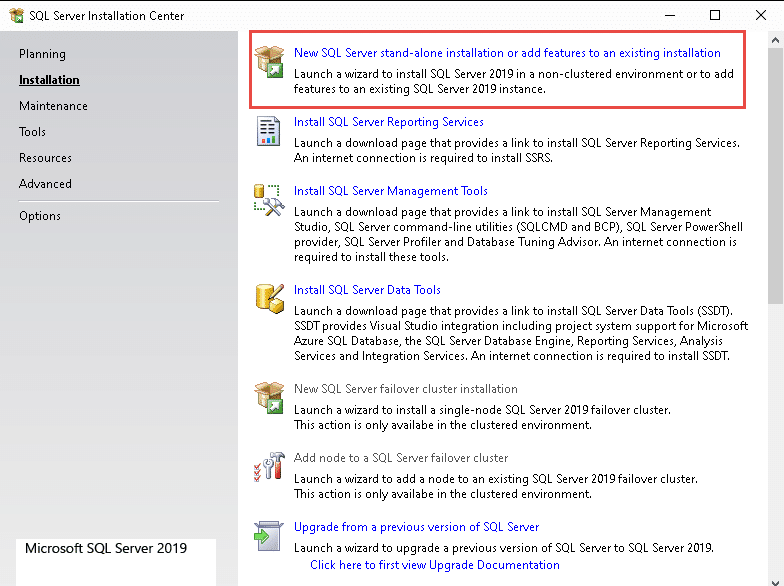
Select Installation & then click on "New SQL Server standalone installation or features to an existing instance" to begin the Installation
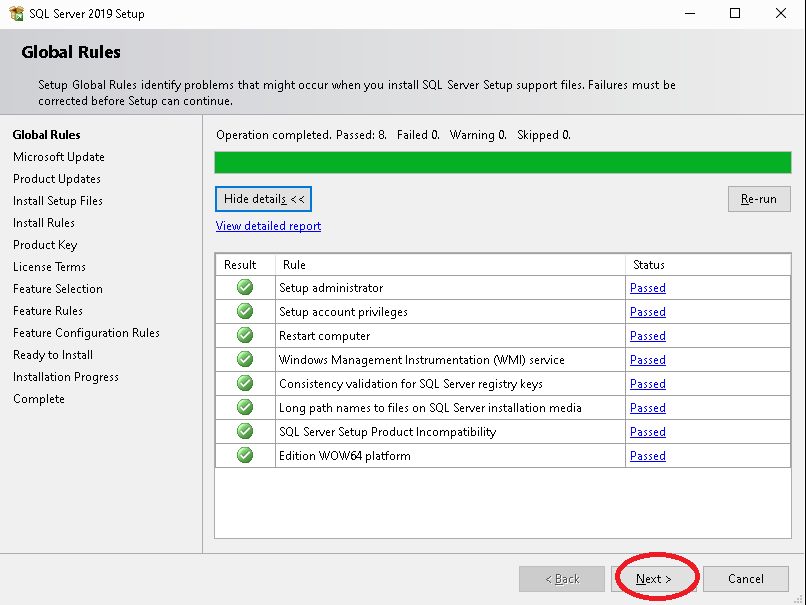
Global Rules
The following window identifies and displays the problems that may occur while installing the SQL server Setup support files.
If there is any issue, those will be highlighted in red here. The Installation will not continue, and you will have to take necessary action depending on the issue.
Click next to continue.
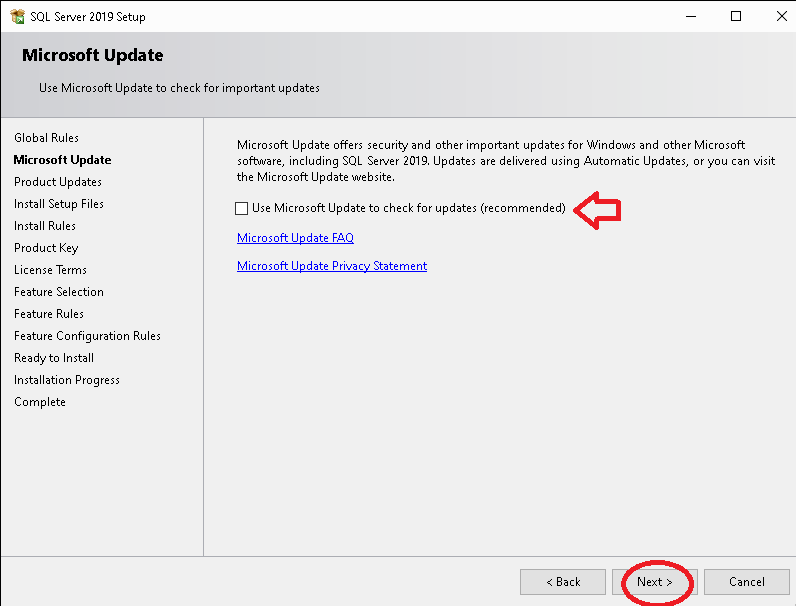
Microsoft Update
Choose yes, if you wish the installer to check the Microsoft update site and download and install the latest updates. Else leave it
Click on Next. On the next page, it checks for the Global rules and gives status information about successful and failed rules. If there are any failed rules, we need to fix those before proceeding with the Installation.
We have selected show details, so it shows details.
Now we need to select the features we need to install with this Installation.
Select the following
- Database Engine Services
- Client Tools Connectivity
- Client Tools for backward compatibility
- SQL Client Connectivity SDK
- Client Tools SDK
You can choose to install a default or named instance name.
We have selected your default instance. If you can only install a named instance, Provide an appropriate name for the named instance.
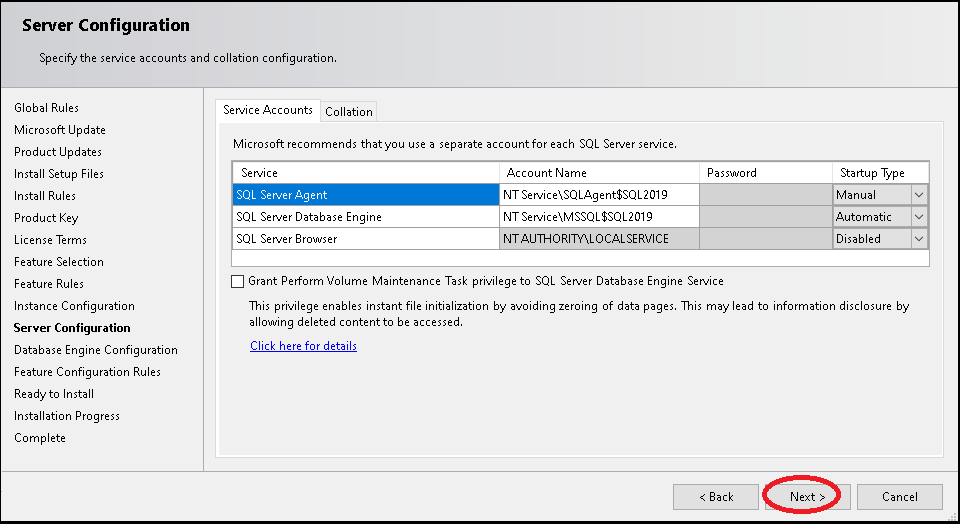
Server Configuration
The Next window List the various services which you can configure. This List of services displayed here depends on the Features selected.
Here, you need to specify each service's Account name, Password, and startup type.
Keep the defaults and click on Next
Database Engine Configuration
Here you are asked to configure the database by providing the authentication mode & Password for the SA User.
Under Authentication Mode, you have two options.
Windows Authentication
In this mode, the windows User is automatically recognized by SQL Server. The Windows security identifier (SID) is passed from Windows to SQL Server. The SQL Server does not store User information and trusts the Windows User. The SA User gets disabled when you use this.
Mixed Mode ( Windows Authentication and SQL Server authentication Mode)
In this mode, along with the Windows Users, the SQL Server also stores the User name & Password in the database. In this scenario, you can connect to SQL Server either using the Windows Account and using the User name/password stored in SQL Server itself
Choose Mixed Mode.
You have to enter the SA User password.
Also, click on Add Current User to add the Current Logged-in User to SQL Server.
Other Configuration
Depending on the Features you have selected, you will be presented with the configuration option for each feature.
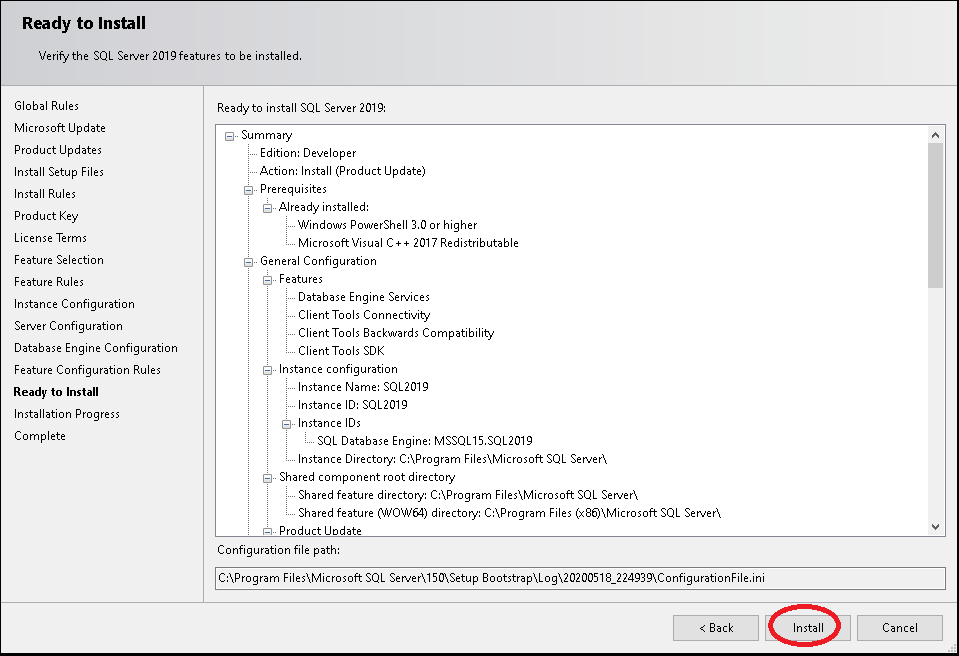
Ready to Install
Finally, once all the configurations are done, you will be presented with a summary of the configuration you have selected. If you wish to change any configuration, you can click the back button and update.
Click on Install to begin the Installation
Installation Progress
The Installation will take some time.
Installation Complete
Once the Installation is complete, you will see the following window.
If there are any errors in Installation, you can open the installation log file to find out what went wrong.
Click on close to continue. Close the SQL Server Installation Center also
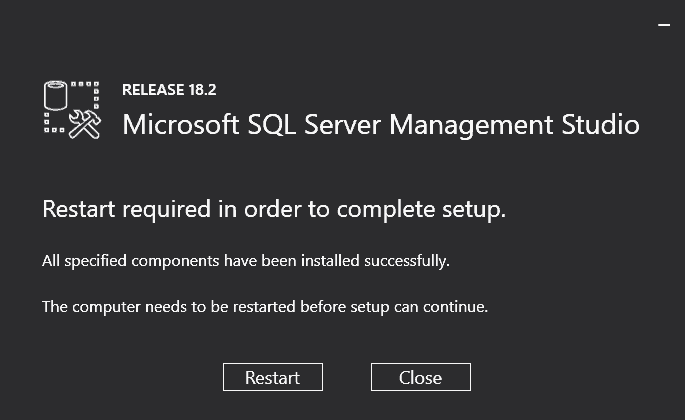
You may be asked to restart the computer.
Next Steps
You need to install SQL Server Management Studio to access and manage the SQL Server Installation. It is available as a separate package
SSMS download:
Download SQL Server Management Studio 18.0 (GA)
Supported OS
- Windows 10 (64-bit) *
- Windows 8.1 (64-bit)
- Windows Server 2019 (64-bit)
- Windows Server 2016 (64-bit) *
- Windows Server 2012 R2 (64-bit)
- Windows Server 2012 (64-bit)
- Windows Server 2008 R2 (64-bit)
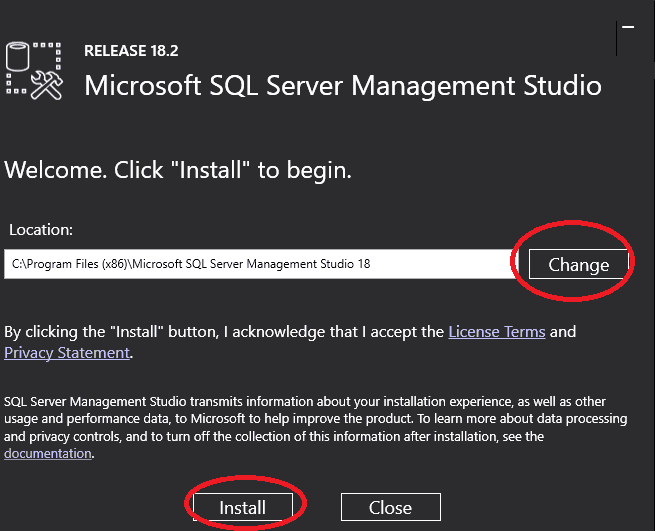
Select Install Location
Say yes, when prompted for "Do you want to allow the following to make a change to this computer? ". You will be taken to the Welcome screen.
You can change the installation location if you wish to. Click on the Install button to continue.
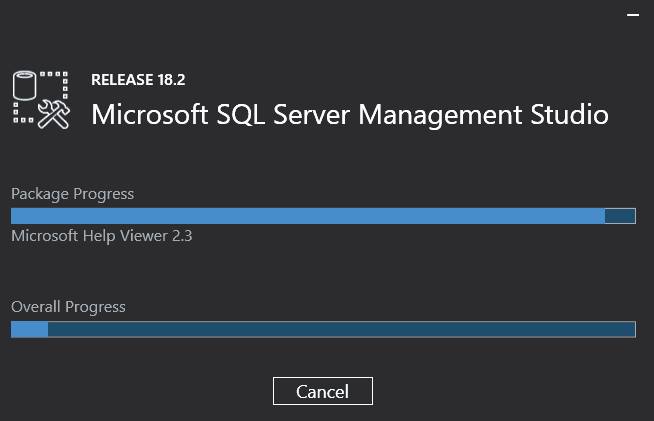
Installation Begins
Installation in Progress
The Installation will take time as it downloads the required packages from the internet.
Installation Complete
Installation completes. You may be asked to restart the PC.
Hinawi Online Setup Guide/Checklist
Information Needed
- Router Password
- Username and Password of Server
- Pre-utilization of Dydns for their Public IP
- Router Type (typically Etisalat provides it)
Server
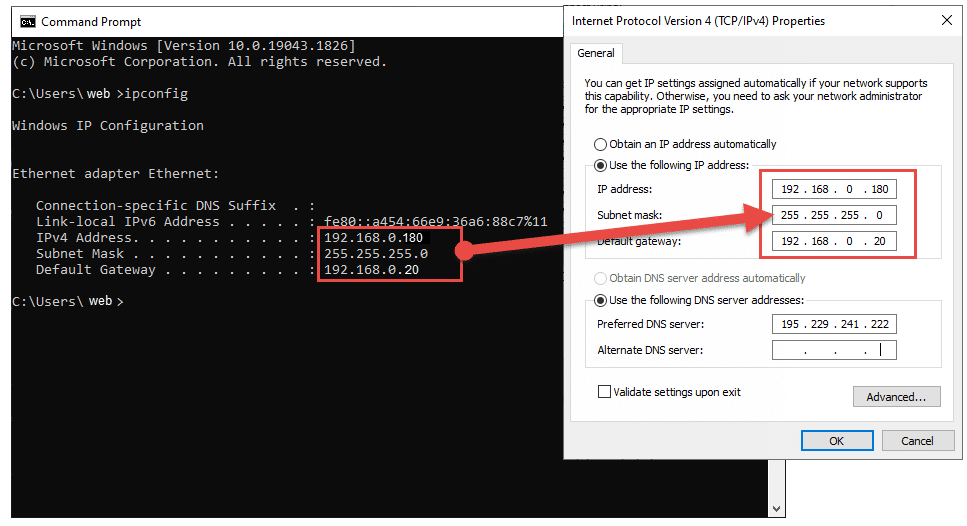
- Open “Run” window (Windows + R) > cmd > type “ipconfig” > Note Down the information
- Network and Sharing Center > Local Area Connection > Properties > Double click Internet Protocol Version 4 (Ipv4) > Select “Use the following IP Address”
- Do as pointed out in the Screenshot:
The CMD window should show the DNS server address; if the DNS server address is not shown, then go to Network and Sharing Center > Local Area Connection > Details > Note down IPv4 DNS Server
SQL Configuration
- Open SQL Server Configuration Manager > SQL Server 2005 Network Configuration > Protocol for SQLEXPRESS > Right Click TCP/IP > Properties > IP Addresses Tab > Type Port Number in the “TCP port” Field for all IPs (IP1, IP10…etc.) use 1433
- Open SQL Server Configuration Manager > SQL Server 2005 Network Services > Right.
- Click “SQL Server (SQL EXPRESS)” and select “restart.” Do the same for SQL Server Browser.
- SQL Server Management Studio > Type *PrivateIP\SQLEXPRESS* > Use the same Username and Pass. For example 192.168.0.180\sqlexpress
Firewall
- Inbound Rule: Open “Windows Firewall with Advanced Security” > Select “Inbound Rules” > Select “New Rule” > select “Port” > click “Next” > select “TCP” > select “Specific local ports” then type the chosen port Number.
- Outbound Rule: Same steps as Inbound Router Port Forwarding
- Open an Internet Browser (Chrome/Internet Explorer) > search “What is my IP?” > Note Public IP. For example, 192.168.0.32.
- Access the router page in the address bar by typing the IP address 192.168.0.32.
- Login > Virtual Servers (under firewall) > Write *CompanyNameOnline* in the description, specify the inbound port > Type “both” > type in the last digits of the Private IP address > specify the private port. (Note that every router has a different way of port forwarding, so use Google or YouTube to understand the router interface or environment)
Test if my public IP is usable
- Open SQL Server Management Studio > Type *PublicIP\SQLEXPRESS, Port #*. For example, 192.168.0.32\sqlexpress, 1433.
- Login using your credentials.
Steps to Create \ Configure new Standalone file in Hinawi Software!
Step –1
Double Click on the Hinawi Software icon.
Step – 2
Click on the “Create / Configure File” button
Step – 3
Select “New File” and “Use Stand Alone Hinawi Software.”
Step – 4
Enter the Company Name you want for the New File & then Click on the SQL Connection button.
Step – 5
Click on the SQL Connection button.
Step – 6
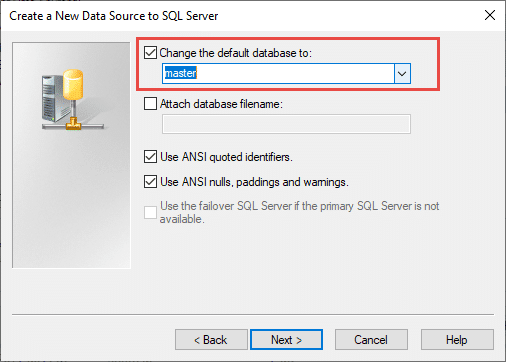
Enter the details in fields as follows
Database Name:
Make sure to enter the database name similar to the Company name, without Special and Special Characters
Select Location:
Please select the location where you want to store the SQL Data on the server. It must be under local drive.
Click on Finish
Steps to Load Default Templates into Hinawi Software
In this document, we will demonstrate the steps to transfer and load ready templates created previously for the sake of time for the User to instantly use these default templates without wasting time creating new ones.
Kindly follow the Steps to learn "How to Load a Template into Hinawi Software?"
Step 1:
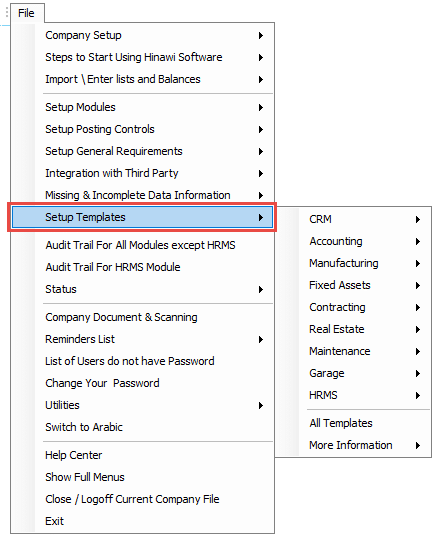
Go to the Template which you want to Load as the default Template! For that, Go to File - Setup Templates
- Select the Transaction you need to Load the Template;
Step 2:
Click on Any transaction Template you want.
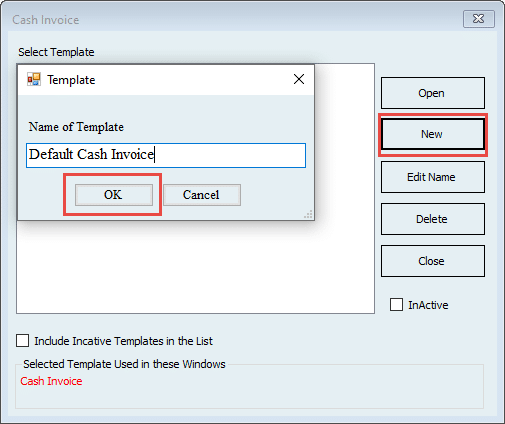
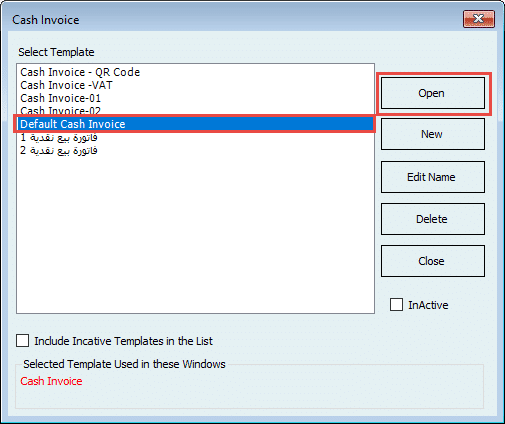
For Example: Let's say you need to Load the default templates for Cash Invoice. Therefore, Click on Cash Invoice from the Menu & then Click on the NEW button in the form.
Step 3:
Select the Created One, Click on Open Button
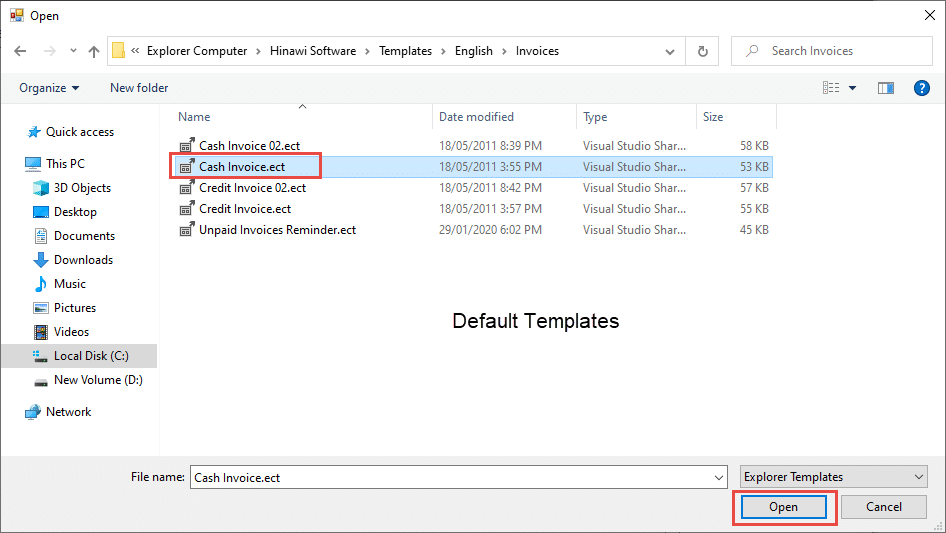
Here, the User can find all the default templates; You need to select the right one,
C:\Program Files(X86)\Explorer Computer\Hinawi Software\
In our case, we are trying to Load the default Template for Cash Invoice, So open the Folder called Invoices And Select Cash Invoice.ECT file.
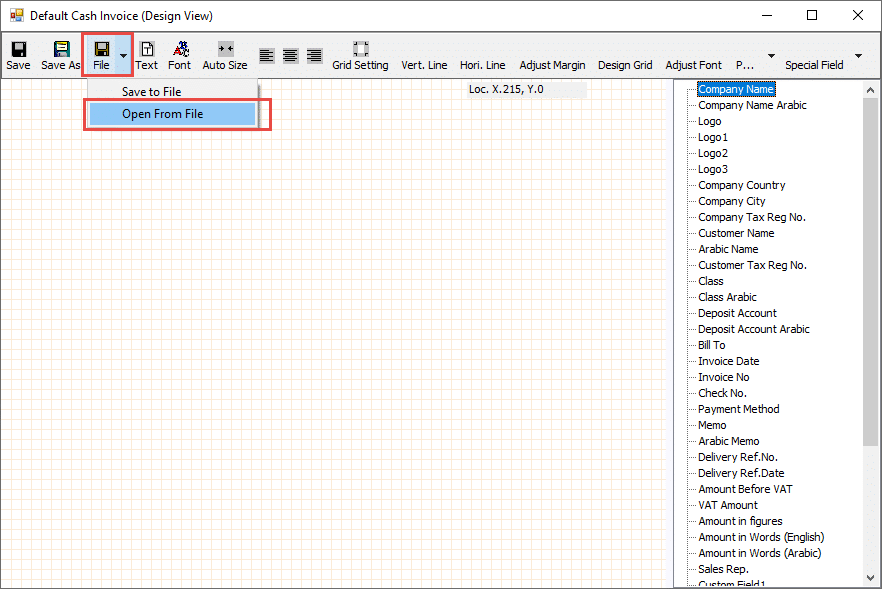
As you see here, the System will load the default Template into the design area of the Template.
Make the Changes you want to do here & click on save the Template.
This way, the User can load any transaction Template from the Location Mentioned;
For ENGLISH Templates
C:\Program Files(X86)\Explorer Computer\Hinawi Software\
For ARABIC Templates
C:\Program Files(X86)\Explorer Computer\Hinawi Software\
Information to Protect Data
QuickBooks
System requirements for QuickBooks Desktop
QuickBooks Software stored the Data as a file. The Data Data will be held in the local drive of the Server Computer, which will be shared over the network to get access with the users.
Users must have full privilege on the QuickBoDatadata storage folder.
Operating systems
- Windows 11, 64-bit, natively installed (QuickBooks Desktop 2022 R3 or later).
- Windows 10, all 64-bit editions, natively installed.
- Windows 8.1, all 64-bit editions, natively installed.
- Windows Server 2019, Standard and Essentials.
- Windows Server 2016, Standard and Essentials.
- Windows Server 2012 R2, Standard and Essentials.
- Windows Server 2012, Standard and Essentials.
Note:
QuickBooks requires you to use Windows natively, not through an emulator or virtual environment.
Database servers
- Windows Server 2019, Standard and Essentials.
- Windows Server 2016, Standard and Essentials.
- Windows Server 2012 R2, Standard and Essentials.
- Windows Server 2012, Standard and Essentials.
- Windows 10.
Note:
QuickBooks requires you to use Windows natively and not through an emulator or virtual environment.
QuickBooks Desktop 2022 requires a 64-bit Windows operating system and won’t run on 32-bit.
QuickBooks Desktop 2022 does require a 64-bit Windows operating system and won’t run on 32-bit. Because 64-bit systems have been around for a while, you’re probably already using one right now. Most software and hardware purchased after 2012 support 64-bit operating system. You’ll be able to install and run the new 2022 QuickBooks Desktop software, provided you meet all the system requirements and run 64-bit Windows 8.1 or newer.
Check which Windows you use
- Select Windows Start .
- Select Settings .
- Select System, then About.
Under Device specifications, you’ll see the processor and operating system type.
Your options if you don’t have 64-bit system compatibility
We recommend one of the following:
- Upgrade your computer hardware / Windows operating system, or both, to provide 64-bit compatibility.
- Stay on your current version of QuickBooks Desktop. QuickBooks will continue to be 32-bit compatible with 2021, 2020 and 2019 versions and support terms remain unchanged.
Browser requirements
QuickBooks Desktop requires internet access.
Hardware and operating system requirements
QuickBooks Desktop requires a 64-bit Windows operating system and won’t run on 32-bit.
Processor | 2.4 GHz minimum |
RAM | 8GB minimum for 64-bit, 16GB Recommended |
Server RAM requirements | 1-5 Users: 8GB RAM 10 Users: 12GB RAM 15 Users: 16GB RAM 20 Users: 20+GB RAM |
Disk space | 2.5GB of disk space (additional required for datafiles). Other software: 60MB for Microsoft .NET 4.8 Runtime, provided with the installation files. Additional requirements for Intuit Data Protect in QuickBooks Connected Services offerings: Require minimum 4.0GB of RAM Twice the size of the most extensive file set to back up + 100MB or twice the size to restore. The space is only required from the work folder LocalApplicationData+” Intuit\Intuit Data Protect.” Note: Store your QuickBooksDataa file on a solid-state drive (SSD) for the best performance. |
Windows | North American version of Windows. Regional settings are supported when set to English. Administrator rights are required for the server computer when hosting multi-user access. Natively installed and doesn’t need to run in a virtual environment or emulation software. |
Screen resolution display | Display optimized for 1280 x 1024 screen resolution or higher with up to 2 extended monitors. |
Important Notes and instructions for Integrating Between Hinawi ERP with QuickBooks
1. Before you start, make sure to change the type of account in Hinawi ERP chart of Account with regards to Cash Type, PDC and CUC Account type.
2. All users of Hinawi ERP must have user a m e in QuickBooks and permissions too.
3. If you have already created QuickBooks data file and now you want to use Hinawi ERP Software, following points must be checked in QuickBooks file before start using our software: -
- Make sure that preference is done in proper way and completed.
- Make sure you did allocations between payments to suppliers and bills, the report.
- Unpaid bills Detail under Vendors and Payables Report should not show any negatives amount.
- Same for report Open Invoices under Customers and Receivables should not have negative amounts.
4. The users in QuickBooks must have Full Permission to the activity forms that they were using in Hinawi ER For Example:
- Creating new Transaction in Hinawi ERP: -
The user mu s t h a v e p er mis sio n in QuickBooks to Create Transaction for that Transaction (Form Activity).
- For Editing Transaction in Hinawi ERP: -
The user must have permission in QuickBooks for Create, Modify & Delete the Transaction. This is an important point, if there is no permission specified above the transaction will duplicate in QuickBooks.
- If t h e user makes “ Edit” write check and his setup is "Automatic" the system will delete the original transaction and create the same automatically, to avoid deleting, set closing date in QB every month.
5. Do not Merge or delete Accounts in Chart of Account list or Vendors or Customers or Employees in QuickBooks.
6. Do not convert the names in `Other Names` list in QuickBooks to Vendors or Customers or Employees List.
7. To switch between multiple Accounting files in QuickBooks. First, you must close Hinawi ERP then open QuickBooks file.
8. By editing transaction in Hinawi ERP, QuickBooks will delete the original one and create new on If this transaction is before set closing dates, QuickBooks will not allow editing in Hinawi ERP. To avoid deleting, set closing date in QuickBooks every month.
9. Make sure to close all kinds of windows in QuickBooks that affects running integration, e.g. Windows of, Videos, preferences, set closing date, setup users, Company information, Add \ Edit Multiple Entries, Verify, Rebuild or clean data and any online QuickBooks services window that opened from QuickBooks or Set Credit` window in Accounts Receivables and Payables. And in QuickBooks do not open company information located under company menu during integration or while posting.
10. If the User enters the Transaction through Hinawi ERP and later modifies the same Transaction from QuickBooks it will not affect Hinawi ER So, user must do ALL his work from Hinawi to guarantee match of balances.
11. Hinawi ERP does not read Multi Currency from QuickBooks, but when creating transaction in Hinawi ERP, it will automatically read the currency in QuickBooks except Journal Voucher where user must select the currency of each transaction.
12. We recommend Admin user to do ‘closing of data’ in QuickBooks at the end of each month. By this, no transactions can be entered or edit from Hinawi ERP.
13. Make sure that the person in charge is the only one to use Admin user. Do not give the password to other user
14. Do not give Admin password to normal user.
15. Date setup in all computers and server is: dd/mm/yyyy. Example: 31/12/2021
16. If you want to run software in Arabic, it is very important to fill ALL required fields in Arabic. Missing Arabic fields located under File menu.
17. Keep data always updated to avoid missing information in reports or in activiti The Missing data report located under File menu.
Important:
All setup done by the customer is his FULL responsibilities.
Settings: -
Complete all settings
Templates
Complete all Templates
Chart of Account Type
Integration Settings:
Make sure to select the integration method that meets your needs.
Sample of process if select manual posting:
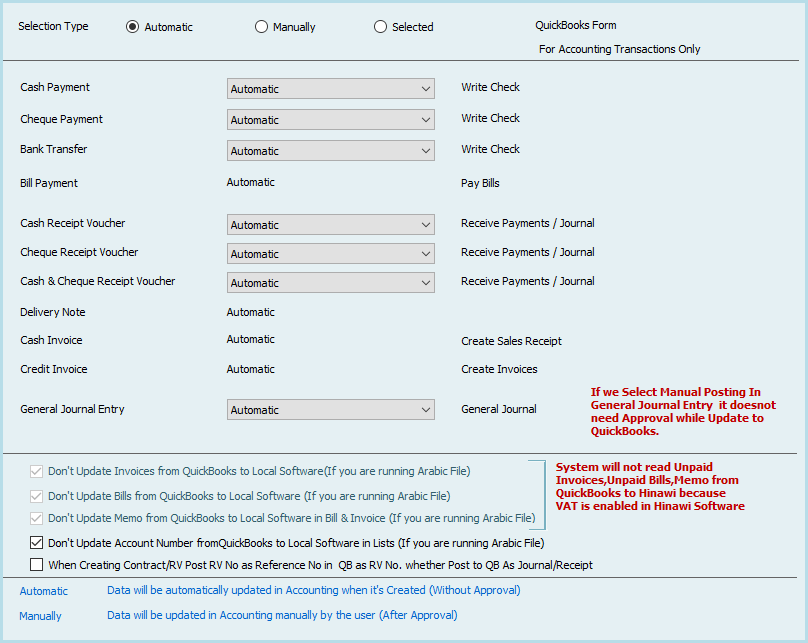
User must update to QuickBooks in below way In Automatic Setup, all transactions will be posted to QuickBooks automatically.
Attachment Setup:
Make sure is done to save all types of attachments
Things to do in QuickBooks before and during using Hinawi ERP: -
If customer already has QuickBooks data, user must work in below for better use of both QuickBooks and Hinawi ERP
1. Make sure there is no Arabic names in all lists
2. Merge similar names in all lists
3. Create Account in Chart of Account no. 99 Intermediate Account
4. Make sure that Account no. 30000 opening Balance is created
5. Delete unnecessary names
6. Make sure that preference is done in proper way and completed.
7. Make sure you did allocations b etween payments to suppliers and bills, the report Unpaid bi lls Detail under Vendors and Payables R eport should not show any negatives amounts.
8. Same for report Open Inv oices under Customers and R eceiv ables should not have negative amounts.
9. Rearrange the accounts of Fixed Asset
10.Import Fixed Assets
11.Rearrange the accounts of Cheques under Collections (CUC) and Post Dated Cheques (PDC). Edit account type in hinawi Chart of Account to: PDC or CUC type
12.Set closing date
13.Set Preferences
Extra features from Hinawi ERP Software that i s not available in QuickBooks:
1. Fully integrated with all versions QuickBooks.
2. Cover missing feature in QuickBooks.
3. Real Estate Management Modul
4. Advanced Fixed Assets Modul
5. Complete Bilingual Language, Arabic and English.
6. Calculate Commission for sales Re
7. Post multiple Receivables and Payables in one JV entry.
8. Create Receipt Voucher (RV) from all kind of na
9. Adding 3 new types in Chart of Accounts (Cash, PDC & CUC).
10. Create 3 ways in posting to QuickBooks. Real Time, Batches and Mix of two.
11. Control Post Dated Cheques Received & Issued with auto revise entry.
12. Receive multiple cheques at one Receipt Voucher (RV).
13. Option to Not allow to post to main Account
14. Option not to sell if there is not enough Quantity
15. Option not to change selling price
16. Allocate expenses to Fixed A
17. Photos of all kind of na
18. Design and templates with Printing for all activity forms (Cheques, Payments, Collections, JV, SIV, SRV, Transfer Inventory, Inventory Adjustments, Enter Bill & more)
19. Complete Module of HR, Time Sheet, Payroll, WPS and Tax.
Inventory:
1. Calculate Landed Cost of Inventory Item (Adding Shipping charges, customs, transportation, and Other expenses).
2. Multiple Inventory Adjustment entry in one form.
3. Movement and None Movement Inventory Item.
4. Advanced Physical Inventory Worksheet.
5. New look of Inventory Valuation Detail.
6. And more.
Reports:
1. Advanced Trial Balance (Beginning Balance, total movements, and Ending Balance).
2. Financial Ratios: Profitability, Activity & Liquidity.
3. Advanced Customer / Job profitability report in summary and detail.
4. Cashier Reports (Collections & Payments).
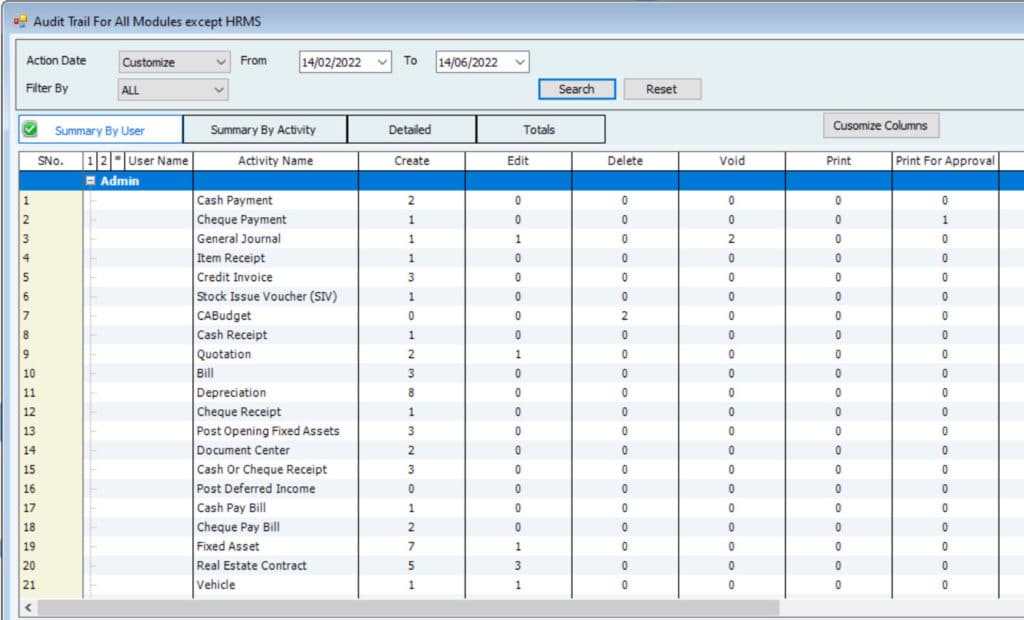
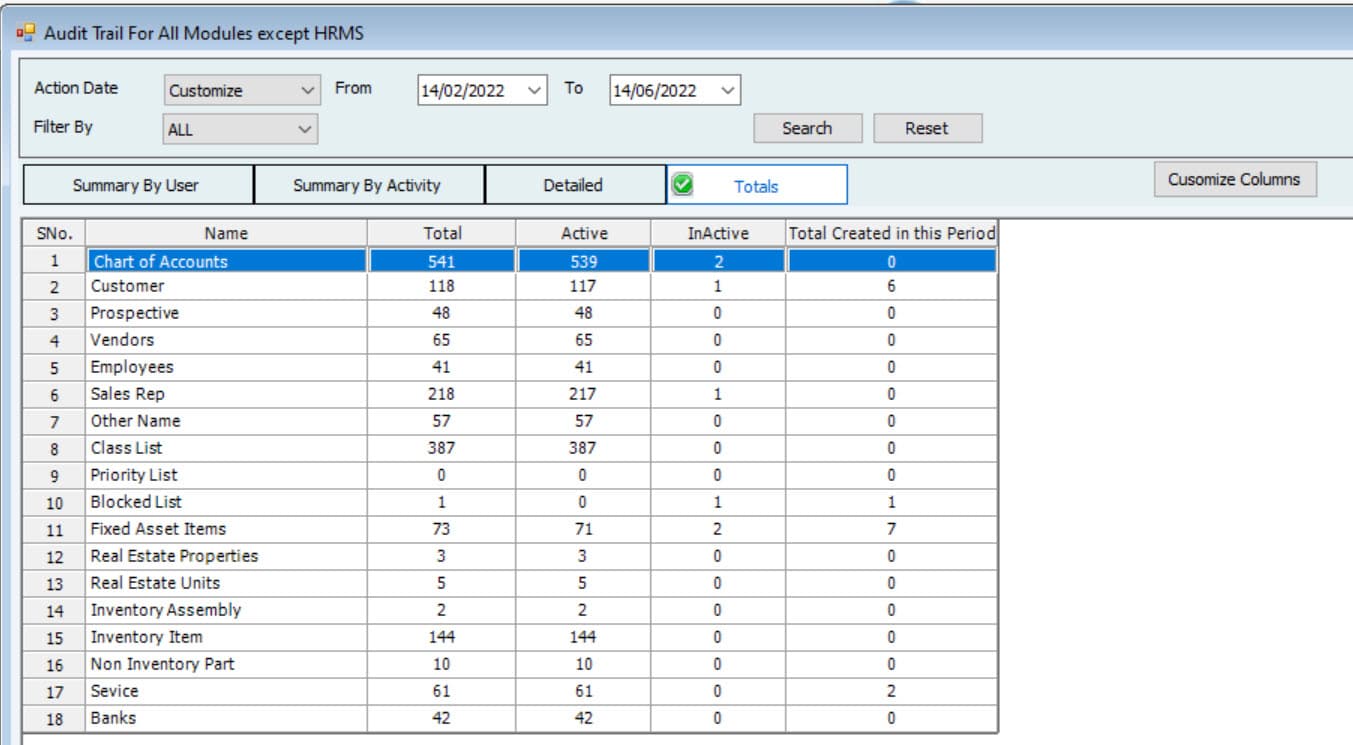
5. Advanced Audit Trail (Filter By user, activity form and total entries by each).
6. Partial paid Invoices and Bi
7. Depreciation by Project.
8. Can customize your required reports from QuickBooks data.
9. Reports in QuickBooks is seen from Hinawi ERP.
Report Center by:
1. Employee
2. Building and flat
3. Class
4. Fixed A
5. And more
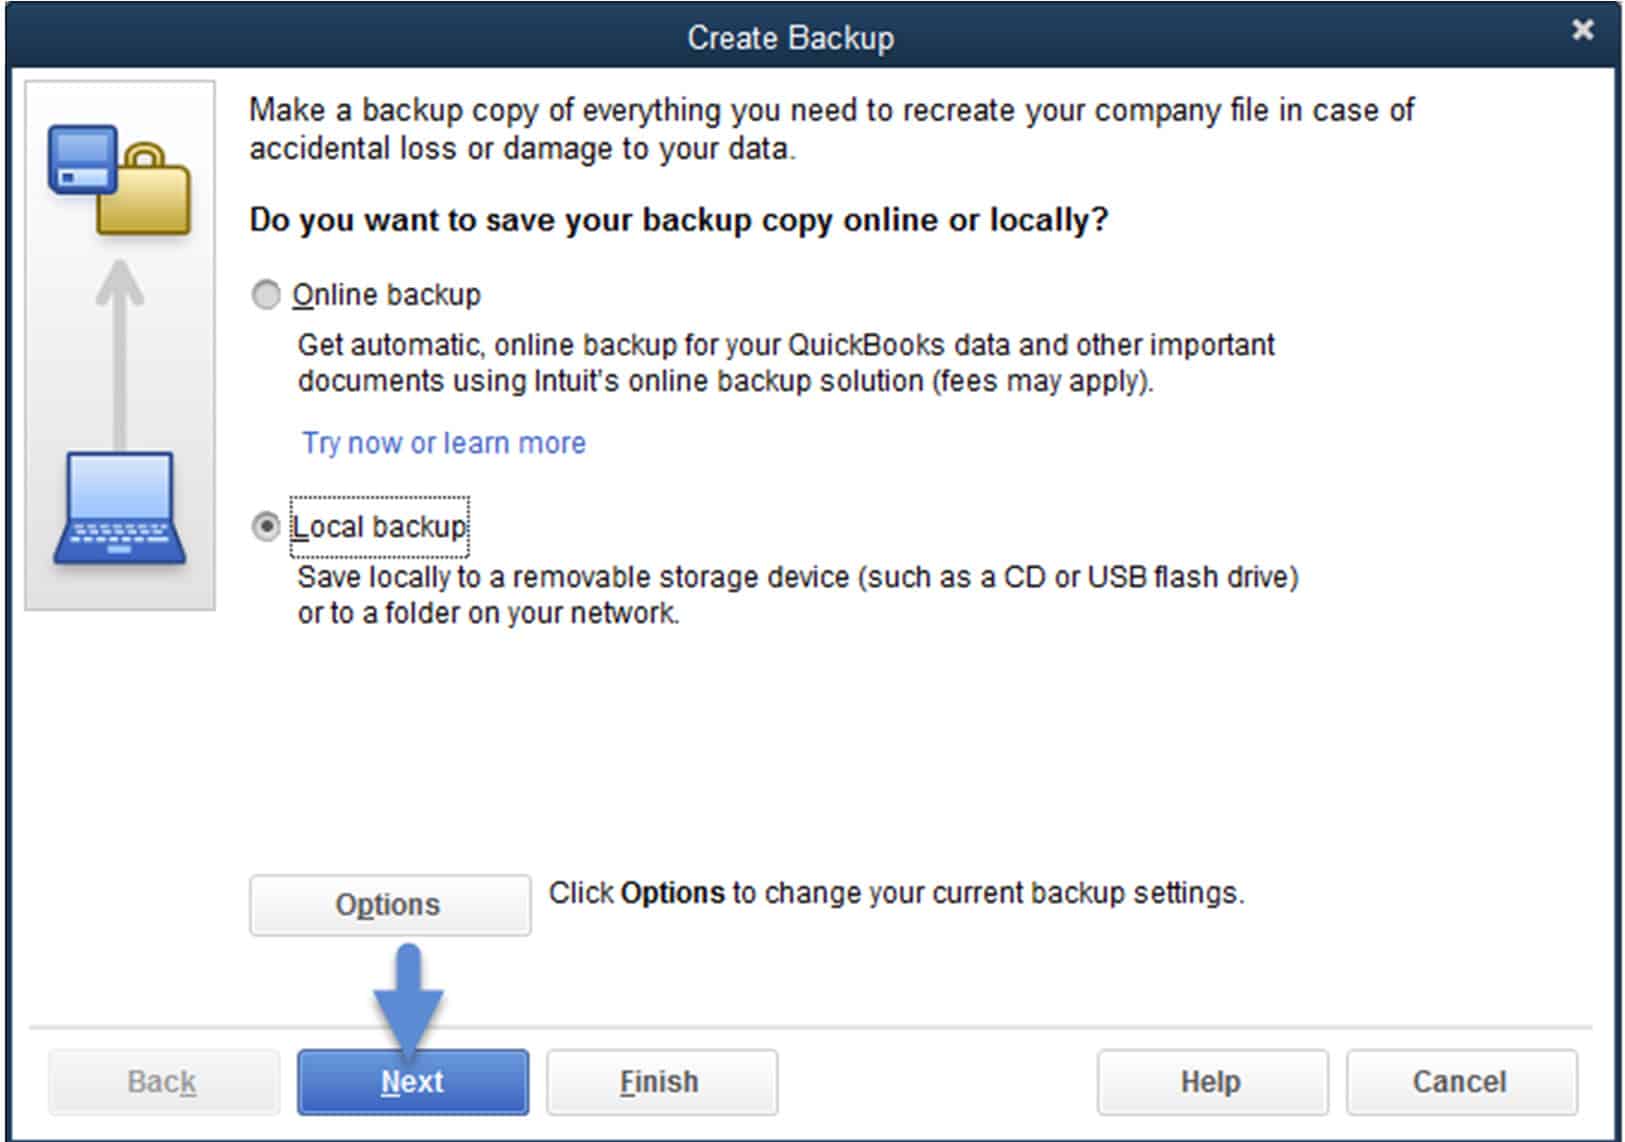
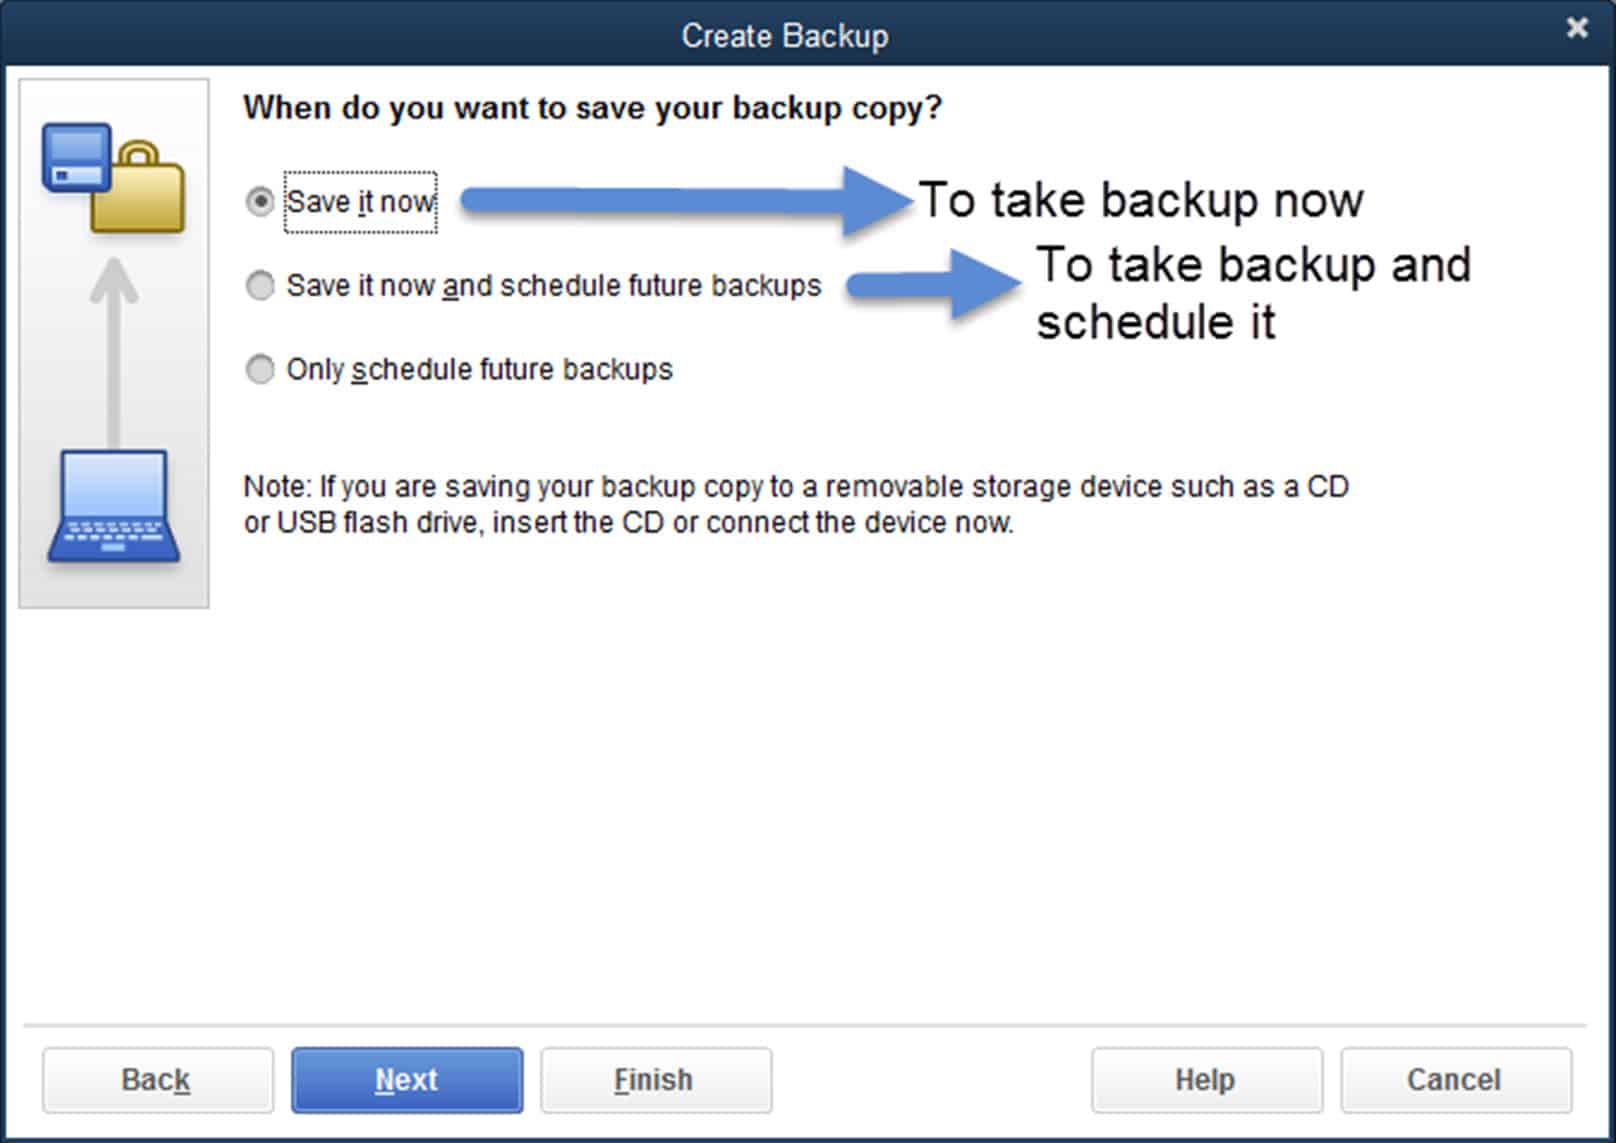
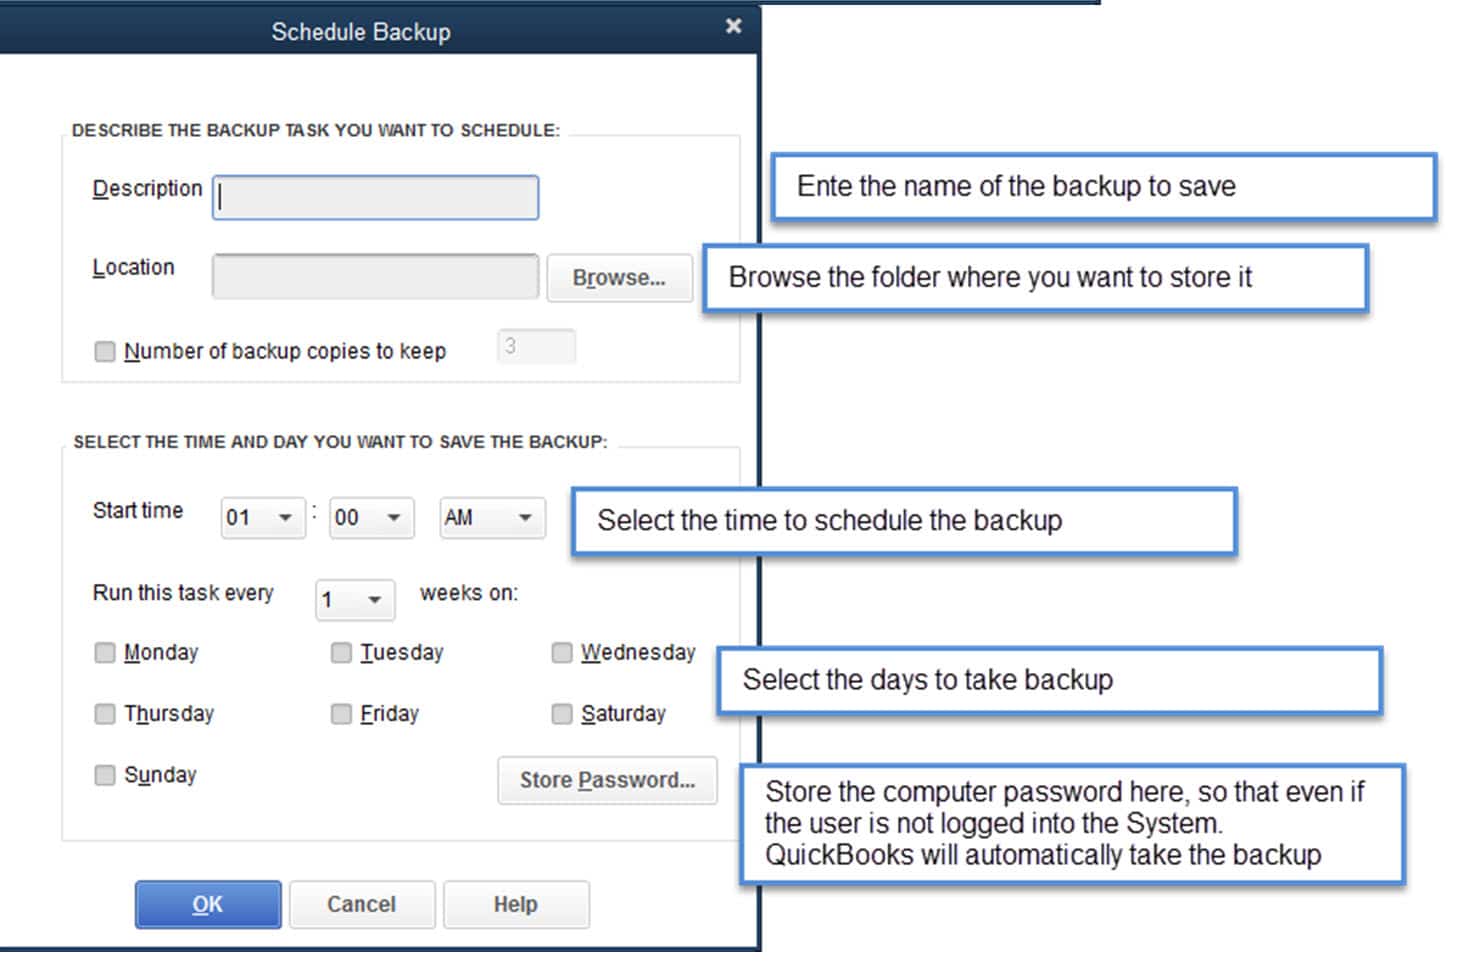
How to schedule an auto backup in QuickBooks Company File.
Main Causes of QuickBooks Hosting Issue
>>A firewall is blocking the connection between the two computers.
Make sure to turn off the firewall that is blocking the Connection b/w client and Server PC or make an exemption
>>QuickBooks isn’t running with admin permissions.
QuickBooks user must have full permission on the file and its related folders
>>User doesn’t have enough permission on the QuickBooks Data folder.
Client User Must have full read \ write permission on the server location where the QuickBooks file is stored
>>User doesn’t have administrative privileges on his\her computer.
The user must be an Administrator on his \ her Computer.
User control Settings must be in never notify mode
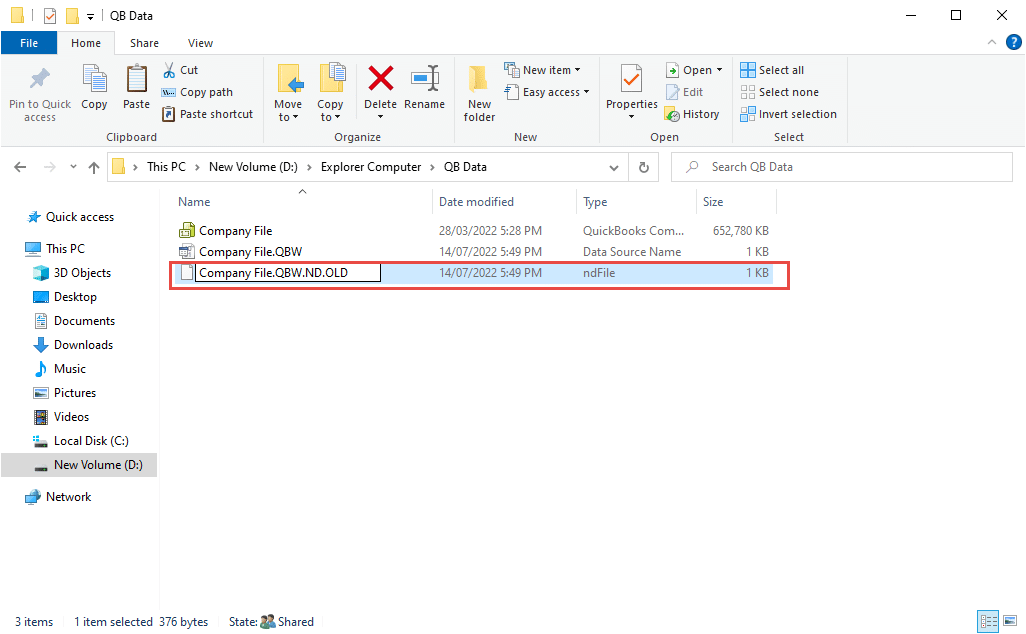
>>.ND and . TLG files are damaged.
These are QuickBooks extensions that stored network-related information. If any connection issue comes, make sure to rename the file with this extension and Re-run the QuickBooks database Server manager.
>>One of the Users, by default, opened the file as single user mode, and when he close the Company file, instances remain in the task Manager
we need to restart the Server to disconnect the file with the Users rather than all the users to restart their PCs
>>Setup hosting is enabled on one of the User computers.
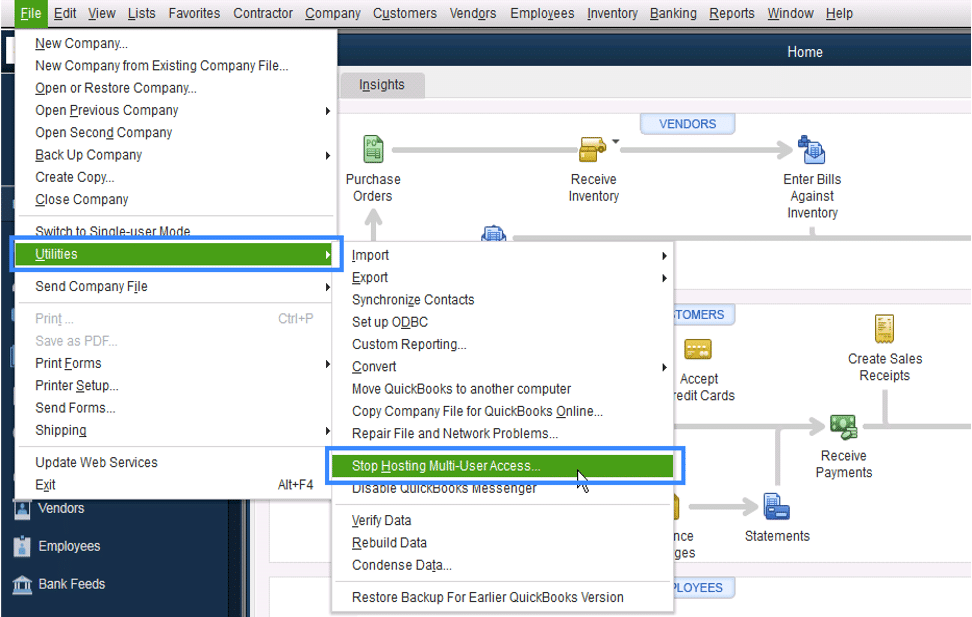
Hosting must be enabled only on Server Computer. If any of the user enabled it by mistake, make sure to disable it by going to QuickBooks -> File->Utilities And making sure its written “Host Multiuser access”
 Detail: when the User tries to switch the QuickBooks Company File to Multiuser mode, the system will throw an error with error codes H202, H205 like the following screen
If you see Error H202 or H505 (or H101 and H103) when you try to switch to multi-user mode, we're here to help. These errors mean something is blocking the multi-user connection to your server. We'll show you how to fix the issue.
Run the QuickBooks Database Server Manager on your server with the QuickBooks Tool Hub
Step 1: Download and install the QuickBooks Tools Hub on your server
The QuickBooks Tool Hub helps fix common errors. You'll need to close QuickBooks to use the tool hub. For the best experience, we recommend you use Tool Hub on Windows 10, 64-bit.
- Close QuickBooks.
- Download the most recent version (1.5.0.0) of the QuickBooks Tool Hub. Save the file somewhere you can easily find it (like your Downloads folder or your Windows desktop). Note: If you've installed Tool Hub before, you can find out which version you have. Select the Home tab. The version will be on the bottom.
- Open the file you downloaded (QuickBooksToolHub.exe).
- Follow the on-screen steps to install and agree to the terms and conditions.
- Double-click the icon on your Windows desktop when the installation finishes to open the tool hub.
 Step 2: From the Tool Hub, run the QuickBooks Database Server Manager on your server
Your server computer is the one that stores your QuickBooks Company file(s). Your other computers connected to your network are your workstations.
- From the QuickBooks Tools Hub, select Network Issues.
- Select QuickBooks Database Server Manager. If QuickBooks isn't on your server, it'll prompt you to install it.
- Inside the QuickBooks Database Server Manager, select Start Scan if you see your Company file folder(s). If you don't, Browse to the location of your company file and then select Start Scan.
- The QuickBooks Database Server Manager will repair your firewall permissions automatically when the scan finishes; select Close.
- Open QuickBooks on each workstation where you see Error H202. Select File and Switch to Multi-user Mode. If you use your server computer as a workstation, be sure to check it too.
- From the tool hub, select Company File Issues.
- Select Run QuickBooks File Doctor. It can take up to one minute for the file doctor to open. (Note: If the QuickBooks File Doctor doesn't open, search for QuickBooks Desktop File Doc and open it manually.)
- In QuickBooks File Doctor, select your company file from the dropdown menu if you don't see your file, select Browse and search to find your file.
- Select Check your file (middle option only) and then Continue.
- Enter your QuickBooks admin password and then select Next.
Fix Error H202 manually
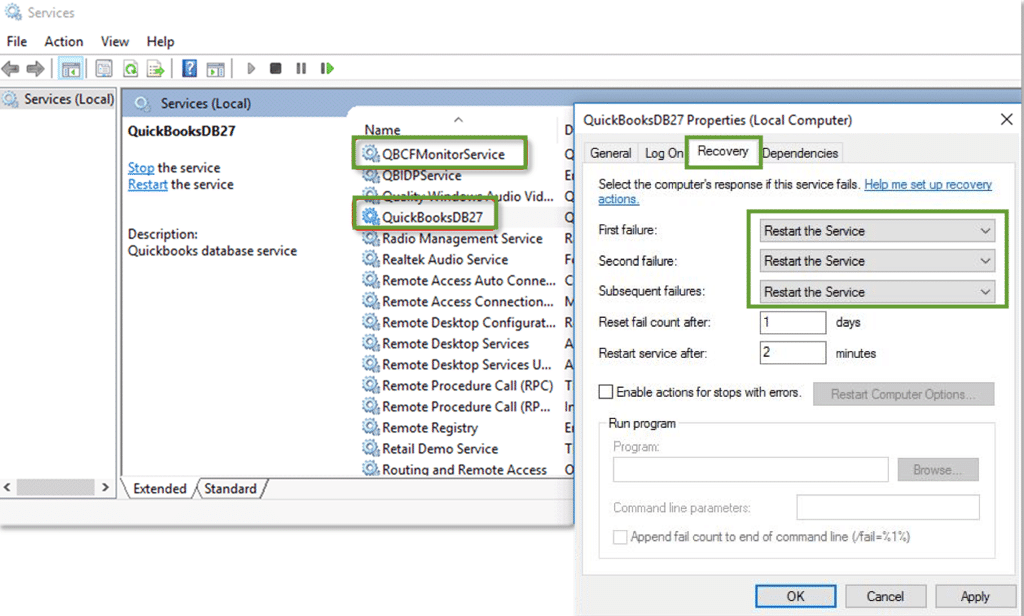
Solution 1: Check the services on your server Make sure QuickBooks services are running on your server computer. Follow these steps to check QuickbooksDBXX. Then repeat them for QBCFMonitorService.- Open the Windows Start Menu on your server computer.
- Type "Run" into the search and open Run.
- Type "services.msc" into the Run window and press Enter.
- Find and double-click QuickBooksDBXXon the List. XX notes your version of QuickBooks.
- Select Automatic for the Startup Type.
- Make sure the Service status is either Running or Started if it's neither select Start.
- Select the Recovery tab.
- Select Restart the Service from these dropdown menus: First, Second, and Subsequent failures.
- Select Apply and then select OK to save the changes.
- Repeat these steps for QBCFMonitorService.
Solution 2: Add services to your Windows admin group on your server
If you haven't already, give QuickBooksDBXX and QBCFMonitorService admin permissions on your server computer. See set Windows access permissions to share company files for instructions. When you're done, open QuickBooks on your server computer and workstations. If you still see Error H202, move on to Solution 3. Solution 3: Configure your firewall settings on your server Make sure your server computer is set to allow QuickBooks through your firewall.- See configure Firewall and Internet security settings for QuickBooks Desktop for instructions on how to set up Windows firewall exceptions.
- After setting your firewall permissions, open QuickBooks on your workstations.
- Go to the File Menu and select Switch to Multi-user Mode.
- Open the Windows Start Menu on your server and workstations.
- Type "Network" into the search and open Network and Sharing Center.
- Select Change advanced sharing settings.
- Make sure Turn on network discovery is selected in the Network Discovery and File and Printer sharing sections.
- Open the Windows Start Menu on your server computer.
- Type "Run" into the search and open Run.
- Type "CMD" into the Run window, and then press Enter.
- Type "ipconfig/all" into the CMD window, and then press Enter.
- Find the Host Name in the Windows IP Configuration section. Your server name is on the right.
- Open the Windows Start Menu from a workstation.
- Type "Run" into the search and open Run.
- Type "CMD" into the Run window, and then press Enter.
- Repeat these steps for each workstation that gets Error H202.
| Note: You can do these steps before opening a Company file. |
- Open QuickBooks Software on any workstations where you see H101, H303, or H505
- Don't open your company file. Instead, select the File Menu and hover over Utilities.
- If you see the Host Multi-User Access option, don't select it. Move on to the next workstation. This one isn't causing the problem.
- Repeat these steps on all workstations where you see Error H101, H303, or H505.
- Open QuickBooks on your server computer.
- Open the File Menu and hover over Utilities.
- If Host Multi-User Access is an option, select it. If Stop Hosting Multi-User Access is an option, don't select it.
- Open the folder that contains your Company file.
- Find the files with the same name as your Company files but with extensions.ND and.TLG.
- company_file.qbw.nd
- company_file.qbw.tlg
- Right-click each file and select Rename. Add the word OLD at the end of each file name. Ex: company_file.qbw.nd.OLD
- Open QuickBooks again and try to sign in to your Company file. If the same issue occurs, proceed to solution 2.
- Go to https://help.quickbooks.intuit.com/en_US/contact
- Select QuickBooks for Windows.
- Select your QuickBooks for Windows version.
- Select a topic.
- Click on the Get Phone Number button.
- Open QuickBooks on one of your workstations
- Don't open your company file. Instead, select the File Menu and hover over Utilities.
- If you see the "Host Multi-User Access" option, don't select it. Move on to the next workstation. This one isn't causing the problem.
- If Stop Hosting Multi-User Access is an option, select it.
- Repeat these steps on all of your workstations
Solution 2: Use QuickBooks File Doctor
Follow the steps to download File Doctor and use it to scan your Company file. Let it fix any issues it finds. Solution 3: Configure your host file First, ping your server to get your server name and IP address:- On one of the computers connected to the network, open the Windows Start Menu.
- Type "CMD" into the search and open Command.
- Type "Ping[Name of your Linux server]" in the window and press Enter.
- Write down the server name and the IP address.
- Close QuickBooks on all of the computers connected to your network. Go to FiMenuenu and select Quit QuickBooks Desktop.
- Open the Windows StaMenuenu.
- Type "File Explorer" into the search and open File Explorer.
- Select My Computer from the navigation bar. This is sometimes called "This PC."
- Open your C: drive. Then open your Windows folder.
- Find the System32 folder. Open the Drivers folder and then the ETC folder
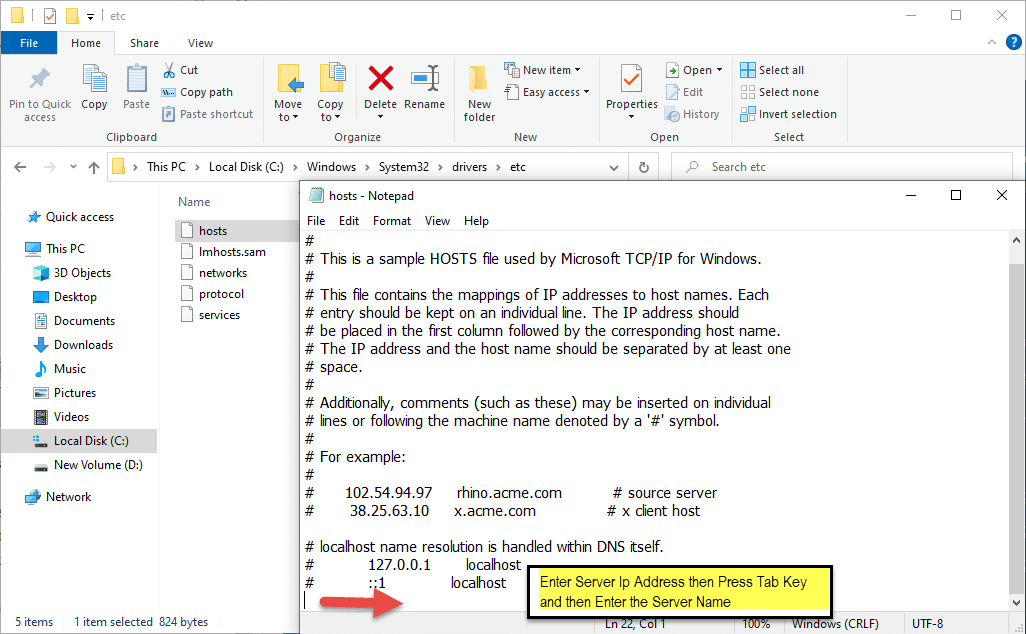
- Right-click the file called C: Windows-System32-drivers-etc-hosts. Select Open with and then Notepad
- Go to the bottom of the file. Add the Linux server IP address to the end of the text. Then press the Tab key and add your Linux server name. Note: Linux systems files are case-sensitive. Make sure you enter names with the correct case.
- Select File and then Save. Then close Notepad
Causes for QuickBooks Error -6176, 0
- A firewall is blocking the connection between the two computers
- .ND and .TLG files are damaged
- QuickBooks isn't running with admin permissions
Step 1: Update QuickBooks Desktop
- Open QuickBooks Desktop
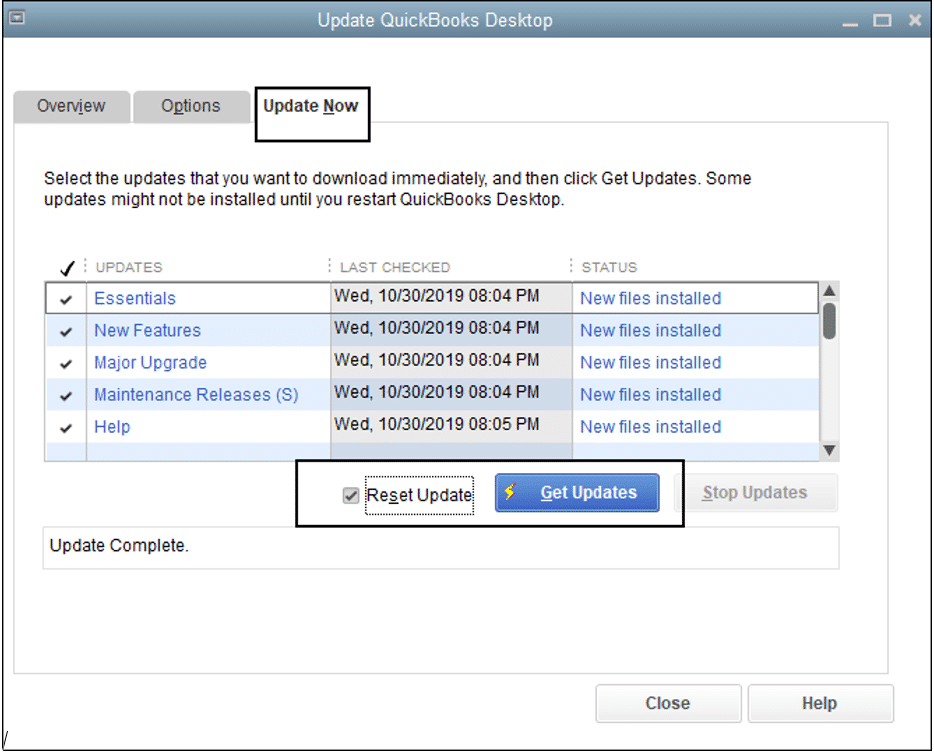
- Then go to Help > Update QuickBooks Desktop
- Then click on Update Now in the top right corner
- Now make check on Reset Update and click Get Updates (See an image below)
- Once the Update is complete, close QuickBooks
Step 2: Download and Run QuickBooks File Doctor
- Download QuickBooks Tool Huband go to your downloads by pressing CTRL+J
- Under your downloaListist, click on exe
- Click Yes to allow this app to make changes
- Now click on Next to install it, and then click Yes again to accept the license agreement.
- Click on Next and then Install (It may take some time)
- Once the installation is complete, click on Finish
- Now open QuickBooks Tool Hub (Icon will be available on your desktop)
Step 3: Rename the .ND and .TLG Files
.ND and .TLG files help you to run QuickBooks company files on network and multi-user mode. If these files are damaged or corrupted, that can cause you QuickBooks Error 6000 107, and renaming these files can help you to resolve it.- Open your QuickBooCompanyany file location. C:-Users-Public-Documents-Intuit-QuickBooks-Company File[Default Location]
- Now look for the files that have .ND and .TLG extensions.
- Make a right-click on them and select Rename, Now type ".OLD" at the end of the file For Example, CompanyName.qbw.ND now changes it to qbw.ND.OLD CompanyName.qbw.TLG now changes it to CompanyName.qbw.TLG.OLD
- Click Yes to confirm.
Common Steps to Resolve QuickBooks Multi-User Hosting Issue
Close QuickBooks and all related Instances from all the QuickBooks User PCs.
To do this, you have to Close the Company file Opened in QuickBooks and Exit
Go to Task Manager - then go to Process and Find QBW32.EXE from the Process list and End Process
Now go to the Server where the QuickBooks company File is stored / Located
Open QuickBooks Database Server Manager on the Server
Run the QuickBooks Database Server Manager as follows
Now Open Services.msc from the Server
Go to Start Program - Type Run on the Search, then on the Run dialogue enter services.msc
Find QuickBooksDB24 (if it is QuickBooks version 17 then QuickBooksDB27 or wiseversa)
right click on it and Select Properties
Now open QuickBooks Company File on the Server as Admin User
Check this in all the User PCs, Open QuickBooks and Check the Hosting.
If any of the User showing as Stop Hosting Multi-User Access then Click on it and Stop, because the Hosting must active only on the Server.
How to Backup Database using Hinawi Software and SQL server
Backup can be done in two ways:
1. From Hinawi Software
2. From SQL Server
1. From Hinawi Software
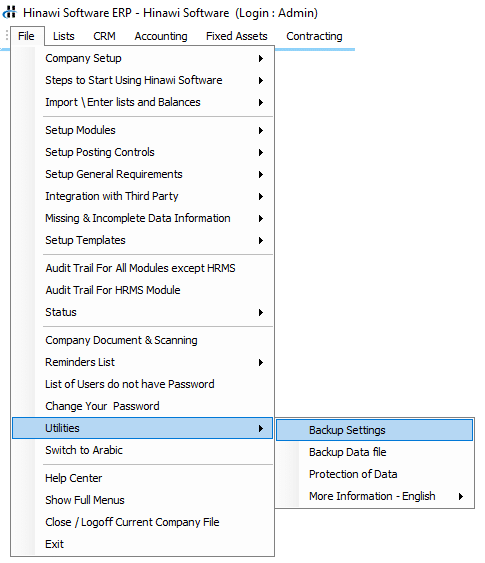
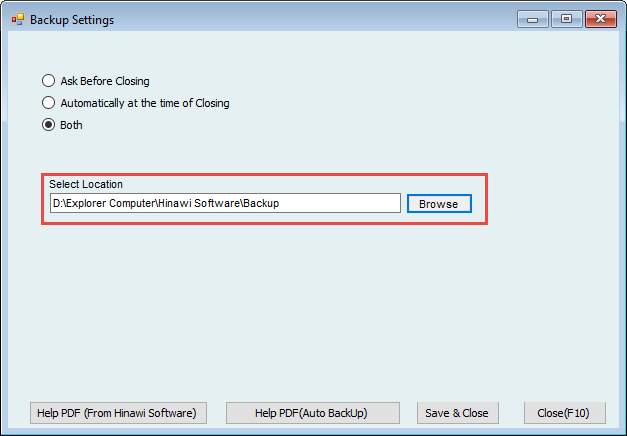
Users can do Backup & Restore from File -> Utilities
User must do Settings for Backup. User must select the Location where the backup is stored.
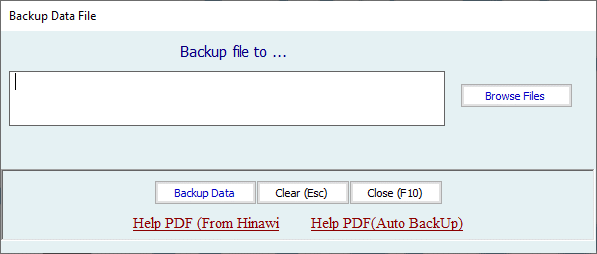
Users can select the Location for Backup from here and click on Backup Data
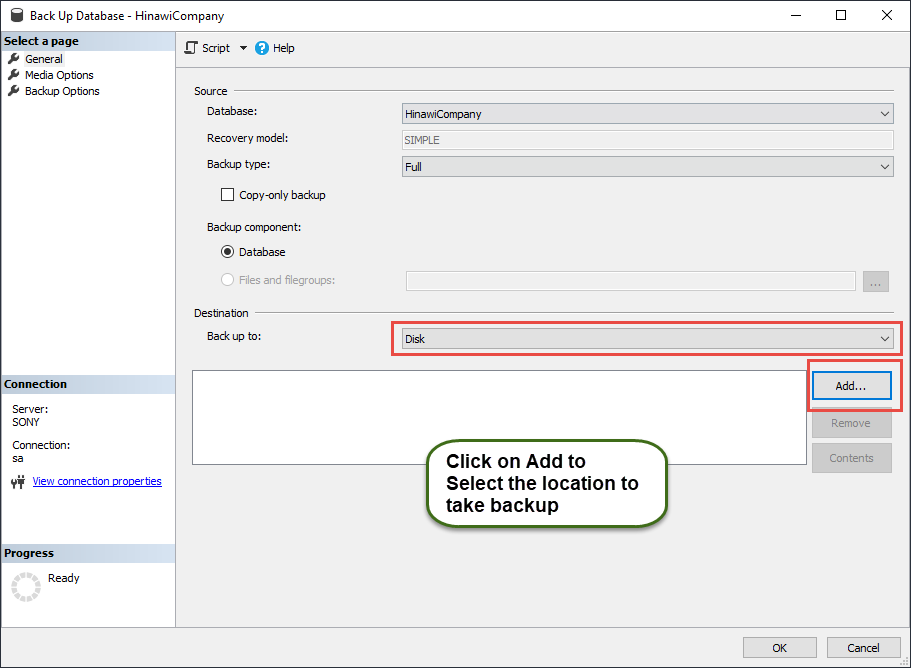
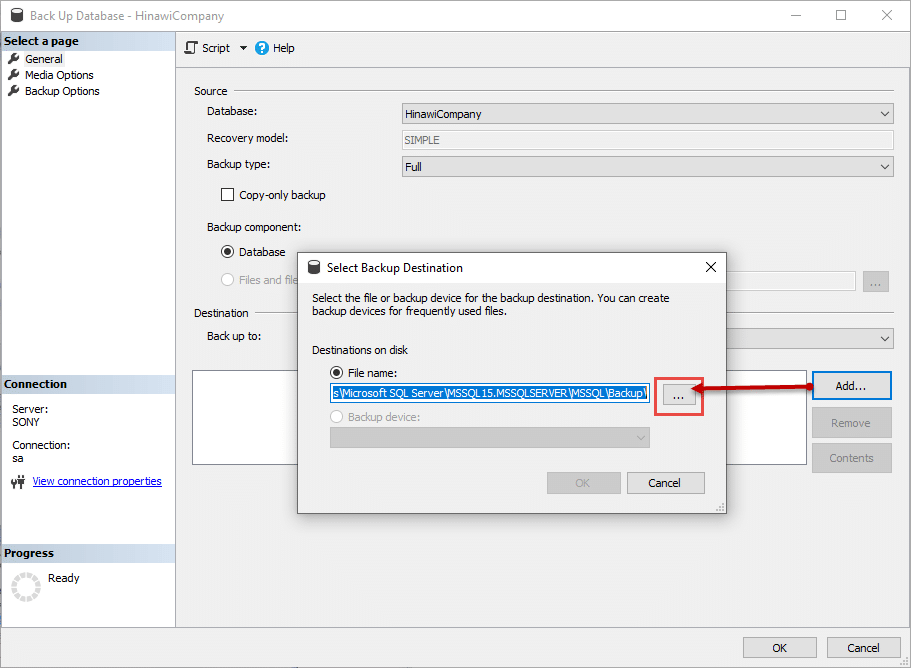
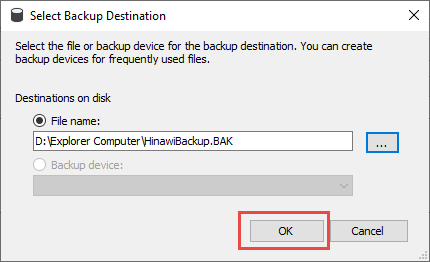
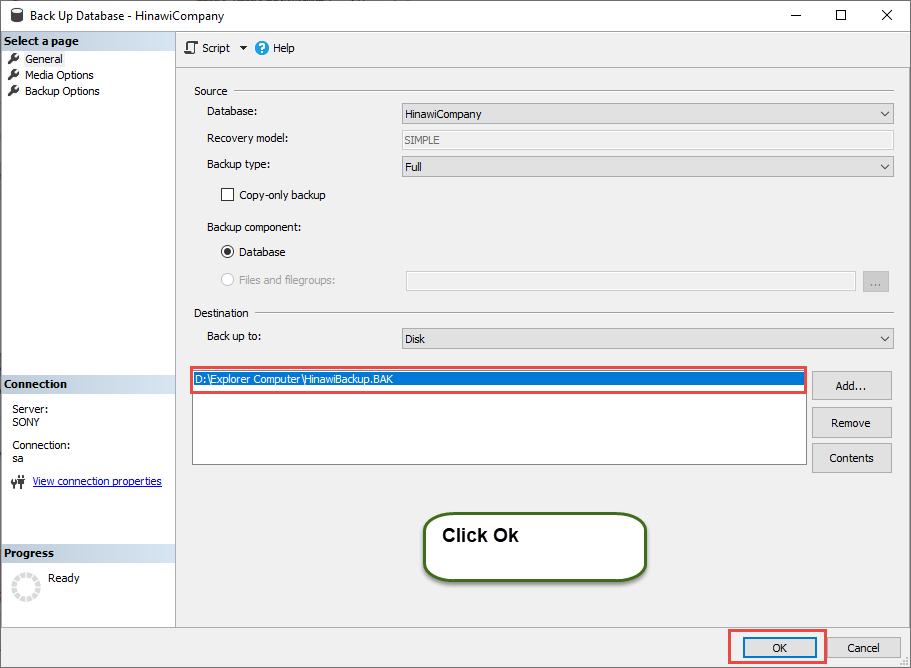
- From SQL Server
To do Back Up from SQL Server, do the followings:
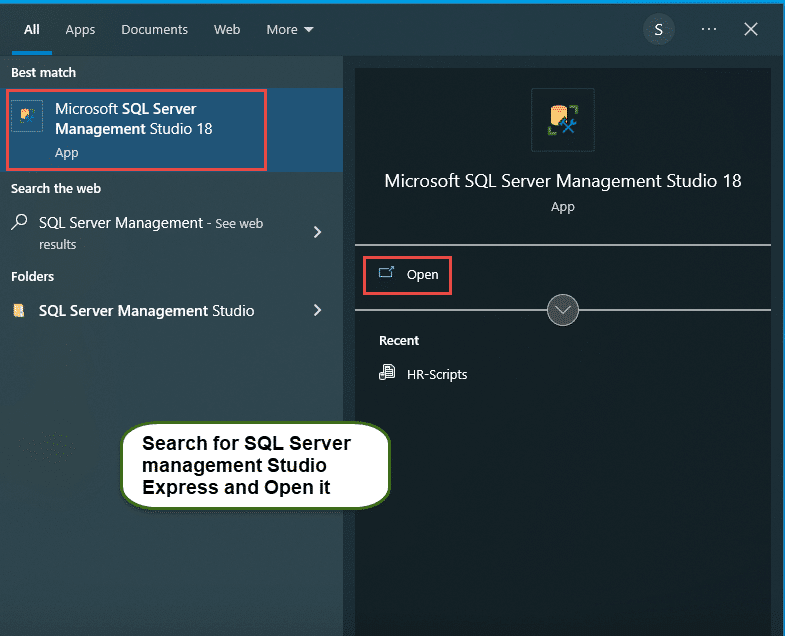
To take back up of any database of Hinawi Software from the SQL Server directly, first, run
The SQL Server Management Studio Express, which you can find from Start and Search for “SQL Server Management Studio Express.”
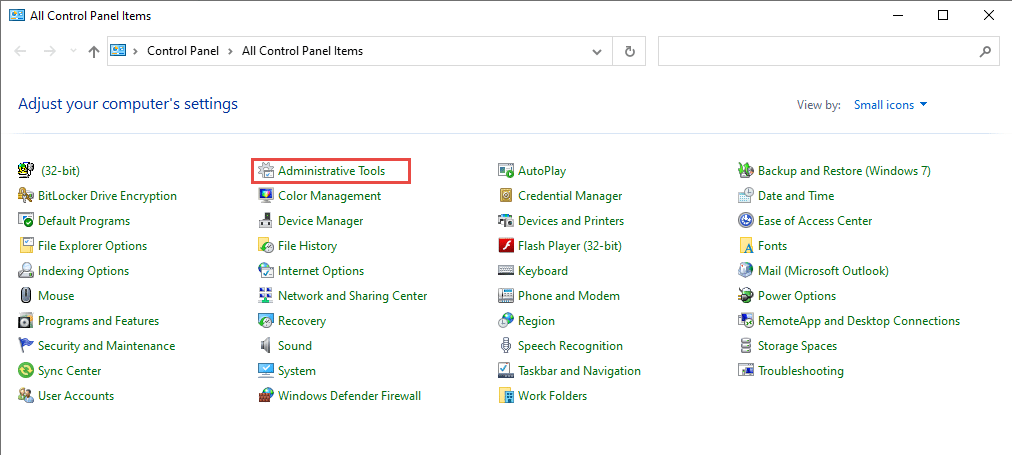
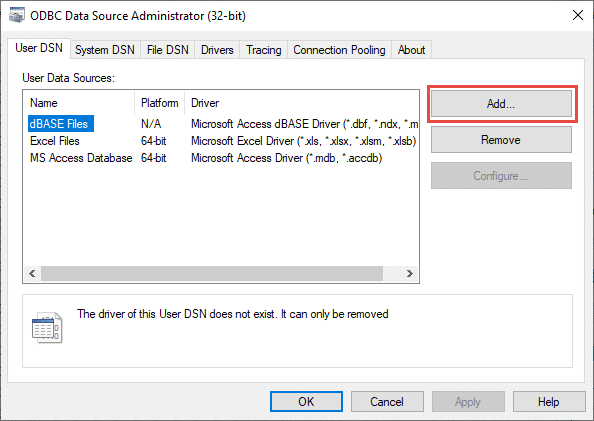
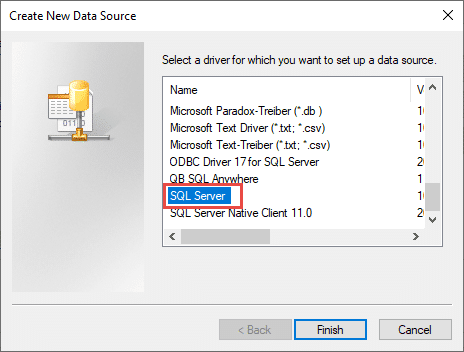
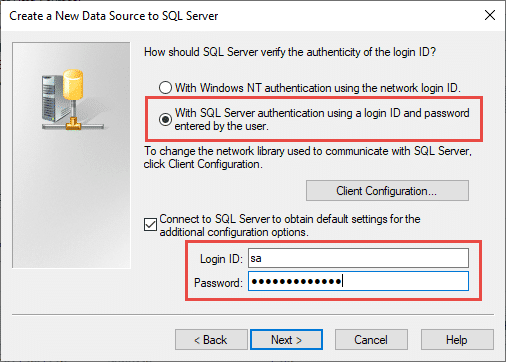
How to do SQL ODBC Test on Client PC.
Step 1-
go to Control Panel and then Click on Administrative tools
How to Make Auto Backup from Hinawi Software
Auto Backup helps you to keep your Data secure.
Backup can be used whenever your original file is corrupted or lost.
Important:
The backup location is to be in the server and external drive.
Make sure that this Setup is applied to the server.
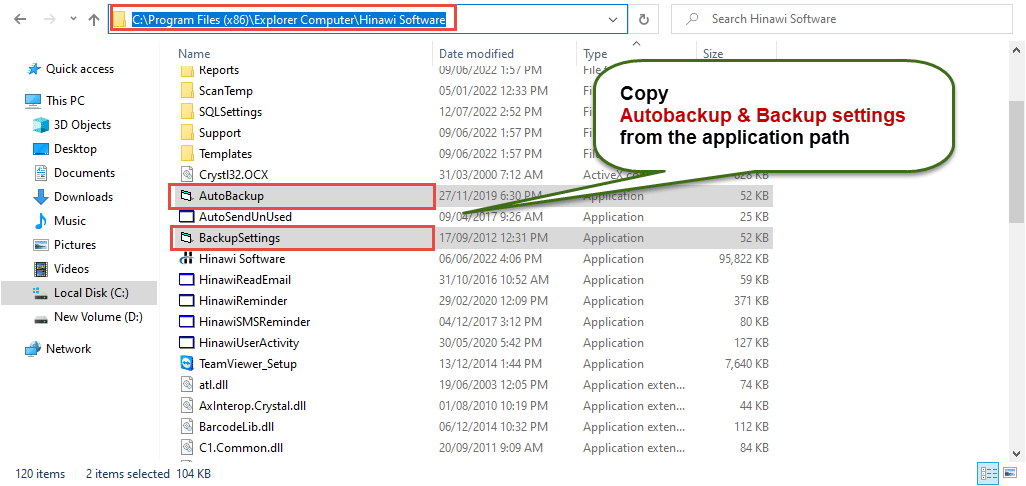
1. Go to:
Local Disk (C:) Program File (x86) or Program File- Explorer Computer- Hinawi Software
Then copy two files:
- AutoBackup
- BackupSettings
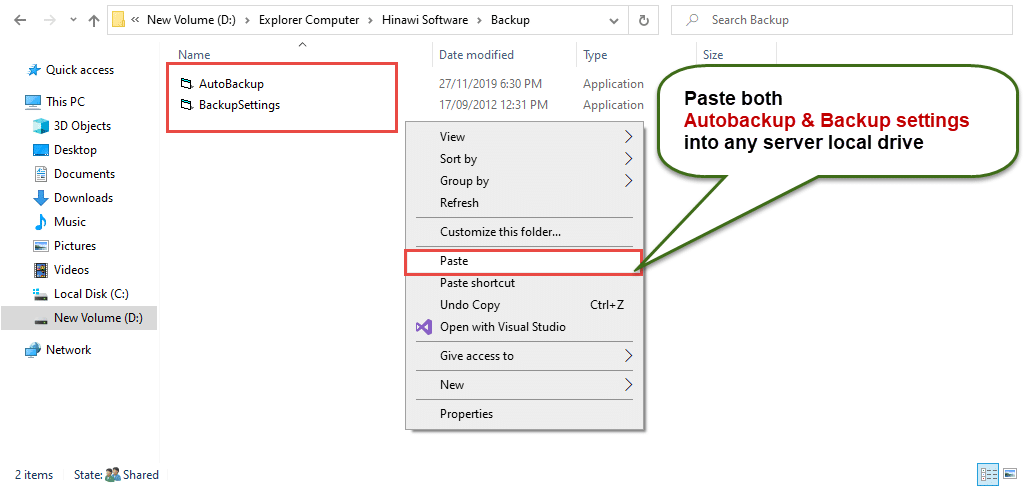
2. Paste the two files into the following:
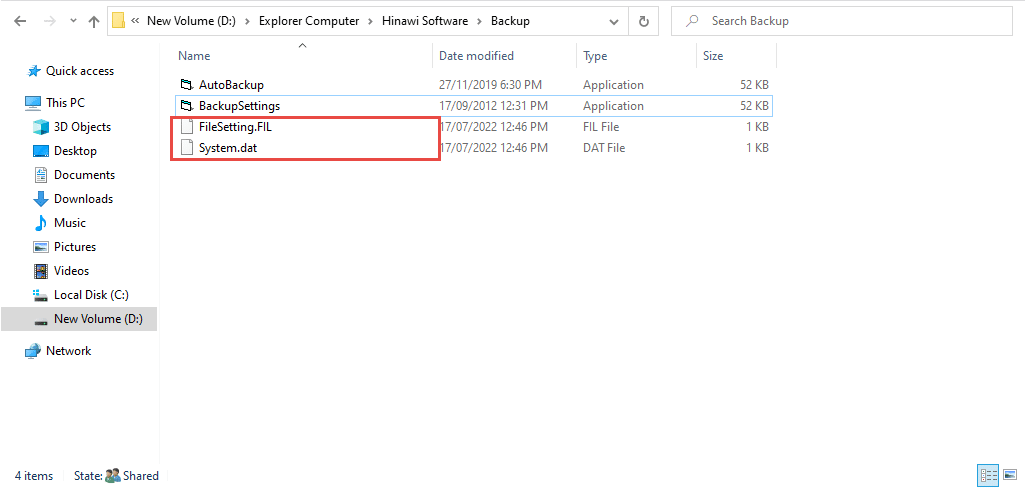
Local Disk (D:) Explorer Computer -> Hinawi Software -> Backup folder
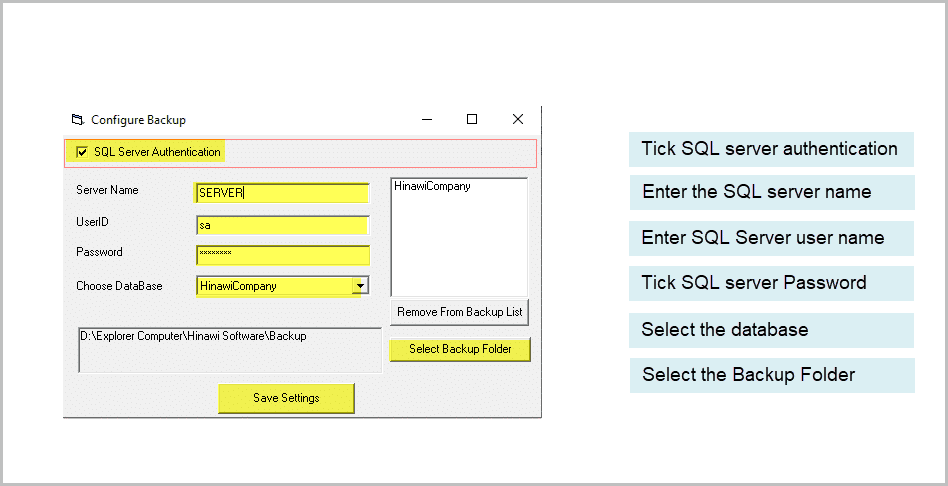
3. Then Double Click On BackupSettings; it will open this window; fill it as shown below:
4. Click Save Settings, and you will note the creation of two new files.
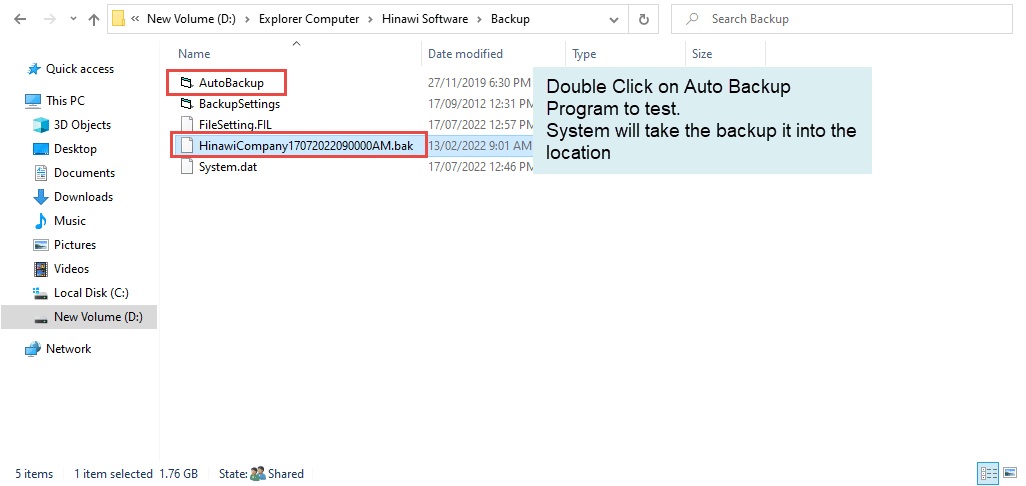
5. To ensure it is working correctly, double-click on AutoBackup, to get new backup files.
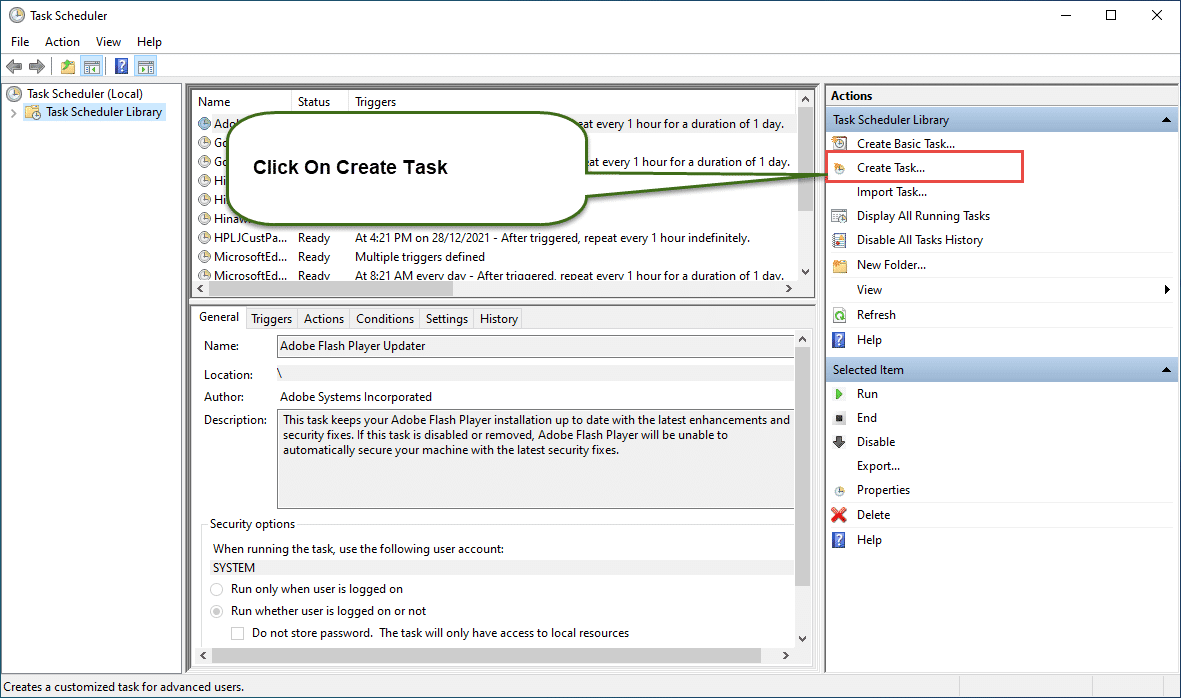
6. To make this Backup work automatically, go to Task Scheduler.
7. Fill in the Task Name and Description, then Next.
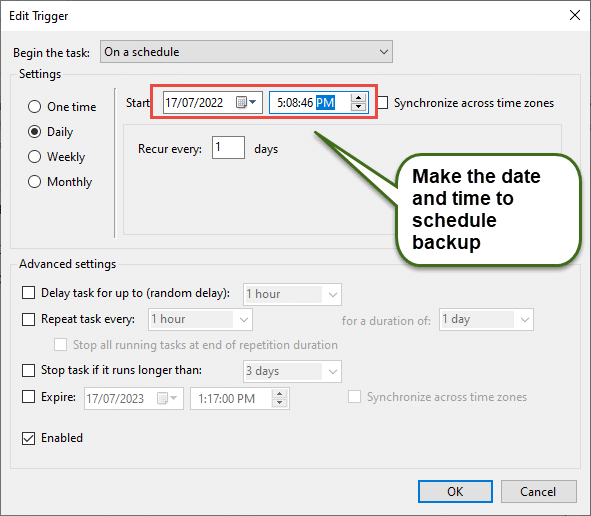
8. Go to Triggers Tab, click New Button & Choose Daily, then Click Ok.
9. Check the starting Date and Time, then Next.
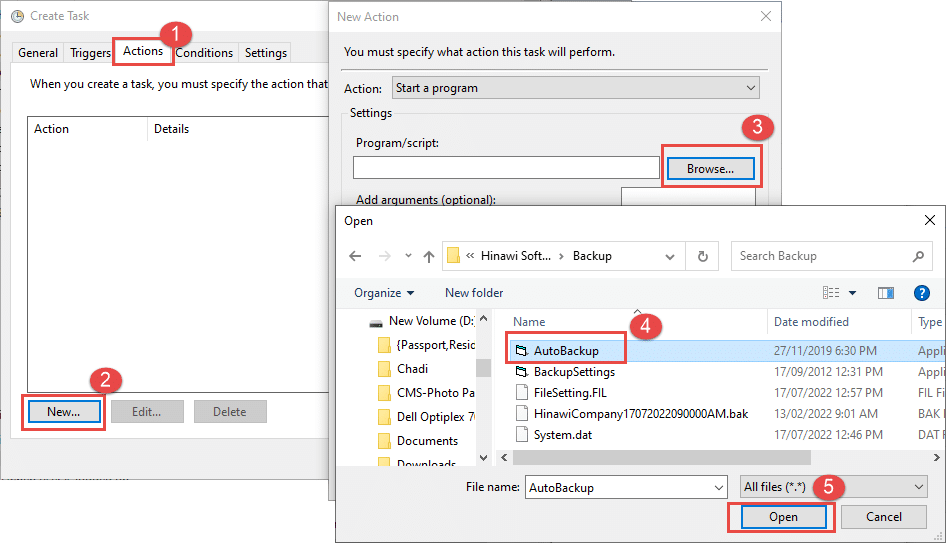
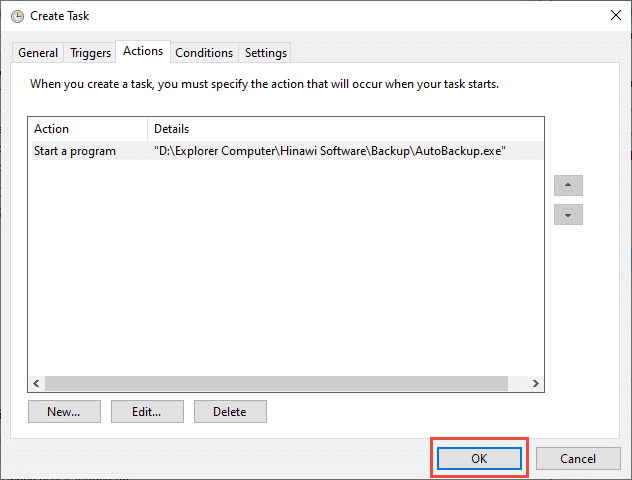
10. Go to Actions Tab, then
- Click on New Button
- Browse the Auto backup Program from the location you copied
- Click Ok
12. Finally, Click Finish.
13. You will see the new Task on the Task Scheduler Library.
14. To Check if the Task is working correctly.
15. You will find that two new Backup files are coming.
Integration of Data from Third-Party Software
Introduction:
Dear Valued Users, thank you for using Hinawi ERP software. This manual is for Hinawi Business Management (Hinawi ERP) Software integration of Data from third-party software.
Settings Information:
File-> Import \ Enter Lists and Balances - > Import from Third Party Integration - > More Information
Below is the explanation for the above screen:-
1. Enabling the sales invoice Setup you will configure.
2. Use Third Party Invoice No.
If User tick marks this option, the User must provide Invoice No. For the sales invoice. b. If User doesn’t tick mark this option, the System will generate Invoice No. for each sale
invoice.
3. Use Items from Third Party Software
If User tick marks this option, the User needs to provide the Items for each sales invoice transaction.
Note:
The User must first import the Item List to the System before the User can include the Item in importing using the standard CSV file.
b. If User does not tick mark this option, the User must choose a default Item for all the sales invoice
4. Use Quantity
If User tick marks this option, the User needs to provide the Number of Items for each sales invoice transaction.
b. If User does not mark this option, the System will consider the Item Quantity as one (1) for all sales invoice transactions.
Note:
This option will be enabled if you tick mark the option for “Use Items from Third Party.
Software”
5. Use Terms (Terms can only be applied to Credit Invoice)
If User tick marks this option, the User can include the payment terms for each sales invoice.
Note:
The User must first import the Terms of Payment List to the System before the User can include the terms in importing using the standard CSV file.
b. If the User does not tick mark this option, the User can’t include the payment terms for each sales invoice.
6. Default Deposit Account
- The User must choose the default deposit Account for Cash Invoices.
7. Default Item
- The User must choose a default Item for all sales invoice transactions.
Note:
Default Item can only be set if the User didn’t choose to mark the option “Use Items from Third Party Software.”
8. A/R Account
-The User must choose the default A/R Account for Credit Invoice.
9. Folder Name
-The User must locate the default folder name where the System will read the entire CSV file.
Note:
User must have Full permission of the default folder location (After Importing the CSV file, the File will be moved to the Imported Files Folder, which the System will generate automatically).
Importing Sales Invoice
File -> Import \ Enter Lists and Balances -> From Third Party -> Import Cash Invoice / Import Credit Invoice.
Import Cash Invoice \ Credit Invoice
Folder Name
- Folder name will be filled automatically depending on the Setup.
Sample Format
- Choose the Standard CSV format for importing the Sales Invoice.
Read Files from the Folder
- After clicking “Read Files from Folder,” one selection box will open, and it shows all the
CSV files are available in that default folder
Note:
The File must contain Columns as per the Setup in the following order.
Standard with Totals:
1. Invoice No.
2. Customer Name (Must Match with the Same Customer Name in Hinawi ERP).
3. Invoice Date.
4. Amount.
5. Memo.
6. Terms (Optional).
Standard with Item Name:
1. Invoice No.
2. Customer Name (Must Match with the Same Customer Name in Hinawi ERP).
3. Invoice Date.
4. Amount.
5. Memo.
6. Terms (Optional).
7. Item Name.
8. Quantity (Optional: If there is no Quantity column System will consider Quantity as
1)
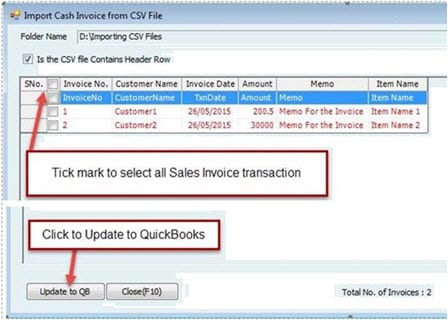
- Choose the CSV file you want to import to the System, tick mark the entire Sales invoice that will be imported to the System, then click “Update to QB.”
- The System will save the Invoice in Hinawi ERP and update it to QuickBooks after that.
- After Importing, the CSV file will be moved to Imported Files Folder.
Protection of Data
How to Protect your Data in Hinawi Software:-
- Data is the Customer's responsibility since the User(s) is the one who is engaged in its daily activities. To avoid loss of Data, please do the following:-
- Backing up your Data to the cloud is one of the best ways to guard against Data loss.
- Cloud Data backup should be done frequently and regularly; this is especially important for mission-critical Data whose loss or corruption can severely hinder normal business processes and operations. Backing up your Data to the cloud allows for easy scalability; your Data storage size can be readily expanded to accommodate your Data storage needs.
- Password control is the primary line of defense in safeguarding the Data within your network. Sensitive information should be password protected so only users who know the password can access the Data.
The password used to secure the Data should not be used for other applications or tools; it should be strong, with a combination of letters, numbers, and special characters, as well as unique.
In addition, the password should be provided only to individuals who need access to the Data to carry out their job duties. Furthermore, the password should be changed regularly. - Daily backup on external and Internal Hard Disks or the cloud.
- Install auto backup software on the server to make daily backups of all Data.
- Virus protection software must be installed on Servers and computers.
- UPS machine for emergency purposes in case of electricity power shutdown. This will keep servers and client PCs working for some time.
- Other safety measures recommended by Customer IT staff or consultants and hardware supplier
- Daily, monthly, and yearly Data printing and reports to be kept safe.
General Terms and Conditions for Supply, Training, and Supporting of Hinawi Software and \ or QuickBooks Accounting Software (Readymade)
CONTENTS
1. Training and Support.
2. Annual Maintenance Contract (AMC).
3. Software warranty.
4. Date protection.
5. Refundable products & services.
6. Adaptations & modifications.
7. License and users of the software.
8. QuickBooks as a ready-made solution.
9. Programming language.
10. Database.
11. Integration of Hinawi software with QuickBooks accounting.
12. Integration of Hinawi software with third-party software.
13. General term.
01. Training and Support:-
1. First, we will understand the Customer's business activity, which will help us set up a Chart of Accounts and modules in Hinawi Software and QuickBooks Accounting Software (if purchased) so we can build the best Setup for the Customer.
2. In the Setup accounting side, we added a predefined sample Chart of Accounts which helps the customers select from different business activities. This will help the user/s to start using the Software quickly. However, we do not mind discussing the Customer's Chart of Accounts and his Setup.
3. Software already has the facility to create multiple companies to maintain separate accounting for subsidiaries, branches, or divisions which may be needed in the future.
4. After completing the Chart of Accounts and Hinawi Software, it is strongly recommended to approve it from the authorized person (Optional). The Chart of Accounts and the Settings in Hinawi Software are approved when user/s starts training and posting.
5. We added options in Hinawi Software for importing lists like employees, customers, and vendors with balances and entering the beginning balance of trial balance aside from cheques under collections and postdated cheques issued. Also, balances of HRMS Module like Leave balance, Loan, end of service, and more. Same thing for Real Estate. This option will help user/s to start using Software immediately without any delay.
6. We can also import Data from other Software when exported to excel. Also, we can import from another database using the standard excel format to be filled by Customer Data is the Customer's responsibility. Extra charges will apply.
7. We will train the user/s to understand working on all lists and activities related to purchased Module lists like Charts of Accounts, Customer Lists, Suppliers (payable) Lists, Employee Lists, Item List, Class List, Customer type List, Suppliers (payable) type List, Terms List, Other name lists, Buildings, Unites, students, cars…., Job List and more.
8. We will train the user/s to enter / Import the opening balance. Start Date of joining opening balances: The opening balance is based on the latest Trial Balance to be entered in Accounting. It should be for the current or previous month and not exceed three months.
9. User/s can start entering the accounts even if the opening balances are not ready; the System will update the new balances automatically when entered later.
10. Hinawi Software and QuickBooks help user/s enter accounts for any previous period. If the Customer decides to re-enter Data by his staff for the preceding period, there's a corresponding charge for helping and supervising the User.
11. If the Customer has existing Data entered in QuickBooks, Hinawi Software can connect with QuickBooks, read all lists, and store them in Hinawi Software Database. Also, can you read the unpaid Bills of Suppliers?
12. If the Customer has an old version of QuickBooks and wants to buy the new version, we will update his Data to work with the latest version. All Data will be updated automatically. To do this, an admin password must be available. If an admin is lost, there might be extra charges to open it. Data will remain as it is after updating.
13. If the Customer already has QuickBooks other than the American version (Canadian, Australian, UK) and wants to buy the American version, Data will not update automatically to the new version. But we can convert it to USA version through our programmers by using Journal Voucher (JV) for all entries without using Inventory. We will convert DAT Data as JV only. Extra charges will apply for conversion.
14. If a Customer has the Software, they have the right to work parallel between the old and new System for comparing results. If the results do not match, it is the Customer's responsibility to check the transactions of 2 software and compare them.
15. We will train the user/s on using Activities, lists, and forms with customizable options available in the System based on authentic documents.
16. Our standard policy in training is to assign the user/s with some work to know whether the user/s has understood the Software. We expect them to finish the assigned job on schedule to avoid delays. This will be checked during our next visit. (Preferably, inform us of our next visit 1-2 days in advance.)
17. We will train the user/s to modify and customize specific reports needed in their daily activities.
18. Any questions or inquiries from the user/s regarding the Software will be accepted and discussed.
19. Our responsibility is to train the user/s to understand the Software. Besides, we will help them how to read and check reports and results, as all Data is your responsibility.
20. We will train user/s on the relations between Hinawi Software and QuickBooks accounting (if purchased) and how to update Data between both Software.
21. There will be free follow-up & support for trained user/s for one year or as agreed in the Quotation.
22. Cooperation from the user/s is/is essential to complete the training within the training period. We are not responsible if the user/s did not work and did not spare enough time for training.
23. Explorer Computer staff will show full cooperation with your user/s, and the Report will be submitted to the management of the Software user/s not following instructions or not showing cooperation.
24. Each User will have a username and password.
25. We will train Customer Admin users to set up the level of access to the user/s and settings. Module Admin is responsible for these settings. Explorer Computer is not responsible for erroneous results because of the wrong Setup. Admin is responsible for giving access to the right persons in the Company.
26. Training, support, and the Number of visits applicable to customers are included in the Quotation. We will visit the Customer site in case not solved remotely unless the issue is from m Customer's side.
27. After implementing the System by Explorer computer, the Customer can create any Number of files in the future; Setup and operating these files are the Customer's responsibility.
28. It is part of our policy that whenever we provide training or visit the Customer, we prepare a Report containing the work we had done and to be countersigned by the Customer's user/s whom we dealt with during that visit.
29. All requested support, minor or significant, will be processed within the working day or, at maximum, the following working day upon order of support request but not exceeding 48 working hours.
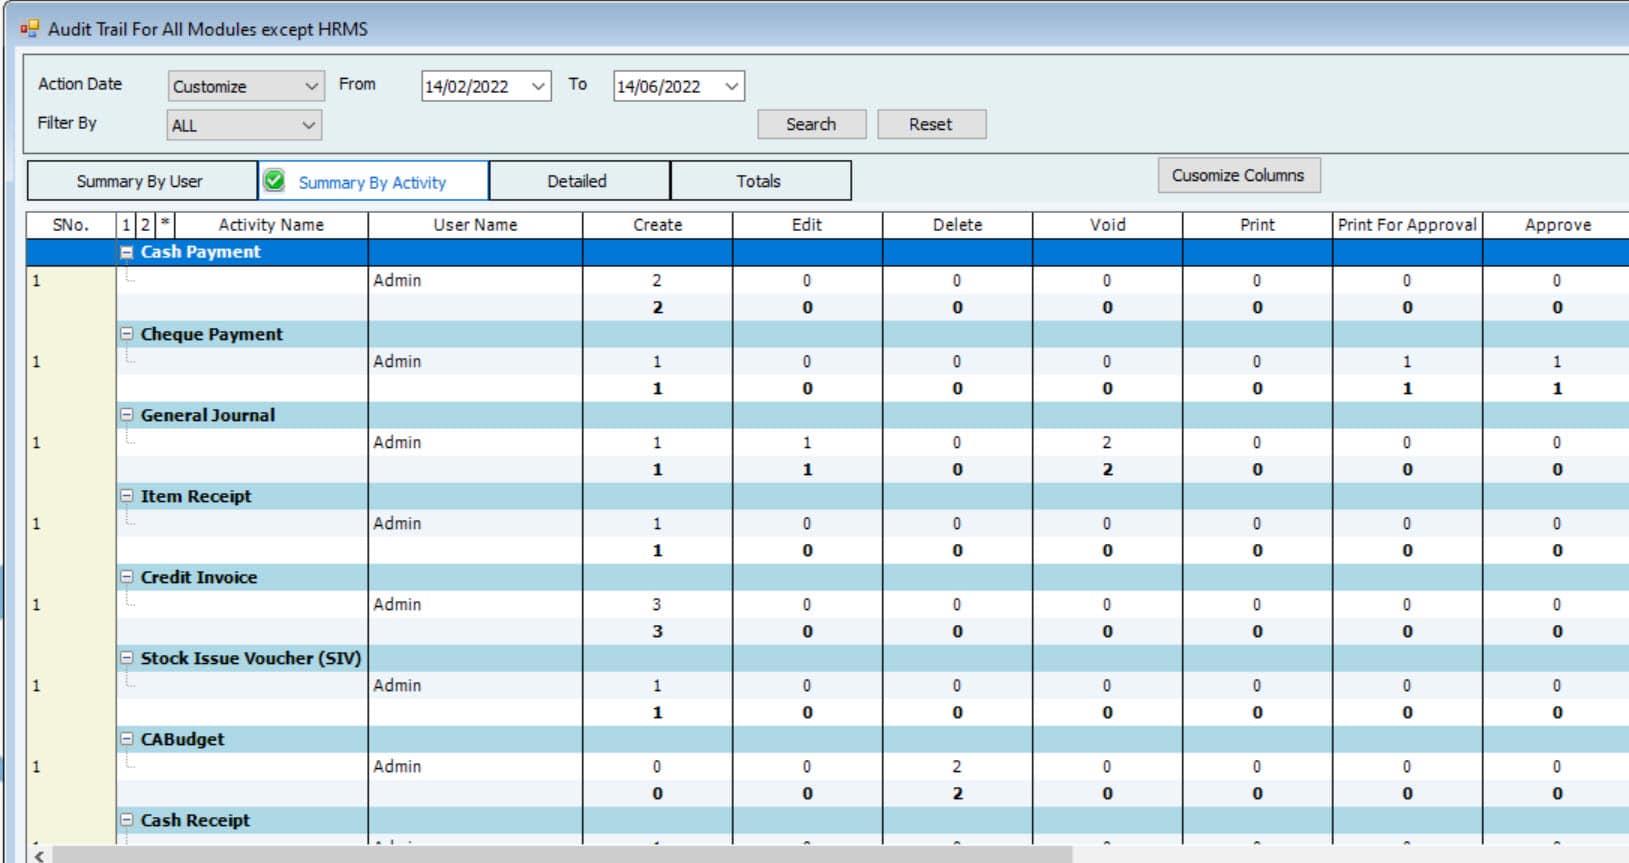
30. Based on our long experience dealing with customers and to evaluate the User's quality of using all features of Hinawi Software and to reach the maximum satisfaction of Customers, Customers must agree and accept in advance to send a summary Report of activities whenever our staff gives training or whenever it's requested (or automatically from the System). This Report is not to show any amounts or private Data; it is just to see what modules and forms the Customer uses. With this, we can guide them to better use of the System.
Sample:
02. Annual Maintenance Contract (AMC):-
- In The first year of the deal, there will be free support and update of Hinawi Software. This would be part of the Contract unless the Customer bought a license only or unless it agreed otherwise.
- The License of Hinawi Software is Annual unless we agree on different things in the approved Quotation \ Contract.
- The Annual Maintenance Contract (AMC) continues to have the same support in the Software. Annual Maintenance Contract (AMC) will cover the same support as the first year, including continuing running of Software. Any functions or errors in the Software, or if they are not working correctly, will be solved via remote support only.
- (AMC) includes updating the Software with a new version during the Contract.
- If the Customer did not sign (AMC), extra charges will be applied for support. The Amount depends on the level of issues.
- The Customer must sign (AMC) if he has an old Software software version and needs to update to the new version to solve the issues.
- By updating to a new version, customers will get the same purchased Module and Number of users, including new features. We will give training on newly added features.
8. Explorer Computer will visit the Customer if necessary during the Contract period, and the priority of the support will be via the Remote Customer IT team must make sure that the server and clients PC network is set up probably per the System requirement that is sent at the start of the work.
9. Explorer Computer will provide help & assistance to your user/s trained by Explorer Computer staff only.
10. We will respond to and discuss queries received from your staff, which will help to work with the software/ Also, we will answer inquiries from your user/s during the year's closing.
11. In case Data is lost or damaged, we will do our best to restore the Data file of the Software. Data to be restored will come from the latest backup done by the user/s under his responsibility. Checking Data after restoring is the Customer's responsibility.
12. Data is the Customer's full responsibility, so the user/s and IT team should do an automatic and manual backup. See below how instructions.
13. As part of the(AMC) tract, the Customer must always have an internet connection for remote support.
14. Our standard response is within 24 hours.
03. Software Guarantee: -
1. Software's guarantee period will be one year starting from the Approval Date.
2. No guarantee on Data Customer IT staff must do a backup of all Data at the server after being trained by Explorer computer staff.
3. Our responsibility for software guarantee is for the current Contract year. The previous year's responsibility will stop and be released from the last day of the expired latest Contract.
4. Guarantee means ensuring that the Software works fine when the network and hardware are according to standard requirements.
5. The guarantee on Software will be void automatically if:
- I am working directly on SQL Database for extracting Data or changes.
- If the Customer updated QuickBooks to a new version or new release through other parties or by IT staff without referring to us in writing.
- The unauthorized person is accessing the System.
- If the outstanding Amount payable to us has not been settled.
- We find that an additional User(s) is/are using the Software without pr training.
04. Protection of Data: -
Data is the Customer's responsibility as the user/s is the one who engages in its daily activities. To avoid loss of Data, please do the following: -
1. Daily backup on external and Internal Hard Disk,/or CD, and USB Flash Disk.
2. Install auto-backup on the server to make a daily backup of all Data.
3. Virus protection software must be installed on Servers and computers.
4. UPS machine for emergency purposes in case of electricity power shutdown. This will keep servers and clients working for some time.
5. Other safety measures recommended by Customer IT staff or consultants and hardware suppliers.
6. Daily, monthly, and yearly printing of Data and reports to be kept in a safe place.
05. Refunding Products and Services Fees: -
Once Products and Services are sold or provided, they cannot be refunded or exchanged. The Customer must pay any remaining balance.
06. Adjustments & Modifications: -
Hinawi Software Local Made Software
- For minor modifications, the Customer can contact us by email to adjust changes to the System changes stem. Providing a screen shoot will help us understand Customer needs.
- Bugs are our responsibility when the Customer is using the latest version. Bugs or errors in connections caused by user/s because of network or other reasons are Customer's responsibility.
- Additional payment will be applied for significant modifications like adding new modules or that will cause or affect the System or modules.
- Explorer Computer will decide if the adjustments or modifications are minor or significant.
07. License and users of Software: -
Hinawi Software
1. Number of users and License:
- Customers can create the user/s to work concurrently on the same database depending on the Number of licenses (concurrent users) purchased with the additional one User for the Admin User. E.g., If a Customer purchased five rights, the total allowed to access at the same time (concurrently) is six users (5+1).
- Customers can buy an additional license at any time for any version.
- The new license will cover the same purchased module/s.
- Customers can buy any Number of User licenses. No limitation
2. License Registration:
- Installation and registration of the Software depend on the Number of licenses purchased.
- The registration key will be provided after installation only.
- 3. Number of Companies:
- Regardless of the above, Hinawi Software can work on multiple Company files created. No limit and no extra charges for the Number of files to open. The only charges are if customers request training on these files.
08. QuickBooks Accounting Ready Made Software
1. Number of users and License: -
- Customers can create any Number of user/s, but opening the Data file is limited to the Number of licenses purchased. E.g., If a Customer purchased five licenses, the total allowed to access at the same time is five users (concurrent users), including Admin (4+1).
- Customers can buy the additional license anytime for the latest version of QuickBooks. Customers cannot purchase additional users for the old version.
- The maximum Number of users who can access the Data simultaneously for one file depends on the license purchased and the type of QuickBooks. The maximum of users who can work simultaneously for the Pro version is three concurrent users, for Premier Version is five concurrent users, and for Enterprise: 30 concurrent users. E.g., If a Customer purchased Enterprise with 30 users and has 2 Data files, it means 60 users can work at the same time on two files, and so on. with
- The license of Enterprise is Annual Subscription. Pro and Premier is a one-time purchase. Customers accept in advance the changes in the policy of QuickBooks.
2. License Registration: -
- Installation and registration of the System will depend on the Number of licenses purchased.
- A validation key will be provided after purchase only.
3. Number of Companies to open: -
- Regardless of the above, QuickBooks can work on multiple Company files created. No limit and no extra charges for the Number of files to open. Operating these files is the Customer's responsibility.
Important
- Customers must keep all Software CDs in a safe place and not be allowed to make an illegal copy (with or without pay) outside use of the Company purchase.
- It is strongly recommended to keep the Extra package .exe of the Software on seething over for future use.
- Customers of QuickBooks must accept changes in Intuit policy regarding license use, upgrades, and others with no liabilities or responsibilities on Explorer Computer.
- Arabic language in QuickBooks is corrupted.
QuickBooks Accounting as Readymade Software
1. Explorer Computer does not have authority to access the program code, in which case only the product manufacturer can do The end-user accepts the terms & conditions of the QuickBooks software, including User license, modifications, and installation. We have to teach user/s how to use the Software within the functions and modules available based on our long experience in the market. So, the Customer should agree and accept to use the Software as it is even if some features are adjusted or removed. No liabilities or any responsibilities on Explorer Computer.
2. Since the product is readymade Software if some modules or features are unavailable avian QuickBooks or do not match with Users/seeds, especially for overseas customers, we at Explorer Computer created our Hinawi Software to meet these needs and requirements. We build Hinawi Software to work aside from QuickBooks. Additional charges will apply.
3. User/s who want to use Arabic Data must always work from Hinawi Software only.
QuickBooks has an issue with displaying Arabic names in lists and memos. Hinawi Software solved all the Arabic problems.
09. Programming Language.
- Hinawi Software: VB.Net
- Hinawi Web application: Java
- Hinawi Mobile: Android
- QuickBooks Accounting Software C++
10. Operating System and Database:
Hinawi Software database: SQL is the database. SQL Server License is the Customer's responsibility, or you can install the free SQL Express license size up to 4GB maximum capacity of Data. SQL license has the option of Auto Backup of Data. We recommended the Customer buy SQL License.
QuickBooks Software: The database is state-of-the-art technology. The Customer does not need to buy an additional license.
Operating Systems Supported:
- Windows 10, all editions including 64-bit, natively installed.
- Windows 8.1, all editions including 64-bit, natively installed.
Database Servers:
- Windows Server 2019, Standard and Essentials
- Windows Server 2016, Standard and Essentials
- Windows Server 2012 R2, Standard and Essentials
- Windows Server 2012, Standard and Essentials
Browser Requirements:
- Internet Explorer 11 (32-bit).
Hardware & Operating System Requirements:
Processor | 2.4 GHz minimum |
RAM | 4GB minimum, 8GB Recommended |
Server RAM requirements | · 1-5 Users: 8GB RAM ·10 Users: 12GB RAM · 15 Users: 16GB RAM · 20 Users: 20+GB RAM |
Disk space | 2.5GB of disk space (additional required for Data files). Require a minimum of 4.0GB RAM Twice the size of the most extensive file set to back up + 100MB or twice the size to restore. The space is only required from the work folder |
Windows | ·US version of Windows. · Regional Settings are supported when set to English. ·Administrator rights are required for the server computer when hosting multi-user access. · Natively installed and doesn't need to run in a virtual environment or emulation software. |
An optical drive | A 4X DVD-ROM drive is required for physical CD installations. |
Screen resolution | ·Display optimized for 1280 x 1024 screen resolution or higher with up to 2 extended monitors. ·Best optimized for Default DPI setting for a given compute |
Hinawi Software Stand Alone
1. Hinawi Software Standalone Version is one of our latest Achievements; Splitting between QuickBooks and Hinawi Software has enabled our IT team to have complete control over the System and continuously add more features per client's requirements.
2. Users no longer need to purchase or open QuickBooks to run the System since it is completely separated.
3. Moreover, the flexibility and user-friendly experience of Hinawi Software will make your daily tasks easier and faster.
4. In addition, the integration between integrating modules in the System will ensure proper workflow and control over the System.
11. Integration of Hinawi Software with QuickBooks Accounting.
Explorer Computer can integrate Hinawi Software with QuickBooks Accounting Software. The version of QuickBooks accounting to integrate with is based on which one is under Intuit sunset (support), all exceeding two years from the Date the other f the old version (see Intuit sunset policy at their website). When connecting, the lists and cleared unpaid Bills of Suppliers will be updated automatically from QuickBooks Accounting Software to Hinawi when it runs. Explorer Computer is always trying to add all forms in QuickBooks to be available in Hinawi Software.
Notes:
- English Data can send and receive in 2 ways between 2 software.
- Arabic Data is one way only, from Hinawi Software to QuickBooks.
There are two options to update Data from Hinawi Software to QuickBooks Accounting.
Option (1): Automatically
When Data is entered into Hinawi Software, it will be updated directly to QuickBooks. If a User edits entries in Hinawi Software, it will also be affected by QuickBooks Accounting Software. If Data is edited in QuickBooks, it will not be updated in Hinawi.
Option (2): Manually
When Data is entered in Hinawi Software, it will NOT update directly to QuickBooks. It will save in the local database of the Software. Then the User can update the transactions to QuickBooks manually by selecting the transactions from the update List Menu in Hinawi Software. Users can edit transactions in Hinawi Software before updating to QuickBooks.
Forms like (Cash invoices, Credit invoices, Tenancy Contracts, and pay bills (and other related Inventory) are always automatically updated.
Note:
Users must have full access to QuickBooks-related authorized modules in Hinawi Software.
12. Integration of Hinawi Software with third-party Software.
If customers wish to send Data from Hinawi Software to other Software, they can do this in two ways: -
1. Third-party Software will Import from Excel.
Reports & Lists from Hinawi Software can be exported to Excel then these Reports can be imported to their Software using tools available in their System.
2. Third-party Software will Import from the Folder.
We can save requested Data fields to customers using XML and CSV format, so customers can import them to their Software using his tools.
3. Extra Charges will apply.
13. General Terms
1. The Quotation price does not include computer hardware, network connections, or any third-party software license.
2. The Quotation price will be invalid automatically if the validity expires.
3. Upon signing this Quotation, the Customer has read the ll statements.
4. If there is a discrepancy in amounts or conditions between the Quotation and General Terms and Conditions, the Quotation will be considered. This may vary for different conditions/circumstances, which will be specified in the Quotation.
5. It is known and agreed by the Customer in advance that we might need to receive backup from his Data for testing, checking, or evaluation.
6. It is agreed upon in this Contract that all support will correspond via email and WhatsApp group a second, we have options with a detailed explanation of the request with support ed print screen.
7. All payments are due and committed to paying to Explorer Compu; we have the right to stop performing our duty if outstanding amounts are not paid. Explorer Computer has the right to get the remaining balance if the delay is from the Customer side.
8. All requested support, minor or significant, will be processed within the working day or the following day upon order of support request but not exceeding 48 working hours.
9. Customer agrees in advance to use "Remote Access" for supporting and helping. The Customer will provide the Team Viewer ID and password to access his computer/s servers. The password is valid for one access only by default. TeamViewer can be downloaded for free at this link https://www.teamviewer.com
10. Customer agrees to keep Windows/System32 Directory open temporarily at installation and for registration purposes.
11. Customer agrees in advance to Intuit (QuickBooks) policy regarding prices, new version, Advanced Inventory, Advanced Pricing, Annual Fees, or any others currently or in the future.
12. Customer is responsible for managing the user/s level of access or settings and whatever authorization is given. Explorer Computer does not carry any responsibility for the mistakes in results that customers might get because of the wrong customization Setup.
13. Customer is responsible for keeping the Admin password in a safe place, and it must be used only by an authorized person.
14. All Printing of forms like cheques issued or reports will use an A4 laser printer. If some reports have more columns and Data, the User must use an A3 printer. Dot-matrix printers are not recommended.
15. Free update for Hinawi Software first 11 months from the Date of purchase. There has been no update in the last month unless there are errors or issues in the Software.
16. These terms and conditions are part of the Quotation to the Customer.
17. Customer must sign the terms and conditions together with a Quotation. If we did not get the Customer's signature, it would be considered as agreed by the Customer when it's sent to them by email and Quotation.
18. Hinawi Software currently works with Windows 7, 8, 1, and 10.
19. There will be an extra charge if the Customer needs Additional Licenses and supplementary training for current or new user/s and reinstallation of Software provided or extra support or to extend the guarantee.
20. Extra Charges as below:
- DHS: 1.500/-per day total of 7 Hours of remote access.
- DHS: 250/-Per hour rate for Special programming
- DHS: 900/-Recovery of QuickBooks Admin Password for each accounting file.
- DHS: 400 for reinstallation on each client pc
- DHS: 1800 for reinstallation on the server.
21. Prices in point 20 and all conditions above are subject to change without prior notice.
22. Our Company is free to change our policy without referring to the Customer.
23. Hinawi Software license will be based annually.
Training Customer on Restoring Backup: -
Introduction: -
We don't mind training the Customer's team on restoring their Data if the server has an issue or for any other reason due to server problems or an error in another; the training is Free of charge if it has AMC Contract. But if customers asked for our help to restore Data, they most probably would be free if has AMC Contract.
We will charge the Customer in case of the followings:-
- If there is no AMC Contract
- If restoring Data requires reinstallation of all Software, even if the Customer has AMC Contract.
The Cost of restoring Data cannot be determined in advance. The price depends on the situation.
There are two cases for the Customer to try to restore the Data as follows:-
First: If the Customer has Hinawi Software Integrated with QuickBooks:-
Because there is a strong relationship between both Software and because QuickBooks policies keep changing, so the followings are required for training:-
- The person trained to restore Data must be a programmer knowledgeable in the programming language and SQL database.
We should have a letter from an authorized person in the Company showing his name and position requesting us to train the Employee with FULL responsible if any mistakes on the Customer's side. - He should be one of the Company's employees due to the importance of the Data and the mission.
- If Data is damaged or lost, it will be the Customer's responsibility.
- If the User restores the old backup to the original Data, all the latest Data after the restoration will not be seen. E.g., If you have a last year's backup, Sept. 2021. Suppose you restore to the current original file. All the Data entered after Sept. 2021 will be lost.
- If the Customer has integration, Hinawi and QuickBooks backup must be on the same Date and time.
- It's well known and agreed with customers that Data and backup are their responsibility.
Second: If the Customer has Hinawi Software standalone, NOT Integrated with QuickBooks:-
- We can train the IT staff who knows SQL database.
- An email to us with a request to train your Employee with specifications and jobs must be sent to us.
- He should be one of the Company's employees due to the importance of the Data and the mission.
- If Data is damaged or lost, it will be the Customer's responsibility.
- Suppose the User restores the old backup to the original
- Data. All the latest Data after the restoration will not be seen. E.g., If you have a last year's backup, Sept. 2021. Suppose you restore to the original file. All the Data after Sept. 2021 will be lost.
- If the Customer has integration, Hinawi and QuickBooks backup must be on the same Date and time.
- It's well-known and agreed with customers that Data and backup are their responsibility.
Note:
These terms and conditions are always part of the agreement, which we always send by email to the Customer with a Quotation. It is considered acceptable by Customers even if it did not get signed.
Customer Support
We use "Team viewer" to do remote support with Clients.
About TeamViewer
TeamViewer is a leading global technology Company that provides a connectivity platform to remotely access, control, manage, monitor, and repair devices – from laptops and mobile phones to industrial machines and robots.
Please follow the instructions: "How to download and use team viewer."
Step 1: Download Teamviewer from the official website.
Click here to Download TeamViewer.
1) Run the Setup file downloaded previously
2) Select Default Installation under How do you want to proceed? and click Accept - next
3) Click the checkbox to accept the TeamViewer EULA and DPA
4) Click Continue to finish the installation and begin using TeamViewer
Once the installation finishes, Go to the Computer desktop or Start button and click on the team viewer icon.
It will open the team viewer dialogue box.
You can give "Your ID" and "Password" to the one whom you want to connect to your computer.
In case you want to connect to someone else computer, take their Teamviewer Your ID, Put it in the Remote Control Field and click on Connect, then fill in the password they gave.
