دليل شامل لنظام شؤون الموظفين والرواتب
نظام إدارة شئون الموظفين
إعدادات الشركة والأنشطة ذات الصلة:
يعتبر الإعداد أهم نظام وأكثرها أهمية في برنامج Hinawi Software. نفخر بتقديم هذا النظام التي تسمح للعملاء ببناء احتياجاتهم الخاصة ووضع سياسات وقواعد الشركة.
ضمن إعدادات الشركة نقوم بدمج كل من معلومات الإعداد غير الرسمية والأنشطة اللاحقة في مكان واحد حتى يتمكن المستخدمون من فهمها بسهولة.
يُنصح بشدة أن يقوم المستخدم المسؤول بإجراء الإعدادات قبل استخدام النظام للحصول على النتائج وفقًا لسياسة الشركة.
ملاحظة:
فقط المستخدم المسؤول لديه حق الوصول إلى الإعدادات لذلك المستخدم في هذا المستند هو المسؤول.
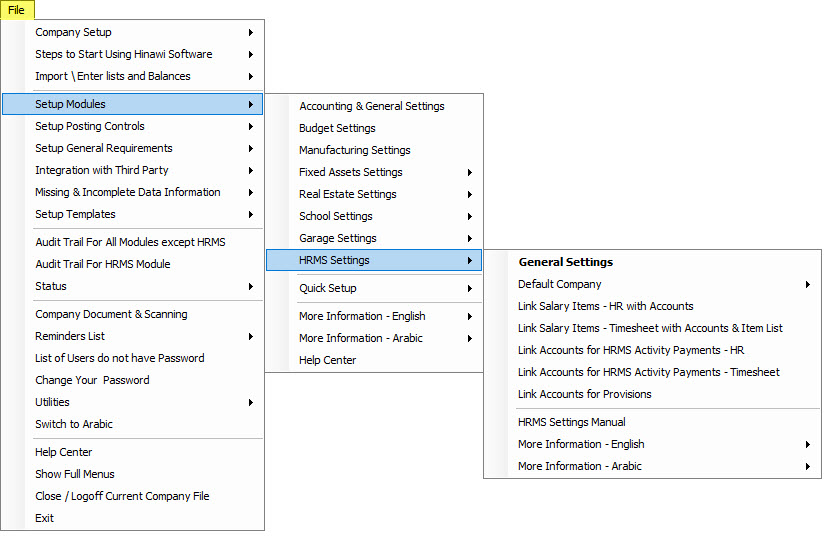
ملف → وحدات الإعداد → إعدادات HRMS → الإعدادات العامة تحتوي على ما يلي:
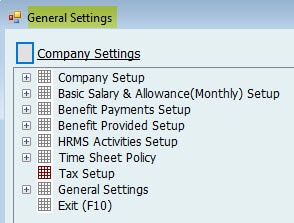
1. إعدادات الشركة
- هنا، يمكن للمستخدم إنشاء شركة جديدة.
- يسمح النظام للمستخدمين بإنشاء أي عدد من الشركات في نفس قاعدة البيانات أو إنشاء قواعد بيانات منفصلة لكل شركة.
- تساعد هذه الميزة في إدارة الشركات المتعددة.
- سيكون هناك إعداد منفصل وتقارير ومستويات وصول لكل شركة.
2. إعداد الراتب الأساسي والبدلات (شهريًا)
3. إعداد مدفوعات المزايا
4. إعداد المزايا المقدمة
5. إعداد أنشطة الموارد البشرية
6. سياسة الجدول الزمني
7. إعداد الضرائب
8. الإعدادات العامة
9. خروج
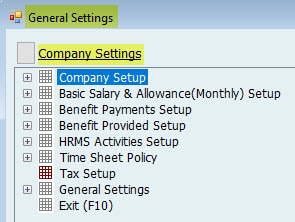
Note:
When the icon is Gray, the setup is not done.

شركة جديدة / معالج إنشاء شركة:
لإنشاء شركة جديدة، انتقل إلى:
ملف → وحدات الإعداد → إعدادات HRMS → الإعدادات العامة → إعداد الشركة → شركة جديدة
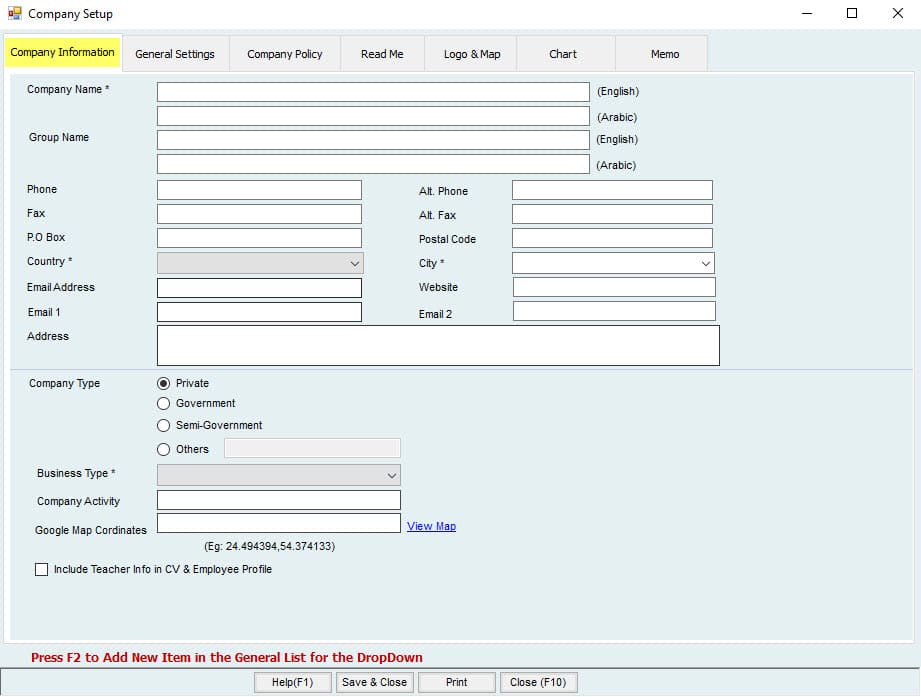
جميع المعلومات التي تحمل علامة (*) يجب ملؤها.
ملاحظة:
- يجب ملء الاسم باللغة الإنجليزية.
- إذا احتاج المستخدم إلى تشغيل البرنامج باللغة العربية، فيجب عليه ملء جميع الحقول باللغة العربية.
- حدد المربع “تضمين معلومات المعلم في السيرة الذاتية” إذا كنت تعمل في مجال المدارس.
- استخدم F2 لإضافة المزيد من العناصر أو الأسماء بسرعة في الحقول المنسدلة.
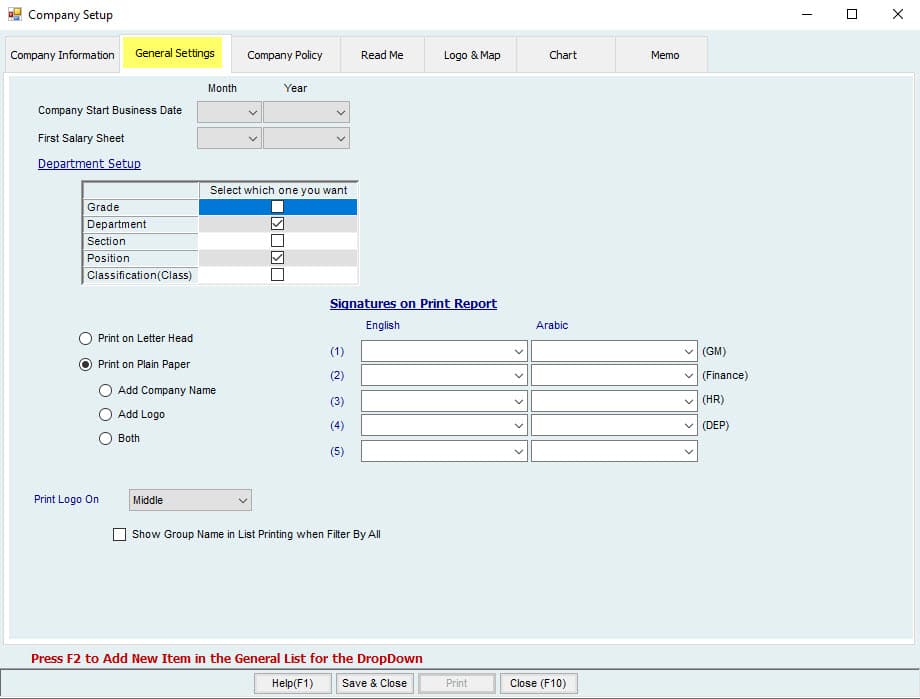
بدء العمل: يمكن للمستخدمين تعيين الشهر والسنة لبدء العمل لا يُسمح بإدخال المعاملات قبل هذا الشهر/السنة.
بدء كشوف المرتبات: يمكن للمستخدمين تعيين الشهر والسنة لبدء كشوف المرتبات للشركة لا يُسمح بإنشاء كشوف رواتب قبل هذا الشهر/السنة.
مثال:
إذا كان بدء العمل هو 01/2010 وبدء كشوف المرتبات هو 01/2014، فيمكن للمستخدم إنشاء موظفين جدد يجب أن يكون تاريخ انضمامهم بعد تاريخ بدء العمل، أي 01/2010. وإذا كان تاريخ انضمام الموظف هو 01/01/2011، فيجب أن يكون تاريخ سريان الراتب أكبر من أو يساوي تاريخ الانضمام.
لا يمكن للمستخدم إنشاء كشوف رواتب للموظف قبل 01/2014 لأن كشوف المرتبات تبدأ من 01/2014.
إعداد الأقسام:
هنا، يمكن للمستخدم تحديد المستويات التي يريد استخدامها للموظفين عن طريق تحديد الخيار المطلوب تفعيله في الشركة.
سيقوم النظام بفحص قسم الإعداد الافتراضي والمسمى الوظيفي ولا يمكن للمستخدم إزالتهما.
يمكن للمستخدم إضافة وربط المستويات المحددة في إعدادات الشركة ← إعداد الشركة ← إعداد القسم ثم إضافة أقسام ومواقع مختلفة للشركة.
سيتمكن المستخدم من عرض وتحديد المستويات (القسم، المسمى الوظيفي، إلخ) عند إنشاء موظف جديد.
بالنسبة للمستويات المختلفة، يمكن للمستخدم تعيين أنشطة مختلفة وإعداد الراتب الأساسي والبدلات ومدفوعات المزايا وإعداد المزايا المقدمة بشكل مختلف.
مثال:
إذا تمت إضافة قسم تكنولوجيا المعلومات وقسم العمليات في إعداد القسم وتمت إضافة موظفين لكل قسم فيمكن للمستخدم في هذه الحالة الحصول على أنشطة مختلفة وإعدادات رواتب لكل قسم.
الطباعة على ترويسة الورق:
يجب على المستخدم تحديد هذا الخيار إذا كان يريد الطباعة على ترويسة الشركة.
الطباعة على ورق عادي:
يجب على المستخدم تحديد هذا الخيار إذا كان يريد طباعة اسم الشركة أو شعارها أو كليهما في خطابات.
العنوان على التقرير:
هنا، يمكن للمستخدم إضافة العنوان على التقارير. املأ باللغة الإنجليزية إذا كنت تعمل باللغة الإنجليزية والعربية إذا كنت تعمل باللغة العربية.
طباعة الشعار على:
يمكن للمستخدم تحديد مكان طباعة الشعار من خلال القائمة المنسدلة.
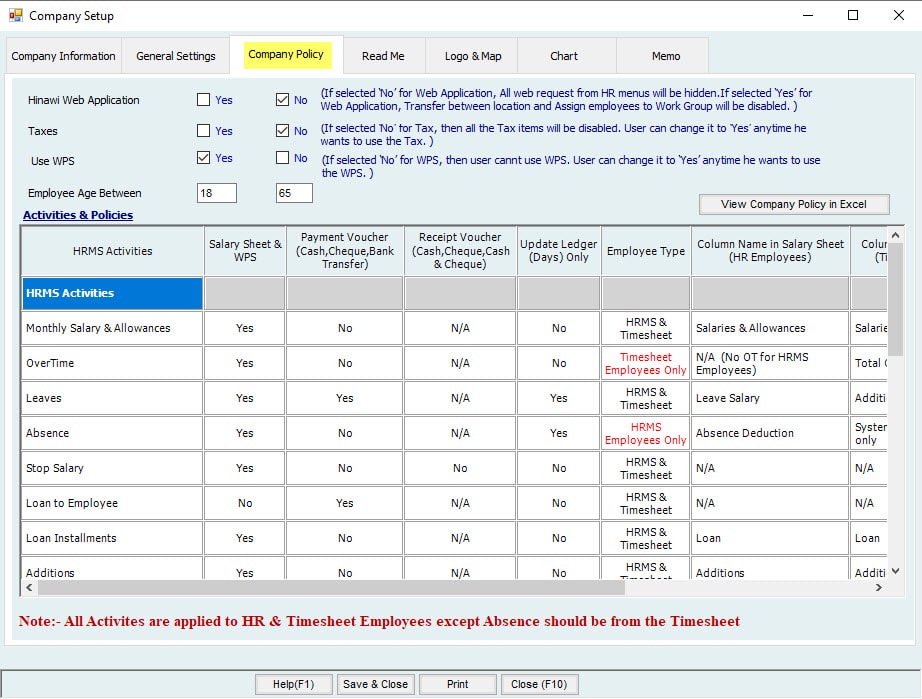
- الضرائب: إذا تم تحديد “لا” للضرائب فسيتم تعطيل بنود الضرائب يمكنك تغييرها إلى “نعم” في أي وقت تريد فيه استخدام الضريبة.
- تطبيق الويب: إذا تم تحديد “لا” لتطبيق الويب فسيتم إخفاء جميع طلبات الويب المتعلقة بقوائم الموارد البشرية إذا تم تحديد “نعم” لتطبيق الويب فسيتم تعطيل النقل بين المواقع وتعيين الموظفين للمجموعة.
- عمر الموظفين: إذا تم تعيين عمر الموظفين بين 16 و 65 عامًا فلن يسمح النظام بوجود موظفين تقل أعمارهم عن 16 عامًا أو أكثر من 65 عامًا.
يمكنك عرض كيفية دفع / أخذ المبالغ إلى / من الموظفين. هنا، سيتم ملء وضع الدفع تلقائيًا من الإعدادات المتقدمة لكل نشاط. اختر وضع الدفع من الإعدادات المتقدمة لكل نشاط. على سبيل المثال، إذا تم تحديد وضع الدفع لـ EOS على أنه “الدفع من خلال كشف الراتب” من الإعدادات المتقدمة، فسيتم ملء وضع الدفع في هذه النافذة لـ EOS تلقائيًا بالقيمة “الدفع من خلال كشف الراتب”. سيتم تحديث التغييرات في وضع الدفع من الأنشطة المتقدمة في هذه النافذة.
هام:
- إذا تم تحديد الدفع من خلال كشف الراتب:
- تتم إضافة المبلغ المراد منحه للموظف إلى كشف الراتب في أعمدة.
- يظهر أيضًا المبلغ المراد خصمه من الموظف في كشف الراتب.
- إذا تم تحديد الدفع من خلال قسيمة الدفع: لن يؤثر ذلك على كشف الراتب في أي من الأعمدة.
- إذا تم توفير تذكرة طيران كدفع من خلال كشف الراتب: فسيتم إضافتها في عمود إضافي من كشف الراتب لكل من موظفي الموارد البشرية وموظفي الجدول الزمني.
- بالنسبة لموظفي الجدول الزمني: لا يتم دفع راتب الغياب في عمود منفصل للدفع من خلال كشف الراتب. هنا، يتم دفع الراتب عن أيام الحضور. على سبيل المثال، إذا غاب الموظف لمدة يومين، فسيتم دفع الراتب لمدة 28 يومًا إذا كان الشهر 30 يومًا. لذلك، يظهر المبلغ لمدة 28 يومًا في كشف الراتب، وليس عمودًا منفصلاً لخصم الغياب.
- يمكنك دفع مقابل العمل الإضافي لموظفي الجدول الزمني فقط إذا كانت “حساب العمل الإضافي” نعم. سيتم عرض المبلغ في عمود منفصل باسم إجمالي العمل الإضافي.
بالنسبة لموظفي الموارد البشرية:
- في حالة غياب يوم واحد، سيتم خصم يوم واحد من إجمالي أيام الشهر بناءً على الإعداد. على سبيل المثال، إذا كان الإعداد هو أيام الشهر الفعلية ويتم خصم غياب الموظف من شهر يناير، فسيكون الراتب لإجمالي الأيام = 30 يومًا (31 – 1 = 30، سيتم خصم غياب يوم واحد). إذا كان الإعداد ثابتًا 30 يومًا ويتم خصم غياب الموظف من شهر يناير، فسيكون الراتب لمدة 29 يومًا.
بالنسبة لموظفي الجدول الزمني:
- نقوم بحساب أيام الحضور فقط. يعتمد دائمًا على أيام الشهر الفعلية. لذلك، عند وجود غياب، يمكنك تغيير الحالة إلى “غائب” ليوم الغياب ولن يتم احتساب ذلك اليوم.
تذكر أنه يمكن تعريف موظفي الشركة (مقسمة إلى جزأين) على أنهم موظفون أو موظفون موظفون في الوقت المحدد. سيحصل موظف الموارد البشرية على راتبه / راتبها تلقائيًا، لكن موظف الجدول الزمني لن يحصل على الراتب ما لم يتم ملء الجدول الزمني.
علامات تبويب أخرى:
- علامة التبويب “اقرأني”: عند إنشاء شركة جديدة، يجب عليك قراءة هذا الجزء بعناية.
- علامة التبويب الشعار والخريطة: هنا، يمكنك إرفاق شعار الشركة وخريطتها وصورتها. عند الطباعة، سيتم عرض الشعار.
- علامة التبويب المخطط: يمكنك تحديد المخطط التنظيمي للشركة. انقر بزر الماوس الأيمن على المنطقة وانقر فوق “إضافة رأس” لإضافة رأس للمؤسسة. لا يرتبط هذا المخطط بإعداد القسم أو أي جزء / وحدة في النظام.
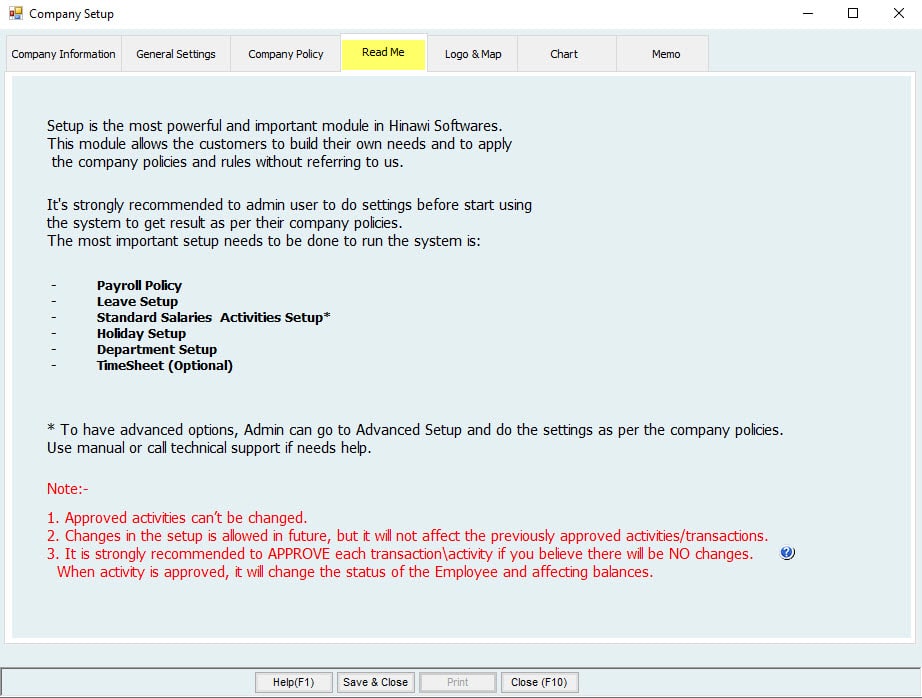
نظرًا لأن الإعداد هو أهم وأقوى نظام في (برنامج حناوي) ويسمح هذا النظام للعملاء ببناء احتياجاتهم الخاصة وتطبيق سياسات وقواعد الشركة دون الرجوع إلينا يوصى بشدة بأن يتأكد المستخدم المسؤول من اكتمال جميع الإعدادات قبل البدء في استخدام النظام للحصول على نتائج دقيقة وفقًا لسياسة الشركة.
الإعدادات الافتراضية المطلوبة قبل تشغيل النظام هي:
- سياسة الرواتب
- سياسة الإجازات والمعاشات التقاعدية
- الإعداد القياسي
- إعداد الإجازة
- جدول زمني (اختياري)
- إعداد القسم (اختياري)
** للحصول على خيارات متقدمة يمكن للمسؤول الانتقال إلى الإعداد المتقدم وتطبيق المزيد من الإعدادات وفقًا لسياسة الشركة استخدم الدليل أو اتصل بالدعم الفني إذا احتجت إلى أي مساعدة.**
يمكن للمستخدم تقسيم الموظفين إلى فئتين موظفين في شئون الموظفين وموظفين في الجدول الزمني يمكنه أن يقرر كيفية تصنيف الموظفين يمكنه وضعهم جميعًا في فئة واحدة أو تقسيمهم إلى فئتين الميزة الافتراضية في النظام هي اعتبار جميع الموظفين على أنهم شئون موظفين للتغيير إلى الجدول الزمني انتقل إلى قائمة Time Sheet ثم قم بتعيين الموظفين إلى الجدول الزمني.
بالنسبة لموظفي شئون الموظفين يتم إنشاء كشف الرواتب تلقائيًا ولكن بالنسبة لموظفي الجدول الزمني لا يتم إنشاء كشف الرواتب ما لم يتم ملء الجدول الزمني يجب على المستخدم ملء الجدول الزمني لكل موظف.
التغييرات بين الفئات ممكنة.
ملاحظة:
- لا يمكن تغيير الأنشطة المعتمدة.
- يُسمح بالتغييرات في الإعداد في المستقبل، لكنها لن تؤثر على الأنشطة / المعاملات المعتمدة مسبقًا.
- يوصى بشدة بالموافقة على كل معاملة / نشاط إذا كنت تعتقد أنه لن يكون هناك تغيير عند الموافقة على نشاط ما فإنه سيغير حالة الموظف ويؤثر على معاملة الأرصدة.
1-2 تحرير الشركة
إعدادات الشركة ← إعداد الشركة ← تحرير الشركة
هنا يمكن للمستخدم تعديل تفاصيل إعداد الشركة كما هو مذكور في الخطوة 1-1
سياسة الرواتب
إعدادات الشركة ← إعداد الشركة ← سياسة الرواتب.
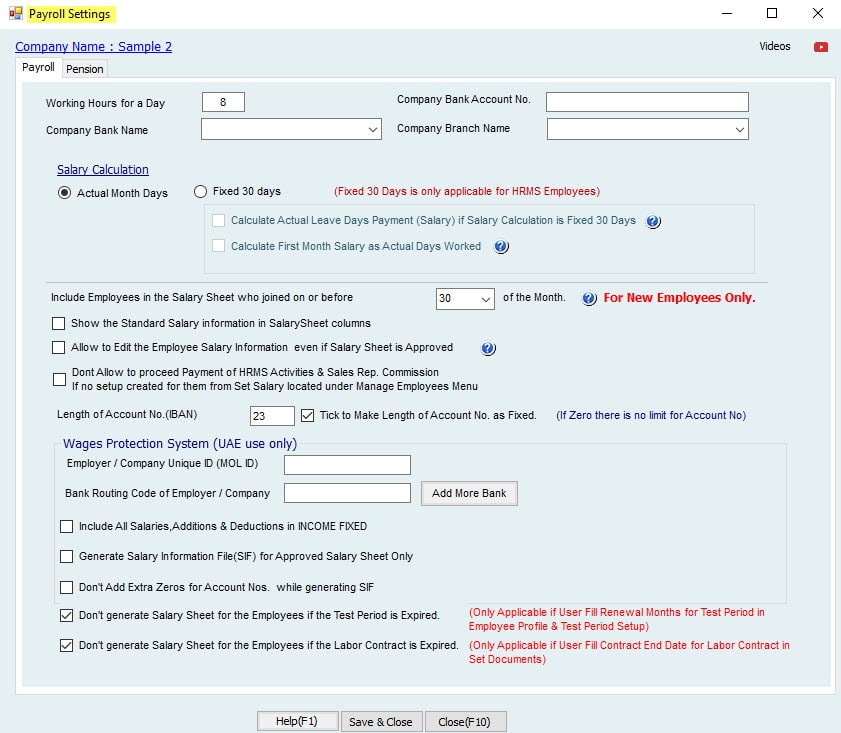
“الرواتب”:
إجمالي ساعات العمل في اليوم: يمكن للمستخدم تحديد إجمالي ساعات العمل للشركة في اليوم.
ملحوظة:
- يمكن أن يختلف من شركة إلى أخرى: 8 ساعات أو 9 ساعات سيؤثر هذا على موظفي شئون الموظفين فقط.
رقم الحساب المصرفي للشركة: يوفر رقم الحساب المصرفي للشركة.
اسم البنك التابع للشركة: يوفر اسم البنك.
اسم فرع الشركة: يوفر اسم الفرع.
حساب الراتب:
من المهم أن يفهم المستخدم طريقة حساب راتب الموظف وعلاقته بالأنشطة الأخرى مثل الغياب والإجازة وما إلى ذلك. في هذا الجزء، سنشرح العملية بالتفصيل لفهم أفضل.
يوجد لدى برنامج حناوي طريقتان لحساب الأساس:
30 يوم ثابت:
في هذا الأساس، يعتبر النظام جميع الأشهر ثابتة 30 يومًا بغض النظر عما إذا كان الشهر هو يناير أو فبراير أو أبريل.
2. أيام الشهر الفعلية:
في هذا الأساس، يحسب النظام عدد الأيام في الشهر. إذن، يناير هو 31 يومًا، فبراير هو 28/29 يومًا، وأبريل هو 30 يومًا.
ملحوظة:
- مبلغ صافي الدفع في كشف الراتب يتم تقريبه ولا يحتوي على نقاط عشرية.
- على سبيل المثال، سيكون 29.22 هو 2903 وسيكون 2892.86 هو 2893 كما هو موضح في الجدول أعلاه.
- أي أن 0.5 وأكثر سيتم اعتبارها 1 وأقل من 0.5 سيتم تجاهلها.
يمكن للمستخدم إجراء الإعدادات من الإعدادات الإضافية.
يؤثر كلاهما على حسابات الراتب الشهري لحالات الأنشطة التالية: الغياب والإجازة.
الحالة 1: الحالة القياسية
راتب الموظف الشهري 3000 درهم، جميع بنود الراتب متضمنة لحساب الإجازة، لا يوجد معاش لغير المواطنين، أساس حساب راتب الإجازة على 0 (صفر) يوم، إعداد الغياب هو الخصم من الراتب، لا يوجد شهر أول.
الحالة 2:
راتب الموظف الشهري 3000 درهم، جميع بنود الراتب متضمنة لحساب الإجازة، لا يوجد معاش لغير المواطنين، أساس حساب راتب الإجازة على 0 (صفر) يوم، لا يوجد شهر أول، الإعداد هو 30 يومًا ثابتًا؛ حساب أيام الإجازة الفعلية إذا تم تحديد مربع أساس حساب الراتب هو 30 يومًا ثابتًا.
الحالة 3:
راتب الموظف الشهري 3000 درهم، جميع بنود الراتب متضمنة لحساب الإجازة، لا يوجد معاش لغير المواطنين، الإعداد هو أيام الشهر الفعلية؛ أساس حساب راتب الإجازة على 360 يومًا.
سياسة حساب الراتب | ||||
| راتب الموظف | ثابت 30يوم | أيام الشهر الفعلية | 360 يوم | 365 يوم |
| Employee Salary: | نعم | نعم | X | X |
| Absence Amount: | نعم | نعم | X | X |
| Absence Days: | X | نعم | X | X |
| Leave Amount leave | نعم | نعم | نعم | نعم |
| Leave Days: | نعم | نعم | X | X |
أيام الشهر الفعلية
بالاعتماد على هذا الأساس، يحسب النظام عدد الأيام في الشهر. وبالتالي، يناير 31 يومًا، وفبراير 28/29 يومًا، وأبريل 30 يومًا.
30 يومًا ثابتًا
وفقًا لهذا الأساس، يعتبر النظام جميع الأشهر ثابتة 30 يومًا بغض النظر عن الشهر سواء كان يناير أو فبراير أو أبريل.
| حساب الغياب علي حسب أيام الشهر الفعلية | ||||||
| يناير | ||||||
| الراتب | 3000 | غياب يوم واحد خلال الشهر | غياب يوم 30 من الشهر | غياب اخر يوم من الشهر يوم31 | غياب 5 أيام ابتداء من يوم 27 | ملاحظات |
| أيام الشهر الفعلية | 31 | |||||
| أيام الإجازة الفعلية | 1 | 1 | 1 | 5 | سيؤدي ذلك إلى تقرير دفتر الأستاذ وسيتم خصمه من إجمالي فترة الخدمة. | |
| الوصف | الأيام من شهر يناير هي 27+28+29+30+31 | |||||
| حساب خصم أيام الإجازة | 1 | 1 | 1 | 5 | ||
| الوصف | One Day only | One Day only | One Day only | الايام من شهر يناير هي 27+28+29+30+31 | ||
| مبلغ الاجازة | الراتب الإجمالي / 31 × أيام الغياب | 96.77 | 96.77 | 96.77 | 483.87 | سيكون مبلغ الغياب أقل إذا كان الشهر 31 يومًا. |
| صافي المبلغ | إجمالي الراتب ناقص مبلغ الغياب | 2903.23 | 2903.23 | 2903.23 | 2516.13 | |
ملاحظة: إذا كان الغياب 10 أيام سيحسب النظام 5 أيام في يناير على النحو التالي: (3000 / 31 * 5) و 5 أيام في فبراير على النحو التالي: (3000 / (28 أو 29) * 5) = 1019.58 في حالة السنة العادية و 1001.11 في حالة السنة الكبيسة. | ||||||
| فبراير – الشهر 28 يوم (سنة كبيسه) | ||||||
| الراتب | 3000 | غياب يوم واحد خلال الشهر | غياب يوم 30 من الشهر
| غياب يوم واحد في نهاية الشهر يوم 28 | غياب 5 أيام ابتداء من يوم 27 | ملاحظات |
| أيام الشهر الفعلية | 28 | |||||
| أيام الغياب الفعلية. | 1 | N/A | 1 | 5 | سيتم عرضها في تقرير دفتر الأستاذ وسيتم خصمها من إجمالي فترة الخدمة. | |
| الوصف | الأيام هي: فبراير: 27+28
مارس: 1+2+3 | |||||
| حساب خصم أيام الغياب | 1 | 0 | 1 | 5 | سوف يتم تقسيم الايام الي شهرين | |
| 2 | يومان من شهر فبراير | |||||
| 3 | 3أيام من شهر مارس | |||||
الوصف
| يوم واحد فقط | _ | يوم واحد فقط | الأيام هي: فبراير: 27+28
مارس: 1+2+3 | ||
| 214.29 | حساب مبلغ الغياب لشهر فبراير. | |||||
| 290.32 | حساب مبلغ الغياب لشهر مارس | |||||
| مبلغ الغياب | الراتب الإجمالي / 28 × أيام الغياب | 107.14 | 0 | 107.14 | 504.61 | سيكون مبلغ الغياب أعلى إذا كان الشهر 28 يومًا. |
| صافي الراتب | إجمالي الراتب ناقص مبلغ الغياب | 2892.86 | 3000.00 | 2892.86 | 2495.39 | |
ملاحظة: إذا كان الغياب 10 أيام سيحسب النظام اليومين في فبراير على النحو التالي: (3000 / 28 * 2) و 8 أيام في مارس على النحو التالي: (3000 / 31 * 8) = 988.47 | ||||||
| شهر فبراير – 29يوم (سنة غير كبيسه) | ||||||
| الراتب | 3000 | غياب يوم واحد خلال الشهر | غياب يوم 30 من الشهر | غياب يوم واحد في نهاية الشهر يوم29 | غياب 5 أيام من الشهر ابتداءمن يوم 27 | ملاحظات |
| أيام الشهر الفعلية | 29 | |||||
| أيام الغياب الفعلية | 1 | N/A | 1 | 5 | سيؤدي هذا إلى عرض تقرير دفتر الأستاذ الغيابي وسيتم خصمه من إجمالي فترة الخدمة. | |
| الوصف | الأيام هي: 27+28+29 فبراير
مارس: 1+2 | |||||
| حساب خصم أيام الغياب | 1 | 0 | 1 | 5 | سوف يتم تقسيم الايام الي شهرين | |
| 3 | 3أيام من شهر فبراير | |||||
| 2 | يومان من شهر مارس | |||||
| الوصف | يوم واحد فقط | _ | يوم واحد فقط | الأيام هي: 27+28+29 فبراير
مارس: 1+2 | ||
| 310.34 | حساب مبلغ الغياب لشهر فبراير. | |||||
| 193.55 | حساب مبلغ الغياب لشهر مارس. | |||||
| مبلغ الغياب | الراتب الإجمالي / 29 × أيام الغياب | 103.45 | 0.00 | 103.45 | 503.89 | مقدار الغياب في شهر فبراير أعلى من الأشهر الأخرى. |
| صافي الراتب | إجمالي الراتب ناقص مبلغ الغياب | 2896.55 | 3000.00 | 2896.55 | 2496.11 | |
ملاحظة: إذا كان الغياب 10 أيام، سيحسب النظام 3 أيام في فبراير على النحو التالي: (3000 / 29 * 3) و 7 أيام في مارس على النحو التالي: (3000 / 31 * 7) = 987.76 | ||||||
| مارس | ||||||
| الراتب | 3000 | غياب يوم واحد خلال الشهر | غياب يوم 30 من الشهر | غياب يوم في نهاية الشهر يوم31 | غياب 5 أيام ابتداء من يوم 27 | ملاحظة |
| أيام الشهر الفعليه | 31 | |||||
| أيام الغياب الفعلية | 1 | 1 | 1 | 5 | سيؤدي هذا إلى تقرير دفتر الغياب وسيتم خصمه من إجمالي فترة الخدمة. | |
| الوصف | الأيام هي: 27+28+29+30+31 مارس | |||||
| حساب الخصم لايام الغياب | 1 | 1 | 1 | 5 | ||
| الوصف | يوم واحد فقط | يوم واحد فقط | يوم واحد فقط | الأيام هي: 27+28+29+30+31 مارس | ||
| مبلغ الغياب | الراتب الإجمالي / 31 × أيام الغياب | 96.77 | 96.77 | 96.77 | 483.87 | سيكون مبلغ الغياب أقل إذا كان الشهر 31 يومًا. |
| صافي الراتب | إجمالي الراتب ناقص مبلغ الغياب | 2903.23 | 2903.23 | 2903.23 | 2516.13 | |
ملاحظة: إذا كان الغياب 10 أيام، سيحسب النظام 5 أيام في مارس على النحو التالي: (3000 / 31 * 5) و 5 أيام في أبريل على النحو التالي: (3000 / 30 * 5) = 983.87 | ||||||
| ابريل | ||||||
| الراتب | 3000 | 1 Day Absence During the month | 1 Day Absence 30 of the month | 1 Day Absence at the end of the month (On 31) | 5 Days absence from 27 of the month | Note |
| أيام الشهر الفعلية | 30 | |||||
| أيام الغياب الفعلية | 1 | 1 | N/A | 5 | سيظهر هذا في تقرير دفتر الأستاذ للغياب وسيتم خصمه من إجمالي فترة الخدمة. | |
| الوصف | الأيام هي: 27+28+29+30 أبريل ويوم 1 مايو. | |||||
| حساب خصم أيام الغياب | 1 | 1 | 0 | 5 | سوف يتم تقسيم الأيام الي شهرين | |
| 4 | 4 أيام من شهر ابريل | |||||
| 1 | يوم واحد من شهر مايو | |||||
| الوصف | يوم واحد فقط | يوم واحد فقط | شهر ابريل فقط 30 يوم | الأيام هي: 27+28+29+30 أبريل ويوم 1 مايو. | ||
| 400.00 | حساب مبلغ الغياب لشهر إبريل. | |||||
| 96.77 | حساب مبلغ الغياب لشهر مايو. (مايو هو 31 يوما). | |||||
| مبلغ الغياب | إجمالي الراتب / 30 × أيام الغياب | 100.00 | 100.00 | 0.00 | 496.77 | |
| صافي الراتب | إجمالي الراتب ناقص مبلغ الغياب | 2900.00 | 2900.00 | 3000.00 | 2503.23 | |
ملاحظة: إذا كان الغياب 10 أيام، سيحسب النظام 4 أيام في أبريل على النحو التالي: (3000 / 30 * 4) و 6 أيام في مايو على النحو التالي: (3000 / 31 * 6) = 883.87 | ||||||
حساب الغياب (الشهر ثابت 30 يوما) | ||||||
| يناير | ||||||
| الراتب | 3000 | يوم واحد فقط خلال الشهر | غياب يوم 30 من الشهر | غياب يوم واحد في نهاية الشهر يوم31 | غياب 5 أيام ابتداء من يوم 27 | ملاحظة |
| أيام الشهر ثابته | 30 | |||||
| أيام الغياب الفعليه | 1 | 1 | 1 | 5 | سيظهر هذا في تقرير دفتر الأستاذ الغيابي وسيتم خصمه من إجمالي فترة الخدمة. | |
| الوصف | الأيام هي: 27+28+29+30+31 يناير | |||||
| حساب خصم أيام الغياب | 1 | 1 | 0 | 4 | ||
| الوصف | يوم واحد فقط | يوم واحد فقط | لن يتم النظر في الأيام بعد 30 | الأيام هي: 27+28+29+30
31 لن تحسب | ||
| مبلغ الغياب | إجمالي الراتب / 30 × أيام الغياب | 100.00 | 100.00 | 0.00 | 400.00 | |
| صافي الراتب | إجمالي الراتب ناقص مبلغ الغياب | 2900.00 | 2900.00 | 3000.00 | 2600.00 | |
ملاحظة: إذا كان الغياب 10 أيام سيحسب النظام 4 أيام في يناير على النحو التالي: (3000 / 30 * 4) و 5 أيام في فبراير على النحو التالي: (3000 / 30 * 5) [لن يتم احتساب يوم 31] = 900 | ||||||
فبراير - الشهر 28 يومًا (السنة غير الكبيسة) | ||||||
| الراتب | 3000 | غياب يوم واحد خلال الشهر | غياب يوم 30 من الشهر | غياب يوم واحد في نهاية الشهر يوم 28 | غياب 5 أيام ابتداء من يوم 27 | ملاحظة |
| أيام الشهر ثابته | 30 | |||||
| أايام الغياب الفعليه | 1 | N/A | 1 | 5 | سيظهر هذا في تقرير دفتر الأستاذ للغياب وسيتم خصمه من إجمالي فترة الخدمة. | |
| الوصف | إذا كان الغياب يومين فإن الأيام المحسومة تكون 4 | الأيام هي: فبراير: 27+28
مارس: 1+2+3 | ||||
| حساب خصم أيام الغياب | 1 | 0 | 1 | 7 | وتكون أيام الغياب أكثر إذا كان الشهر 28/29 يوما. | |
| 4 | 4 أيام في فبراير (27+28+29+30) | |||||
| 3 | 3أيام من شهر مارس | |||||
| الوصف | يوم واحد فقط | _ | يوم واحد فقط | الأيام هي: 27+28+29+30 فبراير
مارس: 1+2+3 | ||
| 400 | حساب مبلغ الغياب لشهر فبراير. | |||||
| 300 | حساب مبلغ الغياب لشهر مارس | |||||
| مبلغ الغياب | إجمالي الراتب / 30 × أيام الغياب | 100.00 | 0.00 | 100.00 | 700.00 | سيكون مبلغ الغياب أعلى إذا كان الشهر 28/29 يومًا. |
| صافي الراتب | إجمالي الراتب ناقص مبلغ الغياب | 2900.00 | 3000.00 | 2900.00 | 2300.00 | |
ملاحظة: إذا كان الغياب 10 أيام، سيحسب النظام 4 أيام في فبراير على النحو التالي: (3000 / 30 * 4) و 8 أيام في مارس على النحو التالي: (3000 / 30 * 8) = 1200 | ||||||
فبراير - الشهر 29 يوم (السنة الكبيسة) | ||||||
| الراتب | 3000 | غياب يوم واحد خلال الشهر | غياب يوم 30 من الشهر | غياب يوم في نهاية الشهر يوم 29 | غياب 5 أيام ابتداء من يوم 27 | ملاحظة |
| أيام الشهر ثابته | 30 | |||||
| أيام الغياب الفعلية | 1 | N/A | 1 | 5 | سيظهر هذا في تقرير دفتر الأستاذ للغياب وسيتم خصمه من إجمالي فترة الخدمة. | |
| الوصف | الأيام هي: فبراير: 27+28+29
مارس: 1+2 | |||||
| حساب الخصم لايام الغياب | 1 | 0 | 1 | 6 | سوف يتم تقسيم الايام الي شهرين | |
| 4 | 4 أيام في فبراير (27+28+29+30) | |||||
| 2 | يومين في شهر مارس | |||||
| الوصف | يوم واحد فقط | _ | يوم واحد فقط | الأيام هي: 27+28+29+30 فبراير
مارس: 1+2 | ||
| 400 | ||||||
| 200 | ||||||
| مبلغ الغياب | إجمالي الراتب / 30 × أيام الغياب | 100.00 | 0.00 | 100.00 | 600.00 | سيكون مبلغ الغياب أعلى إذا كان الشهر 28/29 يومًا. |
| صافي الراتب | إجمالي الراتب ناقص مبلغ الغياب | 2900.00 | 3000.00 | 2900.00 | 2400.00 | |
ملاحظة: إذا كان الغياب 10 أيام سيحسب النظام 4 أيام في فبراير على النحو التالي: (3000 / 30 * 4) و 7 أيام في مارس على النحو التالي: (3000 / 30 * 7) = 1100 | ||||||
| مارس | ||||||
| الراتب | 3000 | غياب يوم واحد فقط خلال الشهر | غياب يوم 30 من الشهر | غياب يوم في نهاية الشهر يوم31 | غياب 5 أيام ابتداء من يوم 27 | ملاحظة |
| أيام الشهر ثابته | 30 | |||||
| أيام الغياب الفعليه | 1 | 1 | 1 | 5 | سيظهر هذا في تقرير دفتر الأستاذ للغياب وسيتم خصمه من إجمالي فترة الخدمة. | |
| الوصف | الأيام هي: 27+28+29+30+31 مارس | |||||
| حساب خصم أيام الغياب | 1 | 1 | 0 | 4 | ||
| الوصف | يوم واحد فقط | One Day only | لن يتم النظر في الأيام بعد 30 | الأيام هي: 27+28+29+30
31 لن تحسب | ||
| مبلغ الغياب | إجمالي الراتب / 30 × أيام الغياب | 100.00 | 100.00 | 0.00 | 400.00 | |
| صافي الراتب | إجمالي الراتب ناقص مبلغ الغياب | 2900.00 | 2900.00 | 3000.0the | 2600.00 | |
ملاحظة: إذا كان الغياب 10 أيام، سيحسب النظام 4 أيام في مارس على النحو التالي: (3000 / 30 * 4) و 5 أيام في أبريل على النحو التالي: (3000 / 30 * 5) [لن يتم احتساب يوم 31] = 900 | ||||||
| ابريل | ||||||
| الراتب | 3000 | غياب يوم واحد خلال الشهر | غياب يوم 30 من الشهر | غياب يوم في نهاية الشهر يوم 31 | غياب 5أيام ابتداء من يوم27 | ملاحظة |
| أيام الشهر ثابته | 30 | |||||
| أيام الشهر الفعلية | 1 | 1 | N/A | 5 | سيظهر هذا في تقرير دفتر الأستاذ الغيابي وسيتم خصمه من إجمالي فترة الخدمة. | |
| الوصف | الأيام هي: 27+28+29+30 أبريل ويوم 1 مايو. | |||||
| حساب خصم أيام الغياب | 1 | 1 | 0 | 5 | سوف يتم تقسيم الايام الي شهرين | |
| 4 | 4ايام من شهر ابريل | |||||
| 1 | 1 يوم من شهر مارس | |||||
| الوصف | يوم واحد فقط | يوم واحد فقط | أبريل 30 يومًا فقط | أيام شهر أبريل هي: 27+28+29+30 ويوم واحد في شهر مايو | ||
| 400 | حساب مبلغ الغياب لشهر إبريل. | |||||
| 100 | حساب مبلغ الغياب لشهر مايو. | |||||
| مبلغ الغياب | إجمالي الراتب / 30 × أيام الغياب | 100.00 | 100.00 | 0.00 | 500.00 | |
| صافي الراتب | إجمالي الراتب ناقص مبلغ الغياب | 2900.00 | 2900.00 | 3ten0.00 | 2500.00 | |
ملاحظة: إذا كان الغياب 10 أيام، سيحسب النظام 4 أيام في أبريل على النحو التالي: (3000 / 30 * 4) و 6 أيام في مايو على النحو التالي: (3000 / 30 * 6) = 1000 | ||||||
الصورة 1:

الصورة2:

الصورة3:

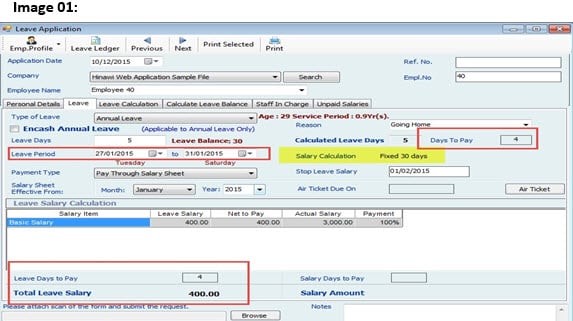
الصورة01:
الصورة 02:

الصورة 03:

الصورة04:

الصورة 05:
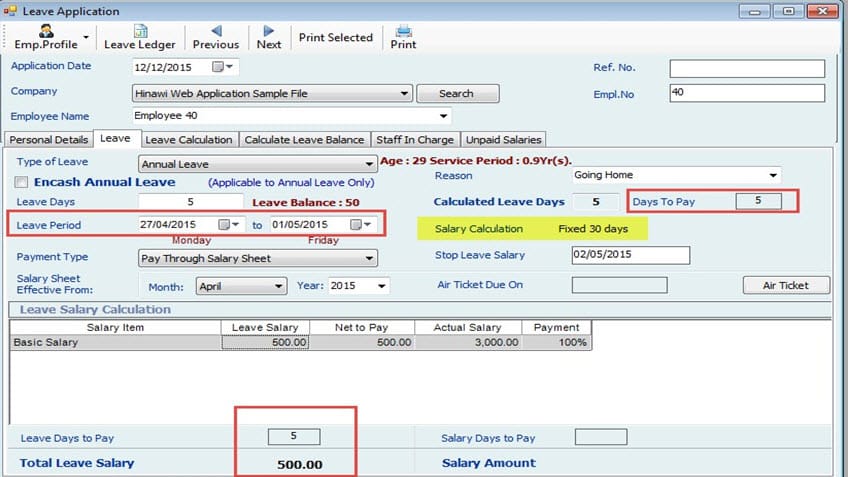
الصورة06:

Note:
1. Leave Salary Calculation Basis is enabled only If the salary calculation is Actual
Month Days. When salary calculation is Fixed 30 Days, this option is disabled.
2. If EOS is created for an employee (resign or terminated), the remaining of leave salary and unpaid salaries will show in EOS for
Calculate Actual Leave Days if salary calculation is Fixed 30 Days:
e.g.: If this option is checked, and an Employee takes a leave for 5 days on Feb 27, then the leave days will be 5 (27,28 & 1,2,3). If this option is not checked, the leave days calculated will be 7 (27, 28, 29, 30 & 1, 2, 3).
Note:
- The absence salary will be deducted from the Effective month given while reading an absence. E.g., an employee was absent from 29th Jan to 2nd Feb. Therefore, while creating the absence, if the effective month is selected as Feb, then the absence day salary will be deducted from Feb Monthly Salary.
- Calculation of Leave Days (for all types of leaves) is always based on the ACTUAL MONTH DAYS.
Special Cases When:
1. Setup is based on fixed 30 days. If an Employee was absent on Jan 31st, leave will be deducted from Leave Days if the setup is “Deduct from Leaves”. And absent day salary will be deducted if the setup is “Deduct from Salary”.
2. Setup is based on fixed 30 days. If an Employee was absent on 28th Feb, then absent salary will be deducted from the effective month if the setup is “deduct from salary”.
3. An absence is created for an employee, and the setup type is deducted from:
leaves → annual leaves, then it will deduct the leave days from the annual Leave Balance.
4. Setup is based on fixed 30 days. If an Employee goes for leave on Jan 31st, leave will be deducted from Annual Leave Days. But will not be paid for that 1 day since it is fixed 30 days.
5. Setup is based on fixed 30 days. If an Employee goes for leave on 28th, leaves will be deducted from Annual Leave Days. Salary is calculated for 27 working days to + 1 day leave salary. For the next 2 days (29 and 30) salary needs to be added as separate in addition and deduction manually by the user. And next month salary (March) will be fotwo 30 Days and 2 days salary in the Addition column.
Important:
Changing between Basis of calculation:
When the user wants to change the Basis of calculation or anything else in SETUP, the activities like Leaves, absence, salary sheet and EOS must be approved before proceeding (if there will not be any further changes on activities in the future.)
Note:
- We advise the user to approve all the activities (If there is no change later)
before changing the setup.
- We also advise users to create salary sheet before proceeding with changes in the setup. Also, to start doing changes in setup after approving the salary sheet.
- Activities approved before changing the policy (Setup) will remain the same and will not change after filling a new policy. I.e., There will be no effect on the calculation if there are changes between 2 methods when activities and salaries are approved.
- New calculation will affect the new activities reading from new changes in setup.
- If the user wants to affect the new changes in activities created already, then recreate the activities after changing the company policy.
Exceptional:
- Calculate First Month Salary as Actual Days Worked:
If thefor setup is fixed 30 days and the employee joining date is not 30 days month, calculate the working days based on the actual month.
Note:
By Default, this option will be checked. We strongly reclaimed keeping this checked. e.g. Employee joined on 27/01 so total working days will be: 5 days and will be calculated as 5/30 X Total Salary.
Employee joined on 27/02 so total working days will be: 2 days and will be calculated as 2/30 X Total Salary.
- Include Employees in the salary sheet who joined on or before of the Month this allows the user to include an employee who joined the company before the given datheirhe month and his/her salary is generated in the salary sheet.
e.g.: If an employee joins on 20th of a month and we set the above to 22, then he will be included in the salary sheet of this month.
- Show the Standard Salary Information in Salary Sheet Columns: If checked, the standard monthly salary will be seen in salary sheet as information only.
- Allow to Edit Employee salary Information even if the salary sheet is approved: This option Allows user to change the Employee Salary Information even if the Salary Sheet is approved. This option is added for employees whose salaries have increased after approving the salary sheet. Therefore, the system allows these changes for history status purposes regarding salary. This does not affect the Approved Salary Sheet. It will only affect the future salary sheets.
Note:
Differences the in the salary for previous period will be adjusted in the next salary sheets.
Wages Protection System (UAE Use Only):
Employer Unique Id: The user can provide the ID of the Employer here.
Bank Code of Employer: This is the bank code of the Employer and the user can add more banks here.
Includes All Salaries, Additions & Deductions in INCOME Fixed: This is a checkbox
Salary Information File (SIF) for Approved Salary Sheet Only: This is a checkbox.
Pension Settings Tab:

- Include Pension for Non-Locals
The user checks this option in case he/she wants to set pension for Non-Locals. Pension for Locals can be set from Default setup/Advanced Setup.
The user can check the option ‘Show the pension for Non-Locals in Separate column in Salary sheet’ if he/she wants the pension to be in separate column of the salary sheet.
The user can change the column name in Salary Sheet by giving a name in ‘Change the Column name in Salary Sheet as’
Deduct Company pension from Employees for Absence Days Locals % Non-Locals % The user can set the pension to be deducted from Employees for Absence Days.
1-4. Leave Policy
Leave Policy is one of the most important screens in the system. Kindly read carefully. You can contact us (End of Manual) for any further clarifications.
Company Settings → Company Setup → Leave Policy
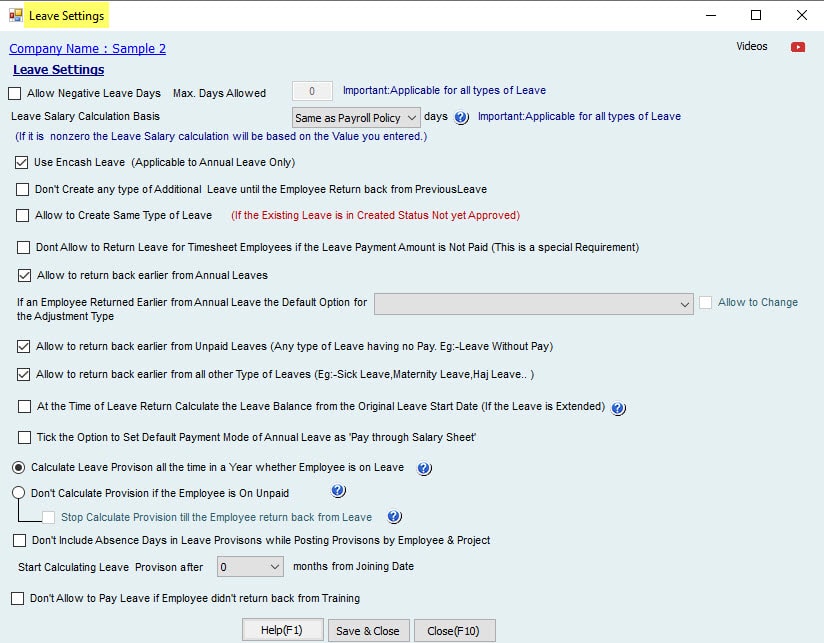
Leave Settings
- Allow Negative Leave Days:
Allows creating Leaves More than the available Balance
Note:
if Negative Leave Days is filled in with the following value: 5, an Employee has Leave Balance of 15 days; then the system will allow creating a leave for 20 days as Negative days are filled. And this is Applicable for All types of leaves.
When “Allow Negative Leave Days” is checked and the value is zero, it will allow creating leaves only as per the Leave balance. i.e., it simply means as if this option is not checked when the value is zero.
If the leave balance is zero or minus, the user should add Admin password to allow the negative days.
This applies to both Timesheet and HR Employees.
- Leave salary calculation basis on:
As default (zero here) it is reading from Payroll settings: Fixed 30 days or Actual month days.
If the user selects any value, the system will ignore reading from the Payroll Settings and reads from here as mentioned below:
If the user selects 360, the system will calculate Leave Salary through the following method:
{(Monthly Salary x 12)/360} x Leave Days
If 365, then as follows:
{(Monthly Salary x 12)/365} x Leave Days
This applies to both Timesheet and HR Employees.
Note:
– The user can change the basis of calculation only if the setup is Actual Month Days.
– If the setup is Fixed 30 days, this option will be disabled.
- Add Leave salary amount in the “Addition” Column of the Salary Sheet:
This is applicable only for Time Sheet Employees and the payment type of leave is Pay Through Salary Sheet; when the user applies it, the system will calculate the leave salaries and add to the additions and deduction form in the Timesheet software and it will be added to the salaries in the “Addition” column. If this option is not selected, no payment of leave will take place in the Salary sheet. This is per company policy.
- Pay Leave Salary separate for Time Sheet Employees:
If this option is checked, Leave Salary is paid separately as Cheque or Cash, and Leave salary will not be added in the salary sheet for Time Sheet Employees.
Note:
If an employee is on leave for 10 days, that 10 days salary will be added in the Additions and Deductions form in the salary sheet if the option ‘Add Leave salary amount in Addition Column of Salary Sheet’ is checked.
If this option is not checked, there will be no payment of leave in the salary sheet. This is per company’s policy.
- Use Encash Leave
Allows to Encash the Leave Days Balance for Annual Leave. For example, an Employee has Annual Leave balance of 20 days and he/she doesn’t want to go home. He/she can take Cash for that leave balance. If the Employee takes encashment for 10 Days Leave, then the next time he/she creates a “Leave”, his/her Leave Balance will show as 10 only. There are settings for selection of allowances for Encashment in the advanced setup.
The user can select Encash Leave Items from the list in the advanced setup.
When ‘Encash Leave’ is checked in the leave’s creation activity dialog, the number of leave days will be encashed as per the setup. Leave Days will be deducted from the Leave balance.
Note:
Negative Leave Days will not be Encashed.
This applies to both Timesheet and HR Employees.
- Don’t create any type of leave until the employee returns from leave
If this box is checked, the employee on leave cannot extend or take any leaves until he/she returns from leave.
To create any leave, user must return from the previous leave. This applies to both Timesheet and HR Employees.
- If an Employee Returned Earlier than expected from Annual Leave, the Default option for the Adjustment type:
Create Loan:
e.g.: An employee goes on 20 days paid leave and he/she comes back after 10 days, days leave back.
He/she must refund the leave salary for 10 days and get the 10
Deduct the leave days only:
e.g.: Employee goes on 20 days leave and he/she comes back after 10 days, so if this option is selected He doesn’t have to refund the money, but his 10 days leaves will be deducted.
Keep the Balance Leave Days:
E.g. Employee goes for 20 days leave and he comes back by 10 (If the company calls him back due to urgent work), if this option is selected He doesn’t have to refund the money and Company will not deduct the leave balance from his leaves.
This applies to both Timesheet and HR Employees.
NOTE:
In all the above cases Employee will get salary.
- At the time of “Leave return”, Calculate the leave Balance from the Leave Start
Date (if the Leave is Extended):
e.g.: An Employee goes on leave for 15 days and he extends leave for 5 days, the system will calculate the Leave Balance from the Leave start date, i.e., 20 days if this option is checked.
If not checked, his leave balance will be calculated from the extended leave. [Clarification]
- Calculate leave Provision
✓ Calculate the provision for working (Present) Days
✓ Calculate leave provision in all paid days (paid salaries + paid any type of leave)
✓ Calculate provision whole year regardless of availability or not (sick , annual leave , absence , paid or unpaid leave)
- Don’t calculate leave provision
1-5. Holiday Setup
Company Settings–> Company set up–>Holidays Setup

Weekly off days tab: Here, the user can select what days represent the weekly day offs. Public Holidays tab: Here, the user can select the public holidays: it can be fixed or variable.
e.g.: Fixed: January 1 is New Year which is a public holiday. Variable: Eid can be set as variable holiday.
Note:
Holidays setup affects calculations in many activities such as: salaries, leave, Time sheet, shift etc. This depends on the setup of each activity.
1-6. Employee Profile Setup:
Company Settings–>Employee set up–>Employee Profile Setup
Employee Profile Setup: Here, the user can setup the employee information that are required in his/her profile where the user has three options (required but optional, required and mandatory, not required). The user can select whether the information is
required or not by checking Y or N. Also, the user can set the filled to be mandatory by checking the “Must fill” in the Data entry checkbox.
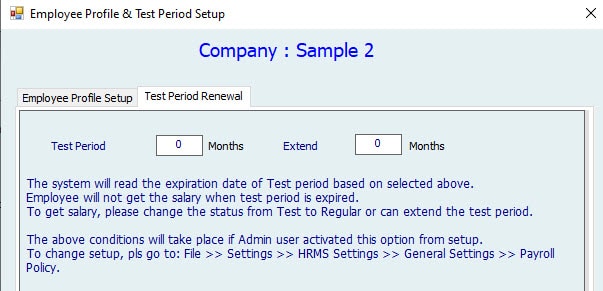
Test Period Renewal:
The user can setup the renewal period from “Employee Profile Setup”.
1-7. Department Setup:
Company Settings → Company Setup → Department Setup
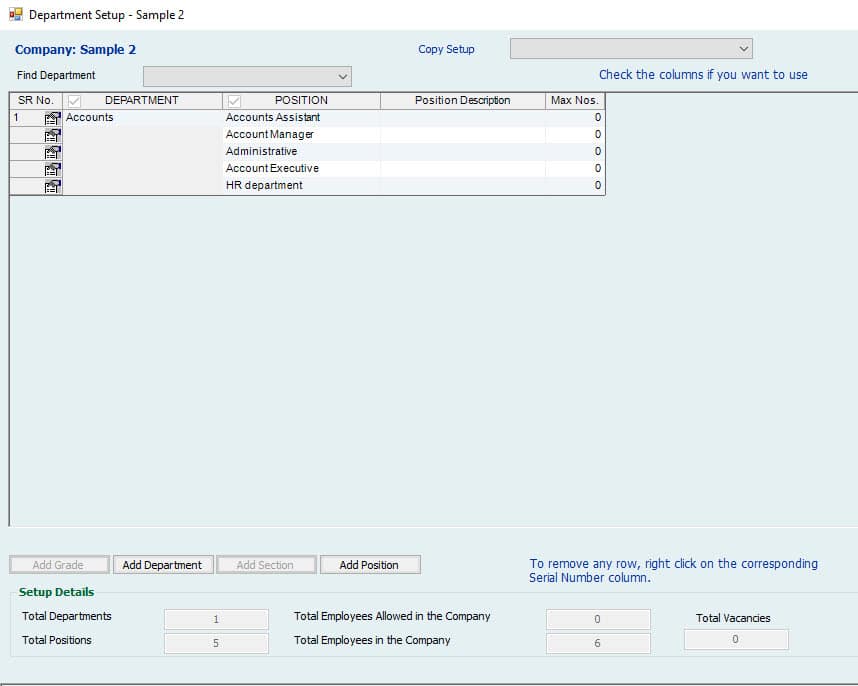
Here, the user can add different levels for Employees in the company. The user will be able to add the levels which are set on the Company Setup→General Setting By default, the user can add levels: Department and Position.
Find Department: The user can find the Departments added quickly whenever there are many number of Departments.
The user can add a Department using “Add Department” option and can add Position to the Department. e.g.: The user can add the Department ‘Sales Department’ and Position ‘IT Assist Manager’ and Max no. of Employees with the position ‘IT Assist Manager’ in
the Department.
The Options “Add Grade” and “Add Section” will be enabled only if these levels are set in the General Settings.
Setup Details: The user can see the details as per added in the above table. Copy Setup from: The user can copy the setup from other companies.
Remember: Whatever level you add in the department setup will be seen in all the system.
1–8. Budget – Salary Setup:
Company Settings → Company Setup → Budget – Salary Setup

Here, the user can set the budget for levels (Department, Position etc.) on a monthly or yearly basis. It will list information as the selected level. E.g. If a Department is selected, it will list all the departments added for the company. Select any department where the user can assign the value for budget in the amount column.
Note: There is a report for every activity.
1-9. Email Setup:
Company Settings → Company Setup → Email Setup
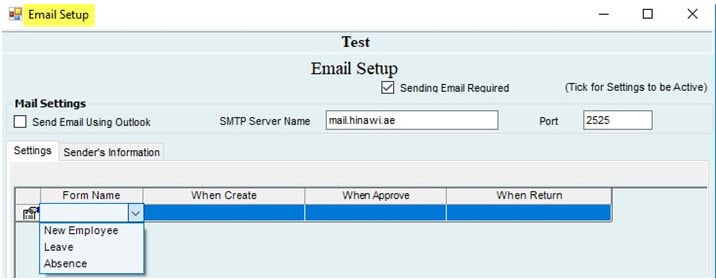
Here, the software provides an option for the user to send an email to the management when creating a new employee or leave (create, approve, return), and for create, by sending emails from outlook.
email.
Send Email Required: Check the box if the user wants to set the Send Email Using Outlook: Check this box if the user wants to send a mail using outlook. If checked, SMTP Server Name and Port will be disabled. The SMTP Server Name will be specific to the company.
Settings: The user can select the Form name:
New Employee: If an Employee Joins the company. Absent: If an Employee is absent.
Leave: If an Employee is on Leave.
If an Employee is on Leave:
When created: Shows the created date. When Approved: Shows the approved Date. When Return: Shows the returning Date. Sender’s Information:
Provide the Senders information and Send By (Signature)
1-10. Evaluation Setup:
Company Settings→ Company Set Up→Evaluation Setup
For Employee Evaluation, this can be used. But it is not a Comprehensive Appraisal / Evaluation.
Image 1:

Image 2:

Image 3:

Here, you can just define Different Evaluation Questions based on the Department and Positions.
In the system, you’ll be able to enter the Values regarding each of the Question first to get the Result.
Employee Category: Description is for the “Name of Evaluation”.
By clicking on the icon at the left, you can more add Departments and Positions.
Note:
The user will be able to add the levels which are set in the Company Setup→General Setting.
Evaluation: The user can add Questions for the Evaluation and specify the maximum points employees can reach in each question.
Grade: Define Grades by Assigning Marks Percentage.
Check the option “Show Results” to be able to view it in the “Data Entry” Screen.
After setting up Evaluation, Go to Manage Employees → Other
Manage Employees → Employee Evaluation. Filter the employees you want to evaluate and select them. “Evaluation Tab” will Show the Results.
Image 1:

Image 2:

1-11. Additional Setup:
Company Settings → Company Setup → Additional Settings

Here, the user can select how employee’s numbers are generated for companies. If “Generate one Employee serial number for all companies” is selected, employee’s serial number will be: company 1: 1,2,3… Company 2: 4,5,6…
If “Generate serial number by company” is selected, employee’s serial number will be:
company 1: 1,2,3… Company 2: 1,2,3…
Setup digits after decimal points and rounding: Here, users can set how many digits required to be displayed after the decimal points; it’s also used for rounding in the Total amount.
Rounding Required: Users can select whether he/she wants to round the salary’s amount. If Yes, increase number by 1 in case the next digit is 5 or more.
Archiving of Timesheet Salary Sheets Required:
If this option is checked, then all the Timesheet salary sheets will be archived.
Use Multicurrency:
If this option is checked, the user will be able to set the currency for Salary. When the user checks it for the first time, it will display the message “No default currency Selected”. You must go to “currency list” to set the default currency. The user can add any number of currencies and make one default. Once a currency is set as Default, it cannot be changed later.
1-12. Employee Costing Setup:
Company Settings → Company Setup → Employee Costing Report Setup
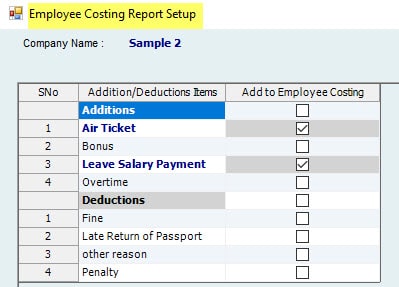
You can add any of the “Addition / Deduction” activities to the “Employee costing report”, so that it will calculate the addition or deduction added as employee “Cost”.
1-13. Report Format Setup:
Company Settings→ Company set up→Report Format Setup different forms.
Select Format Tab:
Here, the user can set available formats to Add prefix text to the employee’s number, and the text will be added before the Employee Number. For e.g.: If the prefix set is ‘A’ and the Employee numbers are 01,02, the Employee numbers are A01, A02
Report Margin tab:
The user can provide the margin details for reports.
1-14. Distance Setup:
Company Settings→ Company set up→Distance Setup
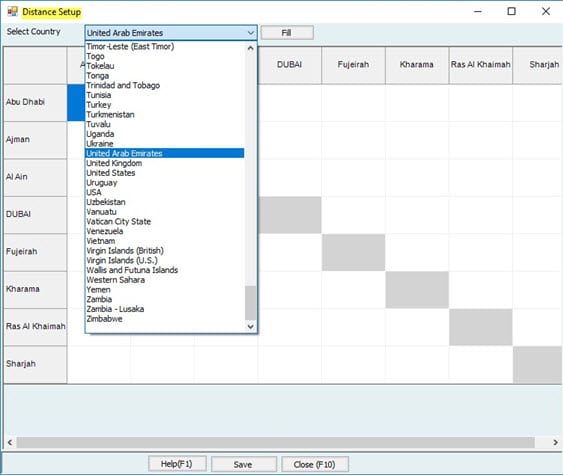
Country:
The user can select a country which will list the cities in that country and the distance between 2 cities. Countries or cities can be added from “General List” under settings. The values in this screen are just information and will not affect any calculations in the system.
1-15. Standard Salaries & Activities Setup:
Company Settings → Standard Salaries & Activities Setup
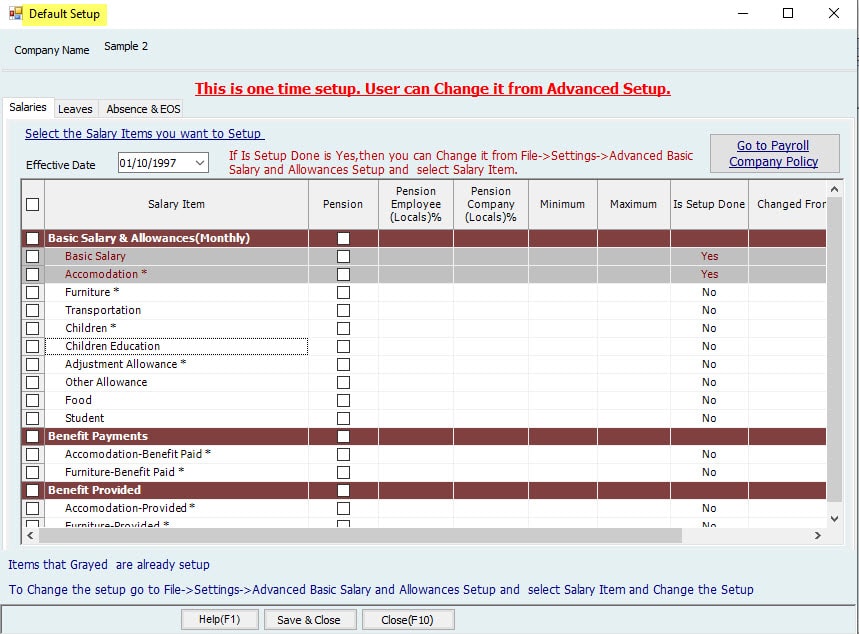
Salaries tab:
The user can select the salary items to be included for the standard setup. This is the minimum / standard setup needed to be done to run the system.
The user can set the minimum and maximum salaries to be given for Employees. Also, setting up the Pension to be deducted from both the company and the employee in each salary item can be done as well.
If the user selects the salary item from here, it will be set for the company. Once set, the user cannot change the settings from here and items will be grayed out.
For more settings, the user can go to “Advanced Settings” for each item. If the user doesn’t want to setup from here, he/she can go to Advanced Settings.
The user can set “Pension” for Locals to be deducted from Employee and Company. After completing the setup, it will be updated in the advanced setup. Moreover, the user can change this through advanced setup.
The user can set the minimum and maximum allowed salary for each salary item. After that, it will be updated in the advanced setup.
“Changed from Advanced Setup”: If the user makes changes from advanced setup, this column will display ‘Yes’.
Leaves tab:
Users can select the type of leave wanted for setup, E.g.: Annual leave, Hajj leave. If the items are selected, it will be set for the system. Users can go to Advanced Settings to make changes anytime. However, once set from here, the items will be grayed out and cannot be changed from here anymore.
If the user doesn’t want to setup the system from here, he/she can go to “Advanced Settings”.
Absence & EOS tab:
Users can select the activities required for setup, E.g.: Absence, EOS (Labor law), and Additions & Deductions.
If the activity items are selected, it will be set in the system. Users can go to Advanced Settings to make further changes anytime. Once set from here, the items will be grayed out and cannot be changed from here.
If the user doesn’t want to setup the system from here, he/she can go to “Advanced Settings”.
Note:
- Once setup is complete, the user cannot change the settings from here. After the initial setup is complete, it will be grayed out.
- Users can go to Advanced Settings for more options.
- Basic Salary & Allowance (Monthly) Setup.
In this part, users can setup Basic Salary and Allowances for their company sorted by levels (Department, Position or Grade…etc.). This depends on the items selected in department setup.
Users can select the Basic Salary & Allowances in company settings→ Basic Salary & Allowances.
2-1. Basic Salary Setup:

Note:
– Users can define which columns needed to be displayed for the Basic Salary setup using ‘Edit Columns’.
– The settings read from the standard setup. Minimum, Maximum and Pension will be reading from the Default setup. Users can change the settings from here.
Department and Position:
– Here, the user can define Basic Salary to be set for the levels: Department and Position.
– The user can select the option ‘All’ if he/she wants to have the same Basic Salary set up for all.
Nationality:
– The user can select which nationality applies to this basic salary settings.
– If Local is selected, the Basic salary will be applied to Locals.
– The user can set different Basic Salary setup for Locals and Non-Locals.
Fixed:
– Users can define a fixed amount to be given as basic salary for the specified employee.
– If the user set a fixed amount, then he/she cannot enter the columns Minimum and Maximum.
Minimum:
– Users can define the minimum basic salary to be given for the specified employee.
Maximum:
– Users can define the maximum basic salary to be given for the specified employee.
Pension (EMP):
– Users can define the percentage of salary to be deducted from the monthly salary as Pension from the employee.
Pension (COMP):
– Users can define the percentage of salary of the Employee to be deducted from the Company as Pension.
Note:
Users cannot define Pension (EMP) and Pension (COMP) for Non-Locals unless the ‘Include Pension for Non-Locals’ is checked from the Leave & Pension Settings. Allowance Type is fixed for Basic salary setup. It is always “paid” as monthly salary.
Users can set the Basic Salary for Employees from Manage Employees–>Set Salary & Benefits → Create / Adjust Single Salary.
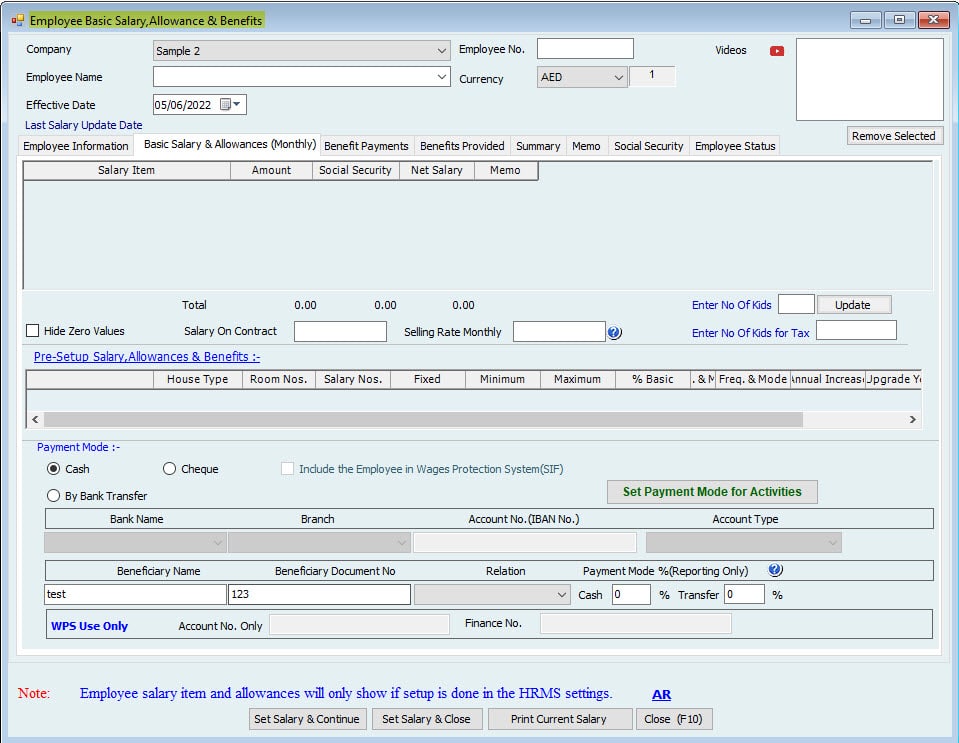
The user can set the amount to be paid as “Basic Salary and Allowances” here. The Salary item displayed here are depending on the setup done in the Default Setup / Advanced Setup.
2-2. Accommodation Setup:

Note:
– The user can define which columns needed to be displayed for the Accommodation setup using ‘Edit Columns’.
– The settings read from the standard setup. Minimum, Maximum and Pension will be reading from the Default setup if any is set. The user can change settings from here.
Allowance Type:
– The user can select the allowance type to show how the accommodation needs to be paid.
– E.g. If “Benefit Payments” is selected as Allowance type then accommodation is paid as Benefit Payments and Accommodation will be moved under Benefit Payments.
Department and Position:
– Here, the user can define Accommodation allowance to be set for the levels: Department and Position.
– The user can select ‘All’ if he/she wants to have the same set up for all.
Nationality:
Users can select which nationality applies to this basic salary settings.
– If Local is selected, the Accommodation allowance will be applied to Locals.
Fixed:
– Users can define a fixed amount to be given as Accommodation for the specified employee.
Minimum:
– Users can define the minimum Accommodation to be given for the specified employee.
Maximum:
– Users can define the maximum Accommodation to be given for the specified employee.
Pension (EMP):
Users can define the percentage of salary to be deducted from monthly salary as Pension from the employee.
Pension (COMP):
– Users can define the percentage of salary from Employees to be deducted from the Company as Pension.
Note:
Users cannot define Pension (EMP) and Pension (COMP) for Non-Locals unless the ‘Include Pension for Non-Locals’ is checked from the Leave & Pension Settings.
Notes:
- Users can change the Allowance type of all items except Basic Salary. Users can decide how he/she wants to pay the allowance to the employee: as basic salary and allowances Or Benefits. Once the value is set from Manage Employees–>Set Salary & Benefits, users cannot change the Allowance type.
- Users can create new items from General List–>Activities–>Basic Salary, Allowances & benefits.
- New created items will be coming under Advanced Basic Salary & Allowances.
I.e., whenever a new item is created, allowance type will be Basic Salary & Allowances.
- Users can change the Allowance type from Advanced Basic Salary & Allowances for the item added.
- If the user changes the Allowance type to Benefit Payment, the item will be listed under “Benefit Payment” after refreshing it.
- E.g.: If a user creates new item ‘Wife Ticket’ under General List→Activities→Basic Salary, Allowances & benefits, then this item will come under “Advanced Basic Salary & Allowances”. Users can open the setup for ‘Wife Ticket’ and change the allowance type to ‘Benefit Payment’ if he/she wants ‘Wife Ticket’ to be paid as Benefit Payment. After refreshing, ‘Wife Ticket’ will be listed under “Advanced Benefit Payments”.
- For any item under “Basic Salary & Allowances”, if the user set Allowance Type as “Basic Salary & Allowance” and after that he/she sets a salary for that item, the user will not be allowed to change the allowance type. Allowance type will be fixed.
- E.g.: If the user sets Furniture as Basic Salary & Allowances and if he/she also sets an amount for Furniture from Manage Employees–>Set Salary& Benefits, then the allowance type for Furniture can’t be changed. It will be fixed as Basic Salary & Allowances.
All the other allowances (Furniture, Transportation etc.) setup is the same as the above Accommodation setup.
2-3. Adjustment Allowance:

2-4. Children Setup:

2-5. Furniture Setup:

2-6. Food Setup:

2-7. Insurance Setup:

2-8. Loan Deduction:

2-9. Maintenance Allowance:

2-10. Other Allowance:

2-11. Phone Setup:

2-12. Student Setup:

2-13. Transportation:

More Items can be added under Basic Salary & Allowances as well.
- Benefit Payment Setup
User can set Advanced Benefit Payment settings from here.
3-1. Accommodation –Benefit Paid:

Note:
-Users can define which columns required to be displayed for the Benefit Payments setup using ‘Edit Columns’.
-The settings read from the standard setup. Minimum, Maximum and Pension will be reading from Default setup. Users can change the settings from here.
Allowance Type:
-It will list the types of allowance: Benefit Payment.
Department and Position:
-Here, the user can define two levels: Department and Position; Setup needs to be done on the settings.
-Users can select ‘All’ if they want to have the same setup to apply for all.
Nationality:
-Users can select what nationalities apply to this benefit payment settings.
Fixed Amount:
-Users can define a fixed amount to be given as benefit payment for the specified employees.
Minimum Amount:
-Users can define the minimum amount to be given as benefit payment for the specified employee.
Maximum Amount:
-Users can define the maximum amount to be given as benefit payment for the specified employee.
Pension (EMP):
Employee.
Pension (COMP):
-Users can define the amount to be deducted as pension from the
-Users can define the amount to be deducted as pension from the Company.
Note:
Users cannot define Pension (EMP) and Pension (COMP) for Non-Locals unless the ‘Include Pension for Non-Locals’ is checked from the Leave & Pension Settings.
Users can set the Benefit Payments for Employees from Manage Employees→Set Salary & Benefits→Create/Adjust Single Salary→Benefit Payments Tab.

Note:
Benefit Payment is not paid through salary sheet. Users need to create benefit from HR Activities where they can pay to the Employee by cheque or cash. This will not affect the salary sheet.
3-2. Furniture-Benefit Paid:

-Users can define which columns need to be displayed for the Benefit Payments setup using ‘Edit Columns’.
-The settings read from the standard setup. Minimum, Maximum and Pension will be reading from Default setup. Users can change the settings from here.
Allowance Type:
-It will list the type of allowance: Benefit Payment.
Department and Position:
-Here, the user can define two levels: Department and Position. The setting needs to be setup.
-Users can select option ‘All’ if he/she wants to have the same set up for all.
Nationality:
-Users can select what nationalities apply to this benefit payment settings.
Fixed Amount:
-Users can define a fixed amount to be given as benefit payment for the specified employees.
Minimum Amount:
-Users can define the minimum amount to be given as benefit payment for the specified employees.
Maximum Amount:
-Users can define the maximum amount to be given as benefit payment for the specified employees.
Pension (EMP):
Users can define the amount to be deducted as pension from the Employee.
Pension (COMP):
-Users can define the amount to be deducted as pension from the Company.
Note:
Users cannot define Pension (EMP) and Pension (COMP) for Non-Locals unless the ‘Include Pension for Non-Locals’ is checked from the Leave & Pension Settings.
Users can set the Benefit Payments for Employees from Manage Employees→Set Salary & Benefits→Create/Adjust Single Salary→Benefit Payments Tab.
- Benefit Provided Setup
User can set Advanced Benefit Provided settings from here.
4-1. Accommodation- Provided:

Note:
-Users can define which columns need to be displayed for the Benefit provided setup using ‘Edit Columns’.
-The settings read from the standard setup. Minimum, Maximum and Pension will be reading from Default setup if set any. Users can change the settings from here.
Allowance Type:
It will list the type of allowance: Benefit Provided.
Department and Position:
-Here, the user can define two levels: Department and Position. Setting needs to be setup.
-The user can select ‘All’ if he/she wants to have the same set up for all.
Nationality:
-Users can select to which nationality to apply this benefit provided settings.
Fixed Amount:
-Users can define a fixed amount to be given as benefit provided for the specified employees.
Minimum Amount:
-Users can define the minimum amount to be given as benefit provided for the specified employees.
Maximum Amount:
-Users can define the maximum amount to be given as benefit provided for the specified employees.
Pension (EMP):
-Users can define the amount to be deducted as pension from the Employees.
Pension (COMP):
-Users can define the amount to be deducted as pension from the Company.
Note:
Users cannot define Pension (EMP) and Pension (COMP) for Non-Local sunless the ‘Include Pension for Non-Locals’ is checked from the Leave & Pension Settings.
Users can set the Benefit Provided for Employees from Manage Employees→Set Salary & Benefit→ Create / Adjust Single Salary → Benefit Provided Tab.
4-2. Furniture –Benefit Provided:

Note:
-Users can define which columns need to be displayed for the Benefit provided setup using ‘Edit Columns’.
-The settings read from the standard setup. Minimum, Maximum and Pension will be reading from Default setup if set any. Users can change settings from here.
Allowance Type:
-It will list the type of allowance: Benefit Provided.
Department and Position:
-Here, the user can define two levels: Department and Position. The settings need to be setup.
-User can select ‘All’ if he/she wants to have the same setup for all.
Nationality:
-Users can select to what nationalities apply to this benefit provided settings.
Fixed Amount:
-Users can define a fixed amount to be given as benefit provided for the specified employees.
Minimum Amount:
-Users can define the minimum amount to be given as benefit provided for the specified employees.
Maximum Amount:
-Users can define the maximum amount to be given as benefit provided for the specified employees.
Pension (EMP):
Users can define the amount to be deducted as pension from Employees.
Pension (COMP):
-Users can define the amount to be deducted as pension from the Company.
Note:
Users cannot define Pension (EMP) and Pension (COMP) for Non-Locals unless the ‘Include Pension for Non-Locals’ is checked from the Leave & Pension Settings.
Users can set the Benefit Provided for Employees from Manage Employees→Set Salary & Benefits→Create/Adjust Single Salary→Benefit Provided Tab.
5.HRMS Activities Setup:
5-1. Leave Setup:
5-1-1. Annual Leave
Users can select the Activities setup in company settings→ HRMS Activities setup→ leave Setup → Annual Leave setup.
When users open the setup for the first time, it will open the below window to select the columns to be displayed for the setup:
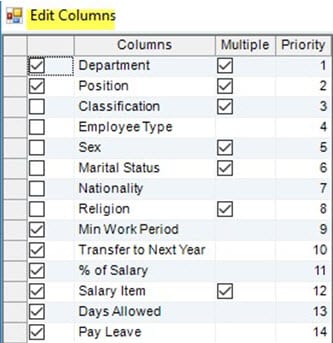
By default, the ticked columns are selected, users must “Save Settings & Close” to continue. In case multiple were checked, there will be multiple lines for the column type. I.e., users can have different setup for different lines.
Users can add more Leave types depending on the Company policy from General List. I.e., Lists→General list→Leave Type.

Note:
User can define which columns need to be displayed for the Annual Leave setup using ‘Edit Columns’.
Department and Position:
-Here the user can define Annual Leave to be set for the levels: Department and Position.
-User can select ‘All’ if he/she wants to have the same setup for all.
Minimum work Period:
-This is the Minimum work period the employee needs to finish in the company before creating the leave.
-For example, if the user (Admin) puts 6 months, the system will not allow to create Leave before 6 months.
Mode:
-Users can define the mode as Month/Year/Days.
Transfer to Next year:
- Transfer to next year means the Leave Balance will be carried forward to next year and so on.
- If Transfer to Next Year is Yes (Monthly), then if an Employee has Leave Balance of 50 Days, it will be transferred to next year and his/her balance will be 50 at the beginning of the year. Also, this will be included in EOS Leave calculation.
- E.g.: When the setup is monthly, all the remaining Leaves from joining date of the Employee will be carried forward to next year at the beginning of the month. The end of each month 2.5 days (as per setup) leaves will be added to the leave balance. If the Employee changes the setup to Annual, then the Leaves from previous years will be lost and the Leave balance will be 30 days. If the user wants to keep the previous leave balances, he/she can add the remaining leaves in Activities→Leaves→Days Adjustments.
- If “Transfer to Next Year” is No (Annual), then if an Employee has Leave Balance of 50 Days, it will not be transferred to next year and this will not be included in EOS calculation as well. The leave balance of the Employee will only be from the current year. At the beginning of the year, his/her balance will be 30 days. If the Employee takes a leave for 15 days, his/her leave balance will be 15 Days. However, if the user changes the setup to “Monthly”, then the leaves from previous years (balance from joining date) will be added to the Leave balance, the taken 15 days will be deducted from the leave balance.
% of Salary:
-What percentage of Defined Salary does the user want to pay in Leave salary?
-If the percentage is 100 and the salary is 1000, then the employee will get 1000 as Leave salary. If the percentage is 50 and the salary is 1000, then the employee will get 500 as the Leave salary.
Salary Item:
-Define the Salary Components to be included in the Leave Salary. For example, Basic Salary + Accommodation + Other Allowances or All Allowances as per company policy.
Encash Leave:
-Users can define the salary component to be given for the leave encashment if the employee is not taking the leave.
Month From / Month To:
-Define period of Leave Calculation Days for Employees.
For example, from 0 to 6 means first 6 months of service period, 7 to 12 means after 6 months and 12 to 0 means after a year. “0” here means infinite.
Days Allowed:
-Users can define Maximum days allowed for calculation of Leave in a specified Service period (Specify the period by using Month From / Month To).
-User can set 7-12-month duration, Days allowed as 24; then the maximum allowed leaves between 7-12 months will be 24 Days.
Duration:
-How many times does the user want to give these Allowed Days? Once a year or Monthly.
Mode:
-Users can define whether the allowed days is Monthly/Yearly.
Pay Leave:
-Users can select whether he/she wants to pay the leave or not for the employees.
Exclude Weekly off Days:
-Weekly off days (e.g. Friday) will be excluded from Leave Days. Weekly off Days can be defined from:
File→ Settings→ Company Setup→ Holidays Setup
For example, yearly allowed leaves are 30. If this option is checked, weekly off days are excluded from annual Leave calculation, and the system will not include Fridays in the Leave Period. It means that if an employee is going for a 30 days leave, the leave calculation will be 26 assuming 4 Fridays during its Leave.
Exclude Public Holidays:
-Public Holidays will be excluded from Leave Days. Public Holidays can be defined from:
File→ Settings→ Company Setup→ Holidays Setup
For example, if any Public Holiday comes during the Leave Period, and if this option is checked, it will not be considered in the leave calculation.
Exclude Used Annual Leave Days from Leave Calculation:
– The Leave period will be excluded from Leave Calculation.
For example, if the user selects this option, the system will not calculate (Accrued) Leaves for created Leave period. This means that after one month leave, the employee will have to work for 12 months to get 30 days.
Note:
Set Default button should change the setup to the default settings for annual leaves setup, as below.

Users can create Annual Leave from: Activities Menu→ Leaves→ Create Leave and select Type of Leave as Annual Leave. Users can select the payment type to be Pay through salary sheet if he/she wants the leave salary to be paid as part of the salary sheet. Users can also select Pay Now if he/she wants to pay the leave salary separately. Leave amount is based on the setup in the Annual Leave Setup.
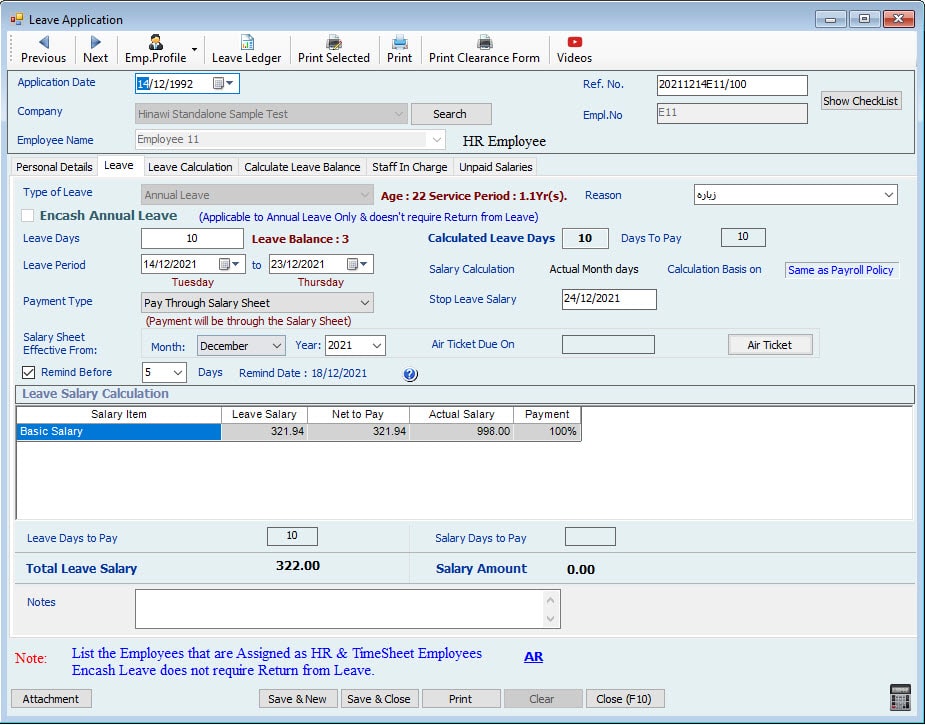
Users cannot create any other leave unless the created leave is processed. I.e., Accept Leave, Leave return.
Note:
- Encash Leave option will be enabled only if the user selects Annual leave.
- Users cannot have the Payment Type to be ‘Pay Now’ for Timesheet Employees.
- When the user creates a leave for Timesheet Employee and select the ‘Payment Type’ to “Update Ledger”, the leaves will not be shown while creating Timesheet.
- I.e., if the user creates sick leave from 02/03/2014 to 06/03/2014 for a timesheet employee and payment time is ‘Update Ledger’, then while creating timesheet for March, days ‘from 02/03/2014 to 06/03/2014’ will be shown as any other normal day.
- Leave Salary is paid in Leave column of the salary sheet for HR Employees.
- Leave Salary is paid in “Addition” column of the salary sheet for Timesheet
Employees.
- Whenever annual Leave is created, it will be deducted from Annual Leave Balance.
- Transfer to Next Year ‘Yes’ means All the leaves from joining date to leave start date will be calculated. It is a monthly calculation, and for each month there will be 2.5 Days added as per setup.
- Transfer to Next Year ‘No’ means that the system will calculate 30 Days starting from every year. The system will ignore all the leaves till end of the last physical year.
- If the user wants to change from Yes to No, and user needs to have the previous leave balance back, this can be done through Leaves Days Adjustment.
5-1-2. Haj Leave:

Note:
Users can define which columns need to be displayed for the Haj Leave setup using ‘Edit Columns’.
Department and Position:
-Here, the user can define Emergency Leave to be set for the levels: Department and Position.
-Users can select ‘All’ if he/she wants to have the same setup for all.
Religion:
-Religion should be Muslim to display Haj Leave in leave requests.
Minimum work Period:
– This is the Minimum working period required in the company before creating the leave.
– For example, if the user (Admin) puts 6 months, the system will not allow creating a Leave before 6 months.
Mode:
-Users can define the mode as Month/Year/Days.
Transfer to Next year:
-Transfer to next year means that the Leave Balance will be carried forward to next year and so on.
% of Salary:
– By Default, Transfer to Next Year is No for Haj Leave.
-What percentage of Defined Salary does the user want to pay in Leave Salary
-If percentage is 100 and the salary is 1000, then employee will get 1000 as Leave salary. If percentage is 50 and the salary is 1000, then the employee will get 500 as Leave salary.
Salary Item:
-Define the Salary Components to be included in the Leave Salary. For example, Basic Salary + Accommodation + Other Allowances or All Allowances as per company policy.
Month From / Month To:
-Define period for Leave Calculation Days of Employees.
For example, from 1 to 0 means throughout the service period.
Days Allowed:
-Users can define Maximum days allowed for calculation of Leave in a specified Service period (Specify the period by using Month From / Month To)
-Users can set Days allowed as 21; then, the maximum allowed Emergency leaves will be 21 Days.
Duration:
-How many times does the user want to give these Allowed Days? Once a year or monthly.
Mode:
-Users can define whether the allowed days are in Month/Year.
Pay Leave:
-Users can select whether he/she wants to pay the leave or not for the employees.
Exclude Weekly off Days:
– Weekly off days (e.g. Friday) will be excluded from Leave Days. Weekly off Days can be defined from:
File→ Settings→ Company Setup→ Holiday Setup
For example, yearly allowed leaves are 10. If this option is checked weekly, off days are excluded from Haj Leave calculation, and the system will not include Fridays in the Leave Period. This means that if an employee is going for 10 leave days, and there are 2 weekly off days, the leave calculation will be 8.
Exclude Public Holidays:
-Public Holidays will be excluded from Leave Days. Public Holidays can be defined from:
File→ Settings→ Company Setup→ Set Holidays
For example, if any Public Holiday comes during the Leave Period, and if this option is checked, it will not be considered in the leave calculation.
Deduct Leave Days from Service Period:
-If this option is checked, the Leave period will be deducted from the calculation of Service Period. Users can specify whether it is applicable for Locals or Non-locals.
-The Leave period will be deducted from Service Period which means that this Period will not be used for Accruing Annual Leave and deducted from End of Service
-For example, if this option is checked and an employee has been working for 5 years in the company, and during this period, he took 10 days (which is deducted from service period), his total service Period is as follows:
– (5 x 365) – 10 = 1815 Days.
Note:
Haj Leave is applicable only for Muslims. Users cannot Encash Haj Leave.
5-1-3. Leave without Pay Setup:

Note:
Users can define which columns required to be displayed for the Leave without Pay setup using ‘Edit Columns’.
Department and Position:
-Here, the user can define Leave without Pay to be set for the levels: Department and
Position.
-The user can select option ‘All’ if he/she wants to have the same setup for all.
Minimum work Period:
-This is Minimum working period employees need finish in the company before creating the leave.
-For example, if the user (Admin) puts 6 months, the system will not allow creating Leave before 6 months.
Mode:
-Users can define the mode as Month/Year/Days.
Transfer to Next year:
-Transfer to next year means that the Leave Balance will be carried forward to next year and so on.
– By Default, “Transfer to Next Year” is No for Leave without Pay.
% of Salary:
-What percentage of Defined Salary does the user want to pay in Leave? Percentage of salary will not make any difference for the setup since there is No payment for the leave.
Salary Item:
-Define the Salary Components to be included in the Leave Salary. This will not make any difference here since No payment is required for this leave.
Month From / Month To:
-Define period for Leave Calculation Days for Employees.
For example, from 1 to 0 means throughout the service period.
Days Allowed:
-Users can define Maximum days allowed for calculation of Leave in a specified Service period (Specify the period by using Month From / Month To)
-Users can set “Days allowed” as 60; which therefore means that the maximum allowed “Leave without pay” will be 60 days per year.
Duration:
-How many times the user wants to give these Allowed Days? Once a year or month.
Mode:
-Users can define whether the allowed days is Monthly/Yearly.
Pay Leave:
-The user can select whether he/she wants to pay the leave or not for the employees.
-Pay Leave is “NO” for this setup.
Exclude Weekly off Days:
– Weekly off days (e.g. Friday) will be excluded from Leave Days. Weekly off Days can be defined from:
File→ Settings→ Company Setup→ Set Holidays
For example, yearly allowed leaves are 60. If this option is checked, weekly off days are excluded from “Leave without Pay” calculation, and the system will not include Fridaysin the Leave Period. This means that if an employee is going for 10 days leave, and thereare 2 weekly off days, the leave calculation will be 8.
Exclude Public Holidays:
Public Holidays will be excluded from Leave Days. Public Holidays can be defined from
File→ Settings→ Company Setup→ Set Holidays
For example, if any Public Holiday comes during the Leave Period, and if this option is checked, it will not be considered in leave calculation.
Deduct Leave Days from Service Period:
-If this option is checked, the Leave period will be deducted from the calculation of Service Period. Users can specify whether it is applicable for Locals or Non-locals.
-The Leave period will be deducted from Service Period which means that this Period will not be used for Accruing Annual Leave and deducted from End of Service
-For example, if this option is checked, and an employee has been working for 5 years in the company, and he took 10 days leave during this period (which is deducted from service period), his total service Period is as follows:
– (5 x 365)- 10 = 1815 Days.
Note:
For the Leave Type ‘Leave without Pay’, the user needs to set Pay Leave as NO. Users can create Annual Leave from: Activities Menu→ Leaves→ Create Leave and select Type of Leave as Leave without Pay. The payment type will be disabled because there is no
payment of leave.

5-1-4. Maternity Leave Setup:

Note:
Users can define which columns need to be displayed for the Maternity Leave setup using ‘Edit Columns’.
Department and Position:
-Here, the user can define Maternity Leave to be set for the levels: Department and Position.
-The user can select ‘All’ if he/she wants to have the same setup for all.
Minimum work Period:
-This is the Minimum work period the employee needs to finish in the company before creating the leave.
-For example, if the user (Admin) puts 6 months, the system will not allow creating a Leave before 6 months
Mode:
-Users can define the mode as Month/Year/Days.
Transfer to Next year:
– “Transfer to next year” means that the Leave Balance will be carried forward to next year and so on
– By Default, Transfer to Next Year is “No” for Maternity Leave
% of Salary:
-What percentage of Defined Salary does the user want to pay in Leave Salary?
If percentage is 100 and the salary is 1000, then the employee will get 1000 as Leave salary. If percentage is 50 and the salary is 1000, then the employee will get 500 as Leave salary.
Salary Item:
-Define the Salary Components to be included in the Leave Salary. For example, Basic Salary + Accommodation + Other Allowances or All Allowances as per company policy.
Month From / Month To:
-Define period for Leave Calculation Days for Employees.
For example, from 1 to 0 means throughout the service period.
Days Allowed:
-Users can define Maximum days allowed for calculation of Leave in a specified Service period (Specify the period by using Month From / Month To)
-e.g. Users can set Days allowed as 45. Therefore, the maximum allowed Maternity leaves will be 45 Days.
Duration:
-How many times does the user want to give these Allowed Days? Once a year or monthly.
Mode:
-Users can define whether the allowed days are Monthly/Yearly.
Pay Leave:
-The user can select whether he/she wants to pay the leave or not for the employee.
Exclude Weekly off Days:
– Weekly off days (e.g. Friday) will be excluded from Leave Days. Weekly off Days can be defined from:
File→ Settings→ Company Setup→ Set Holidays
For example, yearly allowed leaves are 10. If this option is checked, weekly off days are excluded from Maternity Leave calculation, and the system will not include Fridays in the Leave Period. This means that if an employee is going for 10 leave days, and there are 2 weekly off days, the leave calculation will be 8.
Exclude Public Holidays:
– Public Holidays will be excluded from Leave Days. Public Holidays can be defined from:
File–> Settings–> Company Setup–> Set Holidays
For example, if any Public Holiday comes during the Leave Period, and if this option is checked, it will not be considered in the leave calculation.
Deduct Leave Days from Service Period:
-If this option is checked, the Leave period will be deducted from the calculation of Service Period. Users can specify whether it is applicable for Locals or Non-locals.
-The Leave period will be deducted from Service Period which means that this Period will not be used for Accruing Annual Leave and Deducted from End of Service
-For example, if this option is checked, and an employee has been working for 5 years in the company, and he took 10 leave days during this period (which is deducted from service period), his total service Period is as follows;
– (5 x 365)- 10 = 1815 Days.
Note:
Sex must be Female and Marital Status must be married for Maternity Leave. Users cannot Encash Maternity Leave.
5-1-5. Paternity Leave:

Same as the Maternity Leave, but the difference is that paternity must be for Married Male ONLY.
5-1-6. Sick Leave – Full Pay:

Note:
Users can define which columns need to be displayed for the Sick Leave setup using ‘Edit Columns’.
Department and Position:
Here, the user can define Sick Leave to be set for the levels: Department and Position.
-The user can select ‘All’ if he/she wants to have the same setup for all.
Minimum work Period:
-This is Minimum work period the employee needs finish in the company before creating the leave.
-For example, if the user (Admin) puts 6 months, the system will not allow creating Leave before 6months
Mode:
-Users can define the mode as Month/Year/Days.
Transfer to Next year:
– “Transfer to next year” means the Leave Balance will be carried forward to next year and so on.
– By Default, Transfer to Next Year is “No” for Sick Leave
% of Salary:
-What percentage of Defined Salary does the user want to pay in Leave Salary?
-If percentage is 100 and the salary is 1000, then the employee will get 1000 as Leave salary. If percentage is 50 and the salary is 1000, then the employee will get 500 as Leave salary.
Salary Item:
-Define the Salary Components to be included in the Leave Salary. For example, Basic Salary + Accommodation + Other Allowances or All Allowances as per company policy.
Month From / Month To:
-Define period for Leave Calculation Days for Employees.
For example, from 1 to 0 means throughout the service period.
Days Allowed:
Users can define Maximum days allowed for calculation of Leave in a specified Service period (Specify the period by using Month From / Month To).
-Users can set Days allowed as 21. Therefore, the maximum allowed Maternity leaves will be 21 Days.
Duration:
-How many times does the user want to give these Allowed Days? Once a year or monthly.
Mode:
-Users can define whether the allowed days in Month/Year.
Pay Leave:
-Users can select whether he/she wants to pay the leave or not for the employees.
Exclude Weekly off Days:
– Weekly off days (e.g. Friday) will be excluded from Leave Days. Weekly off Days can be defined from:
File→ Settings→ Company Setup→ Holiday Setup
For example, yearly allowed leaves are 10. If this option is checked, weekly off days are excluded from Sick Leave calculation, and the system will not include Fridays in the Leave Period. This means that if an employee is going for 10 leave days, and there are 2 weekly off days, the leave calculation will be 8.
Exclude Public Holidays:
-Public Holidays will be excluded from Leave Days. Public Holidays can be defined from:
File→ Settings→ Company Setup→ Set Holidays
For example, if any Public Holiday comes during the Leave Period, and if this option is checked, it will not be considered in the leave calculation.
Deduct Leave Days from Service Period:
-If this option is checked, the Leave period will be deducted from the calculation of the Service Period. Users can specify whether it is applicable for Locals or Non-locals.
-The Leave period will be deducted from Service Period which means that this Period will not be used for Accruing Annual Leave and deducted from End of Service For example, if this option is checked, and an employee has been working for 5 years in the company, and he/she he took 10 days (which is deducted from service period), the total service Period is as follows;
– (5 x 365)- 10 = 1815 Days.
5-1-7. Sick Leave – half Pay:

Note:
Users can define which columns need to be displayed for the Sick Leave-Half Pay setup using ‘Edit Columns’.
Department and Position:
-Here, the user can define Sick Leave-Half Pay to be set for the levels: Department and Position.
-The user can select ‘All’ if he/she wants to have the same setup for all.
Minimum work Period:
-This is Minimum work period the employee needs to finish in the company before creating the leave.
-For example, if the user (Admin) puts 6 months, the system will not allow creating Leave before 6 months
Mode:
-User can define the mode as Month/Year/Days.
Transfer to Next Year:
“Transfer to next year” means the Leave Balance will be carried forward to next year and so on.
– By Default, Transfer to Next Year is “No” for Sick Leave-Half Pay
% of Salary:
-What percentage of Defined Salary does the user want to pay in Leave Salary?
-Users must specify the percentage to be 50 since the setup is Sick Leave-Half Pay.
Salary Item:
-Define the Salary Components to be included in the Leave Salary. For example, Basic
Salary + Accommodation + Other Allowances or All Allowances as per company policy.
Month From / Month To:
-Define period for Leave Calculation Days for Employees.
For example, from 1 to 0 means throughout the service period.
If the user sets 1 to 12, the user will be allowed to create this leave only for the first year (1 to 12 months).
Days Allowed:
-Users can define the Maximum days allowed for Leave calculation in a specified Service period (Specify the period by using Month From / Month To)
-Users can set Days allowed as 21. Therefore, the maximum allowed Maternity leaves will be 21 Days.
Duration:
-How many times does the user want to give these Allowed Days? Once a year or monthly.
Mode:
-Users can define whether the allowed days are Monthly/Yearly.
Pay Leave:
-The user can select whether he/she wants to pay the leave or not for the employee.
Exclude Weekly off Days:
Weekly off days (e.g. Friday) will be excluded from Leave Days. Weekly off Days can be defined from, File→ Settings→ Company Setup→ Holiday Setup.
For example, yearly allowed leaves are 10. If this option is checked, weekly off days are excluded from Sick Leave-Half Pay Leave calculation, and the system will not include Fridays in the Leave Period. This means that if an employee is going for 10 leave days, and there are 2 weekly off days, the leave calculation will be 8.
Exclude Public Holidays:
-Public Holidays will be excluded from Leave Days. Public Holidays can be defined from
File→ Settings→ Company Setup→ Holiday Setup.
For example, if any Public Holiday comes during the Leave Period, and if this option is checked, it will not be considered in the leave calculation.
Deduct Leave Days from Service Period:
-If this option is checked, the Leave period will be deducted from the calculation of Service Period. User can specify whether it is applicable for Locals or Non-locals.
-The Leave period will be deducted from Service Period which means that this Period will not be used for Accruing Annual Leave and deducted from End of Service
-For example, if this option is checked, and an employee has been working for 5 years in the company, and he took 10 days leave in this period (which is deducted from service period), his total service Period is as follows;
(5 x 365)- 10 = 1815 Days.
Note:
- For Leave Type ‘Sick Leave-Half Pay’, user needs to set the % of salary as50. Users cannot Encash Sick Leave-Half Pay.
- If the user wants to create ‘Sick Leave-Half Pay’ throughout the service period, set ‘Month From/ Month To’ from 1 to 0.
Users can create Annual Leave from: Activities Menu→ Leaves→ Create Leave and select Type of Leave as Sick Leave-Half Pay. The ser can select the payment type to be Pay through salary sheet if he/she wants the leave salary to be paid as part of the salary sheet and Pay now if he/she wants to pay the leave salary separately. Leave amount is based on the setup in “Annual Leave Setup”. Salary Amount will be “half pay” as per the setup.
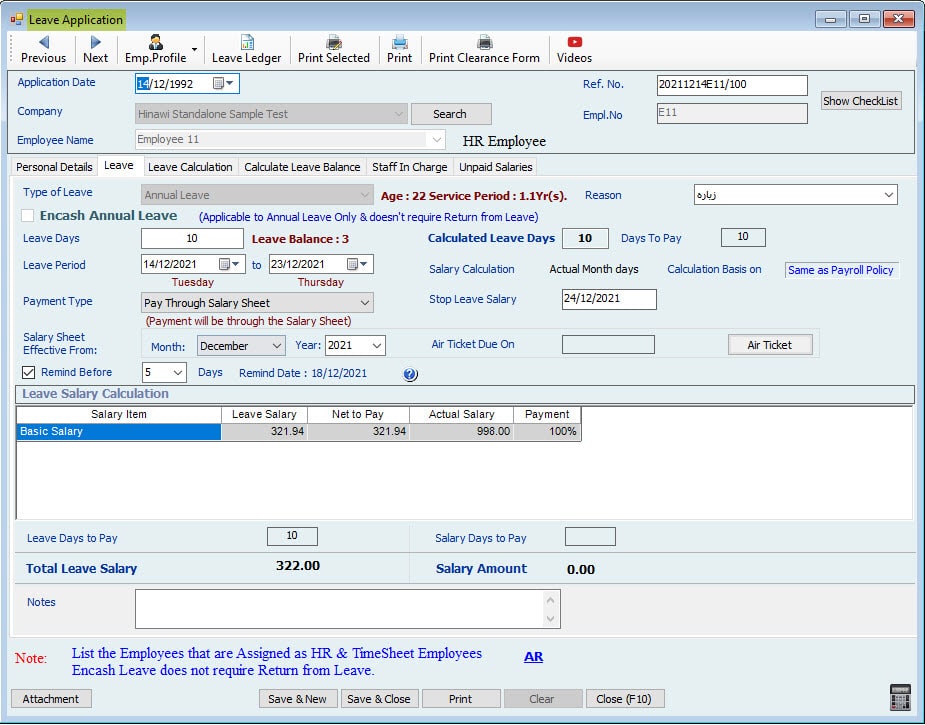
5-1-8. Sick Leave – No Pay:

Note:
Users can define which columns are needed to be displayed for the Sick Leave-No Pay setup using ‘Edit Columns’.
Department and Position:
Here, the user can define Sick Leave-No Pay to be set for the levels: Department and Position.
-The user can select ‘All’ if he/she wants to have the same setup for all.
Minimum work Period:
-This is the Minimum work period for employees to work in the company before creating the leave.
-For example, if the user (Admin) puts 6 months, the system will not allow creating a Leave before 6 months
Mode:
-Users can define the mode as Month/Year/Days.
Transfer to Next year:
– “Transfer to next year” means the Leave Balance will be carried forward to next year and so on.
– By Default, “Transfer to Next Year” is “No” for Sick Leave-No Pay
% of Salary:
-What percentage of the “Defined Salary” does the user want to pay in Leave?
-Percentage of salary is zero for the setup since there is No pay for this type of leave
Salary Item:
-Define the Salary Components to be included in the Leave Salary. This will not make any difference here since there’s “No payment” required for this type of leave.
Month From / Month To:
-Define a period regarding “Leave Calculation Days” for Employees. For example, from 1 to 0 means throughout the service period. Days Allowed:
-Users can define the Maximum days allowed for the calculation of Leave in a
specified Service period (Specify the period by using Month From / Month To)
– Users can set Days allowed as 2. Therefore, the maximum allowed “Sick Leave No pay” will be 2 days per month.
Duration:
How many times does the user want to give these Allowed Days? Once a year or monthly.
Mode:
-Users can define whether the allowed days are Monthly/Yearly.
Pay Leave:
-The user can select whether he/she wants to pay the leave or not for employees.
-Pay Leave is “No” for this setup.
Exclude Weekly off Days:
– Weekly off days (e.g. Friday) will be excluded from Leave Days. Weekly off Days can be defined from:
File→ Settings→ Company Setup→ Set Holidays
For example, yearly allowed leaves are 10. If this option is checked weekly, off days are excluded from Sick Leave-No Pay Leave calculation, and the system will not include Fridays in the Leave Period. This means that when an employee is going for 10 leave days, and there are 2 weekly off days, the leave calculation will be 8.
Exclude Public Holidays:
-Public Holidays will be excluded from Leave Days. Public Holidays can be defined from:
File→ Settings→ Company Setup→ Set Holidays
For example, if any Public Holiday comes during the Leave Period, and if this option is checked, it will not be considered in the leave calculation.
Deduct Leave Days from Service Period:
– If this option is checked, the Leave period will be deducted from the calculation of Service Period. Users can specify whether it is applicable for Locals or Non- locals.
– The Leave period will be deducted from Service Period which means that this Period will not be used for Accruing Annual Leave and deducted from End of Service
– For example, if this option is checked and an employee has been working for 5 years in the company and he took 10 leave days during this period (which is deducted from service period), his total service Period is the following:
(5 x 365)- 10 = 1815 Days.
Note:
For Leave Type ‘Sick Leave-No Pay’, the user needs to set Pay Leave as “No”.
Users can create Annual Leave from: Activities Menu→ Leaves→ Create Leave and select Type of Leave as Sick Leave-No Pay. There will be no payment for this leave as per

Note:
The system allows creating more typical type of leaves. Setup for these other leaves can be defined as per company Policy.
5-1-9. Emergency Leave:

Note:
Users can define which columns needed to be displayed for the Emergency Leave setup using ‘Edit Columns’.
Department and Position:
-Here, the user can define Emergency Leave to be set for the levels: Department and Position.
-The user can select ‘All’ if he/she wants to have the same setup for all.
Minimum work Period:
-This is the Minimum work period employees needed in the company before creating the leave.
– For example, if the user (Admin) puts 6 months, the system will not allow creating a Leave before 6 months
Mode:
-Users can define the mode as Month/Year/Days.
Transfer to Next year:
– “Transfer to next year” means that the Leave Balance will be carried forward to next year and so on.
-Transfer to Next Year is No, by default.
% of Salary:
-What percentage of Defined Salary does the user want to pay in Leave Salary?
-If the percentage is 100 and the salary is 1000, then the employee will get 1000 as
Leave salary. If the percentage is 50 and the salary is 1000, then the employee will get 500 as Leave salary.
Salary Item:
-Define the Salary Components to be included in the Leave Salary. For example, Basic Salary + Accommodation + Other Allowances or All Allowances as per company policy.
Month From / Month To:
-Define the period for Leave Calculation Days for Employees. For example, from 1 to 0 means throughout the service period.
Days Allowed:
-Users can define the Maximum days allowed for leave calculation in a specified Service period (Specify the period by using Month From / Month To)
-Users can set “Days” allowed as 10; then the maximum allowed Emergency leaves will be 10 Days.
Duration:
-How many times does the user want to give these Allowed Days? Once a year or monthly.
Mode:
-The user can define whether the allowed days are Monthly/Yearly.
Pay Leave:
-The user can select whether he/she wants to pay the leave or not for employees.
Exclude Weekly off Days:
– Weekly off days (e.g. Friday) will be excluded from Leave Days. Weekly off Days can be defined from:
File→ Settings→ Company Setup→ Holiday Setup
For example, yearly allowed leaves are 10. If this option is checked, weekly off days are excluded from Emergency Leave calculation, and the system will not include Fridays in the Leave Period. This means that if an employee is going for 10 leave days, and there are 2 weekly off Days, the leave calculation will be 8.
Exclude Public Holidays:
-Public Holidays will be excluded from Leave Days. Public Holidays can be defined from: File–> Settings–> Company Setup–> Set Holidays
For example, if any Public Holiday comes during the Leave Period, and if this option is checked, it will not be considered in the leave calculation.
Deduct Leave Days from Service Period:
-If this option is checked, the Leave period will be deducted from the calculation of Service Period. The user can specify whether it is applicable for Locals or Non-locals. The Leave period will be deducted from Service Period which means that this Period will not be used for Accruing Annual Leave and deducted from End of Service.
-For example, if this option is checked, and an employee has been working for 5 years in the company and he took 10 leave days throughout this period (which is deducted from service period), his total service Period is the following:
– (5 x 365)-10 = 1815 Days.
Note:
Users cannot Encash Emergency Leave.
5-2. Absence Setup:
Note:
User can define which columns required to be displayed for the Absence setup using ‘Edit Columns’.

Department and Position:
-Here, the user can define Absence to be set for levels: Department and Position.
-The user can select ‘All’ if he/she wants to have the same setup for all.
Excuse:
-The user can select Yes/No to set whether he/she has an excuse for the absence or not.
Max. Allowed:
-Users can set the maximum allowed days for absence during the month/Year.
Days/Hours:
-Users can select either Days/Hours for the absence.
Month/Years:
-Users can select Month/Years for the specified number of absence to be allowed in a Month or Year.
Deduction Rate:
-It is a number in which the absence days are deducted. If the rate is 2 and absent days are 2, then 2 X 2 = 4 days will be deducted as absence. If the rate is 0, then there’s no deduction.
No. of days to Deduct:
-It is the number of absence deducted from absence days. E.g. If the No. is set as 2, and employee is absent for 5 days, the deduction of days will only be 2.
Deduction from Service Period:
-User can select Yes/No to set whether the absence to be deducted from Service period or not.
-If selected as yes, the absence days will be deducted from the service period.
Deduction from Salary Sheet:
-Users can select Yes/No to set whether to deduct the absence from Salary/Leave.
-If selected yes, the absence will be deducted from Salary/Leave.
Deduct From:
-Users can specify the absence to be deducted from Leave/Salary.
-If Salary is selected, the absence will be deducted from Salary.
-If Leave is selected, the absence will be deducted from Leaves.
Deduct Item:
-Users can select the items from which the absence is deducted.
-If the deduct from is ‘Salary’, then “Deduct item” will list all the salary items, i.e. Basic, accommodation etc.
-If the deduct from is ‘Leave’ then “Deduct item” will list all the Leave items, i.e. Annual Leave, Emergency, Hajj leave etc.
Note:
If the absence setup is “With Excuse” and Deduction is ‘Deduct from Leave’, then Deduct from Leave’ will not deduct leave balance for the absence.

If the setup is with Excuse and Deduction is ‘Deduct from Salary’, then no amount will be deducted from the Salary.
If “Update Days Ledger” is selected with excuse, only leave ledger days will be updated with no deduction in any amount.
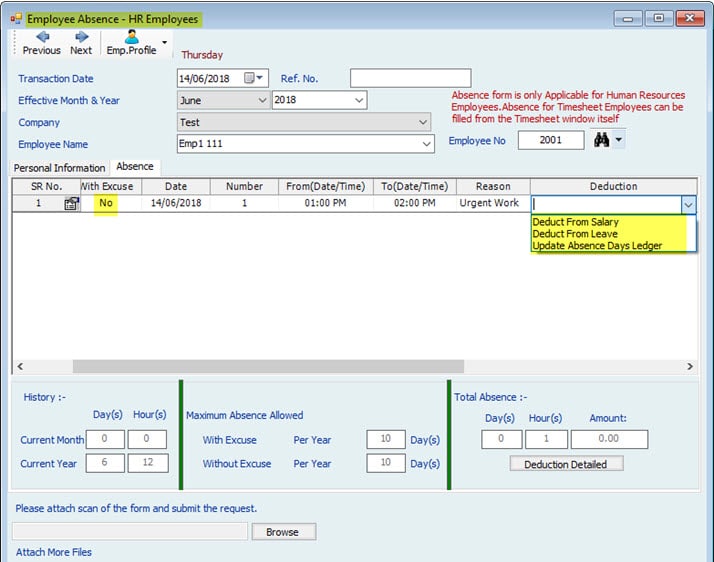
If there’s no excuse for any of the deduction types, there will be an actual deduction.
“Deduct from Salary” will deduct the required amount from the Salary Sheet, “Deduct from Leave” will deduct from the Annual leave balance days for the employee, and “Update Absence Days Ledger” will update the absence ledger in the report and deduct from absence days.
5–3. Loan Setup:

The window displayed above enables users to setup the “Loan process” in Hinawi Software according to their company policy. Permitting certain actions and having certain restrictions provides more flexibility and assures accurate results.

The above image displays the window used to create loans.
This includes the reason of creating this loan, the amount required for the loan, the starting month and year of the loan, the number of installments needed, and of course the installment amount which reads from the loan amount combined with the number of installments chosen.
5–4. Addition / Deduction Setup:
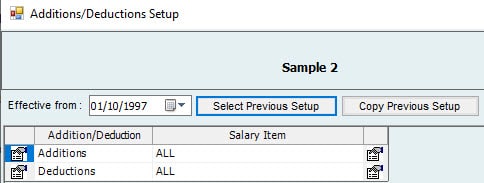
- The user can set this option for anything to be given to Employees other than salary. Normally, it is set for one time, but can be set monthly as automatic addition\deduction. It shows as a separate column in the salary sheet. Finally, t doesn’t affect the standard salary item.
- The user can set Addition or Deduction needed to be done based on the Salary item. I.e., if the user sets Additions and Salary Item as Basic, then whenever there is an addition for the employee in the month, it will consider only Basic salary as the item.
- The icon at the left of Addition/Deduction will allow adding activity Addition/Deduction. Duplicate activity is not allowed. The icon at the right will allow adding salary items for the activities Addition/Deduction.
- If there is an addition for the Employee like bonus, User can add this bonus amount as Addition column in the salary sheet. User can set the salary item to be included for the bonus from Addition/Deduction Setup.
- In the Addition/Deduction activity menu, the user can select “Pay On” to be Days/Month which will add/deduct Days salary/Month salary as per the salary item in the setup.
E.g.: If there is an Addition for the Employee like a Bonus, and Pay On is 1 Month, it will add 1-month salary in the Addition column.

If there’s a deduction for the Employee like Fine, and Pay On is 15 Days, it will deduct 15 days salary and will be shown in the Deduction column in the salary sheet.
Note:
If there is no setup for Addition, and the user creates an addition with Pay on 1 month, there will be no value (Zero) in the addition column since there is no setup. This is as per company policy.
If there is no setup for Deduction, and the user creates a deduction with Pay on 1 month, there will be no deduction since the value to be deducted will be zero. This is as per company policy.
5–5. End of Service (EOS):
By default, End of Service Setup is per Labor Law of the country. The system does not allow to calculate EOS if Service period is less than a year. EOS setup can be adjusted as the Company policy. Below are details for TERMS used in setup:
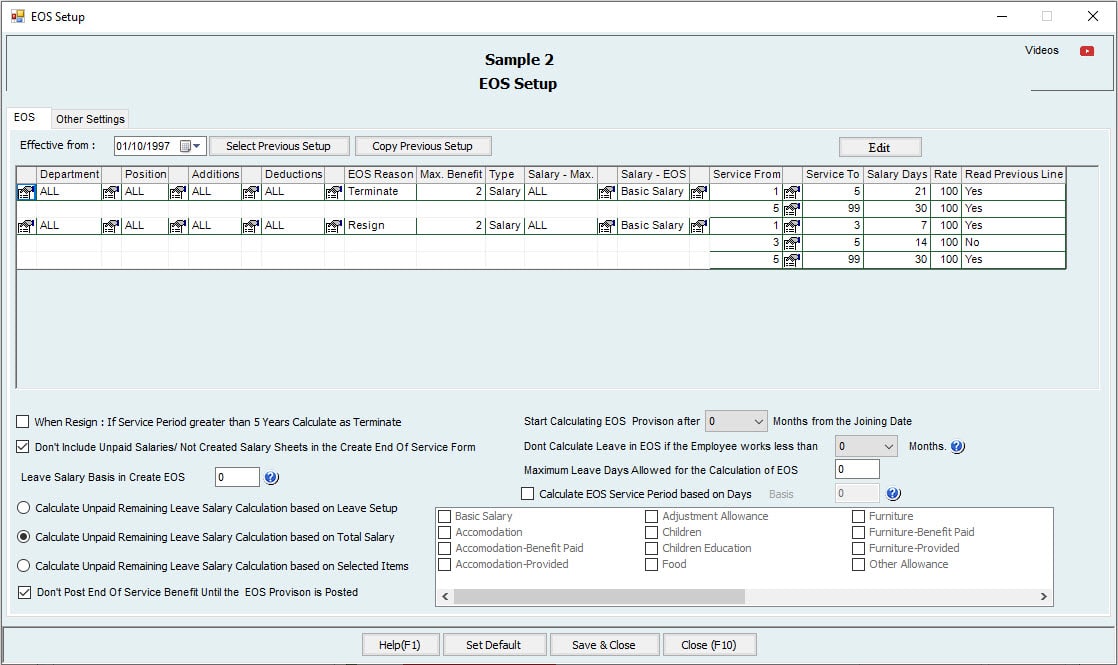
Note:
– The user can define which columns required to be displayed for the EOS setup.
– All the columns displayed here are as per the setup in Edit columns.
Department and Position:
– Here, the user can define EOS to be set for the levels: Department and Position.
– The user can select ‘All’ if he /she wants to have the same setup for all.
EOS Reason:
-Users can define the reason for creating EOS (specified in edit columns). Whether an employee Resigned or is Terminated. In UAE, there are separate settings in Each Case.
If Resign:
- For service period between year 1 to 3, there are 7 days Salary for each year.
- For service period between year 3 to 5, there are 14 days Salary plus preceding 3 years as 14 days as well.
- For service period more than 5 years, then there will be (Either 14 or 21) days salary for the first 5 years,
- Above 5 years will have 30 days salary.
If Terminated:
- For service period between year 1 to 5, 21 days salary will be considered for each year.
- For service period more than 5 years, 30 days will be considered.
Note:
There is an option to Calculate EOS in Resignation as a Termination if the Service period is more than 5 years.
Max-Month\Amount:
– The user can define the maximum benefit to be given for the employee.
– I.e., maximum month salary or amount to be given as maximum benefit.
Type:
– The user can define what type is for Max Benefit. Two options are available, total monthly salary or Amount.
– E.g.: It can be 24 times total monthly salary or 1000 to be the Amount.
– By default, the total monthly salary allowed for max benefit is 24 times the total monthly salary.
Salary Items:
-If Salary is selected as Type, select here which Salary components to be included in Max benefit.
Salary– EOS:
-Users can define which salary components to be included in EOS calculation. It means that the user can add components like Basic salary and allowances depending on their setup.
Service From/Service To:
-Defines the period of service from and to for the EOS calculation.
Salary Days:
-Users can define the salary days for EOS calculation.
Percentage to pay:
-Users can define the percentage of amount to be paid as EOS amount from the EOS calculation.
-E.g. If the EOS amount is 1000 and the percentage to pay is 100, then the amount to be paid is 1000 (full amount) and if the percentage to pay is 50, the amount to be paid will be 500.
Note:
1. Max benefit means: What is the maximum EOS that can be paid to Employee
2. EOS amount or Max benefit, which one is lower will be paid.
Dependable:
-Users can select either Yes or No for ‘Dependable’
– First line is always ‘Yes’ for dependable since there is nothing to depend on from a previous line.
-If the option is “Yes” from years 1 to 3 and 3 to 5, calculated days are 7 days for 1 to 3 years, and 14 days for 3 to 5 years as per the EOS setup.
-If option “No” is selected from years 3 to 5, calculated days are 7 for 1 to 3 years, but any sooner employee who has a service period that exceeds 3 years will enable getting 14 days for all previous years as well.
Note:
All the columns above are as per the settings in Edit Columns.
Maximum Leave Days Allowed for the calculation of EOS:
-Users can set the maximum number of leaves allowed while calculating EOS.
-If an employee has 40 days leave balance and if ‘Maximum Leave Days Allowed for the calculation of EOS’ is 10, he/she will be paid only for 10 days. This is as per the company policy.
Calculate Unpaid Leave Salary Calculation based on Leave Setup:
-If this box is checked, the unpaid salary will be calculated based on Leave setup.
-I.e., Company Setting→Advanced Activities Setup→Annual Leave Setup
Calculate Unpaid Leave Salary Calculation based on Total Salary:
-If this box is checked, the unpaid salary will be calculated based on the Total Salary.
Calculate Unpaid Leave Salary Calculation based on Salary Items:
-If this box is checked, the unpaid salary will be calculated based on Salary Items listed: Basic Salary, Accommodation, Furniture etc. Users can select the salary item to be included for the EOS calculation.
– E.g. Users can select the Basic salary, Accommodation etc.
Leave Calculation Basis:
-Users can check the box and set the basis to 360 or 365 Days.
-By Default, this option is unchecked with a value zero (i.e., basis is not set) which means that the leave calculation is based on the salary setup.
-If the basis is not set and leave days are 10 the salary calculation is: Actual Month Days: Leave Salary Calculation will be: 3000*12*10
365
Fixed 30 Days: Leave Salary Calculation will be: 3000*12*10
360
When Resigns; If service period exceeds 5 years, calculate as Terminate:
-If the option is checked, for any employee after 5 years calculate EOS as Termination when he/she resigns.
Don’t Include Unpaid Salaries/Not Created Salary Sheets in the Create End of Service form:
-If this option is checked, unpaid salaries and not created salary sheets are not included in the EOS calculation.
Date:
Start Calculating EOS provision after—- Months from Joining
-Users can set the number of months to start calculating EOS provision from the joining date.
– E.g., if 6 months is selected, the system will start calculating the EOS provision after 6 months of joining date.
Calculate EOS Service Period based on Days Basis Days:
– EOS Service Period can be calculated on different day’s basis. It could be 365 or 360 days or any basis as per company policy.
– If ‘Calculate EOS Service Period based on Days’ is not set, then the service period will be calculated as 3 + (4 / 12) + (2 / 365) = 3.338813 if Employee worked for 3 Years 4 Months and 2 Days.
– If ‘Calculate EOS Service Period based on Days’ is 360 Days, then the service period will be calculated as 1221 / 360 = 3.391 if the Employee worked for 1221 days. (1221 is the number of calendar days worked from joining date to EOS date).
Note:
When the user selects Set Default, it should go to the default settings of EOS as per UAE (country). Set Default should read from the country EOS setup.
Note:
Creating EOS will not affect any transaction / activities unless EOS is approved.
E.g.: For a Timesheet Employee, if the user wants to create EOS date on 12 June, then he/she needs to do the following:
- Users need to create Timesheet for June. Fill timesheet entry till 11 June normally and from 12 June till the end of the month fill as ‘Absent’.
- Create Salary sheet of June
- Create EOS
Now to cause an effect on activities, the user must approve EOS.
In the Additions & Deductions Tab, the user can add the additions and deductions to be added for the EOS Employee as below:
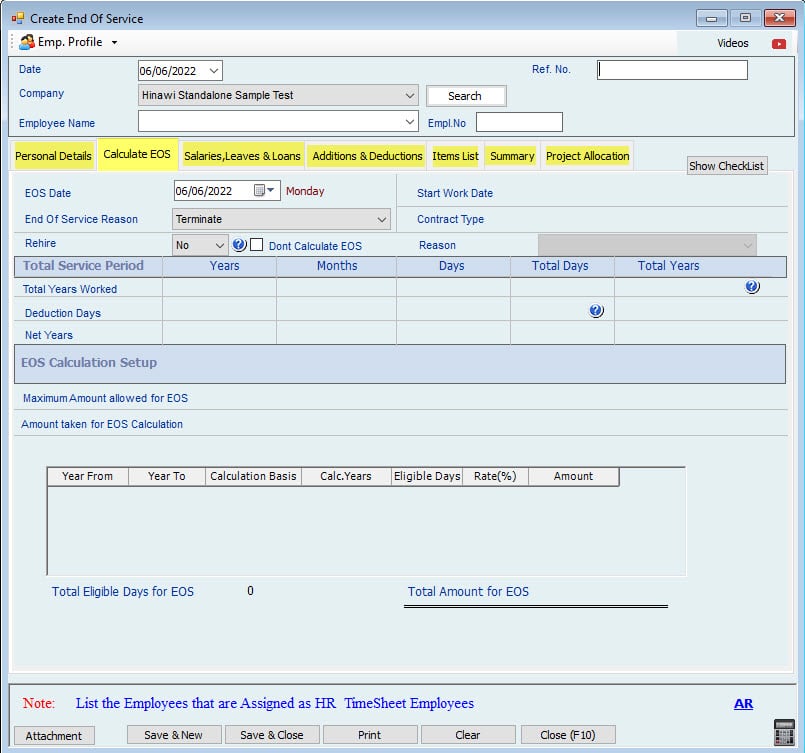
If the user wants to make any Adjustment in the total amount, he/she can do it from the Summary Tab as below:
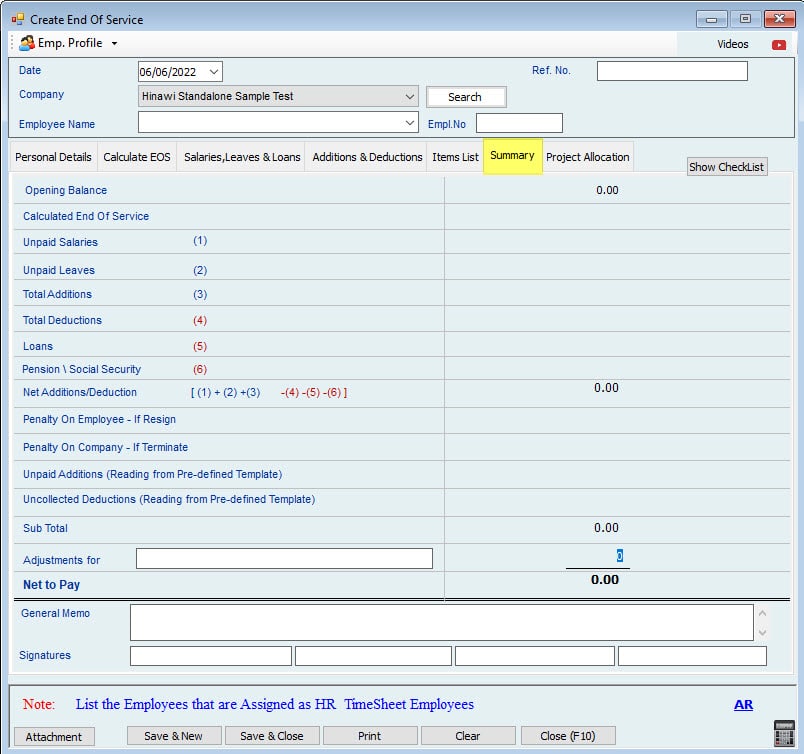
Different Cases:
If the employee Salary is 3000; Calculate Unpaid Leave Salary Calculation Based on Leave Setup, (Leave Setup is to include All Salary Items and Transfer To Next Year is Yes), Employee works for 3 year,4 month and 2 days and EOS Setup is as below: the Default setup.
The Calculation summary is the following:
Note:
If Leave Salary Calculation basis is 0 Days, then it will read the setup from Payroll Settings. If setup is actual month days, then the leave days is divided by 365 Days, if setup is fixed 30 days, then leave days is divided by 360 Days.

The image displayed above represents a closeup view of the EOS Setup where users get to choose and apply the suitable actions and requirements.
Moreover, the cases displayed below represents several calculations regarding the End of Service.
However, the results might vary between one user and another depending on how the setup is made among users
Case 1:
If the setup is
![]()
And Leave Salary Calculation basis is 360 Days, EOS basis =360 in EOS Setup:
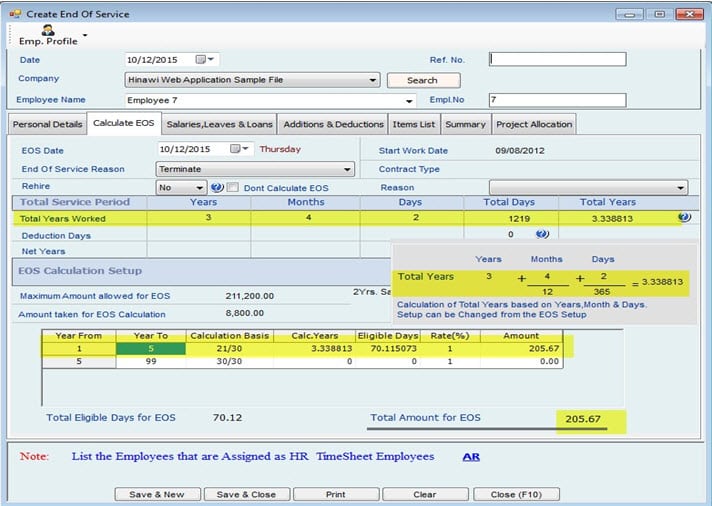
Here, 1-day salary = 3000*12 =100
360
100 X 70.115073 (Eligible Days) =7011.51
If EOS basis = 365, then calculation will be as follows:
1-day salary = 3000 *12 =98.63, then Total amount for EOS will be
365
98.63 * 70.115073 (Eligible Days) = 6915.459
Note:
1. Total Days is calculated as total no of Calendar Days. i.e., 1219 days her
2. When ‘Calculate EOS Service Period based on Days’ is not set (By Default zero), then the years calculated as (as example shown above) 3 + (4 / 12) + (2 / 365) = 3.338813 if 3 years 4 Months and 2 Days.
And If Maximum Leave Allowed for Calculating EOS is set as 10, then Leave salary will be: (3000 * 12 * 10) / 360 = 1000 [basis: 360].

Case 2:
If the setup is
![]()
And Leave Salary Calculation basis is 365 Days,
EOS basis = 360 in EOS Setup:
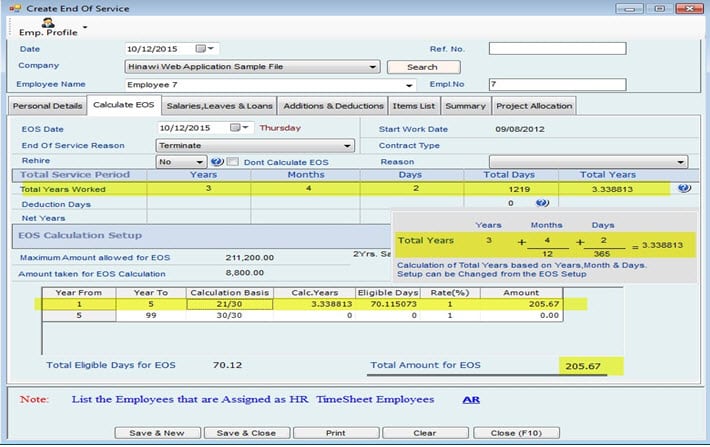
Here, 1-day salary = 3000*12 =100, then, the total amount for EOS will be
360
100 * 70.115073 (Eligible Days) = 7011.51
If EOS basis = 365, then calculation will be the following:
1-day salary = 3000 *12 =98.63, then the Total amount for EOS will be
365
98.63 * 70.115073 (Eligible Days) = 6915.459
And If the Maximum Leave Allowed for Calculating EOS is 10, then Leave salary will be: (3000*12*10) / 365 = 986 [basis: 365]

Case 3:
If the setup is
![]()
And Leave Salary Calculation basis is 360 Days,
EOS basis =360 in EOS Setup:
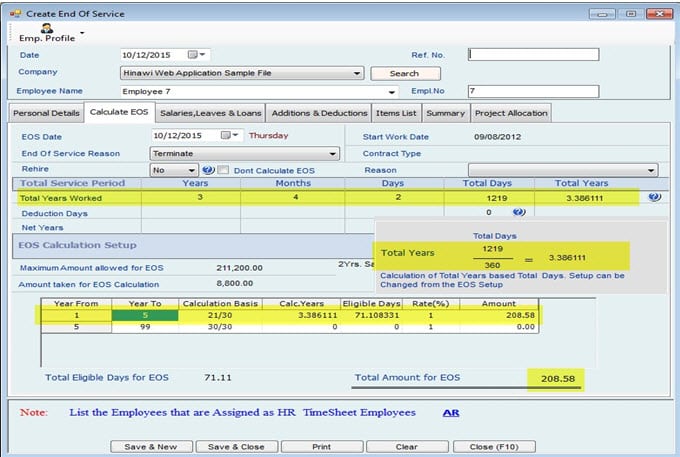
Here, 1-day salary = 3000*12 =100, then the total amount for EOS will be
360
100 * 71.108331 (Eligible Days) = 7110.8331
If EOS basis = 365, then the calculation will be the following:
1-day salary = 3000 *12 =98.63, then Total amount for EOS will be
365
98.63 * 71.108331 (Eligible Days) = 7013.4
And If Maximum Leave Allowed for Calculating EOS is 10, then Leave salary will be: (3000*12*10) / 360 = 1000 [basis: 360].

Case 4:
If the setup is
![]()
And leave salary calculation basis is 365 Days
EOS basis = 360 in EOS setup:
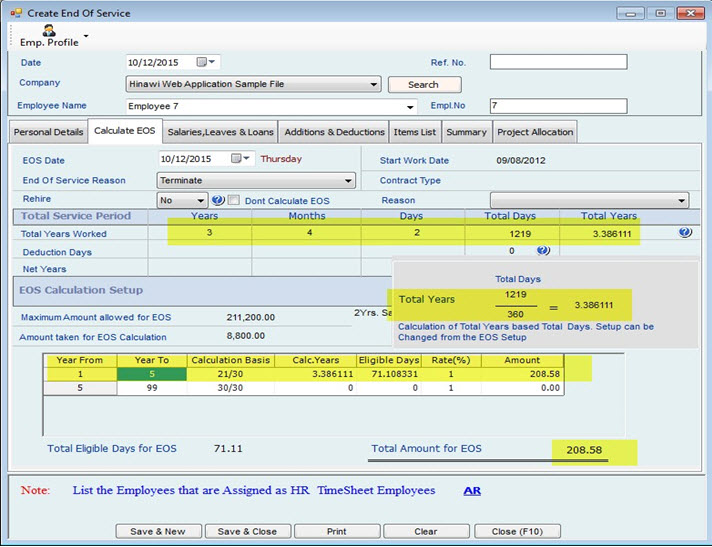
Here, 1-day salary = 3000*12 =100, then the total amount for EOS will be
360
100 * 71.108331 (Eligible Days) = 7110.8331
If EOS basis = 365, then calculation will be as follows:
1-day salary = 3000 *12 =98.63, then the Total amount for EOS will be
365
98.63 * 71.108331 (Eligible Days) = 7013.4
And If the Maximum Leave Allowed for Calculating EOS is 10, then the Leave salary will be:
(3000*12*10) / 360 = 1000 [basis: 360].

Case 5:
If the setup is
![]()
And leave salary calculation basis is 360 Days,
EOS basis = 365 in EOS setup:
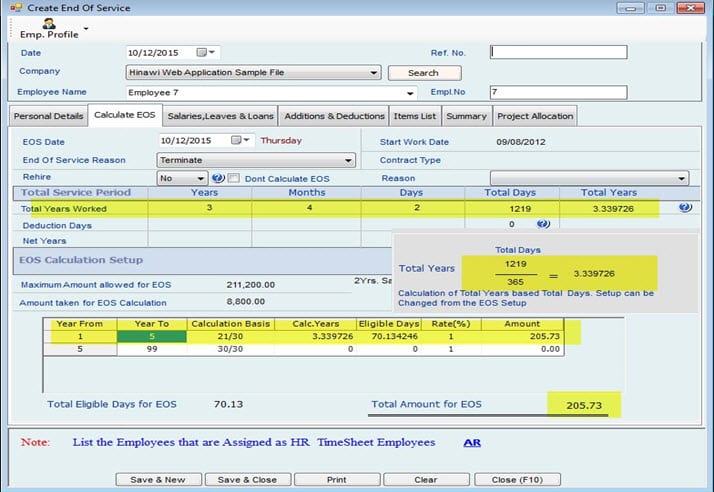
Here, 1-day salary = 3000*12 =100, then total amount for EOS will be
360
100 * 70.134246 (Eligible Days) = 7013.4246
If EOS basis = 365, then calculation will be as follows:
1-day salary = 3000 *12 =98.63, then the Total amount for EOS will be
365
98.63 * 70.134246 (Eligible Days) = 6917.34
And If the Maximum Leave Allowed for Calculating EOS is 10, then Leave salary will be: (3000*12*10)/360=1000 [basis: 360]

Case 6:
If the setup is
![]()
And leave salary calculation basis is 365 days,
EOS basis is = 365 in EOS Setup:
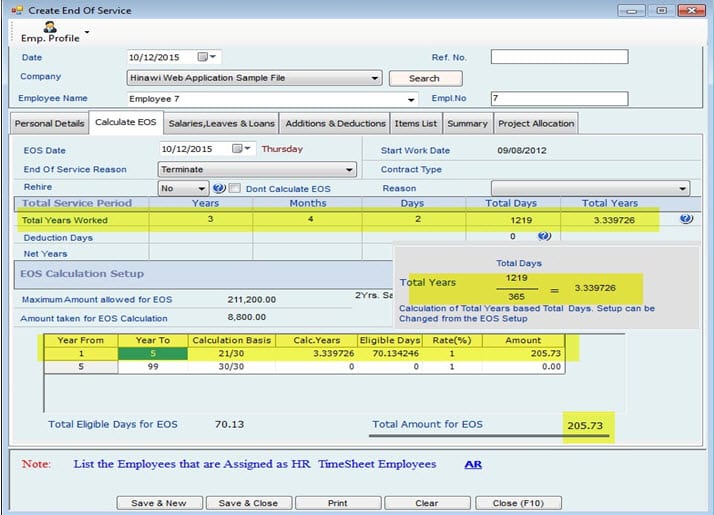
Here, 1-day salary = 3000*12 =100, then the total amount for EOS will be
360
100 * 70.134246 (Eligible Days) = 7013.4246
If EOS basis = 365, then the calculation will be the following:
1-day salary = 3000 *12 =98.63, then Total amount for EOS will be:
365
98.63 * 70.134246 (Eligible Days) = 6917.34
And If the Maximum Leave Allowed for Calculating EOS is 10, then Leave salary will be: (300*12*10)/ 365 = 986 [basis: 365]

Note:
– Users can have separate settings for EOS regardless of the Company setup. They can also have the same settings as per the company policy.
-In EOS, the system will calculate the actual leave days. i.e., If the Transfer to next year is No (In Leave setup) and EOS is created for the Employee in March, the Leave days will be 7 or 8 days.
– If the Leave Salary Calculation basis is Not checked, then it will be calculated Based on the Salary calculation setup:
i.e., If the Maximum Leave Allowed for Calculating EOS is 10
1. Fixed 30 Days: Leave Salary Calculation will be: (3000 * 12 * 10) / 360
2. Actual Month Days: Leave Salary Calculation will be: (3000 * 12 *10) / 365
6. Timesheet Policy
Company Settings–> Company set up–>Timesheet Setup
Time sheet is based on Actual month days. There is no fixed 30 days for time sheet. Time Sheet has three types: Detailed Timesheet, Summary Timesheet and Monthly Timesheet.
The following are steps to Setup Time sheet:
i. Time Sheet Setup
ii.Unit lis
iii.Shift and Holiday setup
i Timesheet and OT Setup v. Sample Calculation
Important Note:
After completing the setup of Time Sheet, it’s strongly recommended for the user to do the following:
Assign Employees to Time Sheet Assign Employees to Project Assign Employees to Shift Assign Employees to Supervisor (This is for Web application user) Do this from Timesheet main menu.
6–1. Timesheet Setup

There are three Types of Time Sheet, Detailed, Summary and Monthly.
- Time Sheet Detailed
-In Time Sheet Detailed, Entries are made on Daily Basis (By Date)
-Presence hours are prefilled as fully Present (Based on Auto fill setup or manually fill)
-Each Day should be filled including the Absence Hours (if any).
-Shift setup can be in Hours or Days.
-Users can select the option; Use Time Reader Machine’ if they have any.
- Time Sheet Summary
– In Time Sheet Summary, Entries can be made on Monthly basis
If the option “Deduct Holidays” when the Labor is absent, the system will deduct the salary of holidays and off days based on the percentage of absence from the whole month
If shift is setup in hours, then monthly present Hours
If shift is setup in days, then number of days present
Basis of Calculation of Absence(Hours) and Basis of Calculation of Absence(Days): If the user fills the Basis of Calculation of Absence; the system will calculate the absence hours separately based on the Basis that the user filled and Subtracted from the total Monthly salary. If the user keeps this blank, the system will calculate present hours only.
E.g.: (Month is January: 31 Days (248 Hours)). Monthly salary of the employee is 3000, Employee is absent for 5 days (40 hours)
If not filled: The system will calculate by taking the present Hours only (248-40=208) Salary=3000*208/248=2516.12
If filled as 240 hours basis: The system will calculate absent days first and deduct from the total monthly salary
Absence=3000*40/240=500
Salary=3000-500=2500
- Time Sheet Monthly
In Time Sheet (Monthly basis), only the present days are available.
Overtime Hours per Day (Normal): The maximum hours an employee can work overtime in normal days.
Overtime Hours per Day (Holidays): The maximum hours an employee can work overtime in Holidays.
Maximum number of days Labor can work: Users can set the maximum number of holidays he/she can work.
Note:
1. Most users use detail Timesheet
2. This Timesheet can be used by both; Labors and Employee
3. Users cannot switch (change) between 3 tabs in the same month. However, the user can do this in the next month after creating and approving the salary sheet of the previous month and when there are no leaves effective on the next month.
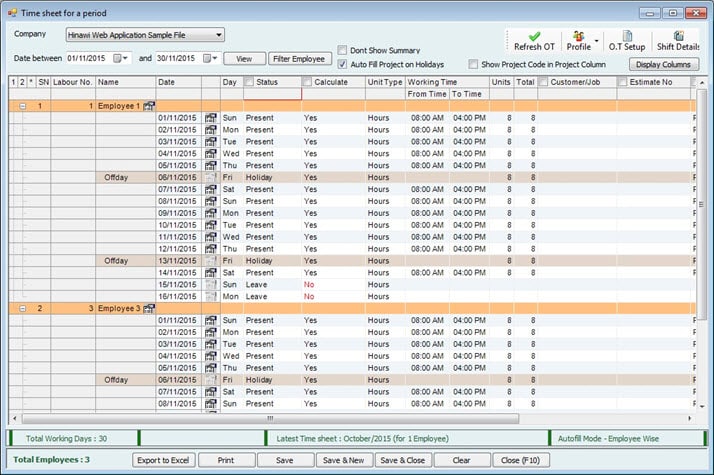
Note:
When the status is selected as Leave, Holiday (which cannot be set as status from here), a message saying ‘It is automatically from activities, can’t be selected from Time Sheet’ will pop up.
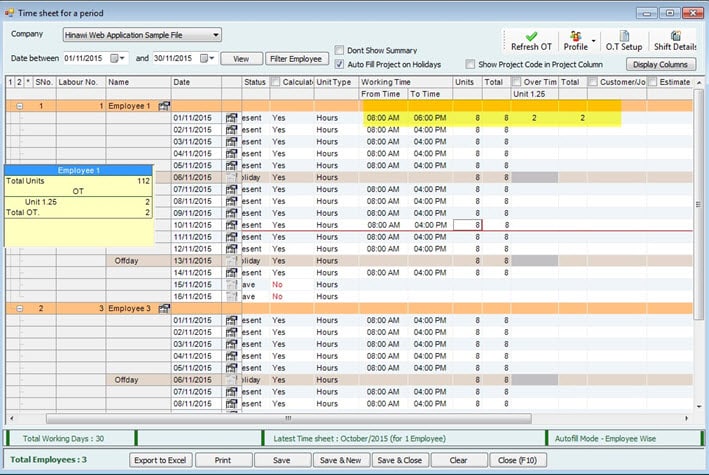
In the above example, when the user changes ‘From Time/To Time’ of morning (1st)
shift, the hours will be added to Units and the salary will be for total no. of units (248 +3= 251 hours here). When the user changes the “To Time” of evening (2nd) shift, it will be added as overtime and paid as OT amount.
Notes:
1. The Status ‘Leave’ is from the HR activit For Timesheet Employees, Leaves can be created from HR activities.
2. The Status ‘Absence’ is set from her When Absence is selected, “calculate” will be set to ‘No’ by default.
3. Users can set Calculate = ’Yes’ for Absence, then, absence day will be paid as any other Working d I.e., that day will be calculated for monthly salary calculation.
4. Users cannot create absence from HR Activit
5. When absence creation dialog is opened from HR activities, it will list only the HR Employee
6. Users can select “absent” as a status from Timesheet.
7. While creating Leave (from activities), users cannot have the “Payment Type” to be ‘Pay Now’ for Timesheet Employees.
Each Time Sheet can be linked to Projects.
Time Sheet can be changed from Detailed to Summary and Summary to Detailed
- If Changed from Detailed to Summary, all data will be converted to Summary for that month
- If changed from Detailed to Summary, the data in that month will not change to Summary but from next months, it will be in Summary.
Deduct Absent days from the service period for Timesheet Employees:
If this option is checked, the absence days will not be included in the service period for Timesheet Employees.
Note:
When leave is created, it affects Timesheet. The status will be changed by default to “Leave” in the Timesheet as per the created leave date.
6-2. Unit List:
It shows the available units and notes:

Hours: Applicable to Timesheet Summary and Detailed
Days: Applicable to Timesheet Summary, Detailed and Monthly.
Create Shift Tab:
6–3. Shift & Holiday Setup

Setting up of Shifts To setup shifts, go to File → Settings → Time Sheet → Shift & Holiday Setup
– Shifts can be created based on Business Activity
– In Create Shifts, define Shift code (e.g. Morning / Evening, Day / Night etc.)
– Select what is the type of Shift from a Dropdown Menu (e.g. Day / Hours). Users must specify the shift timings when Unit Type is Hours.
When Shift is of Unit Type ‘Hours’, users can split the time, i.e., Split the shift into two as below: Morning and Afternoon. In this case, timesheet will have 2 entries for each case.

When Shifts of Unit Type is ‘Days’, timing will not be shown in the timesheet. And default hours will be taken for calculation.

– No. of Shifts means, if there is a break in the Working hours, the user can setup 2 shifts e.g.: 8-1 and 4-8 (Only applicable if Type is Hours)
– Units mean: How many Hours in a shift (Only applicable if shift Type is Hours)
– More Shifts can be created based on the Company setup.
– The maximum number of shifts will always be one if the shift setup is by day
Note:
– In case there is no setup of the shift, the system will read working hours from the box at the bottom of this tab.
1. With this facility, it helps the user to use this setup in all type of busin
2. The Timesheet will be filled automatically based on this shift setup. Therefore, at the time of filling Timesheet for labors, the number of hours will be displayed automatic
3. Users can assign the Employees to more than one shift (HOURS shift and DAYS shift) for Different period.
4. Users cannot assign the Employees to more than one shift (HOURS shift and DAYS shift) for the SAME period.
5. Users can have two Hourly shifts in one month.
Set Shift Tab:
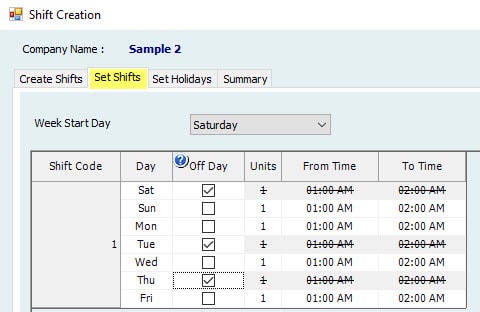
– Here, users can select the “Start Day” of the week.
– Check the Day to make it “Day off”.
– Allow to Change Holiday.
1. It is applicable only for Summary Time Sheet
2. If this option is Activated, Holiday Hours can be modified manually in Summary Time Sheet. For example, in a month, there are 4 Fridays so 32 hours are Holiday Hou We can change 32 to 24 or 40 whatever as off hours.
– Include Holiday Units in the Total Month Units there is No Absence.
Checking and unchecking this box will not affect the salary sheet if
If Box is selected, salary calculation will be as below:
Monthly Salary ={Current Monthly Salary X No. of Hours worked}
31 * 8
If Box is NOT selected, salary calculation will be as below:
Monthly Salary =
{Current Monthly Salary X No. of Hours worked}
27 * 8
Note:
Salary will be the same if there is NO Absence. For Example,
Month is January, No. of hours per day is 8 hours, 4 holidays (Friday) Employee salary is AED 3000. He was absent for 1 day in the month. The calculation in both cases will be as follows:
– If ticked, total No. of Hours worked= 248– 8 = 240 Hours
{3000*240} = 2903
31 * 8
– If not ticked, Holiday hours will be excluded: No. of Hours worked= 216 – 8 = 208 Hours
{3000*208} = 2889
27 * 8
Set Holidays Tab:

– This Tab is reads Holidays from Company Settings and more Holidays can be added in Set Holidays. I.e., Company Setup→ Holliday Settings→Public Holidays Tab

In this window, users can assign the holidays to shift, this means if the box is checked, the company will pay the holiday days to labors under this shift.
-Note that the number of shifts displayed in this window is based on the number of shifts setup reading from Tab 1.
– The company can define paid holidays to some or all shifts.
-The company can define which types of holidays can be paid or not. E.g. fixed holidays can be paid or not.
Summary Tab:

– Summary shows the Setup for Each Shift and the Calculations for the Shift Hours.
– Show the total working units per week and month.
6-4. Timesheet & OT Time:

Over Time (OT) is one of the main features which provides the ability to customize the user (Admin) requirements and needs as per the company and country policy.
Shift:
Select Shift code from Dropdown
Max OT:
Put here the Maximum Overtime allowed for that Shift per Day.
OT:
Check this option to enable Over Time Calculation. Uncheck this box will not allow the user to enter settings for Overtime calculation (It will be disabled) from here and In Timesheet there will be no calculation for OT.
Basis:
Here, users can put the Basis for Over Time calculation. Over time calculation will be divided by the Value entered. If No value is entered, the system will use Actual Month Hours as basis.
For Example, an Employee monthly salary is AED 3,000. OT rate is 1.25 hours and he worked for 20 hours as OT. Calculations will be the following:
Day:
Here, the user can define Multiple Days for OT rates. For example, Normal Days, Holidays and / or Other Days (Festivals / National Day etc.)
Rate:
Define over Time Rate as per Day types defined. For Example, normal day rate could be1.25, Holidays could be 1.5 and festival days could be 2 and so on as per company policy.
Normal Days:
Total working Hours in a Day is 8 hours and If an employee works for 10 hours, extra 2 hours will be paid as overtime as per the rate (1.25) specified.
Off Days (Fridays):
If an employee works on Friday which is a paid day and the company wants to consider this day as 2 days, meaning that the Company wants to pay 16 hours, we will convert the one day (8 Hours) into OT hours like this: 4 Hours OT with Rate2 so total is: 8 hours will be paid along with the normal paid Friday.
Holidays:
Same as off days.
Hours:
Here, define the maximum hours for a defined rate. For example, in Normal days, if the user puts 4 here, he/she can work maximum 4 hours at the rate 1.25.
Autofill:
Select Yes / No from Auto fill. This helps in automatically filling the over time. For example, standard shift time is 8 hours. In the Time Sheet, the time is filled for employee from 9am to 8pm. The system will automatically fill OT 3 hours if Auto fill is “Yes” is selected, otherwise fill Over time Manually.
Calculate OT:
Fill yes if calculation for OT is required. If calculate is “No”, then the employee will be able to enter OT in Timesheet, but the system will not calculate the overtime and it will not be paid in the salary sheet. This is as per Company Policy.
Salary item:
Select which Salary item user want to pay over time. Normally over time is paid on Basic Salary, but the user can add different salary items for OT calculation.
–Allow to change Over Time Manually
By selecting this option, user can change the OT manually in the Time Sheet. If not selected, user cannot change OT manually. User must change the Shift time in Time Sheet.
For e.g.: If this option is checked, then employee can enter OT under different rates. If not checked, user must change the To Time, which will update the OT for corresponding rate.
-Automatically adjust time
By selecting this option, once the user changes OT in Time Sheet, the system will automatically update the Shift time. If not selected, the user must adjust time manually.
Note:
HR Employees are not applicable for Overtime Setup
6-5. Sample Calculation:
It gives Information in General: Calculations for normal hourly rate and normal daily rates, Overtime rate for normal and Holidays.
E.g.:
If the requirement of the company to calculate overtime is as below: Regular days:
Rate per hour X Number of Overtime hours X 1.25
After 21:00 (after 9 PM)
Rate per hour X Number of Overtime hours X 1.50
Official holidays (If compensated with other days) Rate per hour X Number of Overtime hours X 1.50
Fridays Days Off (If compensated with other days)
Rate per hour X Number of Overtime hours X 1.50
Official holidays (If not compensated with other days) Rate per hour X Number of Overtime hours X 2.50
Then he can do the OT Setup as below

The user can put OT in the rate 1.25 on regular days till 21:00 and after that in rate 1.50. OT on Holidays (Friday) if compensated with other days, he/she can put in rate 1.50. OT on official days if compensated with other days, he/she can put on rate 1.5 and if not compensated with other days, he/she can put on rate 2.50. Therefore, the user can do accordingly as per their requirement.
Time Sheet main menu:
- i. Assign Employees to Time Sheet
To assign Employees to Time Sheet, go to:
Time Sheet Menu → Assign Employees to Time Sheet, then click view. Here, the system will show either to Generate Salary sheet from HR or Time Sheet. Select the Employees under Time Sheet for salary through Time sheet.
Users can change the Employee from HR to Time Sheet or vice versa, prior to Salary sheet created. It is changing since last salary sheet created.
- ii. Assign Employees to Project
To assign Employees to Projects, go to
Time Sheet Menu → Assign Employees to Project, then click on search and filter
Employees to assign to Projects. To add projects, go to manage employee’s main menu → Location/project list.
iii.Assign Employee to Shift
To Assign Employee to Shift, go to
Time Sheet → Assign Employee to Shift, then select Dates from / to and then filter Employees and select the relevant shift.
- i Create Time Sheet
To create time Sheet, go to
Time Sheet → Create Time Sheet, then select the Dates and filter Employees and fill in Time Sheet and Over Times based on Setup.
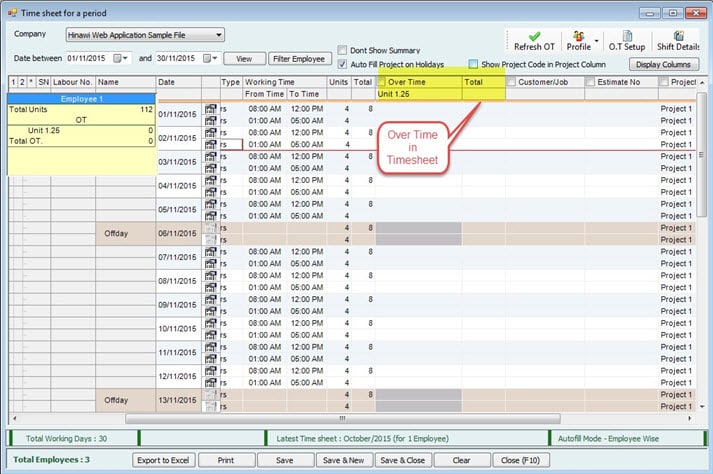
After it is done, save Time Sheet and go to Payroll for Salary Sheet.
Note:
If there is more than 1 shift for a month, users must assign the different shifts before creating Timesheet.
E.g. Ramadan Timing for a company is 6 Hours (8 AM to 2 PM), if it started on June 29, and the user wants the timesheet entry to have 6 hours, then
-Create 1 new shift ‘RAMADAN’ from Create Shifts Tab

– Assign employees to shift for Ramadan month (June 29th to July 27th)
– i.e. Assign Employee to shift as below:
Image 1:

Image 2:

Now while creating the Timesheet for June, last 2 entries will be for 6 hours as below.
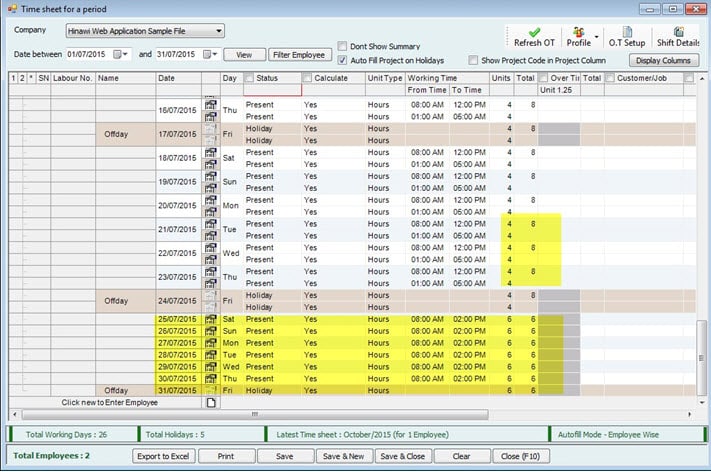
Note:
If the user forgets to assign different shift for Ramadan, and the timesheet is created for Normal shift, he/she must delete the Created Timesheet for month of Ramadan and Assign Employees to ‘RAMADAN’ shift and recreate the Timesheet again to cause effect.
Case 1:

Timesheet Employees, for e.g., timing is 08:00 AM to 05:00 PM; if the Employee is late for 2 hours and he/she comes at 10:00 AM, then the user can set the First 2 hours (08:00 AM to 10:00 AM) as Status = ‘Present’ and Calculate = ’No’ and next 6 hours (10:00 AM to 12:00 PM) as Status = ‘Present’ and Calculate = ’Yes’, and (01:00 PM to 05:00 PM) as Status = ‘Present’ and Calculate = ’Yes’ Then the Total units for calculation will be 6 hours. (As shown in the image above).
Case 2:
If the OT Hours per Day (Normal) is set as 2 (In Company Setup) and Overtime Hours is set as 4 (In Timesheet and OT Setup), then the Employee will be allowed to work for 4 hours OT in Normal Day and it will be paid for 4 Hours as OT in the salary sheet. But as the user set OT Hours per Day (Normal)=2, which can be viewed from the report that OT is for 2 hours and rest 2 hours OT will be paid as Addition.
Case 3:

If the user sets Calculate = ‘No’ in the time Sheet setup, then even if the user put OT in Timesheet, it will not be calculated. The Overtime amount will not be shown\added in the salary sheet. This is per company policy.
7. General Settings
Go to: File→ Settings→General Settings.
7-1. General List:
It will list all the items and values available in the drop down for each item. E.g.: Grade: Grade01, Grade02, Grade03 etc.
Leave Type: Emergency, Haj Type, Sick Leave etc.
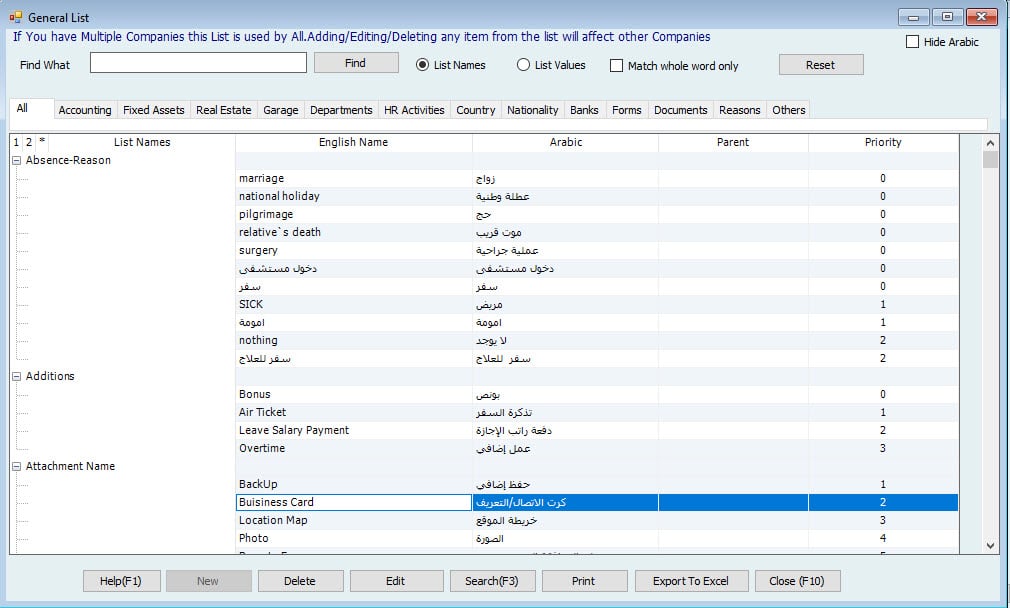
Note:
Users can add items for each list by selecting on the List and then clicking on New.
7-2. Custom Fields:
When the user wants to add any new field in Employee profile, he/she can add from here. Users can add Custom Fields clicking on New. Users can view where the field is added in Custom Information of Employee form.

Users can Edit/Delete the custom fields from here. Users can add these fields in Employee Profile→ Custom tab as shown below.
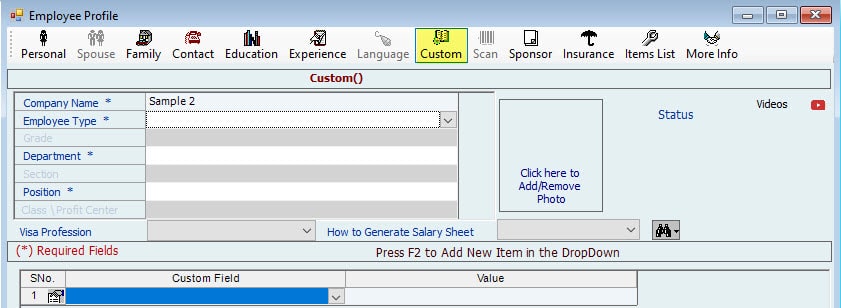
Users can view the Report for Custom Fields from Reports→Employee Basic Information→Employee Custom Field Report.
7-3. Setup Employee Document:
Users can setup the required information about Documents as displayed below.
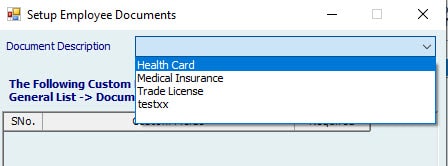
Users can add fields for Custom Fields from General List. For each document, users can specify the fields required or not required. When the user selects Location and Field Required for Health Insurance, it will be shown in Manage Employees→Set Documents→Create Single Document→Other Documents and select Health Insurance, it will show the fields ‘Location’ and ‘Field’.
7-4. Banking Rout Codes:
Users can set the details of routs codes for each bank.

To see the Branch Name and to Enter Routing codes and CBID codes, user must select the branch name for the bank from Manage employees→ Set Salary & Benefits→create/Adjust Single Salary and click on Transfer to Bank under Payment Mode, then provide the bank details.
146
| |||||||||||||||||||||||||||||||||||||||||||||||||||||||||||||||||||||||||||||||||||||||||||||||||||||||||||||||||||||||||||||||||||||||||||||
